Leaderboard


Popular Content
Showing content with the highest reputation on 05/12/2022 in all areas
-
Before installing XPEnology using DSM 7.x, you must select a DSM platform and loader. XPEnology supports a variety of platforms that enable specific hardware and software features. All platforms support a minimum of 4 CPU cores, 64GB of RAM, 10Gbe network cards and 16 drives. Each can run "baremetal" as a stand-alone operating system OR as a virtual machine within a hypervisor. A few specific platforms are preferred for typical installs. Review the table and decision tree below to help you navigate the options. NOTE: DSM 6.x is still a viable system and is the best option for certain types of hardware. See this link for more information. DSM 7.x LOADERS ARE DIFFERENT: A loader allows DSM to install and run on non-Synology hardware. The loaders for DSM 5.x/6.x were monolithic; i.e. a single loader image was applicable to all installs. With DSM 7.x, a custom loader must be created for each DSM install. TinyCore RedPill (TCRP) is currently the most developed tool for building 7.x loaders. TCRP installs with two step-process. First, a Linux OS (TinyCore) boots and evaluates your hardware configuration. Then, an individualized loader (RedPill) is built and written to the loader device. After that, you can switch between starting DSM with RedPill, and booting back into TinyCore to adjust and rebuild as needed. TCRP's Linux boot image (indicated by the version; i.e. 0.8) changes only when a new DSM platform or version is introduced. However, you can and should update TCRP itself prior to each loader build, adding fixes, driver updates and new features contributed by many different developers. Because of this ongoing community development, TCRP capabilities change rapidly. Please post new or divergent results when encountered, so that this table may be updated. 7.x Loaders and Platforms as of 06-June-2022 Options Ranked 1a 1b 2a 2b 2c 3a 3b DSM Platform DS918+ DS3622xs+ DS920+ DS1621+ DS3617xs DVA3221 DS3615xs Architecture apollolake broadwellnk geminilake v1000 broadwell denverton bromolow DSM Versions 7.0.1-7.1.0-42661 7.0.1-7.1.0-42661 7.0.1-7.1.0-42661 7.0.1-7.1.0-42661 7.0.1-7.1.0-42661 7.0.1-7.1.0-42661 7.0.1-7.1.0-42661 Loader TCRP 0.8 TCRP 0.8 TCRP 0.8 TCRP 0.8 TCRP 0.8 TCRP 0.8 TCRP 0.8 Drive Slot Mapping sataportmap/ diskidxmap sataportmap/ diskidxmap device tree device tree sataportmap/ diskidxmap sataportmap/ diskidxmap sataportmap/ diskidxmap QuickSync Transcoding Yes No Yes No No No No NVMe Cache Support Yes Yes Yes Yes Yes (as of 7.0) Yes No RAIDF1 Support No Yes No No Yes No Yes Oldest CPU Supported Haswell * any x86-64 Haswell ** any x86-64 any x86-64 Haswell * any x86-64 Max CPU Threads 8 24 8 16 24 (as of 7.0) 16 16 Key Note currently best for most users best for very large installs see slot mapping topic below AMD Ryzen, see slot mapping topic obsolete use DS3622xs+ AI/Deep Learning nVIDIA GPU obsolete use DS3622xs+ * FMA3 instruction support required. All Haswell Core processors or later support it. Very few Pentiums/Celerons do (J-series CPUs are a notable exception). Piledriver is believed to be the minimum AMD CPU architecture equivalent to Intel Haswell. ** Based on history, DS920+ should require Haswell. There is anecdotal evidence gradually emerging that DS920+ will run on x86-64 hardware. NOT ALL HARDWARE IS SUITABLE: DSM 7 has a new requirement for the initial installation. If drive hotplug is supported by the motherboard or controller, all AHCI SATA ports visible to DSM must either be configured for hotplug or have an attached drive during initial install. Additionally, if the motherboard or controller chipset supports more ports than are physically implemented, DSM installation will fail unless they are mapped out of visibility. On some hardware, it may be impossible to install (particularly on baremetal) while retaining access to the physical ports. The installation tutorial has more detail on the causes of this problem, and possible workarounds. DRIVE SLOT MAPPING CONSIDERATIONS: On most platforms, DSM evaluates the boot-time Linux parameters SataPortMap and DiskIdxMap to map drive slots from disk controllers to a usable range for DSM. Much has been written about how to set up these parameters. TCRP's satamap command determines appropriate values based on the system state during the loader build. It is also simple to manually edit the configuration file if your hardware is unique or misidentified by the tool. On the DS920+ and DS1621+ platforms, DSM uses a Device Tree to identify the hardware and ignores SataPortMap and DiskIdxMap. The device tree hardcodes the SATA controller PCI devices and drive slots (and also NVMe slots and USB ports) prior to DSM installation. Therefore, an explicit device tree that matches your hardware must be configured and stored within the loader image. TCRP automatic device tree configuration is limited. For example, any disk ports left unpopulated at loader build time will not be accessible later. VMware ESXi is not currently supported. Host bus adapters (SCSI, SAS, or SATA RAID in IT mode) are not currently supported. Manually determining correct values and updating the device tree is complex. Device Tree support is being worked on and will improve, but presently you will generally be better served by choosing platforms that support SataPortMap and DiskIdxMap (see Tier 1 below). CURRENT PLATFORM RECOMMENDATIONS AND DECISION TREE: VIRTUALIZATION: All the supported platforms can be run as a virtual machine within a hypervisor. Some use case examples: virtualize unsupported network card virtualize SAS/NVMe storage and present to DSM as SATA run other VMs in parallel on the same hardware (as an alternative to Synology VMM) share 10GBe network card with other non-XPEnology VMs testing and rollback of updates Prerequisites: ESXi (requires a paid or free license) or open-source hypervisor (QEMU, Proxmox, XenServer). Hyper-V is NOT supported. Preferred Configurations: passthrough SATA controller and disks, and/or configure RDM/RAW disks This post will be updated as more documentation is available for the various TCRP implementations.9 points
-
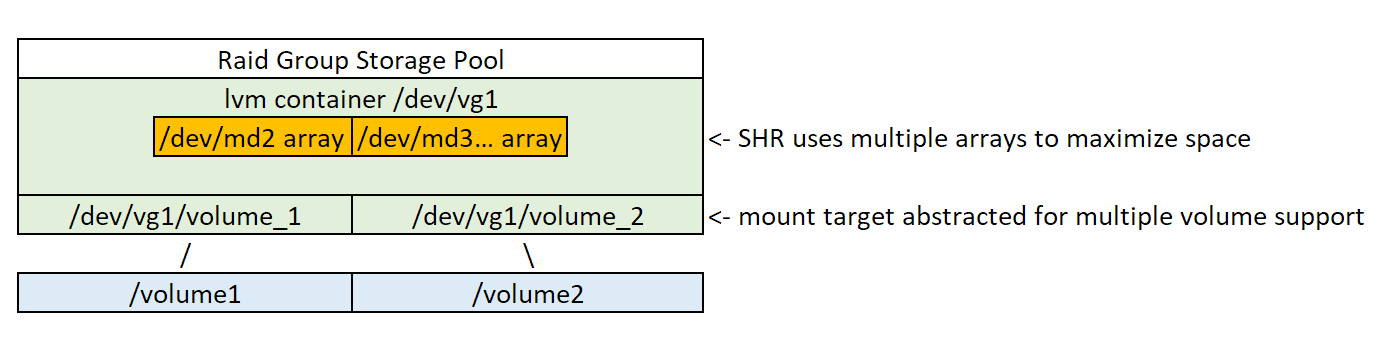
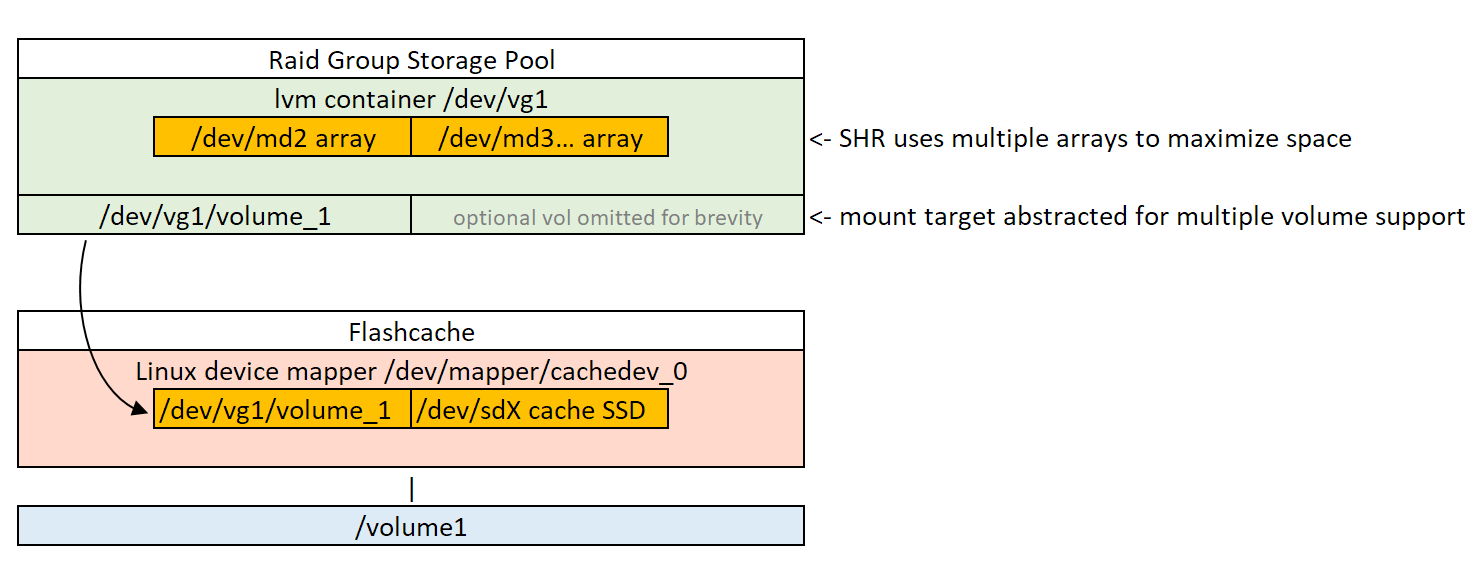
DSM 7 handles array creation somewhat differently than DSM 6.x. This tutorial will explain the new, less flexible behavior of DSM 7, provide historical context and offer practical solutions should the reader wish to create certain array configurations no longer possible via the DSM 7 UI. The structures described herein may also be useful toward an understanding of the configuration, troubleshooting and repair of DSM arrays. Be advised - over time, Synology has altered/evolved the definitions of the storage terms in its documentation and used in this tutorial. Additionally, many of the terms have overlapping words and meanings. This can't be helped, but you should be aware of the problem. Background: DSM 6 offers many options as to how to set up your arrays. In DSM, arrays are broadly referred to as Storage Pools. Within a Storage Pool, you may configure one or more Volume devices, on which btrfs or ext4 filesystems are created, and within which Shared Folders are provisioned. Here's a simplified history of the different Storage Pool configurations available on the XPe-enabled DSM versions and platforms. If you aren't familiar with lvm (logical volume manager), it refers to a storage meta-container able to hold multiple host arrays (i.e. SHR) and/or multiple target Volumes. Note that the word "volume" in logical volume manager has nothing to do with DSM Volumes. DSM 5 provides multiple Storage Pool configurations, including "Basic" (RAID 1 array with one drive), RAID 1, RAID 5, RAID 6, RAID 10, and SHR/SHR2 (conjoined arrays with lvm overlay). These are known as "Simple" Storage Pools, with a single Volume spanning the entire array. The consumer models (i.e. DS918+/DS920+ platforms) always create Simple Storage Pools, with non-lvm arrays (RAID) designated as "Performance" and lvm-overlayed (SHR/SHR2) as "Flexible." DSM 6 adds enterprise features for DS3615xs/DS3617xs/DS3622xs+, including RAID F1 arrays and "Raid Groups." A Raid Group is a Storage Pool with an lvm overlay regardless of array type, and that permits multiple Volumes to be created within it. For DS3615xs/DS3617xs the "Performance" Storage Pool is the same as the consumer models (non-lvm), while "Flexible" refers to the Raid Group (lvm-overlayed) option. Synology limits the use of SHR/SHR2 with these models by default. However, it can be enabled with a well-known modification to DSM configuration files, such that the UI is then able to create a SHR array within a "Flexible" Raid Group Storage Pool. DSM 6 also offers SSD caching on all platforms. When SSD caching is enabled, the target Volume device is embedded into a "device mapper" that binds it with the physical SSD storage. The device mapper is then mounted to the root filesystem in the place of the Volume device. DSM 7 supports all of the above configurations if they exist prior to upgrade. However, DSM 7 Storage Manager no longer is able to create any type of Simple Storage Pool. On all the XPe supported platforms, new Storage Pools in DSM 7 are always created within Raid Groups (therefore lvm-overlayed) and with a dummy SSD cache, even if the system does not have SSDs to support caching. lvm uses additional processor, memory and disk space (Synology is apparently no longer is concerned with this, assuming that the penalty is minor on modern hardware) and if you don't need SHR or cache, creates unnecessary complexity for array troubleshooting, repair, and data recovery. Look back at the first illustration vs. the last and you can see how much is added for zero benefit if the features are not required. Users might prefer not to have superfluous services involved in their Storage Pools, but DSM 7 no longer offers a choice. From all these configuration options, your Storage Pool type can be determined by observing how the DSM Volume connects to the filesystem, and the presence or absence of lvm "Containers." This table shows various permutations that you may encounter (note that all are describing the first example of a Storage Pool and DSM Volume, multiples will increase the indices accordingly): Storage Pool Type Array Device(s) Container /volume1 Device Simple (DSM 6) "Performance" /dev/md2 (none) /dev/md2 Simple (DSM 6, DS918+/DS920+ SHR) "Flexible" /dev/md2, /dev/md3... /dev/vg1000 /dev/vg1000/lv Raid Group (DSM 6, DS36nnxs SHR) "Flexible" /dev/md2, /dev/md3... /dev/vg1 /dev/vg1/volume_1 Simple with Cache (DSM 6) /dev/md2 (none) /dev/mapper/cachedev_0 Raid Group with Cache /dev/md2, [dev/md3...] /dev/vg1 /dev/mapper/cachedev_0 Example query to determine the type (this illustrates a cache-enabled (with read-only cache), lvm-overlaid Raid Group with one DSM Volume): dsm:/$ df Filesystem 1K-blocks Used Available Use% Mounted on /dev/md0 2385528 1063108 1203636 47% / none 1927032 0 1927032 0% /dev /tmp 1940084 1576 1938508 1% /tmp /run 1940084 3788 1936296 1% /run /dev/shm 1940084 4 1940080 1% /dev/shm none 4 0 4 0% /sys/fs/cgroup cgmfs 100 0 100 0% /run/cgmanager/fs /dev/mapper/cachedev_0 33736779880 19527975964 14208803916 58% /volume1 dsm:/$ sudo dmsetup table | head -2 cachedev_0: 0 1234567 flashcache-syno conf: ssd dev (/dev/md3), disk dev (/dev/vg1/volume_1) cache mode(WRITE_AROUND) dsm:/$ sudo lvs LV VG Attr LSize Pool Origin Data% Meta% Move Log Cpy%Sync Convert syno_vg_reserved_area vg1 -wi-a----- 12.00m volume_1 vg1 -wi-ao---- 11.00g Solutions: If desired, DSM 7 can be diverted from its complex Storage Pool creation behavior. You will need to edit the /etc/synoinfo.conf and /etc.defaults/synoinfo.conf files from the shell command line. /etc/synoinfo.conf is read by DSM during boot and affects various aspects of DSM's functionality. But just before this during the boot, /etc.defaults/synoinfo.conf is copied over the file in /etc. Generally you can just make changes in /etc.defaults/synoinfo.conf but the copy is algorithmic, and desynchronization can occur. So it is always best to check for the desired change in both files if the results are not as expected. 1. Enable SHR on DS3615xs, DS3617xs and DS3622xs+: Edit synoinfo.conf per above, changing the parameter supportraidgroup from "yes" to "no". It is no longer required to comment out this line, or add "support_syno_hybrid_raid" to the configuration file. Despite the implications of this parameter being set, Raid Groups continue to be supported and DSM will create Raid Group enabled Storage Pools, with the added bonus of the option for SHR available in the UI. 2. Create arrays without dummy caches: Edit synoinfo.conf per above, changing the parameter supportssdcache from "yes" to "no". Arrays created while this option is disabled will not have the dummy cache configured. Further testing is required to determine whether SSD cache can subsequently be added using the UI, but it is likely to work. 3. Create a cacheless, Simple array on DSM 7: DSM 7 no longer can create a Simple Storage Pool via the UI. The only method I've found thus far is with a DSM command line tool. Once Storage Pool creation is complete, Volume creation and subsequent resource management can be accomplished with the UI. Note that you cannot just create an array using mdadm as you would on Linux. Because DSM disks and arrays include special "space" metadata, the mdadm-created array will be rejected by DSM 7. However, using the DSM command-line tool resolves this problem. First, you need to determine the RAID array type (raid1, raid5, raid6, raid10 or raid_f1; raid_f1 is only valid on DS3615xs/DS3617xs/DS3622xs+ and all array members must be SSDs) and the device names of all the disks that should comprise the array. The disks that you want to use should all be visible like the example: dsm:/$ ls /dev/sd? /dev/sda /dev/sdb /dev/sdc /dev/sdd And, the target disks should not be in use by existing arrays (nothing should be returned): dsm:/$ cat /proc/mdstat | egrep "sd[abcd]3" Then, create the array with the following command (example uses the disks from above and creates a RAID 5 array). All data will be erased from the disks specified. dsm:/$ sudo synostgpool --create -t single -l raid5 /dev/sda /dev/sdb /dev/sdc /dev/sdd If successful, the array will be created along with all the appropriate DSM metadata, and you will see the new Storage Pool immediately reflected in the Storage Manager UI. If it fails, there will be no error message, and it's usually because disks are already in use in another array. Deleting the affected Storage Pools should free them up. You can review the events that have occurred by reviewing /var/log/space_operation.log. A DSM Volume can then be added using the Storage Manager UI. Further testing is required to determine whether SSD cache can subsequently be added using the UI, but it is likely to work.


 3 points
 -
https://dlcdnets.asus.com/pub/ASUS/mb/LGA1155/P8H61-I_LX_R2.0/E7989_P8H61-I_LX_R2.pdf If you look at page 31 of this manual, it says that hot plug and ahci are possible. Be sure to enable both options. This will help with disk not being found related to sataportmap.2 points
-
1 point
-
I mentioned this in the post below today. The GA-H87N-WIFI has been my main XPE for a long time. It's a DS918+ that hasn't been updated to DSM7 yet, but one of the SHR disks installed in the HBA gets corrupted in the system partition very occasionally. I do not know the exact cause, but it seems that this phenomenon mainly occurs in low-cost ripper disks. Of course it's bare metal and there were no serious errors as you mentioned.1 point
-
Hi On a Gen8 i saw this also bios reset after reboot i can select user default and the bios will reset to user defaults 😆 Maybe you have also this setting on the other hand i have also en asush87iplus MB and there was sometimes a Bios Reset with MBR Loader 1.03 but with Redpill or Tinycore all is working fine thank you again pocopico 🤩1 point
-
Change both to ./rploader.sh ext broadwellnk-7.1.0-42661 add https://github.com/pocopico/redpill-load/raw/develop/redpill-virtio/rpext-index.json ./rploader.sh ext broadwellnk-7.1.0-42661 add https://github.com/pocopico/redpill-load/raw/develop/redpill-acpid/rpext-index.json1 point
-
Very learnful for me, thanks again for the information. Btw this board was a replacement for a Gigabyte GA-H87N-WIFI. This Gigabyte works well with DSM 7 but the bios get's corrupted every reboot. See below. It's on Proxmox now, working well but I preferred baremetal.1 point
-
Thanks for the help Pocopico. AHCI is active in the BIOS, checked it again. Proxmox is maybe the way forward with this board. Kind regards, Paul1 point
-
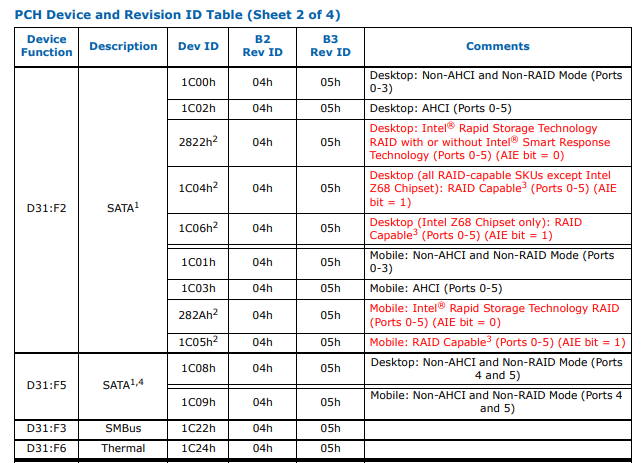
Well i was afraid of that : ata_piix ata_piix is not supported in DSM7. Modules will not compile. I've tried a lot of times. check your BIOS settings for AHCI or IDE mode. ONLY AHCI will work. Edit : unfortunately your onboard HBA does not support AHCI as per the table below (1C00 and 1C08): Reference : https://www.intel.com/content/dam/doc/design-guide/6-and-c200-chipset-specification-update.pdf and https://pci-ids.ucw.cz/read/PC/8086/1c08
 1 point
 -
Well, although DSM reports no disks found, usually the disks are visible into DSM, just not in the way DSM expects them to be found. This may give you a hint. open a browser to http://<yourip>:7681 login as user root with no password fdisk -l1 point
-
Hello all, Hope someone can help me with the right DiskIdxMap and SataPortMap. I made a loader for a 3615xs and 3622xs+ and both show that no disks are found. TC suggests DiskIdxMap = 2 and SataPortMap = 22. The motherboard is an Asus P8H61-I-LX-R2 with an i5-2500. The codes for the drive controllers are 00:1f.2 (8086:1c00) and 00:1f.5 (8086:1c08). Tried a lot of combinations for the mapping, changed BIOS settings for sata like AHCI and IDE, but no luck. What can I do, any ideas ? Regards, Paul1 point
-
https://xpenology.com/forum/topic/54545-dsm-7-and-storage-poolarray-functionality/1 point
-
No mate, I get an ip within a minute without the 10g card, But waited about 5 mins when card is in, so I could try the 10 to 15 min wait and see what happens.1 point
-
@franky52 @erazor1112 Fixed the missing denveron file on v9fs extension. Please try again.1 point
-
If you see disk activity, then probably there is no KP. Several people complain about the 10min wait for IP. did you leave the system up for about 10-15 mins and still dont get an IP ?1 point
-
I was finally able to create a DV3221 VM in Unraid! Thank you both. But I´m not able to use virtio as network because I get the same error as erazor1112. ######################################################################## 100.0% [#] Verifying /home/tc/redpill-load/custom/extensions/pocopico.v9fs/dva3221_42661/check-v9fs.sh file... [OK] [-] Recipe file for extension pocopico.v9fs platform dva3221_42661 is logically invalid - recipe defines kmod virtio_blk.ko *FILE* which doesn't exist after all files entries are processed. You SHOULD contact the extension packer to report that (see below) [!] Failed to dump extension pocopico.v9fs for platform dva3221_42661 as its recipe file cannot be retrieved. Isn't the extension misspelled or not supported on that platform? *** Process will exit *** [!] Failed to dump all extensions for dva3221_42661 platform to /home/tc/redpill-load/build/1652295433/custom-initrd/exts - see errors above *** Process will exit *** FAILED : Loader creation failed check the output for any errors Any idea? I´m totally fine with intel e1000, but virtio would give more flexibility (or maybe I´m mistaken 😀) Thank you.1 point
-
Hi @gericb here is the new link to the file. https://ufile.io/b43l2wy4 Welcome making mirror. Regards!1 point