

flyride
-
Posts
2,438 -
Joined
-
Last visited
-
Days Won
127
Posts posted by flyride
-
-
@phone guy et al
There have been repeated requests for documentation on TCRP for some time. What that part of the community wants is something that works in a reliable sense, and isn't too terribly technical or complicated. The recent Tutorial posts are intended as a response to that.
This post is in a development thread. We need to start separating dev effort from a mainstream path that the majority of users should be encouraged to follow. For example, the new tutorials don't reference JUN/JOT mode because it isn't very well tested yet.
DTS/DTB support is experimental and incomplete. It works, but not in a very repeatable sense and with consequences that most users don't understand, even with previous 6.x experience. There are several different approaches to solve the problem that may eventually work and become mainstream.
JUN/JOT is experimental. It's very much a dev feature and nobody knows whether it will really work in the long term for future versions. But that will become apparent over some time. And if it is the best option, it will probably become the only option. We didn't know if Jun's 6.x loader would work for successive upgrades either - and in fact it didn't for 6.2.4 without some tweaking.
-
 1
1
-
 1
1
-
-
Minor changes made to the rploader.sh command syntax to reflect @pocopico's latest updates. No change in functionality with old or new syntax.
-
Introduction
This tutorial is a supplement to the main TCRP installation tutorial located here:
You should be familiar with all the concepts and procedures in that tutorial, and general knowledge of VMware ESXi installation and virtual machine management. The focus here is on differences between installing on baremetal (with DSM as the only OS on the NAS), and as a virtual machine using VMware ESXi as the hypervisor. However, much of the conceptual information applies to other hypervisors.
Some reasons to install DSM using a hypervisor:
- virtualize unsupported network card
- virtualize NVMe or other storage and present to DSM as SATA
- run other VMs in parallel on the same hardware (as an alternative to Synology VMM)
- share storage or network cards with other non-XPEnology VMs
- testing and rollback of updates
About VMware ESXi
ESXi (currently branded as the "VMware vSphere Hypervisor") is a stand-alone hypervisor that is part of the VMware enterprise computing platform. ESXi's strength includes robust testing and support, good compatibility with modern hardware platforms, and very flexible control over the hypervisor configuration.
The core hypervisor is free to use, all that is needed is to sign up to receive a lifetime free license key. Key limitations of the free license are 8 vCPU's (8 threads, same as DS918+) and no serial port virtualization. To use the serial console, a physical connection is needed from the motherboard to your personal computer, or if the motherboard has IPMI features, intercepting the physical serial data with the IPMI remote access tools works as well.
There is also a trial ESXi license that offers 256 vCPUs and serial port virtualization.
ESXi and DSM Platform/Architecture
All currently supported DSM platforms can run as virtual machines. As of this writing, the Device Tree platforms (DS920+ and DS1621+) are not supported by the TCRP device tree patcher when ESXi virtual SATA controllers are used. The problem is understood but currently the only way to make these platforms work is to manually patch the DTS.
Transcoding platforms are supported with a compatible CPU, but actual transcoding requires a passthrough configuration of the VGA display adapter, which is somewhat complicated to set up, and beyond the scope of a basic tutorial.
As DSM is run as a workload inside ESXi, there is an overhead tax, so the minimum requirements are somewhat higher:
-
x86-64 CPU with two cores or more
- Hardware virtualization features enabled in the BIOS (Intel VT-x or AMD RVI)
- 4GB of RAM or more
- Dedicated 138GB or larger boot and storage device for ESXi system files, run-time files and datastore containing VM configuration files and virtual disks
- Block storage/controllers on ESXi's compatibility list OR compatible with DSM for passthrough
- Storage for use with DSM (either as backing storage for virtual disks, or passthrough devices)
Creating a DSM Virtual Machine, Part 1
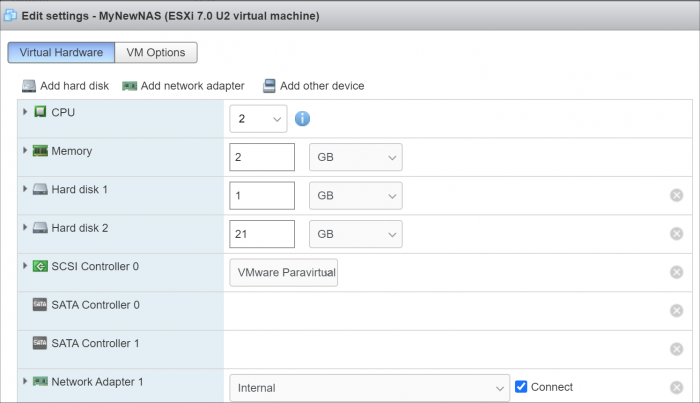
When we create a virtual machine we are defining its hardware characteristics. This machine must be compatible with DSM. For the purposes of the tutorial, we'll create a simple DSM VM with a 21GB virtual SATA drive.
First the hardware profile must be selected. The recommended options are illustrated below. Other 3.x Linux (64-bit) is best even when installing a DSM platform with 4.x kernel. The selection here doesn't actually have anything to do with the OS being installed - it's just defining the behavior of the emulated hardware.
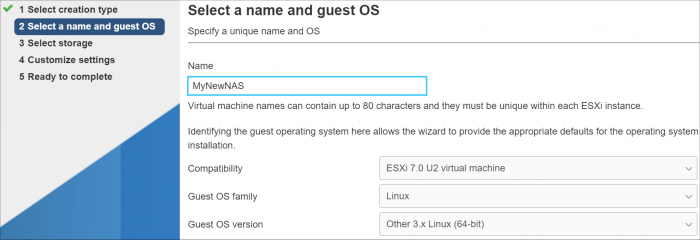
Here's the initial complement of hardware created with Other 3.x Linux (64-bit):
The pre-configured Network Adapter is VMware 10Gbe virtual vmxnet3 and is directly supported by TCRP.
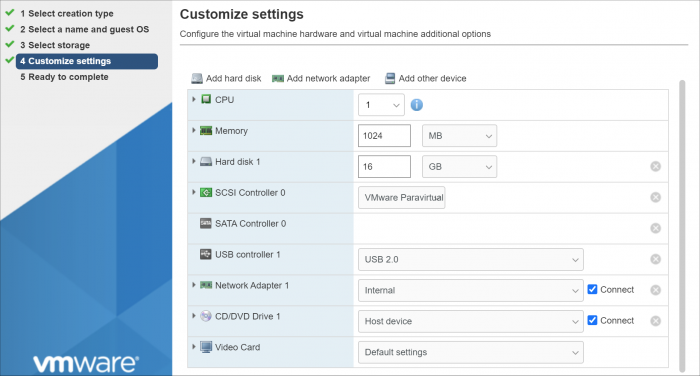
However, some changes need to be made to the virtual machine:
- Change the CPU vCore count to 2 or more
- Change the memory amount to 2048 or more
-
Change the virtual hard disk size to 21GB or larger (see minimum spec here)
- If desired, open the drop-down menu and change the virtual disk type to Thin if the VM is only for testing
- Delete the USB controller
- Delete the CD/DVD Drive
- Add a second SATA controller - this will initially be called "New SATA Controller"
Save the virtual machine. This creates a virtual machine folder on the datastore, and provisions the VM configuration file and virtual disk in that folder. It is not ready for use yet; some additional preparatory steps need to be completed.
Preparing the TCRP Image
ESXi VMs cannot boot virtualized USB flash drive images. A passthrough physical USB can be used, but is not recommended. Instead, a special version of the loader is used as a bootable virtual SATA drive. When the TCRP loader boots in this manner, it is called SATABOOT.
Download the tinycore-redpill 7.x loader and save it to your personal computer. Then, open it with a zip manager to show the boot images:
tinycore-redpill.vX.X.X.img.gz (for BIOS/CSM/Legacy boot from USB flash drive)
tinycore-redpill-uefi.vX.X.X.img.gz (for UEFI/EFI boot from USB flash drive)
tinycore-redpill.vX.X.X.vmdk.gz (for virtual machine SATABOOT from disk image)Save the vmdk gzip file to your personal computer. Then, upload it to the new virtual machine folder contained in the datastore:
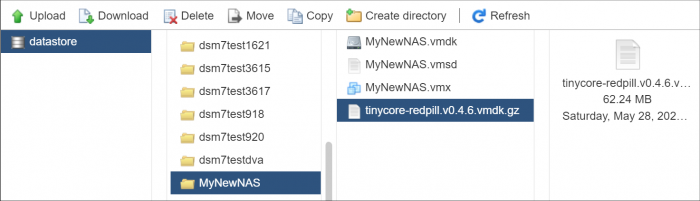
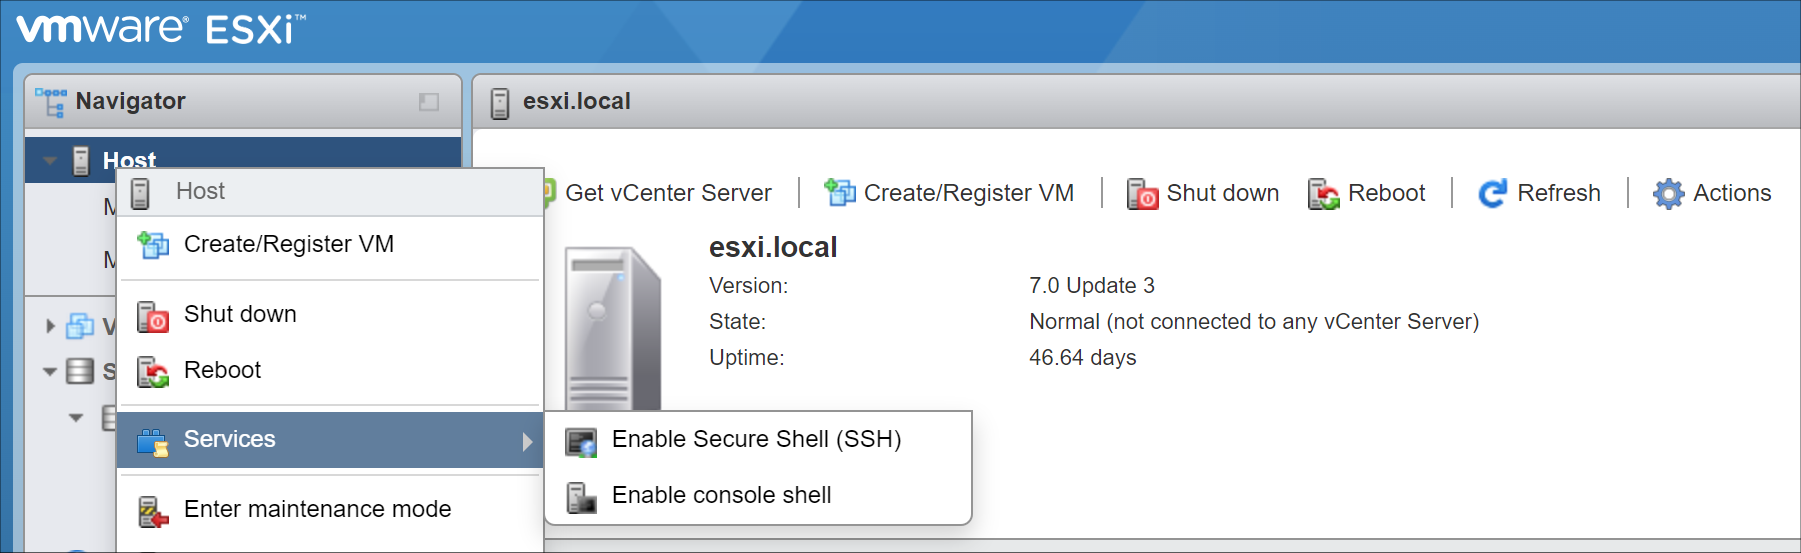
For the next step, ESXi console access is required. From the web GUI, enable both SSH and the console shell.

SSH into the ESXi host and navigate to the new VM's folder:
[root@esxi:] cd /vmfs/volumes
[root@esxi:] cd <datastore>
[root@esxi:] cd MyNewNAS
[root@esxi:] ls -la
total 65664
drwxr-xr-x    1 root     root         73728 May 28 09:02 .
drwxr-xr-t    1 root     root         81920 May 28 08:58 ..
-rw-------    1 root     root     22548578304 May 28 08:58 MyNewNAS-flat.vmdk
-rw-------    1 root     root           474 May 28 08:58 MyNewNAS.vmdk
-rw-r--r--    1 root     root             0 May 28 08:58 MyNewNAS.vmsd
-rwxr-xr-x    1 root     root          1941 May 28 08:58 MyNewNAS.vmx
-rw-r--r--    1 root     root      65260813 May 28 09:02 tinycore-redpill.v0.4.6.vmdk.gz
The TCRP SATABOOT image is provided compressed and in VMware Workstation format. These commands prepare it for use with ESXi:
[root@esxi:] gunzip tinycore-redpill.v0.4.6.vmdk.gz
[root@esxi:] vmkfstools -i tinycore-redpill.v0.4.6.vmdk MyNewNAS-TCRP.vmdk
Destination disk format: VMFS zeroedthick
Cloning disk 'tinycore-redpill.v0.4.6.vmdk'...
Clone: 100% done.
Creating a DSM Virtual Machine, Part 2
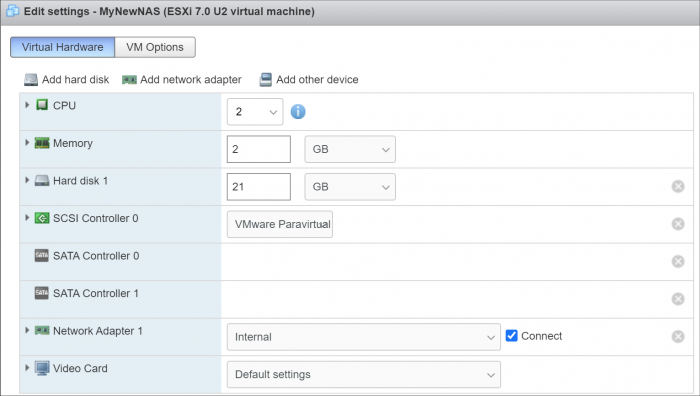
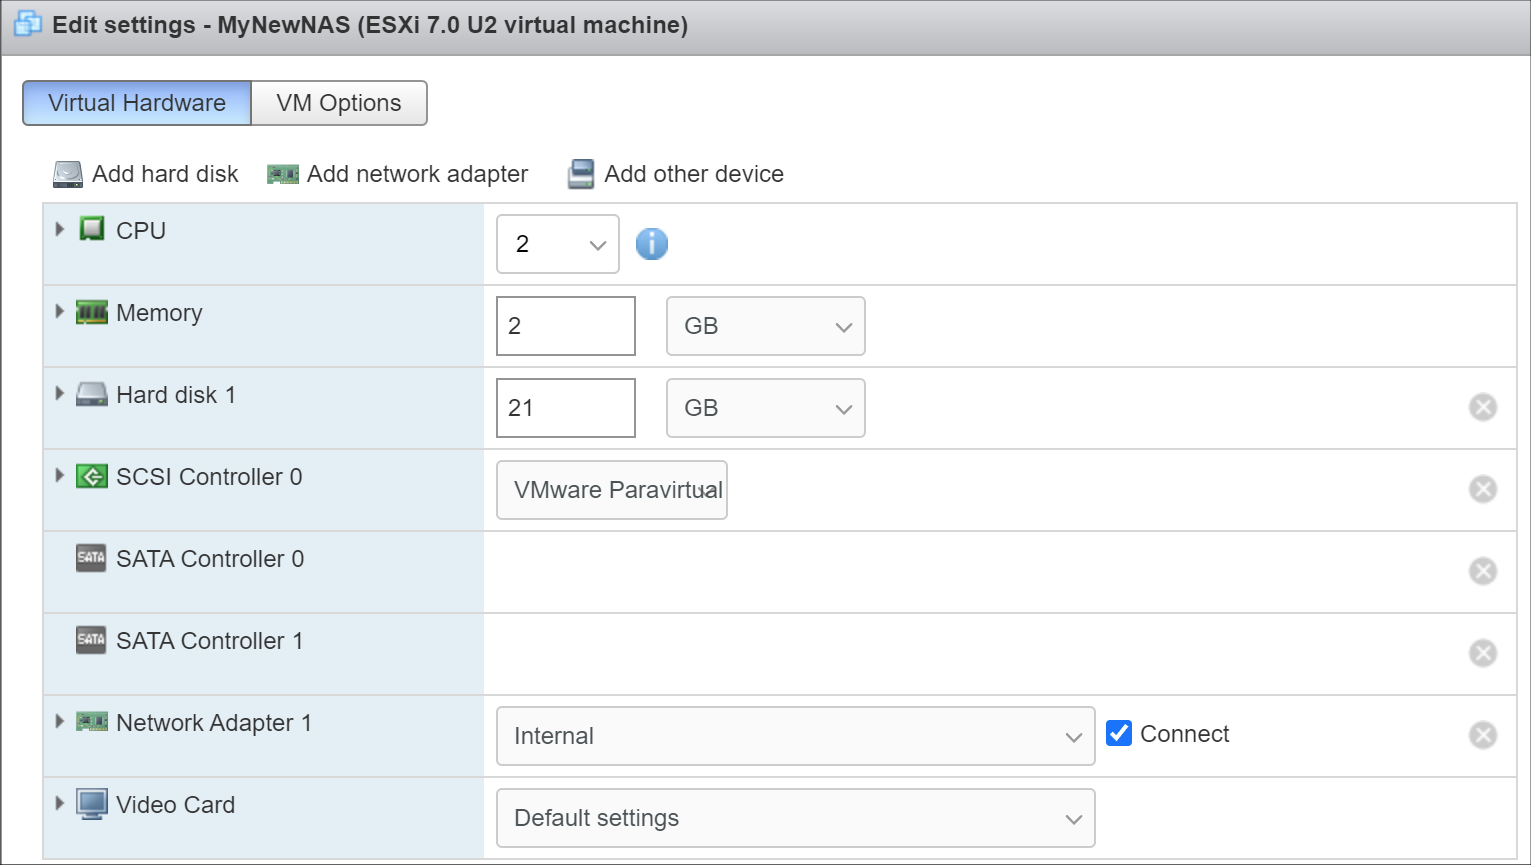
From the GUI console, select the DSM virtual machine and Edit. This is what things look like now:
Now the SATABOOT loader must be added to the virtual machine.
- Select Add hard disk (existing hard disk) and choose the TCRP vmdk created in the previous step
-
It will be displayed as "New hard disk" - expand the dropdown
- Change the controller to SATA Controller 0
- The disk address should be SATA0:0
- Save the changes to the VM
The default for the Other 3.x Linux (64-bit) hardware profile is to create a SCSI virtual controller and attach all new virtual disks to it. DSM works better with the virtual SATA controller, so we need to move the DSM virtual data disk to it.
- Edit the virtual machine
-
Expand the dropdown for Hard disk 1 (note that it is 21GB or whatever size we selected)
- Change the controller to SATA Controller 1
- The disk address should be SATA1:0
- Save the changes to the VM
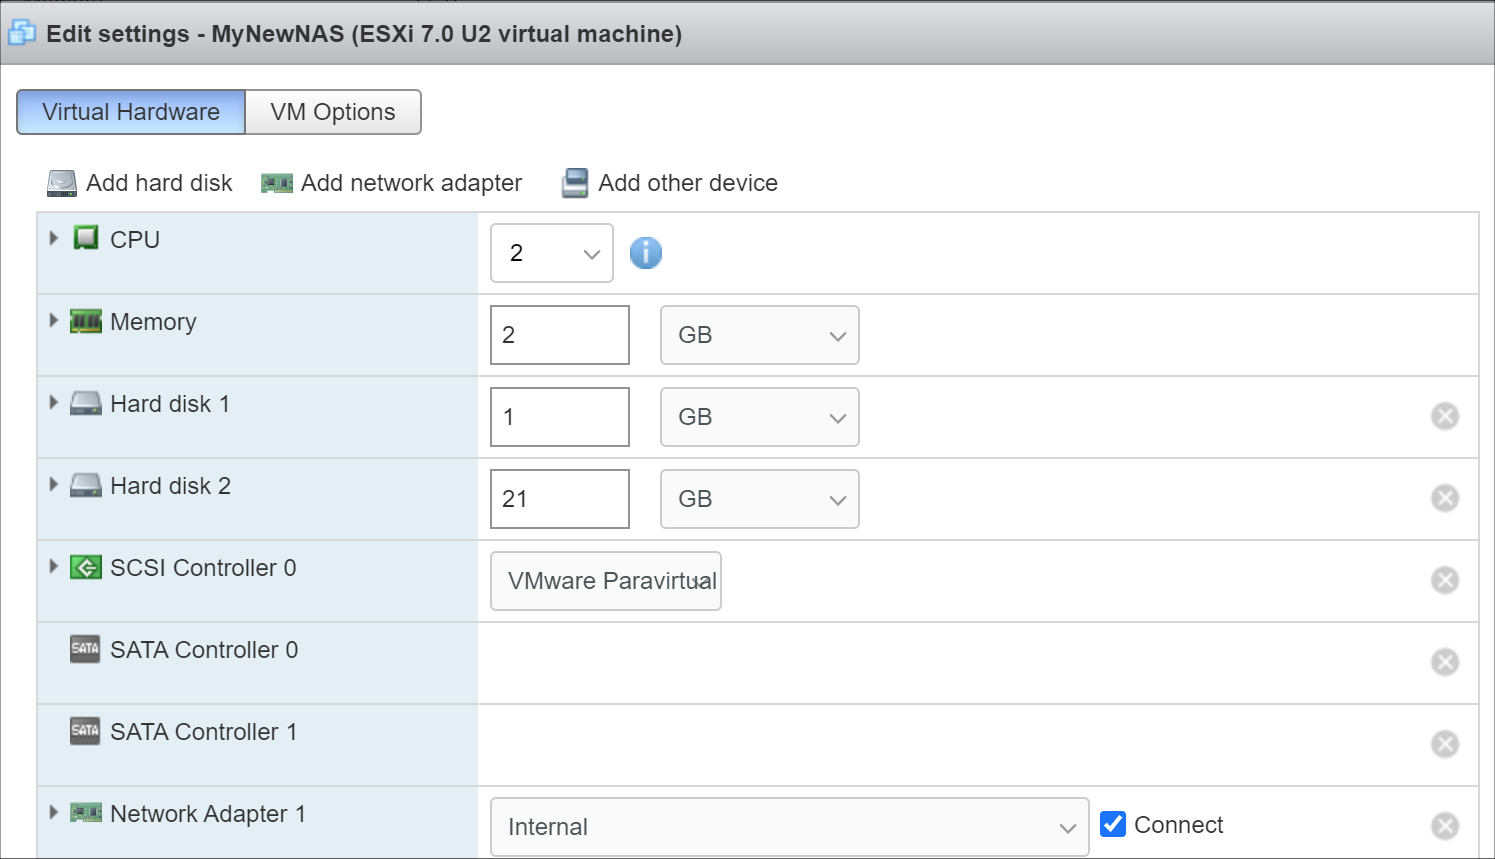
VMWare has an odd behavior in that it renumbers all the hard disks based on the last edit. This is cosmetic, and only affects the VM configuration screen. It does not change the disk addressing order in any way. The VM edit window now looks like this:
Now that no disks are attached to the SCSI controller, we can (and should) delete it.
The final configuration of controllers and disks is:
SATA Controller 0: SATABOOT (SATA0:0)
SATA Controller 1: DSM Data DIsk (SATA1:0)
Any additional virtual DSM data disks should be added to SATA1 (i.e. SATA1:1, SATA1:2, etc).
SATA0 should be reserved only for SATABOOT.
The VM is now ready for the TinyCore boot (main tutorial, Step 3).
System-Specific Parameters and SATABOOT
ESXi requires minor adjustments to the basic tutorial configuration steps:
-
The USB flash drive VID/PID configuration step (./rploader.sh identifyusb) is invalid and can be skipped when using SATABOOT.
-
When using a virtual network adapter (such as VMXNET 3), its MAC address and the loader's MAC address setting must match. When a virtual machine is booted for the first time, a random address is assigned to each virtual adapter. Unless your primary network interface is a passthrough device, the serialgen configuration step requires the realmac argument to match the virtual NIC's random address to TCRP. Example:
./rploader.sh serialgen DS3622xs+ realmac -
The Drive Slot Mapping configuration step is the same, but the outcome is different when SATABOOT is in use.
- ./rploader.sh satamap will enforce the prohibition on data disks attached to SATA0 and warn if this configuration exists.
- SataPortMap and DiskIdxMap are configured to remove a blank slot between the SATA0 and SATA1 controllers.
- SCSI/SAS controllers or HBAs (either passthrough or virtual) ignore satamap functionality. When SATABOOT is also in use, there is an unavoidable blank slot between the last SATA controller and the first SCSI/SAS controller or HBA.
Boot DSM with GRUB
When the GRUB Menu is displayed: if necessary, use the arrow keys to ensure that SATA is selected and press ENTER.

Advanced Configuration Examples: Passthrough and Raw Device Mapping (RDM)
SpoilerWhile not needed for a basic tutorial on how to configure DSM via TCRP on ESXi, passthrough and RDM are important tools that may be factors in the decision to use ESXi (or another virtualization platform). The ability to mix virtual and physical resources within the same virtual machine is an incredibly powerful tool that can solve many problems.
Passthrough attaches a physical hardware device to a virtual machine, giving it exclusive access. The virtual SATA controllers and virtual network controller in the configuration example above are software fabrications, emulating the behaviors of real devices. But we can also "pass through" a real, physical PCI device by identifying it, reserving it, and then attaching the device to the VM. This is set up with the Manage tab under the ESXi host. For example, a Mellanox ConnectX-3 10Gbe network adapter is reserved.

Then the NIC is attached to a virtual machine by editing the VM configuration, and adding a PCI device.
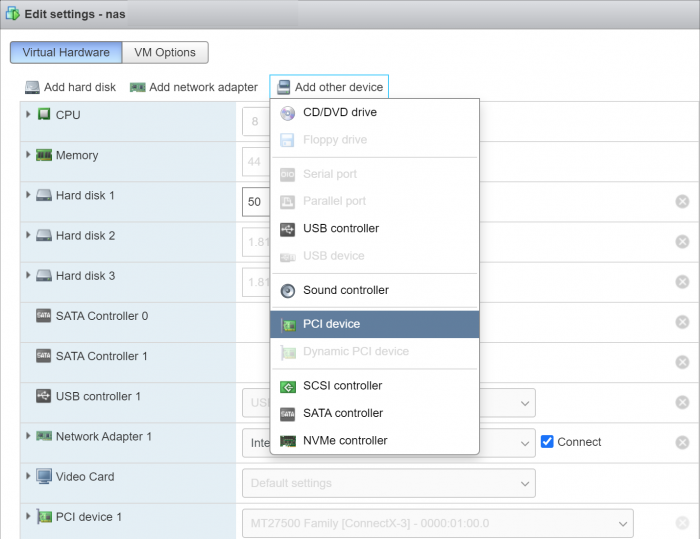
The Mellanox NIC now can ONLY be used by that virtual machine. DSM must be able to directly support the passthrough device with internal drivers, because ESXi is no longer involved.
When a disk controller (such as an motherboard embedded SATA controller or a SCSI HBA) is passed through, all the attached disks pass through with it and are not visible to or shareable by ESXi. Passthrough of the disk controller is a practical method for a full XPEnology conversion from baremetal to virtualized, as a virtualized DSM will then see the disks in the exact same condition as the baremetal system. Disk controller passthrough also maximizes DSM's SATA drive management technology, and performance with a multi-disk array.
Raw Device Mapping (RDM) blends virtual and physical characteristics for block storage (drives). With a passthrough disk controller, all drives attached to that disk controller are no longer available to ESXi or other VMs. Functionally, RDM acts as a passthrough for an individual drive, while the controller and the other drives attached to that controller can remain managed and shared under ESXi. In reality, RDM is a virtualization and translation/emulation layer. It appears to offer direct access to the disk hardware, but ESXi remains active managing the real device in the background.
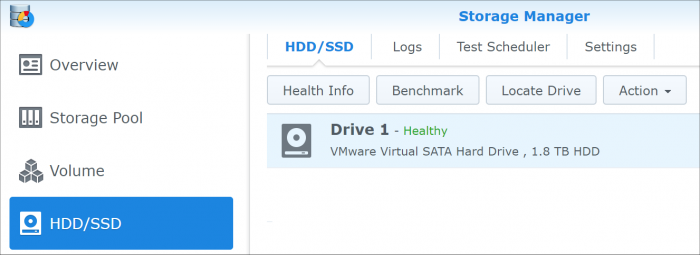
Once configured, a RDM drive can then be attached to the DSM virtual machine and presented in any form that is needed. This can be very useful! For example, when a NVMe SSD is configured with Raw Device Mapping and attached to a virtual SATA controller, it appears to DSM as a SATA device, which can then be used as regular storage within Storage Manager.
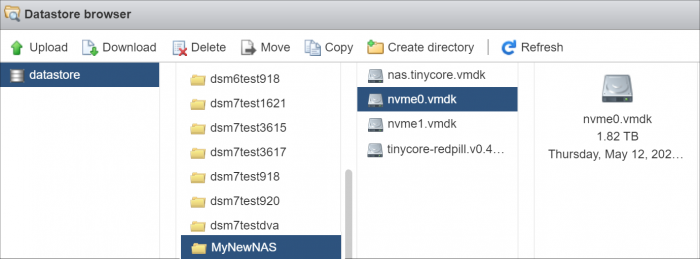
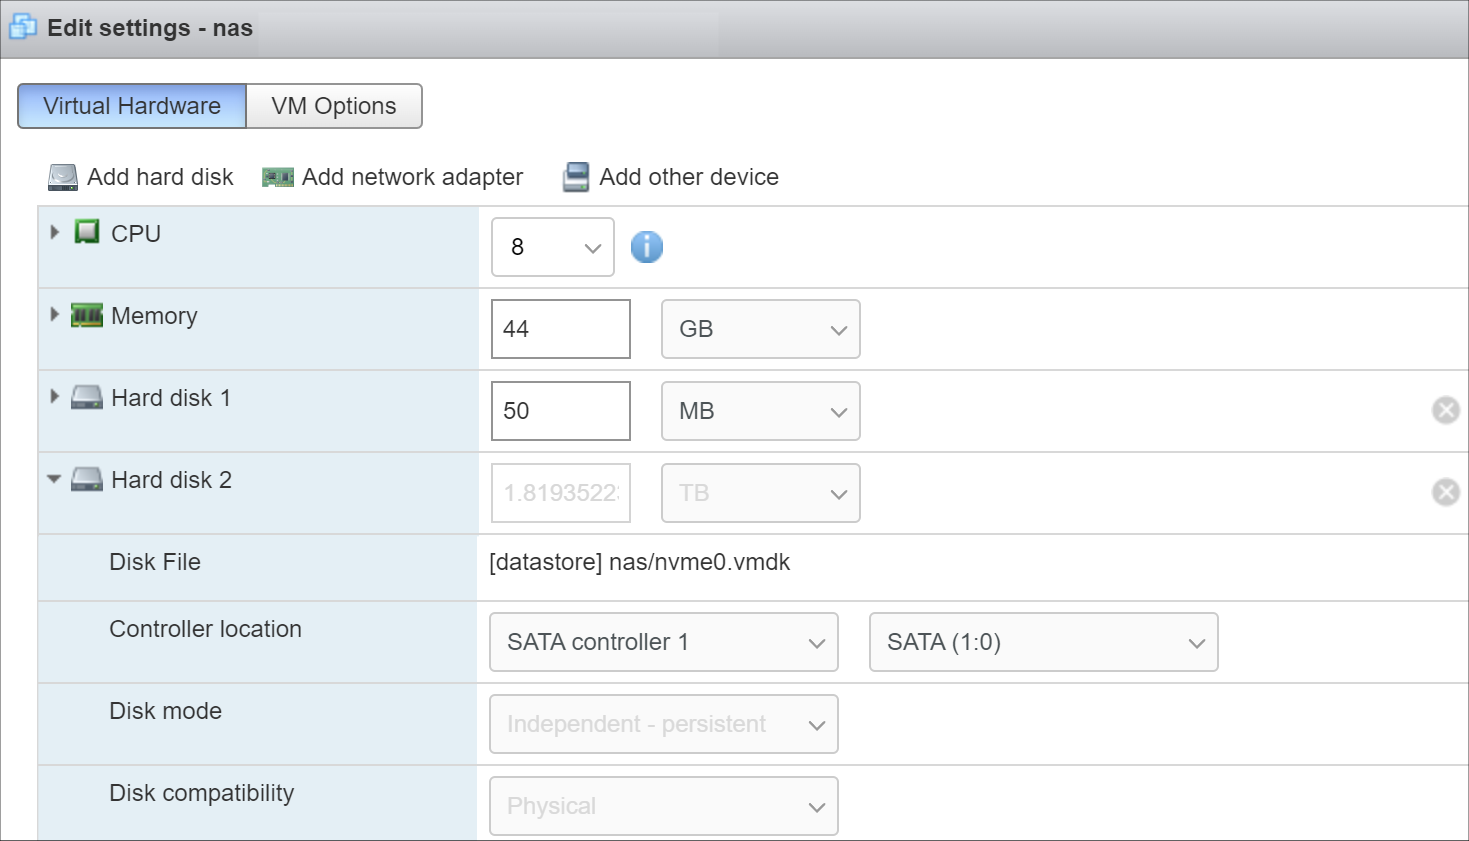
There is no GUI configuration for RDM. This VMware article explains how to create a local raw device mapping from the console shell command line, which results in a virtual disk pointer in the VM folder. Here's the example of creating an RDM for an attached NVMe drive:
[root@esxi:] cd /vmfs/volumes
[root@esxi:] cd <datastore>
[root@esxi:] cd MyNewNAS
[root@esxi:] ls -l /vmfs/devices/disks
-rw-------    1 root     root     2000398934016 May 30 09:03 t10.NVMe____INTEL_SSDPE2MX020T4_CVPD609542HM2P0TGN__00000001
-rw-------    1 root     root     2000398934016 May 30 09:03 t10.NVMe____INTEL_SSDPE2MX020T4_CVPD6123403F2P0TGN__00000001
[root@esxi:] vmkfstools -z /vmfs/devices/disks/t10.NVMe____INTEL_SSDPE2MX020T4_CVPD609542HM2P0TGN__00000001 nvme0.vmdk
[root@esxi:] ls -la
total 65664
drwxr-xr-x    1 root     root         73728 May 28 09:02 .
drwxr-xr-t    1 root     root         81920 May 28 08:58 ..
-rw-------    1 root     root     22548578304 May 28 08:58 MyNewNAS-flat.vmdk
-rw-------    1 root     root           474 May 28 08:58 MyNewNAS.vmdk
-rw-r--r--    1 root     root             0 May 28 08:58 MyNewNAS.vmsd
-rwxr-xr-x    1 root     root          1941 May 28 08:58 MyNewNAS.vmx
-rw-------    1 root     root     2000398934016 Jan 20 13:56 nvme0-rdmp.vmdk
-rw-------    1 root     root           534 May 12 17:33 nvme0.vmdk
-rw-r--r--    1 root     root      65260813 May 28 09:02 tinycore-redpill.v0.4.6.vmdk.gz
Now the RDM drive can be attached to the VM with Add New Hard Disk (existing) just like the TCRP loader image.
Finally, the RDM drive is then assigned to a virtual SATA controller:
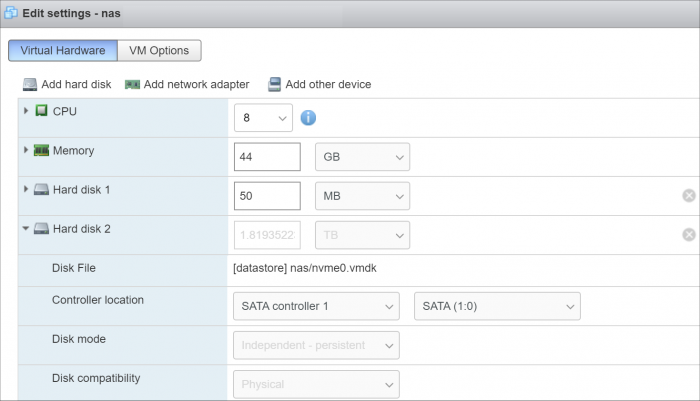
And now the NVMe drive appears to DSM as regular SATA storage
CAUTION: Because of the virtualization layer, TRIM may not be supported across device types.
Test with a non-production workload prior to enabling TRIM with RDM.-
9
-
2
-
I think you've helped me out a ton. It's unfortunate that board isn't simple as it is a decent platform with 8 real SATA ports. Go install and enjoy DSM 7.
-
To what device is the hard drive connected?
-
I posted the new tutorial today. Hopefully it can still help you:
-
No, I misunderstood the screencap - I thought you could disable the port itself. Never mind that then. So for now, you want to try option 3:
-Drop the ports on the second controller down to 2 (that would give you 6 usable ports in total).
Also another trial and error option, as you are doing a baremetal install, you may be able to try a null SataPortMap and DiskIdxMap, but I think you'll have the same problem with the M.2 ports. You can delete the lines from user_config.json altogether, or just delete the numeric values from between the quotes.
-
An extensive end-user installation tutorial has been posted here:
It should answer many of the questions often posed on this development site. Please start directing general installation questions to the Help forums unless you know you are contributing to a dev issue.
-
3
-
2
-
-
For SATABOOT, the image file should be the only device on the first controller (SATA0:0). Your example has two virtual disks on the first controller.
Add another virtual SATA controller and connect the virtual disk you wish to use for storage to that one (SATA1:0)
You can passthrough entire SATA controllers or syndicate individual drives using RDM if you prefer not to use virtualized storage.
-
Thank you for the independent confirmation of the HBA behavior. There is a lot of evidence this has been observed by others, but testing it to the point of understanding was quite laborious. As @pocopico confirmed by checking BIOS strings, SasIdxMap no longer exists in the current DSM builds.
ESXi does not, and has never supported USB virtual image boot. This is why Jun created the ESXi option in their loader, and nothing has changed with RedPill (except calling the strategy SATABOOT).
If you want to modify MaxDIsks, do it in user_config.json. You can also change internalportcfg, usbportcfg and esataportcfg there too.
-
I know it seems like we have been just trying things randomly, but let's summarize what we have managed to observe:
- Your motherboard exposes its SATA ports from controllers using two different PCI slot addresses
- As presented to Linux, the high-ordered (second) controller controls the first four ports
- The low-ordered controller (first) controller controls the second four ports, plus two more phantom ports which might be the M.2 slots when in SATA mode
- The M.2 SATA mode slots seem to be placed in the middle of the range and might be the cause of the "bad port" message
-
Somehow the PCI slot addresses of the controllers can change
- sometimes your low ordered controller is this 0000:03:09.0/0000:0a:00.0 and other times it is 0000:02:09.0/0000:06:00.0
- sometimes your high ordered controller is this 0000:03:0a.0/0000:0b:00.0 and other times it is 0000:02:0a.0/0000:07:00.0
That last behavior is very strange, as it appears that the system and chipset are dynamically assigning PCI slot resources based on BIOS settings. It also suggests that you made some other change that resulted in that effect - moving drives around would not be a cause. The slot addresses changing technically shouldn't matter, but it is unusual.
The next few things I would try are:
1. BIOS disable all unpopulated disk slots and see if you get a different result. Please note that different result doesn't mean it installs, so don't gloss over details. For example you say you see the same error message, but does that mean the same ports were disabled?
2. Populate both NVMe slots with blank NVMe drives and see if the phantom slots disappear (skip this if you don't have any suitable devices).
3. Drop the ports on the second controller down to 2 (that would give you 6 usable ports in total).
In other words, try SataPortMap=42 and DiskIdxMap=0200. That also means you would need to put two disks on ports 5,6 and two disk on ports 1,2. If that actually works, that might be the best solution with this board. There is one other thought I have to try that might get the last two ports working, but I'll leave that to later. -
1 hour ago, wessu said:
Okay, I just did that. I'm getting disks 3,4 error now instead of 7&8. See attached screenshot.
Here is the output:
But you left the disks on motherboard ports 5,6,7,8?
-
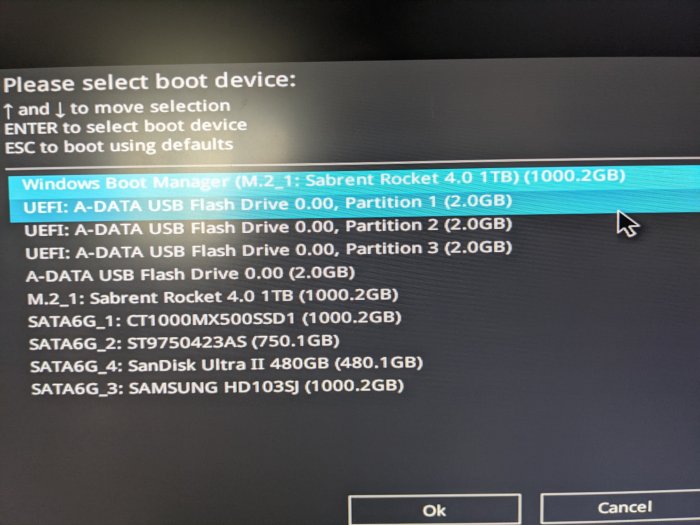
23 hours ago, wessu said:
SATA6G_1 = CT1000MX500SSD1
SATA6G_2 = ST9750423AS
SATA6G_3 = SAMSUNG HD103SJ
SATA6G_4 = SanDisk Ultra II 480GB
SATA6G_5 = Not Present
SATA6G_6 = Not Present
SATA6G_7 = Not Present
SATA6G_8 = Not Present
M.2_1 = Windows Boot NVME Drive (Sabrent Rocket 4.0 1TB)
M.2_2 = Not Present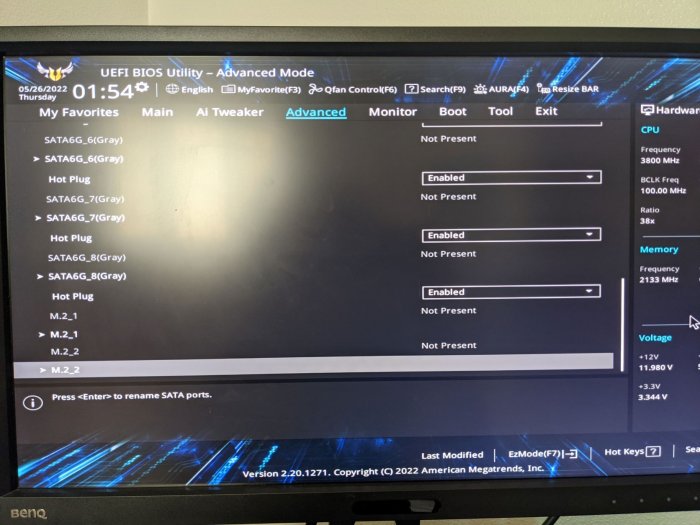
M.2_1 = Windows Boot NVME Drive (Sabrent Rocket 4.0 1TB)
Why would this be in the system? It doesn't appear to be present based on the screenshot above. Do you intend to leave the NVMe slots empty?
It also looks like in the screenshot that the menu can be expanded for M.2_1 and M.2_2. If those ports have a SATA or NVMe option, please change to NVMe.
-
24 minutes ago, wessu said:
So I made the first controller 6 instead of 4 and made the second controller 4 instead of 6 (reversed them).
See the screenshot for errors. Here is output:
SynologyNAS> cat /proc/cmdline
BOOT_IMAGE=/zImage withefi syno_hw_version=DS3622xs+ console=ttyS0,115200n8 netif_num=5 earlycon=uart8250,io,0x3f8,115200n8 mac1=00113214A042 sn=2040SQRW7L4RA HddHotplug=0 DiskIdxMap=0006 syno_hdd_detect=0 vender_format_version=2 syno_hdd_powerup_seq=0 root=/dev/md0 SataPortMap=64Unfortunately that wasn't what we needed to do. Just changing the answers to ./rploader satamap now won't solve this.
You need to manually edit user_config.json. As I said before DiskIdxMap=0600 (and SataPortMap=46 stays the same).
-
12 hours ago, leang521 said:
root@x99pve:/etc/pve/qemu-server# cat 108.conf
balloon: 0
bios: ovmf
boot: order=ide2;sata0
cores: 4
cpu: host
ide2: none,media=cdrom
machine: q35
memory: 4096
meta: creation-qemu=6.1.0,ctime=1653357922
name: DVA3221
net0: virtio=00:11:32:7E:6D:DA,bridge=vmbr0,firewall=1
numa: 0
ostype: l26
sata0: data-zfs:vm-108-disk-1,backup=0,size=1G
scsi0: data-zfs:vm-108-disk-0,backup=0,size=1200G
serial0: socket
smbios1: uuid=7fb25a1e-5f14-4a3d-9242-5aa88b0ca99a
sockets: 1
vmgenid: 6f42693e-62e8-4b59-a859-840f57244b93I have repeated your install in both configurations (USB/SATA and SATABOOT/SCSI) on my equipment with no issue.
I did notice one difference back in your SATABOOT/SCSI test, and since you seem to be missing SCSI disk, maybe it is relevant.
My VM conf file has "scsihw: virtio-scsi-pci" and yours did not. I am not a Proxmox expert so I do not know if it matters.
-
Also the embedded LAN card is: a Qualcomm® Atheros® AR8171 - there is a Synology native driver for this but there might be a silicon rev that is newer than the driver. Supported PCI ID's are 1969:1091, 1969:10A1, 1969:E091
Maybe it might not be supported without using extra.lzma.... @IG-88 its the alx embedded kernel module, any advice?
-
Make sure you are installing a supported version. The last DSM version for Jun 1.04b is 6.2.3-25426
https://global.download.synology.com/download/DSM/release/6.2.3/25426/DSM_DS918%2B_25426.pat
That means download and save the above to your computer, then do "Manual Install" where you upload the PAT file from your PC.
If you let DSM download and install for you, it will pull an incompatible version.
-
This board reverses the disk connections to each controller versus what is reported in the BIOS.
0000:03:09.0/0000:0a:00.0 - this is your first enumerated controller, with 4 ports
0000:03:0a.0/0000:0b:00.0 - this is your second enumerated controller, with 6 ports (not sure why it has two extra still)
The BIOS calls disk 1 the first port on the second controller. So this is defeating any reasonable algorithm to detect this correctly.
You happened upon a partial solution with previous values on the first DS3622xs+ install, but it would not have allowed you to use all your ports.
Now it's trial and error until it can be figured out. I would try two things:
1. Reverse the DiskIdxMap settings - (i.e. instead of 0004 change to 0600)
This is easiest and has a good chance of working.
2. Move your disks to the places that are actually being presented. I assume that would be ports 5,6,7,8 on your motherboard.
This is most "techically correct" if that matters to you.
We might still have errors on the last two ports, but this will get it closer.
Sorry but sometimes hardware manufacturers do weird stuff. Let me know how it goes.
-
Ok try ls -la /sys/block/scsi_host
Also cat /proc/cmdline
-
3 minutes ago, wessu said:
Under BIOS>Advanced>SATA Configuration
I get only SATA 1-8 and 2 NVMEs. Is it possible that those two NVMEs are causing 7,8 errors in the previous picture?
Possibly. Maybe screenshot that. Sometimes a M.2 port can be either a SATA SSD or NVMe SSD depending on BIOS. If you don't have any SATA M.2 SSD's, they should be disabled probably.
-
13 minutes ago, wessu said:
Is there a difference if you select a UEFI boot vs CSM boot for tinyCore? See attached image. BTW, these are all my currently connected drives.
Your motherboard supports UEFI boot and CSM boot. The one you should use is based on the img file you used to write to the TCRP USB flash drive:
tinycore-redpill.vX.X.X.img.gz (for BIOS/CSM/Legacy boot from USB flash drive)
tinycore-redpill-uefi.vX.X.X.img.gz (for UEFI/EFI boot from USB flash drive)
tinycore-redpill.vX.X.X.vmdk.gz (for hypervisor VM boot from disk image)If you used the first one, you should pick A-DATA USB Flash Drive 0.00 (2.00GB) from the BIOS
18 minutes ago, wessu said:I did update now command. Here is the results:
tc@box:~$ ./rploader.sh satamap now
Found "0a:00.0 Advanced Micro Devices, Inc. [AMD] FCH SATA Controller [AHCI mode] (rev 51)"
Detected 4 ports/0 drives. Override # of ports or ENTER to accept <4> 4Found "0b:00.0 Advanced Micro Devices, Inc. [AMD] FCH SATA Controller [AHCI mode] (rev 51)"
Detected 6 ports/4 drives. Override # of ports or ENTER to accept <6> 6Recommended settings:
SataPortMap=46
DiskIdxMap=0004Should i update the user_config.json with these values ? [Yy/Nn] y
Done.This says your motherboard maps 10 devices, not 8. Apparently you just now tried to rebuild the loader with these values. Please launch the TCRP console again and post:
cat /proc/cmdline
ls -la /sys/block
ls -la /sys/class/ata_device
Also, please confirm exactly which ports the drives are connected to.
It may be that your controllers are showing ports that aren't actually connected to hardware, which is a weird problem but it has been encountered before.
-
3 minutes ago, leang521 said:
Very frustrated and failed again. The V9FS driver work is good, the NIC work is good, and there is no error in the build.
But the disk is not found on installing the webpage.
I'm sorry you are frustrated. You did get caught up in some broken repos that took a day or two to get fixed. You also have done some things in a strange way that would have been avoided if there were better documentation. I am happy to say that is about to improve.
I have exactly replicated your build and it is working fine.
You may want to attach a serial console to the VM, reboot and launch. The serial console will show "SynologyLogin: " and you can use root to access the system as DSM sees it.
Then post ls -la /sys/block and we will learn what is happening with your SCSI disk.
-
1 hour ago, vikikang said:
Hello everyone. I have successfully got DS3622xs+ running. Then I got a weird problem that I can't get the DSM update information. It keeps saying " Connection failed, check your internet connection". Although the package center is functioning well.
Any suggestion is much appreciated~~
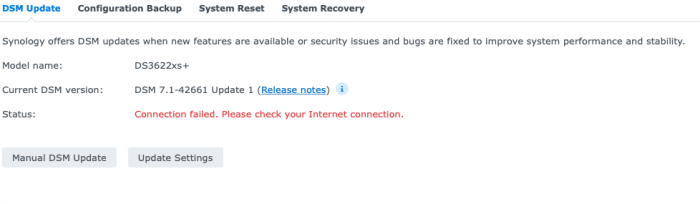
This is only from the DSM update screen. RedPill blocks that so that you don't update by accident. The consequence is that it gives you that error message.
In summary, it's by design and nothing is wrong.
-
43 minutes ago, leang521 said:
And I need to build Denverton-7.0.1-42218, and then build Denverton-7.1.0-42661.
Otherwise, an error will be reported. Is this my special case?You do not need to build them in sequence. You can just build 42661


Best DSM OS and boot loader for Inetl Nuc DC3217IYE
in General Installation Questions/Discussions (non-hardware specific)
Posted
DSM is really intended to manage SATA drives. A USB enclosure can theoretically be made to work, but only with some hacking of system settings.
There is nothing wrong with using a NUC for DSM, but it isn't very expandable.
Regardless, take a look at these threads to help make decisions about your hardware strategy and which DSM software is right for you:
https://xpenology.com/forum/topic/61634-dsm-7x-loaders-and-platforms/
https://xpenology.com/forum/topic/13333-tutorialreference-6x-loaders-and-platforms/