Leaderboard


Popular Content
Showing content with the highest reputation on 04/09/2021 in all areas
-
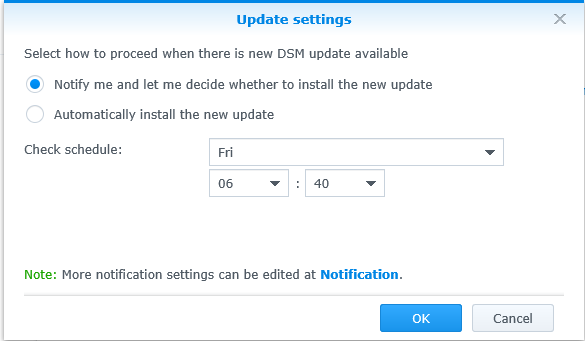
this is kind of work in progress and not perfect for all scenarios but as synology now offers 6.2.4 in the DSM GUI as update (instead of 6.2.3 U3) more people might have that problem, some people tested that already here (https://xpenology.com/forum/topic/41473-dsm-624-25554-install-experience/) but i wanted to continue in a easier to find area and try to sort out problems and fine tune here in the tutorial and guides section there is the more complicated way of going back to 6.2.3, keeping all settings and data, that needs some experience in general and some linux skills and a easier way where you keep your data but loose the settings (user, shares, ...), the skills needed for this is more or less the same what you need to install xpenology, a link to the less complex way is added down below as a PS download a rescue/live linux like system rescue cd (i used a "older" version 6.0.3, mdadm and lvm worked ootb, any newer should be fine too), transfer it to a usb (not your dsm boot usb) to boot from it assemble your raid1 system partition like here (1st partitions of all disks as /dev/md0) skip anything about swap or volume1 data partition, we only need access to the dsm system partition https://xpenology.com/forum/topic/7004-tutorial-how-to-access-dsms-data-system-partitions/ mount the assembled raid1 to /mnt with this mount /dev/md0 /mnt then remove some files with this rm -rf /mnt/SynoUpgradePackages rm -f /mnt/SynoUpgrade.tar rm -f /mnt/SynoUpgradeindex.txz rm -f /mnt/SynoUpgradeSynohdpackImg.txz rm -f /mnt/checksum.syno rm -f /mnt/.syno/patch/* also check the files containing the DSM Version cat /etc/VERSION cat /etc.defaults/VERSION if the one in /etc shows 6.2.3 and the one in /etc.defaults shows 6.2.4 delete or rename one with 6.2.4 and copy the one with 6.2.3 to that place (a version file with slightly more content is also in the *.pat file that can be opened with 7zip, that can be used for comparison too) report say's its working too if you just delete both VERSION files shutdown the rescue linux shutdown -h now now you will have to restore the kernel files on your boot usb to 6.2.3 (the update also replace files on the loaders 2nd partition) win10 can have some difficulties with mounting the 2nd partitions of the loader, so look here https://xpenology.com/forum/topic/29872-tutorial-mount-boot-stick-partitions-in-windows-edit-grubcfg-add-extralzma/ (it can also be done with linux but i have not tried what other tools will extract the kernel files but if you are familiar with linux you will find out https://xpenology.com/forum/topic/25833-tutorial-use-linux-to-create-bootable-xpenology-usb/) on 2nd partition delete all files except extra.lzma and extra2.lzma (if its 3615/3617 then its just extra.lzma) use 7zip to open "DSM_xxxxx_25426.pat" (dsm 6.2.3 install file, depends on you dsm type 3615/3617/918+) extract "rd.gz" and "zImage" and copy it to the 2nd partition of your xpenology usb the assumption here is you already had 6.2.3 before the 6.2.4 update try, if not you would use the kernel files from the *.pat of the 6.2.x you had installed as a example what could go wrong: if you had 6.2.2 and did 6.2.4 your extra/extra2.lzma on the loader where usually replaced with special ones made for 6.2.2, if you add 6.2.3 kernel files to the 6.2.2 extra/extra2 (drivers) then most of the drivers will not work as of the incompatibility with 6.2.1/6.2.2 with 6.2.0/6.2.3 if you are unsure about the extra/extra2 or you dsm version then use the original extra/extra2 from jun's loader (img file can be opened with 7zip, loaders kernel files and drivers in its extra/extra2 are 6.2.0 level) or use a extended version of the extra/extra2 made for 6.2.3 and use the kernel files of 6.2.3 if you had a older 6.2.x that would do a update to 6.2.3 put back your usb to the xpenology system, boot up, find it in network (i used synology assistant) and "migrate" to version 6.2.3 (keeps data and settings) - dont try internet that will do 6.2.4 again, use manual install and give it the 6.2.3 *.pat file (you already have as you needed it to restore the kernel files on the loader) it will boot two times, one for 6.2.3, 2nd for 6.2.3_U3 (it will be downloaded automatically if internet connection is present) everything should be back to normal except patches like nvme ssd patch (or other stuff you patched after installing 6.2.3 that is not dsm update resistant) oh and one more thing - check your update settings, it should look like this please comment on how to make it easier to follow, its just a short version i tried once PS: if that sounds all to complicated then its still possible to use the other downgrade method (but you will loose all settings and end with a factory default DSM - but you data volume(s) would still be unchanged) https://xpenology.com/forum/topic/12778-tutorial-how-to-downgrade-from-62-to-61-recovering-a-bricked-system/
 2 points
 -
Hello first off I don't want to seem rude or anything, I just want to know what the future holds for xpenology, so I was wondering if the Admin team or Devs could answer if there is any kind of roadmap for the future of the project? i have been slowly moving away from unraid to xpenology as I find the system so easy to use very lightweight and very well supported. but as with the last two updates having failed to install according to a number of people and with DSM 7 in the wings is there a future. I know Jun seems to have been away for a while so is there others that will be making boot loaders and taking up the mantle? i myself have no experience with coding or programming which is why my knowledge in this department is low. i also realise that most people here do this kind of work as a hobby and have other commitments. i saw IG55s post about looking at other specs of synology nas to try replicate but i was wondering if there is any kind of official stand from the project. Are we going to hold off on new boot loaders till dsm 7 is released?1 point
-
I am not trying to be rude also but this question was answered so many times already in different posts. There is no road map and this forum does not have a "development" team to work on loaders but very experienced members for troubleshooting. Is there a future? No one knows if this is the end of XPEnology or not. This is up to Jun or any other person with coding skills... As @flyride said on another post with similar question. If he was Jun, he would not spend his time creating a new boot loader just to support this last update. DSM 6 is at the end and these small updates have nothing major. He would be more focus on DSM 7. DSM 7 at the moment is on beta stage, once is released we will see...1 point
-
nic is a ATHEROS AR8121 -> atl1e.ko thats part of juns default driver set, so nothing to request as the driver is already there you might want to have a look in the tutorial section https://xpenology.com/forum/topic/13333-tutorialreference-6x-loaders-and-platforms/ 1.04b 918+ needs min. 4th gen intel cpu (haswell), no way with that old cpu ??? your links seem to be all about 918+, not going to work i'd say try 1.03b (dsm 6.2) or 1.02b (dsm 6.1) loader seems not to be uefi bios so even 1.03b should be working easily sata in bios needs to be set to ahci (might also be called extended mode)1 point
-
Bonjour à tous les lecteurs ;) ! J'ai enfin réussi à mettre en place quelque chose de stable. Pour commencer, j'ai changé ma config précédente par un HP Z420, car je n'ai jamais réussi à utiliser la totalité de mes disques avec la carte PCIe 10x port SATA qui je pense pause des soucis avec ESXI 6.7 & 7 : Intel(R) Xeon(R) CPU E5-1620 0 @ 3.60GHz Mémoire 32 Go 7 x HDD 3.5" 6To 2 x HDD 3.5" 10To 1 x Samsung SSD 860 EVO 2.5" (250 Go) Avant tout, je tiens à remercier chaleureusement fbittoun, il ne m'a jamais laissé tombé et même en privé avec confcall ... Respect camarade ! Il es de bons conseils et m'a permis de rectifier quelques erreurs et incompréhensions 😉 ! A l'heure ou je vous écris ces quelques lignes, j'ai déjà monté 2 VM opérationnelles sous ESXi7 : DS3617xs avec la totalité de mes 6To en Raid5 OMV5 pour l'utilisation de mes 2 10To en RAID0 avec un serveur PLEX sous Docker. Mes prochaines VM seront Windows Serveur 2019 / DS918+ / Linux Mint 20.1 Je vais également rajouter une PCIe SATA car … ça manque de disques 🤣 Je reste à l'écoute ;)1 point
-
Ох уж эти торопыги...))) 1. Вам необходимо отформатировать первый раздел на каждом харде. Не удалить, не изменить, а именно отформатировать. 2. Переустановить систему. Будет предложена миграция и восстановление 3. Установить необходимые приложения. 4. Если есть резервная копия настроек, то восстановиться из неё. Настройки сохранятся Загрузчик лучше переписать по новой. Загрузчики: https://mega.nz/folder/yQpw0YTI#DQqIzUCG2RbBtQ6YieScWg/folder/7AoyySoS Файлы. Сначала 6.2.3-25426: https://archive.synology.com/download/Os/DSM/6.2.3-25426 Потом апдейт 6.2.3-25426-3 : https://archive.synology.com/download/Os/DSM/6.2.3-25426-31 point
