dolbycat
-
Posts
74 -
Joined
-
Last visited
Everything posted by dolbycat
-
Can RedPill work with and AMD cpu?
dolbycat replied to phone guy's topic in Developer Discussion Room
pocopico -> DS1621+ is a perfect match for people with AMD cpus and "Tinycore" supports ds1621+ -
RedPill - the new loader for 6.2.4 - Discussion
dolbycat replied to ThorGroup's topic in Developer Discussion Room
Only Realtek LAN is recognized now. If pocopico Intel LAN extension driver is added to ds1621p, HDD recognition fails. I also hope that Intel LAN is supported, but it seems impossible at the moment. -
RedPill - the new loader for 6.2.4 - Discussion
dolbycat replied to ThorGroup's topic in Developer Discussion Room
Everything is correct. And I don't know what is wrong. It works fine on my j5040. Please follow what I posted. -
RedPill - the new loader for 6.2.4 - Discussion
dolbycat replied to ThorGroup's topic in Developer Discussion Room
DS920+ ,DS1621+ Bootloader Workflow * Asrock J5040, Debian 11. 1 ) Boot Asrock J5040 with tinycore and check the pcie_root value of "output.dts" file. tc@box:~$ lspci -tnnvq -[0000:00]-+-00.0 Intel Corporation Gemini Lake Host Bridge [8086:31f0] +-00.1 Intel Corporation Celeron/Pentium Silver Processor Dynamic Platform and Thermal Framework Processor Participant [8086:318c] +-02.0 Intel Corporation GeminiLake [UHD Graphics 605] [8086:3184] +-0e.0 Intel Corporation Celeron/Pentium Silver Processor High Definition Audio [8086:3198] +-0f.0 Intel Corporation Celeron/Pentium Silver Processor Trusted Execution Engine Interface [8086:319a] +-12.0 Intel Corporation Celeron/Pentium Silver Processor SATA Controller [8086:31e3] +-13.0-[01]--+-00.0 Intel Corporation 82575EB Gigabit Network Connection [8086:10a7] | \-00.1 Intel Corporation 82575EB Gigabit Network Connection [8086:10a7] +-13.1-[02]----00.0 JMicron Technology Corp. JMB58x AHCI SATA controller [197b:0585] +-13.2-[03]----00.0 Realtek Semiconductor Co., Ltd. RTL8111/8168/8411 PCI Express Gigabit Ethernet Controller [10ec:8168] +-13.3-[04]----00.0 ASMedia Technology Inc. ASM1062 Serial ATA Controller [1b21:0612] +-15.0 Intel Corporation Celeron/Pentium Silver Processor USB 3.0 xHCI Controller [8086:31a8] +-1f.0 Intel Corporation Celeron/Pentium Silver Processor LPC Controller [8086:31e8] \-1f.1 Intel Corporation Celeron/Pentium Silver Processor Gaussian Mixture Model [8086:31d4] tc@box:~$ 2 ) Look at the above sentence and set the following values to be included in the attached "output.dts" file. pcie_root = "00:12.0" pcie_root = "00:13.1,00.0" pcie_root = "00:13.3,00.0" Unpack the attached "outout.zip" file and edit the "output.dts" file in the ds1621 ( DS920 ) folder with an editor as shown below. pcie_root = "00:12.0"; ata_port = <0x00>; pcie_root = "00:12.0"; ata_port = <0x01>; pcie_root = "00:13.1,00.0"; ata_port = <0x00>; pcie_root = "00:13.1,00.0"; ata_port = <0x01>; pcie_root = "00:13.3,00.0"; ata_port = <0x00>; pcie_root = "00:13.3,00.0"; ata_port = <0x01>; 3) Put the modified "output.dts" file in the "redpill-tool-chain-master" folder. https://github.com/tossp/redpill-tool-chain After modifying the "sample_user_config.json" file in the "redpill-tool-chain-master folder" to suit your system, rename it to "ds1621p_user_config.json" and save it. 4) Copy the "redpill-tool-chain-master" folder to debian 11. 5) Follow the procedure below. sudo apt-get update sudo apt install docker.io sudo apt install jq sudo apt install curl sudo apt install device-tree-compiler cd /home/dolbycat/redpill-tool-chain-master chmod +x redpill_tool_chain.sh ./redpill_tool_chain.sh add https://github.com/jumkey/redpill-load/raw/develop/redpill-dtb/rpext-index.json ./redpill_tool_chain.sh build ds1621p-7.0.1-42218 ./redpill_tool_chain.sh auto ds1621p-7.0.1-42218 dtc -I dts -O dtb output.dts > model_ds1621p.dtb cp model_ds1621p.dtb ./custom/extensions/jumkey.dtb/ds1621p_42218 ./redpill_tool_chain.sh auto ds1621p-7.0.1-42218 6) Finally, Delete the first "redpill-DS1621+_7.0.1-xxxxxxxx.img" file in the image folder and use the second created redpill-DS1621+_7.0.1-xxxxxxxx.img file. < Note > 1 ) More accurate pcie_root and ata_port values can be obtained in the following way. cat /sys/block/sataX/device/syno_block_info X=1~6 2) If the extension driver is used, the hard disk is not recognized. You must have a Realtek LAN. output.zip -
RedPill - the new loader for 6.2.4 - Discussion
dolbycat replied to ThorGroup's topic in Developer Discussion Room
Extension drivers should not apply. If applied, the hard disk cannot be found. You still need to use pure realtek LAN. -
RedPill - the new loader for 6.2.4 - Discussion
dolbycat replied to ThorGroup's topic in Developer Discussion Room
pciepath=00:1c.3 ( X ) pciepath=00:1c.3,00.0 ( O ) -
Thanks for your kind reply. I think the way I make ds1621p is wrong. please check. ./rploader.sh update now ./rploader.sh serialgen DS1621+ now ./rploader.sh identifyusb now ./rploader.sh satamap now ./rploader.sh download v1000-7.0.1-42218 ./rploader.sh listmods v1000-7.0.1-42218 ./rploader.sh ext v1000-7.0.1-42218 add https://github.com/jumkey/redpill-load/raw/develop/redpill-dtb/rpext-index.json wget https://github.com/jumkey/redpill-load/raw/develop/redpill-dtb/releases/dtc wget https://github.com/jumkey/redpill-load/raw/develop/redpill-dtb/releases/model_ds1621p.dtb dtc -I dtb -O dts model_ds1621p.dtb > output.dts Edit the "output.dts" file dtc -I dts -O dtb output.dts > model_ds1621p.dtb cp model_ds1621p.dtb redpill-load/custom/extensions/jumkey.dtb/ds1621p_42218/model_ds1621p.dtb ./rploader.sh build v1000-7.0.1-42218 reboot
-
DS1621+ , baremetal I put the modified "model_ds1621p.dtb" file for my system in the " redpill-load/custom/extensions/jumkey.dtb/ds1621p_42218 " folder. However, when I run " ./rploader.sh build v1000-7.0.1-42218 ", jumkey's "model_ds1621p.dtb" file is overwritten. In the end, it seems that the hard disk is not recognized.
-
RedPill - the new loader for 6.2.4 - Discussion
dolbycat replied to ThorGroup's topic in Developer Discussion Room
Tc does not support ds920p yet. I used the redpill-tool-chain below. https://github.com/tossp/redpill-tool-chain -
RedPill - the new loader for 6.2.4 - Discussion
dolbycat replied to ThorGroup's topic in Developer Discussion Room
You need to overwrite the created "model_ds920p.dtb" file to the original location. Finally, run the below: ./redpill_tool_chain.sh auto geminilake-7.0.1-42218 -
RedPill - the new loader for 6.2.4 - Discussion
dolbycat replied to ThorGroup's topic in Developer Discussion Room
You need to overwrite the created "model_ds920p.dtb" file to the original location. Finally, run the below: ./redpill_tool_chain.sh auto geminilake-7.0.1-42218 -
Does ds1621p not work on intel platforms? And if you support ds920p, thank you.
-
RedPill - the new loader for 6.2.4 - Discussion
dolbycat replied to ThorGroup's topic in Developer Discussion Room
internal_slot@3 pcie_root = "00:13.3,00.0" ata_port = <0x01> => DS920+ recognized as the 3rd slot internal_slot@4 pcie_root = "00:13.3,00.0" ata_port = <0x01> => DS920+ recognized as the 4th slot internal_slot@5 pcie_root = "00:13.3,00.0" ata_port = <0x01> => DS920+ recognized as slot 5 internal_slot@6 pcie_root = "00:13.3,00.0" ata_port = <0x01> => DS920+ recognized as the 6th slot jumkey's "The new PortMapping ext(redpill-dtb)" seems great. There seems to be no need to worry about SataPortMap and DiskIdxMap anymore.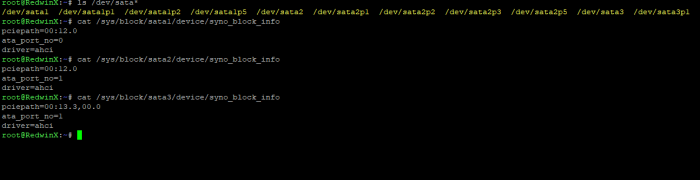
-
RedPill - the new loader for 6.2.4 - Discussion
dolbycat replied to ThorGroup's topic in Developer Discussion Room
0000:00:12.0 Class 0106: Intel Corporation Celeron/Pentium Silver Processor SATA Controller (rev 06) Referring to the above sentence, pcie_root = "00:12.0" internal_slot@1 { protocol_type = "sata"; power_pin_gpio = <0x14 0x00>; detect_pin_gpio = <0x23 0x01>; led_type = "lp3943"; ahci { pcie_root = "00:12.0"; ata_port = <0x00>; }; led_green { led_name = "syno_led0"; }; led_orange { led_name = "syno_led1"; }; }; internal_slot@2 { protocol_type = "sata"; power_pin_gpio = <0x15 0x00>; detect_pin_gpio = <0x24 0x01>; led_type = "lp3943"; ahci { pcie_root = "00:12.0"; ata_port = <0x01>; }; led_green { led_name = "syno_led2"; }; led_orange { led_name = "syno_led3"; }; }; After compiling with the above values, run DS920+. Then, as in the picture below, get the remaining pcie_root values and compile again.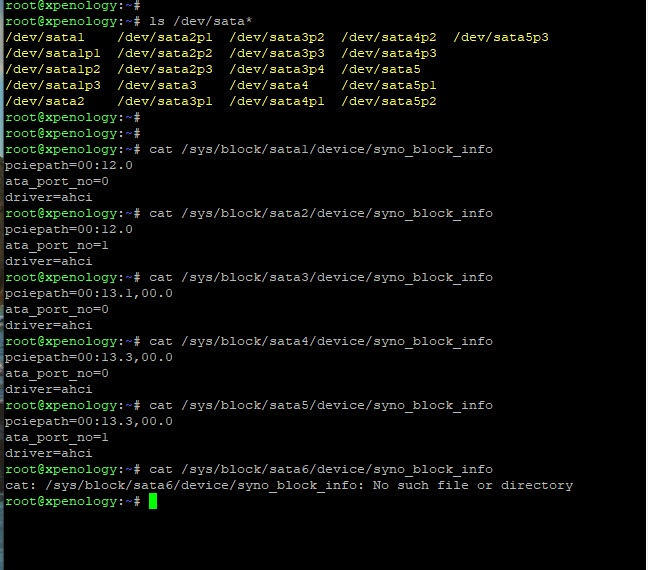
-
RedPill - the new loader for 6.2.4 - Discussion
dolbycat replied to ThorGroup's topic in Developer Discussion Room
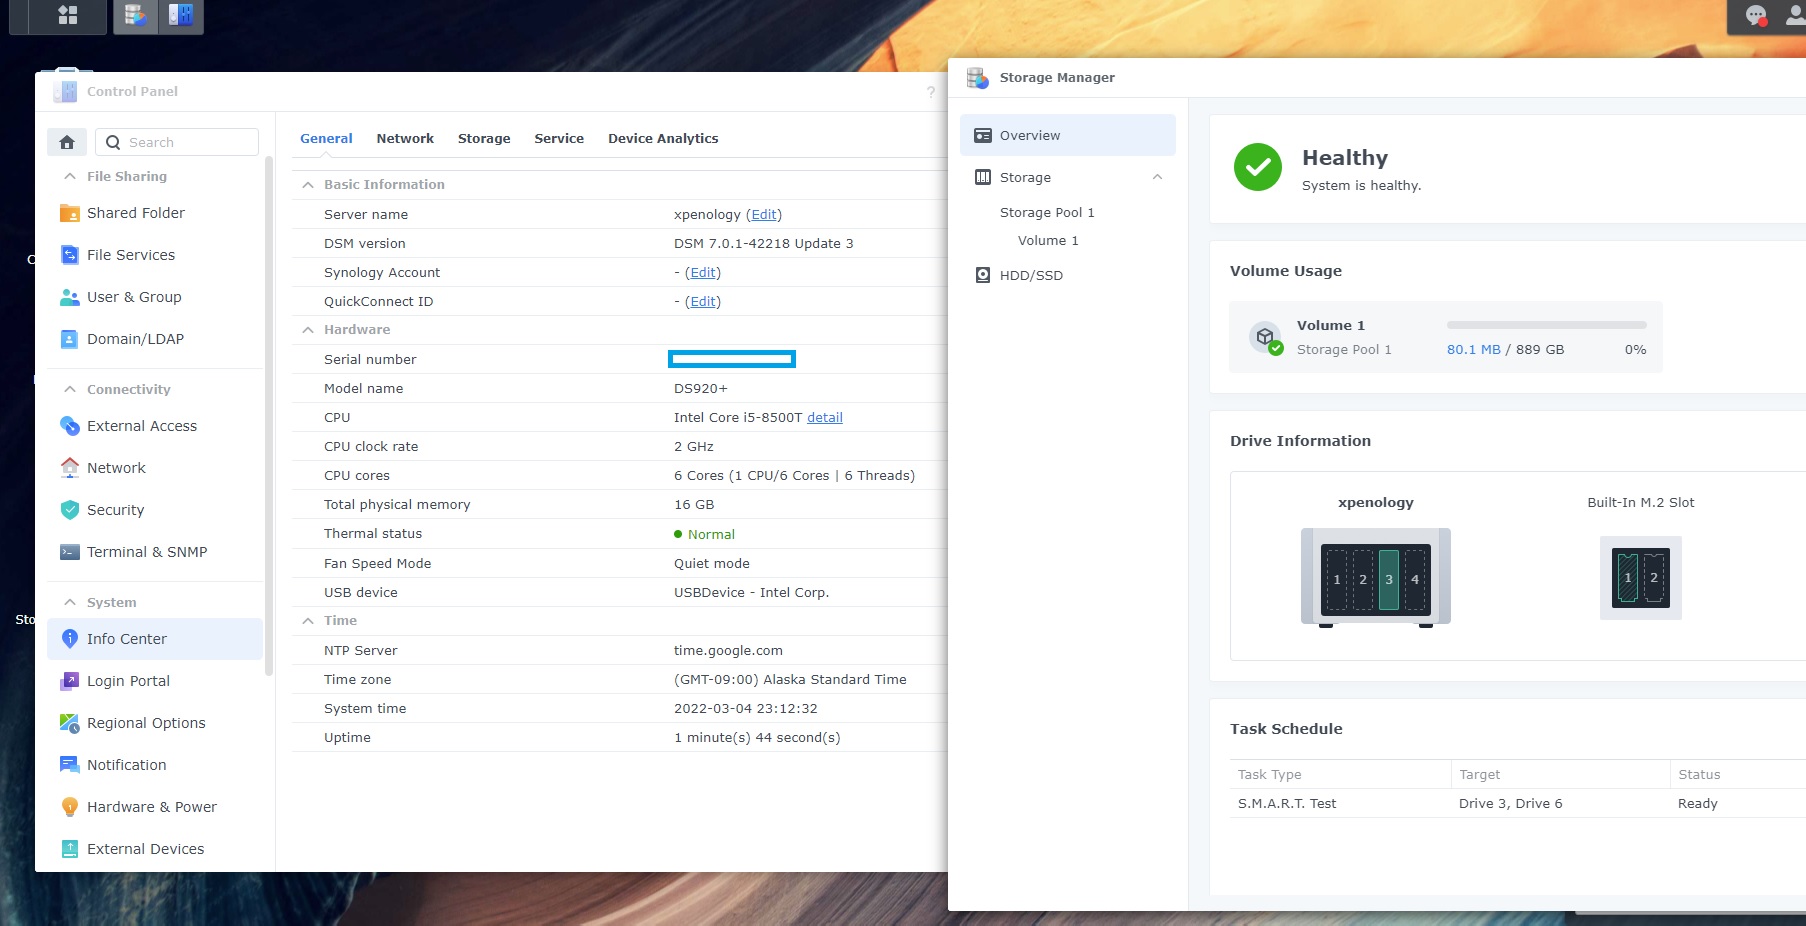
Hi , jumkey DS920+ Finally, Asrock J5040 succeeded in recognizing all hard disks. I was stupid. I should have looked carefully at jumkey's words. cat /sys/block/sataX/device/syno_block_info X=1-4 When I put the value obtained by executing the above command in model_ds920p.dtb, it was recognized properly. The new PortMapping ext(redpill-dtb) seems great. There seems to be no need to worry about SataPortMap and DiskIdxMap anymore.
-
RedPill - the new loader for 6.2.4 - Discussion
dolbycat replied to ThorGroup's topic in Developer Discussion Room
I think it is an address that designates the sata port. Looking at it now, it seems that the ata_port value is different among the model_ds920p.dtb values I have created. jumkey's instruction is required...😅 -
RedPill - the new loader for 6.2.4 - Discussion
dolbycat replied to ThorGroup's topic in Developer Discussion Room
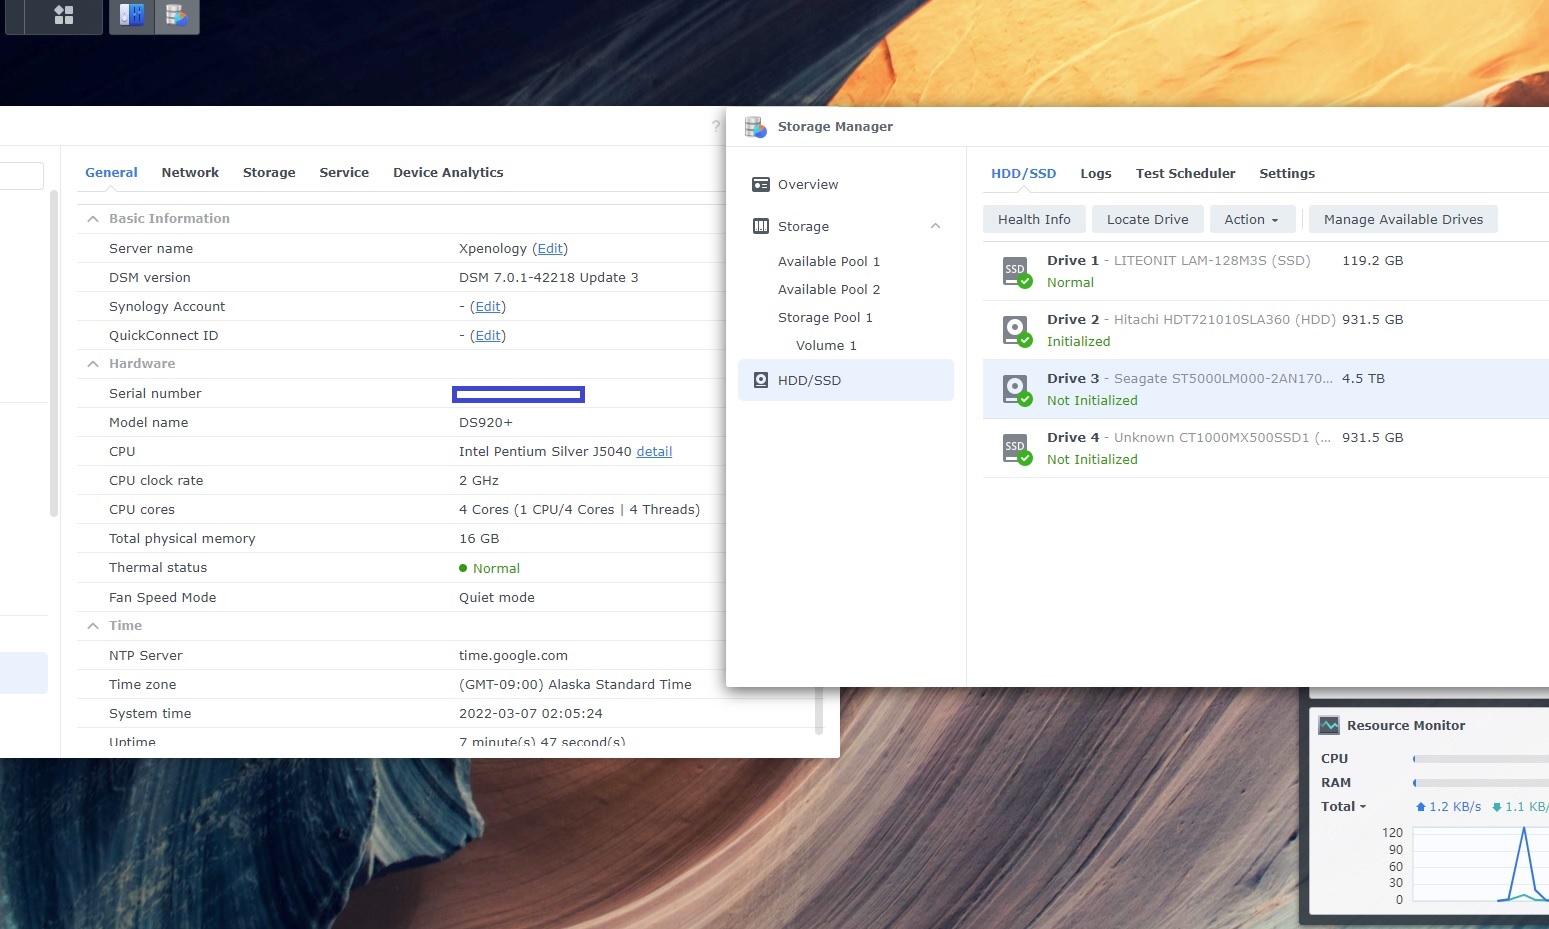
Thank you for your interest. Below are the values given. root@xpenology:~# root@xpenology:~# ls /dev/sata* /dev/sata1 /dev/sata2p1 /dev/sata3p2 /dev/sata4p2 /dev/sata5p3 /dev/sata1p1 /dev/sata2p2 /dev/sata3p3 /dev/sata4p3 /dev/sata1p2 /dev/sata2p3 /dev/sata3p4 /dev/sata5 /dev/sata1p3 /dev/sata3 /dev/sata4 /dev/sata5p1 /dev/sata2 /dev/sata3p1 /dev/sata4p1 /dev/sata5p2 root@xpenology:~# root@xpenology:~# root@xpenology:~# cat /sys/block/sata1/device/syno_block_info pciepath=00:12.0 ata_port_no=0 driver=ahci root@xpenology:~# cat /sys/block/sata2/device/syno_block_info pciepath=00:12.0 ata_port_no=1 driver=ahci root@xpenology:~# cat /sys/block/sata3/device/syno_block_info pciepath=00:13.1,00.0 ata_port_no=0 driver=ahci root@xpenology:~# cat /sys/block/sata4/device/syno_block_info pciepath=00:13.3,00.0 ata_port_no=0 driver=ahci root@xpenology:~# cat /sys/block/sata5/device/syno_block_info pciepath=00:13.3,00.0 ata_port_no=1 driver=ahci root@xpenology:~# cat /sys/block/sata6/device/syno_block_info cat: /sys/block/sata6/device/syno_block_info: No such file or directory root@xpenology:~#
-
RedPill - the new loader for 6.2.4 - Discussion
dolbycat replied to ThorGroup's topic in Developer Discussion Room
Hello. I'm having trouble installing DS920+. Asrock J5040 motherboard has a total of 6 SATA ports with a SATA 2-port expansion card installed. But only 2 ports are recognized. dolbycat@debian:~$ lspci 00:00.0 Host bridge: Intel Corporation Gemini Lake Host Bridge (rev 06) 00:00.1 Signal processing controller: Intel Corporation Celeron/Pentium Silver Processor Dynamic Platform and Thermal Framework Processor Participant (rev 06) 00:02.0 VGA compatible controller: Intel Corporation GeminiLake [UHD Graphics 605] (rev 06) 00:00e.0 Audio device: Intel Corporation Celeron/Pentium Silver Processor High Definition Audio (rev 06) 00:00f.0 Communication controller: Intel Corporation Celeron/Pentium Silver Processor Trusted Execution Engine Interface (rev 06) 00:12.0 SATA controller: Intel Corporation Celeron/Pentium Silver Processor SATA Controller (rev 06) 00:13.0 PCI bridge: Intel Corporation Gemini Lake PCI Express Root Port (rev f6) 00:13.1 PCI bridge: Intel Corporation Gemini Lake PCI Express Root Port (rev f6) 00:13.2 PCI bridge: Intel Corporation Gemini Lake PCI Express Root Port (rev f6) 00:13.3 PCI bridge: Intel Corporation Gemini Lake PCI Express Root Port (rev f6) 00:15.0 USB controller: Intel Corporation Celeron/Pentium Silver Processor USB 3.0 xHCI Controller (rev 06) 00:1f.0 ISA bridge: Intel Corporation Celeron/Pentium Silver Processor LPC Controller (rev 06) 00:1f.1 SMBus: Intel Corporation Celeron/Pentium Silver Processor Gaussian Mixture Model (rev 06) 01:00.0 Ethernet controller: Intel Corporation 82575EB Gigabit Network Connection (rev 02) 01:00.1 Ethernet controller: Intel Corporation 82575EB Gigabit Network Connection (rev 02) 02:00.0 SATA controller: JMicron Technology Corp. JMB58x AHCI SATA controller 03:00.0 Ethernet controller: Realtek Semiconductor Co., Ltd. RTL8111/8168/8411 PCI Express Gigabit Ethernet Controller (rev 15) 04:00.0 SATA controller: ASMedia Technology Inc. ASM1062 Serial ATA Controller (rev 02) Based on the above lspci information, I got the below values. pcie_root = "00:12.0" <- Processor SATA Controller pcie_root = "02:00.0" <- JMB58x AHCI SATA controller pcie_root = "04:00.0" <- ASM1062 Serial ATA Controller But only pcie_root = "00:12.0" seems to be recognized. How can I recognize JMB58x AHCI SATA controller and ASM1062 Serial ATA Controller? * model_ds920p.dtb is as below. /dts-v1/; / { compatible = "Synology"; model = "synology_geminilake_920+"; version = <0x01>; syno_spinup_group = <0x02 0x01 0x01>; syno_spinup_group_delay = <0x0b>; syno_hdd_powerup_seq = "true"; syno_cmos_reg_secure_flash = <0x66>; syno_cmos_reg_secure_boot = <0x68>; DX517 { compatible = "Synology"; model = "synology_dx517"; pmp_slot@1 { libata { EMID = <0x00>; pmp_link = <0x00>; }; }; pmp_slot@2 { libata { EMID = <0x00>; pmp_link = <0x01>; }; }; pmp_slot@3 { libata { EMID = <0x00>; pmp_link = <0x02>; }; }; pmp_slot@4 { libata { EMID = <0x00>; pmp_link = <0x03>; }; }; pmp_slot@5 { libata { EMID = <0x00>; pmp_link = <0x04>; }; }; }; internal_slot@1 { protocol_type = "sata"; power_pin_gpio = <0x14 0x00>; detect_pin_gpio = <0x23 0x01>; led_type = "lp3943"; ahci { pcie_root = "00:12.0"; ata_port = <0x00>; }; led_green { led_name = "syno_led0"; }; led_orange { led_name = "syno_led1"; }; }; internal_slot@2 { protocol_type = "sata"; power_pin_gpio = <0x15 0x00>; detect_pin_gpio = <0x24 0x01>; led_type = "lp3943"; ahci { pcie_root = "00:12.0"; ata_port = <0x01>; }; led_green { led_name = "syno_led2"; }; led_orange { led_name = "syno_led3"; }; }; internal_slot@3 { protocol_type = "sata"; power_pin_gpio = <0x16 0x00>; detect_pin_gpio = <0x25 0x01>; led_type = "lp3943"; ahci { pcie_root = "02:00.0"; ata_port = <0x02>; }; led_green { led_name = "syno_led4"; }; led_orange { led_name = "syno_led5"; }; }; internal_slot@4 { protocol_type = "sata"; power_pin_gpio = <0x17 0x00>; detect_pin_gpio = <0x26 0x01>; led_type = "lp3943"; ahci { pcie_root = "02:00.0"; ata_port = <0x03>; }; led_green { led_name = "syno_led6"; }; led_orange { led_name = "syno_led7"; }; }; internal_slot@5 { protocol_type = "sata"; power_pin_gpio = <0x18 0x00>; detect_pin_gpio = <0x27 0x01>; led_type = "lp3943"; ahci { pcie_root = "04:00.0"; ata_port = <0x04>; }; led_green { led_name = "syno_led8"; }; led_orange { led_name = "syno_led9"; }; }; internal_slot@6 { protocol_type = "sata"; power_pin_gpio = <0x19 0x00>; detect_pin_gpio = <0x28 0x01>; led_type = "lp3943"; ahci { pcie_root = "04:00.0"; ata_port = <0x05>; }; led_green { led_name = "syno_led10"; }; led_orange { led_name = "syno_led11"; }; }; esata_port@1 { ahci { pcie_root = "02:00.0"; ata_port = <0x03>; }; }; usb_slot@1 { vbus { syno_gpio = <0x1d 0x01>; }; usb2 { usb_port = "1-1"; }; usb3 { usb_port = "2-1"; }; }; usb_slot@2 { vbus { syno_gpio = <0x1e 0x01>; }; usb2 { usb_port = "1-2"; }; usb3 { usb_port = "2-2"; }; }; nvme_slot@1 { pcie_root = "00:1d.0"; port_type = "ssdcache"; }; nvme_slot@2 { pcie_root = "00:14.0"; port_type = "ssdcache"; }; }; -
RedPill - the new loader for 6.2.4 - Discussion
dolbycat replied to ThorGroup's topic in Developer Discussion Room
Jumkey's DS920+ First of all, only Realtek LAN is recognized. Intel doesn't work. Additional driver support is not yet available. I've been working on debian11. I downloaded redpill-tool-chain from https://github.com/tossp/redpill-tool-chain and installed it on debian11. sudo apt-get update sudo apt install docker.io sudo apt install jq sudo apt install curl cd /home/dolbycat/redpill-tool-chain-master chmod +x redpill_tool_chain.sh ./redpill_tool_chain.sh add https://github.com/jumkey/redpill-load/raw/develop/redpill-dtb/rpext-index.json ./redpill_tool_chain.sh build geminilake-7.0.1-42218 ./redpill_tool_chain.sh auto geminilake-7.0.1-42218 After working as above, if you go inside the custom folder, there is a "model_ds920p.dtb" file. You need to modify "model_ds920p.dtb". sudo apt install device-tree-compiler dtc -I dtb -O dts -o output.dts model_ds920p.dtb Edit the newly created "output.dts" file with an editor to suit your system. I booted asrock h370 with "tinycore-redpill.v0.4.5" and typed lspci -tnnvq. tc@box:~$ lspci -tnnvq -[0000:00]-+-00.0 Intel Corporation 8th Gen Core Processor Host Bridge/DRAM Registers [8086:3ec2] +-01.0-[01]----00.0 Realtek Semiconductor Co., Ltd. RTL8111/8168/8411 PCI Express Gigabit Ethernet Controller [10ec:8168] +-02.0 Intel Corporation CoffeeLake-S GT2 [UHD Graphics 630] [8086:3e92] +-12.0 Intel Corporation Cannon Lake PCH Thermal Controller [8086:a379] +-14.0 Intel Corporation Cannon Lake PCH USB 3.1 xHCI Host Controller [8086:a36d] +-14.2 Intel Corporation Cannon Lake PCH Shared SRAM [8086:a36f] +-16.0 Intel Corporation Cannon Lake PCH HECI Controller [8086:a360] +-17.0 Intel Corporation Cannon Lake PCH SATA AHCI Controller [8086:a352] +-1c.0-[02]----00.0 Intel Corporation I211 Gigabit Network Connection [8086:1539] +-1c.6-[03]----00.0 Intel Corporation Dual Band Wireless-AC 3168NGW [Stone Peak] [8086:24fb] +-1d.0-[04]----00.0 SK hynix Device [1c5c:1627] +-1f.0 Intel Corporation H370 Chipset LPC/eSPI Controller [8086:a304] +-1f.3 Intel Corporation Cannon Lake PCH cAVS [8086:a348] +-1f.4 Intel Corporation Cannon Lake PCH SMBus Controller [8086:a323] +-1f.5 Intel Corporation Cannon Lake PCH SPI Controller [8086:a324] \-1f.6 Intel Corporation Ethernet Connection (7) I219-V [8086:15bc] tc@box:~$ From the above, you can see that pcie_root = "00:17.0" So, I modified the "output.dts" file as follows. /dts-v1/; / { compatible = "Synology"; model = "synology_geminilake_920+"; version = <0x01>; syno_spinup_group = <0x02 0x01 0x01>; syno_spinup_group_delay = <0x0b>; syno_hdd_powerup_seq = "true"; syno_cmos_reg_secure_flash = <0x66>; syno_cmos_reg_secure_boot = <0x68>; DX517 { compatible = "Synology"; model = "synology_dx517"; pmp_slot@1 { libata { EMID = <0x00>; pmp_link = <0x00>; }; }; pmp_slot@2 { libata { EMID = <0x00>; pmp_link = <0x01>; }; }; pmp_slot@3 { libata { EMID = <0x00>; pmp_link = <0x02>; }; }; pmp_slot@4 { libata { EMID = <0x00>; pmp_link = <0x03>; }; }; pmp_slot@5 { libata { EMID = <0x00>; pmp_link = <0x04>; }; }; }; internal_slot@1 { protocol_type = "sata"; power_pin_gpio = <0x14 0x00>; detect_pin_gpio = <0x23 0x01>; led_type = "lp3943"; ahci { pcie_root = "00:17.0"; ata_port = <0x00>; }; led_green { led_name = "syno_led0"; }; led_orange { led_name = "syno_led1"; }; }; internal_slot@2 { protocol_type = "sata"; power_pin_gpio = <0x15 0x00>; detect_pin_gpio = <0x24 0x01>; led_type = "lp3943"; ahci { pcie_root = "00:17.0"; ata_port = <0x01>; }; led_green { led_name = "syno_led2"; }; led_orange { led_name = "syno_led3"; }; }; internal_slot@3 { protocol_type = "sata"; power_pin_gpio = <0x16 0x00>; detect_pin_gpio = <0x25 0x01>; led_type = "lp3943"; ahci { pcie_root = "00:17.0"; ata_port = <0x02>; }; led_green { led_name = "syno_led4"; }; led_orange { led_name = "syno_led5"; }; }; internal_slot@4 { protocol_type = "sata"; power_pin_gpio = <0x17 0x00>; detect_pin_gpio = <0x26 0x01>; led_type = "lp3943"; ahci { pcie_root = "00:17.0"; ata_port = <0x03>; }; led_green { led_name = "syno_led6"; }; led_orange { led_name = "syno_led7"; }; }; internal_slot@5 { protocol_type = "sata"; power_pin_gpio = <0x18 0x00>; detect_pin_gpio = <0x27 0x01>; led_type = "lp3943"; ahci { pcie_root = "00:17.0"; ata_port = <0x04>; }; led_green { led_name = "syno_led8"; }; led_orange { led_name = "syno_led9"; }; }; internal_slot@6 { protocol_type = "sata"; power_pin_gpio = <0x19 0x00>; detect_pin_gpio = <0x28 0x01>; led_type = "lp3943"; ahci { pcie_root = "00:17.0"; ata_port = <0x05>; }; led_green { led_name = "syno_led10"; }; led_orange { led_name = "syno_led11"; }; }; esata_port@1 { ahci { pcie_root = "00:13.0,00.0"; ata_port = <0x03>; }; }; usb_slot@1 { vbus { syno_gpio = <0x1d 0x01>; }; usb2 { usb_port = "1-1"; }; usb3 { usb_port = "2-1"; }; }; usb_slot@2 { vbus { syno_gpio = <0x1e 0x01>; }; usb2 { usb_port = "1-2"; }; usb3 { usb_port = "2-2"; }; }; nvme_slot@1 { pcie_root = "00:1d.0"; port_type = "ssdcache"; }; nvme_slot@2 { pcie_root = "00:14.0"; port_type = "ssdcache"; }; }; My asrock h370 motherboard has 6 sata ports. So I made the "internal_slot" to six. Create "model_ds920p.dtb" using the "output.dts" file. dtc -I dts -O dtb -o model_ds920p.dtb output.dts You need to overwrite the created "model_ds920p.dtb" file to the original location. Finally, run the below: ./redpill_tool_chain.sh auto geminilake-7.0.1-42218 I'm a beginner, so there may be some mistakes. I would be grateful if the seniors could improve it. -
RedPill - the new loader for 6.2.4 - Discussion
dolbycat replied to ThorGroup's topic in Developer Discussion Room
First of all, only Realtek LAN is recognized. Intel doesn't work. Additional driver support is not yet available. -
RedPill - the new loader for 6.2.4 - Discussion
dolbycat replied to ThorGroup's topic in Developer Discussion Room
Hi~ jumkey Success thanks to jumkey's advice. Also, tossp's redpill-tool-chain was very helpful. I had a hard time understanding the ds920p.dtb file. I haven't fully understood it yet, and I'm not sure if the way I did it is correct, but I succeeded with DS920+ on i5-8500t and asrock h370 motherboards. Thank you very much.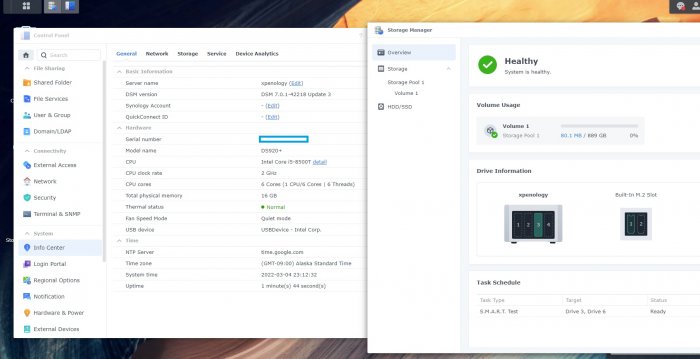
-
RedPill - the new loader for 6.2.4 - Discussion
dolbycat replied to ThorGroup's topic in Developer Discussion Room
https://github.com/tossp/redpill-tool-chain -
RedPill - the new loader for 6.2.4 - Discussion
dolbycat replied to ThorGroup's topic in Developer Discussion Room
That's good info. -
RedPill - the new loader for 6.2.4 - Discussion
dolbycat replied to ThorGroup's topic in Developer Discussion Room
I don't know how to create a dtb file. because I'm a beginner
-
RedPill - the new loader for 6.2.4 - Discussion
dolbycat replied to ThorGroup's topic in Developer Discussion Room
1) https://github.com/tossp/redpill-tool-chain 2) geminilake_user_config.json { "extra_cmdline": { "pid": "XXXXXX", "vid": "XXXXXX", "sn": "XXXXXXXXXXX", "mac1": "XXXXXXXXXXXX", "DiskIdxMap": "000402", "SataPortMap": "222", "SasIdxMap": "0" }, "synoinfo": { "internalportcfg" : "0xffff", "maxdisks" : "16" }, "ramdisk_copy": {} }