berwhale
-
Posts
183 -
Joined
-
Last visited
Recent Profile Visitors
1,479 profile views


berwhale's Achievements
Advanced Member (4/7)
1
Reputation
-
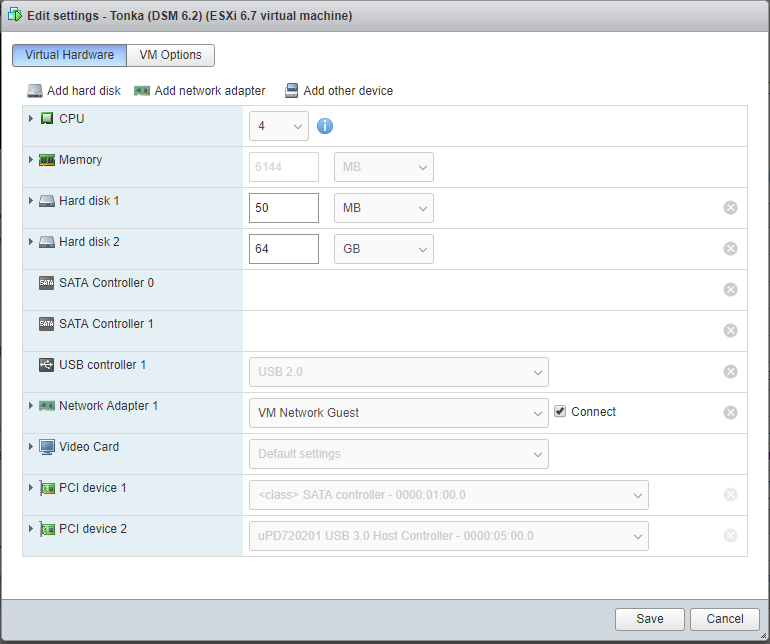
What does your VM settings look like? Here's mine with a 4 port SATA adapter and a USB controller passed through... Note: Hard disk 2 is a vmdk on my main data store which is an SSD, I did this so that Plex metadata is on the fastest available drive.
-
I wouldn't worry about it too much, ESXi will manage CPU resources across all your VMs and CPU cores. 'over allocating' vCPUs to a little used VM is unlikely to impact your main systems as by definition, it's not doing much. I allocate 4 vCPU for my main server with Plex and 2 vCPUs for the other DSM instances (downloader, surveillance, test) - this is on a Dell T20 (3.4Ghz quad core Xeon) with 24GB RAM.
-
Hi Jokerigno, It's quite easy to convert from bare metal (Physical) to Virtual (P2V) without loosing any data. DSM and it's configuration is stored on your data disks, so all you need to do is virtualize the bootloader (Xpenology) - i.e. replace the USB key with a Vmdk attached to a virtual machine. You then attach your existing disks to the virtual machine and it will retain all of your configuration and data. If you match the bootloader versions on both physical and virtual machines, then you should avoid any DSM upgrade during the P2V. When trying this for the 1st time, I was in the fortunate position of having several old PCs and disks lying around, so I was able to create a new bare metal server and P2V that to the T20 before attempting this with my main server (with a fully loaded 4x3TB SHR array). If you have access to some spare kit, I would encourage you to do the same. On vSphere/ESXi, there are two ways to present your existing disks to the virtual machine: 1. DirectPath IO - Install a PCI-e SATA adaptor in the T20, connect your existing disks to the adaptor and pass the adaptor through to the new VM. DSM will see all of the disks natively and will have access to SMART data. This is the route I went down when P2Ving my server several years ago. There are some downsides to this route that affect your ability to manage the VM (e.g. All the RAM you configure for the VM is dedicated to the VM and can't be shared with other VMs, you can't take snapshots for the VM for backup purposes) In practice, these limitations have not been a problem for me. I think this is the PCI-e card i'm using: https://www.amazon.co.uk/gp/product/B00AZ9T3OU?psc=1&redirect=true&ref_=oh_aui_detailpage_o00_s00 (I seem to recall that the Marvell chipset was important for DSM support at the time I bought it) 2. Raw Device Mapping (RDM) - Disks can be attached to the VM individually as RDMs, this involves creating links to the physical disks on the ESXi command line, then attaching these links to the VM as disks. This configuration will give you a bit more flexibility from a ESXi perspective, but you do loose visibility of SMART data in DSM. My own T20 (24GB RAM) is currently running 5 instances of DSM, with a mixture of both approaches above: e.g. Main file server has PCI-e adapter passed through with several disks attached. Surveillance server has a single 2TB surveillance drive (WD Purple) attached as RDM. Here's my own notes on how to pass through a drive via RDM... Via SSH: List Disks: ls -l /vmfs/devices/disks Identify 2TB Surveillance Disk: t10.ATA_____WDC_WD20PURX2D64P6ZY0_________________________WD2DWCC4M3XP0D4A Create RDM mapping: vmkfstools -z /vmfs/devices/disks/t10.ATA_____WDC_WD20PURX2D64P6ZY0_________________________WD2DWCC4M3XP0D4A "/vmfs/volumes/Samsung_250GB_SSD/RDM/WD_2TB_RDM_1.vmdk" Note: 'Samsung_250GB_SSD' is my primary vSphere data store, so this is where I create the RDMs. Add 'Existing Disk' to VM: Set RdmFilter.HbalsShared to TRUE in Advanced Configuration Assign to SATA adapter 1 Set Disk Compatibility to 'Virtual' Set Disk Mode to 'Independent - persistent' More here: https://gist.github.com/Hengjie/1520114890bebe8f805d337af4b3a064 I hope this is some help and good luck Regards, Berwhale.
-
- Outcome of the update: SUCCESSFUL - DSM version prior update: DSM 6.2-23739 - Loader version and model: Jun's Loader v1.03b - DS3615xs - Using custom extra.lzma: NO - Installation type: VM - ESXi 6.7 on Dell T20 - Additional comments: Switch VMNIC to Intel1000e (was Vmxnet3)
-
Yes and Yes (as long as the disks are passed through or accessed as RDMs) Several years ago, I migrated a set of disks attached to baremetal Xpenology install to DSM VM hosted on ESXi. I have the disks attach to a dedicated SATA adapter and this is passed through to the DSM VM,. DSM has complete control of the disks (they're not visible in ESXi). I've also tested going back the other way. You need a motherboard and CPU that supports DirectPathIO to pull this trick off. I believe it's also possible by passing the disks through as Raw Device Mappings (RDM), I do have a disk passed through to another DSM VM this way, but I haven't tested it's portability.
-
What's the reason to attach 2 drives rather than one bigger one? Are they on different data stores?
-
What type of drives are attached to SATA 1? What is the Compatibility and Disk Mode set to? Does the install work if you just attach one of the drives?
-
Your 1st drive, Synoboot.vmdk, should be attached to SATA 0. If you attach it to SATA 1, DSM will try to wipe it during install.
-
The USB drive is just a bootloader, so just recreate it with the correct version of Xpenology. DSM and it's config is stored across all the HDDs in your array.
-
I tried changing various off-load settings on the Realtek NIC on my motherboard. I got some small improvements and increased throughput up to 49MB/Sec, but it's still nowhere near it should be. I've ordered a Dell Broadcom server NIC to see if that helps.
-
I tried the settings suggested for smb.conf in this promissing guide: https://turlucode.com/synology-optimizing-samba-2/ Transfers are still running at ~40MB/sec *hint*: both etc/smb.conf and etc.defaults/smb.conf are editable using the Config File Editor package if you don't fancy using vi. *edit* It's my PC. I tested from another Windows 10 PC (with a much lower spec) and I get 100-110MB/sec.
-
Tried SMB2, SMB2 + Large MTU and SMB3 - it makes no difference (SMB1 doesn't appear to work with SMB1).
-
Hi, did you ever find out what the problem was? I seem to have a similar problem. I know it's not a network issue, I can run IPERF and consistently transfer over 100MB/sec both ways.
-
Interesting, I'll play with the NIC settings. I get the same speeds with larger files. It's always the same speed, it doesn't start fast and then degrade. I've ordered a 2nd hand HP Smart Array P410 and a couple of SFF-8087 to SATA cables from eBay, i'm hoping that's going to help.
-
I did a bit more testing... Copy 1.2GB MKV from main 'production' DSM VM to workstation = 45MB/Sec (Data is hosted on HDDs connected via Marvell SATA adapter which is passed through with DirectPathIO Copy 1.2GB MKV from 'test' DSM VM to workstation = 80MB/Sec (Data hosted on SSD data store) Both DSM VMs are at the same version and are hosted on the same vSwitch. So maybe there is an issue with DirectPathIO on the cheap Marvell adapter that I'm using? I wonder if it's worth swapping it out for a cheap SAS HBA off eBay...