

asheenlevrai
-
Posts
211 -
Joined
-
Last visited
-
Days Won
3
Posts posted by asheenlevrai
-
-
On 12/27/2023 at 4:30 PM, asheenlevrai said:
Do you have any advice about how I could solve this problem?
I meant that as a question. I can no longer edit the OP, though.
-
Hello,
I have this rig (see specs below) and now I received a warning message about filesystem error(s) on Volume1.
Storage Manager tells me to run a file system check. However this fails every time (after ~1 minute) with this error message:
The system could not complete the file system check on Volume 1 because errors occurred.
You can check Log Center for more information and try again later.
If this issue persists, please contact Synology Technical Support.
The Log Center lists the following:
- System ran [ext4 filesystem check & repairing] on [Volume 1]. Exit code: [4]
I also get the following logs:
- File system error was found on volume [1].
- [ext4 filesystem check & repairing] completed. System reactivated [Volume 1] and related services.
Do you have any advice about how I could solve this problem.
Currently, files on Volume1 seem to be available normally.
PC specs:
- Gigabyte GA-z87-hd3 (BIOS version: F8)
- i7 4770s
- 4x2GB DDR3 1333
- 9x 12TB Seagate Ironwolf (6x on MB, 3x on PCIe AIC) : Setup as RAID5 on 8 disks +1 hot spare
- 5ports sATA3 PCIe3.0 x4 AIC
- 550W PSU
- DSM 7.1-42661 update 1 (Model "DS918+")
-
I also believe that it would make a whole lot of sense if ARPL and TCRP merged at some point (or if all devs would collaborate on a common solution), but I guess @pocopico answered this in post #20. Even though I don't see the logic behind it, it's definitely the dev's choice to do what they feel is the best (for them).
-
 2
2
-
-
21 hours ago, ed_co said:
Could you be more explicit? What exactly stopped working? Did happened in all the 7.x versions or just from an specific subversion?
I believe what he meant is that not all apps that used to work in DSM6 will work in DSM7.
Some of them reached EOL and others were replaced.
I don't have a list (probably Synology published one at some point), but I know that, for instance, there was a Dokuwiki package available in DSM6 Package Center and they stopped offering the package in DSM7 (You need to install DW manually on your Synology NAS since DSM7 if you want it).
AFAIR there was also some major changes for Synology Photo and related apps.
Best,
-a-
-
2
-
-
On 5/23/2022 at 8:47 AM, flyride said:
Loader Information and Background
RedPill is the core technology that enables DSM 7.x to run on non-Synology hardware. This post is intended to serve as a definitive tutorial/reference for configuring @pocopico's TinyCore RedPill (TCRP) loader. It explains how to install TCRP on baremetal, i.e. with DSM as the only operating system on your NAS hardware. A tutorial to install TCRP using the ESXi hypervisor is located here. There are other hypervisor tutorials in the Tutorials and Guides forum.
TCRP uses a two step-process. First, a Linux OS (TinyCore) boots and evaluates the NAS hardware configuration. Therefore, it is best to have the hardware you plan to use (disk controllers and network cards in particular) installed prior to starting the TCRP setup.
Then, an individualized loader (RedPill) is created. This loader is used to install and run DSM. After that, you can switch between starting DSM with RedPill, and booting back into TinyCore to adjust and rebuild the loader as needed.
Basic Linux command line skills are needed to complete the installation. The tutorial provides examples of the commands that are needed, but exact syntax and capitalization are critical. If unfamiliar, research and review the following minimal list of commands:
ls show the files in the current directory
cat <file> show the contents of the specified file
pwd show the current directory name
cd <directory path> change to the specified directory (same rules as Windows, except with forward slashes instead of backslashes). With no argument, it returns to the “home” TCRP directory
vi <file> a file editor, for manual editing of configuration files if requiredOngoing Development
This tutorial is maintained for consistency with the pocopico stable repository. Since TCRP is completely open-sourced, anyone can fork their own repo and contribute to development, and pocopico now maintains a separate development repo. As the best features and ideas are fully vetted and tested, they may be incorporated into the stable repo over time.
If you use a repo, script or shell other than the pocopico stable repo, the loader may behave quite differently and the instructions and troubleshooting steps in this tutorial might no longer apply. In an open-source community, you can use any development resource you want, but you add the additional responsibility of understanding, vetting and testing that code on your system.
Migration
DSM 6.x (with Jun’s loader) can be migrated to DSM 7.x using TCRP.
Do not attempt to upgrade from 6.x to 7.x using the Control Panel.
Complete the following tasks prior to migration:
- Read through this reference thoroughly
- Remove the 6.x loader USB and array disks (making sure to mark their order)
-
Build a TCRP loader on a new USB to practice and confirm the build process
(with all the same NAS hardware that will be used for the upgrade) - Trial install DSM 7.x to a test HDD/SDD
- Verify DSM is working perfectly with all the NAS hardware
- Remove the test USB and HDD/SDD, and restore the 6.x loader USB and array disks
- VERIFY BACKUP of all data saved elsewhere before attempting an in-place upgrade
The actual migration process is simple:
- Remove any existing SSD cache configuration (strongly recommended)
- Shut down the NAS
- Replace the existing 6.x USB loader with the TCRP 7.x USB loader from the process above
- Boot the NAS and complete the DSM Migration when prompted
- Restore SSD cache configuration as desired
NOTE: Depending on which DSM version was previously installed, the migration process may override the manual option for DSM updates and set it to automatic. Restore the manual option from Control Panel as soon as possible - it might be necessary to shutdown the Internet connection until that is complete.
Step 1. Choose a DSM Platform/Architecture
Evaluate your intended NAS hardware and your the intended use of DSM, and select a platform that best meets your needs. Reference information here: https://xpenology.com/forum/topic/61634-dsm-7x-loaders-and-platforms/
Write down the selected platform (e.g. DS918+), the corresponding architecture (e.g. apollolake) and whether the platform uses SataPortMap/DiskIdxMap or Device Tree for slot mapping. This information will be needed later.
Now, make sure the NAS hardware is compatible, and prepare it correctly:
-
x86-64-compatible CPU with two cores or more
- Each platform have maximum threads support! Any threads in excess will be ignored
-
For certain platforms, Intel CPUs must be 4th generation “Haswell” or newer with FMA3 instruction set
The corresponding AMD CPU architecture is “Piledriver” or newer - AMD-based systems may require deactivation of the C1E option in the BIOS
- 2GB of RAM or more
-
2GB or larger USB flash drive
- Configure the BIOS to boot from the USB flash drive ONLY
-
SATA disk controllers are preferred, but SCSI/SAS are compatible
- IMPORTANT: All SATA controllers must be configured to AHCI mode
- SATA controllers with port multipliers are not compatible
- ATA controllers are not compatible (disable embedded ATA in BIOS if possible)
-
At least one SATA/SCSI/SAS drive (HDD or SSD), minimum size 21GB
- IMPORTANT: Enable SATA port hotplug on each disk port, if hotplug is supported by the BIOS/controller
- IMPORTANT: Disable M.2 SATA ports that are not in use, if supported by the BIOS/controller
- NVMe drives are not usable except as dedicated cache devices
- Host Bus Adapters are not currently compatible with Device Tree platforms
-
Install any NVMe drives intended as cache devices
- On Device Tree platforms, NVMe drives must be installed prior to loader installation in order for them to be recognized
Step 2. Download TCRP and Write Image to the USB Flash Drive
The latest pocopico stable loader code is always linked here: https://xpenology.com/forum/topic/7848-links-to-loaders/
Download the tinycore-redpill 7.x loader and save it to your personal computer. Then, open it with a zip manager to show the boot images:
tinycore-redpill.vX.X.X.img.gz (for BIOS/CSM/Legacy boot from USB flash drive)
tinycore-redpill-uefi.vX.X.X.img.gz (for UEFI/EFI boot from USB flash drive)
tinycore-redpill.vX.X.X.vmdk.gz (for virtual machine SATABOOT from disk image)Select the boot image that matches the boot capability of the NAS motherboard. If unsure, choose BIOS/CSM/Legacy boot. Save the gzip file to your personal computer, then open it with a zip archive manager and save the uncompressed version.
Write the uncompressed image to the USB flash drive using Win32DiskImager or other appropriate tool.
The USB flash drive is used to store TinyCore and the RedPill loader that it generates. It is a permanent component of an operational XPEnology system. Do not remove it, even after the DSM installation is complete and the NAS is fully up and running.Step 3. Boot into TinyCore and Complete Pre-Configuration Updates
Start your NAS with the USB flash drive installed and TinyCore will boot. Then, launch a command-line session with either of these methods:
-
Click the Terminal icon at the bottom right of the TinyCore desktop to launch a console window

-
Use a ssh client (e.g. PuTTY) on your computer to connect a network-based console
- Consult your DHCP server/router for the IP address assignment (TinyCore's host name is "box")
- Login credentials: tc/P@ssw0rd
When the Linux command line prompt ($) is displayed, update the TCRP script
./rploader.sh update
Checking Internet Access -> OK
Checking if a newer version exists -> There is a newer version on the repo should we use that ? [yY/nN] Y
OK, updating, please re-run after updating
Updating tinycore loader with latest updates
Backing up files to /mnt/sda3//mydata.tgz
Then, update the TCRP support files
./rploader.sh fullupgrade
<downloads snipped>
Current /home/tc size is 114M , try to keep it less than 1GB as it might not fit into your image
Should i update the sda with your current files [Yy/Nn] Y
Backing up home files to sda : Backing up files to /mnt/sda3//mydata.tgz
Finally, choose a DSM release number
Each DSM build as provided by Synology has a release number. You can display the combinations of platforms and releases supported by TCRP by just running the script with no arguments
./rploader.sh
<command help snipped>
Available platform versions:
----------------------------------------------------------------------------------------
apollolake-7.0-41890
apollolake-7.0.1-42218
apollolake-7.1.0-42661
broadwell-7.0.1-42218
broadwell-7.1.0-42661
broadwellnk-7.0.1-42218
broadwellnk-7.1.0-42661
bromolow-7.0.1-42218
bromolow-7.1.0-42661
denverton-7.0.1-42218
denverton-7.1.0-42661
geminilake-7.0.1-42218
geminilake-7.1.0-42661
v1000-7.0.1-42218
v1000-7.1.0-42661
Step 4. Configure System-Specific Parameters
Custom system parameters are stored in the user_config.json file. This can be manually edited, or TCRP can help determine appropriate values for the hardware.
-
USB flash drive VID/PID: TCRP can query the USB flash drive for the hardware vid/pid values that DSM uses to identify the loader during bootup
./rploader.sh identifyusb Found: Superdisk Flash SerialNumber: 123456 Vendor ID: 0x1234 Product ID: 0x0001 Should i update the user_config.json with these values ? [Yy/Nn] Y -
Serial number/MAC: TCRP can automatically generate a serial number for the platform selected in step 1. Additionally, it will generate a random MAC address for the NAS network card. If you prefer to use the actual hardware MAC address instead, append "realmac" to the command.
Example 1: random MAC address./rploader.sh serialgen DS3622xs+ Serial Number for Model : 20C0SQRLR47QM Mac Address for Model DS3622xs+ : 00:11:32:80:B2:36 Should i update the user_config.json with these values ? [Yy/Nn] Y
Example 2: real MAC address./rploader.sh serialgen DS3622xs+ realmac Serial Number for Model : 2150SQRGS7N5T Mac Address for Model DS3622xs+ : 00:11:32:57:3A:9B Real Mac Address : 00:0C:24:62:3E:3D Notice : realmac option is requested, real mac will be used Should i update the user_config.json with these values ? [Yy/Nn] Y -
Drive Slot Mapping: TCRP can try to determine how to map the NAS disk controller ports to DSM slots. If the chosen platform uses SataPortMap/DiskIdxMap for port mapping, the command below will do this. If it uses Device Tree for slot mapping, the command may be skipped, as the Device Tree is configured automatically during the loader build.
./rploader.sh satamap
Found "02:02.0 SATA AHCI controller"
Detected 4 ports/2 drives. Override # of ports or ENTER to accept: <4>

Recommended settings:
SataPortMap=4
DiskIdxMap=00

Should I update the user_config with these values ? [Yy/Nn] Y
If the port count is not what you expect, it may be due to the motherboard design servicing physical ports with multiple controllers, or because of M.2 SATA slot support. If necessary, the port count can be overridden with whatever you like. NOTE: If you see a WARNING message, it is certain that either some of your drives are inaccessible or the DSM install will encounter problems. Evaluate and investigate the issue. The satamap command can be rerun as many times as needed to understand the system.
-
Manual Review: With prior loaders (such as Jun's), the configuration of these parameters was completely manual. There is no single setup that works for all hardware. Even after using the tools above, please review and verify the parameters, understand what they do, and manually edit if needed.
Whatever changes rploader.sh makes to the user_config.json file can be reviewed by displaying the file contentscat user_config.json
and overridden by editing the filevi user_config.json
You can also add a simpler editor, nanotce-load -iw nano nano user_config.json
And there is also a graphical editor accessible from the TinyCore desktop
Step 5. Optional: Manually Add Driver Extensions
While TCRP can automatically add drivers based on the detected NAS hardware, it isn’t foolproof. You might want to build a loader for a device you don’t actually have yet. And there are features that are "opt-in" only. So, a process exists to manually add drivers and other functionality. Extensions are stored in repositories hosted on the web. All the extensions in the main repository are viewable here: https://github.com/pocopico/rp-ext
To list all the extensions recommended by TCRP's hardware detection algorithm, use
./rploader.sh listmods <architecture>-<version>-<DSMreleasenumber>./rploader.sh listmods apollolake-7.1.0-42661
To add a specific extension, choose from the list and reference the architecture from Step 1.
./rploader.sh ext <architecture>-<version>-<DSMreleasenumber> <extensionurl>./rploader.sh ext apollolake-7.1.0-42661 add https://raw.githubusercontent.com/pocopico/rp-ext/master/redpill-acpid/rpext-index.json ./rploader.sh ext denverton-7.1.0-42661 add https://raw.githubusercontent.com/pocopico/rp-ext/master/v9fs/rpext-index.jsonThe examples illustrate adding ACPI and VIRTIO support. These are often chosen enhancements to a basic installation.
Step 6. Build the Loader
When all preparation steps are complete, build the loader using the command structure
./rploader.sh build <architecture>-<version>-<DSMreleasenumber>
Example #1: DS3622xs+, auto detect hardware./rploader.sh build broadwellnk-7.1.0-42661
Example #2: DS918+, use preselected drivers./rploader.sh build apollolake-7.1.0-42661 manualTCRP will download resources from the Internet to complete the complex process of the loader build. When finished, it will write it to the USB flash drive and add new items to the GRUB boot menu. Review the output for any errors and make corrections if necessary.
Step 7. Optional Backup TasksSave the TinyCore configuration state as the default, so that the next boot of TInyCore starts with all your settings
./rploader.sh backupBack up the generated RedPill loader partition to available space on the USB flash drive
./rploader.sh backuploaderStep 8: Restart and Boot DSM Using the Grub USB Option
Cleanly shutdown and reboot with the TinyCore command
exitcheck.sh rebootFirst, the GRUB Menu is displayed. If necessary, use the arrow keys to ensure that USB is selected and press ENTER.

The loader will show some initialization information and silently boot DSM. Nothing else will be displayed unless a serial console is attached (see the Troubleshooting section below). Wait a few minutes, then launch either https://find.synology.com or the Synology Assistant desktop utility. If the loader is working properly, a new "SynologyNAS" will be displayed as Not installed (for a new build) or the name of your existing Migratable NAS (if upgrading from a previous version).

Use your browser to connect to the NAS.
If "Something went wrong" is displayed, jump to the Basic Troubleshooting section below.
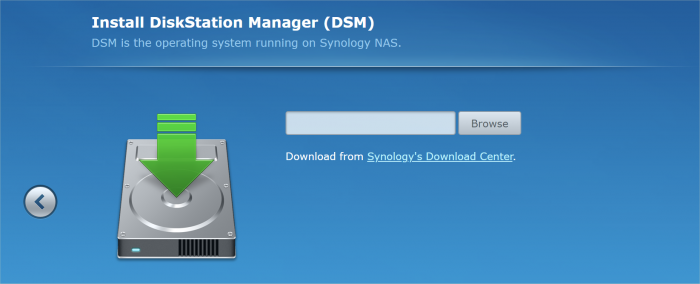
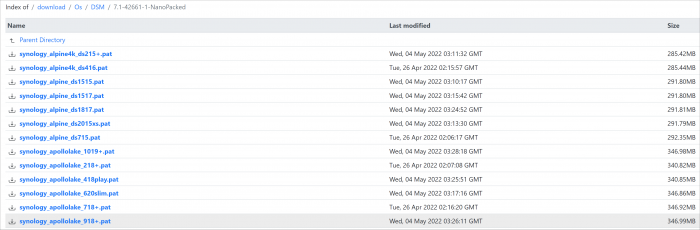
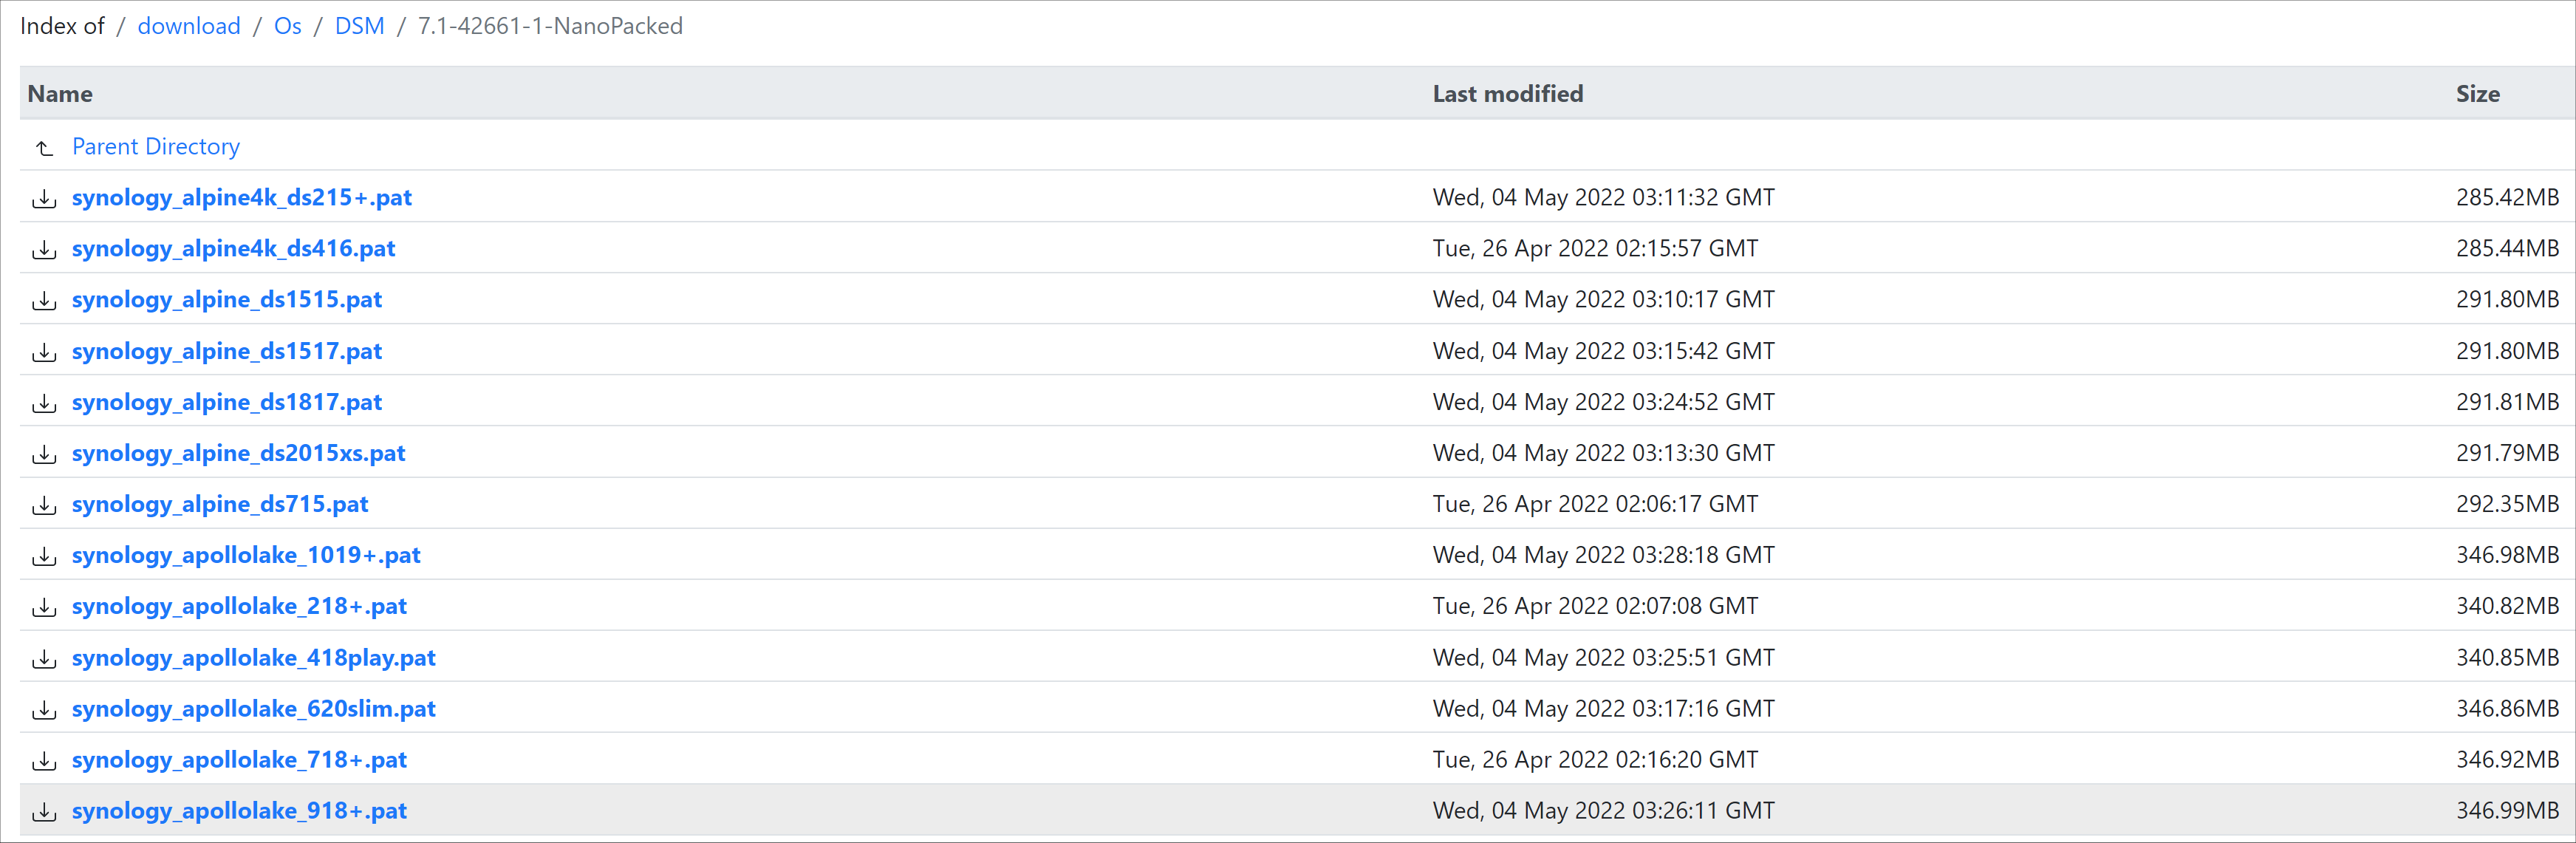
Otherwise, browse to the Synology Download Center and download the DSM install PAT file that matches the platform and release number specified in the loader build. Do not use the PAT file stored in TinyCore. It has modifications that are incompatible with DSM installation. However, its name may help identify the correct PAT file to download below.
There can be several files that appear to be candidates. PAT files marked VirtualDSM will not work. Also there can be patch PAT files with the same numbering. These will not work and will usually be smaller than 50MB. The correct PAT file is 300MB or larger.
Once the correct DSM PAT file is saved to your personal computer, upload it to the NAS. Follow the prompts to complete the installation.
FOR UPGRADES ONLY: If Synology Assistant shows Not installed, or if prompted to erase the disks during the upgrade, STOP! Some or all of your array disks are not visible to DSM. This must be resolved via troubleshooting and reconfiguration before installing DSM 7.x.
IMPORTANT: During the install, always select DSM manual updates. If a new install completes normally, but then fails after the reboot, it may be that DSM has attempted to auto-update itself with incompatible code.

Basic Troubleshooting
Typical Problems:
-
If the DSM installation reports something went wrong/SATA ports disabled, or if WARNING: Bad port is returned by the TCRP configuration tools, there are three primary causes:
- hotplug not enabled for all ports on controllers that support hotplug
- ports supported by the chipset but omitted from the motherboard physical implementation
- M.2 SATA-capable ports that have no hotplug option enabled
-
Consider these workarounds/solutions:
- enable hotplug on all ports
- install SATA drives on all ports (including M.2 SATA ports)
- disable M.2 SATA ports in the BIOS (if the option exists)
-
reduce SataPortMap port count to exclude unimplemented or M.2 SATA ports
(this only works IF they are not the first ports on the controller) - install a different SATA controller and disable the onboard one
- virtualize the DSM installation, possibly in concert with one of the above options
- change the DSM platform to one that uses Device Tree (which can address only the good ports, leaving out the bad)
-
choose another motherboard which does not exhibit the causal issues
A loader or SATA controller configuration that disables valid ports in order to install DSM can be updated to enable those ports once the DSM installation is complete.
-
If the DSM installation reports that no drives are available, use the serial or TCRP console described below to help investigate the problem
- If unable to locate the new SynologyNAS using Synology Assistant, either the loader has kernel panicked, or the network is not functioning (usually because of a missing or incompatible network driver, or no accessible DHCP server). The only way to verify the specific cause is to use a serial console.
Using the Serial Console for Troubleshooting
This involves configuring a physical serial port from the NAS hardware to your personal computer and using a terminal emulation program for access. The serial console is also mirrored to a special TCRP network console. If the network is functioning (i.e. you can see the IP in Synology Assistant), it can be accessed via a browser at https://<DSM IP>:7681
If DSM has not been installed, "SynologyNAS login:" will be displayed. If DSM has been installed but cannot start, "DiskStation login:" will be displayed. This is Junior mode. You can log in with root (you won't be prompted for a password).
If desired, the reason that Junior mode was started can be displayed with
cat /var/log/junior_modeDisk port shutdown errors and missing disks are usually a SataPortMap/DiskIdxMap/Device Tree problem, but can be a driver issue if using SCSI or SAS host bus adapters. If SATA disks are missing, investigate DSM’s view of SataPortMap/DiskIdxMap and some other user_config.json parameters by typing
cat /proc/cmdlineIf the loader device "/dev/synoboot" is not returned by the following command, the identifyusb step of the install may have been skipped
ls /dev/synobootInspect DSM's view of the accessible disk devices with
ls –la /sys/blockIf using a Device Tree platform, display the contents of the device tree with
dtc –I dtb -O dts /var/run/model.dtbWhere to Post for Help
It’s easy for requests for installation help to get lost in various unrelated forum threads. Post requests for help as a new topic in the DSM Installation Forum.
At a minimum, state the hardware configuration, selected platform, DSM version, user_config.json information (delete or redact the serial number and configured MAC address) and any information from debugging analysis that you have done.
DON’T post general requests for help on this thread.
Please DON’T post general requests for help on TCRP or RedPill development threads unless providing feedback on a dev issue.
2022-Jun-03 added disabled SATA port troubleshooting, removed some satamap complex description
2022-May-31 added restoresession argument
Hey
")
What is the current status about hibernation?
supported? broken?
Thanks
-
On 12/13/2022 at 8:17 PM, Sak1s said:
hello everyone,
try the following :
Connect with ssh as root and force a symlink
i use DSM 7.1.1-42962 Update 2 and disk hibernation works
Hello @Sak1s
Is this trick "universal"?
I need to enable hibernation on the following rig:
- DS3622xs+, TCRP 0.9.3 with friend, DSM7.1.0-42661 (I'd like to upgrade DSM7.1.1-42962 if that's possible, still looking into it)
- bare metal
- Asus MB with Z77 chipset
- i7-3770 (Ivy Bridge)
Does hibernation only spin down the disks or can it also stop the fans? (case fans, CPU fan, ...)
Thanks
-a-
-
Any way I could mark this thread as [solved]?
-
12 hours ago, rojoone2 said:
(...) Make sure you are using the right image file for your boot setting.
Thanks a lot @rojoone2! 🙏
For some reason the PC was booting in legacy mode instead of UEFI.
Changing this setting in BIOS fixed the problem
-
21 minutes ago, asheenlevrai said:
oh.... My CPU is not Haswell (4th gen). It's 3rd gen. I should chose DS3622xs+ instead of DS918+
🤦♂️
nope... same issue when using DS3622xs+
-
14 hours ago, asheenlevrai said:
Thanks a lot 🙏
Sorry for not having provided the necessary information.
(I haven't solved this yet)
Do you know what can cause this type of error message?
The specs of the new machine are:
- i7 3770
- 16GB DDR3 1333 (4x4GB)
- Asus P8Z77-M uATX MB (z77 express chipset). BIOS v2203
- 7x 1TB sATA3 HDD (Seagate Barracuda). 2 on MB sATA3 ports (4 sATA2 ports free, unused), the 5 others are on a 5-ports sATA3 AIC (see below)
- 5-ports sATA3 PCIe3.0 x4 controller (Chipset: JMicron JMB585)
- 450W PSU (xilence)
Please let me know if there is any information that I failed to provide.
Thanks again 🙏
-a-
oh.... My CPU is not Haswell (4th gen). It's 3rd gen. I should chose DS3622xs+ instead of DS918+
🤦♂️
-
-
8 hours ago, rojoone2 said:
Can you give some information about your “new machine”? You can’t expect to get an answer with so little to go on… or did you solve the issue yourself?
Thanks a lot 🙏
Sorry for not having provided the necessary information.
(I haven't solved this yet)
Do you know what can cause this type of error message?
The specs of the new machine are:
- i7 3770
- 16GB DDR3 1333 (4x4GB)
- Asus P8Z77-M uATX MB (z77 express chipset). BIOS v2203
- 7x 1TB sATA3 HDD (Seagate Barracuda). 2 on MB sATA3 ports (4 sATA2 ports free, unused), the 5 others are on a 5-ports sATA3 AIC (see below)
- 5-ports sATA3 PCIe3.0 x4 controller (Chipset: JMicron JMB585)
- 450W PSU (xilence)
Please let me know if there is any information that I failed to provide.
Thanks again 🙏
-a-
-
Hey
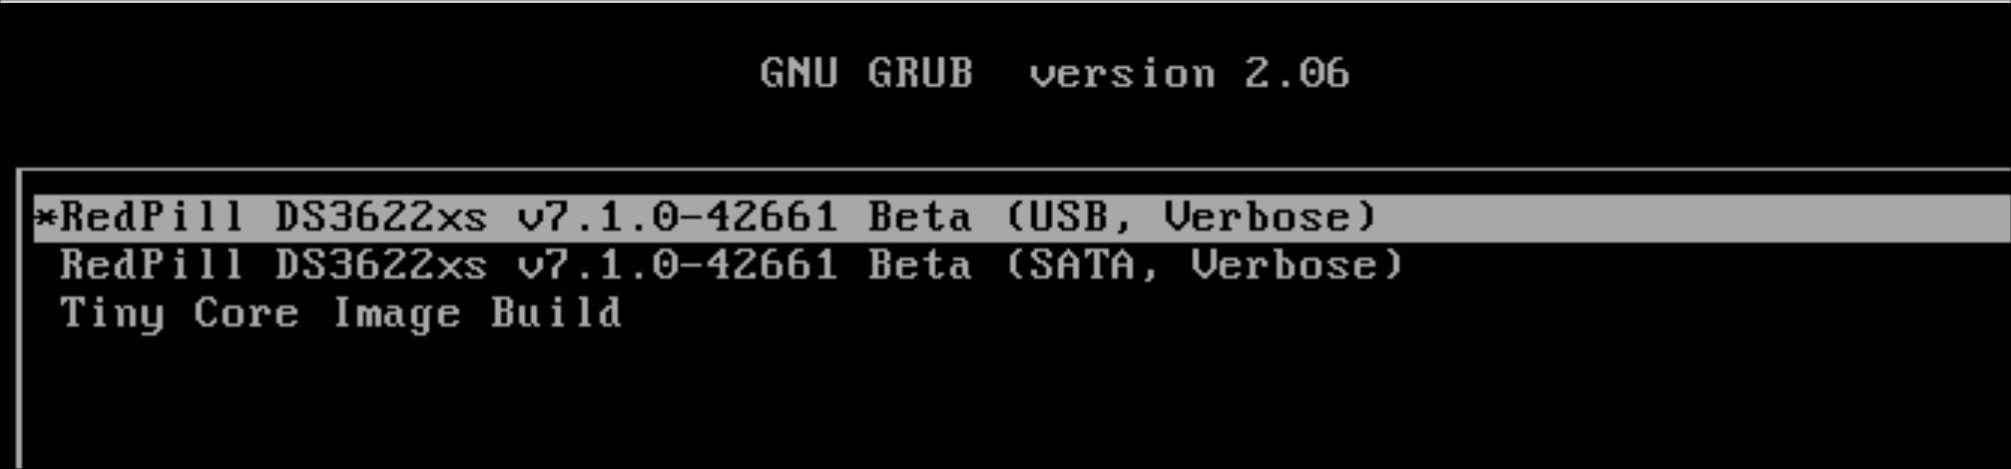
I just made a USB launcher using TCRP (DS918, using the tutorial from @flyride) for a new machine (bare-metal).
Upon 1st boot on the USB dongle, I get the following:
Error: symbol 'grub_disk_native_sectors' not found.
entering rescue mode...
grub rescue >
What does that mean?
What went wrong?
Should I just restart from scratch and try to remake the USB launcher?
Thank you very much in advance for your help and advice.
Best,
-a-
-
-
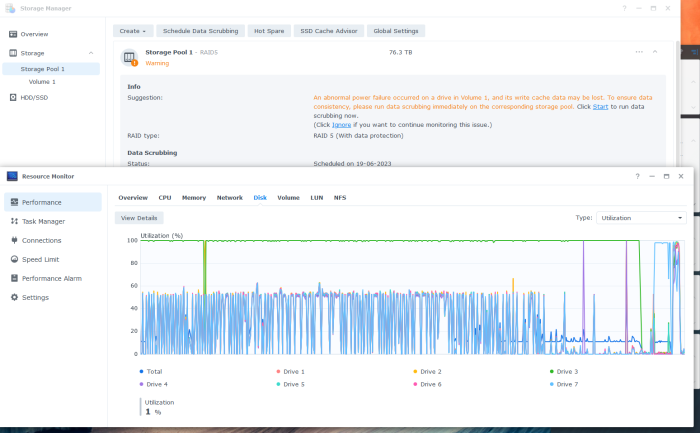
It looks better this time around. Except for disk 3 which is still stuck at 100%
-
drive 3 still stuck @ 100% utilization...
-
???
.thumb.png.bf20e6ec157a4538076ca5bd6a032a72.png)
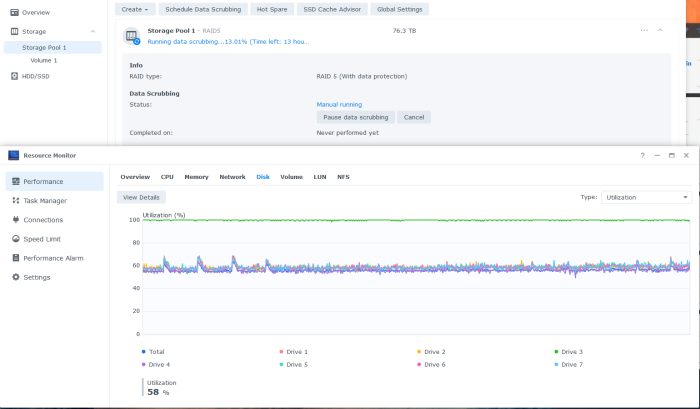
Power failure of drive 1 during data scrubbing
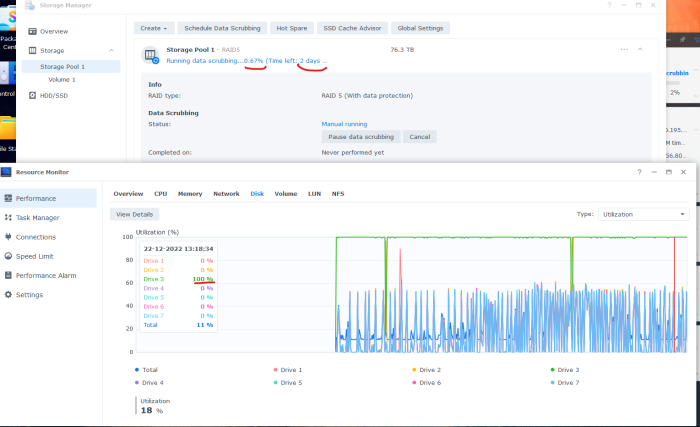
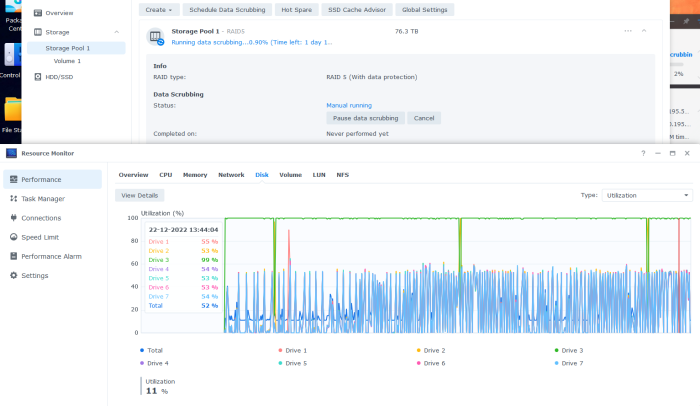
.thumb.png.205119224b8acf9edc86f476cd6ae794.png)
File system check -> OK
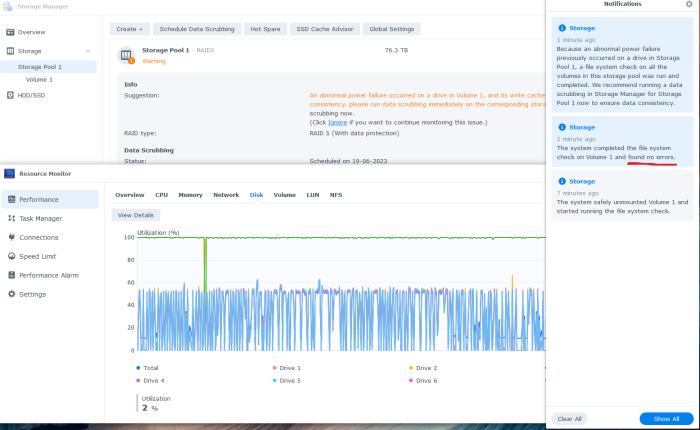
data scrubbing restarted with write cache disabled for disks 1-4
.thumb.png.828f57bee4dc194407c7d050f08a1250.png)
-
Hey
Should I be worried about drive 3?
(both regular and extended SMART tests as well as IW health test all come up OK)
I don't know what kind of information may be relevant here so I'll just list the following, but do not hesitate to tell me if more detailed information could be useful.
CPU: i7-4790k (4cores/8threads)
RAM: 4GB (2x2GB) DDR3 1333
MB: Asus Z97-A
HDDs: Seagate IronWolf 12TB x9 (RAID5 over 8 disks +1 hot spare)
sATA ports: 6/6 sATA3 ports from MB (drives 1-6); 3/5 sATA3 ports from PCIe3.0 x4 AIC (ref) (drives 7-9). All 11 ports detected properly when loader was built (satamap).
TCRP version: 0.9.3.0 (without "friend")
DSM version: 7.1.0 42661
-
3 hours ago, apriliars3 said:
Could you use bringfriend.
- bringfriend
Downloads TCRP friend and makes it the default boot option. TCRP Friend is here to assist with
automated patching after an upgrade. No postupgrade actions will be required anymore, if TCRP
friend is left as the default boot option.
./rploader.sh <model> bringfriend
Thanks
Can you please explain the difference between
./rploader.sh <model> bringfriend
and
./rploader.sh build <model> withfriend
(as described here)?
Thanks a lot
-a-
-
Hi
I was running a bare metal Xpen rig that was using TCRP loader (no "friend") and running DSM7.1 42661 as a DS918+. I recently installed this rig and didn't have vital data on it.
I tried to remake the USB loader (the same way as the 1st time) but this time adding the "withfriend" parameter when building the loader from TCRP. The idea was to be able to perform DSM updates more easily in the future (although it is still not clear to me how I should perform these updates whether or not I'm using TCRP with or without "friend").
After rebooting, my DS918+ was detected as "not installed" and I proceeded to install the corresponding pat file (DSM_DS918+_42661.pat - 346MB).
However, after the 10 minutes countdown I get "something went wrong" and I can restart the process (which results in the same failure every time).
Is there any way I could "fix" this?
If not, how should I proceed to restart from scratch? Should I reformat all my drives and remake the USB loader (with or without "withfriend" this time?) ?
Best,
-a-
-
On 10/25/2022 at 7:56 PM, apriliars3 said:
TCRP Friend is here to assist with
automated patching after an upgrade. No postupgrade actions will be required anymore, if TCRP
friend is left as the default boot option.If I don't have TCRP with friend, what postupgrade actions should I do after upgrading?
Thanks
-a-
-
1 hour ago, Orphée said:
He is refering to N54L because this is the only hardware known (yet) to not be compatible with TCRP with friends.
You must use "old" TCRP standard mode. the same way you need to enable "Direct Boot" to "true" on ARPL with N54L.Thanks a lot
Fortunately, I'm not running on a n54l -
2 minutes ago, Peter Suh said:
TCRP alone is also called JOT.
Now it is the way of the past and the use of TCP Friend is impossible.
On the HP N54L this is useful.Thanks
- What does JOT stand for? (out of curiosity)
- Why do you say the use of TCRP "with friend" is now impossible)
- Why are you mentioning the HP N54L? (Are you using this device?)
-
On 12/8/2022 at 1:50 PM, kekesed97 said:
Switching between loaders will need you to rebuild the loader. You just need to carry over the same parameters (like SN/MAC) if you plan to switch, and your instance should work as it should (unless you use different SN/MAC, it will just do migration).
Hey
@kekesed97
In order to make a new loader, can I just boot on the current USB dongle but in TCRP rather than into the DSM loader that was previously built? And then from TCRP "overwrite" the current loader with a new one?
Or should I start from scratch (with a new USB dongle or after erasing the one I am currently using)?
Thanks for your help
-a-


.png.4178be9f9b0b01236f3559dab417febc.png)
.png.b8d7459e118a54be3aedce156ce47a81.png)


.png.e721aa8f46a1f1c9cc0e7ead83a91a71.png)


Nas 1010 + Xpenology Arc fonctionne Impec !
in Compatibilité Hardware & Installation
Posted
Is there a tutorial anywhere for those who are not familiar with Arc?