Leaderboard


Popular Content
Showing content with the highest reputation on 12/10/2022 in all areas
-
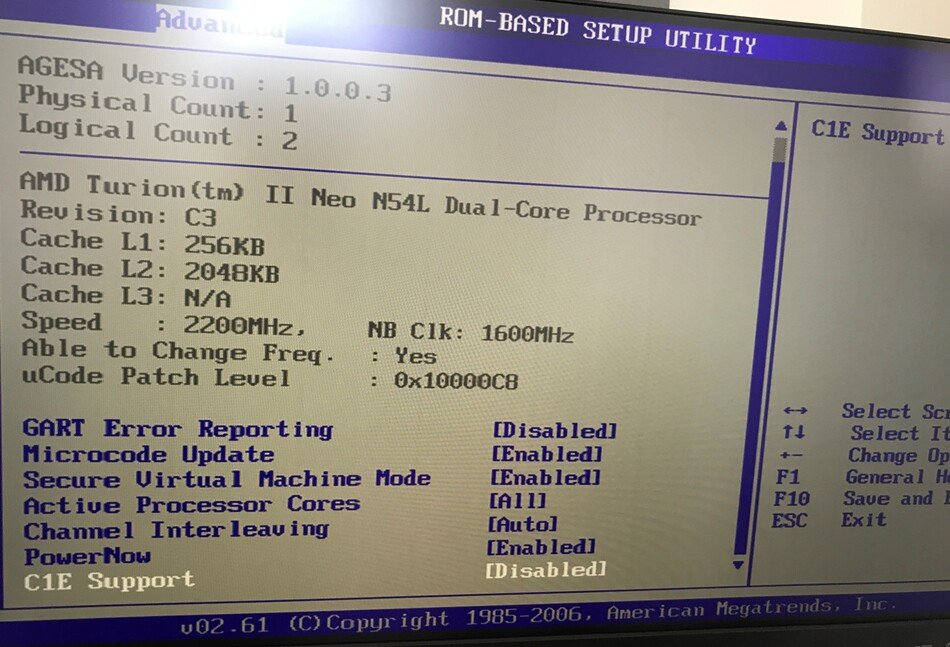
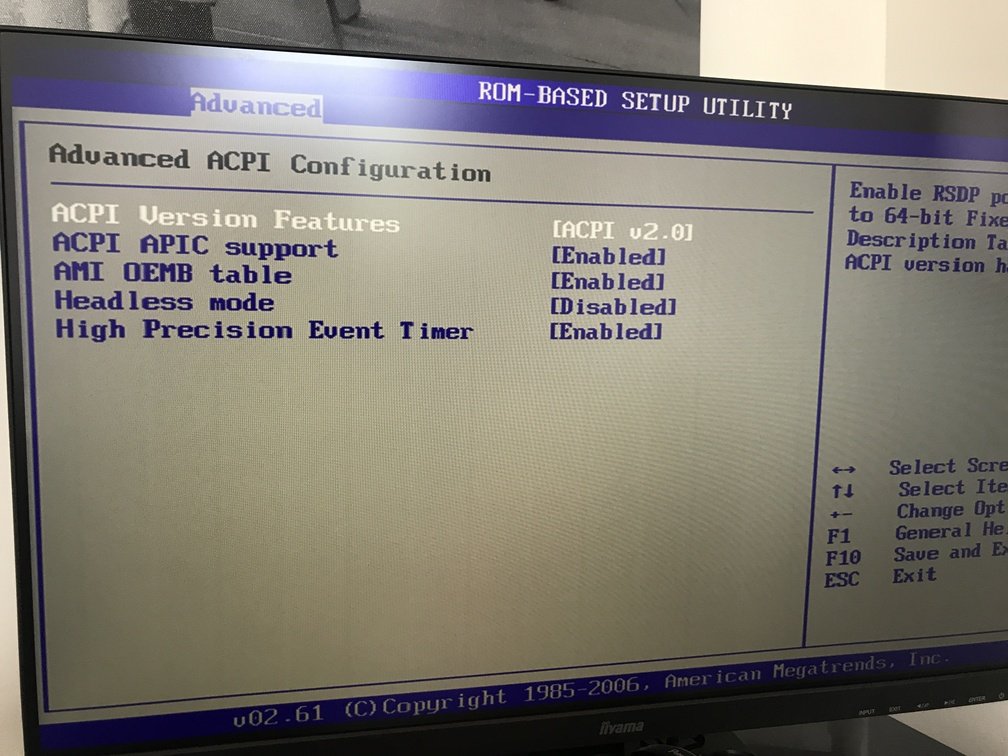
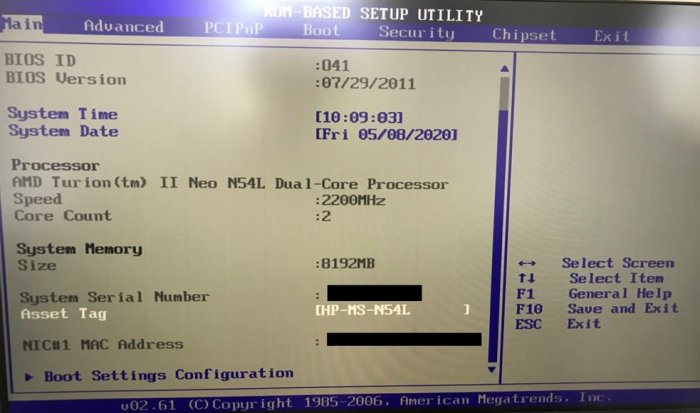
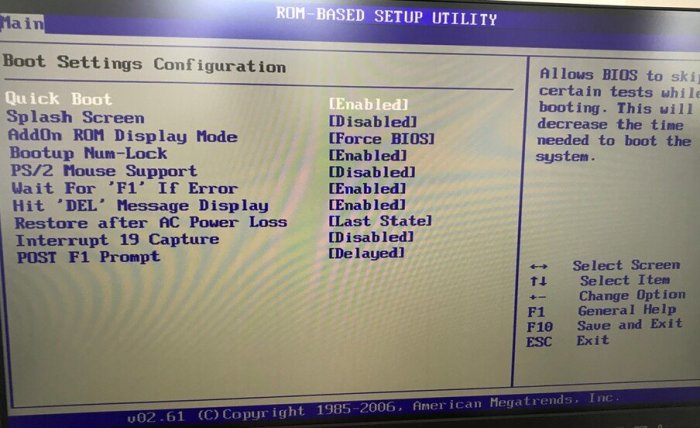
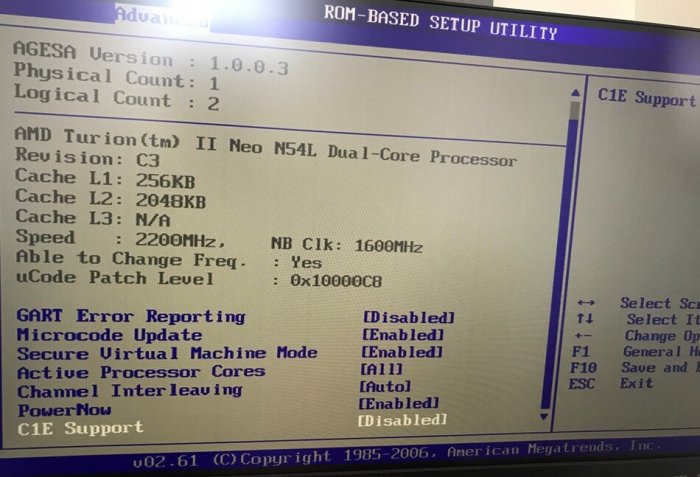
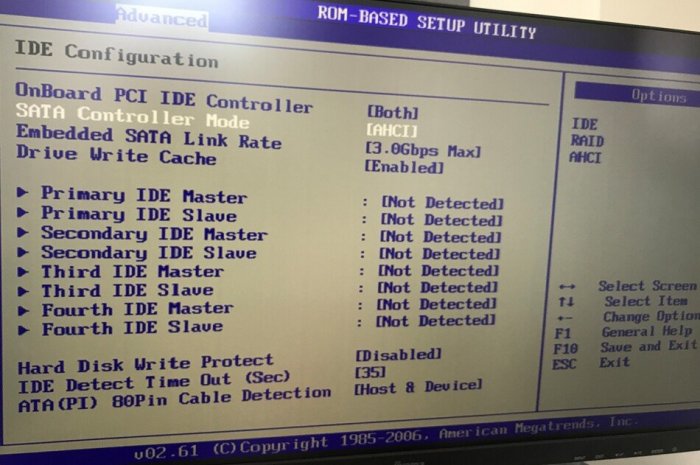
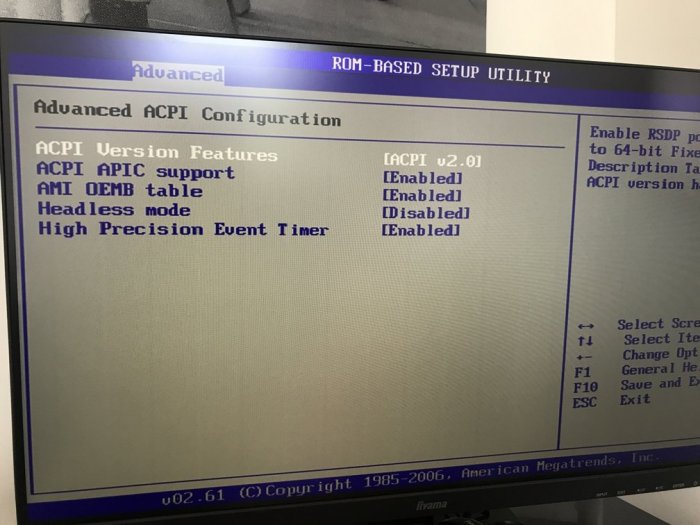
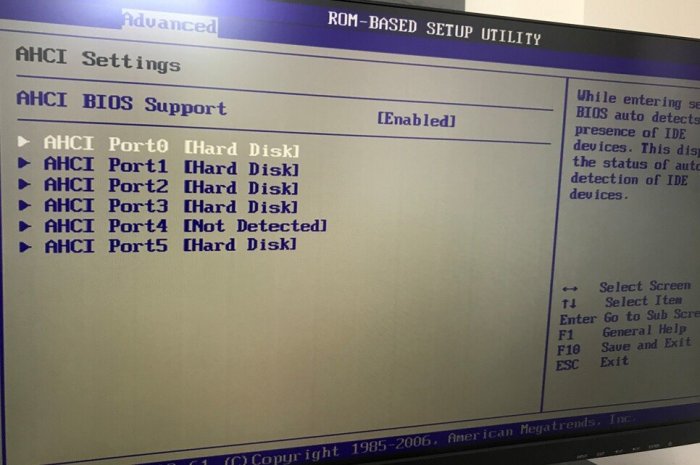
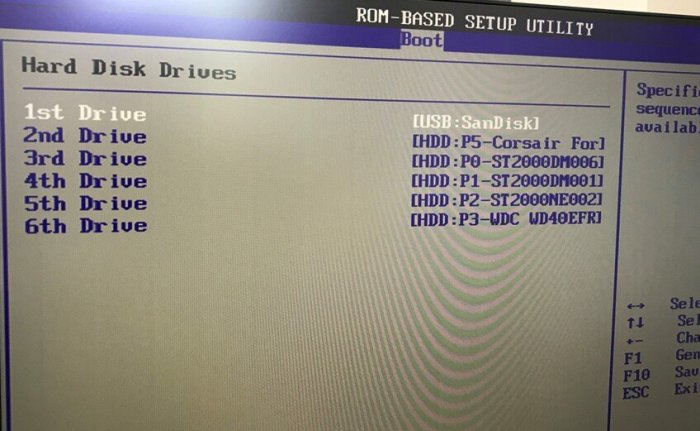
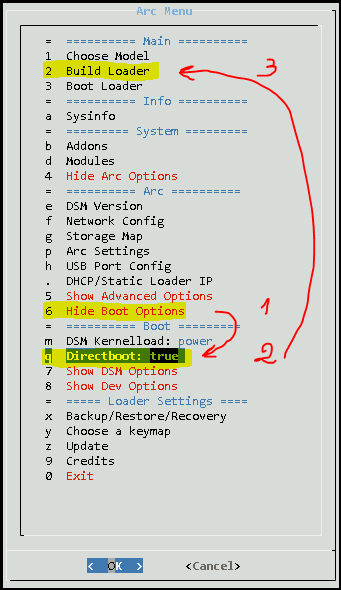
Bonjour, [EDIT] @nicoueron21/10/2023 : Changement du mode de configuration du flag directboot [EDIT] @nicoueron16/10/2023 : Factorisation du tuto avec le tuto principal [EDIT] @nicoueron02/10/2023 : Refonte avec le loader arpl-i18n [EDIT] @nicoueron05/05/2023 : révélation de la section BIOS [EDIT] @nicoueron24/11/2022 : ajout section "mise à jour" [EDIT] @nicoueron19/11/2022 : version DSM7.1.1 minimum + adaptations commande suite aux changements du loader >v0.9.2.9 [EDIT] @nicoueron07/10/2022 : fin support <DSM7.1 [EDIT] @nicoueron26/09/2022 : Ajout capture écran paramètre IDE pour avoir les disques 5 et 6 de visible [EDIT] @nicoueron27/06/2022 : support DS3622XS+ et note sur l'incompatibilité de l'USB avec DSM7.1 [EDIT] @nicoueron28/04/2022 : prise en charge de l'USB [EDIT] @nicoueron22/03/2022 : précision sur la pile du bios [EDIT] @nicoueron16/03/2022 : ajout de DSM 7 [EDIT] @nicoueron08/05/2020 : adaptation du tuto pour DSM 6.2.3 sans aucun matos nécessaire en plus. Pré-requis 1 : Service DHCP et Accès internet Un service DHCP doit être actif sur votre réseau. De même, lors de la construction du loader, le serveur doit avoir accès à Internet. Pré-requis 2 : Vérifier la pile du BIOS Avant tout de chose, le serveur HP N54L gen7 étant maintenant très ancien, je conseille fortement de procéder au remplacement de la pile du BIOS, pour info la référence est CR2032. N'hésitez pas à faire des captures d'écrans des options de votre BIOS avant son remplacement, à défaut les options ci-dessous devraient pouvoir vous aider Pré-requis 3 : Flashé le BIOS avec cette version correctement configurée Celui de 2011 (V041 - 2011): TheBay_Microserver_Bios_041.rar Le Bios Mod: o41072911mod.rom Il suffit de supprimer celui présent sur la clé, de copier/coller le fichier mod.rom et de le renommer comme l'ancien. Vous pouvez suivre ce Tuto qui est très explicite : How to flash Bios HP Proliant (c'est le même Bios pour les 3 servers N36L; N40L et N54L). Une fois le BIOS flashé faites les réglages suivants : Onglet Main: Onglet Main > Boot Setting Configuration : Onglet Advanced > CE1 Support = Disabled Onglet Advanced > IDE Configuration > SATA Controller Mode AHCI Onglet Advanced > Advanced ACPI Configurtation > ACPI v2.0 Onglet Advanced > AHCI Settings > ici il faut vous assurer que TOUS les disques sont bien détectés et que le paramètre AHCI BIOS Support est sur Enabled Onglet Boot > Hard Disk Drives > ici positionner la clé USB en premier Onglet Chipset > ici positionner l'option onChip IDE Type sur IDE Loader Arc : ==>Suivre à la lettre le tuto générique : [Tuto] DSM 7 pour tous la seule différence porte sur le point suivant qui doit être réalisé juste avant la construction du loader (point n°11) : Dérouler le menu Boot Options (1) > Sélectionner "Directboot: true" (2) > Build Loader (3) et.... c'est tout ! En effet, le reste est identique au tuto ==> Enjoy

 1 point
 -
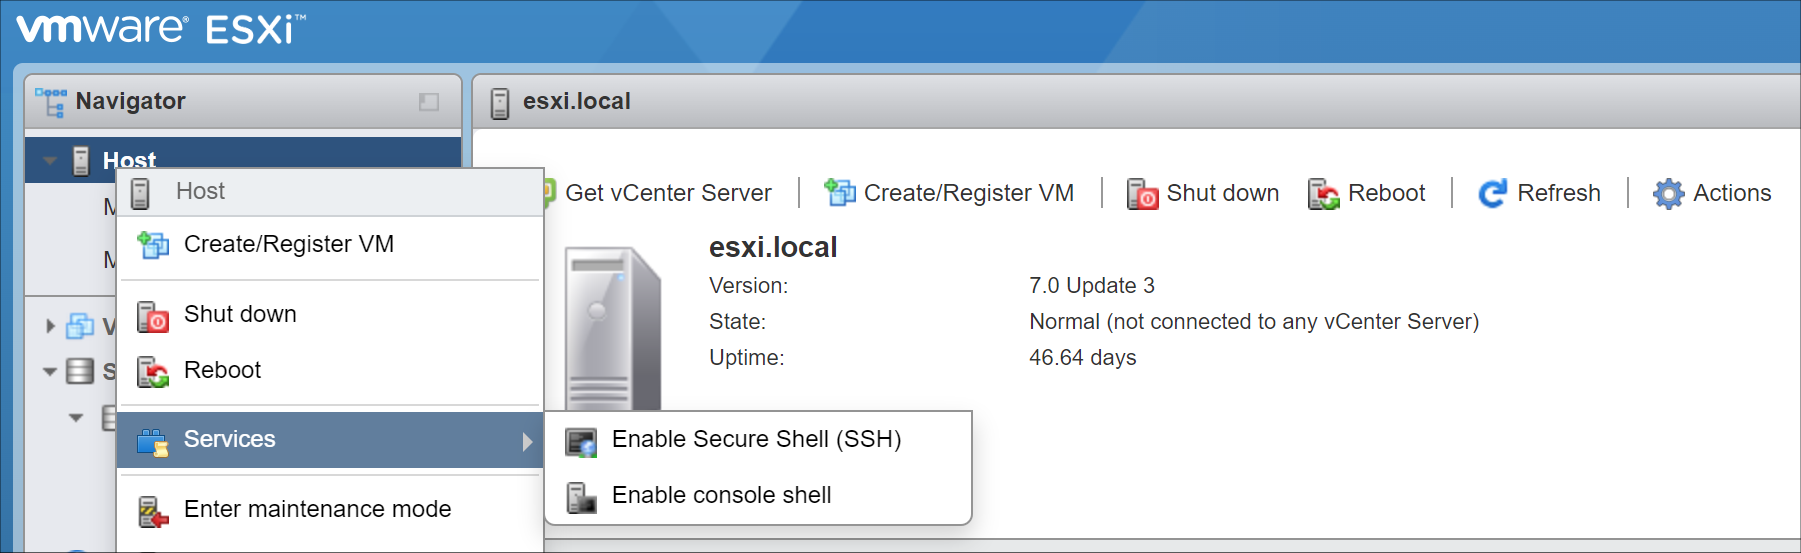
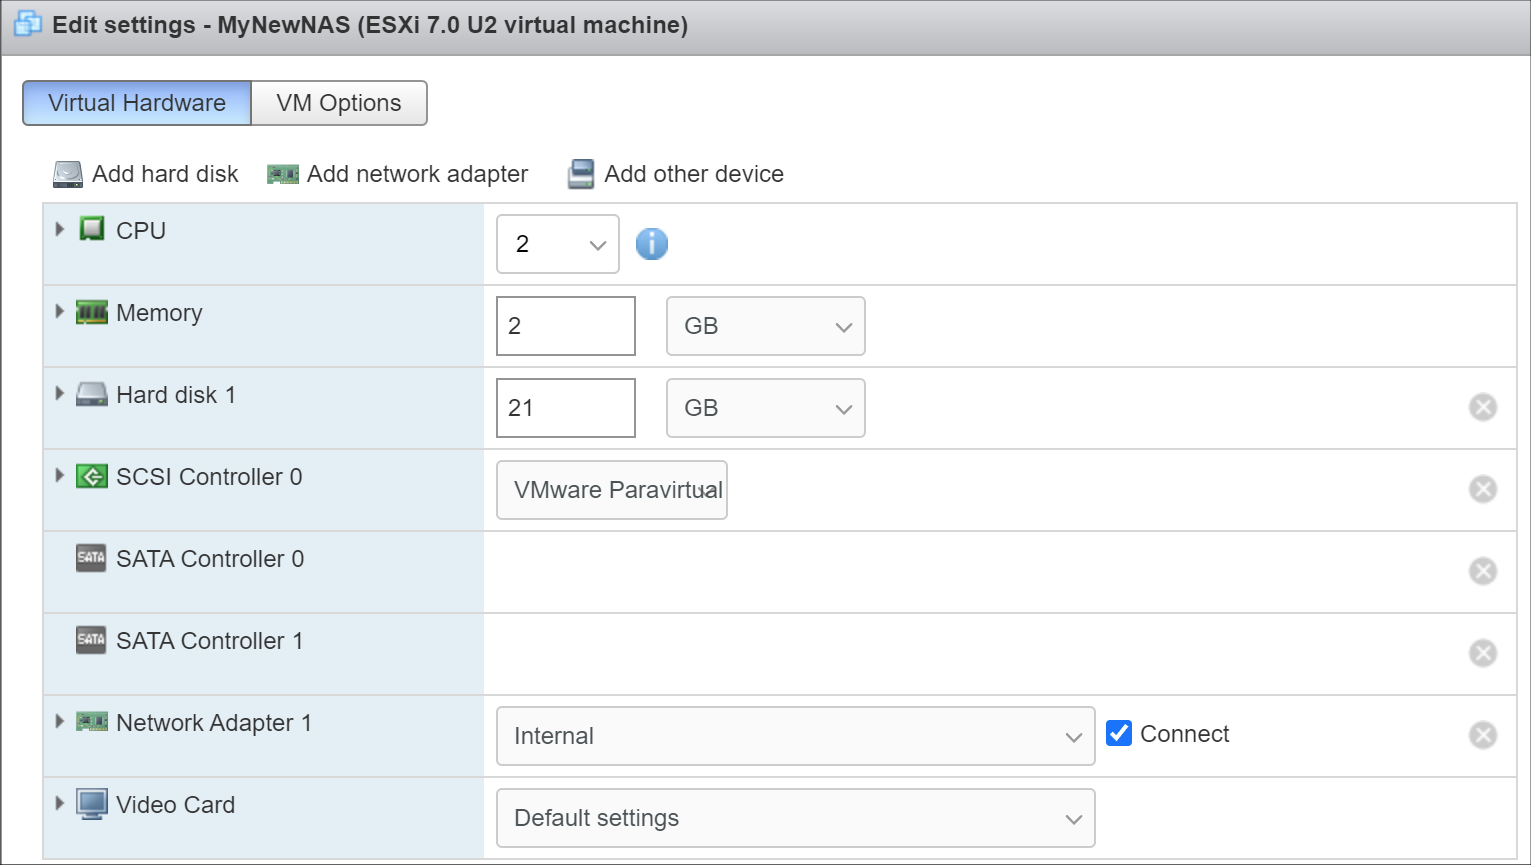
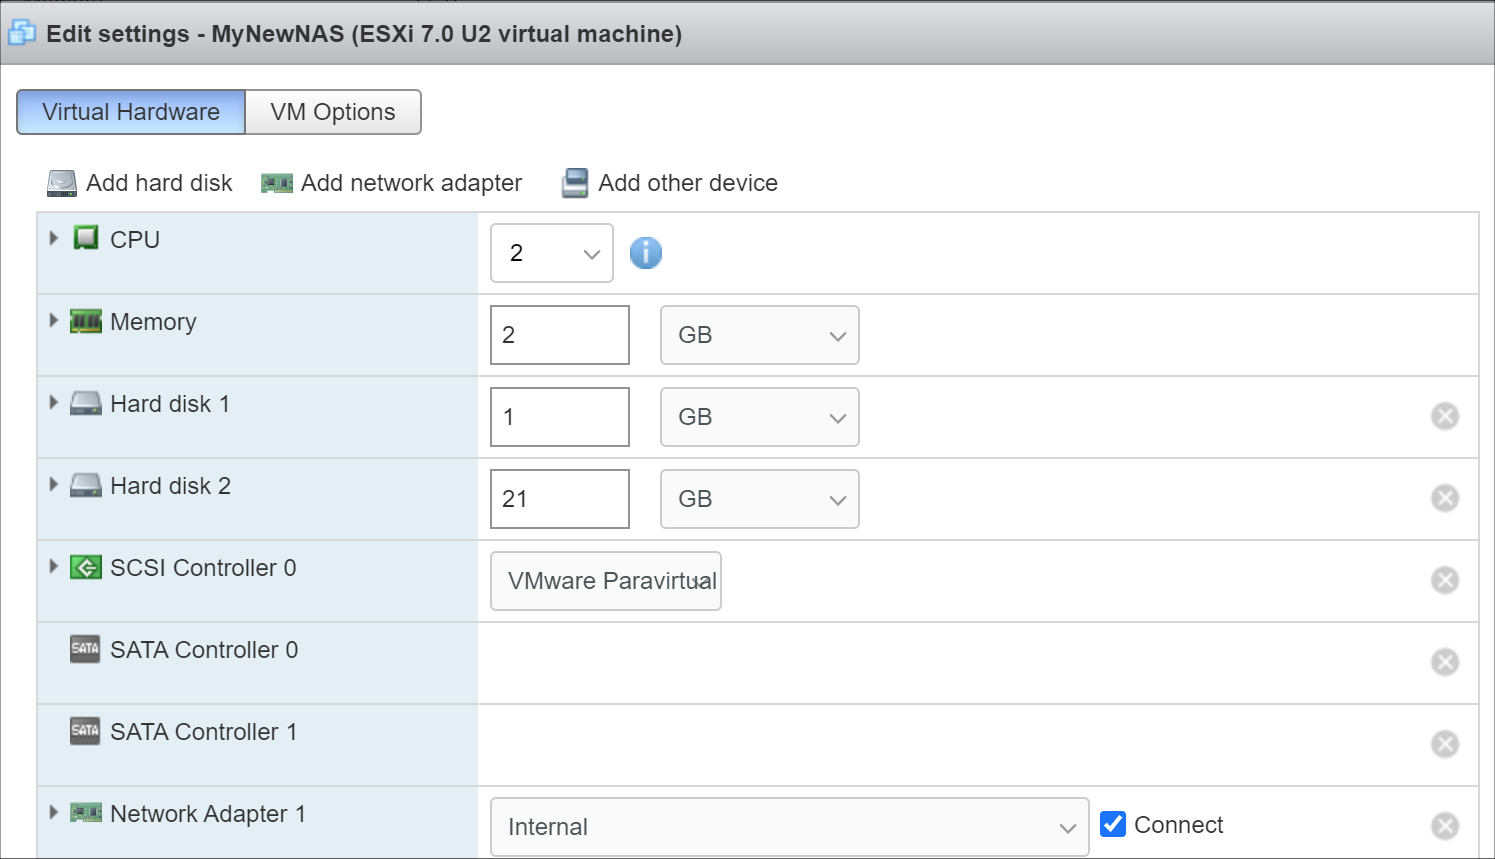
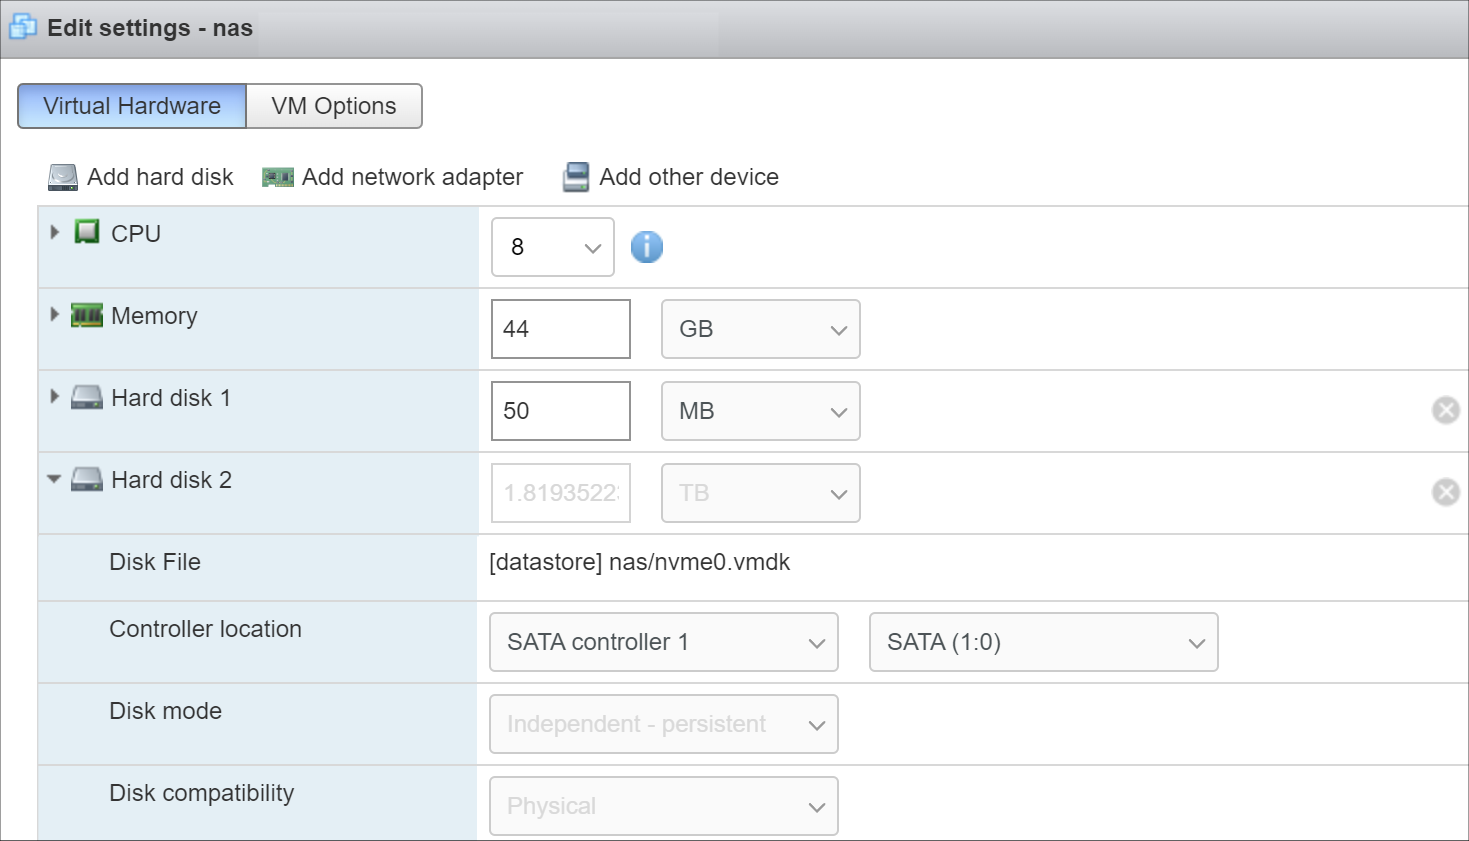
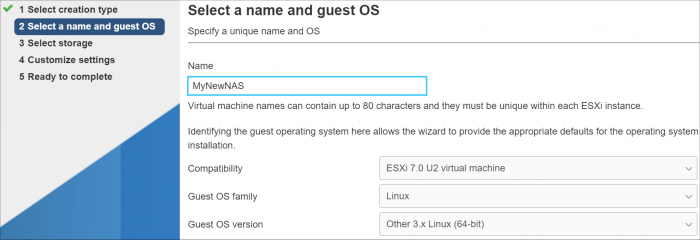
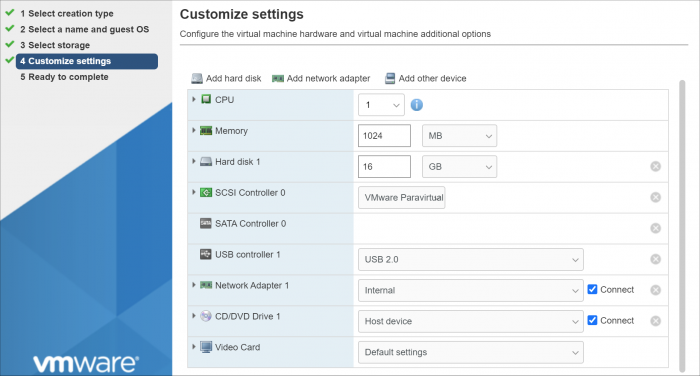
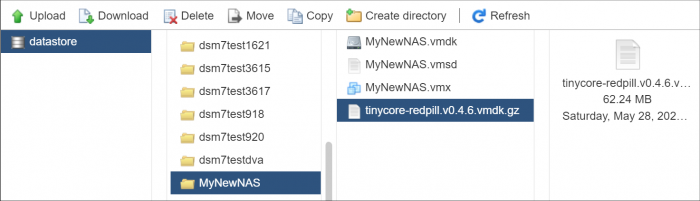
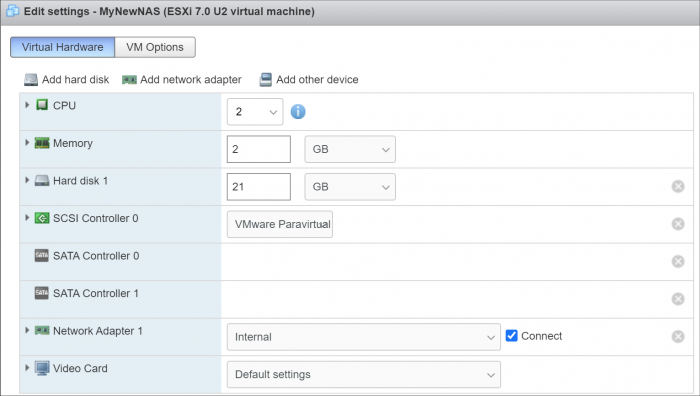
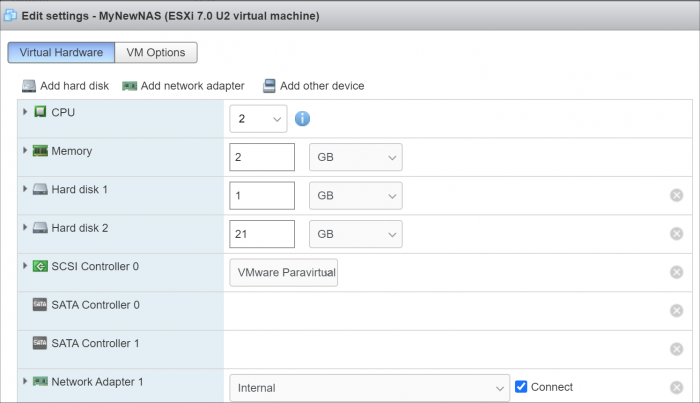
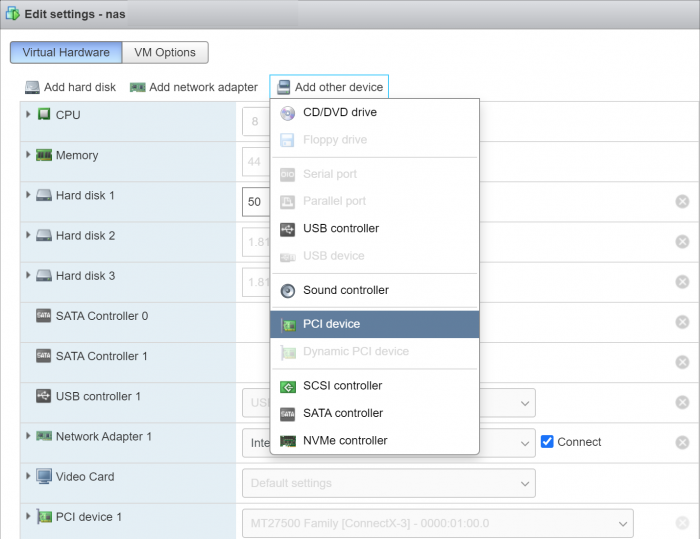
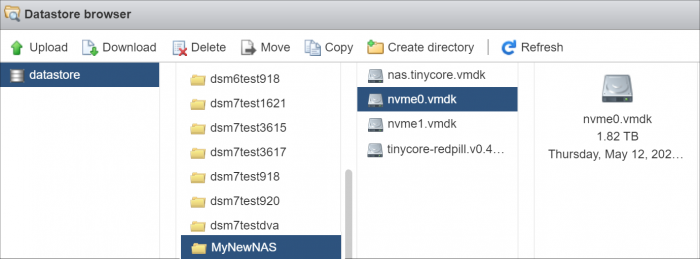
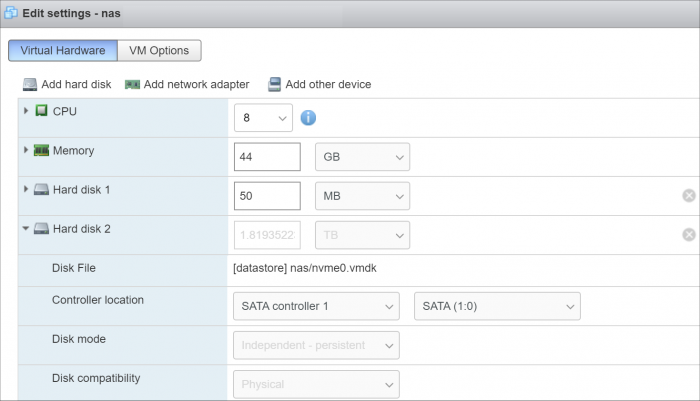
Introduction This tutorial is a supplement to the main TCRP installation tutorial located here: https://xpenology.com/forum/topic/62221-tutorial-installmigrate-to-dsm-7x-with-tinycore-redpill-tcrp-loader/ You should be familiar with all the concepts and procedures in that tutorial, and general knowledge of VMware ESXi installation and virtual machine management. The focus here is on differences between installing on baremetal (with DSM as the only OS on the NAS), and as a virtual machine using VMware ESXi as the hypervisor. However, much of the conceptual information applies to other hypervisors. Some reasons to install DSM using a hypervisor: virtualize unsupported network card virtualize NVMe or other storage and present to DSM as SATA run other VMs in parallel on the same hardware (as an alternative to Synology VMM) share storage or network cards with other non-XPEnology VMs testing and rollback of updates About VMware ESXi ESXi (currently branded as the "VMware vSphere Hypervisor") is a stand-alone hypervisor that is part of the VMware enterprise computing platform. ESXi's strength includes robust testing and support, good compatibility with modern hardware platforms, and very flexible control over the hypervisor configuration. The core hypervisor is free to use, all that is needed is to sign up to receive a lifetime free license key. Key limitations of the free license are 8 vCPU's (8 threads, same as DS918+) and no serial port virtualization. To use the serial console, a physical connection is needed from the motherboard to your personal computer, or if the motherboard has IPMI features, intercepting the physical serial data with the IPMI remote access tools works as well. There is also a trial ESXi license that offers 256 vCPUs and serial port virtualization. ESXi and DSM Platform/Architecture All currently supported DSM platforms can run as virtual machines. As of this writing, the Device Tree platforms (DS920+ and DS1621+) are not supported by the TCRP device tree patcher when ESXi virtual SATA controllers are used. The problem is understood but currently the only way to make these platforms work is to manually patch the DTS. Transcoding platforms are supported with a compatible CPU, but actual transcoding requires a passthrough configuration of the VGA display adapter, which is somewhat complicated to set up, and beyond the scope of a basic tutorial. As DSM is run as a workload inside ESXi, there is an overhead tax, so the minimum requirements are somewhat higher: x86-64 CPU with two cores or more Hardware virtualization features enabled in the BIOS (Intel VT-x or AMD RVI) 4GB of RAM or more Dedicated 138GB or larger boot and storage device for ESXi system files, run-time files and datastore containing VM configuration files and virtual disks Block storage/controllers on ESXi's compatibility list OR compatible with DSM for passthrough Storage for use with DSM (either as backing storage for virtual disks, or passthrough devices) Creating a DSM Virtual Machine, Part 1 When we create a virtual machine we are defining its hardware characteristics. This machine must be compatible with DSM. For the purposes of the tutorial, we'll create a simple DSM VM with a 21GB virtual SATA drive. First the hardware profile must be selected. The recommended options are illustrated below. Other 3.x Linux (64-bit) is best even when installing a DSM platform with 4.x kernel. The selection here doesn't actually have anything to do with the OS being installed - it's just defining the behavior of the emulated hardware. Here's the initial complement of hardware created with Other 3.x Linux (64-bit): The pre-configured Network Adapter is VMware 10Gbe virtual vmxnet3 and is directly supported by TCRP. However, some changes need to be made to the virtual machine: Change the CPU vCore count to 2 or more Change the memory amount to 2048 or more Change the virtual hard disk size to 21GB or larger (see minimum spec here) If desired, open the drop-down menu and change the virtual disk type to Thin if the VM is only for testing Delete the USB controller Delete the CD/DVD Drive Add a second SATA controller - this will initially be called "New SATA Controller" Save the virtual machine. This creates a virtual machine folder on the datastore, and provisions the VM configuration file and virtual disk in that folder. It is not ready for use yet; some additional preparatory steps need to be completed. Preparing the TCRP Image ESXi VMs cannot boot virtualized USB flash drive images. A passthrough physical USB can be used, but is not recommended. Instead, a special version of the loader is used as a bootable virtual SATA drive. When the TCRP loader boots in this manner, it is called SATABOOT. Download the tinycore-redpill 7.x loader and save it to your personal computer. Then, open it with a zip manager to show the boot images: tinycore-redpill.vX.X.X.img.gz (for BIOS/CSM/Legacy boot from USB flash drive) tinycore-redpill-uefi.vX.X.X.img.gz (for UEFI/EFI boot from USB flash drive) tinycore-redpill.vX.X.X.vmdk.gz (for virtual machine SATABOOT from disk image) Save the vmdk gzip file to your personal computer. Then, upload it to the new virtual machine folder contained in the datastore: For the next step, ESXi console access is required. From the web GUI, enable both SSH and the console shell. SSH into the ESXi host and navigate to the new VM's folder: [root@esxi:] cd /vmfs/volumes [root@esxi:] cd <datastore> [root@esxi:] cd MyNewNAS [root@esxi:] ls -la total 65664 drwxr-xr-x 1 root root 73728 May 28 09:02 . drwxr-xr-t 1 root root 81920 May 28 08:58 .. -rw------- 1 root root 22548578304 May 28 08:58 MyNewNAS-flat.vmdk -rw------- 1 root root 474 May 28 08:58 MyNewNAS.vmdk -rw-r--r-- 1 root root 0 May 28 08:58 MyNewNAS.vmsd -rwxr-xr-x 1 root root 1941 May 28 08:58 MyNewNAS.vmx -rw-r--r-- 1 root root 65260813 May 28 09:02 tinycore-redpill.v0.4.6.vmdk.gz The TCRP SATABOOT image is provided compressed and in VMware Workstation format. These commands prepare it for use with ESXi: [root@esxi:] gunzip tinycore-redpill.v0.4.6.vmdk.gz [root@esxi:] vmkfstools -i tinycore-redpill.v0.4.6.vmdk MyNewNAS-TCRP.vmdk Destination disk format: VMFS zeroedthick Cloning disk 'tinycore-redpill.v0.4.6.vmdk'... Clone: 100% done. Creating a DSM Virtual Machine, Part 2 From the GUI console, select the DSM virtual machine and Edit. This is what things look like now: Now the SATABOOT loader must be added to the virtual machine. Select Add hard disk (existing hard disk) and choose the TCRP vmdk created in the previous step It will be displayed as "New hard disk" - expand the dropdown Change the controller to SATA Controller 0 The disk address should be SATA0:0 Save the changes to the VM The default for the Other 3.x Linux (64-bit) hardware profile is to create a SCSI virtual controller and attach all new virtual disks to it. DSM works better with the virtual SATA controller, so we need to move the DSM virtual data disk to it. Edit the virtual machine Expand the dropdown for Hard disk 1 (note that it is 21GB or whatever size we selected) Change the controller to SATA Controller 1 The disk address should be SATA1:0 Save the changes to the VM VMWare has an odd behavior in that it renumbers all the hard disks based on the last edit. This is cosmetic, and only affects the VM configuration screen. It does not change the disk addressing order in any way. The VM edit window now looks like this: Now that no disks are attached to the SCSI controller, we can (and should) delete it. The final configuration of controllers and disks is: SATA Controller 0: SATABOOT (SATA0:0) SATA Controller 1: DSM Data DIsk (SATA1:0) Any additional virtual DSM data disks should be added to SATA1 (i.e. SATA1:1, SATA1:2, etc). SATA0 should be reserved only for SATABOOT. The VM is now ready for the TinyCore boot (main tutorial, Step 3). System-Specific Parameters and SATABOOT ESXi requires minor adjustments to the basic tutorial configuration steps: The USB flash drive VID/PID configuration step (./rploader.sh identifyusb) is invalid and can be skipped when using SATABOOT. When using a virtual network adapter (such as VMXNET 3), its MAC address and the loader's MAC address setting must match. When a virtual machine is booted for the first time, a random address is assigned to each virtual adapter. Unless your primary network interface is a passthrough device, the serialgen configuration step requires the realmac argument to match the virtual NIC's random address to TCRP. Example: ./rploader.sh serialgen DS3622xs+ realmac The Drive Slot Mapping configuration step is the same, but the outcome is different when SATABOOT is in use. ./rploader.sh satamap will enforce the prohibition on data disks attached to SATA0 and warn if this configuration exists. SataPortMap and DiskIdxMap are configured to remove a blank slot between the SATA0 and SATA1 controllers. SCSI/SAS controllers or HBAs (either passthrough or virtual) ignore satamap functionality. When SATABOOT is also in use, there is an unavoidable blank slot between the last SATA controller and the first SCSI/SAS controller or HBA. Boot DSM with GRUB When the GRUB Menu is displayed: if necessary, use the arrow keys to ensure that SATA is selected and press ENTER. Advanced Configuration Examples: Passthrough and Raw Device Mapping (RDM)


 1 point
 -
CQFD, le BIOS que tu avait sauvegardé est en fait celui que le gars avait modifié en 2014 dans le lien que j'ai donné plus haut Merci !1 point
-
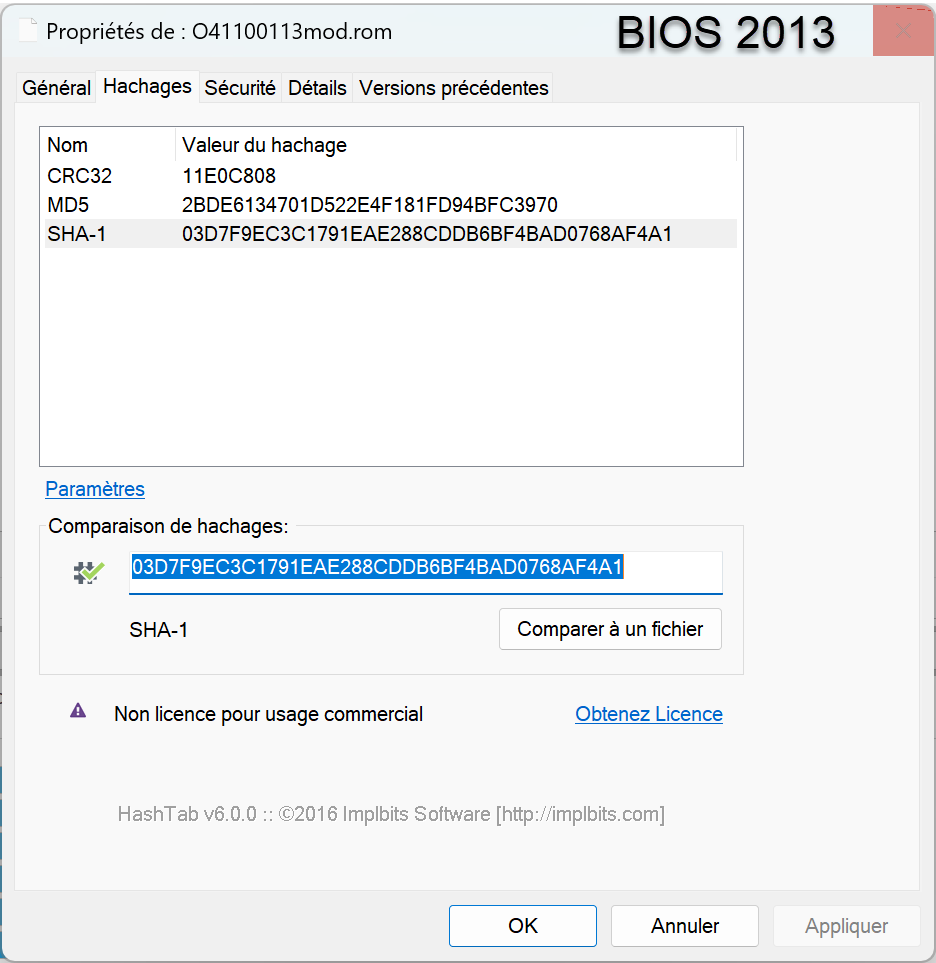
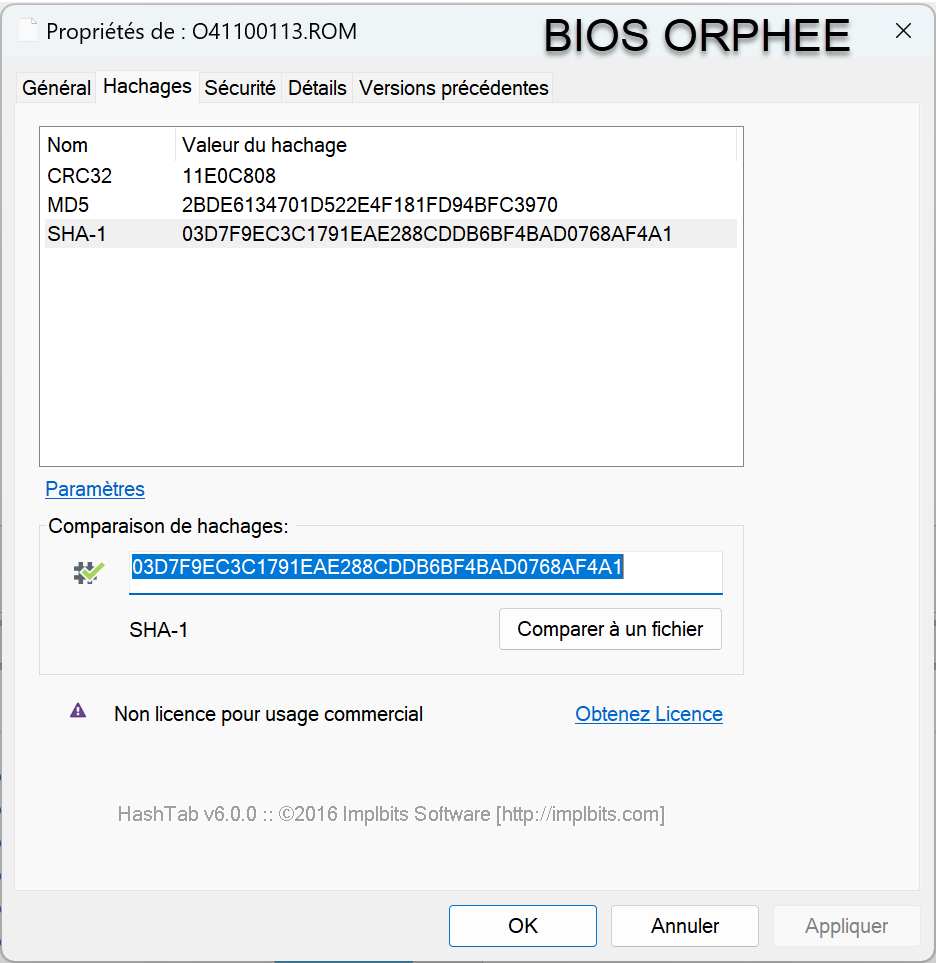
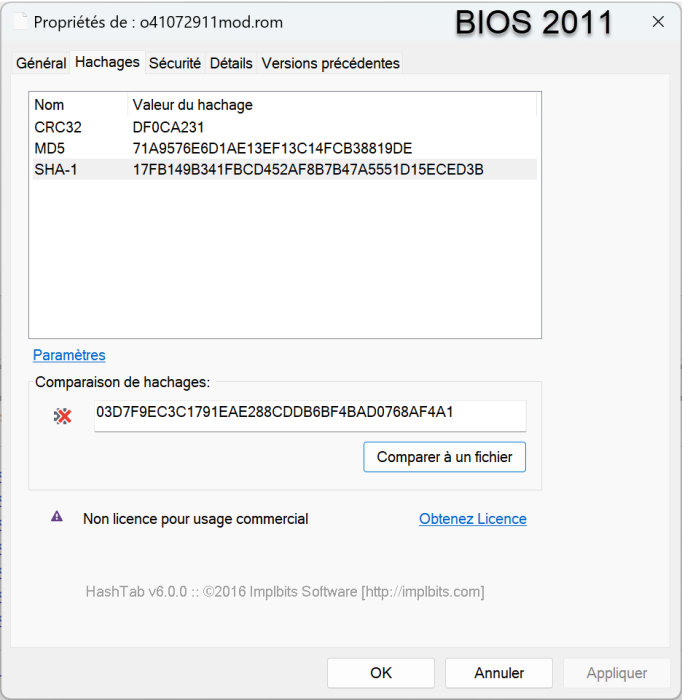
Bonjour, si cela peut t'aider le hash des deux O41100113mod.rom et celui de 2011 comparé à 2013.

 1 point
 -
Ditto @Peter Suh! Worked like a charm.1 point
-
I recommend you to try M SHELL for TCRP FRIEND, which I developed. It has evolved a lot from the old TCRP and has been changed to enable loader builds using convenient MENU. A user guide is also shared on Github at the link below. https://github.com/PeterSuh-Q3/tinycore-redpill/releases/tag/v0.9.3.0-11 point
-
Вот тут все отлично рассказано. https://www.youtube.com/watch?v=I9eWkNNRONs1 point