Leaderboard


Popular Content
Showing content with the highest reputation on 11/16/2022 in all areas
-
Hello everyone, I would like to share a personal project that I am developing. It is another loader for TTG Redpill, intended to be as automatic and user-friendly as possible. The link is below, download the image and record it on a flash drive, the rest is done on the same computer. I'm Brazilian and I'm not good at English language, so forgive me for translation errors. I used forum knowledge and code from various loaders developed by TTG, pocopico, jumkey, Jun and many others. Hope you like it. https://github.com/fbelavenuto/arpl Edit: An important information that I forgot to mention is that I developed a simple patch to no longer display the DUMMY port error on models without device-tree, the user will be able to install without having to worry about it1 point
-
j'ai eu le même soucis de blocage au démarrage, pas d'adresse IP dispo, j'ai essayé avec le 3615xs et ça à marché, je pense que ça vient du loader où de paramètres du Bios incompatible1 point
-
I haven't been here in a while But my xpenology Gave up the ghost and Brought a Dell PowerEdge T110 Server Tower I ended up removing the SAS card and just using SATA Following the instructions from this youtube Vid Was able to Get the Dell Running fine on 7.1 Thank to everyone who help with this hobbie
 1 point
 -
Yeah.. looks like an old PERC 6/i. You are better off trying to sell it because I don't think there is any IT firmware fir it.1 point
-
TCRP of pocopico and The TCRP of the m shell differs in handling extension drivers. pocopico's TCRP adds only the necessary NIC drivers during the loader build process. m shell uses the integrated driver pack just like ARPL. Perhaps your system partition has already installed DSM, which is stabilized through pocopico's TCRP. In that state, you will not get a chance to install My Full Featured Driver Pack on your system partition. This problem was confirmed today during the testing of the vmxnet3 driver of Proxmox. Perhaps there is a dependency between drivers. If all the M shell's integrated driver packs are installed through Junior mode, the problem may be resolved.1 point
-
nonon, pas de raison, si il en reconnait un, il en reconnaitra 6 C'est donc côté bios qu'il doit manquer quelque chose1 point
-
De mon côté il supporte les disques de 14to1 point
-
Merci pour votre réponse sans équivoque, j'avais déjà mis 5x 5TO en Raid 5 et ça marchait bien1 point
-
i915.ko-DS920-DSM7.1.1-42962-IMNKS0911.zip i915.ko-DS918-DSM7.1.1-42962-IMNKS0911.zip1 point
-
Criticism is appreciated, but there are no plans to make this menu.sh more convenient and beautiful. pocopico is developing the Next Generation TCRP loader. If you look closely at the repo of TCRP, there is a web page under development under html, which is the next-generation design that will replace the menu.sh that I temporarily created in ARPL style. https://github.com/pocopico/tinycore-redpill/tree/main/html pocopico said they needed some time to develop this new loader with a new design. I am very much looking forward to it.
 1 point
 -
Yes - it's detailed in the readme: https://github.com/fbelavenuto/arpl#readme See Accessing Loader -> Via the Web You will need to know the IP of your baremetal box (check on your router)1 point
-
Setting CPU to "Haswell" : "start failed" Setting it to "qemu64" with added CPU flags 'qemu64,+ssse3,+sse4.1,+sse4.2,+x2apic,+fma3' : "start failed" Settings it back to "default (kvm64) : Start OK Nov 15 09:47:13 pve-gen8 pvedaemon[292631]: start failed: QEMU exited with code 1 Nov 15 09:47:13 pve-gen8 pvedaemon[2322]: <root@pam> end task UPID:pve::qmstart:105:root@pam: start failed: QEMU exited with code 1 No matter what, I don't think you can fake fma3 instructions when host can't run it.1 point
-
j'ai pris une version du redpill en V0.9.2.7 et du premier coup, il c'est compilé et j'ai trouvé le syno en ligne... peut etre un soucis dans la version1 point
-
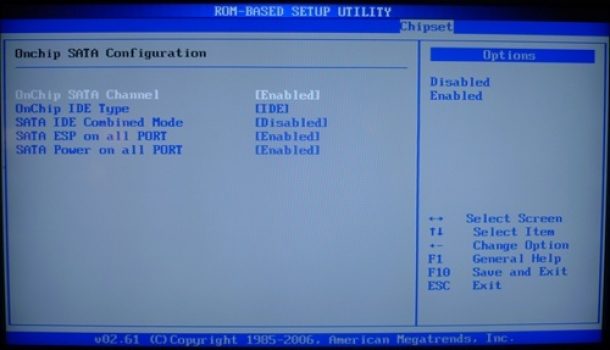
Petite suggestion d'ajout sur le tuto de première page. Si comme moi vous avez un microserver ancien et que vous ne savez plus si vous avez ou non flashé le bios Il suffit de démarrer le serveur avec un écran et un clavier, d'aller dans le bios, et de voir si vous avez les onglets : PCIPnP et Chipset. Ensuite, autre attention, lorsque l'on change la pile, le bios repasse à ses valeurs par défauts. Les infos dans ce topic ne sont pas suffisantes pour ceux qui veulent utiliser plus de 4 disques. Voici ce qu'il faut vérifier : Dans un des derniers onglets, sur les chipsets, vérifier que vous êtes bien en ide type : IDE (comme dans la capture d'écran jointe. Sinon les disques 5 et 6 ne s'affichent plus. Un dernier conseil, si tout fonctionne avant de démarrer l'upgrade, allez dans le bios, prenez des photos de tous les écrans, changez la pile ENSUITE, puis reconfigurer le bios, a commencer par la date (très important) et remettez tout tel que c'était, démarrer une fois avant l'upgrade, vérifiez que tous vos disques sont là, et enfin faites l'update avec une clé usb différente. voilà, du coup, je suis stoppé pour le moment, le disque 6 ayant disparu, il veut le reconstruire, c'est partit pour 24 ou 48h....
 1 point
 -
any advice to make it working under DSM 7.0?1 point
-
Hmmmm Virtualization (Intel VT...) is enabled in BIOS settings?1 point