Leaderboard


Popular Content
Showing content with the highest reputation on 07/30/2022 in all areas
-
Hello everyone, I would like to share a personal project that I am developing. It is another loader for TTG Redpill, intended to be as automatic and user-friendly as possible. The link is below, download the image and record it on a flash drive, the rest is done on the same computer. I'm Brazilian and I'm not good at English language, so forgive me for translation errors. I used forum knowledge and code from various loaders developed by TTG, pocopico, jumkey, Jun and many others. Hope you like it. https://github.com/fbelavenuto/arpl Edit: An important information that I forgot to mention is that I developed a simple patch to no longer display the DUMMY port error on models without device-tree, the user will be able to install without having to worry about it1 point
-
i finally swapped my old production VM to the new one on a different host, and after testing a lot i can say that it's very impressive and stable. latest version of ARPL 0.3a6, DS920+ build (with my real SN/MACs applied and working), ESXi 7.0U3f, Asus z490i + i3 8c 10th gen cpu (Comet Lake), iGPU (UHD630) in passthough with the backported i915 kernel modules working (hvec hdr and tonemapping works), Intel Sata Controller is also in passthough so all the disks are natively handled with all the real smart data.. perks, the disks start from the first sata port so no more /dev/sda reservation problem i had with the LSI in passthrough. great work with ARPL, a really good loader.1 point
-
Yup its the same with synology surveillance, it says its activated but when you try to load an h265+ camera stream it says cant be streamed and have to activate advanced media extensions, thank you for sharing this solution but doesn't work, at least not for my intended use. Best regards1 point
-
Note that, to have a working local display, you must have an Intel CPU that has an integrated i915 compatible display controller(ie: UHD610, etc)... This means anything that is 4th Gen (Haswell) or newer. The built in drivers support up to 9th Gen, and backported drivers support 10th and possibly 11th Gen CPUs... 12th Gen CPUs do not have a compatible display controller. AMD APUs are not compatible. see this post:1 point
-
There will be no problem, this was always an install issue.1 point
-
Just for information purposes: The DVA1622 DMS pat file includes the original i915 driver files. They will work for 2nd Gen to 9th gen Intel CPUs, but not for 10th gen CPUs. So, the situation I ran into is: Baremetal, Asus H410m motherboard, Pentium Gold G6400 (Comet Lake) CPU, DVA1622-7.1.0-42661u3, ARPL loader. 1) When the system boots, the original i915 driver files load, but do not get activated because the IGPU is not compatible. 2) Since the DVA1622 uses a geminilake CPU and the DS920+ is also a geminilake platform, I try the patched files for the DS920+. Of course, because the original drivers are loaded, the new drivers fail to load. 3) run the rm_modules.sh script. Original driver files are unloaded. 4) run the in_modules.sh script. Patched modules are loaded. The screen spring to life and loads the local display software and eventually (a minutes or so later) presents a login screen on the local display. So far, so good... Here is where the issue show up... 5) copy the required driver files to the /usr/lib/module directory. (The firmware files are already installed ad part of the DVA1622 install) 6) reboot the machine. Machine reboots and loads DSM, but the screen does not change from the ARPL boot screen. 7) SSH into the machine to discover that the original i915 drivers are loaded and inactive. It turns out that, although the patched drivers are installed, they are not used. The boot process loads the original drivers that are embedded in the initial ramdisk in the loader rather than the drivers installed on the DSM on the HD. The Solution... remove the original driver files from the loaders ramdisk: 1) boot ARPL using the "configure loader" option. Run the menu.sh script and go to the update menu 2) If you are running ARPL less that 0.3-alpha3, update arpl. (if you need to reboot, do so and restart) 2) update MODULES then exit the menu back to the shell prompt 3) add dummy drivers to the modules archive. (details given below) 4) run menu.sh 5) Build the loader 6) Boot the loader. As the driver files that are embedded in the loader are now empty files, the loader is not able to load the original drivers, and the boot process will load the drivers installed on the HD when udev or eudev starts. The machine will now load and use the patched drivers, and will operate like a real DVA1622. To add the dummy drivers into the modules archive, do the following 1) change directory to the modules directory: cd /mnt/p3/modules 2) extract the modules from the geminilake archive: mkdir tmp;gunzip geminilake-4.4.180.tgz|tar -C ./tmp -xf - 3) create the empty driver files: cd ./tmp; touch backlight.ko; touch drm.ko; touch drm_kms_helper.ko; touch fb.ko; touch i2c-algo-bit.ko; touch i915.ko; touch iosf_mbi.ko; touch video.ko 6) create the new modules archive and replace the original archive: tar -cf ../drivers.tar *; cd ..; gzip drivers.tar; rm geminilake-4.4.180.tgz; mv drivers.tar.gz geminilake-4.4.180.tgz 7) clean up and return to the ARPL directory: rm -rf ./tmp/; cd /opt/arpl/ One final thing to mention... When I first created the loader, I used the default LKM (dev)... After the first boot (when all the packages have been downloaded and installed and the DSM image on the HD is stable)... The boot process is excruciatingly slow.... The H410M/G6400 combo in my machine took 289 seconds (almost 5 minutes)... The development LKM does a LOT of logging... an OBSCENE amount of logging, and that significantly affects performance. SO... Once you have set up your machine and are sure that it works... rebuild the loader with the production LKM... It does more modest logging and is significantly fasted... My machine now takes 96 seconds to boot... BTW... Big thanks to @pocopico and @fbelavenuto for all the work on the loaders and @blackmanga for providing the patched driver1 point
-
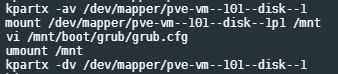
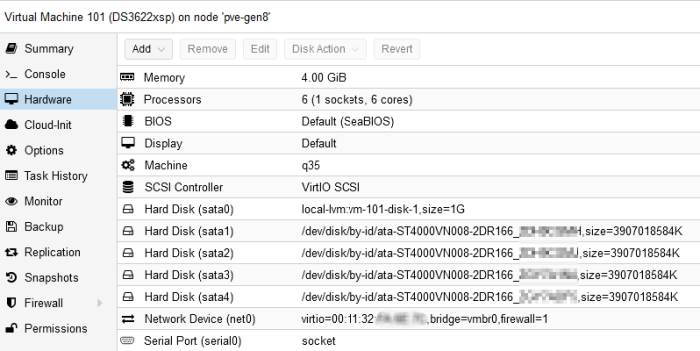
@jrac86 @NooL there is no need to use a real USB key with Proxmox or convert vmdk ... You just need to create your VM, delete default drive and cd-rom. Then copy IMG file with scp transfert into proxmox system. then import IMG in proxmox VM config with : qm importdisk 101 /var/lib/vz/dump/orphee/tinycore-redpill.v0.8.0.0.img local-lvm of course adapt values with your VM number, etc... Then your IMG will be unused available disk in Proxmox GUI, you will be able to set it to SATA0 and go in VM option to set it to "boot order" If you choose q35 machine, you will have a dummy/unused controller so your SataPortMap will have to be SataPortMap="1X" and DiskIdxMap="10XX" in my case : SataPortMap="18" DiskIdxMap="1000" Your disks in DSM will start at sdb and will see first disk slot unsused. You can choose i440fx and you will not need to play with this unused controller. You will also add a serial socket to your VM with : qm set 101 -serial0 socket I choosed to not passthrough my HBA card to DSM because with HP Gen8, Proxmox passthrough is quite tricky, you must patch the kernel to enable iommu... So I added SATA drives to the VM directly with : qm set 101 -sata1 /dev/disk/by-id/ata-ST4000VN008-2DR166_XXXXXXXA qm set 101 -sata2 /dev/disk/by-id/ata-ST4000VN008-2DR166_XXXXXXXB qm set 101 -sata3 /dev/disk/by-id/ata-ST4000VN008-2DR166_XXXXXXXC qm set 101 -sata4 /dev/disk/by-id/ata-ST4000VN008-2DR166_XXXXXXXD My actual VM Proxmox conf : Edit : Bonus If you install kpartx on Proxmox (apt install ...) You are able to mount IMG partition and edit file from proxmox SSH console in case needed : Edit 2 : If you need more info about GPU passthrough you can have a look at my post in DVA3221 development thread
 1 point


