

s2k7
-
Posts
45 -
Joined
-
Last visited
-
Days Won
1
Posts posted by s2k7
-
-
https://mega.nz/file/NWBinb6K#fcZliphdJo_USVws4bo3AsNXnGsz35_6xIlDa7s4qWwHallo,
kann vielleicht jemand noch mal das neuere "OX" Boot-Image uploaden?
Der alte file.io Link ist ja bekanntlich tot und der Link in Post #383 verweist auf das alte Image, wie jemand hier auch schon angemerkt hatte.
Besten Dank!
Tapatalk を使用して私の HMA-AL00 から送信
-
 2
2
-
-
# patch_extractHallo zusammen,
ich konnte beide Varianten zum laufen bringen, aktuell nutze ich die 'Ox'-ISO (mit Yumi UEFI erstellt).
Ich nutze für den Testbetrieb folgende Hardware
- MSI H87M-P33 (4x Intel SATA Ports H87) mit Intel i5-4570 + 8GB
- Dawicontrol DC-614e (Marvel 9125) 4-Port SATA Controller
- Intel Pro/1000 PT Dual Port Netzwerkkarte
die model.conf habe ich entsprechend angepasst und ich bekomme alle Laufwerke angezeigt. Als Basis dient ein Image von X72 (TVS-872X). Leider wird die OnBoard NIC von Realtek nicht erkannt, eine entsprechende r8101.ko Treiber Datei liegt mir vor, jedoch habe ich keinen Ansatz wo man diese Datei mit über die 'Ox'-ISO integrieren kann. Hat dies jemand schon erfolgreich durchführen können?
Bei dem letzten "QNAP-BOOT-EN-v1.00.img" Image kann man die .ko Dateien über den Ordner /Additional_modules und Anpassung des Scriptes (eigene .ko Dateien aufnehmen) mit dem Befehl "./add_modules_file" einbinden. Der abschließende Befehl "./pack_your_initrd" übernimmt es dann in die Bootkonfiguration des QNAP USB-Sticks.
Viele Grüße
# sudo cp YOUR.ko /home/tc/patch/
# sudo patch_install
# sudo reboot
müssen Sie bearbeiten
laojifuli_patch
bearbeiten, um YOUR.ko einzufügen
Tapatalk を使用して私の HMA-AL00 から送信
-
On 7/6/2022 at 6:20 PM, frezeen said:
can someone help me with proxmox ?
i create a vm with sata1 drive 16gb
first question: i need a usb storage or bootdisk can be a virtual sata/ide unit too?
this is my output:
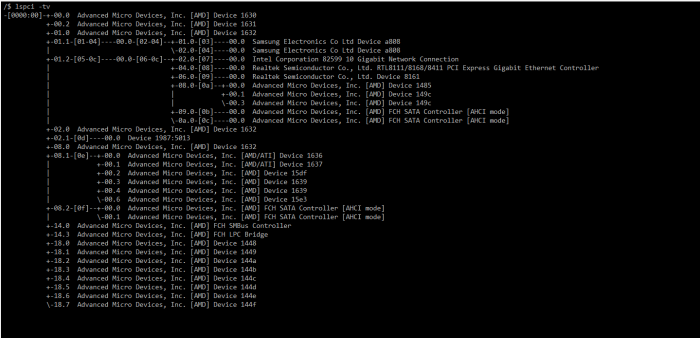
-[0000:00]-+-00.0  Intel Corporation 82G33/G31/P35/P31 Express DRAM Controller [8086:29c0]
           +-01.0  Device [1234:1111]
           +-1a.0  Intel Corporation 82801I (ICH9 Family) USB UHCI Controller #4 [8086:2937]
           +-1a.1  Intel Corporation 82801I (ICH9 Family) USB UHCI Controller #5 [8086:2938]
           +-1a.2  Intel Corporation 82801I (ICH9 Family) USB UHCI Controller #6 [8086:2939]
           +-1a.7  Intel Corporation 82801I (ICH9 Family) USB2 EHCI Controller #2 [8086:293c]
           +-1b.0  Intel Corporation 82801I (ICH9 Family) HD Audio Controller [8086:293e]
           +-1c.0-[01]--
           +-1c.1-[02]--
           +-1c.2-[03]--
           +-1c.3-[04]--
           +-1d.0  Intel Corporation 82801I (ICH9 Family) USB UHCI Controller #1 [8086:2934]
           +-1d.1  Intel Corporation 82801I (ICH9 Family) USB UHCI Controller #2 [8086:2935]
           +-1d.2  Intel Corporation 82801I (ICH9 Family) USB UHCI Controller #3 [8086:2936]
           +-1d.7  Intel Corporation 82801I (ICH9 Family) USB2 EHCI Controller #1 [8086:293a]
           +-1e.0-[05-09]--+-01.0-[06]--+-03.0  Red Hat, Inc Virtio memory balloon [1af4:1002]
           |               |            +-07.0  Intel Corporation 82801IR/IO/IH (ICH9R/DO/DH) 6 port SATA Controller [AHCI mode] [8086:2922]
           |               |            \-12.0  Intel Corporation 82574L Gigabit Network Connection [8086:10d3]
           |               +-02.0-[07]--
           |               +-03.0-[08]--
           |               \-04.0-[09]--
           +-1f.0  Intel Corporation 82801IB (ICH9) LPC Interface Controller [8086:2918]
           +-1f.2  Intel Corporation 82801IR/IO/IH (ICH9R/DO/DH) 6 port SATA Controller [AHCI mode] [8086:2922]
           \-1f.3  Intel Corporation 82801I (ICH9 Family) SMBus Controller [8086:2930]
and this is model.conf generate when i execute create command
[System Enclosure]
VENDOR = QNAP
MODEL = TVS-XXX
CAP=0x28000000
CAP = 0x143b1c
MAX_DISK_NUM = 4
MAX_FAN_NUM = 1
MAX_TEMP_NUM = 1
MAX_NET_PORT_NUM = 1
INTERNAL_NET_PORT_NUM = 1
NET_PORT_MAPPING = ENHANCE
MAX_PCIE_SLOT = 0
CPU_TEMP_UNIT = DTS:1
ENV_TEMP_UNIT = EC
SYSTEM_TEMP_UNIT=EC
SIO_DEVICE = IT8528
PWR_RECOVERY_UNIT = EC
PWR_RECOVERY_CMOS_STORE = 0x70,0x61
BOARD_SN_DEVICE = VPD
ETH_MAC_DEVICE = NET
DISK_DRV_TYPE = ATA
DISK_DEFAULT_MAX_LINK_SPEED = PD_SATA_SAS_6G
SYSTEM_DISK_CACHEABLE_BITMAP = 0x1e
SS_MAX_CHANNELS = 0
SS_FREE_CHANNELS = 0
HEAT_PCI_DEVICE = 8086:1528
MULTI_CONF_FORMAT = 1
[System FAN]
FAN_UNIT = EC
FAN_1=I1
FAN_LEVEL_0 = 0
FAN_LEVEL_1 = 77
FAN_LEVEL_2 = 70
FAN_LEVEL_3 = 95
FAN_LEVEL_4 = 120
FAN_LEVEL_5 = 160
FAN_LEVEL_6 = 200
FAN_LEVEL_7 = 250
HEAT_SOURCE = SYS, CPU, DISK
[FAN Region]
MAX_REGION_NUM = 1
[System I2C]
DEV_BUS = B00:D20:F0
DEV_PORT = 0
[System EDID 1]
DEV_BUS = B00:D02:F0
DEV_PORT = 0
[System IO]
RESET_BUTTON = EC
STATUS_GREEN_LED = EC
STATUS_RED_LED = EC
JBOD_CONNECT_LED = EC
VPD_MB = EC
VPD_BP = EC
LOCATE_LED = EC
LED_BV_INTERFACE = EC
LED_BV_SCROLLBAR = 0
[System Disk 1]
DEV_BUS = B00:D03:F0
DEV_PATH = 0000:xx:00.0/0000:xx:08.0/0000:xx:00.0/0000:xx:0f.0
PCI_SWITCH_PORT = 8
DEV_PORT = 0
ERR_LED = EC
PRESENT_LED = EC
LOCATE_LED = EC
BLINK_LED = EC
SLOT_NAME = SSD 1
[System Disk 2]
DEV_BUS = B00:D03:F0
PCI_SWITCH_PORT = 8
DEV_PORT = 1
ERR_LED = EC
PRESENT_LED = EC
LOCATE_LED = EC
BLINK_LED = EC
SLOT_NAME = SSD 2
[System Disk 3]
DEV_BUS = B00:D03:F0
PCI_SWITCH_PORT = 8
DEV_PORT = 2
ERR_LED = EC
PRESENT_LED = EC
LOCATE_LED = EC
BLINK_LED = EC
SLOT_NAME = SSD 3
[System Disk 4]
DEV_BUS = B00:D03:F0
PCI_SWITCH_PORT = 8
DEV_PORT = 3
ERR_LED = EC
PRESENT_LED = EC
LOCATE_LED = EC
BLINK_LED = EC
SLOT_NAME = SSD 3
[System Network 1]
DEV_BUS = B00:D05:F1
DEV_PORT = 0
[Usb Enclosure]
VENDOR = QNAP
MODEL = USB
MAX_PORT_NUM = 4
EXT_PORT_NUM = 4
USB3_PORT_BITMAP = 0x1E
[Usb Port 1]
DEV_BUS = B00:D16:F7
DEV_PORT = 2
[Usb Port 2]
DEV_BUS = B00:D18:F0
DEV_PORT = 2
[Usb Port 3]
DEV_BUS = B00:D18:F0
DEV_PORT = 1
[Usb Port 4]
DEV_BUS = B00:D03:F0
PCI_SWITCH_PORT = 8
DEV_PORT = 4
[Boot Enclosure]
VENDOR = QNAP
MODEL = BOOT
MAX_DISK_NUM = 1
DISK_DRV_TYPE = USB
[Boot Disk 1]
DEV_BUS = B00:D03:F0
DEV_PATH=0000:xx:00.0/0000:xx:08.0/0000:xx:00.0/0000:xx:10.7
DISK_DRV_TYPE = USB
DEV_PORT = 1
[System Memory]
MAX_CHANNEL_NUM = 2
MAX_SLOT_NUM = 2
SLOT1_ADDR = 1, 0x50
SLOT2_ADDR = 2, 0x52
thanks for help
It is easy to boot from SATA/IDE port.
Surely you can boot from USB too, if you can write correctly.
Try following patameters for
+-07.0 Intel Corporation 82801IR/IO/IH (ICH9R/DO/DH) 6 port SATA Controller [AHCI mode] [8086:2922]"
[System Disk 1] DEV_BUS = B00:D30:F0 PCI_SWITCH_PORT = 7 PCI_BRIDGE_PORT = 1 DEV_PORT = 0 DEV_BRIDGE_BUS = B05:D01:F0 SLOT_NAME = Disk 1 -
3 hours ago, blackmix said:
Können Sie mir sagen, warum das uefi OX-Image bei mir nicht funktioniert?
Der Fehler, der auftritt, ist, dass beim Booten von Tinycore die Module openssh, grub2-multi, dosfstools, parted und efibootmgr nicht geladen werden. Ich habe mehrere Möglichkeiten ausprobiert, um korrekt zu laden
Es gibt ein OX-Image im Legacy?
mein Motherboard ist ein Maschinist mr9a
Mit dem Bootvorgang kenne ich mich nicht aus.
Da der Dateiname das Wort UEFI enthält, ging ich davon aus, dass er von EFI booten sollte.
Sie können ESXi wie ich ausprobieren, um sicherzugehen.ESXi ist einfach, jede Software zu installieren.
-
Wenn Sie das OX-Versions-Image verwenden, können Sie direkt auf das nächste neue QTS upgraden.Ich habe dein Image nun verwendet und konnte es ohne Probleme installieren und von dieser booten.
Leider erhalte ich nach einem Neustart keine LAN Verbindung mehr. Ich bin wie von snoopy78 auf Seite 15 beschrieben vorgegangen.
Ich habe unter /home/tc/patch/etc/model.conf den USB-Stick eingetragen, den ich verwenden möchte. Die Installation hat ebenfalls ohne Probleme funktioniert und wie gesagt, wurde von diesem OS-Stick erfolgreich gebootet, aber leider ohne LAN-Verbindung. Hier ein kurzer Auszug nachdem ich die Installation abgeschlossen und von dem OS-Stick gebootet habe, um nachträglich Änderungen an der model.conf zu machen.
Meine Frage ist nun:- Habe ich bei der ersten Installation die Werte für den OS-Stick richtig in /home/tc/patch/etc/model.conf hinterlegt?
- Wo und in welcher .conf kann ich beispielsweise die Werte für Network, Disks oder USB ändern?
- Wie und wo kann ich nach erfolgreicher OS-Installation die model.conf anpassen?
Alles, was Sie tun müssen, ist die model.conf in Ihrem OS-Stick zu bearbeiten
Sie können den Zyklus wiederholen: model.conf bearbeiten, zur Bestätigung neu starten
der Inhalt von model.conf ist derselbe wie beim alten Image.
Es ist schwierig, die korrekte model.conf auf pve+q35 zu schreiben.CPU-Typ auf 440 ändern
Tapatalk を使用して私の ELS-NX9 から送信
-
12 hours ago, Tiras2810 said:
So, nach langem rumprobieren gebe ich aus nachfolgenden Gründen das Projekt QTS auf eigener Hardware auf.
- Es ist mir nicht möglich, mit sämtlichen Images meine Festplatten zum laufen zu bekommen.
- Die Tastatur und Mouse funktionieren sporadisch in Tinycore.
- Die Netzwerkkarte wird nach erfolgreichem build/installieren der QTS nicht mehr erkannt.
Da ich hier schon eine TS-932PX stehen hab, diese aber leider nicht fähig ist, Virtualisierungen auszuführen, wird es wohl demnächst eine TVS-h1288X-W1250 werden.
Meine jetzige Lösung, sämtliche VMs unter Windows 11 und VMWare Workstation zu betreiben, ist keine weitere Option für mich.
Einen letzten Test werde ich jetzt nochmal mit meiner Unraid Plus Lizenz machen, aber danach hört es bei mir auf.
Meinen Hut ziehe ich vor allen, die es geschafft haben, eine QTS Version auf ihre custom Hardware zu installieren.
Viele Grüße
Sie sollten das von mir hochgeladene neue Boot-Image ausprobieren. Es wird sehr einfach zu installieren sein.
-
18 minutes ago, red7 said:
Ich verstehe, dass es besser ist, das Booten von USB auf einem echten Gerät zu verwenden - es gibt keinen Streit darüber.
Aber ich frage nach der Größe der Partitionen auf einem solchen Bootloader, und es spielt keine Rolle, ob es USB oder virtuelle IDE ist, nur wenn das ursprüngliche QNAP die Größe der neuen 4Gb-Modelle hat, dann müssen wir anscheinend alle Partitionen des QNAP-BOOT-EN-v1.00-Images irgendwie vergrößern.img das ich auf einem USB oder einer virtuellen IDE bereitstellen werde.
Wenn das Original QNAP Flash 512MB und QNAP-BOOT-EN-v1.00 hat.img Partitionsgröße Part 2 = 380 MB, dann ist das normal,
aber wenn QNAP Flash 4-5 Gb hat, müssen Sie wahrscheinlich die Größe von Part 2 zum Beispiel auf 1Gb oder 2GB erhöhen oder einen anderen Wert haben.
Und dementsprechend erhöhen Sie in diesem Fall die Größe anderer Partitionen, ist das nicht eine faire Annahme ?Es hat keinen Sinn, hier zu diskutieren.
Ich denke, der andere ungenutzte Platz wird freigehalten.Sie können dies bestätigen, indem Sie eine neue Bootdiskette erstellen.
-
25 minutes ago, red7 said:
Bitte erzählen Sie uns ein wenig mehr, warum in älteren Modellen das IDE Boot Flash-Laufwerk 128-512Mb ist, und in neuen Modellen ist es 4Gb?
Was ist dort auf ihnen gespeichert, sind nicht die heruntergeladenen Apps aus dem App Store + Einstellungen ?Normale Laufwerke sind verständlich, werden nur zum Speichern von Daten benötigt, aber die IDE Boot Flash 4Gb speichert auch etwas scheinbar Großes ?

Verwenden Sie zum Booten besser einen USB-Stick.
Um das DOM nicht zu stören.Die Informationen im DOM sind wie eine Bootdiskette.
Kein kleines DOM heutzutage.
-
9 hours ago, red7 said:
Tut mir leid, dass ich Ihre Gefühle verletzt habe, ich habe ehrlich gesagt die Erwähnung der Sprache Deutsch in der Überschrift des Forums nicht bemerkt, ich werde versuchen, beim nächsten Mal aufmerksamer zu sein (Englisch und Deutsch sind eigentlich nicht meine Muttersprache, aber ich kenne sie teilweise, und ich kenne sie nicht und verwende Online-Übersetzer).
In der heutigen Welt, insbesondere in der IT-Branche, spielt die Sprache an sich keine Rolle, da es immer Online-Übersetzer gibt, so dass ich persönlich kein Problem sehe, dass eine Person, die die Antwort auf eine Frage kennt, überall in ihrer Muttersprache beantwortet, denn die Hauptsache ist die Antwort auf das Problem und nicht all diese nationalistischen Ideen. Zum Beispiel sind 99% der Programmiersprachen in Englisch geschrieben, aber Menschen verschiedener Nationalitäten stören das nicht, und so kam es, dass ich dachte, wenn ein Forum der IT-Industrie gewidmet ist, lösen alle das Problem mit gemeinsamen Anstrengungen und helfen sich gegenseitig, unabhängig von der Nationalität, aber ich habe einfach keine solche klare Trennung in den Sprachen bemerkt und überhaupt zum ersten Mal in den Foren der IT-Industrie und -Entwicklung und nicht in den üblichen Foren der Chatter und Foren für Spiele.
1) Da die alten Modelle 128-512 MB groß sind und die neuen 4 GB oder 5 GB groß sind, habe ich eine faire Frage, warum das von uns verwendete Image eine Größe hat, die keinem der Wertebereiche entspricht.
Außerdem unterstützten ältere Modelle nicht die Virtualisierungstechnologie (Virtualization Station), die ich ausprobieren werde, dh ich gehe theoretisch davon aus, dass die aktuelle Größe auch bei 1 GB (QNAP-BOOT-EN-v1.00) liegt.vmdk), wird nicht ausreichen, und deshalb hat der Hersteller eine so große 4-GB-bootfähige Festplatte für die neuen Modelle installiert. Natürlich kann ich die Größe der aktuellen bootfähigen Festplatte auf 4 GB erhöhen, aber dann stellt sich die Frage, wie kann ich die Größe der Partitionen auf dieser Festplatte richtig erhöhen, da sie jetzt so sind:Part 1 = 64MB Part 2 =320MB Part 3 =320MB Part 4/5/6 ~= 16MB Part 7 =180MB?
2) Vor allem bin ich daran interessiert, die folgenden Programme/Dienstprogramme/Tools zu installieren:Busybox //Die neueste Vollversion mc //"Midnight Commander" fdisk lsscsi 7zip gitund andere, die ich bei der Verwendung des Geräts benötigen würde (vielleicht gcc, qt 4 und andere wichtige Dinge für Entwickler)
?Sie haben ein Missverständnis von QTS.
Geh einfach hin und probiere es aus.1. QTS erfordert eine Bootdiskette (>1 GB) und eine Datendiskette (>50 GB).
Die Installations-ISO formatiert diese Datenträger für Sie.2. Diese haben nichts mit Modulen zu tun.
Es kann nach der Installation von QTS über eine Anwendung wie Entware oder einen Docker (Ubuntun 16.04) erreicht werden.-
1
-
-
@haydibe,
@hitman22
@snoopy78
@pocopico
Please help me.
A few questions:
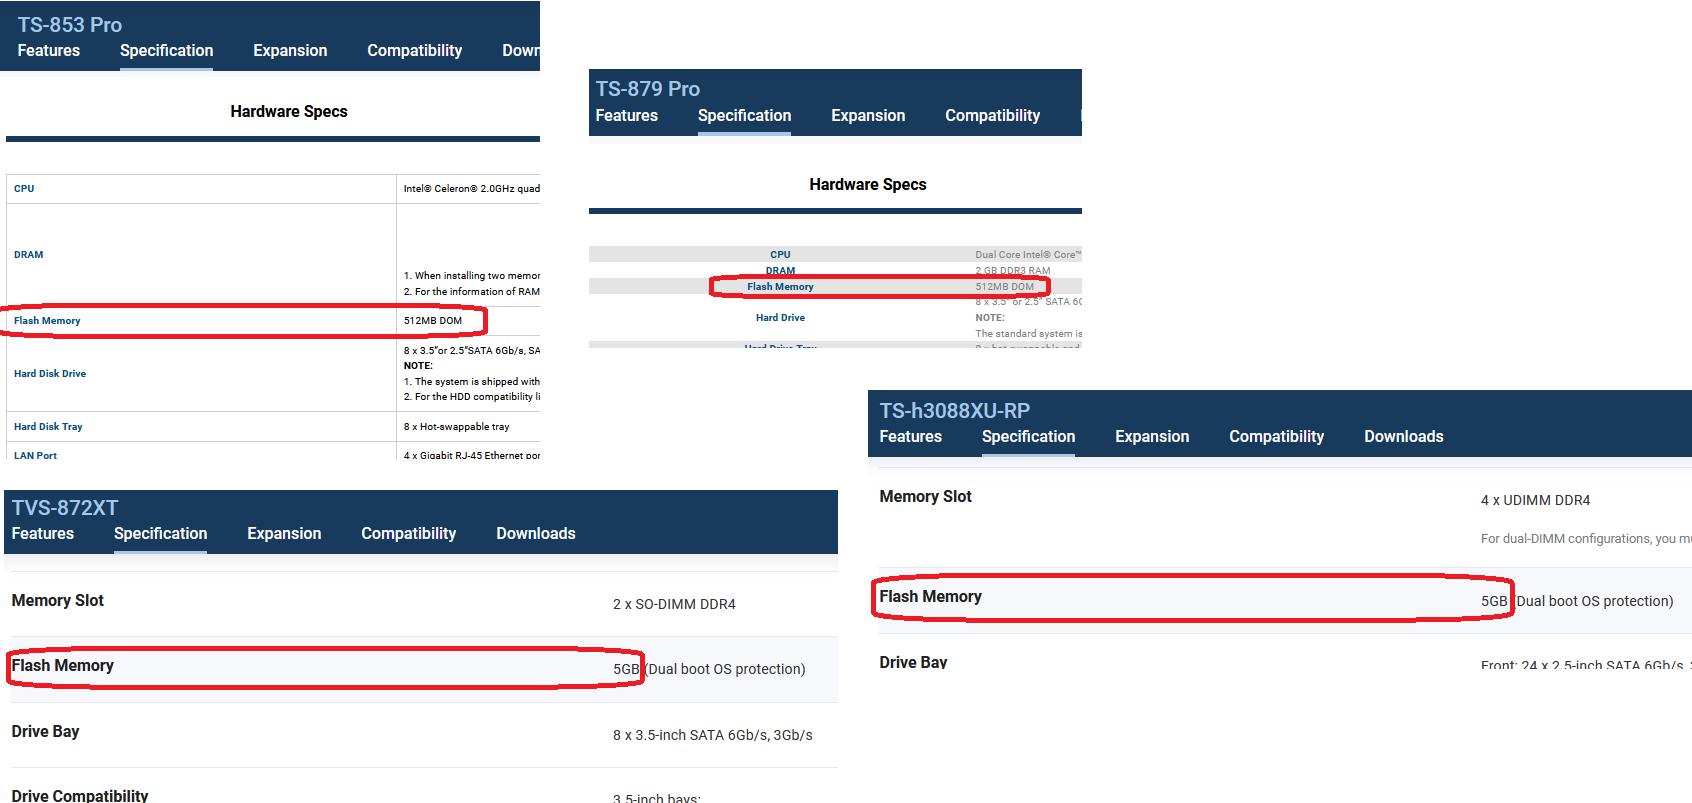
1) The old models have an IDE 128-512MB hard drive and the new models have a bootable hard drive IDE
of either 4Gb or 5Gb, so how in this case can you increase the partitions of the existing image?
(QNAP-BOOT-EN-v1.00.vmdk size =~1Gb contains sectionsPart 1 64MBPart2 320MBPart3 320MBPart 4/5/6 je 16MBPart7 180MB
What do they mean and how to expand them correctly?)
Model TVS-872XT must have 4Gb, so, how i must resize bootable IDE witch i create from QNAP-BOOT-EN-v1.00.img or QNAP-BOOT-EN-v1.00.vmdk ?
2) Show an example of how to use the script correctly ./add_modules_file
What modules are needed for what and how to connect them, the password is good,
but maybe something else can be done and configured immediately during installation?
3) I can't install the following models on the virtual machineTS-1079 ProTS-879 ProTS-853 ProTVS-872XT
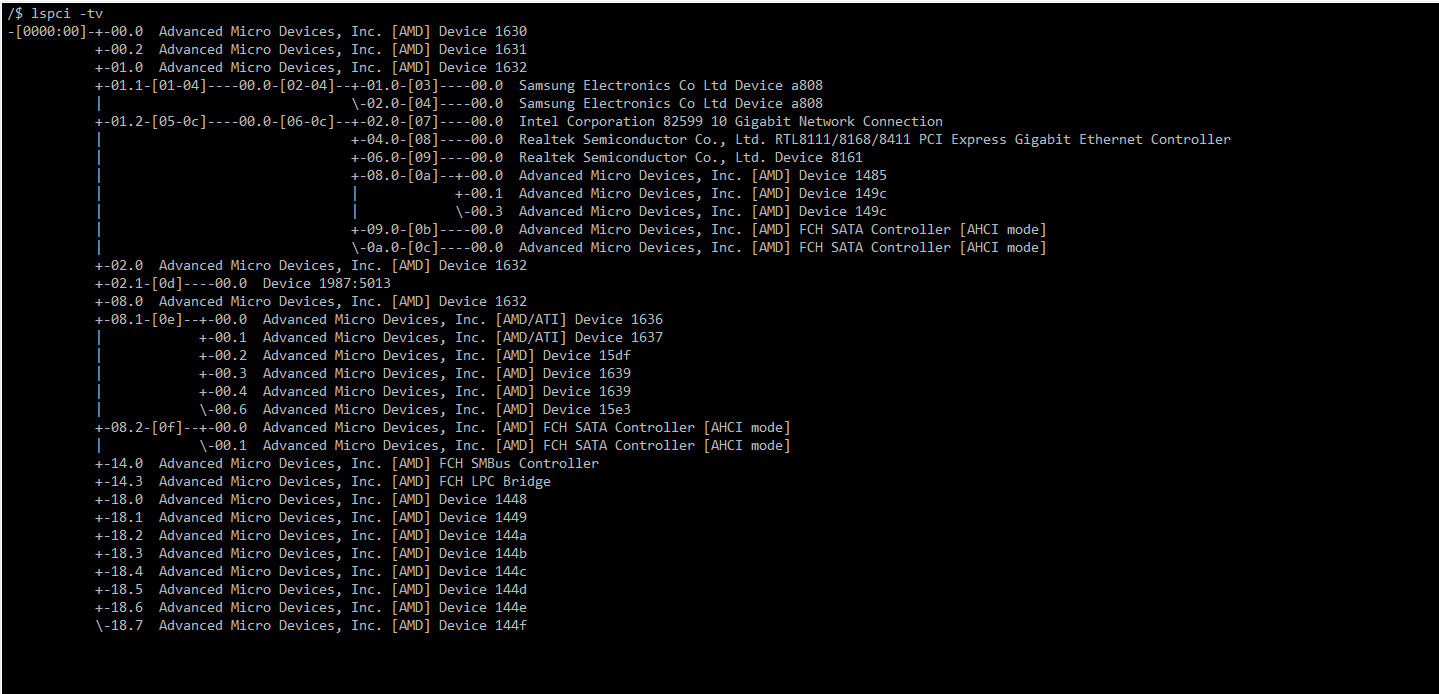
The script ./my_create_qnap_boot works fine, all addresses are specified correctly and I personally checked them with commandsls -al /sys/block/sd*lspci -vtnnlsscsi -dvsi
But DEV_PORT does not change, they remain as in the original, and there for most models in my experiments
they go either 0 or 1 for even and odd disks and vice versa. I tried to leave it as it is,
I tried to manually change it just in order as they have Windows in VMware/ESXi, i.e. from 0 to 7 and then just call immediately./pack_your_initrd
And they always get the same result - the system does not see disks on the web and I can't do anything else from there.
But if there is a terminal/console, I see there that there are disks in the system and their addresses are correct, the same
as they were specified in the /initrd/etc/model.conf file
4) Why is there an entry added in the configuration file /inintrd/etc/model.conf for only one or two of the first hard drives, but not for the rest?[system Disk 1]...PCI_SWITCH_PORT = 0...[system Disk 2]...PCI_SWITCH_PORT = 0...[system Disk 3]...[system Disk 4]...
Please tell me what the problem is, and it's better to lay out a ready-made virtual machine image for the above models.
I am especially interested in the TS-1079 Pro and the best TVS-872XT, because in theory it even has a QuTS hero.
I really ask you to throw me the finished file *.vmx and *BOOT*.vmdk for the above models.
At first, change to OX version.
All you have to do is to modify model.conf.
1. boot drive 1G is enough.
you do not need to do anything.
2. I will show u how to add modules late by hand.
What kind modules do u need?
3,4 Make correct model.conf. that is all.
If it did not work, just post your model.conf and lspci -tvnn.
If u use ESXi, it will be very easy to handle model.conf. U can use SATA upto 30.
For Proxmox, I have to use IDEx2 for data, satax1 for boot.
Tapatalk を使用して私の ELS-NX9 から送信
-
Here is a good teacher.

Tapatalk を使用して私の ELS-NX9 から送信-
1
-
-
8 hours ago, s2k7 said:
Hi meine Freunde,
hier ist der Link zum "Year of the OX" Loader auf Englisch.
https://mega.nz/file/MfoTkKKR#zjK_UyVzvZ5tL5Mhr34IzyqR5mogjaiSQ8l2uAI7J9w
Originalbeitrag
http://www.nasyun.com/thread-76364-1-1.html
Aktualisiert, um VIRTIO_NET in qts 5.0 zu verwenden
https://mega.nz/file/NWBinb6K#fcZliphdJo_USVws4bo3AsNXnGsz35_6xIlDa7s4qWw
-
1
-
-
1 hour ago, snoopy78 said:
@ S2k7 you seem to understand the Chinese much better than I do.... you can if necessary. explain the modding/patch part in more detail....
As far as I understand, you can integrate your own files/drivers via /home/tc/patch/etc/init.d/file and then "./patch_install".....but I haven't tested it yet.. ..
Wählen Sie das dritte Menü
"Re-edit model.conf by TinyCore 10.1 System"
# patch_extract
# sudo vi patch/etc/model.conf
...
# patch_install
# sudo reboot
-
1
-
-
On 2/5/2022 at 9:38 PM, snoopy78 said:
hier eine kleine (grobe) Anleitungf zum neuen Image...
- gewünschte Firmware von QNAP herunterladen
- USB Stick (#1) mit ISO vorbereiten und booten
==> in Tinycore wechseln
===> admin/admin
====> ipconfig
=> SSH in das System
==> tc/admin
=> winscp in das System
==> tc/admin
===> via WinSCP die heruntergeladene Firmwaredatei auf das System kopieren
====> wenn du eine model.conf hast, ggfls. diese auch gleich in das Verzeichnis kopieren
=> in SSH folgende Befehle eingeben
==> sudo get_qnap_firmware /home/tc/TS-X72_20211223-4.5.4.1892.zip
- leeren USB Stick (#2) anstecken (!! der wird später alles zum Booten enthalten und muss nicht mehr entfernt werden)
==> ls -al /sys/block /sd*
===> die Ausgabe dokumentieren und umrechnen
z.B.
/devices/pci0000:00/0000:00:14.0/usb4/4-4/4-4:1.0/host6/target6:0:0/6:0:0:0/block/sda/=> diese Wert in model.conf eintragen (wenn das nicht stimmt, bootet er nur bis ca. 18Sek)
=> [Boot Disk 1]
DEV_BUS = B00:D20:F0
DEV_PORT = 4==> sudo cp model.conf /home/tc/patch/etc/model.conf
==> sudo create_qnap_boot1. USB Stick rausziehen und dann sollte es laufen
Hi meine Freunde,
hier ist der Link zum "Year of the OX" Loader auf Englisch.
https://mega.nz/file/MfoTkKKR#zjK_UyVzvZ5tL5Mhr34IzyqR5mogjaiSQ8l2uAI7J9w
Originalbeitrag
http://www.nasyun.com/thread-76364-1-1.html
-
2
-
-
12 hours ago, snoopy78 said:
one question to all the linux cracks here....
with the new boot iso i created an bootable usb stick
since i want to modify the
i did unpack the initrd.boot to modify some values in "create_udev_rule.sh" (located /etc/init.d/ )
so i did
mkdir /tmp/initrd_content
cd /tmp/initrd_content
sudo xz -z /tmp/initrd_content/ /mnt/sdc2/boot/initrd.boot -i
Then i were anle to find & modify the required values...
but HOW can i compress the changes now again so that i have a valid initdr.boot again?
Thank you for your help
PACK
# find . | cpio -o -H newc | gzip > ../initrd.boot
UNPACK
# gzip -dc ../initrd.boot | cpio -id
-
1
-
-
My system x53D-4.5.2 worked well in PVE-7.0.
CPU: i5-9400
MB: asrock H310
datadisk: ide0
bootdisk: ide2
The order is very important.
I will try a live update to 5.0 late.
-
The photo app did work with 9pfs. That was my target. I don't know other way to use 9pfs other than a docker.Thanks, Does DSM moment work with 9pfs? I have tested same app(for example moment/backup..) didn't work with NFS in DSM6.
Can you share your vm config? Looks like you use the docker DSM?
I used old way, just to put 9p modules directly. You can use any config in this post to include virtio default.
Tapatalk を使用して私の ELS-NX9 から送信
-
9p worked well.Is it possible that support virtfs/9p in DSM?
NFS directory is blocked in some DSM apps.
Please check my post in another thread.
Tapatalk を使用して私の ELS-NX9 から送信
-
1
-
-
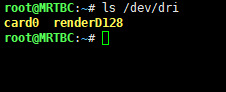
8 hours ago, tbc0309 said:
DSM7.0.1-42218 HD630 driver fix i915.ko for DS918+
thanks @IG-88 and laojifuli 🥰
replace:/usr/lib/modules/i915.ko
reboot then:insmod /usr/lib/modules/i915.ko
check:ls /dev/dri
test:
i9 9900t:ok
support:
i5-9400、i5-9600K、i9-9900T(8086:3E98)
i5-10600T(88086:9BC8)
i5-10500(88086:9BC8)8086:3E92 => iGPU UHD 630, Low End Desktop 9 Series (original driver)
8086:3E98 => iGPU UHD 630, High End Desktop 9 Series (i5-9400, i5-9600k, i7-9700t, i7-9700)
8086:9BC8 => iGPU UHD 630, Low End Desktop i5-10500, i5-10600T and lower
8086:9BC5 => iGPU UHD 630, High End Desktop i510600K and higher
8086:3E93 => iGPU UHD 610, Low End Desktop 9 Series
8086:9BA8 => iGPU UHD 610, low End Desktop Series like G6400Thanks a lot. Worked well in the following system:
CPU: i5 9400
OS: PVE-7.0 passthru iGPU, DS918+, photo-1.1.0-0224
-
You need SSH to your system with ROOT to edit.Thanks I will try today. Do i need root access or just add socket/serial port?
Tapatalk を使用して私の ELS-NX9 から送信
-
/etc.defaults/synoinfo.confI have quad GbE pcie card and I want to use it with DS918. All 4 ports are connected to switch with created bond (LACP) connection. When I add second mac with count 2 into grub.cfg they both appear in DSM. If I do the same with 4 mac adresses and change count to 4, DSM still shows only 2 connections. Is it possible to have 4 ports active in DS918?
/etc/synoinfo.conf
change to 4 from following 1 or 2
maxlanport="1"
Tapatalk を使用して私の ELS-NX9 から送信
-
@segator
@uxora-com
Is it possible to passthrough iGPU to xpenology ?
It will be useful for DS918+.
Tapatalk を使用して私の ELS-NX9 から送信 -
Redpill two versions worked well in this docker system.
3615xs-7.0.1-42218
918p-7.0.1-42218
If you want 9p modules, you can download from my github: https://github.com/s2k7/DSM7-modules
-
2 hours ago, pocopico said:
Can you please remind me the platform ? DS918 or DS3615 ?
After changing to apollolake toolchain, all compiled modules worked well now!
Thanks!
By the way, the default virtio for DS3615 worked well in my system!
-
1
-
QNAP auf eigener Hardware
in GERMAN
Posted
Tapatalk を使用して私の HMA-AL00 から送信