

nexuscan
-
Posts
33 -
Joined
-
Last visited
Posts posted by nexuscan
-
-
Hello all,
I have barematel old machine. and I installed proxmox 8.0.4 on that.
I have installed arc boot loader 23.10.1 and I install synology on that RS4021xs+ with 7.2.1-69057
Today I got update notification on synology 7.2.1-69057 Update 1
and as I check arc there is new version as well 23.10.3a
So, my questions are;
- What are the steps to update arc boot loader
- What are the steps to update synology
- Should I update first arc boot loader, and then synology update ?
I will be very happy if someone can explain to me step by step for dummy
") which is I am :))
which is I am :))
Thanks a lot !
Devrimer
-
On 8/16/2022 at 3:55 AM, phone guy said:
If it were me, here's how I would do it. (there is probably easier way, but this is how I would do it without fear)
- FIRST: If at all possible, backup any important data because sometimes bad things happen, period! (ok, now that's out of the way proceed at your risk)
- Establish which platform your build is for (DS918/DS3622/etc). Establish what your current redpill booting method is (USB/SATA). I am going to assume you know the basics of building a loader from here on out, like SSH, watching boot screens and grub menu's in proxmox, etc...
- Verify you have a Serial port 1 console added to your DSM VM in Proxmox. If you don't have one, add it in proxmox now, this helps verify everything is working as expected, and takes the guess work out. If you don't have a Serial console on your DSM VM, add it and reboot the working DSM VM and open the serial console quickly by double clicking on the name of the VM or right clicking on the name of the DSM VM and open the console (this will open a new tab or window depending on your browser), and watch it so you can see what it says and looks like on a successful working DSM boot, it will fly by lines of code and processes which is normal and when its done successfully booting you will see it echo "DSM Login:" or something like that, and just a few lines above that it will show you the IP of your dsm vm. (if you look at my signature at the bottom of this message there is a link to the guide for installing redpill on proxmox, and it shows how to add a serial console with pictures and everything). At this point you should have seen what the console will look like on a successful DSM boot.
-
Restart/Reboot your DSM VM back to TinyCore by watching the boot screen in proxmox and pressing the down arrow on the keyboard to the last grub menu item that says TINYCORE and press Enter, SSH into your TinyCore session and do ./rploader.sh to establish which version of rploader.sh you are running (this really doesn't matter, but if you want to know which version you started from). While you are there, you can do the backup, update and fullupgrade of rploader. Commands are ./rploader.sh backup now / ./rploader.sh update now / ./rploader.sh fullupgrade now . Let it do it's thing and this will get you to the latest stable release of Redpill, which you will need to install 7.1u4.
./rploader.sh backup now ./rploader.sh update now ./rploader.sh fullupgrade now - Now reboot your DSM VM again back to DSM by selecting your original loader boot method (USB/SATA) the upgrade you just did will not affect your current working system at this point, go to synology.com and download the 7.1 with update 1 file for your platform, this file will be about 300mb in size. Also download the 7.1u4 file for your platform, this file will only be about 30mb in size.
- Manually update your system to 7.1u1 (the big file only) inside DSM (control panel->upgrade) and allow it to restart. Depending on how and when you created your first original Redpill, it should work without issue. If you run into a problem at this stage, I'll add something at the bottom, but it should work, as I remember 7.0.1 and 7.1 both worked at the same time so you'll be fine. You can open the serial console in proxmox during the booting and watch its display to verify its booting normal with the DSM LOGIN: as the sign of successful update, just like it did before.
-
Now, at this stage, you should have an updated/fullupgrade redpill tinycore, a working DS#### platform running DSM7.1u1. At this point you can manually upgrade to the 7.1u4 the small 30mb file only. When the system reboots, click back to proxmox and during its reboot, again, boot to TinyCore (last menu item) and SSH into your TinyCore session and run the ./rploader.sh postupdate <platform> command. That will do its thing, update your loader, restore the backup you made earlier and work. Reboot again, go back to proxmox and boot whatever your normal boot method was (USB or SATA whichever you used originally) and you should have a working DSM7.1u4. Hold off on the 7.1.1RC until it's official, that's my suggestion.
./rploader.sh postupdate <platform>
In the unlikely event your DSM7.1u1 doesn't start up correctly, you can boot into tinycore, ssh in, and try the ./rploader.sh postupdate <platform> command now and reboot back to DSM, but I don't think this will be an issue. If you still can not get back into DSM after the 7.1u1 update and the postupdate command, simply re-build the loader with your fully current and updated redpill. Do a ./rploader.sh restoresession command, add whatever ext drivers you had before (nic, etc) and the build command, as an example: ./rploader.sh build broadwellnk-7.1.0-42661 and reboot, and the restore should retain your serial/mac numbers and you will boot to 7.1u1 no matter what now, and you can proceed to step 7 to update to 7.1u4.
Good luck! Post your results, Mark this reply as ANSWERED and press the thanks button. 😉
Hello phone guy,
I want to say that thank you so much to explain step by step everything ! really thanks man!
This is can be article in the forum.
Bravo!
okay I will follow these steps and I will share the results in here.
BR
-
Hello to all,
I installed proxmox on baremetal and on that I installed one year ago DSM 7.0.1-42218 Update 3 with redpill (I dont know which version of redpill I have on the server).
Can someone help me: How to upgrade from DSM 7.0.1-42218 Update 3 to DSM 7.1-42661 on proxmox (or to 7.1.1-42951 RC)
Thanks,
Cheers!
-
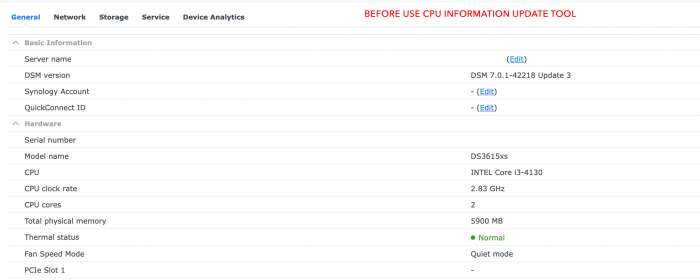
8 hours ago, FOXBI said:
ch_cpuinfo utilizes "/proc/cpuinfo" to gather information.
Because the environment you are using is KVM virtualization,
CPU information is recognized as "model name: Common KVM processor",
so it is impossible to output normal CPU information.
okay, thank you for the info.
but how can I be sure that xpenology is using all of 4 cores in my system.
-
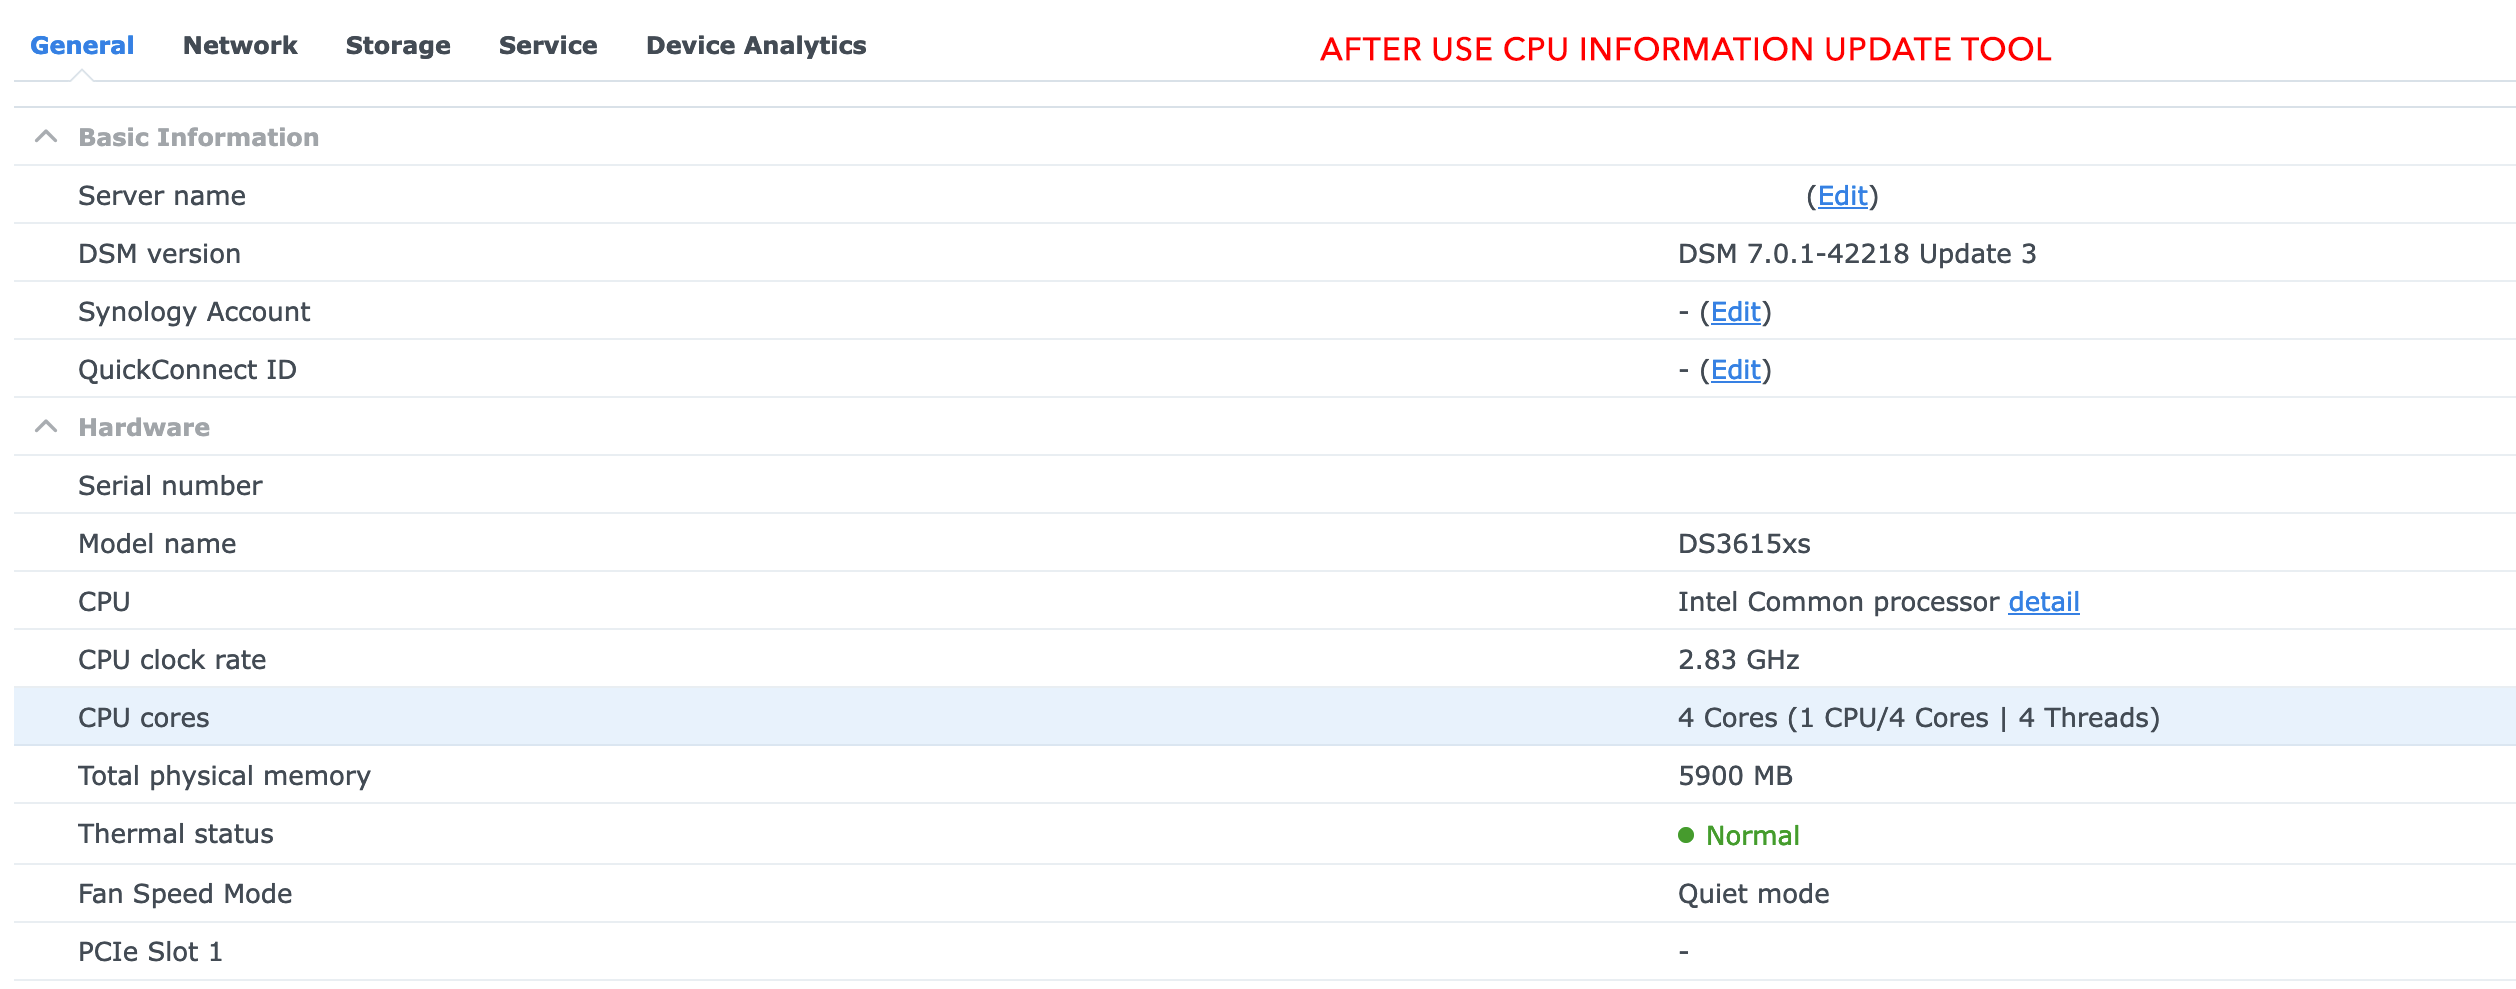
Hello,
I just change it my cpu on my old desktop pc.
and I tried this app to update it. yes it is update it but CPU name is not appear in the Info Center.
my CPU is: Intel(R) Core(TM)2 Quad CPU Q9550 @ 2.83GHz - Link
here is the commands outputs:
root@nexus:~# dmidecode -t processor
# dmidecode 3.2
Scanning /dev/mem for entry point.
SMBIOS 2.8 present.Handle 0x0400, DMI type 4, 42 bytes
Processor Information
Socket Designation: CPU 0
Type: Central Processor
Family: Other
Manufacturer: QEMU
ID: 61 0F 00 00 FF FB 8B 07
Version: pc-i440fx-6.1
Voltage: Unknown
External Clock: Unknown
Max Speed: 2000 MHz
Current Speed: 2000 MHz
Status: Populated, Enabled
Upgrade: Other
L1 Cache Handle: Not Provided
L2 Cache Handle: Not Provided
L3 Cache Handle: Not Provided
Serial Number: Not Specified
Asset Tag: Not Specified
Part Number: Not Specified
Core Count: 4
Core Enabled: 4
Thread Count: 1
Characteristics: Noneroot@nexus:~# cat /proc/cpuinfo
processor : 0
vendor_id : GenuineIntel
cpu family : 15
model : 6
model name : Common KVM processor
stepping : 1
microcode : 0x1
cpu MHz : 2832.995
cache size : 16384 KB
physical id : 0
siblings : 4
core id : 0
cpu cores : 4
apicid : 0
initial apicid : 0
fpu : yes
fpu_exception : yes
cpuid level : 13
wp : yes
flags : fpu vme de pse tsc msr pae mce cx8 apic sep mtrr pge mca cmov pat pse36 clflush mmx fxsr sse sse2 ht syscall nx lm constant_tsc nopl xtopology pni cx16 x2apic hypervisor lahf_lm
bogomips : 5665.99
clflush size : 64
cache_alignment : 128
address sizes : 40 bits physical, 48 bits virtual
power management:processor : 1
vendor_id : GenuineIntel
cpu family : 15
model : 6
model name : Common KVM processor
stepping : 1
microcode : 0x1
cpu MHz : 2832.995
cache size : 16384 KB
physical id : 0
siblings : 4
core id : 1
cpu cores : 4
apicid : 1
initial apicid : 1
fpu : yes
fpu_exception : yes
cpuid level : 13
wp : yes
flags : fpu vme de pse tsc msr pae mce cx8 apic sep mtrr pge mca cmov pat pse36 clflush mmx fxsr sse sse2 ht syscall nx lm constant_tsc nopl xtopology pni cx16 x2apic hypervisor lahf_lm
bogomips : 5665.99
clflush size : 64
cache_alignment : 128
address sizes : 40 bits physical, 48 bits virtual
power management:processor : 2
vendor_id : GenuineIntel
cpu family : 15
model : 6
model name : Common KVM processor
stepping : 1
microcode : 0x1
cpu MHz : 2832.995
cache size : 16384 KB
physical id : 0
siblings : 4
core id : 2
cpu cores : 4
apicid : 2
initial apicid : 2
fpu : yes
fpu_exception : yes
cpuid level : 13
wp : yes
flags : fpu vme de pse tsc msr pae mce cx8 apic sep mtrr pge mca cmov pat pse36 clflush mmx fxsr sse sse2 ht syscall nx lm constant_tsc nopl xtopology pni cx16 x2apic hypervisor lahf_lm
bogomips : 5665.99
clflush size : 64
cache_alignment : 128
address sizes : 40 bits physical, 48 bits virtual
power management:processor : 3
vendor_id : GenuineIntel
cpu family : 15
model : 6
model name : Common KVM processor
stepping : 1
microcode : 0x1
cpu MHz : 2832.995
cache size : 16384 KB
physical id : 0
siblings : 4
core id : 3
cpu cores : 4
apicid : 3
initial apicid : 3
fpu : yes
fpu_exception : yes
cpuid level : 13
wp : yes
flags : fpu vme de pse tsc msr pae mce cx8 apic sep mtrr pge mca cmov pat pse36 clflush mmx fxsr sse sse2 ht syscall nx lm constant_tsc nopl xtopology pni cx16 x2apic hypervisor lahf_lm
bogomips : 5665.99
clflush size : 64
cache_alignment : 128
address sizes : 40 bits physical, 48 bits virtual
power management: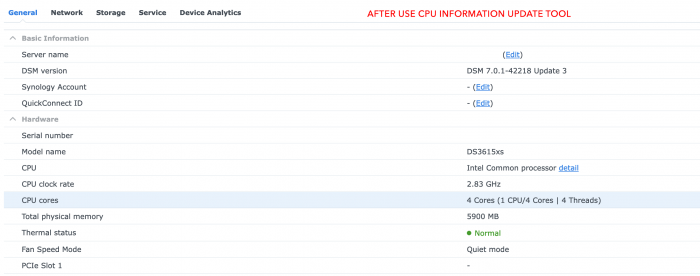
-
okay, thank you so much friends!
I will leave like that, simply ignoring this notification on my nas.
I hope it will help to other people as well that you shared information about that.
thanks a lot !
-
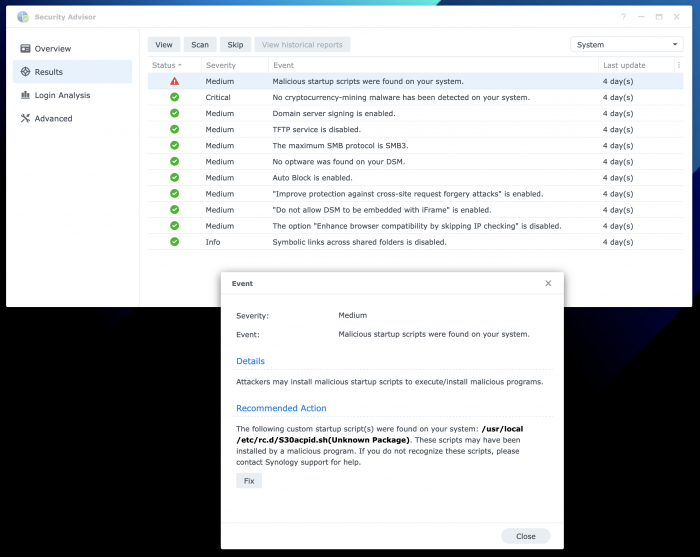
18 hours ago, flyride said:
Security Advisor reports any startup script that is unknown or modified from the distro as anomalous.
You will need to inspect the file and determine if it is malware on your own. Post the contents here if you'd like more advice.
here is the command that in s30acpid.sh file.
#!/bin/sh
#
# This goes in /usr/local/etc/rc.d and gets run at boot-time.PATH_ACPID=/bin/acpid
case "$1" in
start)
if [ -x "$PATH_ACPID" ] ; then
# auto by lkm insmod /lib/modules/button.ko
# auto by lkm insmod /lib/modules/evdev.ko
echo "start acpid"
$PATH_ACPID
logger -p daemon.info "$0 started acpid"
fi
;;stop)
echo "stop acpid"
killall acpid > /dev/null 2>&1
logger -p daemon.info "$0 stopped acpid"
;; -
17 hours ago, Orphée said:
You probably installed acpid extension with radpill loader.
Is so, it is safe.yeah I use redpill boot loader on proxmox.
-
I found this: https://community.synology.com/enu/forum/1/post/150920
His NAS was infected with the 0xxx Virus
-
Hello all,
I am getting this result when I run the synology security advisor.
Is that something virus, idk.
-
hello friend,
thank you so much for that solution!
stay safe!
-
 1
1
-
-
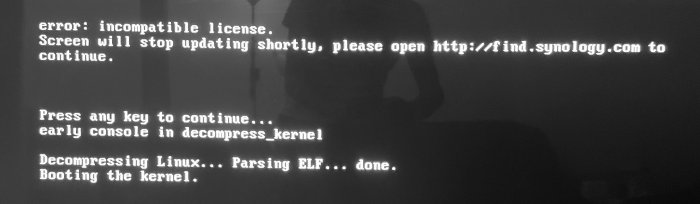
Hello friends,
I was using more than 4 year my bearmetal xpenology pc.
but currently I am getting this error after I restart my pc.
and there is no ping. I cannot connect to my server.
I think something happened to the usb boot drive?
please check attached picture.
anybody help ?
-
Unfortunately I did not find anything 😐
selamlar
-
at least this time we helped the people I think dear, It is satisfying @Polanskiman
-
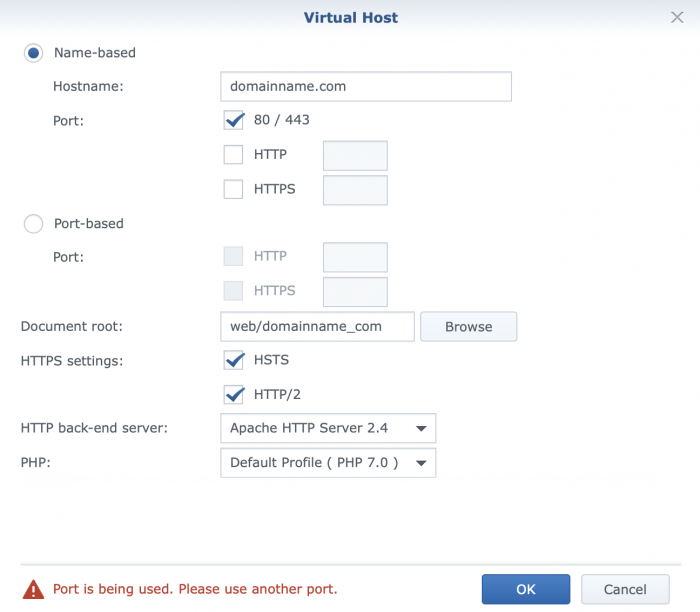
Hello All,
I have baremetal pc and running DSM 6.1.7-15284 Update 3.
I did not install new app or no any changes on any app.
It just appears Abnormal on Web Station panel.
I simply delete my all VH on that.
I uninstall PHP, Apache and Web Station. and then re-installed.
and now when i am trying to create new VH and I am getting this error:
port is being used. please use another port.
you can check the picture to see the error.
more info: I can choose different port. and It is saving like that. For Examp. for http 8080 and for https 4443.
I will be glad if someone can help me about that. I have my personal webpage that was running on that.
I really do not want to re-install the server, again 😔
BR
DEV
-
20 hours ago, Polanskiman said:
Was your question answered to your satisfaction @nexuscan?
thank you also for your following the topic @Polanskiman
-
On 1/17/2019 at 9:52 PM, flyride said:
I believe that motherboard uses Realtek NICs. So you will need to go buy an Intel PCIe NIC and disable RealTek in the BIOS before updating to 6.2.1.
FMI: https://xpenology.com/forum/topic/13333-tutorialreference-6x-loaders-and-platforms/
Thank you for your reply @flyride !
I simple ordered new network card, and waiting product to arrive soon or later. and I will test with that. I will reply result about that after that I test it with new network card. and this will be helpful for the other users as well.
BR.
-
2 hours ago, flyride said:
I believe that motherboard uses Realtek NICs. So you will need to go buy an Intel PCIe NIC and disable RealTek in the BIOS before updating to 6.2.1.
FMI: https://xpenology.com/forum/topic/13333-tutorialreference-6x-loaders-and-platforms/
yes there are2 realtek ethernet port on this motherboard. And you are saying that there is no more support? pfff so I should buy new NIC....
BR
-
Hello, @bluesnow,
it just asked directly to new installation.
then I found the image file from web site. and I test it with 6.2 and 6.2.1 pat files. it just worked with only 6.2 pat.
then I tried to upgrade but it did not worked after upgrade.
Best Regards
-
On 8/27/2018 at 8:51 PM, bluesnow said:
I tested in VMWare Workstation 14 Player,
..and package on this file DS3617xs DSM 6.2 on VMWare. Please be sure to add at least one SCSI hard disk drive and make SATA disk drive first boot device on BIOS.
I've changed the default option boot to select VMWare and you don't need to select on VMWare.
Regards
could you please tell us exactly which version did you used (pat file) ?
because I just run that vmachine and tried to installed latest update but then it did not worked.
please share with us which version did you used of that PAT file.
thanks.
-
it is an old pc actually. but thanks god I can user this machine by your help about OS.
core2duo cpu,
gigabyte x48 motherboard with 2 onboard ethernet,
ddr2 ram
BR.
-
Hello all,
I have baremetal Synology 6.1.7-15284 with V1.02b for ds3615 and I am looking for a help from you guys about migrate my server to 6.2.1.
Should I just prepare new usb boot loader with V1.03b for DSM 6.2 and then remove the old version usb and put the new one and then boot with the new usb and try to migrate ?
Many thanks your help!
BR.
-
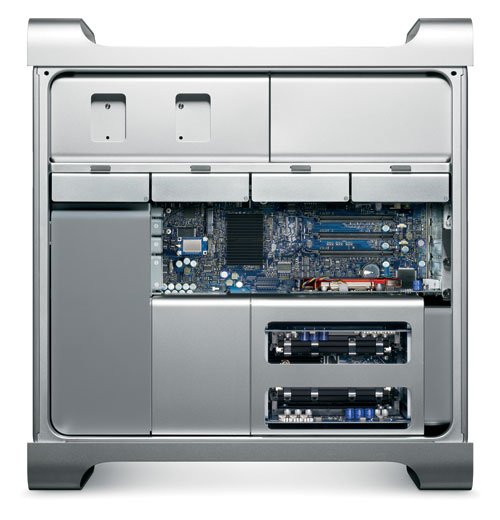
Hello all,
I want to run synology with bootloader on Apple Mac Pro A1186. is that possible ?
Should I make same way that we just create boot loader to my usb stick drive and boot with that ?
BR
-
Hello all again,
I just install new dsm on vm. and I just tested with new this machine about my issue. And as I understand I should delete Host on Virtual Machine Manager.
But I cannot open this application.
So, I need your help about; to delete this host with command cli.
Is there way to remove this Host record?
many many thanks to all.


how to update arc loader and synology
in General Post-Installation Questions/Discussions (non-hardware specific)
Posted
Thank you apriliars3,
So, first first step; I should check current released version of arc boot loader version and this version add which synology version support.
After that if it is support latest update of synology then I should update first arc boot loader?
After that I should update synology server.
Am I right ?
if yes;
should I make arc bootloader backup before update it ?
if yes;
what is the backup process of arc bootloader, is there step by step guide ? Because I really don't know.
and after update of arc bootloader, should I update synology manually or I can just click update button on synology update section ?
thanks a lot, really! :))