Leaderboard


Popular Content
Showing content with the highest reputation on 06/06/2023 in all areas
-
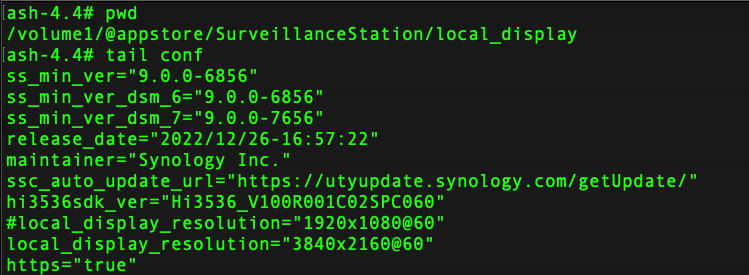
Simple tweak but didn't see it mentioned on the forums. The DVA1622 ships with its local display output set to 1920x1080@60. You can tweak the config file and make it come up to 4K - assuming you are connecting to a 4K monitor. Depending on your monitor and host hardware, you might get 4K@60 working (rather than @30) - its working for me with a DVA1622 based off an HP ProDesk (Intel 630) but of course my monitor supports 4K60. My CPU still only 12% with monitor centre open and an AI task running, quite impressed. Dunno why they don't ship with 4K enabled out of the box - text and high res camera images look much crisper and can't see a reason not to use it if monitor is 4K. Note after you test it and it works there is also a .defaults version of the conf file you should update so this is persistent.
 1 point
 -
The matter has been resolved! Some kind guy at Reddit advised to use web.archive.org for downloading legacy DSM versions that Synology deleted. Ref: https://web.archive.org/web/20210305152847/https://archive.synology.com/download/Os/DSM1 point
-
you can try this one. It may works. ./rploader.sh ext ds920p-7.2.0-64561 add https://raw.githubusercontent.com/pocopico/tcrp-addons/main/acpid/rpext-index.json1 point
-
according to the script here ( https://github.com/pocopico/tcrp-addons/blob/main/acpid/releases/install.sh ) I manually installed the acpid addon. but i beleve the best option is to add the ACPI addon as @pocopico suggested when you build the image.1 point
-
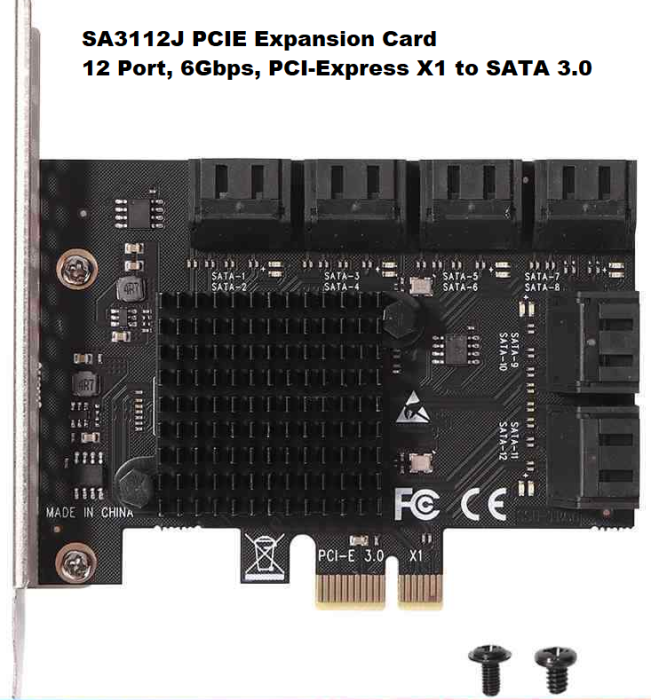
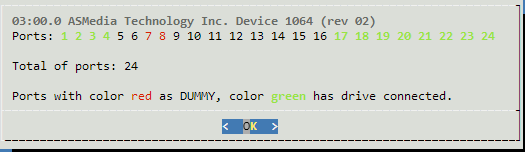
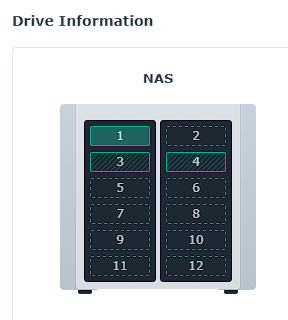
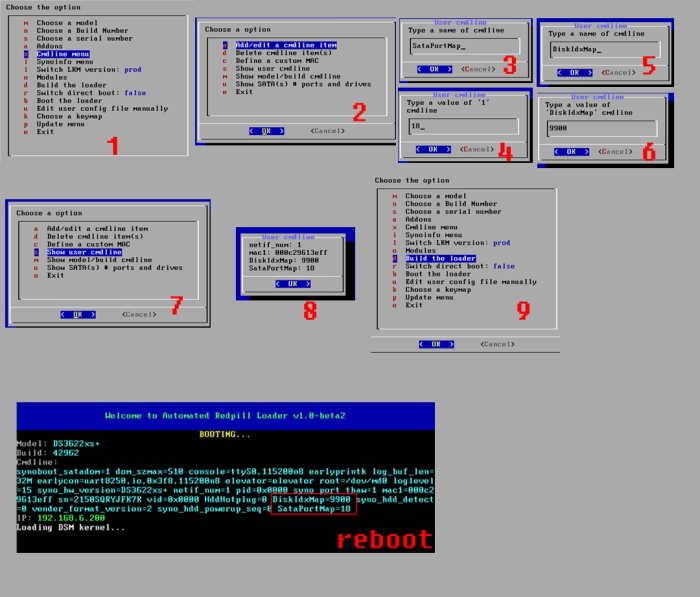
I was in the process of upgrading my DSM 6.2 NAS with 2 TB drives to DSM 7.1 using 16 TB drives. I figured that my SAS card was not compatible with drives that size and I needed to have 12 ports. I also learned that DSM 6 was not capable of properly handling large drives. I got me one of these: It was plug and play. It was immediately recognized by my system and ARPL. However, I noticed a problem with it. ARPL reported the 12 ports not contiguously used. It reported ports 1-4, and 17-24 as the ports assigned to the actual physical ports. I am a bit anal with things like this. I need the ports in the DSM Interface to match the actual ports of my drives in case I need to replace them. I even noticed that some of the assigned ports didn't even follow the proper order. I would have expected all the ports to be contiguous using the sequential numbers. So here's how I fixed it: Step 1. Identify which SATA port is mapped to which physical port 1. I plugged a drive to every physical port 2. I made a list of all the Serial Numbers of each disk and their physical location 3. Loaded DSM and checked in the Storage Manager > HDDs to identify the port actually assigned to each disk I ended up with the following list: SATA PHYSICAL 1 1 2 2 3 3 4 8 5 4 6 5 7 6 8 7 9 9 10 10 11 11 12 12 This helped me identify which ports I needed to switch in order for it to be shown contiguously with the proper numbers that correspond to the actual physical ports. Step 2. Rebuild the ARPL loader 1. I restarted the NAS and made sure to use the option to make changes to the loader 2. Went into the Command Line options by following this: 3. Added the following as the sata_remap command line option: sata_remap: 16>3:17>4:18>5:19>6:3>7:20>8:21>9:22>10:23>11 This translates to: Make port 16 be port 3. Make port 17 be port 4. Make port 18 be port 5. Make port 19 be port 6. Make port 3 be port 7. Make port 20 be port 8. Make port 21 be port 9. Make port 22 be port 10. Make port 23 be port 11. ---- NOTE THAT: The SATA ports are given values that start at 0. So, if I had 24 ports, it actually meant ports values were 0-23. That means that 16>3 is actually changing the DSM reported Drive 17 to be the Drive 4. ---- 4. Built the loader 5. Booted the loader Step 3. Confirm Changes After booting, I checked the reported drives and their serials and that they matched the order in which the physical ports were put. Hope you find this useful.
 1 point
 -
The TCRP HTML Builder has reached a stable status and it is available for all to test and report any additions or ideas to improve. Thanks to all for the assistance in testing and especially @pcristi for pointing some bugs Thanks Mate ! You can have a look at : https://github.com/pocopico/tinycore-redpill/wiki/TCRP-Web-Builder More pictures and a how to manual will be soon be in the WiKI section of the repo. To try please download latest 0.9.4.8 and point your browser to the TCRP ip e.g. http://yourip1 point