PREngineer
-
Posts
20 -
Joined
-
Last visited
-
Days Won
1
Everything posted by PREngineer
-
 Finally found the problem. It was the USB drive. I had bought a new one from Amazon: TeamGroup 64GB. It works fine but not for the OS in XPEnology. I switched back to the old SanDisk and no issues now.
 -
Finally found the problem. It was the USB drive. I had bought a new one from Amazon: TeamGroup 64GB. It works fine but not for the OS in XPEnology. I switched back to the old SanDisk and no issues now.
-
Well... turns out that the problem was not that. I had Unraid running fine without freezes for a week. Decided to go back to DVA1622. It immediately started freezing again. Something wrong is going on with my hardware and the XPEnology setup and I can't figure it out.
-
Well..... On today's episode of "Being a dumbass"... Turns out that the CPU heatsink didn't sit properly and the CPU was overheating. That was the reason for the freezes. I noticed when I decided to give Unraid a try to see if it performed better and I saw better temperature details than Synology provides. Hopefully somebody learns from this stupid mistake I made.
-
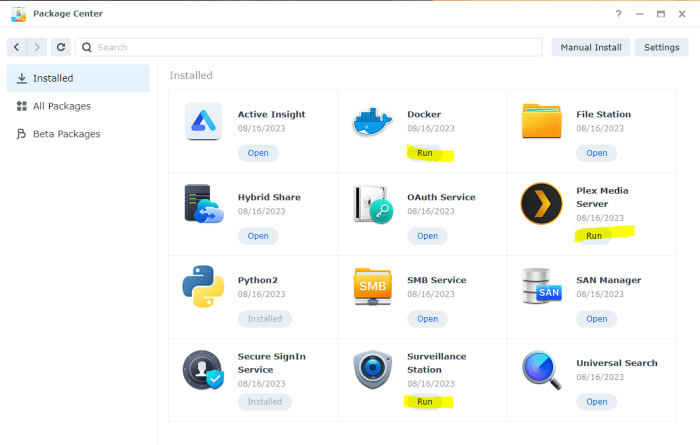
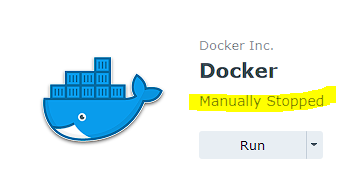
Updates, I think that I found what the problem was. I had an array of 8x2TB drives in my Storage Pool. I bought 2x16TB drives and I tried to add them to my pool. Apparently, having Docker + Plex + Surveillance Station running while doing that, messes up the process and that's why it freezes as it is trying to write new things to the pool while it is expanding it. It was a pain in the butt because it would freeze very fast and wouldn't let me disable the packages. I managed to disable them using the CLI immediately after booting (had to do it several times after several reboots). But once I saw that the packages, especially DOCKER (since containers had the auto-start enabled, which restarted Docker after I stopped it), were stopped, it didn't freeze up on me anymore. Hopefully it is able to add the new disks without issues and freezes. Commands used: ----------- sudo synopkg stop Docker OR new version sudo synopkgctl stop Docker --------------- OR run as root (for better results): ----------- sudo su - synopkg stop Docker OR new version sudo su - synopkgctl disable Docker ----------- I will update on the result.
-
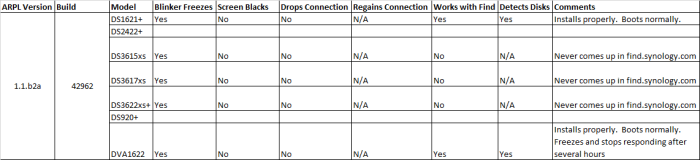
Hi April, please check the link in post #8 as I decided to continue over there. With my hardware, it has been working fine (baremetal) since I changed ARPL to use DS1621+. I am still continuing to monitor it, but no freezes yet. I don't know why you got freezes while it was virtualized. I never had issues when it was running in ESXi as DVA1622.
-
Plex seems to be working fine with hardware acceleration by using the integrated Intel HD 4000 graphics card from the processor.
-
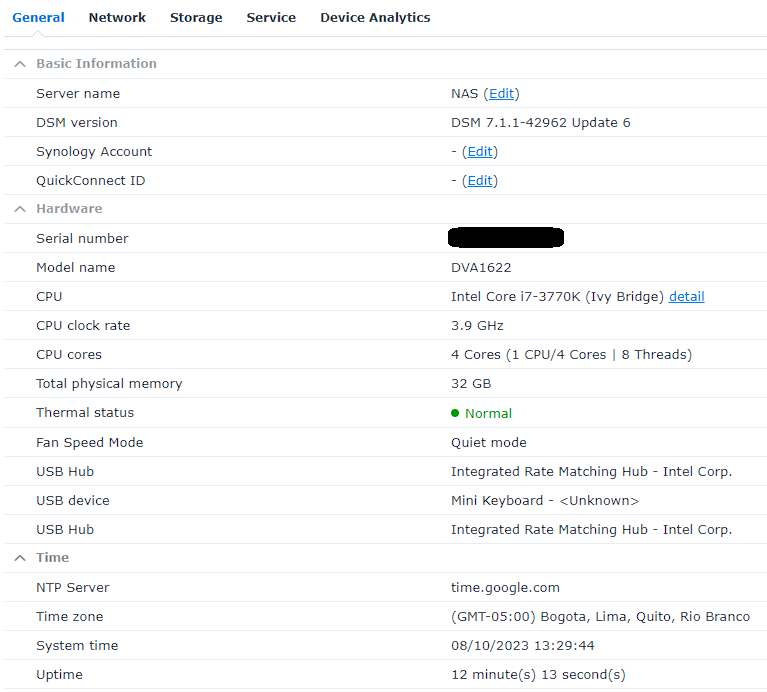
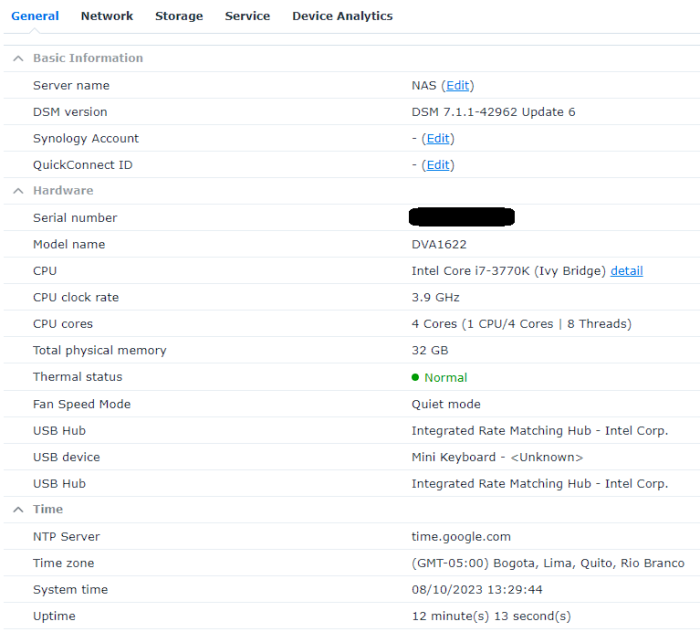
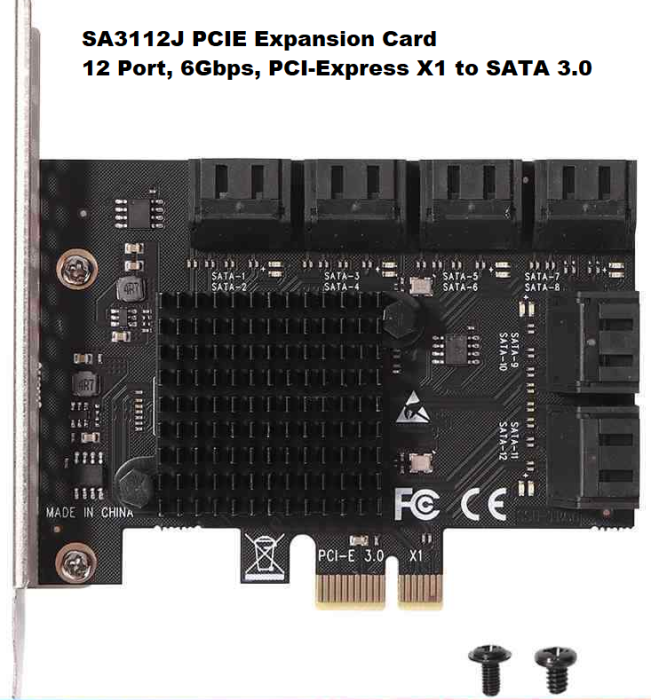
This machine was running virtually, inside ESXi 5.5. All disks were put into the AsMedia PCI-e card and passed through to the VM. Installation was done in a USB drive though. It was running as a DVA1622 (to get the 8 Surveillance Station licenses). Original hardware: Make: Dell Precision WorkStation T7400 CPU: Intel Xeon E5405 x2 RAM: 40 GB PCI-E: AsMedia PIC-E 12-port adapter LAN: Broadcom Gigabit Ethernet New hardware: Motherboard: Gigabyte Z77-DS3H CPU: Intel i7-3770K 3.5GHz (4 Core | 8 Thread) 8MB 77W LGA1155 CPU RAM: 32 GB Corsair Pro (4x 8GB) DDR3 1600MHz CL9 PC3-12800U PSU: Thermaltake Smart 700W LAN: Atheros AR8161 Gigabit Ethernet I am using the ARPL (Automated Red Pill Loader) to set up the system. I've found some issues, so, I am documenting the progress here for future me or other people. Within ARPL, I picked the CPUInfo + Codec patch addons. Will update this thread until I find a stable installation.
-
Well... I've been testing today and I've got some updates. I'm going to be making those at the top of the thread. Thinking maybe about making it a full thread on how to set it up on this hardware that I have. Great... it looks like I cannot edit since I "answered" my post. This thread cannot be deleted, so I will continue documenting the setup for this hardware here.
-
Hi, I would like to get a hold of the DSM 6.2 PAT files but they have all been removed from the Synology website. Is there anyway to get them? Can anybody share them, if they have it? I would really appreciate the help.
-
Yes Bermu, I just confirmed that it won't freeze in Windows. However, I did a hard disk check for bad sectors while it was in Windows and it did find 3 sectors damaged. I am going to try the DS3617XS+ setup now to see if it freezes too.
-
Well... turns out that it continued freezing. I am running the machine with Windows to see if it continues to freeze or if it is somehow related to my DSM 7.1 install. I am thinking about switching from DVA1622 to DS3617XS+ to see if it does any better. Will keep updating this thread.
-
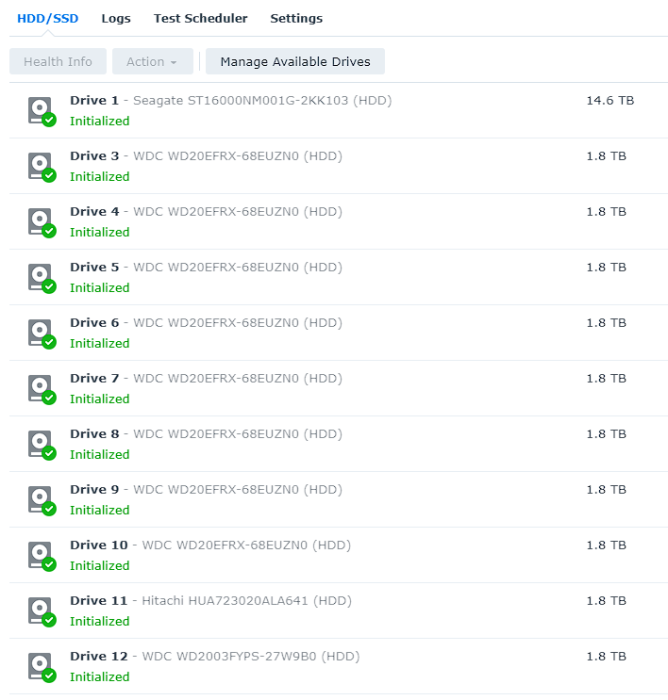
Found several problems... 1. Bad Drives 2 out of my 12 drives are bad, one reported as failing and the other as critical. I was attempting to do Extended SMART checks on them to validate and it would cause the system to freeze after checking some specific areas of the disks. Pulled out the 2 disks. Created a new Storage Pool with only the good drives and performance improved. 2. RSYNC from old NAS on application folder like Docker, PLEX, Surveillance Station. Should not be done! Noticed that if I RSYNCED the folder for any application installed from the Package Center (Docker, Surveillance Station, Plex) from the old NAS into the new one and then tried to run the application, it would not run and it would cause freezes.
-
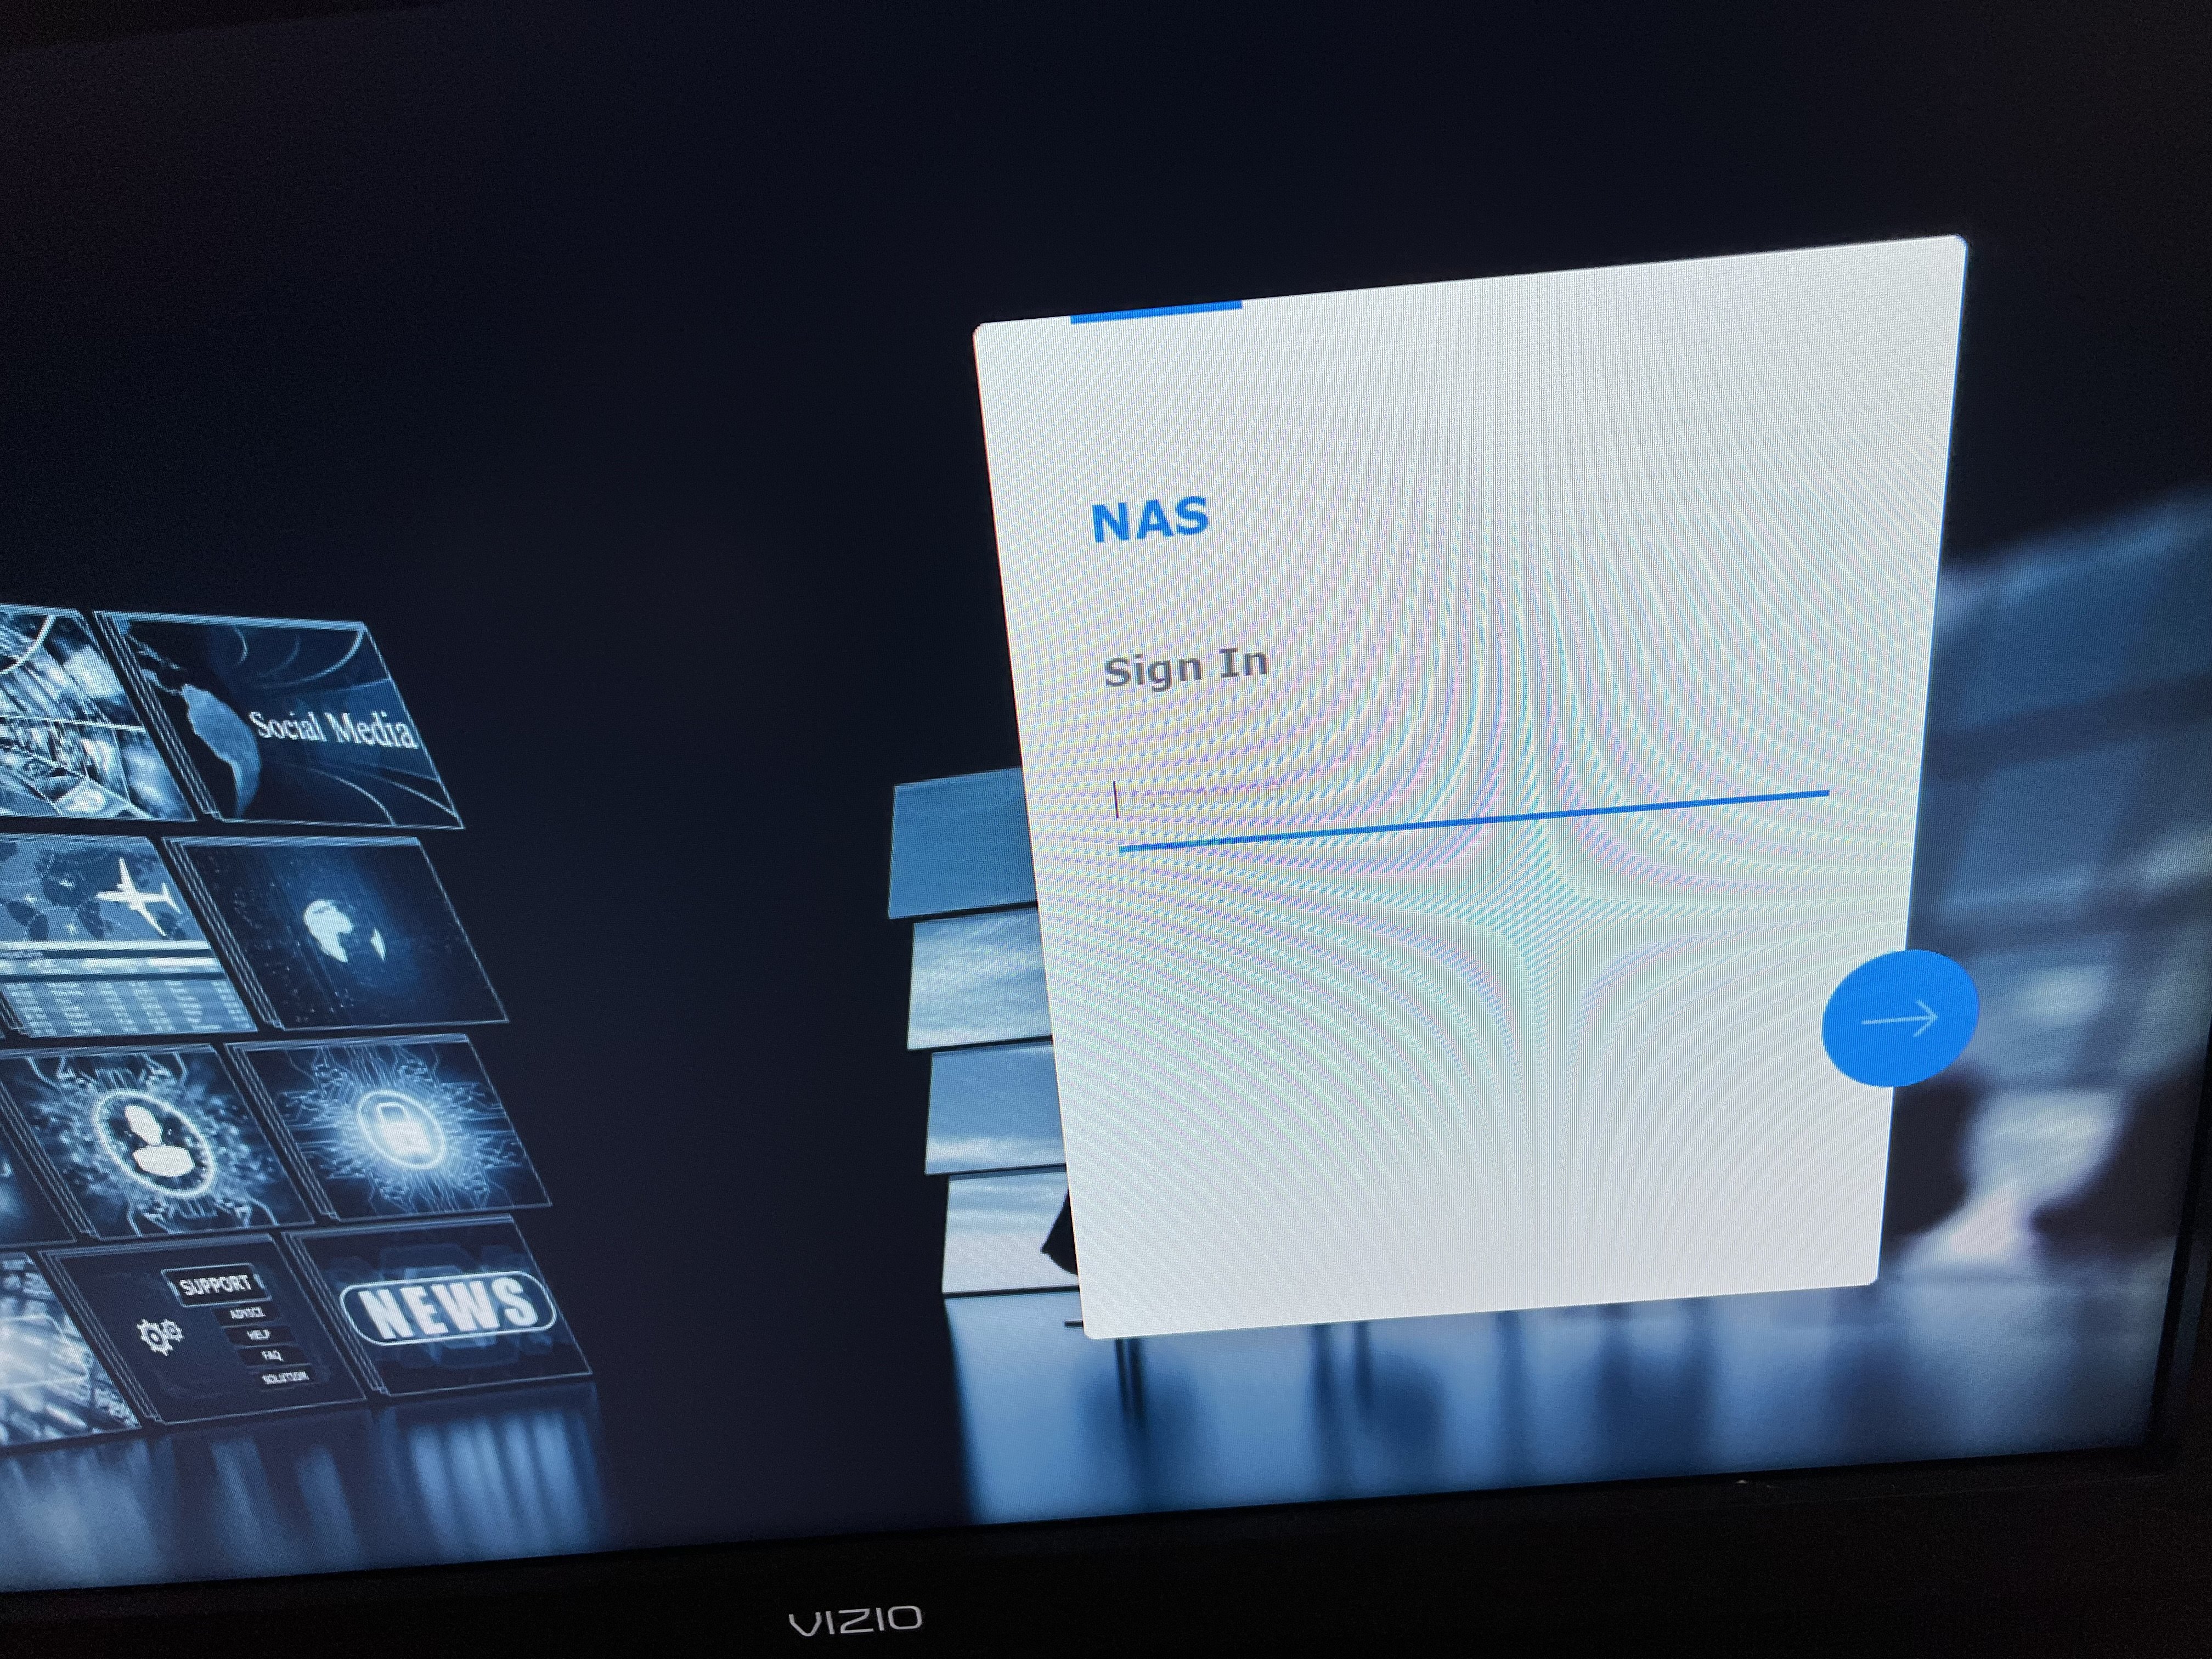
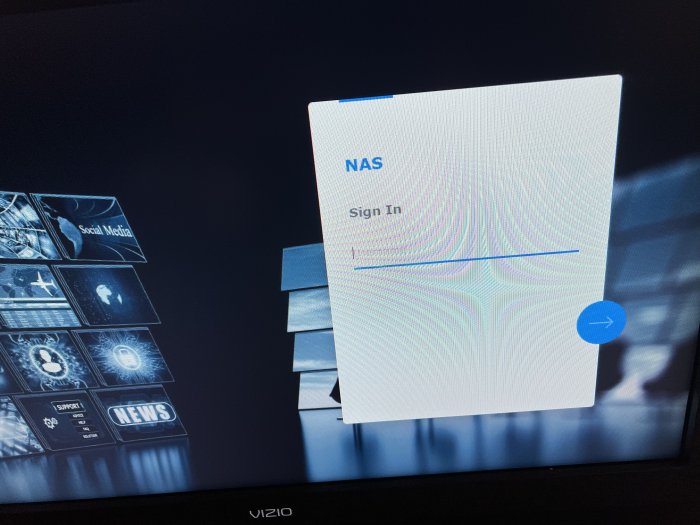
Hi XPEnologers! I migrated my NAS to a new hardware. I am having an issue that I can't figure out. I'm looking for insight. I configured it as a DVA1622 because I need the 8 free camera licenses for Surveillance Station. My NAS starts up and works normally. The problem that I am having is that, after some hours, it seems to freeze and it doesn't respond from the USB keyboard or from the network. I can see the user interface in the monitor plugged into the NAS (see image below) but it doesn't respond. I have to literally shut it down (power button) and power it on again and then it starts working normally. I disabled Hard Disk sleep, thinking it could be something related, but it didn't help. I am not sure if I have a hardware problem or if this is somehow related to XPEnology. --- New hardware is: Motherboard: Gigabyte Z77-DS3H CPU: Intel i7-3770K 3.5GHz (4 Core | 8 Thread) 8MB 77W LGA1155 CPU RAM: 32 GB Corsair Pro (4x 8GB) DDR3 1600MHz CL9 PC3-12800U PSU: Thermaltake Smart 700W LAN: Atheros AR8161 Gigabit Ethernet ---
-
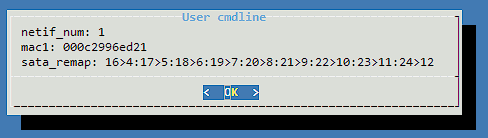
I was in the process of upgrading my DSM 6.2 NAS with 2 TB drives to DSM 7.1 using 16 TB drives. I figured that my SAS card was not compatible with drives that size and I needed to have 12 ports. I also learned that DSM 6 was not capable of properly handling large drives. I got me one of these: It was plug and play. It was immediately recognized by my system and ARPL. However, I noticed a problem with it. ARPL reported the 12 ports not contiguously used. It reported ports 1-4, and 17-24 as the ports assigned to the actual physical ports. I am a bit anal with things like this. I need the ports in the DSM Interface to match the actual ports of my drives in case I need to replace them. I even noticed that some of the assigned ports didn't even follow the proper order. I would have expected all the ports to be contiguous using the sequential numbers. So here's how I fixed it: Step 1. Identify which SATA port is mapped to which physical port 1. I plugged a drive to every physical port 2. I made a list of all the Serial Numbers of each disk and their physical location 3. Loaded DSM and checked in the Storage Manager > HDDs to identify the port actually assigned to each disk I ended up with the following list: SATA PHYSICAL 1 1 2 2 3 3 4 8 5 4 6 5 7 6 8 7 9 9 10 10 11 11 12 12 This helped me identify which ports I needed to switch in order for it to be shown contiguously with the proper numbers that correspond to the actual physical ports. Step 2. Rebuild the ARPL loader 1. I restarted the NAS and made sure to use the option to make changes to the loader 2. Went into the Command Line options by following this: 3. Added the following as the sata_remap command line option: sata_remap: 16>3:17>4:18>5:19>6:3>7:20>8:21>9:22>10:23>11 This translates to: Make port 16 be port 3. Make port 17 be port 4. Make port 18 be port 5. Make port 19 be port 6. Make port 3 be port 7. Make port 20 be port 8. Make port 21 be port 9. Make port 22 be port 10. Make port 23 be port 11. ---- NOTE THAT: The SATA ports are given values that start at 0. So, if I had 24 ports, it actually meant ports values were 0-23. That means that 16>3 is actually changing the DSM reported Drive 17 to be the Drive 4. ---- 4. Built the loader 5. Booted the loader Step 3. Confirm Changes After booting, I checked the reported drives and their serials and that they matched the order in which the physical ports were put. Hope you find this useful.


-
Hi, thanks for replying! No worries. I figured it out with a little Googling. I tried to make it easy to understand for anybody having the same issue. I posted the answer by editing the previous post.
-
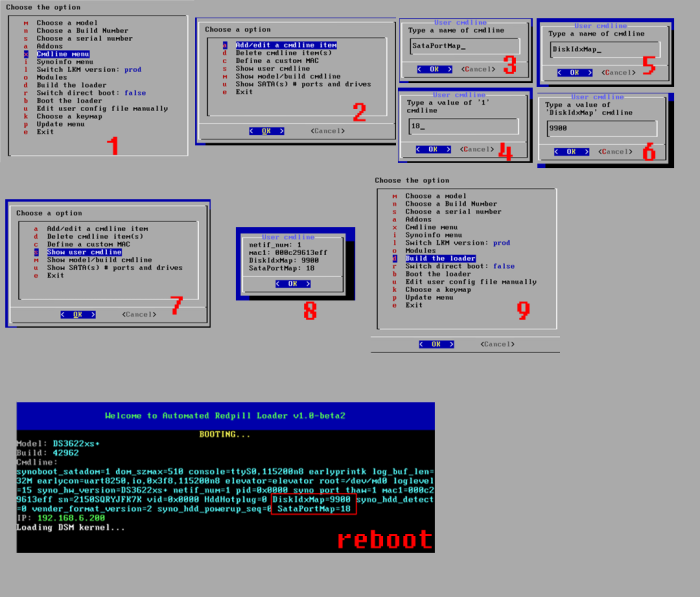
how to config SataPortMap sata_remap and DiskIdxMap?
PREngineer replied to lukemin's topic in DSM 6.x
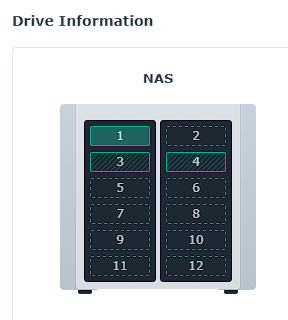
Here's how I solved it for my particular case: Problem: I have a PCIE SATA expansion card. It has 12 physical ports but it has 24 virtual ports in its firmware. I needed to remap drives 17-24 to empty ports 5-12. Here's what I did: 1. In ARPL, add a new Cmdline option using these steps: 2. Name of the option: sata_remap 3. Values are written in the following format: [Current Number - 1]>[Where I Want It - 1] 4. Since I had to remap 8 ports, I kept adding using the : 5. Final value was like this: 6. Re-built the loader 7. Re-loaded DSM 8. Problem fixed, now my drives are shown "sequentially" (when I took this picture, drive 2 was removed):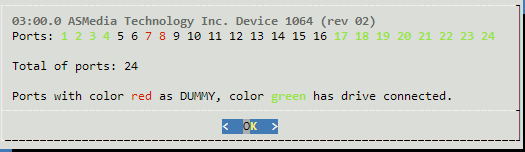

-
Awesome work you've done with this tool. I have a questions that I would like to know if anybody can help me solve. When I check the SATA ports and drives, I can see that my SATA expansion card (12 ports) doesn't map the ports together. So, the drives get recognized as not being in a contiguous set of ports. Is there any way to remove the empty (not used) port numbers and have all my drives show contiguously? ---- ANSWERING MYSELF FOR THE BENEFIT OF OTHERS ---- Here's how I solved it for my particular case: Problem: I have a PCIE SATA expansion card. It has 12 physical ports but it has 24 virtual ports in its firmware. I needed to remap drives 17-24 to empty ports 5-12. Here's what I did: 1. In ARPL, add a new Cmdline option using these steps: 2. Name of the option: sata_remap 3. Values are written in the following format: [Current Number - 1]>[Where I Want It - 1] 4. Since I had to remap 8 ports, I kept adding using the : 5. Final value was like this: 6. Re-built the loader 7. Re-loaded DSM 8. Problem fixed, now my drives are shown "sequentially" (when I took this picture, drive 2 was removed):


-
tutorial: 4 camera on surveillance station (legally)
PREngineer replied to le.pipo007's topic in Tutorials and Guides
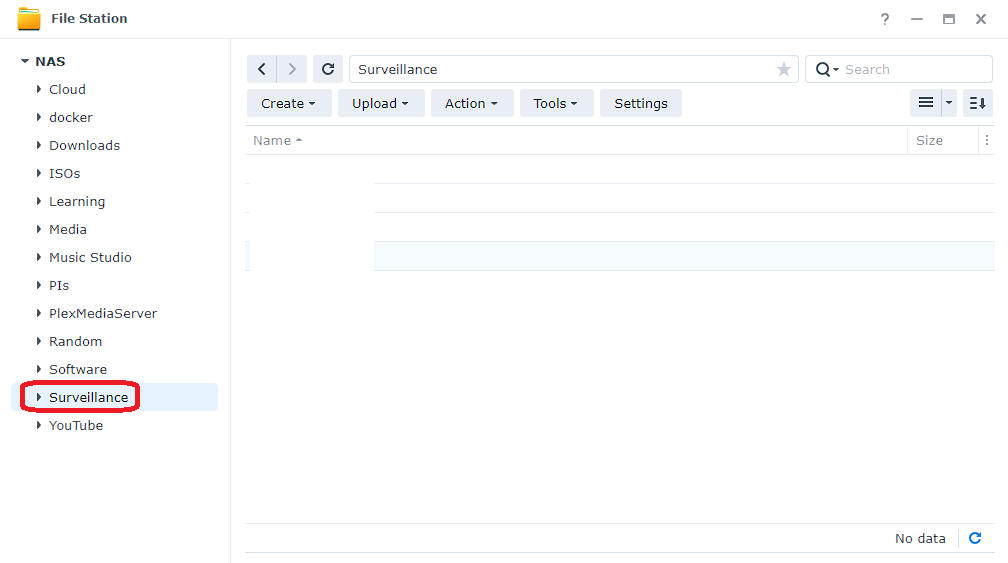
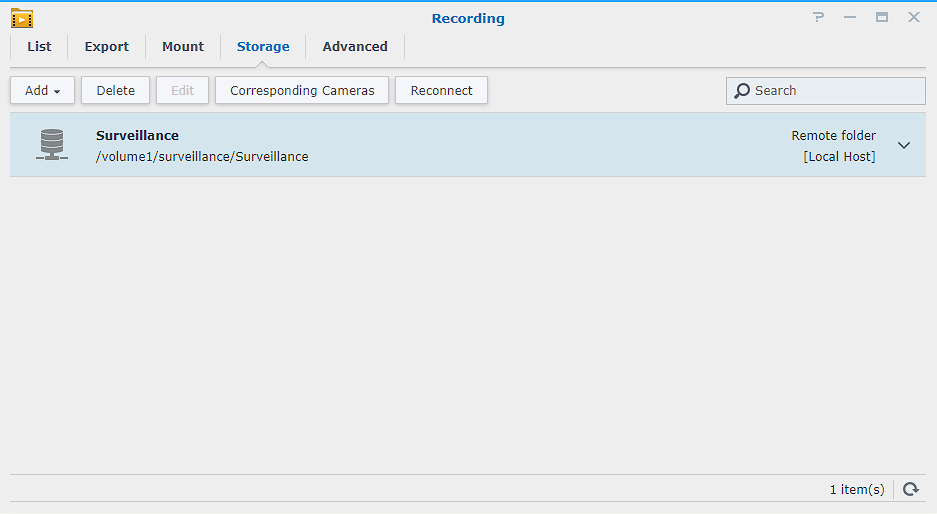
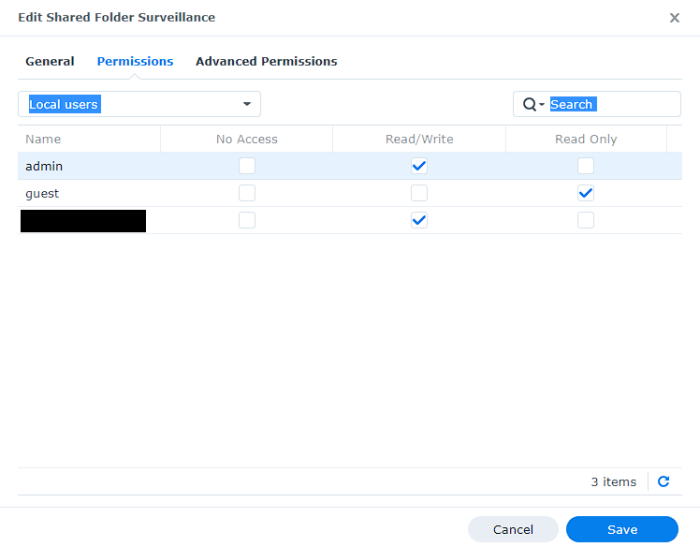
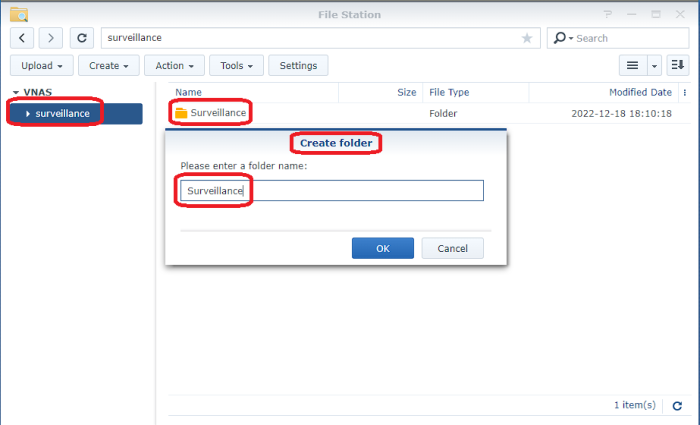
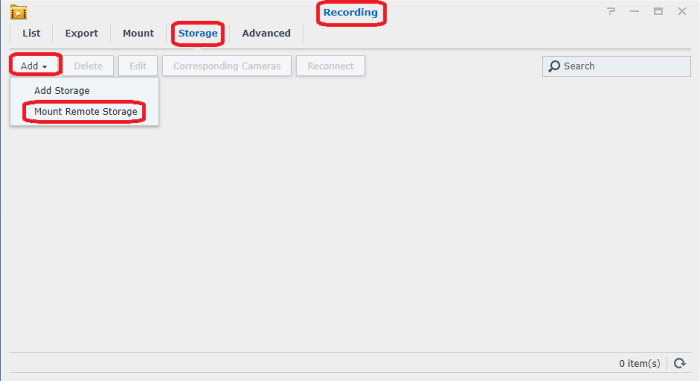
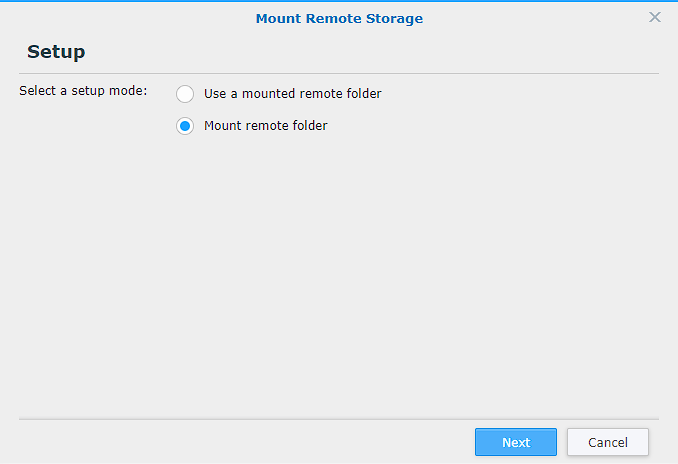
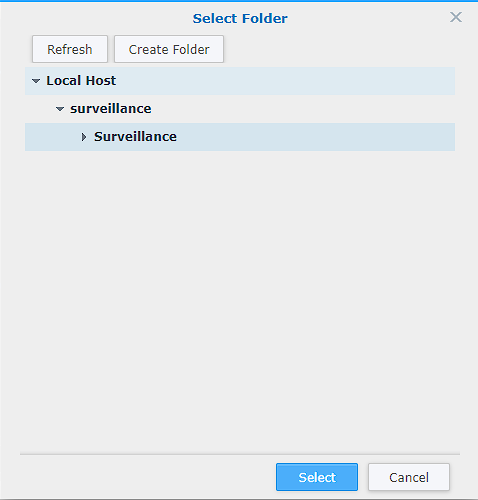
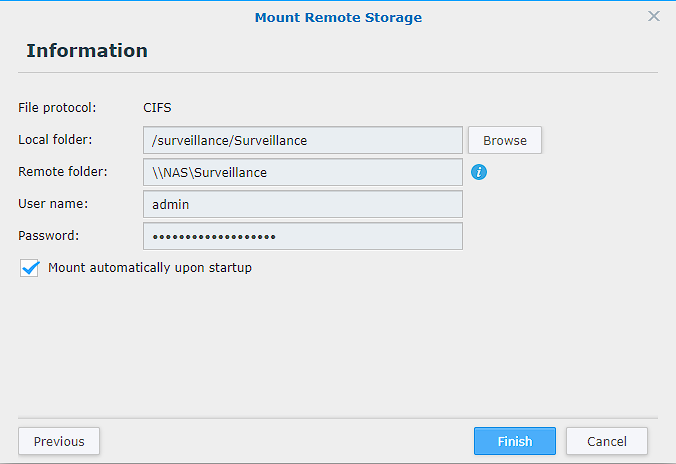
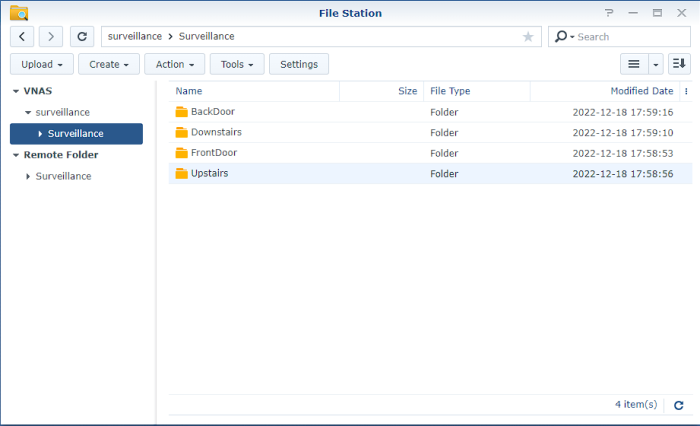
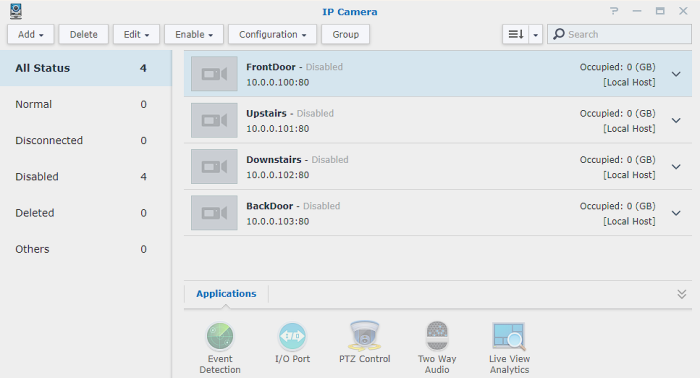
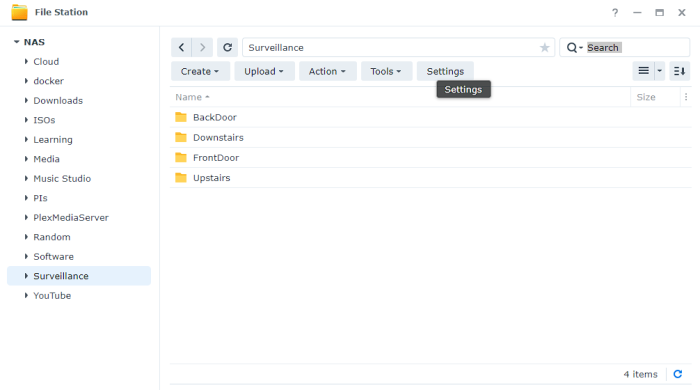
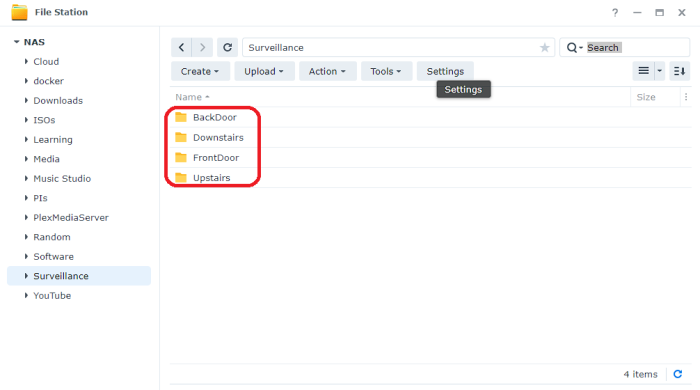
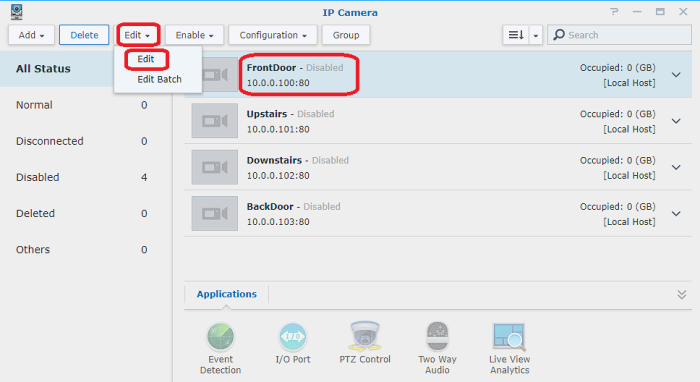
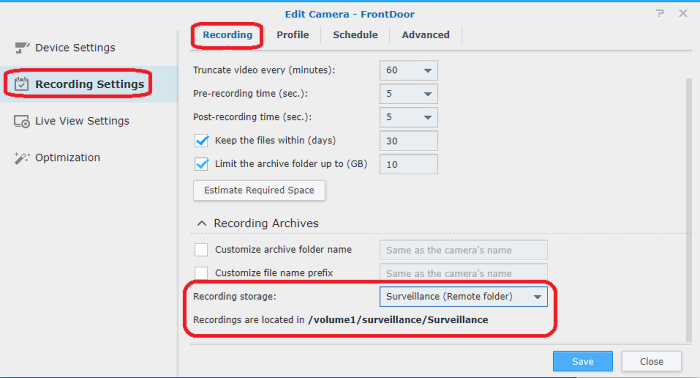
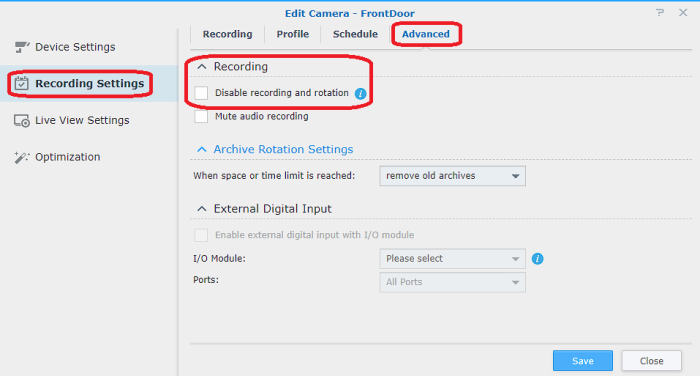
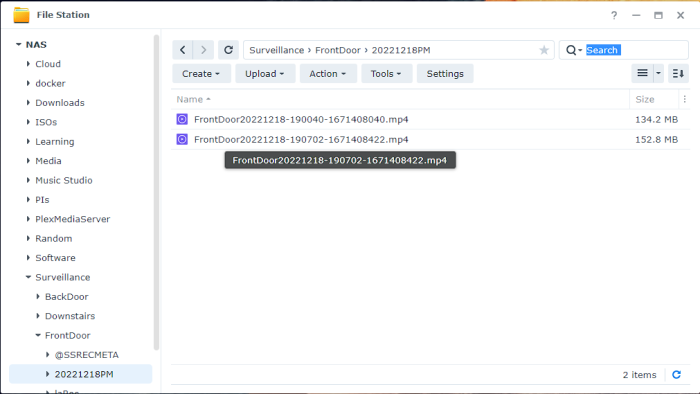
@le.pipo007, This part of your guide should be fixed because the Synology Operating System is configured in a way that /etc/fstab changes get cleared whenever you restart the NAS. Feel free to use my instructions and images or just link to this post in your top post. This way, makes sure that the Virtual NAS can mount your SAMBA (CIFS) share from the Baremetal NAS and use it: Step I > In the Baremetal NAS: 1. Create a Shared folder named Surveillance (or share the surveillance folder created by Surveillance Station using SAMBA) 2. Make sure to allow access to the user that you will use to mount it on the Virtual NAS Step II > In the Virtual NAS: 1. Open File Station and select the shared folder named surveillance that was created by Surveillance Station. Click Create > Create folder (This is not a shared folder. It is inside the originally created shared folder.) Name it Surveillance and create it. It will show up on the right side when you select the surveillance folder on the left. 2. Open Surveillance Station. Open the Recording application. Click on the Storage tab. Click the Add button. Click the Mount Remote Storage option. 3. On the new window, choose Mount remote folder and click Next. 4. On the Select Folder window, find the non-shared folder we created before named Surveillance. Highlight it and click the Select button. 5. On the Mount Remote Storage window, fill up the information accordingly. Then click the Finish button. Note that this is using CIFS (Samba) to mount the share and you can't change it. Local folder should be what we selected on the previous step. For the Remote folder value, you can use the server name or IP address of the Baremetal NAS like so: \\<name>\<share> or \\<ip>\<share> User name should be an account that you authorized in Step I. Password is the password for that account in the Baremetal NAS. Make sure to check the box for Mount automatically upon startup. (This solves the issue that we had with the /etc/fstab mods that kept getting lost upon reboot.) 6. The share is now accessible in our Virtual NAS. If you check in File Station, it will show up as a Remote Folder. We will now proceed to use it for recording. 7. Import or Add your cameras into the IP Camera application. 8. You can see the folders being created in the Baremetal NAS now. (Note: The remaining steps must be done for all the cameras) 9. Select the camera. Click the Edit dropdown and then click the Edit option. 10. On the left side, select the Recording Settings option. On the right side, select Recording and make sure to set the Recording storage location to be our mounted remote folder Surveillance inside the surveillance folder created by Surveillance Station. In the end, it should say that your recordings are located in the /<volume name>/surveillance/Surveillance path. Then, click the Save button. 11. On the right side, select Advanced and make sure that the Disable recording and rotation option is not checked. 12. Enable your camera(s). 13. That's it! Your camera is now recording to the Baremetal NAS share and a reboot will not mess it up.

-
Hi everybody, I was testing FreeNAS and I found that you are able to assign IPs to the docker containers. I am wondering if it is possible to assign an IP within my network to the container in XPEnology instead of it always running on the same IP as the NAS but with a different port.