SCMO
-
Posts
10 -
Joined
-
Last visited
Everything posted by SCMO
-
PS: Thanks a lot @IG-88 for the advice regarding the SATA cables. For a very long time I have only been working with the ones with metal tongue, because in the past I had problems with the other models without clips and the difference in money between them is insignificant.
-
Hi Again @IG-88, I'm sorry for the delay in my reply, but I've been quite busy with work lately and I haven't had much time for other things I followed your advice and found a version with 5 SATA ports on Amazon. This would be the link : https://www.amazon.com/Electop-Controller-Expansion-Non-Raid-Standard/dp/B08BHZQVP7 This is very similar to what was presented on the forum in the posts you sent me for study. It appears to have a JMB585 chipset and is specified to be PCI-E x 4.Would it be an option to consider for the ASM1166 version? Thank's, Mihai
-
what model of board exactly do you use with jmb585? I ask you because I prefer to follow an already beaten path
-
Hi again @IG-88 After studying the link you sent in detail, I decided on two models. The first model would be this : https://www.amazon.com/BEYIMEI-Controller-Expansion-Non-Raid-Standard/dp/B08DFK4LZ7 And the second would be the version from silverstone ECS06. From the tests done by you and from your experience, which of these would be more stable and easier to configure? Thank's Mihai
-
Thank's alot @IG-88 I'll start reading
-
Hi again @IG-88 A few weeks ago I also managed to upgrade from DSM 6.2.3 to DSM 7.1.1-42962 v1 on 918+ on my Asus Z370i with i7 8700 and I even succeeded with the help of the bb-qq drivers for realtek (RTL8152/RTL8153) to successfully install a USB 3.1 network card (Club 3D) of 2.5 Gbit. I'm already waiting for the second one to try to use them together. But now I encountered another problem to which I did not find a clear answer, although I found many possible options on the forum. I would be interested in expanding the number of SATA ports with a card to use on the PCI-E 16x slot .I would be interested in an extension of at most 5 SATA ports that can complete the 4 already existing on the motherboard. Do you have any stable version of such a board that I can use without possible problems? Thank's alot
-
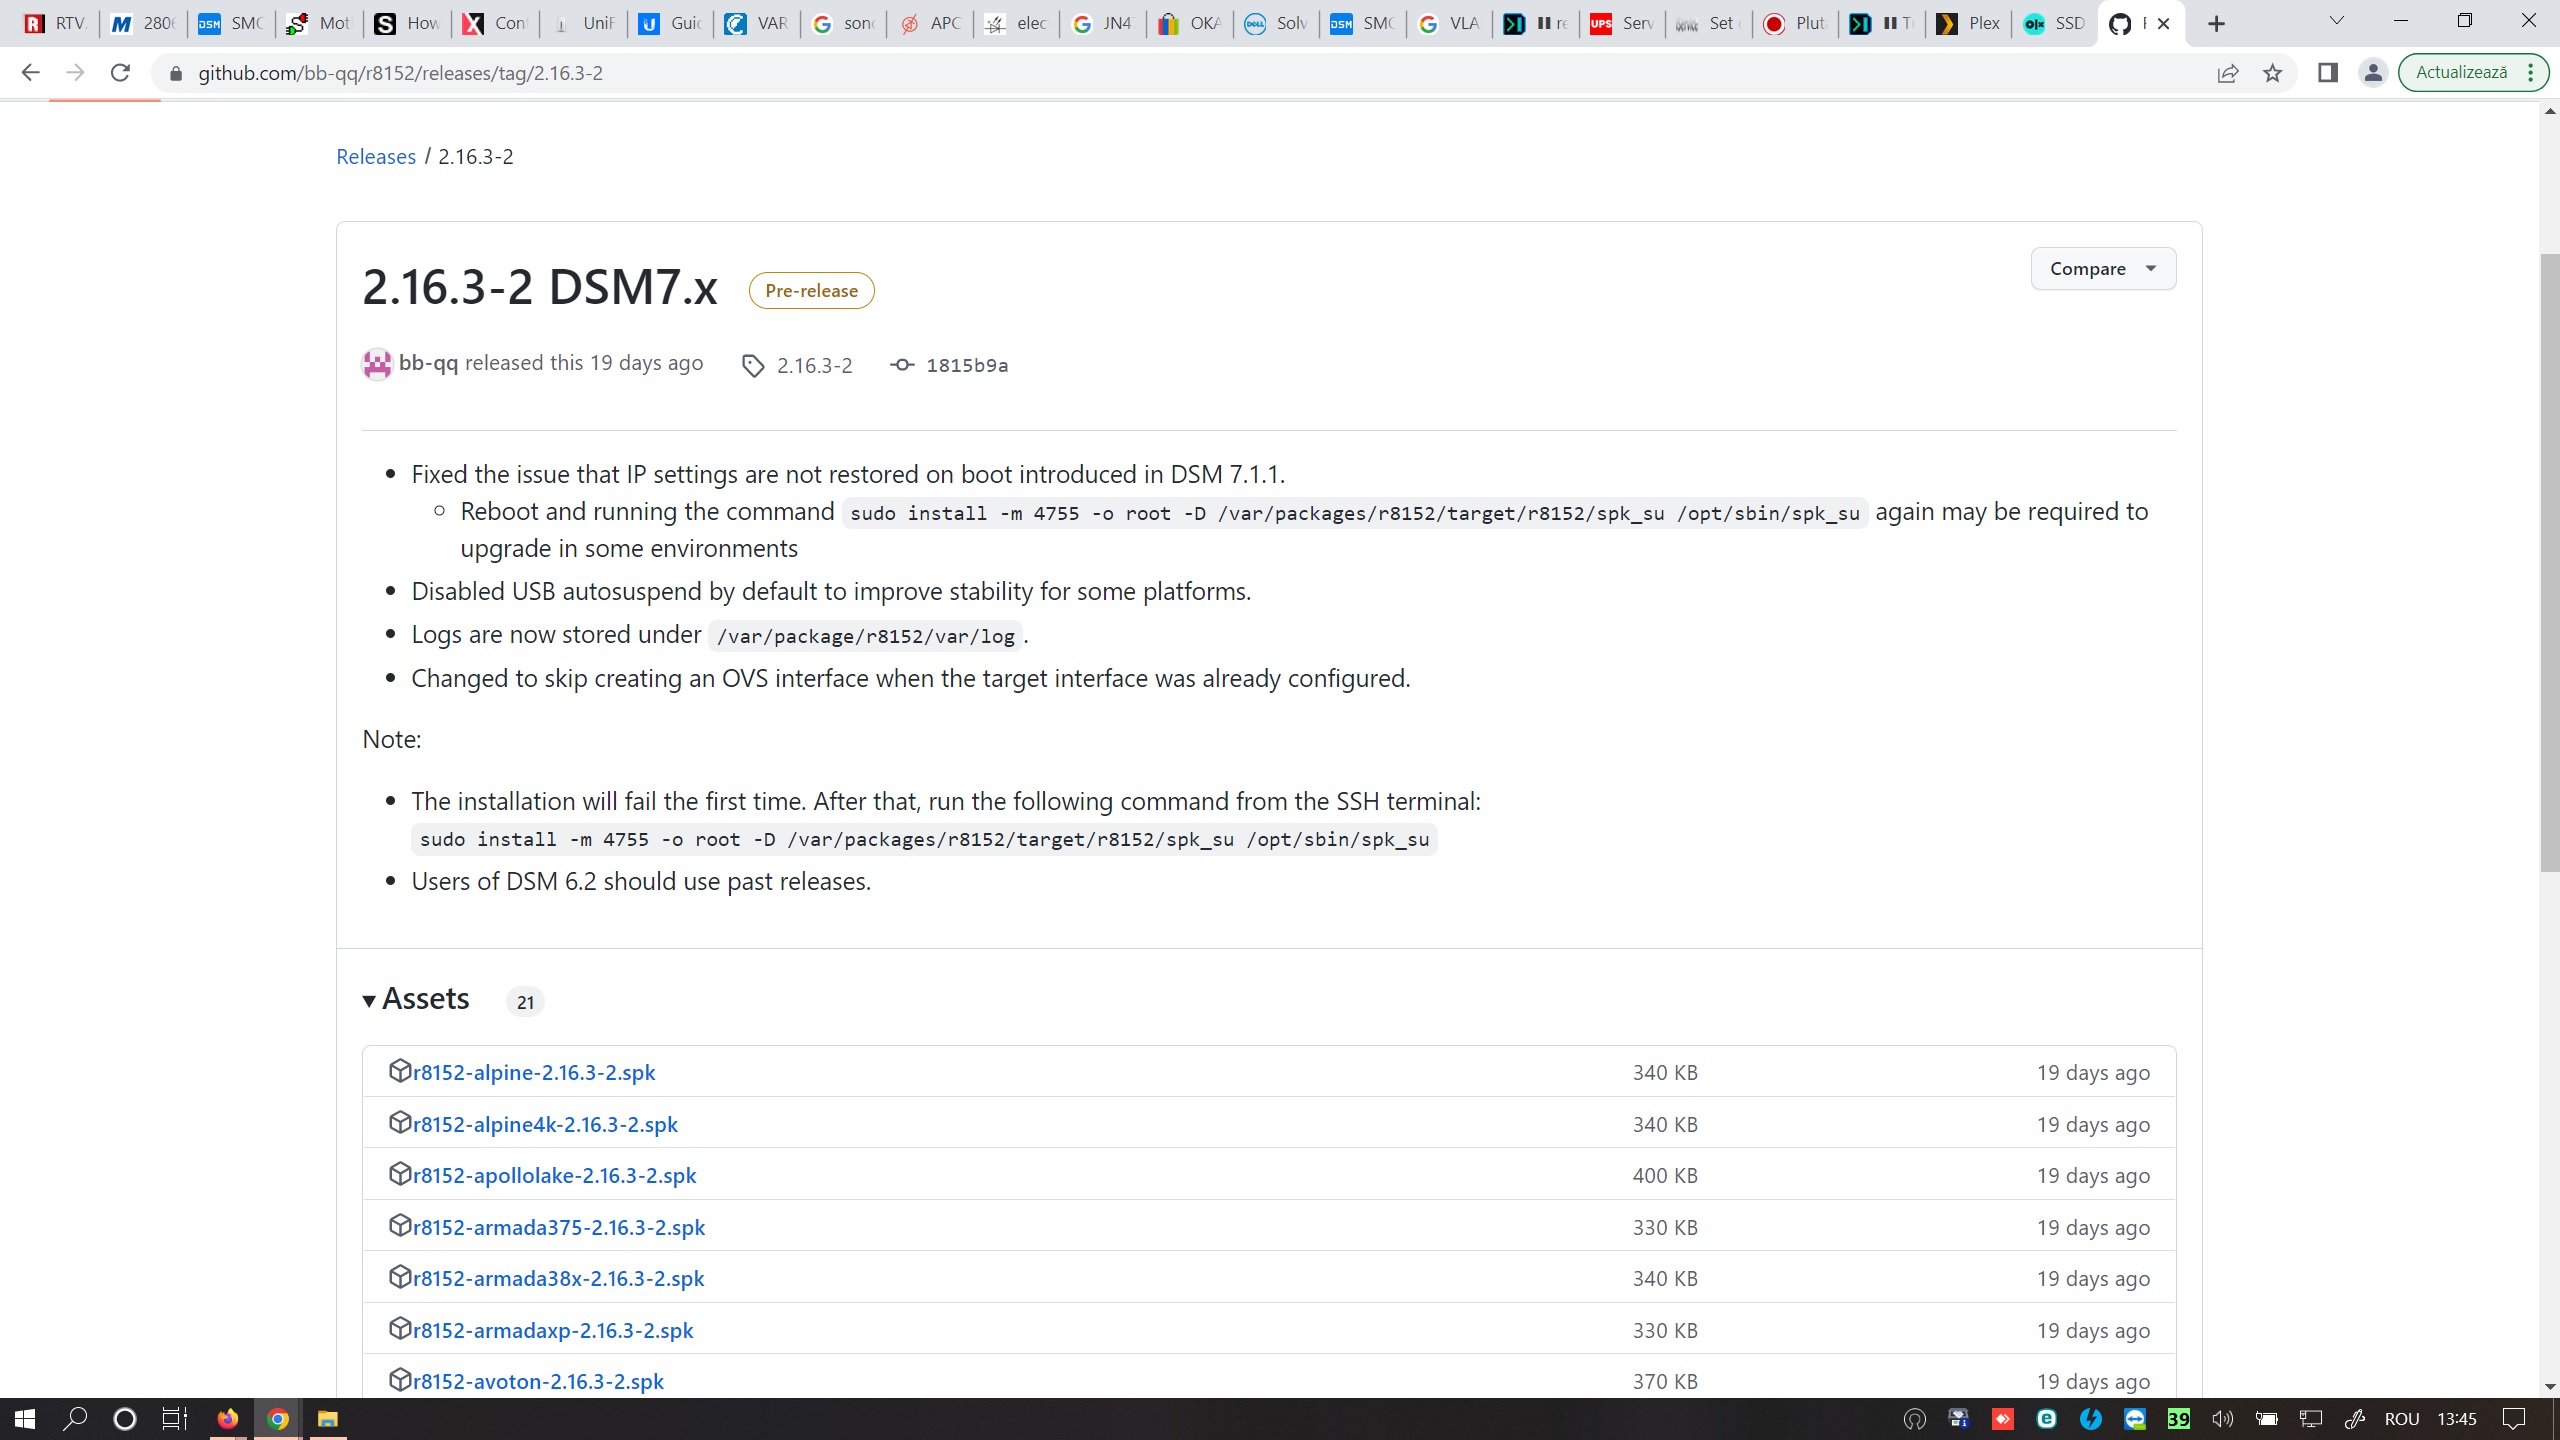
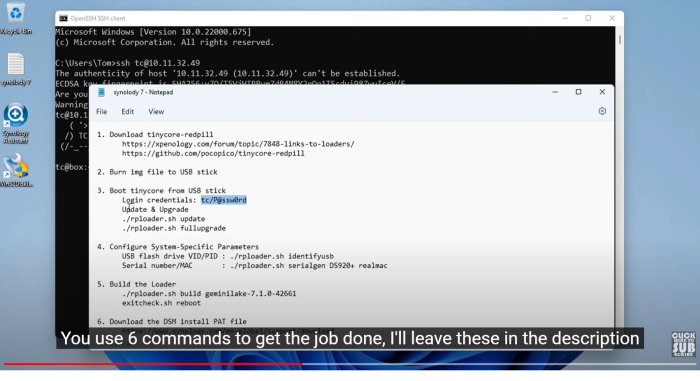
Hello everyone, Tonight I will try to tell as briefly as possible my experience in using xpenology. I hope that those who will read will be helped in building a NAS with multiple capacities. My whole story started at the beginning of this year when I wanted to build a NAS to be able to use it with plex (hw transcoding). I specify that I have been using a synology NAS for over 4 years, so I was somewhat familiar with the operating system and related applications, but not having the capability of a plex with hw transcoding (DS418play), so as a result I purchased a case from fractal design and ROG Z370-i with i7-8700 and started assembling it.After this, without studying a lot and with a lot of luck, I decided to build the 918+ version with june loader 1.04b.At that moment I didn't know exactly what infrastructure I needed for the 918+ version to work, but to my luck and surprise, in a maximum of 2 hours I had installed the first version of xpenology (6.2.2) after which I successfully managed to upgrade to 6.2. 3_25426.This time I started studying because I had added an NVME SSD directly to the port on the motherboard and I wanted to use it as cache memory.In the end I found a script that I launched and after restarting I managed to see the SSD and set it accordingly. After some time I discovered that it doesn't help me much in the hw transcoding process, but I managed to set something on this new NAS .The next step was to figure out how to make hw transcoding work. Until this step, I ran into another big problem. Without using hw transcoding, the CPU health quickly rose to over 80-90% and its temperature quickly rose to 70 -80 C and with the stock cooler obviously it failed to cool it down and obviously it stops as soon as the temperature rises above 85-90 C.After a few days of study and being somewhat constrained by the limited space in the case, I decided not to purchase a cooler from noctua and finally purchased a liquid cooler from Corsair (icue H115 PRO). After installing it, relatively easy ( I had not installed such a cooler until then) and its setting in the bios, the processor's situation changed dramatically for the better. With a processor usage of over 80%, its temperature no longer exceeded 70-75C at the most, after which it dropped suddenly below 50C.The only big disadvantage is that the radiator was mounted on the side of the case and blocks the use of the PCI-E 16x slot. But at that time I wasn't thinking of using it in any way, so I didn't see any problem in this regard. Considering that I couldn't control the speed of the 2 12 cm fans, I decided to replace them with 2 Noctua fans mounted on the radiator inside with the absorption function and with the speed reducers that came with the package. Thus they became extremely silent even if they were working permanently.With this problem solved, I returned to the search for how to activate hw transcoding.After a few more weeks of study,I understood, or at least I hope I understood, that the whole part of HW transcoding could be activated by changing drivers.Consequently I downloaded the new drivers (extra918plus_v.0.13.8) and I replaced both .izma files on the second partition of the boot stick easily. Previously I emptied the / modules / update / directory with the command rm -rf / usr / lib / modules / update / *. After the restart I noticed that I can use HW transcoding and the processor was used with a maximum of 35%.In the meantime, DSM 7 also appeared, which I installed on the Synology NAS and which had several applications superior to those in version DSM 6.2.3. The Photos application is much more interesting and brings together the 2 applications from version DSM 6.2.3. I also use this application a lot for personal photos and videos.Although I managed to activate my hw transcoding, plex was buffering every 20-30 seconds. In the end I discovered that this happens because the tone mapping was done with the help of the processor and the transcoding was done by hw, or so I understood .Finally, in order to have a correct transcoding, I moved plex to docker and this buffering was also solved.Now I come back to the present, when I got the courage to try to upgrade to DSM 7.1.1. I did a thorough study again and decided to try this upgrade, already knowing the advantages of DSM 7 on the Synology NAS. I specify that DSM 6.2.3 was very stable during the few months it was used for plex and the periodic back-up of the other one.In the first phase I decided to stay with 3 old HDDs for tests. I DO NOT RECOMMEND this, because I had to forcefully turn it off several times and one of the HDDs failed. At least it had 3 years of continuous use :)).After I realized that I could create problems for the HDDs, I found a 500G Samsung 850 SSD around the house, which I mounted and continued the tests.I downloaded tinycore-redpill v0.9.2.9 and wrote it to the stick using Win32DiskImager.I have attached a picture with the steps to follow to create the bootloader. I also found these steps on YouTube.I use to build DS918p-7.1.1-42962 an after that the NAS restarted and I was able to find it with the direct IP (I knew which IP I had assigned from the MAC router to the network card of the NAS) and I was able to connect to it and installed DSM_918+_42962.pat .In this way I managed relatively simply to install the DSM 7.1.1 version. Considering that I have only one gigabit network card on the motherboard, I decided after a little study to install a USB 2.5 GBit network card (Club 3D).With realtek drivers that I found at github.com. I have attached the driver package as well as the script that you have to launch after the first error.ATTENTION that after restarting, the driver package must be launched again with "RUN" otherwise the external card will not work.ATTENTION that after restarting, the driver package must be launched again with "RUN" otherwise the external card will not work. So the NAS will have to be accessed after restart also on the old network card. This driver package can be found among the installed applications .The second network card of the same type is already on the way to be able to use it together with the other one (Bond). Tomorrow I'll be back with some information and advice (if I'm allowed) for those who want to try what I presented above r8152-apollolake-2.16.3-2.spk
-
Now that I've found out where the problem comes from, I've found something on the forum and I'm starting to study
-
Good morning.The first thing I already did was move the test file to a local folder on the new NAS and I have the same problems. I eliminated this cause from the beginning, because in the case of direct play 4k (gigabit network between the two NAS and WAN too) the new NAS managed to handle a constant traffic of over 9-10 MB/sec without any issues.I will try to use syno's videostation as well.The serial number is real (that of the old NAS) and was edited in the boot file after I tried to play with the Moments application and did not do the correct (or rather not at all) rendering of the movies for preview.There are many things I've worked on on the old NAS and I'm somewhat familiar with some of the applications and when I noticed that on the new one doesn't work properly, I started searching the forum to find out the cause.I will try to use videostation and if necessary I will launch that patch for serial number and I'll keep you posted on what happened next. Hello again. I'm back with new information. Video station (DS Video) works perfectly on mobile (VLC player) after a few freezes at first until it make buffers, I guess, but unfortunately I only managed to use it with Direct Play (10-12 MB / sec) and with a maximum of 1% processor load.In the DS Video settings the video conversion is ON and the playback quality is LOW (speed first). I have no idea where I could force HW transcoding.Which is true, I didn't use DS Video on the old NAS either, because from remote location I tried to use Kodi (Direct Play) and on TVs without android or Linux where Kodi can't be installed (Samsung, LG) with Plex. I think I found the reason why plex does not buffer properly when using HW transcodes. After several attempts if I unselect the "Enable HDR Tone Mapping" movie runs without other interruptions and the processor load decreases considerably (maximum 1-6%). Thank's again,Mihai
-
Good evening. I will briefly try to present the problem I ran into after many hours of detailed study here. I already own a Synology 418play NAS but due to the fact that some of the movies I own on it are in 4k Bluray format I decided to create a more powerful one to be able to use Plex HW of an i7 processor.And from here the study began to create it. By a lucky mistake I bought the motherboard and the processor before studying if I could use them. Luckily for me it seems that I succeeded somewhat.I use Asus Z370i with i7 8700. I managed to quickly generate the 1.04b boot stick and the installation of DS 918+ went really fast in the conditions in which I had not yet studied very well if and what to install on the side the hardware they own.Only after the installation with version 6.2.2 went, I upgraded to 6.2.3 _ 25426 and it also went ok. Later I managed to add an NVME SSD with the launch of the necessary script, it works perfectly, although I noticed that for the transcoding part it is not very helpful.From this moment all my attention was directed to the transcoding part. With the extra / extra 2.izma initial files I didn't manage to use HW plex transcoding. The processor could easily transcode a single 4k channel at 1080p, but it was in 80% usage .After a few more hours of study, I understood, or at least I hope I understood, that the whole part of HW transcoding could be activated by changing drivers.Consequently I downloaded the new drivers (extra918plus_v.0.13.8) and I replaced both .izma files on the second partition of the boot stick easily. Previously I emptied the / modules / update / directory with the command rm -rf / usr / lib / modules / update / *. After the restart I noticed that I can use HW transcoding and the processor was used with a maximum of 35%.This is where the problems started. When I use HK transcoding from 4k to 1080p it buffers every 30 sec. This doesn't happen when I use transcoding without HW support. I guess it could be a driver that is not doing its job properly.Can anyone help me with some advice? I mention that there is an NFS connection between the two synology, the videos being on 418play. Thank's alot,Mihai