

myswe
-
Posts
8 -
Joined
-
Last visited
Posts posted by myswe
-
-
I encountered an issue when trying to pass-trough HDD on DSM7. After fresh red-pill DS3615xs installation I followed the Proxmox
documentation to mount two 4TB HDDs to the VM via shell commands
qm set 999 -scsi0 /dev/disk/by-id/ata-WDC_WD40EFAX-XXXXXXX_WD-WXXXXXXXXX31
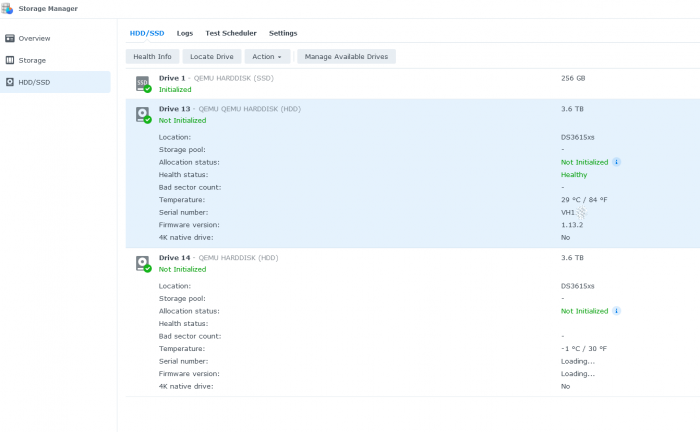
qm set 999 -scsi1 /dev/disk/by-id/ata-WDC_WD40EFAX-XXXXXXX_WD-WXXXXXXXXXN2after booting I see the drives in Synology Storage manager but I can't create a storage volume
See screenshot for error "disk_reason_template_0"
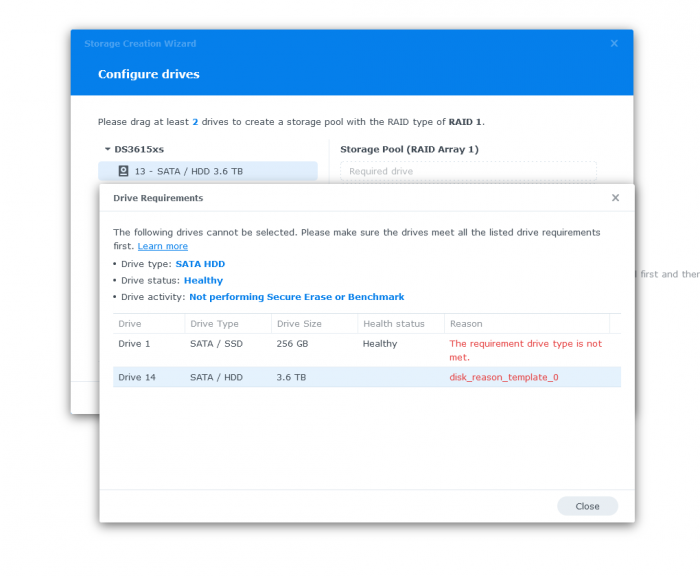
But the storage manager clearly see's both of them
Any idea how to fix this?
-
37 minutes ago, haydibe said:
My bad, I accidently removed the bootindex setting, which is required to actualy boot from the usb disk. It is present in the link of my signature, but not in the "updated" command sequence I posted earlier.
# set vm id
id=930

# create image directory, download and uncomporess
mkdir -p /var/lib/vz/images/${id}
curl --location https://github.com/pocopico/tinycore-redpill/raw/main/tinycore-redpill.v0.4.4.img.gz --output /var/lib/vz/images/${id}/tinycore-redpill.img.gz
gzip --decompress /var/lib/vz/images/${id}/tinycore-redpill.img.gz --keep

# create vm
qm create ${id} \
  --args "-device 'qemu-xhci,addr=0x18' -drive 'id=synoboot,file=/var/lib/vz/images/${id}/tinycore-redpill.img,if=none,format=raw' -device 'usb-storage,drive=synoboot,bootindex=1'" \
  --cores 2 \
  --cpu host \
  --machine q35 \
  --memory 2048 \
  --name DSM \
  --net0 virtio,bridge=vmbr0 \
  --numa 0 \
  --onboot 0 \
  --ostype l26 \
  --scsihw virtio-scsi-pci \
  --sata0 local-lvm:vm-${id}-disk-0,discard=on,size=100G,ssd=1 \
  --sockets 1 \
  --serial0 socket \
  --serial1 socket \
  --tablet 1

# create disk for sata0
pvesm alloc local-lvm ${id} vm-${id}-disk-0 100G
Plase remove your vm and try again.
Success! Thank you very much for your patience with me.
I have been able to spin up a ds3615xs and will now try alternative versions to start testing backups between my real synology's and the vms's.
Thank you again!-
 1
1
-
-
9 hours ago, haydibe said:
@myswe I understand the sequence of commands went over your head.
The sole purpose of the commands is to make it easy for every Proxmox user to download tinycore and create a proxmox vm that uses the img-file as usb-boot. The usb-boot configuration is NOT visible in the ui and can not be configured or changed from the ui. But you can see the "real" configuration in /etc/pve/nodes/${nodename}/qemu-server/${id}.conf (at least that's the location in my 3 node Proxmox cluster).
This part is responsible to do so (only works if the sequence of commands I pasted, otherwise the variable ${id} will be empty: `
--args "-device 'qemu-xhci,addr=0x18' -drive 'id=synoboot,file=/var/lib/vz/images/${id}/tinycore-redpill.img,if=none,format=raw' -device 'usb-storage,drive=synoboot'" \`
Please throw away the created vm with all your customizations, and the hdd and re-execute the sequence of commands.
This time start the vm without changes, generate serial and mac, compare the created user_config.json with what I wrote above and then build your configuration. You will see that it works ootb.
There is no need to guess or do random things without understanding why they would be necessary or understanding the impact of your changes.
Please do not skip or modify parts of the command sequence you don't understand.
@haydibe I followed your instructions 1:1 making absolutely no changes but when I start the VM I end up in a boot loop with the VM not seeing a boot-able device
-
1 hour ago, haydibe said:
You didn't follow the link to my signature as @pocopico suggested, did you?
This will download tinycore, extract the image, create a preconfigured vm to use the extracted tinycore image with usb boot. It will also add a 100gb data disk, to be attached to sata0.
Run these command in the shell of your Proxmox server:
# set vm id
id=930

# create image directory, download and uncomporess
mkdir -p /var/lib/vz/images/${id}
curl --location https://github.com/pocopico/tinycore-redpill/raw/main/tinycore-redpill.v0.4.4.img.gz --output /var/lib/vz/images/${id}/tinycore-redpill.img.gz
gzip --decompress /var/lib/vz/images/${id}/tinycore-redpill.img.gz --keep

# create vm
qm create ${id} \
  --args "-device 'qemu-xhci,addr=0x18' -drive 'id=synoboot,file=/var/lib/vz/images/${id}/tinycore-redpill.img,if=none,format=raw' -device 'usb-storage,drive=synoboot'" \
  --cores 2 \
  --cpu host \
  --machine q35 \
  --memory 2048 \
  --name DSM \
  --net0 virtio,bridge=vmbr0 \
  --numa 0 \
  --onboot 0 \
  --ostype l26 \
  --scsihw virtio-scsi-pci \
  --sata0 local-lvm:vm-${id}-disk-0,discard=on,size=100G,ssd=1 \
  --sockets 1 \
  --serial0 socket \
  --serial1 socket \
  --tablet 1

# create disk for sata0
pvesm alloc local-lvm ${id} vm-${id}-disk-0 100G
Make sure to change the value for id from 930 to an id of your choosing.
If you want a bigger data disk, just change 100G to how much G you want. Once the vm is created, the settings can be changed in the Proxmox frontend later.
A valid user_config.json for q35 machine looks something like this. The vid and pid are correct if usb-boot is used (the commands above exactly do that).
The SataPortMap and DiskIdxMap are valid for the q35 machine type - the values are not valid for i440fx machine type.
{
    "extra_cmdline": {
        "vid": "0x46f4",
        "pid": "0x0001",
        "sn": "1510LWN123456",
        "mac1": "00123456789A",
        "SasIdxMap": "0",
        "SataPortMap": "66",
        "DiskIdxMap": "0600"
    },
    "synoinfo": {
        "internalportcfg": "0xffff",
        "maxdisks": "16"
    },
    "ramdisk_copy": {}
}
Thank you very much again. Your help is very much appreciated.
I did look at the post but I assume my lack of technical understanding is the culprit, please excuse me.
I followed your instructions but its missing the USB boot portion. Would you mind sharing how to appropriately usb-boot the vm?
I tried adding a USB Device via pass-through (both via port and device id) which then enabled me to boot and create the image. However at the end of that process I am still presented with the corruption error. So I assume adding a USB device like I do is the issue and I am trying to work out how to boot from the image that gets downloaded at the beginning of your instructions.
Thanks again!
-
20 minutes ago, pocopico said:
Are you on proxmox right ? Make sure you have selected usb boot on grub and that the USB VID PID are set correctly
Yes I am on Proxmox 7.
I mounted the image that you get after the creation as local disk SATA0. I did not have success booting into the boot-loader any other way.
Are you saying I should try booting the image via USB?
-
9 hours ago, pocopico said:
Thank you!
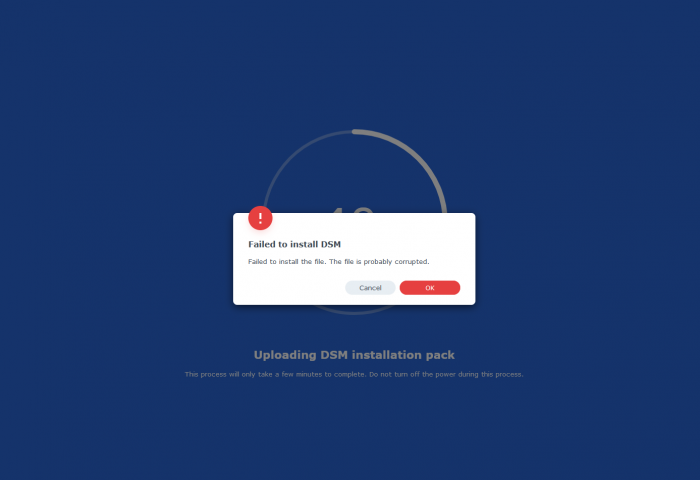
I have now been able to build the boot loader but I am unable to install DSM. I get to the initial setup where I need to upload the .pat file but encounter a "corrupt file" error. Any pointers to what I could be doing wrong?
-
Does anyone have a Proxmox template to share? I have been trying to work this out off this tutorial but when I try to install the .pat I get a corruption error.
-
1
-


RedPill - the new loader for 6.2.4 - Discussion
in Developer Discussion Room
Posted
Yes SATA seems to be working flawlessly, I wonder if it has performance impact.