

PincoPalla
-
Posts
97 -
Joined
-
Last visited
Posts posted by PincoPalla
-
-
Qualsiasi fornitore (o quasi, generalmente si usa No-ip) di DDNS, bisogna configurare il DSM su accessi esterni e la relativa porta a seconda di come si ha strutturato la rete LAN
-
3 hours ago, pocopico said:
TCRP Web builder
Hi all, sorry I can't figure out how to view TCRP in web mode, I'm missing something, with ARPL it's clear to me (it gives me the IP+port number) but with TCRP with shell I can't do it, I tried to do a search in the threads but I'm probably wrong to ask the question because I can't find anything, can someone help me?? it's not important because you can do the same but it was just to learn. Thank you
-
11 minutes ago, Orphée said:
This happens because your browser cached this page.
Try clear your browser cache or use private/incognito mode.
Done, thanks Orphée was as you said
-
Thank you, for 7.2 we'll see later I did a clean install of 7.2 too, but for now I'm interested in knowing what data I have to include in this request. Thank you
-
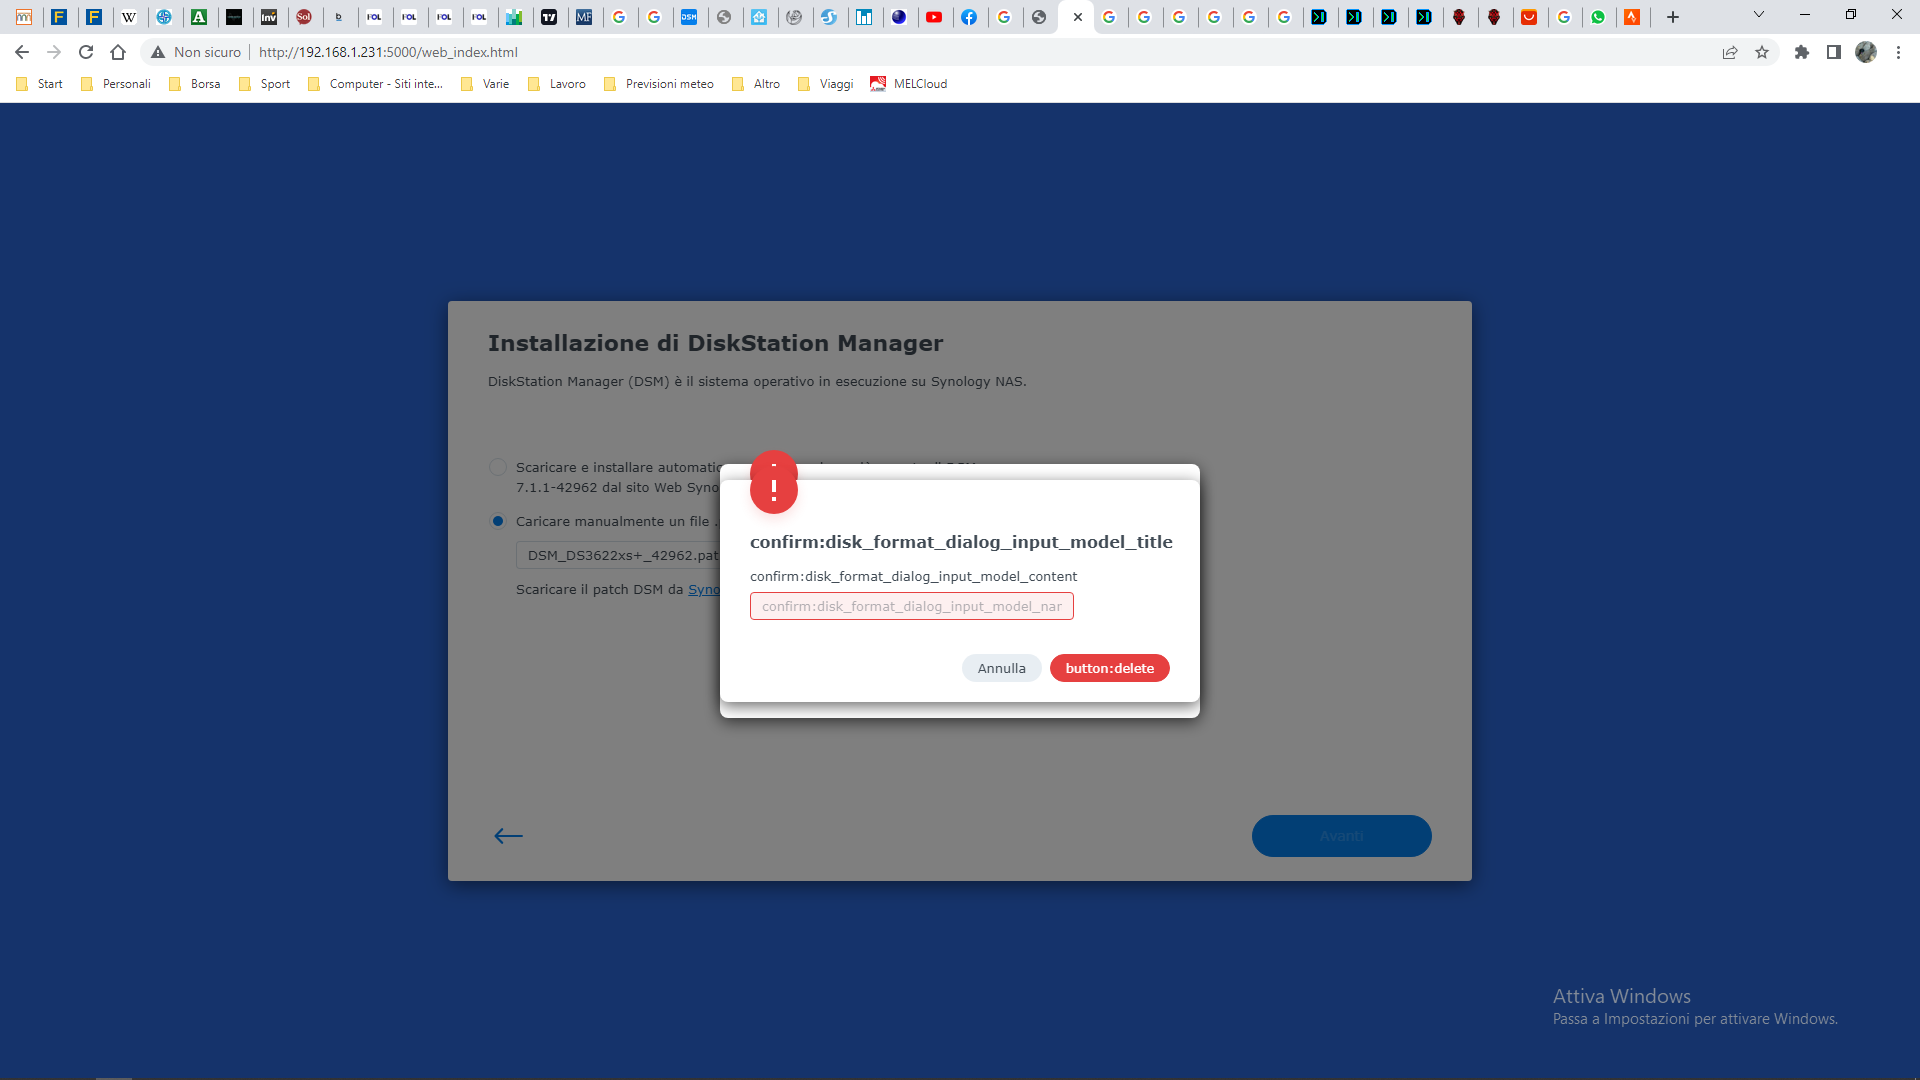
Hi all, I'm doing installation tests on v.m. of the DSM both with RedPill support tool (m shell) and with ARPL starting from version 7.1.1 (42962) and then try to upgrade to 7.2 to see how it behaves and how to do it to then install it on a bare metal machine . everything proceeds correctly and the image is created to load the DSM but when I get to this screen I can't go on anymore, it's not clear to me what I have to enter (in previous systems up to 7.1 I hadn't seen it, I tried to do a search on the subject but it's possible that I put the question wrong and I didn't find anything) and I'm stuck, can someone help me out?? Thank you

-
9 hours ago, Orphée said:
This is official release note from Synology.
It just means on official Synology hardware, they won't be noticed a new release is available. They will have to manually put the new PAT file.
Nothing to be afraid for us.
Ok thank you Orphee
-
6 hours ago, Peter Suh said:
8. For the models below, you can only download the upgrade patch from Synology Download Center because you won't receive notifications for this update on your DSM.
* FS Series: FS3017, FS2017, FS1018
* XS Series: RS18016xs+, RS4017xs+, RS3617xs+, RS3617xs, RS3617RPxs, RS18017xs+, DS3617xs, DS3617xsII, DS3018xs
* Plus Series: RS2416RP+, RS2416+, DS916+, DS716+II, DS716+, DS216+II, DS216+, DS1817+, DS1517+, RS2818RP+, RS2418RP+, RS2418+, RS818RP+, RS818+, DS1618+, DS918+, DS718+, DS218+, RS1219+
* Value Series: DS416, DS416play, DS216, DS216play, DS116, RS816, DS1817, DS1517, RS217, DS418play
* J Series: DS416slim, DS416j, DS216j, DS418j, DS218j, DS419slim, DS119jHi Peter, I don't understand this passage, if you can explain it better thanks. For example, I installed a 918+ vers. 7.0.1 - 42218 what should I do???. Thank you
-
Ciao, la domanda non è molto chiara, comunque in modalita SHR è possibile cambiare 1 disco alla volta e ricostruire il volume, poi eventualmente sostituirne un altro e si ricostruisce il volume e cosi via; il disco nuovo deve sempre essere maggiore o uguale a quello che si va sostituire, mai minore, ma vedo che non dovrebbe essere il tuo caso (per questo che in modalita SHR si va "perdere" un disco uguale al piu grande disco del volume per quello che tu chiami protezione, ma il concetto è un po diverso); poi per "clonare" non si capisce cosa si intende, il disco si sostituisce con le modalita sopradescritte e basta (sperando che nel frattempo che si riscostruisce il volume, un 3 Tb ci mettera 15/20 ore, un altro disco non si rompa altrimenti sono guai, si perde tutto). Spero di essere stato chiaro 😀😀😀
-
Hello everyone, sorry if I intrude, I usually never do it but given what is happening in this forum I think it is appropriate, some users have published requests for help on installation (the last three pages are practically dedicated to this), I wanted to remind that this is a tutorial, for the problems concerning the installation, as indicated on page 1 by Fliryde, they are to be done in the DSM installation forum, I also see that some developers also follow them, I repeat that a 20/30 and more pages is equivalent to no longer being usable, already in this forum there is a lot of confusion in the topics (with topics of 150/200 pages are they usable??? I think not) please don't continue to create even more. Thank you
-
Hello everyone, I would have a proposal to make to the administrators of the forum and developers, I see that for example the topic "automated redpill loader" has been moved to loaders as it has arrived at a stable version, and therefore I would like to propose to developers to make a guide ( to be set apart, and only editable by the developer himself if there are any changes) concise enough to guide you step by step and explain the commands and what they are for. Now in the case of the Automated redpill loader it is very simple and intuitive (I managed it too ....) but in the case of the other type of loader (Tinycore Redpill loader) it could be a little more complicated (there is already a guide made by FlyRide) but I see that for example the TinyCore RedPill Loader (TCRP) - Development version 0.9 (which is still under development, but in anticipation of a stable version) there are a series of "new" commands for example " bringfriend ”I think it would be appropriate to explain what it is, what it is for and how to install it and how to use it (it is also possible that I plan to do it, I would do it if I were able to). I remember that the development topics and then moved to fixed sections contain a bit of everything characteristics of the development, I also remember that topics of 160/170 pages are in fact useless (at least as I see things) even by activating the search function. I am not a big expert in software developer but in organization and documentation management enough, this is my advice. If needed, I will also put this request on the topic TinyCore RedPill Loader (TCRP). I wanted to thank the developers and administrators for their work. Thank you
-
 2
2
-
-
Hi everyone, I had the same problem a few days ago, in fact I had put a post on RedPill Tinycore loader (no one answered ...), I was testing the construction of a loader on v.m. (virtualbox) in anticipation of upgrading from 7.0.1 up3 to a baremetal version, I tried days and days it always gave me the same problem with different versions of machines (918,920,3622 etc.) by selecting ./rploader.sh satamap and giving yes, then with TCRP version 0.9.0.2 I tried NOT to select it (I just skip the string) and everything worked, tried several times, even DSM updates, everything ok, I don't know test .... !!!!
-
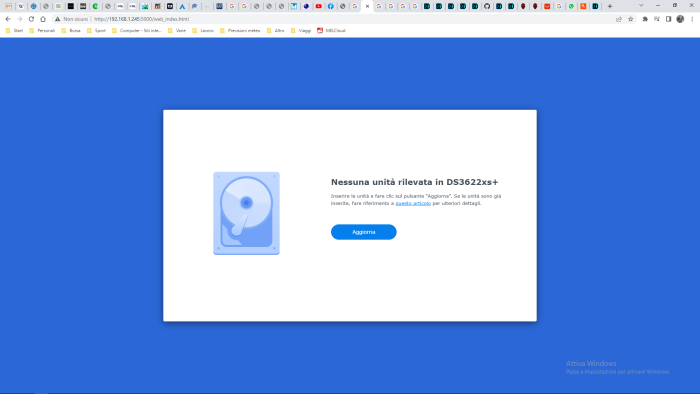
Hello everyone, surely the topic has already been dealt with in other points, but I can't find it, the thread is too long, I've been trying to build the charger for days and days, I'm doing some tests in v.m. mode. in anticipation once I have learned well to build one for bare metal mode, in the construction phase it does not give me any error but when I go to open it in the browser it always gives me this error, I can not get out of it, does anyone know how to help me ??? ? thank you
-
Hi everyone, I have tried the alpha 6.0 in v.m. and everything went well, I'm not a great connoisseur, but I noticed that version 7.0 is about 90Mb while version 6 (and the previous ones) is 121 Mb, isn't it that we forgot something ???? 😃😃
-
Che sappia io synology e qnap lavorano praticamente uguali, per la cache nvme velocizza molto i metadati e le virtualizzazioni se hai usato qnap lo dovresti sapere
-
Come ti ho detto ho speso circa 1000€ di tutto (preso tutto nuovo un po di qua un po di la), ho preso la serie xeon per via dei consumi (è meno performante di un i7 ma consuma molto meno), il DSM è installato sul raid (tipo ibrido di synology, comunque con tolleranza di un disco) dei 4 hdd, le nvme le uso come cache (ma se mi fai queste domande non sono sicuro che hai capito come funziona il DSM in baremetal, cioe come su una macchina originale) velocizzano molto di piu quando si lavora con le virtualizzazioni, per la virtualizzazione uso il programma di virtualizzazione del DSM, ma se mi fai anche questa domanda non sono sicuro che conosci bene il DSM)
-
Case: Fractal Design Node 804
Alimentatore: Cooler Master MWE 650 Gold V2 PSU
Motherboard: Supermicro X11SCH-LN4F socket 1151 (H4)
Processore: Intel Xeon E 2276G architettura Coffee Lake
Dissipatore: Noctua NH-D15
Memorie RAM: DIMM DDR4 3X 16GB Micron 2666 MT/s UDIMM 288pin ECC DR x8 unbuffered / ddr4 2666 2Rx8 ecc udim MTA18ADF2G72AZ 2G6E1
vanno bene anche le Samsung M391A2K43BB1-CTD
Memorie SSD: 2X Samsung NVMe V-NAND SSD 670 Pro 512Gb
Dischi fissi: 4X Western Digital 4Tb EFRX -
Proxmox so che non ha problemi a far girare il DSM, la questione secondo me è come vuoi configurare ed usare il sistema intero, come ti ho gia detto io faccio girare tutto sopra il DSM, per quanto riguarda il tuo hardware mi sembra un po pochino soprattutto per quanto riguarda la RAM, per il resto il DSM non assorbe molte risorse, quando ho deciso di farmi un nuovo hardware io al tempo (gennaio 2021) ho speso circa 1000€ (senza dischi fissi che avevo gia) ma ora è un super server gli originali non ci vanno neanche vicino
-
Ciao ciao, dato che entrambi parliamo italiano ti rispondo in italiano che mi viene piu facile 🙈🙈; allora hai posto parecchie domande, cerco di risponderti ad una alla volta, sul fatto che si potra sempre installare il sistema DSM la risposta è si ma anche forse, xpenology è fatto da gente smanettoni che riescono ad emulare il sistema (di fatti per ogni aggiornamento bisogna rifare l'immagine ecc.ecc.) per cui in informatica a me è sempre stato insegnato che niente è impossibile (a parte i limiti hardware) per cui se ci sara gente che si impegna a dare la possibilita di fare gli aggiornamenti allora si altrimenti temo che andra a decadere; io non sono uno smanettone, me ne intendo un poco ma sono un autodidatta e ho parecchie lacune, di fatti ad ora non sono in gradi di fare l'immagine cosi come si fa dalla versione 7 in poi del DSM anche se non credo sia difficilissimo mi ci sono applicato poco principalmente per paura di creare casini e pigrizia.....!!!! 🙈 immagino che poni la domanda per decidere se spendere delle risorse economiche per prendere un hardware nuovo ecc.ecc., io l'ho fatto ancora quasi 2 anni fa pero i rischi ci sono sempre, in ogni caso so che c'e gente che ancora fa girare la versione 6.2.x del DSM che va ancora bene, quindi penso che per i prossini 4/6 anni si e a posto!!!!! Sulla seconda domanda io credo che ti conviene far girare il DSM sul server attuale via proxmox, dato che da quel che si capisce gira gia l'home assistant e il fotovoltaico anche se non è specificato le caratteristiche dell'hardware (bisogna vedere se fattibile), io nel mio caso è fatto all'ìincontrario rispetto a te, nel senso che sotto il DSM faccio girare tutto il resto, home assistant, una macchina virtuale per il programma contabilità oltre che al atre macchine virtuali che avvio all'occorrenza e tutta una serie di altri servizi, posta, sito, downloader, cloud, server per film, musica e foto, ecc.ecc. solo che a causa dei costi dell'elettricita degli ultimi tempi ho deciso di spegnere tutto e accendere solo all'occorrenza (mi costava circa 6/7€ al giorno.....3/400w h24) per cui la posta, sito ecc.ecc. l'ho trasferita su aruba ecc.ecc., non ho il fotovoltaico come te!!!!! 🙈 per ultimo, nel caso non fosse piu disponibile l'installazione del sistema DSM si puo sempre passare ad altri sistemi come TrueNas o altri che alla fine offrono "quasi" gli stessi servizi (nel sito tedesco di xpenology c'e anche la sezione per installare i Qnap), in ogni caso bisogna sempre tenere delle copie di backup, io ho 3 server, 2 syno originali ma vecchiotti che uso per i backup (ad ora ho circa 10/11 Tb di dati) e il server nuovo che ho fatto io che uso come macchina principale. Spero di esserti stato di aiuto. Ciao ciao
-
On 5/23/2022 at 8:47 AM, flyride said:
Loader Information and Background
RedPill is the core technology that enables DSM 7.x to run on non-Synology hardware. It has gone through an extensive alpha development process that has been very public and visible. This has resulted in many installation posts and tutorials, some of which are out of date, incorrect or incomplete.
This post is intended to serve as a definitive tutorial/reference for installing DSM 7.x using the TinyCore RedPill (TCRP) loader, superseding the limited README documentation in the TCRP github. It explains how to install TCRP on baremetal, i.e. with DSM as the only operating system on your NAS hardware. Discussion of the differences associated with using a hypervisor is accomplished in a different tutorial.
TCRP installs with a two step-process. First, a Linux OS (TinyCore) boots and evaluates the NAS hardware configuration. Therefore, it is best to have the hardware you plan to use (disk controllers and network cards in particular) installed prior to starting the TCRP setup.
Then, an individualized loader (RedPill) is created. This loader is used to install and run DSM. After that, you can switch between starting DSM with RedPill, and booting back into TinyCore to adjust and rebuild the loader as needed.
Basic Linux command line skills are needed to complete the installation. The tutorial provides examples of the commands that are needed, but exact syntax and capitalization is critical. If unfamiliar, research and review the following minimal list of commands:
ls show the files in the current directory
cat <file> show the contents of the specified file
pwd show the current directory name
cd <directory path> change to the specified directory (same rules as Windows, except with forward slashes instead of backslashes). With no argument, it returns to the “home” TCRP directory
vi <file> a file editor, for manual editing of configuration files if requiredMigration
Any XPEnology installation of DSM 6.x (with Jun’s loader) can be migrated to DSM 7.x using TCRP. However, TCRP works very differently than Jun’s loader. It is strongly recommended to complete the following tasks prior to migration:
- Read through this reference thoroughly
- Remove the 6.x loader USB and array disks (making sure to mark their order)
-
Build a TCRP loader on a new USB to practice and confirm the build process
(with all the same NAS hardware that will be used for the upgrade) - Trial install DSM 7.x to a test HDD/SDD
- Verify DSM is working perfectly with all the NAS hardware
- Remove the test USB and HDD/SDD, and restore the 6.x loader USB and array disks
- VERIFY BACKUP of all data saved elsewhere before attempting an in-place upgrade
The actual migration process is simple:
- Shut down the NAS
- Replace the existing 6.x USB loader with the TCRP 7.x USB loader from the process above
- Boot the NAS and complete the DSM Migration when prompted
Do not attempt to upgrade from 6.x to 7.x using the Control Panel.
Step 1. Choose a DSM Platform/Architecture
First, make sure the NAS hardware is compatible, and prepare it correctly:
-
x86-64-compatible CPU with two cores or more
- Each platform have maximum threads support! Any threads in excess will be ignored
-
For certain platforms, Intel CPUs must be 4th generation “Haswell” or newer with FMA3 instruction set
The corresponding AMD CPU architecture is “Piledriver” or newer - AMD-based systems may require deactivation of the C1E option in the BIOS
- 2GB of RAM or more
-
2GB or larger USB flash drive
- Configure the BIOS to boot from the USB flash drive ONLY
-
SATA disk controllers are preferred, but SCSI/SAS are compatible
- All SATA controllers must be configured to AHCI mode
- SATA controllers with port multipliers are not compatible
- ATA controllers are not compatible (disable embedded ATA in BIOS if possible)
-
At least one HDD/SSD of at least 16GB in size (21GB for DVA3221)
- Enable BIOS/controller hotplug features on each disk port, if available
- NVMe is not directly supported except for caching purposes
-
Install any NVMe drives intended for caching
- On certain platforms, NVMe drives must be installed prior to loader installation in order for them to be recognized
Now, evaluate the NAS hardware and your the intended use of DSM, and select a platform that best meets your needs. Reference information here: https://xpenology.com/forum/topic/61634-dsm-7x-loaders-and-platforms/
Write down your chosen platform (e.g. DS918+), the corresponding architecture (e.g. apollolake) and whether the platform uses SataPortMap/DiskIdxMap or Device Tree for slot mapping. This information will be needed later.
Step 2. Download TCRP and Write Image to the USB Flash Drive
The latest core loader code is always linked here:
https://xpenology.com/forum/topic/7848-links-to-loaders/Download the tinycore-redpill 7.x loader and save it to your personal computer. Then, open it with a zip manager to show the boot images:
tinycore-redpill.vX.X.X.img.gz (for BIOS/CSM/Legacy boot from USB flash drive)
tinycore-redpill-uefi.vX.X.X.img.gz (for UEFI/EFI boot from USB flash drive)
tinycore-redpill.vX.X.X.vmdk.gz (for hypervisor VM boot from disk image)Select the appropriate boot image, depending upon the boot capability of the NAS motherboard. If unsure, choose BIOS/CSM/Legacy boot. Save the gzip file to your personal computer, open it with a zip archive manager and save the uncompressed version.
Write the uncompressed image to the USB flash drive using Win32DiskImager or other appropriate tool.
The USB flash drive is used to store TinyCore and the RedPill loader that it generates. It is a permanent component of an operational XPEnology system. Do not remove it, even after the DSM installation is complete and the NAS is fully up and running.Step 3. Boot into TinyCore and Complete Pre-Configuration Updates
Start your NAS with the USB flash drive installed and TinyCore will boot. Then, launch a command-line session with either of these methods:
-
Click the Terminal icon at the bottom right of the TinyCore desktop to launch a console window

-
Use a ssh client (e.g. PuTTY) on your computer to connect a network-based console
- Consult your DHCP server/router for the IP address assignment
- Login credentials: tc/P@ssw0rd
When the Linux command line prompt ($) is displayed, update the TCRP script
./rploader.sh update now
Checking Internet Access -> OK
Checking if a newer version exists -> There is a newer version on the repo should we use that ? [yY/nN]y
OK, updating, please re-run after updating
Updating tinycore loader with latest updates
Backing up files to /mnt/sda3//mydata.tgz
Done.
Then, update the TCRP support files
./rploader.sh fullupgrade now
<downloads redacted>
Please make sure you are using the latest 1GB img before using backup option
Current /home/tc size is 114M , try to keep it less than 1GB as it might not fit into your image
Should i update the sda with your current files [Yy/Nn] Y
Backing up home files to sda : Backing up files to /mnt/sda3//mydata.tgz
Done.
Finally, choose a DSM release number
Each DSM build as provided by Synology has a release number. You can display the combinations of platforms and releases supported by TCRP by just running the script with no arguments
./rploader.sh
(command help redacted)
Available platform versions:
----------------------------------------------------------------------------------------
apollolake-7.0-41890
apollolake-7.0.1-42218
apollolake-7.1.0-42661
broadwell-7.0.1-42218
broadwell-7.1.0-42661
broadwellnk-7.0.1-42218
broadwellnk-7.1.0-42661
bromolow-7.0.1-42218
bromolow-7.1.0-42661
denverton-7.0.1-42218
denverton-7.1.0-42661
geminilake-7.0.1-42218
geminilake-7.1.0-42661
v1000-7.0.1-42218
v1000-7.1.0-42661
----------------------------------------------------------------------------------------
Each time an existing loader is to be rebuilt (e.g. if troubleshooting or adding hardware), re-run the above updates to get the latest code, and:
./rploader.sh clean nowThis will make space for the rebuild process on the limited storage of the USB flash drive.
Step 4. Configure System-Specific Parameters
Custom system parameters are stored in the user_config.json file. This can be manually edited, or use the TCRP rploader.sh script to determine appropriate values for the NAS.
-
USB flash drive VID/PID: TCRP can query the USB flash drive for the hardware vid/pid values that DSM uses to identify the loader during bootup
./rploader.sh identifyusb now
Found: Superdisk Flash SerialNumber: 123456
Vendor ID: 0x1234 Product ID: 0x0001
Should i update the user_config.json with these values ? [Yy/Nn]
Answer “Yes” to write the detected values to user_config.json
-
Serial number/MAC: TCRP can automatically generate a serial number for the platform selected in step 1. Additionally, it will generate a random MAC address for the NAS network card. If you prefer to use the actual hardware MAC address instead, append "realmac" to the command.
Example 1: random MAC address./rploader.sh serialgen DS3622xs+ Serial Number for Model : 20C0SQRLR47QM Mac Address for Model DS3622xs+ : 00:11:32:80:B2:36 Should i update the user_config.json with these values ? [Yy/Nn]
Example 2: real MAC address./rploader.sh serialgen DS3622xs+ realmac Serial Number for Model : 2150SQRGS7N5T Mac Address for Model DS3622xs+ : 00:11:32:57:3A:9B Real Mac Address : 00:0C:24:62:3E:3D Notice : realmac option is requested, real mac will be used Should i update the user_config.json with these values ? [Yy/Nn]Answer “Yes” to write the proposed values to user_config.json.
-
Drive Slot Mapping: TCRP can try to determine how to map the NAS disk controller ports to DSM slots. If the chosen platform uses SataPortMap/DiskIdxMap for port mapping, the command below will do this. If it uses Device Tree for slot mapping, the command may be skipped, as the Device Tree is configured automatically during the loader build.
./rploader.sh satamap now
Found "02:02.0 SATA AHCI controller"
Detected 4 ports/2 drives. Override # of ports or ENTER to accept: <4>

Recommended settings:
SataPortMap=4
DiskIdxMap=00

Should I update the user_config with these values ? [Yy/Nn] Y
Done.
For the best disk hotplug functionality, accept all the ports detected on each controller. Sometimes there are multiple embedded SATA controllers on a motherboard (for example, the AsRock J4105-ITX has two controllers, each with 2 ports connected). If TCRP has trouble determining the correct configuration, it can be overridden with whatever you like.
The total number of ports allocated must be less than maxdisks. For all supported platforms, default maxdisks is 16. This is a stable value that meets capacity requirements for most users. Maxdisks can be increased by editing user_config.json. Change it only if you plan to exceed 16 disks, as it may create unexpected issues with DSM. At a minimum, the internalportcfg and usbportcfg parameters will also need to be changed for compatibility with the new maxdisks. Determining the correct values for these parameters is beyond the scope of a basic installation tutorial.
The tool only evaluates SATA controllers. DSM automaticaly adds the ports on SCSI and SAS controllers after the last SATA slot. Even if there are no SATA controllers present, the tool should be run to set functional default values. NOTE: As SCSI/SAS ports are not evaluated, there will be no warning if the addition of the SCSI/SAS ports exceeds the maxdisk value.
-
Manual Review: With prior loaders (such as Jun's), the configuration of these parameters was completely manual. There is no single setup that works for all hardware. Even after using the tools above, please review and verify the parameters, understand what they do, and manually edit if needed.
Whatever changes rploader.sh makes to the user_config.json file can be reviewed by displaying the file contentscat user_config.json
and overridden by editing the filevi nano user_config.json
You can also add a simpler editor, nanotce-load -iw nano nano user_config.json
And there is also a graphical editor accessible from the TinyCore desktop
Step 5. Optional: Manually Add Driver Extensions
While TCRP can automatically add drivers based on the detected NAS hardware, it isn’t foolproof. You might want to build a loader for a device you don’t actually have yet. And there are features that are "opt-in" only. So, a process exists to manually add drivers and other functionality. Extensions are stored in repositories hosted on the web.
All the extensions in the main repository are viewable here: https://github.com/pocopico/rp-ext
To list all the extensions recommended by TCRP's hardware detection algorithm, use
./rploader.sh listmods <architecture>-<version>-<DSMreleasenumber>./rploader.sh listmods apollolake-7.1.0-42661
To add a specific extension, choose from the list and reference the architecture from Step 1.
./rploader.sh ext <architecture>-<version>-<DSMreleasenumber> <extensionurl>./rploader.sh ext apollolake-7.1.0-42661 add https://raw.githubusercontent.com/pocopico/rp-ext/master/redpill-acpid/rpext-index.json ./rploader.sh ext denverton-7.1.0-42661 add https://raw.githubusercontent.com/pocopico/rp-ext/master/v9fs/rpext-index.jsonThe examples illustrate adding ACPI and VIRTIO support. These are often chosen enhancements to a basic installation.
Step 6. Build the Loader
When all preparation steps are complete, build the loader using the command structure
./rploader.sh build <architecture>-<version>-<DSMreleasenumber> [buildtype]
Example #1: DS3622xs+, auto detect hardware./rploader.sh build broadwellnk-7.1.0-42661 auto
Example #2: DS918+, use preselected drivers./rploader.sh build apollolake-7.1.0-42661 manualTCRP will download resources from the Internet to complete the complex process of the loader build. When finished, it will write it to the USB flash drive and add new items to the GRUB boot menu. Review the output for any errors and make corrections if necessary.
Step 7. Optional Backup TasksSave the TinyCore configuration state as the default, so that the next boot of TInyCore starts with all your settings
./rploader.sh backup nowBack up the generated RedPill loader partition to available space on the USB flash drive
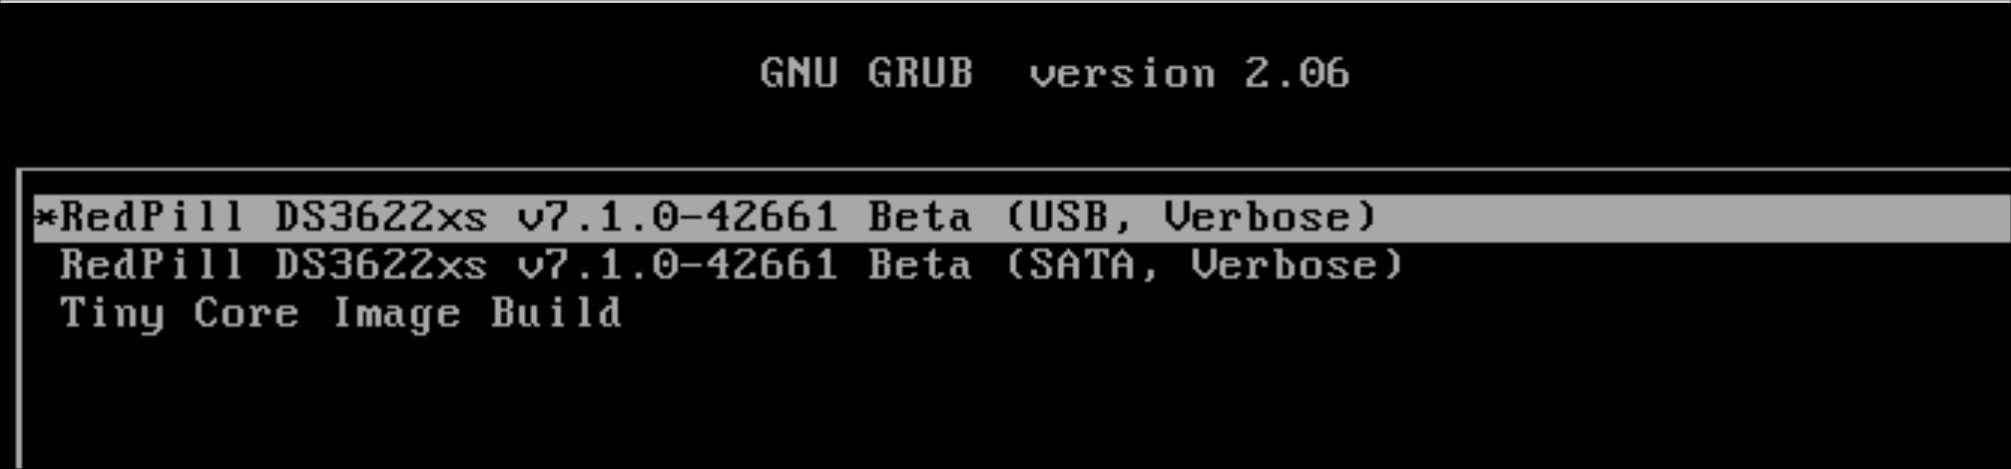
./rploader.sh backuploader nowStep 8: Restart and Boot DSM Using the Grub USB Option
Cleanly shutdown and reboot with the TinyCore command
exitcheck.sh rebootFirst, the GRUB Menu is displayed. If necessary, use the arrow keys to ensure that USB is selected and press ENTER.

The loader will show some initialization information and silently boot DSM. Nothing else will be displayed unless a serial console is attached (see the Troubleshooting section below). Give it a few minutes to complete booting. Then, launch either https://find.synology.com or the Synology Assistant desktop utility. If all is well, a new "SynologyNAS" will be displayed as Not installed (for a new build) or the name of your existing Migratable NAS (if upgrading from a previous version).

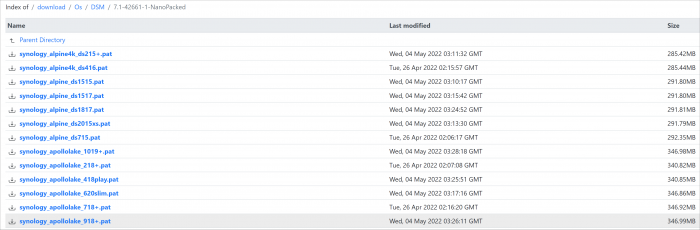
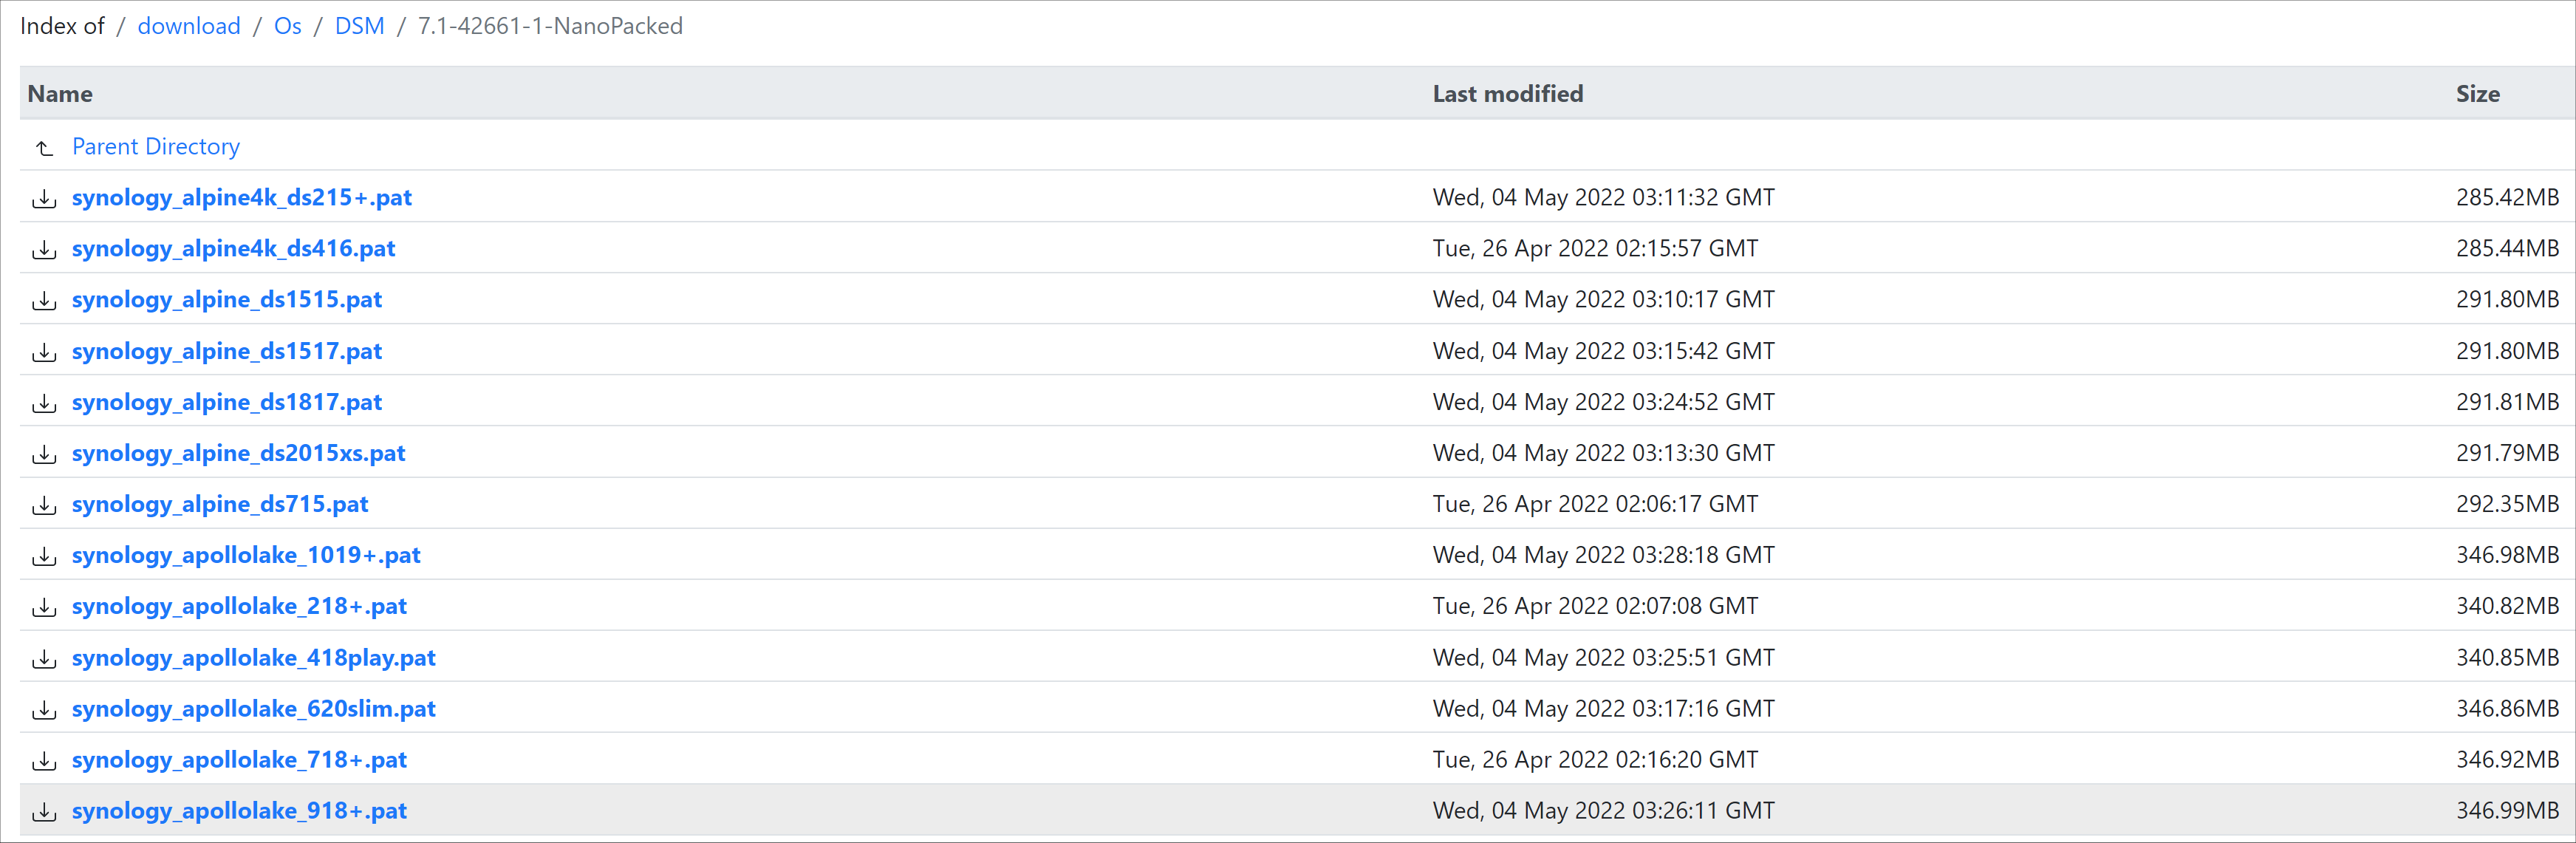
Download the DSM install PAT file that matches the platform and DSM release number specified in the loader build. Files are available from the Synology download archive https://archive.synology.com/download/Os/DSM. There can be several files that appear to be candidates. PAT files marked VirtualDSM will not work. Also there can be patch PAT files with the same numbering. These will not work and will usually be smaller than 50MB. The correct PAT file is 300MB or larger.
Once the correct DSM PAT file is downloaded to your personal computer, launch the installer and upload the PAT file to the NAS. Follow the prompts to complete the installation.
IMPORTANT: If you are attempting to upgrade DSM, and Synology Assistant shows Not installed, or if prompted to erase the disks during the upgrade, STOP! Some or all of the disks are not visible to DSM. This must be resolved via troubleshooting and reconfiguration before installing DSM 7.x.
Troubleshooting
If unable to locate the new SynologyNAS using Synology Assistant, either the loader has kernel panicked, or the network is not functioning (usually because of a missing or incompatible network driver, or no accessible DHCP server). The only way to verify the specific cause is to use a serial console. This involves configuring a physical serial port from the NAS hardware to your personal computer and using a terminal emulation program for access.
The serial console is mirrored to a special TCRP network console. If the network is functioning (i.e. you can see the IP in Synology Assistant), it can be accessed via a browser at https://<DSM IP>:7681
However access is gained, a special DSM login prompt will be displayed. This is Junior mode, visible before DSM is installed, or if DSM is installed but cannot start. If DSM has not been installed, log in with root (you won't be prompted for a password).
SynologyNAS login:Disk port shutdown errors and missing disks are usually a SataPortMap/DiskIdxMap/Device Tree problem, but can be a driver issue if using SCSI or SAS host bus adapters. If SATA disks are missing, investigate DSM’s view of SataPortMap/DiskIdxMap and some other user_config.json parameters by typing
cat /proc/cmdlineIf the loader device "/dev/synoboot" is not returned by the following command, the identifyusb step of the install may have been skipped
ls -la /dev/synobootInspect DSM's view of the accessible disk devices with
ls –la /sys/blockIf using a Device Tree platform, display the contents of the device tree with
dtc –I dtb /var/run/model.dtbWhere to Post for Help
It’s easy for requests for installation help to get lost in various unrelated forum threads. Post requests for help as a new topic in the DSM Installation Forum.
At a minimum, state the hardware configuration, selected platform, DSM version, user_config.json information (delete or redact the serial number and configured MAC address) and any information from debugging analysis that you have done.
DON’T post general requests for help on this thread.
Please DON’T post general requests for help on TCRP or RedPill development threads unless providing feedback on a dev issue.
Final Words
Because of ongoing community development, TCRP capabilities change rapidly. Please DO post corrections and new or divergent results when encountered, so that this tutorial may be updated.
Great post Flyride, thanks I hope to be able to fix something. Thank you
-
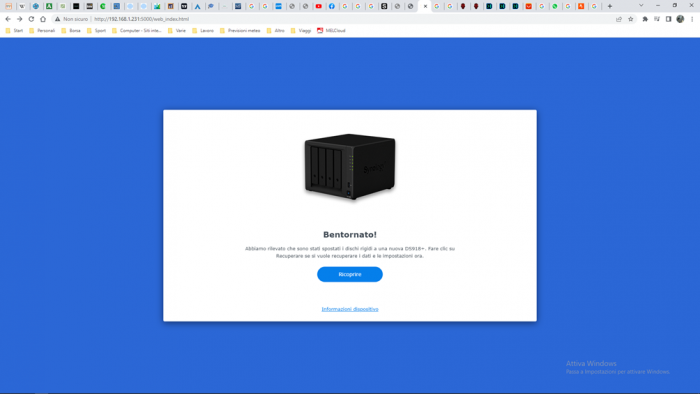
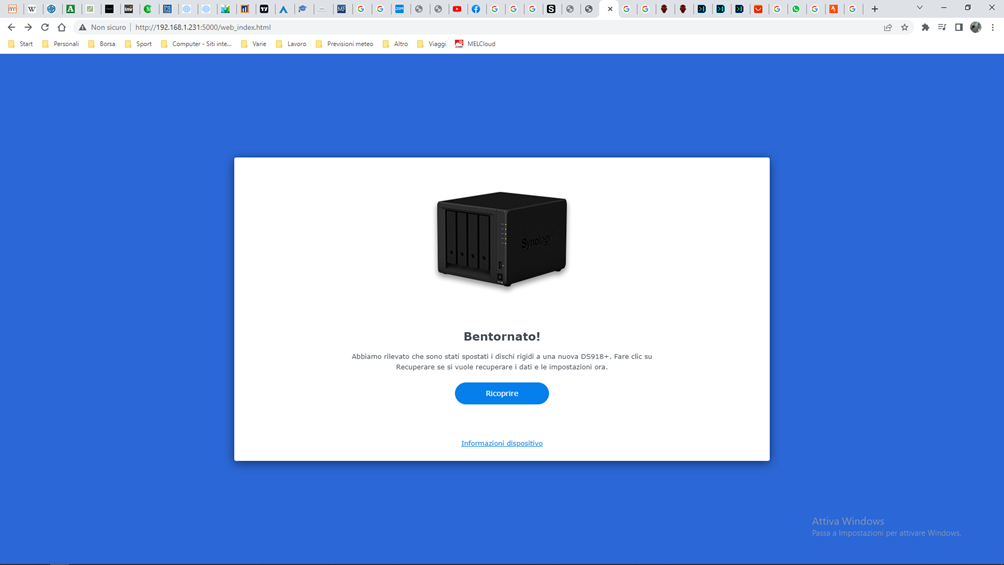
Hi Flyride, today I tried to restart it, I don't know how and why it gave me internal ip to the lan and then it connects me, only it tells me, in addition to the welcome back it has detected that the hard drives have been moved to a new one 918+, click on “overlay” to recover the data and settings. Except that when I do it, he executes a command that I don't know then gives me 10 minutes to wait and in the end he gives me that he wasn't able to execute and try again. I guess I busted everything, I had read in some threads about problems with disk mapping but I can't find it
-
Yes, that's what I thought I would do, tomorrow I'll take a little courage and try ..... I'll let you know, thanks in the meantime (in any case I have all the backup of the machine in other old synolgy that I use as a backup, bad that it goes to zero everything and put back on the 7.0.1 up2 it will take time because I have about 9Tb of data ... !!!)
-
Hello Flyride thanks for the answer, you are right without knowing where a charger comes from you can't say, I know I did a stupid thing I don't even know why I did it .... !!!! however this is, unfortunately I am not able to build it I have tried it several times but I do not have the knowledge of how to do it (I was fine when there were 102/103/104 chargers already made ...), moreover I do not I don't even know what a TCRP loader is .... (I think T stands for Tyny, C stands for Core ...) however from find.synology.com it tells me that the system is resettable, the problem is that it changed my range ip of the host and I don't know how to reach it
-
Baremetal installation
Motherboard: Supermicro X11SCH-LN4F socket 1151
Processor: Intel Xeon E 2276G Coffee Lake
RAM: 64Gb
4 Hhd Western Digital 4Tb EFRX
2 NVMe Samsung NVMe V-NAND SSD 670 Pro 512Gb
Loader: found on the net already made for 918+
Hello everyone, yesterday I dreamed of updating DSM 7.01 up.2 working from January to up.4 manually, I downloaded the update from Synology 7.0.1-42218-4 (apollolake) site and started the update, after the update, however, the machine was never found; I thought I had everything busted but I tried to search for it with Synology web assistant (find.synology.com) and I realized that the machine is there (indeed it sees two), only that it has changed the IP addresses (I had assigned it an address static ip) with a very different range from mine, I use 192.168.1.1/254 while now he gives it to me with DHCP server and assigned ip addresses 169.254.63.90 to one machine and 169.254.58.122 to the other. Obviously my network can't see it can see hosts with that ip address renga, I tried with the Synology assistance program to change the addresses but it doesn't (it tells me that the machine is recoverable), how can I do ??? I had thought of changing the range of in to my lan (router and pc to possibly control the host) in 169.254.63.1/254 and see if I can enter the DSM and try to change the ip from the, can you do ?? ?? Or suggestions ???? Thanks
-
I would wait more than a few days to install it even on original machines ... !!!!!! 😃😃


Quale configurazione consigliate con Terramaster F4-423?
in ITALIAN
Posted
Ciao dato che siamo italiani ti scrivo in italiano che mi trovo tanto meglio😀😀
allora ha i posto varie domande vediamo di rispondere una ad una
esistono varie tipologie di caricatore (3/4) ma quella che scrivi tu non mi risulta forse volevo scrivere ARPL comunque le 3 che vanno per la maggiore sono queste;
- Tinycore utilizza metodo jun, ti scarichi l'eseguibile dal repository github lo la fai partire dalla macchina e lui si cerca e scarica tutti i file che gli servono in base al tipo di macchina per costruire l'immagine che fara partire il sistema;
- Tinycore M-Shell è sempre un'immagine Tinycore ma la procedura per fare il caricatore è guidata;
- ARPL è una procedura completamente guidata per la costruzione del caricatore (sempre in base al proprio hardware) e utilizza un metodo jot, mi pare pero che lo sviluppatore se nè andato e non so se avra futuro, mi pare che con le ultime versioni (dalla 7.2 up.1 o 2 non funziona, ma non sono sicuro ho poco tempo per andarci dietro)
si dice che il metodo jot sia leggermente piu lento nell'avvio
Nei repository si trovano sempre 3 tipi di immagine, una per eseguire la macchina in ambiente virtuale, una per eseguire la macchina in modalita baremetal l'altra sinceramente non me lo ricordo...!!!!!🙈🙈
Ti consiglio di provare prima con una macchina virtuale, quando avrai capito un po il funzionamento poi puoi provare a installarlo su una macchina baremetal anche se nel tuo caso non credo cambi molto, vedevo che hai 4Gb di RAM sarebbero un po pochini. Per quanto riguarda la versione non è la 918+ la piu usata ma la 3622+ dipende sempre dall'hardware e da cosa si vuole o deve fare
Ci sono in rete vari video di come si fa a costruire un caricatore cerca un po (con ARPL e M-Shell è diventato molto facile). ciao ciao