
Jizar Stoffel
-
Posts
47 -
Joined
-
Last visited
Everything posted by Jizar Stoffel
-
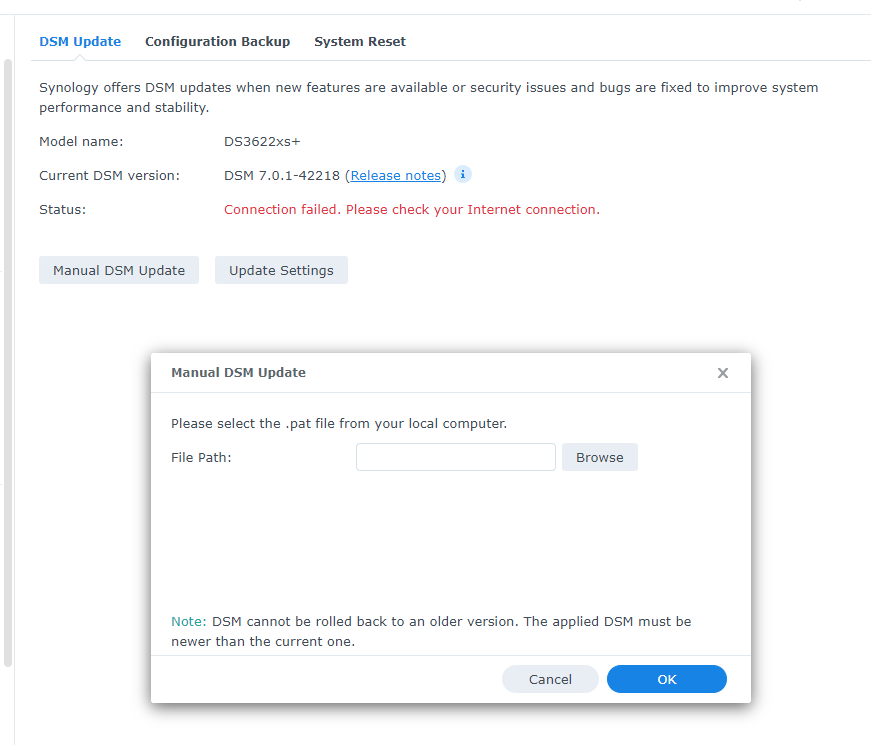
Autoupdate does not work for me. Should I download the update and do it manually.... if so, what version? 7.0.1-42218 > 7.1-42621 or just download DSM 7.0.1?

-
ip a 1: lo: <LOOPBACK,UP,LOWER_UP> mtu 65536 qdisc noqueue state UNKNOWN group default qlen 1 link/loopback 00:00:00:00:00:00 brd 00:00:00:00:00:00 inet 127.0.0.1/8 scope host lo valid_lft forever preferred_lft forever inet6 ::1/128 scope host valid_lft forever preferred_lft forever 2: eth0: <BROADCAST,MULTICAST,UP,LOWER_UP> mtu 1500 qdisc pfifo_fast state UP group default qlen 1000 link/ether bunchofnumbers inet ip444/24 brd netmask scope global eth0 valid_lft forever preferred_lft forever inet6 ip666 scope link valid_lft forever preferred_lft forever 3: sit0@NONE: <NOARP> mtu 1480 qdisc noop state DOWN group default qlen 1 link/sit 0.0.0.0 brd 0.0.0.0
-
Result of lspci -v 0000:03:00.0 Class 0200: Device 10ec:8136 (rev 07) <<<<<<<<<<<<<<<<<<<<< WORKING ONBOARD NIC Subsystem: Device 10ec:0123 Flags: bus master, fast devsel, latency 0, IRQ 33 I/O ports at d000 [size=256] Memory at f7d00000 (64-bit, non-prefetchable) [size=4K] Memory at f0000000 (64-bit, prefetchable) [size=16K] Capabilities: <access denied> Kernel driver in use: r8169 0000:04:00.0 Class 0200: Device 10ec:8125 (rev 05) <<<<<<<<<<<<<<<<<<<<<<<<< NON WORKING PCI 2.5BG NIC Subsystem: Device 10ec:8125 Flags: fast devsel, IRQ 10 I/O ports at c000 [disabled] [size=256] Memory at f7c00000 (64-bit, non-prefetchable) [disabled] [size=64K] Memory at f7c10000 (64-bit, non-prefetchable) [disabled] [size=16K] Capabilities: <access denied> $ lspci -q 0000:00:00.0 Host bridge: Intel Corporation 4th Gen Core Processor DRAM Controller (rev 06) 0000:00:01.0 PCI bridge: Intel Corporation Xeon E3-1200 v3/4th Gen Core Processor PCI Express x16 Controller (rev 06) 0000:00:02.0 VGA compatible controller: Intel Corporation Xeon E3-1200 v3/4th Gen Core Processor Integrated Graphics Controller (rev 06) 0000:00:03.0 Audio device: Intel Corporation Xeon E3-1200 v3/4th Gen Core Processor HD Audio Controller (rev 06) 0000:00:14.0 USB controller: Intel Corporation 8 Series/C220 Series Chipset Family USB xHCI (rev 05) 0000:00:16.0 Communication controller: Intel Corporation 8 Series/C220 Series Chipset Family MEI Controller #1 (rev 04) 0000:00:1a.0 USB controller: Intel Corporation 8 Series/C220 Series Chipset Family USB EHCI #2 (rev 05) 0000:00:1b.0 Audio device: Intel Corporation 8 Series/C220 Series Chipset High Definition Audio Controller (rev 05) 0000:00:1c.0 PCI bridge: Intel Corporation 8 Series/C220 Series Chipset Family PCI Express Root Port #1 (rev d5) 0000:00:1c.2 PCI bridge: Intel Corporation 8 Series/C220 Series Chipset Family PCI Express Root Port #3 (rev d5) 0000:00:1c.3 PCI bridge: Intel Corporation 8 Series/C220 Series Chipset Family PCI Express Root Port #4 (rev d5) 0000:00:1d.0 USB controller: Intel Corporation 8 Series/C220 Series Chipset Family USB EHCI #1 (rev 05) 0000:00:1f.0 ISA bridge: Intel Corporation H81 Express LPC Controller (rev 05) 0000:00:1f.2 SATA controller: Intel Corporation 8 Series/C220 Series Chipset Family 6-port SATA Controller 1 [AHCI mode] (rev 05) 0000:00:1f.3 SMBus: Intel Corporation 8 Series/C220 Series Chipset Family SMBus Controller (rev 05) 0000:01:00.0 SATA controller: Marvell Technology Group Ltd. 88SE9215 PCIe 2.0 x1 4-port SATA 6 Gb/s Controller (rev 11) 0000:03:00.0 Ethernet controller: Realtek Semiconductor Co., Ltd. RTL810xE PCI Express Fast Ethernet controller (rev 07) 0000:04:00.0 Ethernet controller: Realtek Semiconductor Co., Ltd. RTL8125 2.5GbE Controller (rev 05) 0001:09:00.0 SATA controller: Marvell Technology Group Ltd. 88SE9235 PCIe 2.0 x2 4-port SATA 6 Gb/s Controller (rev 11) 0001:0c:00.0 SATA controller: Marvell Technology Group Ltd. 88SE9235 PCIe 2.0 x2 4-port SATA 6 Gb/s Controller (rev 11)
-
After restart: I can access SSH and winSCP. but lost access to web interface. even http://find.synology.com/ cant find DSM. Nevermind, rebooted again and it came back. but still the same, no 2nd or 3rd NIC
-
Thank you, I was looking in the wrong place. I was looking at : https://github.com/pocopico insteal of https://github.com/pocopico?tab=repositories the simplest things get us so confused..... ehehehe testing it now, will post results
-
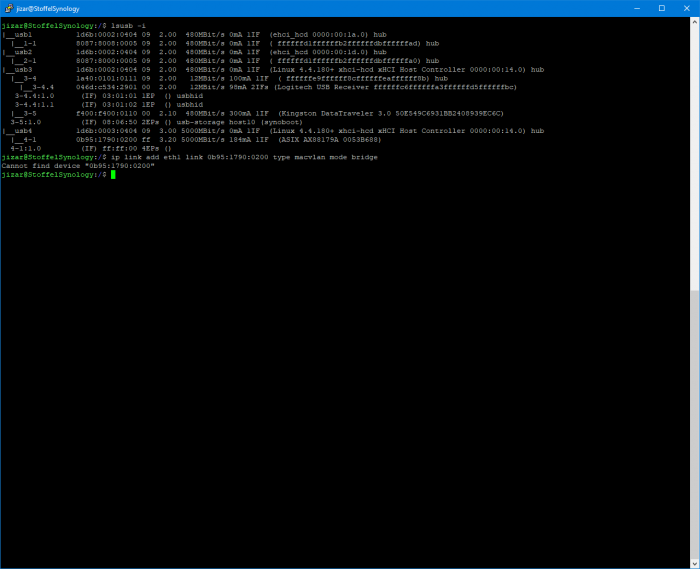
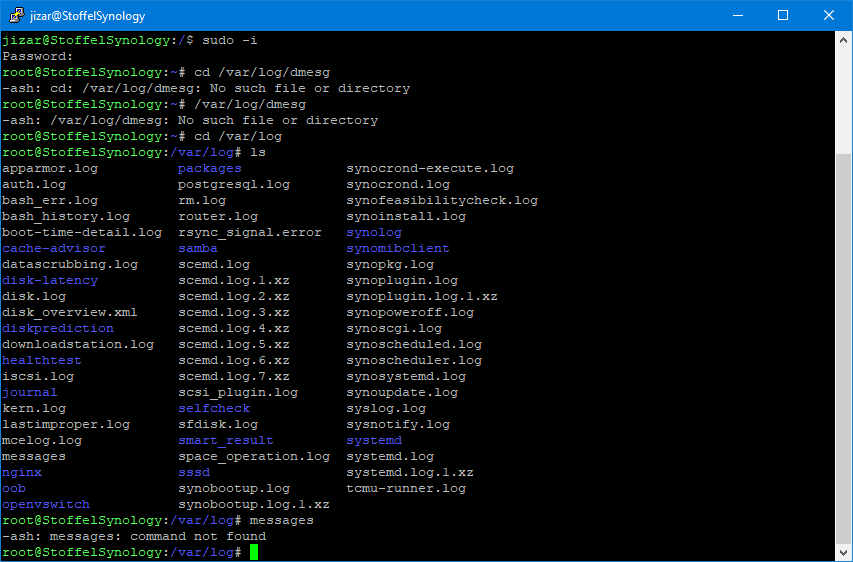
it does not should I try 3.10.108-molules instead... what is the difference? jizar@StoffelSynology:/$ lsmod Module Size Used by fuse 84268 1 8021q 17633 0 ocs_fc_lio 751604 0 tcm_qla2xxx 23502 0 qla2xxx 578233 1 tcm_qla2xxx libfc 92202 0 scsi_transport_fc 44614 4 qla2xxx,libfc,tcm_qla2xxx,ocs_fc_lio vhost_scsi 27040 1 vhost 29194 1 vhost_scsi tcm_loop 14155 1 iscsi_target_mod 264102 1 target_core_user 26622 0 target_core_ep 54913 2 target_core_multi_file 33434 1 target_core_file 54974 1 target_core_iblock 22853 1 target_core_mod 874498 24 target_core_iblock,target_core_multi_file,vhost,tcm_qla2xxx,iscsi_target_mod,ocs_fc_lio,target_core_ep,target_core_file,target_core_user,vhost_scsi,tcm_loop syno_extent_pool 1364513 0 rodsp_ep 86823 3 target_core_multi_file,syno_extent_pool,target_core_file usbserial 21209 0 vfat 10287 0 fat 54020 1 vfat udf 78539 0 isofs 31872 0 loop 19663 0 synoacl_vfs 15990 2 btrfs 1125611 2 ecryptfs 81058 1 btrfs zstd_decompress 71155 1 btrfs zstd_compress 150407 1 btrfs xxhash 4611 2 zstd_compress,zstd_decompress raid456 108731 1 async_raid6_recov 5446 1 raid456 async_memcpy 1726 2 raid456,async_raid6_recov async_pq 4740 2 raid456,async_raid6_recov async_xor 3489 3 async_pq,raid456,async_raid6_recov xor 10808 2 btrfs,async_xor async_tx 2070 5 async_pq,raid456,async_xor,async_memcpy,async_raid6_recov raid6_pq 96748 4 async_pq,raid456,btrfs,async_raid6_recov linear 5295 1 adt7475 30458 0 zram 18210 4 aesni_intel 175128 0 glue_helper 3893 1 aesni_intel lrw 3541 1 aesni_intel gf128mul 5610 1 lrw ablk_helper 2012 1 aesni_intel broadwellnk_synobios 77926 0 hid_generic 1321 0 usbhid 25951 0 hid 87850 2 hid_generic,usbhid usblp 10810 0 uhci_hcd 21742 0 etxhci_hcd 83507 0 bnx2x 1415848 0 mdio 3319 1 bnx2x mlx5_core 504733 0 mlx4_en 123301 0 mlx4_core 281872 1 mlx4_en mlx_compat 1561 3 mlx4_en,mlx4_core,mlx5_core qede 123410 0 qed 787750 1 qede atlantic_v2 195529 0 atlantic 181885 0 r8168 524960 0 tn40xx 30650 0 i40e 339616 0 ixgbe 275001 0 be2net 115902 0 i2c_algo_bit 5392 0 igb 173452 0 dca 4832 2 igb,ixgbe e1000e 171055 0 sg 26379 0 dm_snapshot 28715 0 dm_bufio 14512 1 dm_snapshot crc_itu_t 1531 3 udf,atlantic_v2,atlantic crc_ccitt 1531 0 psnap 1917 0 p8022 1243 0 llc 3505 2 p8022,psnap hfsplus 90461 0 md4 3889 0 hmac 2961 0 sit 15342 0 tunnel4 2389 1 sit ipv6 313927 79 sit flashcache_syno 225902 2 flashcache 78200 0 syno_flashcache_control 1167 2 flashcache_syno,flashcache dm_mod 88259 18 flashcache_syno,dm_bufio,flashcache,dm_snapshot arc4 2104 0 crc32c_intel 13062 1 cryptd 7818 2 aesni_intel,ablk_helper sha256_generic 10521 0 ecb 2177 0 aes_x86_64 7503 1 aesni_intel authenc 4140 0 des_generic 16221 0 ansi_cprng 3940 0 cts 4200 0 md5 2641 0 cbc 2712 0 cpufreq_powersave 1126 0 cpufreq_performance 1130 8 acpi_cpufreq 6503 0 processor 25777 9 acpi_cpufreq cpufreq_stats 2806 0 vxlan 32111 7 i40e,qede,bnx2x,ixgbe,be2net,mlx4_en,mlx5_core ip6_udp_tunnel 1967 1 vxlan udp_tunnel 2419 1 vxlan ip_tunnel 12243 1 sit r8169 71172 0 mii 4355 1 r8169 usb_storage 49177 0 xhci_pci 4650 0 xhci_hcd 109368 1 xhci_pci ehci_pci 3935 0 ehci_hcd 41544 1 ehci_pci usbcore 199352 10 etxhci_hcd,usblp,uhci_hcd,usb_storage,usbserial,ehci_hcd,ehci_pci,usbhid,xhci_hcd,xhci_pci usb_common 2286 1 usbcore mv14xx 521484 0 redpill 147624 0 jizar@StoffelSynology:/$ sudo lsmod |grep -i Usage: grep [OPTION]... PATTERN [FILE]... Try 'grep --help' for more information. jizar@StoffelSynology:/$ sudo lsmod |grep -i r8125 jizar@StoffelSynology:/$
-
I used this for trying to match my hardware the best I could.. https://kb.synology.com/en-me/DSM/tutorial/What_kind_of_CPU_does_my_NAS_have in my case DS3517xs and DS3622xs+ are the best match
-
here is what I did and the error I got. 1. Using WinSCP, I opened /lib/modules 2. Went to : https://github.com/pocopico/4.4.180plus-modules and got module r8125.ko 3. SSH into DSM and used : sudo chmod 777 lib/modules (other wise I got permission error) 4. move r8125.ko into /lib/modules 5. ran sudo ln -s /bin/kmod /sbin/modinfo 6. ran sudo ln -s /bin/kmod /sbin/depmod 7. ran sudo depmod -a got this error: depmod: WARNING: could not open /lib/modules//modules.order: No such file or directory depmod: WARNING: could not open /lib/modules//modules.builtin: No such file or directory what am I doing wrong?
-
hey man, don't be sorry, I got nothing but respect for you guys that try to help us out!!!
-
Agreed... I know this is a Devs area. and we should know all the basics, and I do know most linux commands. but DSM syntax does not really work that way... I have tried so many commands only to get "this is not a valid command" or " does not exits" etc. Normally, when I help people with tech stuff, I try to dumb it down by simplifying things and giving step by step instructions. Needless to say that I spent most of the day searching on the web on how to fix this, but nothing I tried worked. This is why I decided to post here.... to see if I can get the help needed.
-
im having problem finding the device id. Ive tried every combination and it always says "Cannot find device"
-
try this first: sudo ./rploader.sh clean now
-
Im in the same boat, I have a 100mb onboard NIC, a 2.5Gb PCI NIC, and a 1Gb USB NIC. it see the USB NIC under info on the control Panel inside DSM7, but it does not see it as a LAN2 or LAN3. im in the process of figuring out how to read the logs, but so far not good, on WinSCP it gives permission error and on Putty gives file not found.....
-
This post helped me understand much about SMP and DIM https://gugucomputing.wordpress.com/2018/11/11/experiment-on-sata_args-in-grub-cfg/
-
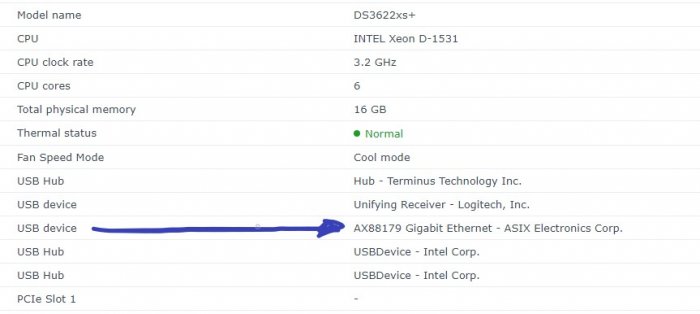
huh!!! I dont have that file on my system. I think that ext is installed, the NIC I really wanted to use was my PCI card. NICGIGA NIC-2.5G I posted a request for the ext on the github, but it seems it is already supported, I just dont know how to add it. https://github.com/pocopico/tinycore-redpill/issues/48 this is the NIC output: 01:00.0 Ethernet controller [0200]: Realtek Semiconductor Co., Ltd. RTL8125 2.5G bE Controller [10ec:8125] (rev 05)

-
So... here is what I did.... 1. Burned a new TinyCore USB Stick on a brand new Usb Stick. (saved my previous on just in case) 2. Ran the following codes: sudo ./rploader.sh update now sudo ./rploader.sh serialgen DS3622xs+ now (I used the same Serial I had before) sudo ./rploader.sh satamap now (result was 64/0004) sudo ./rploader.sh identifyusb now sudo ./rploader.sh ext broadwellnk-7.0.1-42218 auto added mac2 and mac3 to user_config.json (just so see if my NICs would pop up) sudo ./rploader.sh build broadwellnk-7.0.1-42218 sudo ./rploader.sh backup now (and downloaded the .pat from the cache folder) sudo reboot I let it boot normally to see if it would give me the infamous drive error. Oddly enough... it didn't , it went straight thru to the login page, didn't even asked to installation or restoration. So it seems that by using the same serial number from previous installation did the trick. If I would have gotten the drive error, I would've rebooted and pressed 'e' on loader menu and edit "SataPortMap" to 1 and "DiskIdxMap" to 00, just to reinstall the .pat So far, everything is working normally as before. Now I just need to figure it out how to get my NICs to work. And maybe mess arround with code to move the drives around to fill drives 3,4 instead of 9,10. PS... Synology Drive Server is not installing, keeps asking for a repair.
.thumb.jpg.35e915063ed8639967e6d9122e22e4d5.jpg)
-
right at this moment.. im creating new boot usb stick and starting from scratch... Ill let you guys know if it works
-
Trying to solve my issue... I ran into this when trying to rebuild my setup. anyone have any thoughts that might help me?
-
I had that issue, I fixed it by reburning the iso to a different usb stick, removing one HHD from my machine, wiping all data out, putting it back on the machine, and running setup with Sataportmap:1 Diskidxmap:00. that got me thru the installation problems. but once installed.... Im still having problem to permanently change the satapormap to 64 and diskidxmap to 0004. to reflect my drives setup. it works fine if I do it thru pressing 'e' at loader menu and changing manually, but it resets every time there is a system reboot.
-
FYI: my H81 intel Motherboard has 4 fisical SATA port. but on bios and on TC it says it has 6 ports... after some research I found out that Port 1,2,5,6 are the fisical ones. and port 3 and 4 its up somewhere in the 4th Dimention... thats why it gives the drive error (3,4.... blablabla, disable crap)
-
Hello, it has taken me 4 days to read thru this topic, and finally come out with a woking DS3632xs+ DSM 7. Although I was able to update from my 6.2 on the first try with DS3615xs... but after the 1st reboot I lost all my files because of errors after errors! (no matter, thats what backups are for) Here is my problems now... In order to be able to install the DSM without getting the Drives Error (3,4 blablabla)... that has to do with "SataPortMap (SPM)" and "DiskIdxMap(DIM)" , I set my settings to SPM 1 and DIM 00. That got me all the way to installation on DS3622 and Found 1 drive. After that I rebooted the machine and on the Loader Menu I pressed "e" and manually changed the SPM to 64 and SPM to 0004. and Got a fully working 8 disks, I went ahead and install all my main apps. (Plex, sonarr, radarr, jackett, etc). Had it all working fine for 2 days. Due to a power outage. the machine got reboot it and when it came back on, there were only 1 drive in the system and a bunch of errors... Fine, I reboot again, Pressed 'e' on loader menu, edit the lines again... and pressed F10 and got all my drives back. Then I tried to reboot into tinycore and manually change the user_config.json to reflect the changes I made. I saved it but when I reboot it, the values were not saved... So I read that TC only saves into RAM and the values gets reseted on reboot, And I should ssh into TC and run the "sudo ./rploader.sh backup now" command to save it, but now for some reason, everytime I reboot into TC the new values are there, but it does not transfer to the installed loader. Am I going to have to redo the whole process from scratch? or is there a way to permanently save the changes on user_config,json to reflect the installed Loader? If I have to reinstall the whole thing , should I set SPM to 64 and DIM to 0004, and if I get the same drives errors, Ill just 'e' on loader menu and change it to 1 and 00. just for the install and then let it reboot normally? 2. I had a USB 1gb NIC working on 6.2. On DSM 7, it finds the USB NIC but it does not load as NIC or LAN2, I only have the LAN1 from my onboard NIC (which is only 100mb) I also tried adding a PCI 2.5Gb card, but that does not work yet, maybe missing EXT. I already post a request on the github page. and I did add a mac2 to the user_config.json. just not sure is the changes are sticking to the loader on reboot. I really dont mind the NIC problem, my onboard card does a pretty decent job send 4k movies to my TVs on plex. as for files, I have a 10Gb card on my PC serving as file transfer intermediate. my BareMetal setup is: I7 4790s on a Intel H81 MB 16GB DD3 4 port on board SATA 4 port PCI SATA card - had a 8 port before, but that gave me lots of headace messing around with SPM and DIM.
-
Just went thru this, I set my Vlan ID to 1 by mistake, and after about 2 hrs.... and lots of frustration because I didnt want to do a full wipe and start from scratch. I decided to install a network card I had on another pc on my xpenology pc... restarted and bam.... I was able to access my server gui again. just had to do a network scan for the new IP my router gave to it. once there I changed my vlan id to disable and got everything back on track without having to redo the whole thing. So... 1. Install a new Network card. 2. restart the server. 3. Use a network scanner to obtain the new server IP. (with the port you chose) 4. Disable Vlan. 5. Restart. (you can take the network card out if you choose to). 6. Enjoy this amazing Xpenology.....


.jpg.7a296bdc922da8465bbc0bcc972e946c.jpg)
