

NiGGaZ
-
Posts
14 -
Joined
-
Last visited
-
Days Won
1
Posts posted by NiGGaZ
-
-
20 часов назад, IG-88 сказал:
when trying to estimate network speed its best to use a tool that only does exactly this, keeping out buffers cache and read/write speed problems of disks, even ssd's have cache and can have write speed decreased when needing to empty a block (4k) before writing it again, to cover that up and emptying early there is trim but that usually kicks in when there is nothing to do
the kernel and settings for 918+ and 1019+ will be the same as its the same hardware platform (apollo lake), when used on the same hardware i'd expect the same performance, so my explanation would be systematic problems to measure reliably under constant conditions and one method to cope with this is to exclude as much factors as possible (like using a tool that just meaures the network speed and does not write anywhere else then /dev/nul)
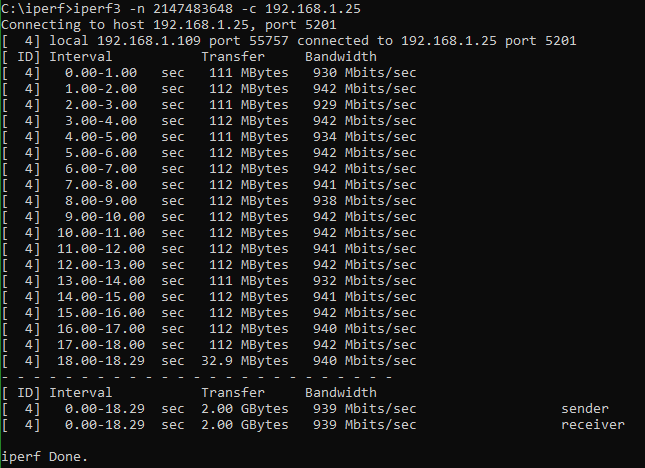
Curious! I've tested network speed with iperf3 (on synology with docker). I'm shocked! Then why copying through ordinary network not so good!?
-
В 02.07.2020 в 22:15, NiGGaZ сказал:
Hi.
I've prepared extra.lzma based on Juns patch and Custom loader for DS1019+ for DSM 6.2.3-25426, link below:
https://mega.nz/file/pao0CQrb#_pLGNjTl-f7eneoWQgDkPklDoRCyqxJ_vhx_d79kIKg (only extra.lzma ~ 5.7Mb)
You can find loader for DS1019+ on this forum or another place, you can remove both extra files from partition and use re-compiled.
Then you need to download PAT files from https://archive.synology.com/download/DSM/release/6.2.3/25426/DSM_DS1019+_25426.pat, and just replace zImage and rd.gz
Tested on ASUS N3150M-E (Lan: Realtek 8111H) and it works better then on loader for DS918+ (including extra)
Comparing Read/Write speed between DS1019+ (chinese, repacked) and DS918+ (from this forum loaders).
Hardware: ASUS N3150M-E, Lan: Realtek 8111H, SSD: Samsung 128Gb (Sata 3Gbps).
File: approx. 2,52 GB img
Strange, but DS1019+ (W: ~63-65 Mb/s, R: ~66-67 Mb/s) copying faster then DS918+ (W: ~50-58 Mb/s, R: ~60-62 Mb/s).
Checked on another HDD WD 1Tb: DS1019+ (W: ~39-45 Mb/s, R: ~40-47 Mb/s) copying faster then DS918+ (W: ~30-36 Mb/s, R: ~36-38 Mb/s).
Maybe someone can explain why it so!?
DS918+ Wrinting (SSD Samsung 128Gb)
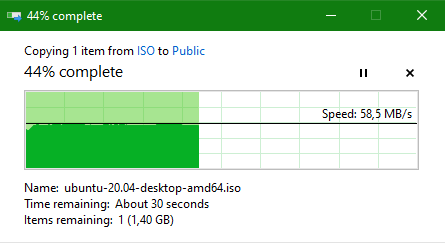
DS918+ Reading (SSD Samsung 128Gb)
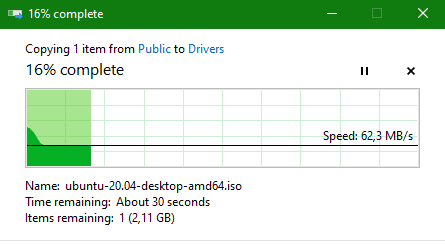
DS1019+ Wrinting (SSD Samsung 128Gb)

DS1019+ Reading (SSD Samsung 128Gb)

-
4 минуты назад, IG-88 сказал:
i guess your i915 driver for hardware transcoding is not working that way (/dev/dri)
Perhaps it is, because when I read logs there was something about DRM.
6 минут назад, IG-88 сказал:ahh, so it was you, not the people who adapted the patch in the first place
why? it does not hurt in any way to have more "slots" in the web gui, it will only limit the usability for other people
IMHO: I just imagine about weak motherboard with 16 slots...
-
2 минуты назад, IG-88 сказал:
did you use a differen realtek driver?
I tried to load another version of realtek drivers, but there was some version differences of kernel.
5 минут назад, IG-88 сказал:pitty the people in china removed the 16 drive part of jun's patch
Yes, I've removed too. Because for me it's not necessary, I got only 2 sata ports. (Sorry if removed)
7 минут назад, IG-88 сказал:if you want to maintain this a little i could try to make a adapted patch that has the 16 drives, i was planing to do it for 3615/17 anyway
I've interested to maintain. From the beginning of lockdown
") 10 минут назад, IG-88 сказал:
10 минут назад, IG-88 сказал:as stated above, the drivers you are using are made for 6.2.2, that version had different kernel settings
you would need to use drivers from extra.lzma/extra2.lzma for loader 1.04b ds918+ DSM 6.2.3 v0.10 or above
I used extra2 made for 6.2.2, but currently loaded 6.2.3 and it works fine!
You're right about kernel, I've tried to compile kernel from sourceforge, but results wasn't good.
-
9 минут назад, IG-88 сказал:
why is ist better?
it looks like as he drivers are just repackaged from my "extra918plus_v0.6_test.zip" from 10/2019 and that version was for 6.2.2 not for 6.2.3
also the patch inside the extra does not patch the amount of drives so people using this will be limited to the default of 5 drives for this unit
the original hardware ist the same as 918+, no added functionality by this model
this extra.lzma looks the same as the one inside a "ds1019+6.22.img" i downloaded from china last december to have a look what they where doing
what did you change/add?
imho thats not jun's loader anymore, its based on his loader
the poeple who did it also changes juns info.txt
Intro:
This mod is based on the basic modification made by Jun. You can contact me to discuss technical details, but general installation issues should be resolved through forums or other communities.

by:QQ124718842
QQ Group:630756404
Hi IG-88
I will try to send more information later, but I've just re-packed extra.
And additioanlly prepared loader, you can find it by link https://mega.nz/file/ESw1lCIK#_RIGEaKHXn5loScfmAnkyEjHczSVv_v3xE5wr9K0HT0
And you right it's based on QQ124718842.
Currently I'm testing, and most of performance looks better.
-
Hi.
I've prepared extra.lzma based on Juns patch and Custom loader for DS1019+ for DSM 6.2.3-25426, link below:
https://mega.nz/file/pao0CQrb#_pLGNjTl-f7eneoWQgDkPklDoRCyqxJ_vhx_d79kIKg (only extra.lzma ~ 5.7Mb)
You can find loader for DS1019+ on this forum or another place, you can remove both extra files from partition and use re-compiled.
Then you need to download PAT files from https://archive.synology.com/download/DSM/release/6.2.3/25426/DSM_DS1019+_25426.pat, and just replace zImage and rd.gz
Tested on ASUS N3150M-E (Lan: Realtek 8111H) and it works better then on loader for DS918+ (including extra)
-
- Outcome of the update: SUCCESSFUL
- DSM version prior update: DSM 6.2.2-24922 Update 6
- Loader version and model: Jun's v1.04b - DS918+
- Using custom extra.lzma: Repacked extra.lzma (based on Jun's Extra 918+ v0.8 syno)
- Installation type: BAREMETAL - ASUS N3150M-E rev. 1.02 (MicroATX) / Removed 16 disks support, MB equipped only 2 x 6Gb SATA
- Additional comment: WOL works only if use native MAC address.
-
В 14.07.2019 в 23:55, IzzoBar сказал:
Итак, делюсь накопленным опытом: Попытки запустить DSM 6.2.2 На матери ASUS AT3IONT-I DELUXE с Atom 330 не увенчались успехом. 3615, 3617 установились но были не доступны по сети после загрузки - видимо сетевуха не заработала. 918 вообще не установился, писал что файл (скаченный с сервера Synology) поврежден.
Вопрос: значит ли это, что потолок этой матери DSM 6.1.7, или есть еще бубны в запасе?
Спасибо добрым советам, удалось быстро вернутся на рабочую систему вернув основной диск и флешку. Новые диски система адекватно приняла после удаления с них всех разделов на большом компьютере. SSD 120GB подключил как кэш, не знаю, будет ли от этого реальная польза... А вот дополнительный 1Тб винчестер пока не знаю как подключить. Предлагает создать RAID group для одного массива или RAID group для нескольких массивов.
Напомню, в данный момент в системе крутится 1 винт 4тБ. Критически суперважных данных нет. Посоветуйте, какой вариант подключения и какой райд для меня оптимален?
Привет.
Вот только что установил и обновил до актуальной DSM 6.2.2-24922 Update 6.
Сразу оговорюсь, что 918+ никак не идет, диск теряет при обновлении.
Устанавливал (for DS3615xs) - v1.03b (extra) и обязательно прописывал загрузочную запись как гибридная.
-
2 минуты назад, 50l3r сказал:
HP ProLiant MicroServer Gen10
AMD Opteron X3216
RAM 8GB
I recieved notifications about ACME 1.0 client deprecation
Why I’m asking, because I’ve updated my HP Compaq Elite 8300 CMT to 6.2.2, but that was not so smooth. 😁
-
1 час назад, 50l3r сказал:
Much thanks. It works for me
Enjoy! What hardware are you use?
-
В 26.05.2019 в 23:05, jamkiki72 сказал:
Been there. Elite 8300 PITA of a system to set up Xpenology.
Someone on the forum sugested Hybrid partition usb working.
Found it, credit goes to "Mitja"
https://xpenology.com/forum/topic/12867-user-reported-compatibility-thread-for-dsm-62/page/2/?tab=comments#comment-107653Use 1.03b ds3615 (maybe 3617 works, but 3615 is prefered).
You MUST create "HYBRID" partition bootable usb for HP Compaq Elite 8300.
Using it myself, update from 6.2.1 to 6.2.2 or clean install of latest 6.2.2 working perfect.Allow me to make it easyer for you:
-----------------------------------------------------------
PART 1. preparation:
-Download: "gdisk-windows-1.0.4.zip" (for windows) or appropriate one for other systems from here
https://sourceforge.net/projects/gptfdisk/files/gptfdisk/1.0.4/gdisk-binaries/-unzip content to folder (in the instructions bellow I unziped it in folder named "a" and copied that folder to root of a C disk)
-in the BIOS of the HP Compaq Elite 8300 turn OFF UEFI boot by going to boot menu and press (I think) "F5" while UEFI option is highlighted,
this will disable PC to default to UEFI boot on restart or powering on after power off.-in option ROM loading menu set all to legacy (storage, gpu, network)
-on the working pc create standard clean usb with 1.03b - ds3615xs as usual
leave it in the PC when done.
-go to computer manager/disk managment (right click "My Computer" or "This PC" select "Manage" then "disk managment")
- IMPORTANT - DATA LOSS POSIBLE IF YOU MAKE MISTAKE!!!
note your USB key disk number ( Disk 0 is usually system partition). Please be carefull and double check!
in the down listed commands the USB Key is "Disk 2" , copy/paste commands to lets say notepad, and CHANGE to match your situation
(including for folder "a" in a root off a C disk if you didnt do it that way).-----------------------------------------------------------
PART 2. creating HYBRID partition USB Key-
"gdisk-windows-1.0.4.zip" unziped to folder "a" in root of a C disk, USB KEY is "Disk 2" - !!!ALTER THIS TO MATCH YOUR SITUATION!!!first command "cd c:\a" - "a" represents folder named "a" and location in root (C:\) of a C disk - !!!ALTER THIS TO MATCH YOUR SITUATION!!!
second command: "gdisk64 2:" - nr.64 represents 64bit system is running on, if you use 32bit system use #gdisk32 2:"
-nr.2 represents Disk 2 on the system - !!!ALTER THIS TO MATCH YOUR SITUATION!!!-open command prompt as admin
List of commands as per situation above (64bit sys, gdisk in folder "a" root C, USB is "Disk 2") press ENTER after each one of course:--------------------------------------
cd c:\a

gdisk64 2:

r

o

h

1 2 3

n

"JUST PRESS ENTER - THIS SHOWING UP (DO NOT TYPE ANYTHING): Enter code (MBR partition #1):"

y

"JUST PRESS ENTER - THIS SHOWING UP (DO NOT TYPE ANYTHING): Enter code (MBR partition #2):"

n

"JUST PRESS ENTER - THIS SHOWING UP (DO NOT TYPE ANYTHING): Enter code (MBR partition #3):"

n

w

y

exit
--------------------------------------
Now window will probably pop up asking you to format the drive,
DO NOT DO IT!! Safely remove USB and put it in Elite 8300 and You are ready to go.This way created USB is harder to reformat and use again.
Best way I found is to use free version of "MiniTool Partition Wizard" , first rebuild MBR whitin the
program then delete partitions one by one (apply betwen each operation).
I am sure you manage it and find best way if you need to reformat and reuse USB Key.Sorry for my English, not native speaker....
Good Luck!!Really useful!
-
Synology DSM 6.1 (xpenology) Lets Encrypt ACMEv1 to ACMEv2
If you get messages like:synoscgi_SYNO.Core.Certificate.LetsEncrypt_1_create[5038]: certificate.cpp:957 syno-letsencrypt failed. 200 [new-req, unexpect httpcode]
synoscgi_SYNO.Core.Certificate.LetsEncrypt_1_create[5038]: certificate.cpp:1359 Failed to create Let'sEncrypt certificate. [200][new-req, unexpect httpcode]Then you need to upgrade your DSM up to version 6.2 orreplace execution (syno-letsencrypt) file and some changes in configuarion file:1. Download file syno-letsencrypt (this file from DSM v6.2) link https://drive.google.com/drive/folders/1-LgjOAU3dBtNk2WKZ1KJY88Lklf12RPp?usp=sharing
2. If not enabled SSH, please enable in settings
3. Copy downloaded file syno-letsencrypt in any folder on you NAS
4. Connect to NAS with SSH (Putty) using admin account
5. Make backup of original syno-letsencrypt (sudo cp /usr/syno/sbin/syno-letsencrypt usr/syno/sbin/syno-letsencrypt.bck)
6. Copy downloaded syno-letsencrypt file to directory /usr/syno/sbin/ (ex.: sudo cp /volume1/sharedFolder/syno-letsencrypt /usr/syno/sbin/)
7. Change attributes (sudo chmod 755 /usr/syno/sbin/syno-letsencrypt) to execute new file
8. Now change default address for syno-letsencrypt, using ssh (sudo vi /usr/syno/etc.defaults/letsencrypt/letsencrypt.default)
9. Fine string "server": "https://acme-v01.api.letsencrypt.org/directory", press i and change 01 to 02
10. Press escape, enter :wq and reboot your NAS.
-
 6
6
-
-
Driver extension jun 1.03b/1.04b for DSM6.2.3 for 918+ / 3615xs / 3617xs
in Additional Compiled Modules
Posted
1.04b DS918+ (DSM 6.2.2-24922 u6)