

Arabezar
-
Posts
172 -
Joined
-
Last visited
Posts posted by Arabezar
-
-
- Outcome of the installation/update: SUCCESSFUL
- DSM version prior update: DSM 6.2.3-25426
- Loader version and model: Jun v1.04b - DS918+
- Using custom extra.lzma: NO
- Installation type: BAREMETAL - Supermicro MBD-X11SCL-IF-O, mini-ITX, Intel C242 chipset, CPU Intel Core™ i3-9100F, RAM 32GB, HDD Seagate NAS 4*3=8TB (SHR), WD Ultrastar 12TB, SSD Intel 545s 512GB, Power Thermaltake TR-500P 500W, Back-UPS CS 650
- Additional Comment: Reboot required
-
Привет всем!
Сделал хук на проверку домена (DNS API) для ACME-клиента acme.sh
Если у Вас есть желание потестировать - вэлкам.
Процедуру описал на англоязычном форуме.
Жду комментариев.
-
As you know standard certificate issuing wizard supports wildcards only for Synology DDNS.
If you want to issue wildcard certificate for your own domain you can use 3rd-party ACME Client.
At first I've tried to use Certbot in Docker with no success.
Then I found acme.sh that is working fine on Synology DSM (mine is 6.2 on DS918+).
Below you can find a short list for issuing, updating and deploying wildcard cert for you own domain on Synology DSM with Synology DNS Server.1. Installing acme.sh
Open SSH client's terminal, go to any folder with write access permissions (e.g. /tmp or ~ folder), download and install acme.sh:git clone https://github.com/acmesh-official/acme.sh.git cd ./acme.sh ./acme.sh --install \ --home /usr/local/acme.sh \ --cert-home /usr/local/acme.sh/certs \ --config-home /usr/local/acme.sh/data \ --accountemail "email@example.com" \ --force # use it with elevation (sudo) for all commands
After successful installation remove the downloaded folder and restart the terminal in order to apply changes to the ACME-client settings (environment variables):
cd ..
rmdir acme.sh
2. Issuing certacme.sh supports several ways of domain approving (you can find all in acme.sh documentation).
Since I'm using my own DNS Server on Synology DSM I've created my own DNS API hook for acme.sh and I would like to ask you for help in testing the hook.
For now the hook (dns_synology_dsm) is in development state and you can find it here only: https://github.com/arabezar/acme.sh/blob/dev/dnsapi/dns_synology_dsm.shIt's a good idea first trying to issue cert using test server (with debug log):
/usr/local/acme.sh/acme.sh --staging --debug 2 --issue --dns dns_synology_dsm -d example.com -d *.example.com --log
After successful issuing cert on staging server you can issue the real one:
/usr/local/acme.sh/acme.sh --issue --dns dns_synology_dsm -d example.com -d *.example.com --log
*) use --force when using elevation (sudo)
3. Updating cert
Updating can be realized using daily task.
Go to Control Panel -> Task Scheduler and add the new task with the name 'Lets Encrypt Update Cert' (run as root):export LE_WORKING_DIR="/usr/local/acme.sh" export LE_CONFIG_HOME="/usr/local/acme.sh/data" /usr/local/acme.sh/acme.sh --config-home /usr/local/acme.sh/data --renew-all
4. Deploying cert
And at last the cert should be deployed to all modules. This can be done by adding another periodical task (e.g. monthly).
Go to Control Panel -> Task Scheduler and add the new task with the name 'Lets Encrypt Deploy Cert' (run as root):export LE_WORKING_DIR="/usr/local/acme.sh" export LE_CONFIG_HOME="/usr/local/acme.sh/data" export SYNO_Create=1 # Create cert if not exists yet export SYNO_Certificate="example.com" # Description text in Control Panel -> Security -> Certificates /usr/local/acme.sh/acme.sh --config-home /usr/local/acme.sh/data --deploy -d example.com --deploy-hook synology_dsm
Also you have to export some personal data such as admin (root) pass and device id once you start the deployment. Please read the appropriate instructions here. These values would be stored in config file for later usage.
In some time I would like to rewrite the deployment hook (actually it's not mine) using synowebapi in order to get rid of password saving. Keep following the latest news
")
So that's all folks!
Please feel free to ask any questions.
And of course I will appreciate any help in testing the DNS API hook.-
 1
1
-
-
- Outcome of the installation/update: SUCCESSFUL
- DSM version prior update: DSM 6.2.2-24922 Update 5
- Loader version and model: Jun v1.04b - DS918+
- Using custom extra.lzma: NO
- Installation type: BAREMETAL - Supermicro MBD-X11SCL-IF-O, mini-ITX, Intel C242 chipset, CPU Intel Core™ i3-9100F, RAM 32GB, HDD Seagate NAS 4*3=8TB (SHR), WD Ultrastar 12TB, SSD Intel 545s 512GB, Power Thermaltake TR-500P 500W, Back-UPS CS 650
- Additional Comment: Reboot required
-
After manual installation it has appeared in the Package list as Beta.
Unfortunately VirtualBox has been installed on the first volume (Volume1).
When moving shared folder virtualbox from the default location (Volume1) for example to Volume3 (SSD in my case), VirtualBox service cannot be started at all. (((
I guess something should be changed in config files.
Is there any way (or life hack) to create virtualbox share from the package above on the other volume than the first without changing config files?
-
I just wanted to know whether VirtualBox for apollolake is available from some repository as in the picture above...
-
4 hours ago, NoeOrion said:
Have you ever tried this?
Not yet. I will definitely try it if there is no other way to install the package from any repository.
-
Is VirtualBox Beta available for all platforms?
I cannot find it in my DS918+ (apollolake) package manager... 😭
-
10 hours ago, Olegin said:
Вы уверены, что это образы а не полноценные виртуальные диски?
Немного не понял вопроса. Да, это полноценные виртуальные диски, на основе которых требуется создать виртуалку.
Похожая ситуация: создаю другую виртуалку импортом из одного образа (полноценного диска), виртуалка создаётся, запускается, отлично работает (могу заскриншотить).
-
Hi guys!
I have 2 image files (.vhd). The 1st image contains Windows Server OS with some ERP system. The 2nd one contains only data for that ERP.
When selecting an image - VMM fills the size of the disk in the wizard form with 127 GB value preventing to modify it; for now it is possible to create the VM.
When selecting both images - VMM prevents creating VM telling that the size of the disk should be from 10 to 81 GB; for now you can neither change the size of images nor create the VM.
Do you have any ideas how to create a VM with 2 images?
Spoiler
P.S. I've also tried to create VM with one image. But then it is not possible to link the 2nd image. Actually it is possible to create new disk only without ability to specify the existing one.
Is there any way to link the 2nd image after creating VM?
-
Удалил хранилище, включил на плате более интенсивный режим охлаждения, пересоздал хранилище, и теперь образ создаётся.
Но возникла новая проблема - создаю виртуальную машину на основе образов: у виртуалки должно быть 2 диска (ОС и данные)… при выборе образа размер фиксируется автоматически на 127 ГБ, менять не даёт… при выборе 2-го образа, размер тоже фиксируется автоматически на 127 ГБ, и размеры обоих дисков подсвечиваются красным, а кнопку Далее нажать не получается. ((((
Есть идеи, как победить?
Spoiler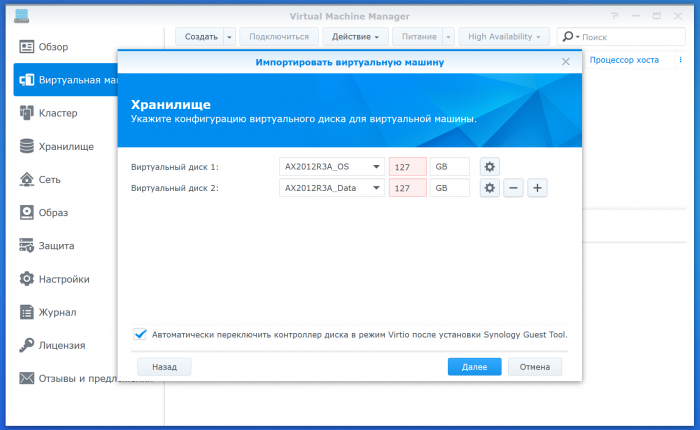
-
Не подскажете, где искать файлы настроек VMM?
Через WinSCP доступ имеется.
-
Люди, подскажите, куда копать, плиз...
Попытался добавить образ диска; в процессе создания образа SSD раскалился до 61 гр.по Цельсию, DS ругнулась на перегрев диска и выключилась (недосоздав образ).
Теперь при повторном создании образа ругается, что имя уже использовано, хотя в списке образов этого имени нет.
Переставлять пакет VMM?
-
- Outcome of the installation/update: SUCCESSFUL
- DSM version prior update: DSM 6.2.2-24922 Update 4
- Loader version and model: Jun v1.04b - DS918+
- Using custom extra.lzma: NO
- Installation type: BAREMETAL - Supermicro MBD-X11SCL-IF-O, mini-ITX, Intel C242 chipset, CPU Intel Core™ i3-9100F, RAM 32GB, HDD Seagate NAS 4*3=8TB (SHR), WD Ultrastar 12TB, SSD Intel 545s 512GB, Power Thermaltake TR-500P 500W, Back-UPS CS 650
- Additional Comment: Reboot required
-
On 12/11/2019 at 11:52 AM, The Chief said:
Проще создать том из nvme ssd руками, это несложно и он никуда потом не денется даже при обновлении DSM.
Жаль, не дождался ((( ...и купил M.2 Intel 545s SATA. Хочу виртуалку там пускать. Не будет хватать скорости, придётся докупать и менять на NVMe.
-
On 10/19/2018 at 5:36 PM, flyride said:
DSM /dev/dri - Supporeted / Not Supported
Could you explain please, what does the above mean?
-
Вот и столкнулся с субжем... покурил форум, пишут, что переполнился системный раздел. Запускаем под SSH:
df -hSpoileradmin@BugData:~$ df -h Filesystem Size Used Avail Use% Mounted on /dev/md0 2.3G 2.0G 211M 91% / none 3.9G 0 3.9G 0% /dev /tmp 3.9G 1020K 3.9G 1% /tmp /run 3.9G 20M 3.9G 1% /run /dev/shm 3.9G 4.0K 3.9G 1% /dev/shm none 4.0K 0 4.0K 0% /sys/fs/cgroup cgmfs 100K 0 100K 0% /run/cgmanager/fs /dev/vg1000/lv 11T 9.9T 998G 91% /volume1Ранее такого не возникало, в последнее время игрался с пакетом VirtualBox. Проверим (как опять же советуют):
du -sh /tmp/* /var/* /root/* /root/.* /opt/* /home/*Spoileradmin@BugData:~$ du -sh /var/* /root/* /root/.* /opt/* /home/* 26M /var/cache 4.0K /var/crash du: cannot read directory ‘/var/db/sudo’: Permission denied 66M /var/db 2.6M /var/dynlib 4.0K /var/empty du: cannot read directory ‘/var/lib/synosmartblock’: Permission denied du: cannot read directory ‘/var/lib/pengine’: Permission denied du: cannot read directory ‘/var/lib/net-snmp’: Permission denied du: cannot access ‘/var/lib/ha/sync’: Permission denied du: cannot read directory ‘/var/lib/heartbeat/cores/root’: Permission denied du: cannot read directory ‘/var/lib/heartbeat/cores/nobody’: Permission denied du: cannot read directory ‘/var/lib/heartbeat/crm’: Permission denied du: cannot read directory ‘/var/lib/heartbeat/lrm’: Permission denied du: cannot read directory ‘/var/lib/postfix’: Permission denied 5.8M /var/lib 0 /var/lock du: cannot read directory ‘/var/log/Docker’: Permission denied du: cannot read directory ‘/var/log/nginx’: Permission denied du: cannot read directory ‘/var/log/selfcheck’: Permission denied du: cannot access ‘/var/log/pstore/oops’: Permission denied du: cannot read directory ‘/var/log/synolog’: Permission denied 112M /var/log du: cannot read directory ‘/var/net-snmp’: Permission denied 4.0K /var/net-snmp 11M /var/packages 0 /var/run 8.0K /var/services 36K /var/spool du: cannot read directory ‘/var/state/ups’: Permission denied 8.0K /var/state 8.0K /var/synobackup 12K /var/target 228K /var/tmp du: cannot access ‘/root/*’: Permission denied du: cannot access ‘/root/.*’: Permission denied 231M /opt/VirtualBox du: cannot access ‘/home/*’: No such file or directory
Предпоследняя строка: файлы VirtualBox
Недолго думая, бэкапирую виртуалку (всего одна), удаляю её, а затем удаляю весь пакет VirtualBox
Spoileradmin@BugData:~$ df -h Filesystem Size Used Avail Use% Mounted on /dev/md0 2.3G 1.8G 438M 81% / none 3.9G 0 3.9G 0% /dev /tmp 3.9G 1020K 3.9G 1% /tmp /run 3.9G 20M 3.9G 1% /run /dev/shm 3.9G 4.0K 3.9G 1% /dev/shm none 4.0K 0 4.0K 0% /sys/fs/cgroup cgmfs 100K 0 100K 0% /run/cgmanager/fs /dev/vg1000/lv 11T 9.9T 999G 91% /volume1Маловато будет, системе всё равно не хватает места (необходимо, как она пишет ≥ 525 МБ).
Копаем дальше:
Spoileradmin@BugData:~$ sudo du -sh /var/* /root/* /root/.* /opt/* /home/* ... admin@BugData:~$ sudo du -sh /root 527M /root admin@BugData:~$ sudo ls -l /root total 8 drwxr-x--- 5 root root 4096 Jan 5 00:22 logicaldoc drwx------ 2 root root 4096 May 6 07:37 VirtualBox VMs admin@BugData:~$ sudo du -sh /root/logicaldoc 527M /root/logicaldoc
Опять большой пакет. Бэкапируем, сносим.
Но данные после него остаются, чистим вручную:
rm -fr /root/logicaldocSpoileradmin@BugData:~$ sudo du -sh /root 88K /root admin@BugData:~$ df -h Filesystem Size Used Avail Use% Mounted on /dev/md0 2.3G 1.3G 964M 57% / none 3.9G 0 3.9G 0% /dev /tmp 3.9G 988K 3.9G 1% /tmp /run 3.9G 19M 3.9G 1% /run /dev/shm 3.9G 4.0K 3.9G 1% /dev/shm none 4.0K 0 4.0K 0% /sys/fs/cgroup cgmfs 100K 0 100K 0% /run/cgmanager/fs /dev/vg1000/lv 11T 9.9T 1000G 91% /volume1
Можно, конечно, почистить ещё пакеты перед обновлением, а потом восстановить, но как-то неаккуратненько... )))Теперь места достаточно!
По сему возникли вопросы:
Каков должен быть механизм чистки системы?
Существуют ли какие пакеты, помогающие «освежить» систему, для неопытных пользователей?
Можно ли как-то расширить системный раздел на случай таких ситуаций?
-
1 minute ago, Olegin said:
Не работает NVMe на хренологии
Видать, врут?! Я там вопрос прямой задал, ждём, что ответят.
-
On 7/9/2018 at 12:14 PM, 4sag said:
m.2 NVMe не работает !
Наткнулся на просторах на ветку, где SSD XPG SX8000NP-128GM-C заработал, а он NVMe 1.2; PCI-e 3.0x4
Хочу XPG SX8200 Pro поставить, а у них с указанным выше контроллеры одинаковые - Silicon Motion.
Есть мысли? А то покупать, чтоб только протестировать, нет желания )))
UPD: Вот ещё интересный пост, говорящий о том, что якобы Synology team работает над тем, чтобы сделать возможным использования M.2 дисков на плате расширения в качестве обычных (не кэширующих) дисков... правда, о сроках не говорят )))
-
On 1/15/2019 at 11:00 PM, UrriTim said:
нет, не возможно
Наткнулся на просторах на ветку, где SSD XPG SX8000NP-128GM-C заработал, а он NVMe 1.2; PCI-e 3.0x4
Хочу XPG SX8200 Pro поставить, а у них с указанным выше контроллеры одинаковые - Silicon Motion.
@Olegin, есть мысли? А то покупать, чтоб только протестировать, нет желания )))
UPD: Продублировал сюда. Лучше отвечать там, ибо та тема больше соответствует ))
-
@Olegin, я просто отказываюсь верить...
Да, видел, как с помощью платы расширения подключают 2 SSD в качестве кэша.
Зло берёт, что такая мощная платформа (Сино), не может дать возможность пользователям более эффективно использовать железо по их воле.
Неужели, даже если БИОС поддерживает NVMe, невозможно «превратить» (дрова какие, ХЗ...) SSD в видимые диски?!
-
@Olegin, я как раз и смотрю ща в сторону M.2 PCIe 3.0x4 винта... по вменяемой цене можно взять ≥ 2000 МБ/с на запись; только не уверен, что Хрень его зацепит, интересно, у кого-нить есть опыт?
За одно всё прокачаю... мать, память, SDD... только корпус с БП и HDD останется.
А выбор пал не спроста... ))) Матерей mini-ITX на 6 SATA очень мало, а у меня 4 винта уже в рэйде... а тут ещё глянул на M.2 PCIe SDD, и меня порвало́ )))
-
7 hours ago, Olegin said:
… на ssd сразу получаете запредельные скорости работы с диском для виртуалок …
Да, видимо, придётся, как Вы сказали делать (VMM на SSD)... и ещё ОЗУ добавить… ибо подключил я ща виртуалочку под 150 Гигов (на Win 2012 R2)… ох, как она медленно шевелится… (( … а раньше она у меня на SSD уже крутилась, и горя я не знал )))
-
@Olegin, да, думал уже об этом… но счастье для меня, похоже, возможно только с VirtualBox по двум причинам: я не планировал пока расширять дисковую подсистему, btrfs вроде как считается сыроватым ещё, не хотелось бы потерять виртуалку.


Issuing and auto renewing Let's Encrypt wildcard certificates for your own domain
in Packages & DSM Features
Posted
I've just added wiki to my fork, the description to the API and an issue for bugs.
This script just issues the certificate but does not do deploy it to the NAS. If you want to deploy please use deploy/synology_dsm.sh that was written a long time ago.
My script is intended to be used with Synology DNS Server only.
There will be another script (same as deploy/synology_dsm.sh) for that but without user/pass authentication. Just wait please.
Full automation is already done. And it works for all Synology packages. You can use my script (dnsapi/dns_synology_dsm.sh) for issuing and then script (deploy/synology_dsm.sh) for deploying.