

Hostilian
-
Posts
318 -
Joined
-
Last visited
-
Days Won
3
Posts posted by Hostilian
-
-
Nice work.. Gave this a shot earlier.. Extra.lzma file is a good bit smaller.
Didn't notice a quicker boot - and I'll try patching to 6.2.2 sometime soon - but progress, IMHO!!")
I've a J3455-itx and I'd like an improved 1.04b - as it could be better with my hardware..
-
On 8/5/2019 at 6:49 PM, NooL said:
In order to be able to 100% spoof a real 918.. Does one need to burn a new MAC to the NIC? Is the loader MAC sufficient or does Synology license management look through it?
Loader MAC is enough for my 918+.
-
Probably the same..
RAID1 is just a mirror, so it should still work without the second disk..I would try..
Configure your box with a new blank HDD on the previous DSM version on Sata port 1.. Do not configure any new shares or disks - just the base Synology install..
Shut down and add in the 1st disk of your RAID1 pair to Sata port 2 (use whichever disk was connected to this port before - though dont think it makes a difference)..
Reboot until it sees the drive, it should ask you if you want to repair the boot partition (or something similar). Your shares etc should appear as if by magic..
Shut down and remove the 'new' Sata disk from Sata port 1..
Boot up the box..
If it looks OK, shut down and add the other RAID1 disk on Sata port 1.
Boot the box, do the same 'repair option' again..
That should be it...
-
Seemed to work.. I've added my own steps or comments in red on the original post..
Unfortunately, I'm having to install my apps again - but no biggie. This is a Surveillance station box anyway!
Thanks again!
-
 1
1
-
-
On 6/25/2018 at 4:58 PM, Porkchop said:
- Once you have your new, reflashed USB stick, unplug ALL drives from the motherboard. Make sure there are NO SATA interfaces connected.
- Plug in your new, empty hard drive to the motherboard and boot from the USB stick. (You will need a keyboard for this step) The first option in the GRUB interface is what you are looking for. Put this blank hard drive on the first Sata port on your board.
- Use http://find.synology.com or Synology Web Assistant to find your DSM. Or just scan the network.
-
Follow the steps and install DSM 6.1 from a PAT file. DO NOT INSTALL 6.2 I was installing 6.2.1 and update 6.. So didn't reinstall 6.2.2
- IF YOU LEFT A DRIVE IN IT WILL SAY RECOVER. GOTO 2.
- Let Synology do its thing and eventually you will have a working 6.1. (6.2.1 for me)
- While the PC is ON, connect the drives to the motherboard (with you data on it). Under Storage Manager they will pop up and say Unused. In my case, they said 'not initialized'.
- You might need to reboot, at this option. It took me some fiddling around, but eventually Synology will prompt you with a Recover Crashed Partition prompt. Click Yes. I rebooted and they came online. The system partition needed repairing but all shares and data came back after the reboot..
- All of your data will appear, and Synology will automatically perform RAID scrubbing.
Seemed to work - Thanks!! I've added the steps I took (or comments) in red above..
Unfortunately, I'm having to install my apps again - but no biggie. This is a Surveillance station box anyway!
-
Nice one, thanks!
I was actually thinking of trying to put my old drives into my 6.2.1 system, lol..
This at least gives me something to follow!
-
OK, so I screwed up.. Checked the updates reports and it seemed that a few people had success with the same Mobo as me..
Tried it and no NAS on the network.
I have a J3455-itx board.
Should say it's 1.04b loader on DS918+
Anyway, wondered if there was a way to reset the nic config (kind of like the button at the back of an actual Synology). Any way to do this at boot?
I have a network bond configured with LACP/link aggregation configured, so if I could clear this out of the network configuration (dunno how as I cannot connect to it) that might help...
If not, I've another 6.2.1 update 6 flash drive ready to do a restore, of sorts..
Not ideal but hey ho..

Using a 1.04b USB drive with 6.2.1 u6 on it sees the disks, but the only option on the console is to 'RECOVER'.
It then installs DSM without prompting (assume 6.2.2 again) and I can no longer see the Synology box on the network.
Any ideas please?
Cheers,
H
-
- Outcome of the installation/update: UNSUCCESSFUL
- DSM version prior update: DSM 6.2.1-23824 update 6
- Loader version and model: JUN'S LOADER v1.04b - DS918+
- Using custom extra.lzma: NO
- Installation type: BAREMETAL - Asrock J3455
- Additional comments: Not pinging after manual reboot.. Tried leaving it 10 mins, then rebooting again. Nothing. I did have a NIC Bond configured (maybe I should have removed the bond beforehand like I normally do). I've tried switching the cables to other ports. Using only the PCIe NIC etc.. Nothing so far - currently troubleshooting, sigh..
-
19 hours ago, mandreto10 said:
I quoted those guides because because I thought they were more complete. I though your guide is incomplete because you did not:
It's a rough guide to try to help.. I don't need my efforts to help others 'marked' thank you very much.. DH...
If you want to do another, more complete, guide than the one I put together in about 30 minutes - 5 Months ago - feel free to do so in another thread!
Muddying the waters with guides for other operating systems doesn't really help AND the ('missing') info is already in many locations on this very helpful site....
You could have, instead, added the links and maybe the other little guides (freely available in many other articles here that are dedicated to those very topics) that I so naughtily missed in my 30 minute effort to put something down on 'paper' - but no, you went down another route..
-
1
-
-
20 hours ago, mandreto10 said:
This is better guide:
So is this:
You obviously don't know the difference between VMWare Workstation (that this quick guide was written for) and ESXi - which was the two guides you linked...
Maybe your guides should be linked in an ESXi tutorial, rather than Workstation??
-
1
-
-
10 hours ago, Trailblazer said:
Are we supposed to use MAC's from an actual unit in the Grub config file or our MAC for our network port?
Thanks for the serial
Have to disagree.. Find a serial/mac for an actual Syno Box and change it slightly for use on your own box..
Any time I tried to use the actual MAC of my MoBo/NIC cards, it didn't work correctly (though that was a long time ago)..
-
Yes it is.. Needs FMA3 extensions - introduced in Haswell..
Think it might also need AVX 2.0 - once again Haswell only..
Your one doesn't have them..
Oh and believe me, there's no way around it.. I tried.
-
 1
1
-
-
On 11/23/2018 at 11:04 PM, ilovepancakes said:
Followed this exactly but when the VM starts up I can't seem to find the DSM with find.synology.com or the Synology Assistant... I checked my DHCP server and the synoboot is not even getting an IP it seems... I do have VMXNET3 as network adapter and other VMs on the same port group and vSwitch work fine so I don't think it is my ESXi config... Any ideas?
What loader/model are you using..
What CPU do you have?
If it's 1.04b/DS918+ and an IvyBridge or older CPU, it won't work.. Needs to be Haswell or newer..
Other than that, need a bit more info. What sort of Motherboard/NIC? Onboard or add-in?
If you're using ESXi, there are other threads dedicated to ESXi..
-
Your CPU is not compatible.. It needs some additional instructions that Haswell has (and Ivy Bridge does not).
It needs to be 4th Gen or better for DS918.. No way around it - even in a VM..You CAN use DS3615 or DS3617 though..
-
 1
1
-
-
Look on Ebay.. You can get cheap, managed (ex-corporate) Cisco or HP switches for around £50..
Not 8 ports, generally 24 - but you'll soon outgrow 8 ports - especially if you're considering LACP..
-
1 hour ago, RobertoW said:
Do you have any idea? Did I use a wrong serial?
You said you checked it with another memory stick?
Need to ask.. Did you change the VID/PID when you tried the other memory stick? It will be different..
Also, might be worth using a serial and mac address that's simular to the scheme used on a real ds918+
-
Nice one!
The 50MB disk... I haven't tried.. I'm happy just ignoring it!
-
21 hours ago, ideasman69 said:
with the same hardware and same 4 drive RAID5 volume but using the 1.02b 3615 bootloader and DSM 6.1.7:
1073741824 bytes (1.1 GB) copied, 1.17239 s, 916 MB/s
results speak for themselves 😉
916MB/s for 4 drives in RAID5? Are they SSDs?
If not, it sounds VERY high (for 4 disks) for Read and ridiculously high for Write for RAID5.
For a normal disk - ignoring the parity in R5 - that's over 225MB/s per disk. I don't have any (non-SSD) disks that get anywhere near that..
Yes.. It should be higher than 153MB/s - so there looks to be something wrong..
Do you mind pasting the commands you're running - to benchmark it?
-
4 hours ago, MooseMan123 said:
I will be following this thread, as this information would be useful for me too. I just passed through a 9207-8i, and my drive is so far off the numbers it shows as an eSATA drive. What model card do you have?
QuoteOK.. Sorted it out.. I'll put the details here for completeness..
The 2 disks were showing up as eSATA drives - not much use, but at least it's a step forward..
To get them to show up as normal SATA drives, I needed to do the following..
used vi to edit the following two files;
etc/synoconf.conf
and
etc.defaults/synoconf.conf
Change the same 3 lines in each file to;
internalportcfg="0x3FFFFFF"
usbportcfg="0xFF00000000"
esataportcfg="0x0"(They're all down near the bottom..)
When I rebooted the Syno box, I had lots of disks (including the 50MB boot disk)..
eSATA were now gone and moved to normal SATA.
For info, my sataportmap was "666" in grub.cfg
Pasting one of my previous posts here - should sort you out!
#H
-
1
-
-
On 10/25/2018 at 9:57 PM, Benoire said:
My sataportmap config was set to 88 as that is currently what the baremetal is using the 2 LSI cards but I wonder if it should in fact be sataportmap = 088 as that would give the first controller 0 ports and then allow my SAS HBAs to take the first set of slots, would that work? I'm in a test environment so can play around lots but would like to resolve this prior to the weekend.
I have one add in card (and two onboard controllers) so mine is set to 666..
I reckon yours should be something similar..
You may also need to tweak your config files, iusing Putty, if your drives are showing up as 'external'..
-
12 hours ago, hannibal1969 said:
My reply maybe to serious, was made because I don’t see the real benefit to go for lacp in a private setup. Simultaneous writes from different processes are killing for spinning disks anyway. The max. IOPs per disk is 100 so you will reach this quite soon. I think if you make two pools with 2 disks and you write to two different pools you will sustain the NIC. If you have one pool with 4 disks in jbod you won’t. Lacp won’t help you on this I think.
All of my disks (on this machine) are single disks; I don't need any sort of fault tolerance here..
Pretty sure your camera (I have three) wasn't streaming when you were getting 113MBs**..
.....But then, you could have just said it wouldn't help you for your setup - and left it at that.. Instead, you decided to be an arse. 😉
**Unless you have some sort of magic NAS..
-
18 hours ago, hannibal1969 said:
Yes and LACP is crying out with 10Gbit, read please ... JBOD with 3 old disks... so we have a bottleneck here. And although its a little offtopic as is it concerns to LACP, as far as I know, its MAC address / session based. So you can hook up 2 NICs and bond them together with LACP but what about the other side ... the one PC you are working on is connected with 1Gbit? Even when the PC is hooked up with LACP too I don't think it wil utilise the 2Gbit bandwidth whit that nas. Only initiating two transfers simultaneously maybe. Maybe its much improved but that's what I understood in the past.
Why so seriousssssssss. Jeez, it was said in jest..
Ok.. Being serious then.. Your disks CAN obviously pump out more - if they're bouncing around at the limits of 1GB Ethernet.. So the bottleneck is obviously the NIC - not the disks.
Depends on what you use it for though..
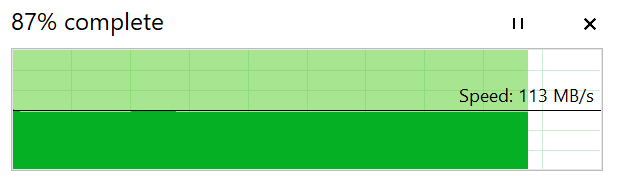
I have LACP bonds between my various NAS boxes and whilst it might not bring it much above 113MB/s on an individual transfer, having LACP definitely helps when you have other things going to the box (camera streams) or other people using it - which I do..Having camera streams (even only a few MB/s) cuts down MY peak transfer rate by about 40% (to about 70MB/s). With LACP it still hits 113MB/s..
-
21 hours ago, hannibal1969 said:
Thats steady no-nonsense NAS performance
") limit of my JBOD pool of 3 old disks
limit of my JBOD pool of 3 old disks
That's crying out for LACP!
-
 1
1
-
-
21 minutes ago, fenguoerbian said:
These versions of bios is on-line several days ago. But there seems to be some problem with the bios file.
My j3455-itx has bios version 1.60. When I use instant flash of the motherboard, the 1.70 doesn't show up while 1.80 shows up.
But the website clearly states one should first update the bios to 1.70 if it's original version is older than that before updating to 1.80.
So currently i still haven't update my bios.
But on the website, it says bios v1.80 updates the TXE FW version to 3.1.50.2222, which is exact my current verion(my bios version is 1.60, which is not listed on the website of asrock).
Dont use the version that connects to the internet to download the BIOS OR any version that updates within Windows. You'll potentially be left with a Brick..
Always update with a previously downloaded BIOS file, extracted, and use the BIOS utility to select this file for upgrade.
I've read many reports of these boards being bricked due to the first two methods.
I downloaded 1.7 and flashed that (fine) from 1.40.
Then 1.8 and flashed that (fine).
Cloning Synology disk to new (bigger) disk..
in Answered Questions
Posted
Wondered if anyone could recommend a bootable (USB preferably) cloning tool that works for Synology disks please?
Free please.. There are plenty out there..
One of my Syno boxes has 4 disks and only 4 SATA ports - so no option to add another disk in and move stuff to the new drive..
I wanted to replace a 250GB SSD with a 500GB SSD - without having to reinstall anything..
Anyone tried Clonezilla to clone a Synology disk (or do you have a recommendation)?
It needs to be able to scale to bigger drives.
Thanks!