Leaderboard


Popular Content
Showing content with the highest reputation on 01/22/2024 in all areas
-
Стандартные процедуры для mdadm (если поискать инет то инструкций будет много, есть даже инструкции как массив из хрени/сино завести на простом линуксе ) А вот это весьма верное утверждение, надо понимать почему упал массив, а потом уже пытаться восстановить.1 point
-
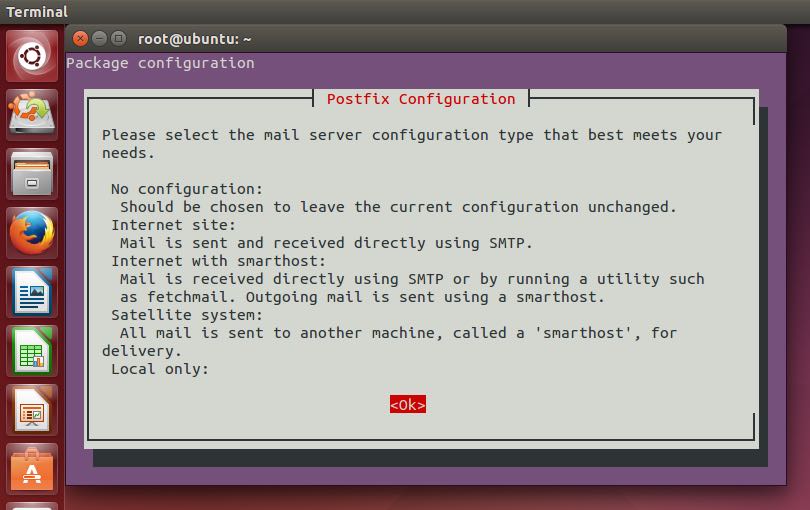
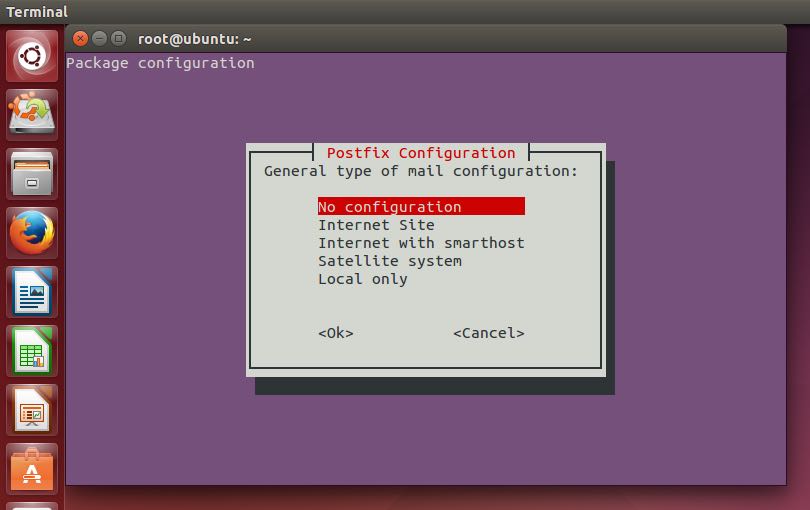
If you can't access your Xpenology box but you still wish to try and 'fix' some configuration files or perhaps you wish to finally make that backup that you should have done before fiddling with the root user, then you can access the content of the system partition and data partitions through a Live Ubuntu CD (or whatever unix flavoured OS you so desire). Here is how to: 1 - Make a Live Ubuntu USB drive. Ideally it is more convenient to make a persistent Live Ubuntu USB drive but that's not required for this tutorial and it would just complicate things unnecessarily. 2 - Once you're done burning Ubuntu on the USB flash drive, go plug it in your Xpenology box and boot from it. 3 - Once in Ubuntu, launch Terminal. You will need to first be root so type: sudo -i 4 - Now install mdadm and lvm2 by typing the following command: apt-get install mdadm lvm2 You should get the following Postfix Configuration menu: Select as shown in the pictures above. If you wish to mount the data partition alone then proceed with the following command: 5 - To mount the data partition, simply issue this command and you are done: mdadm -Asf && vgchange -ay If you also wish to mount the system partition then proceed with the following commands (adapt to your case accordingly): 6 - Then you need to check your raid array and partitioning of your drives: fdisk -l | grep /dev/sd In my case I see this. Note I only have 2 drives /dev/sda and /dev/sdb root@server:/etc.defaults# fdisk -l | grep /dev/sd Disk /dev/sda: 1.8 TiB, 2000398934016 bytes, 3907029168 sectors /dev/sda1 256 4980735 4980480 2.4G fd Linux raid autodetect /dev/sda2 4980736 9175039 4194304 2G fd Linux raid autodetect /dev/sda3 9437184 3907015007 3897577824 1.8T f W95 Ext'd (LBA) /dev/sda5 9453280 3907015007 3897561728 1.8T fd Linux raid autodetect Disk /dev/sdb: 1.8 TiB, 2000398934016 bytes, 3907029168 sectors /dev/sdb1 256 4980735 4980480 2.4G fd Linux raid autodetect /dev/sdb2 4980736 9175039 4194304 2G fd Linux raid autodetect /dev/sdb3 9437184 3907015007 3897577824 1.8T f W95 Ext'd (LBA) /dev/sdb5 9453280 3907015007 3897561728 1.8T fd Linux raid autodetect System partitions are the ones labeled sda1, sdb1. If you have more drives in the array, subsequent system partitions will probably be called sdc1, sdd1 so on and so forth. You get the point. 7 - Once you figured out all system partitions, you can examine the foreign endian array members by issuing (this is for my case, with 2 drives): mdadm -Ee0.swap /dev/sda1 /dev/sdb1 If you have 3 drives then you add /dev/sdc1. You get the idea. 8 - Finally, assemble the array and fix the byte order (this is for my case, with 2 drives): mdadm -AU byteorder /dev/md0 /dev/sda1 /dev/sdb1 Same comment as previous command; add any additional system partitions that you may have. Beware of the /dev/md0. It's normal, not a mistake. Your system partition should now be mounted and you can navigate through the system files. Simply unmount the drives and shutdown the machine when you are done. If for some reason you need to reboot and want to access the partitions again then you will need to re-install mdadm and lvm2 because the Live Ubuntu USB is not persistent. --------- Reference: https://www.synology.com/en-global/knowledgebase/DSM/tutorial/Storage/How_can_I_recover_data_from_my_DiskStation_using_a_PC http://xpenology.com/forum/viewtopic.php?f=2&t=22100&p=83631&hilit=version#p83631 http://xpenology.com/forum/viewtopic.php?f=2&t=20216&p=74659&hilit=mdadm#p74659 >> Thanks to Jun
 1 point
 -
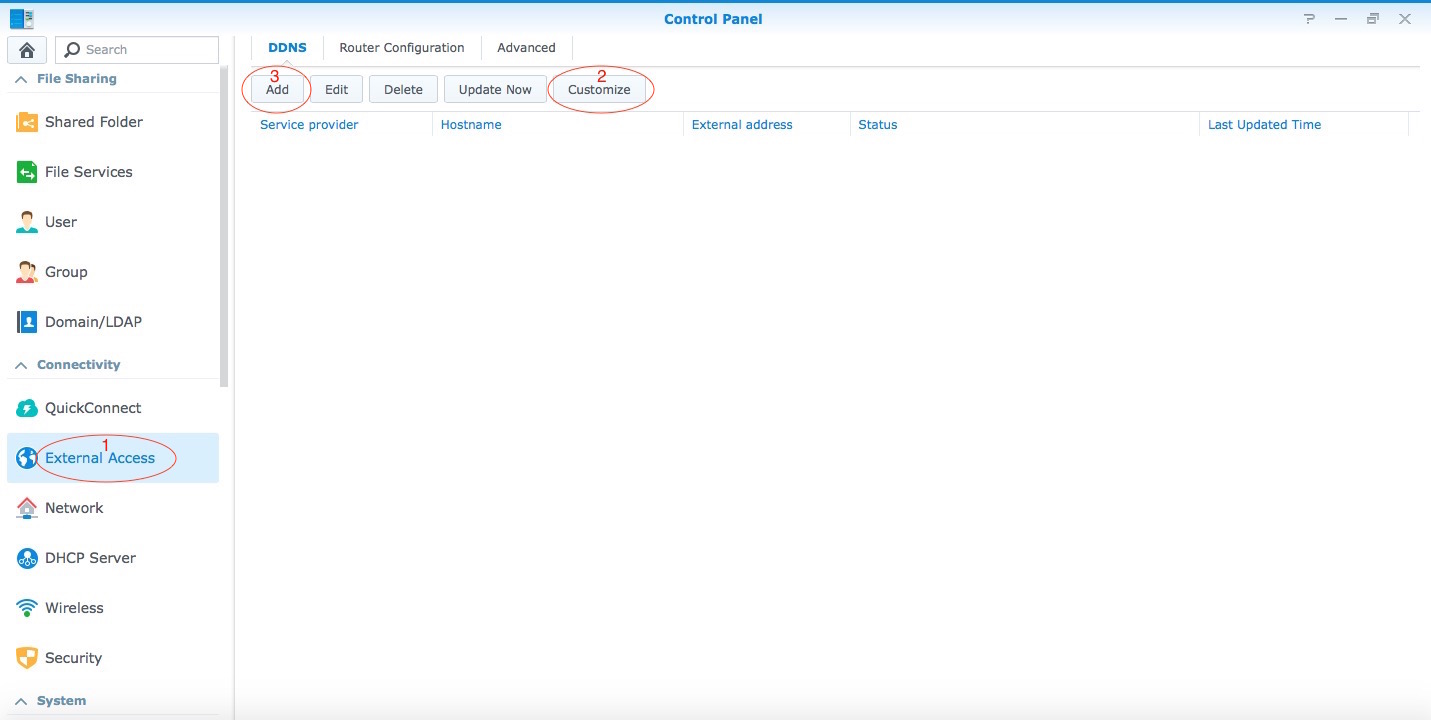
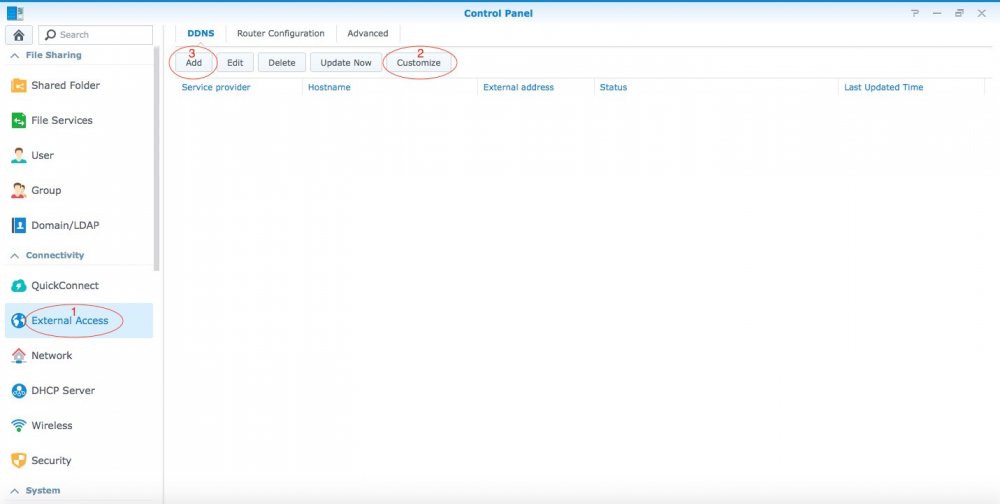
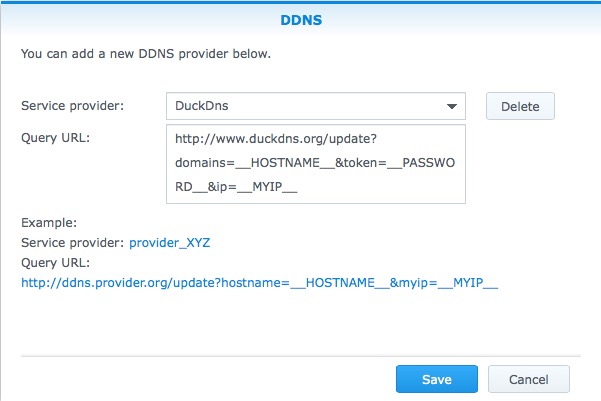
If you have a dynamic IP, you will need to setup a DDNS to access your NAS from outside your local network. So to start thing off you will need to open an account with a DDNS service provider. There are plenty out there, some paid, some free. The two below are the ones that I use personally. They are free. If you find others then you should also be able to use those. Some of these providers might already be part of the list included by Synology in which case you can skip the 'Customize' button and simply use the 'Add' button and select your service provider from there. The configuration example I am giving below will be based on duckdns.org because it's the easiest I have seen out there but unfortunately it is not included in the DDNS service providers list included by Synology so you will need to use the 'Customize' button first. - http://www.duckdns.org - http://www.nsupdate.info Once you have chosen your domain with duckdns.org you will need to configure DSM accordingly. So here is how to: In Control Panel go to External Access (1), then click on Customize (2). A new window should open. You need to fill in as per the image. To save you some time you can copy paste from the code tag provided below the image: http://www.duckdns.org/update?domains=__HOSTNAME__&token=__PASSWORD__&ip=__MYIP__ When you are done click Save. The window should close. Now click on Add (3), see first image. A new window should open. Select *DuckDns from the service provider list and fill in your duckdns domain, username and token: Click on Test Connection to verify that it's working. If it is working you should see the word Normal in green next to Status. You can then click Ok. If it is not working then it means you screwed up somewhere. Recheck query URL, domain, username and token. All that is left to do is to configure port forwarding on your router. This is called at times "port forwarding" or "port mapping". You need to check with your router's user guide as sometimes the wording differs from one brand to the other. The port(s) you will be forwarding to your box also need to be opened on DSM's firewall else DSM will refuse access to the port/service requested. If your ISP implements double NAT you might have to do some additional configuration to your router to allow the ports to be forwarded correctly. Check with your ISP first and also check this site or this site on how to overcome double NAT. Google is your friend. Note of caution here: If you want to make things very safe you would only port forward VPN ports. This means that you can only access your box via VPN which in turn then gives you full access to the box (and to your local network if configured accordingly) once a VPN connection is established. You could also port forward the GUI ports (usually 5000/5001 or the ones you would have customised). This would give you full GUI access to DSM from outside of your network but this can be unsafe specially if you don't have a strong password and proper firewall and safety mechanisms configured in DSM. You could also just forward the port(s)/service(s) that you need. It really all depends what you are using your box for but in most cases the VPN solution is the safest although not the most convenient. NEVER EVER port forward port 22 unless you know exactly what you are doing. To test that your box is accessible from the outside world while being at home you could use your smart phone in data mode (not in wifi) at the following address: http://[yourdomain].duckdns.org:[port number] or https://[yourdomain].duckdns.org:[port number] - Do no put www
 1 point