Leaderboard


Popular Content
Showing content with the highest reputation on 08/17/2018 in all areas
-
Hi, everyone, Thanks for you patience. A new ds918 loader support 6.2/6.21 is uploaded. whats new: uefi issue fixed. i915 driver updated. link https://mega.nz/#F!Fgk01YoT!7fN9Uxe4lpzZWPLXPMONMA (for DS918+) - v1.04b ---Beginning of addition by polanskiman--- link https://mega.nz/#!OV4gVKyZ!dCgfXx1bgAOyvbFwFiov3s7RSNoFuqnAcNmSllLoUiw (for DS3615xs) - v1.03b link https://mega.nz/#!zcogjaDT!qIEazI49daggE2odvSwazn3VqBc_wv0zAvab6m6kHbA (for DS3617xs) - v1.03b Please read this topic to know what loader to chose: ---End of addition by polanskiman---2 points
-
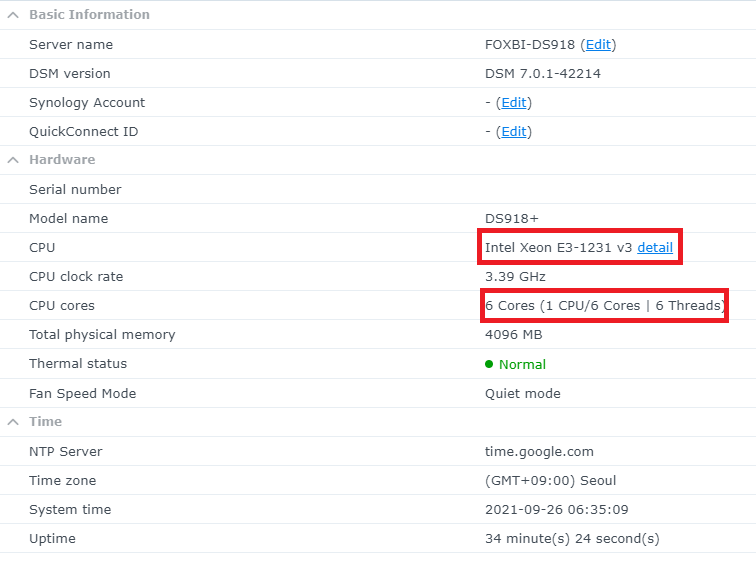
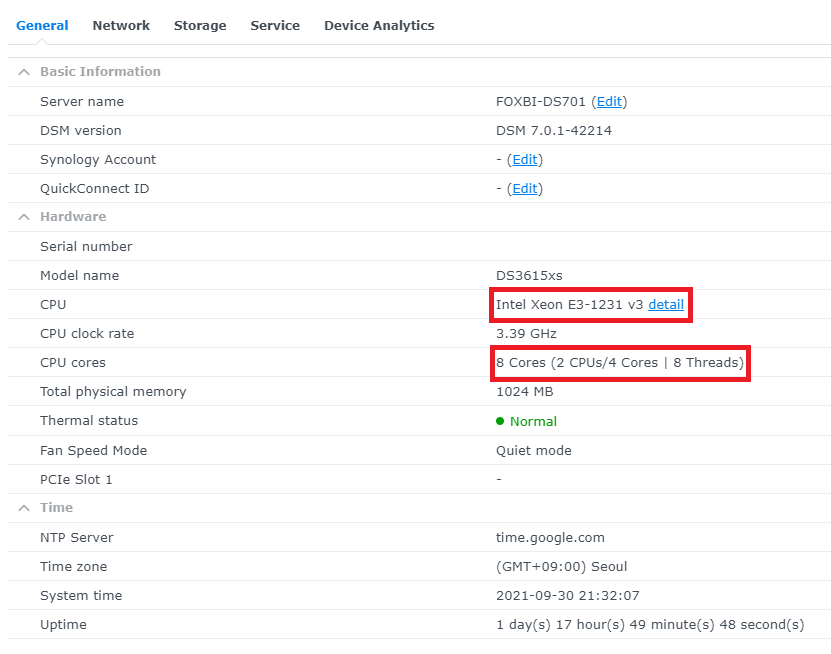
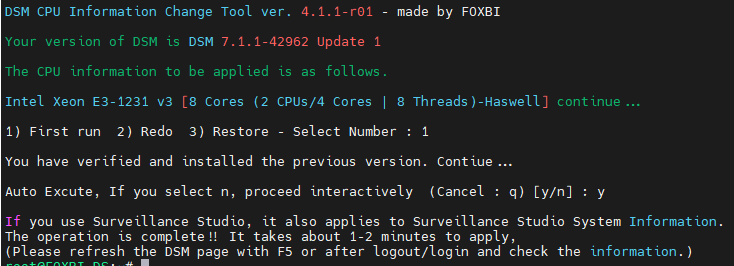
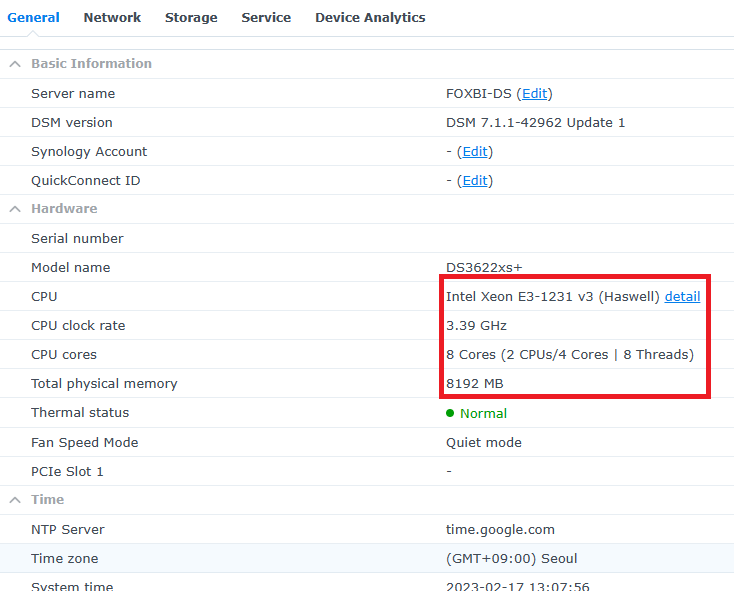
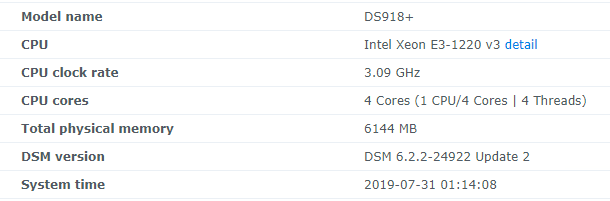
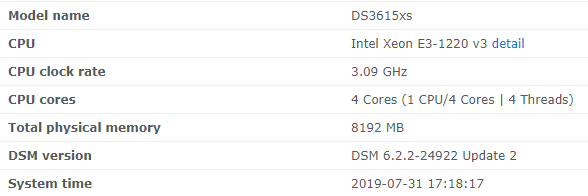
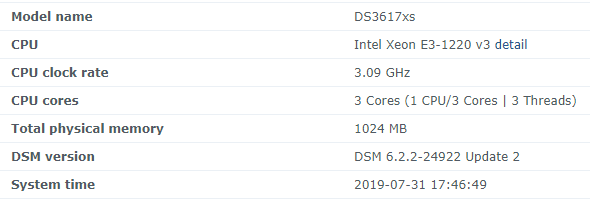
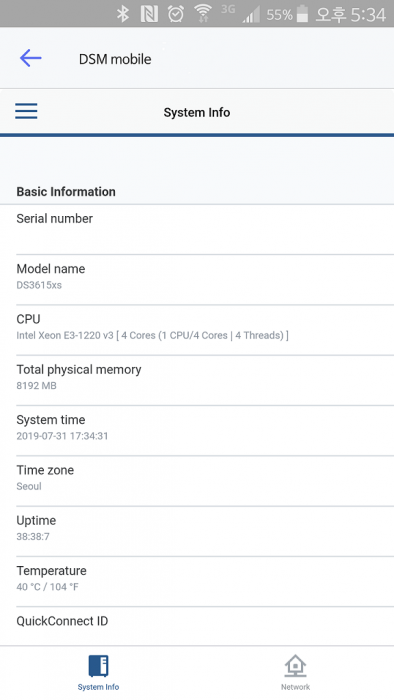
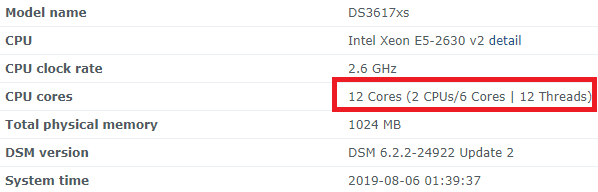
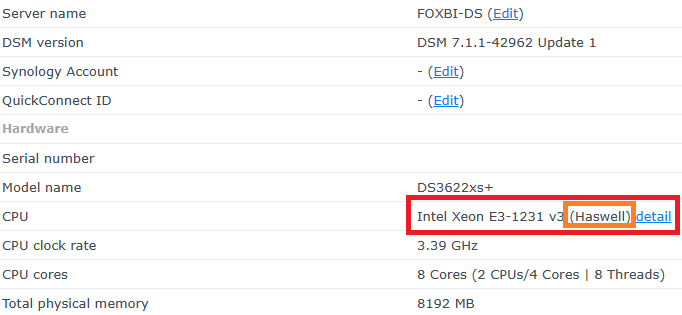
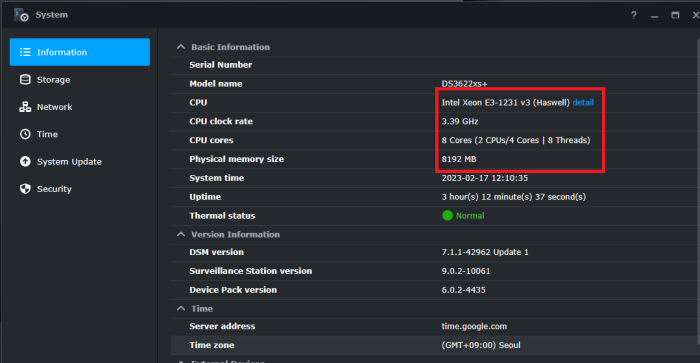
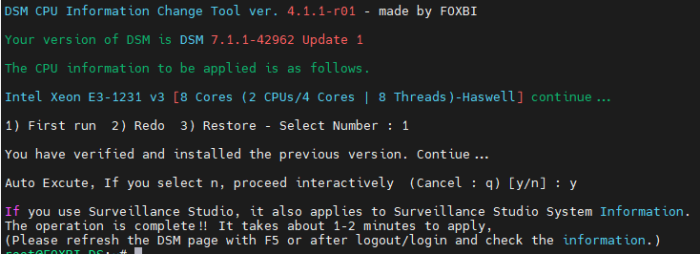
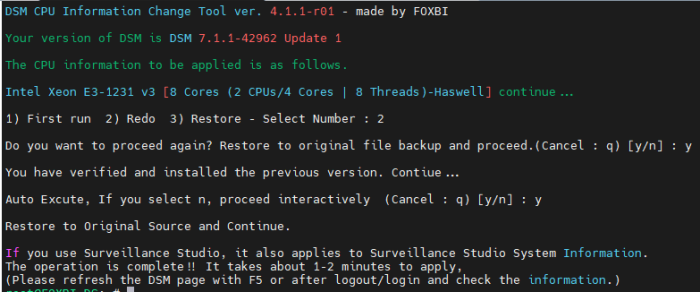
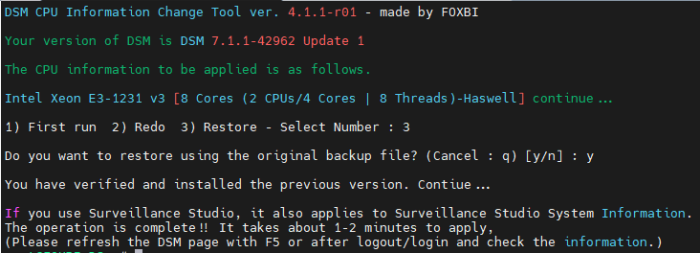
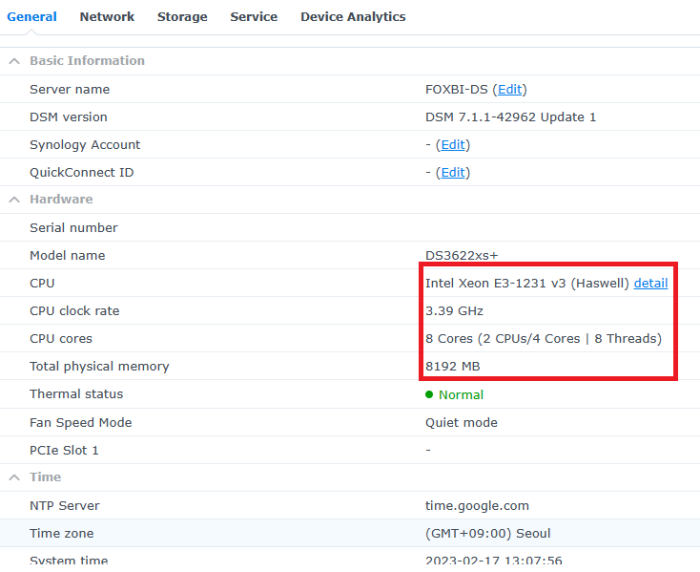
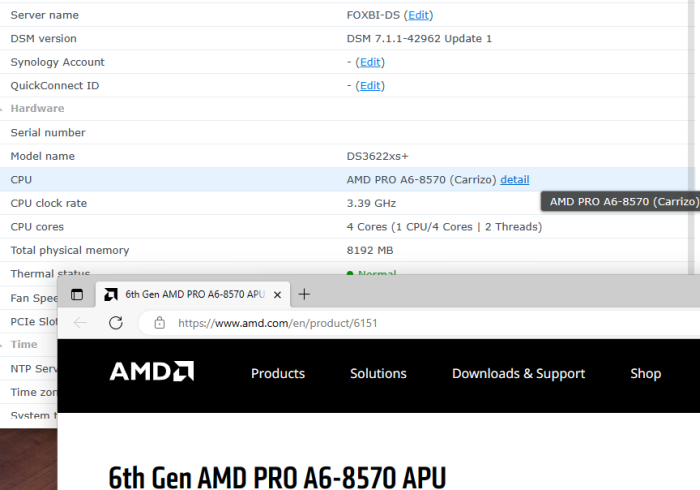
Hello! I am xpenology user. And I am an IT engineer who creates shell scripts as hobbies. Please understand that it is written by a google translate site. because i’m korean who is not fluent in English. I created a tool to change cpu information for Xpenology’s users. Modify the actual cpu name and cores of your pc or server. Howto Run ============================================================= 1. Download attached file on your PC (ch_cpuinfo.tar) (ch_cpuinfo_en.tar) / (ch_cpuinfo_kr.tar is file for korean) 2. Upload file to your DSM location (by filestation, sftp, webdav etc....) 3. Connect to ssh by admin account. (dsm > control panel > terminal & snmp > terminal > enable ssh check) 4. Switch user to root: sudo su - (input admin password) 5. Change directory to where ch_cpuinfo.tar file is located: cd /volume1/temp 5-1. in another way, Download ch_cpuinfo.tar with wget wget https://github.com/FOXBI/ch_cpuinfo/releases/download/ch_cpuinfo/ch_cpuinfo.tar 6. Decompress file & check file: tar xvf ch_cpuinfo.tar ls -lrt (check root’s run auth) 7. Run to Binary file ./ch_cpuinfo or ./ch_cpuinfo.sh (If you use busybox in DSM 5.x, you can use it as a source file) 8. When you execute it, proceed according to the description that is output. 9. Check your DSM’s CPU name, CPU cores at “information center” made a video of the how to run ch_cpuinfo. Extra Action If you want to use ch_cpuinfo in your language Modify and use the LANG.txt file in the same path as ch_cpuinfo. It is possible to use after changing the English content of each variable after translation and changing the value of CUSTLANG in line 8 to Y. Sample image(by Google trans) ==================================================== Addtional, Adjust binary to excute file made by shc(http://www.datsi.fi.upm.es/~frosal) The tool does not inclue worms, bad code. If you want to edit the CPU information yourself manually, please refer to the contents below. ——————————————————————————————————————————————————————————————— Location : /usr/syno/synoman/webman/modules/AdminCenter Source : admin_center.js / admin_center.js.gz(above 6.2) Add Before -> if(Ext.isDefined(h.cpu_vendor)&&Ext.isDefined(h.cpu_family)&&Ext.isDefined(h.cpu_series)){ o.push([_T("status","cpu_model_name"),String.format("{0} {1} {2}",h.cpu_vendor,h.cpu_family,h.cpu_series)])} if(Ext.isDefined(h.cpu_cores)){o.push([_T("status","cpu_cores"),h.cpu_cores])} Add contents: h.cpu_vendor="Intel";h.cpu_family="Xeon";h.cpu_series="E3-1220 V3";h.cpu_cores="4 Cores (1 CPU/4 Cores | 4 Threads)"; h.cpu_detail="<a href='https://ark.intel.com/content/www/us/en/ark/search.html?_charset_=UTF-8&q=E3-1220 V3' target=_blank>detail</a>" Change contens: String.format("{0} {1} {2}",h.cpu_vendor,h.cpu_family,h.cpu_series) to String.format("{0} {1} {2} {3}",h.cpu_vendor,h.cpu_family,h.cpu_series,h.cpu_detail) ——————————————————————————————————————————————————————————————— Finally, All descriptions are based on version 6.2, and the actual executable file supports 5.x, 6.x and 7.x Publish the source through github(https://github.com/FOXBI/ch_cpuinfo). For versions DSM 6.x and later, you can use the binary as before. If you use busybox in DSM 5.x, you can use it as a source file(ch_cpuinfo.sh). Please contact me by comment or bug report, i’ll respond to you as much as possible within my ability. Test & Made Environment ———————————————————————————————————— Base Server : HP ML310e v2 gen8 + VMware ESXi 6.0 + RDM DSM : DSM 6.2.3-25426 Update 3 (DS3615xs) Base Server : HP ML310e v2 gen8 + VMware ESXi 6.0 DSM : DSM 7.0.1-42214 (DS3615xs) Base Server : HP ML310e v2 gen8 + VMware ESXi 6.0 DSM : DSM 7.0.1-42214 (DS918+) Base Server : HP ML310e v2 gen8 + VMware ESXi 6.0 DSM : DSM 6.2.4-25556 (DS3615xs) Base Server : Intel E5-2630 v2 + VMware ESXi 6.7u2 DSM : 6.2.2-24922 Update 2 (DS3617xs) ———————————————————————————————————— Change Log Update new version (ch_cpuinfo ver 4.2.0-r01) 2023.02.18 - Application of AMD's CPU information collection function improvement - xpenlib(cpu_info.sh) refered https://github.com/FOXBI/xpenlib/blob/main/cpu_info.sh Update new version (ch_cpuinfo ver 4.2.1-r01) 2023.03.05 - Fixed error when users of previous version perform redo with version 4.2.0-r01 (Thanks for the @Mentat report.) I am sorry for not being able to actively respond to your inquiries due to busy life. Thank you!! Have a nice day!! Cheer up!! We can do it!! Reduce activity & Stay home & Wear a Mask!! Let's overcome COVID-19 !! Let's pray and support together for the two countries where the earthquake caused great damage and many deaths and missing people. ============================================= Download links: ch_cpuinfo ver 4.2.0-r01 - new version update -> ch_cpuinfo ver 4.2.1-r01 - new version update -> ch_cpuinfo.tar Reference images # 1.04b + DS918+ # 1.03b + DS3615xs # 1.03b + DS3617xs # Normal output is possible even when using more than 8core. # Support DSM 7.x


 1 point
 -
I was finally able to get v1.03b to work successfully after a lot of runarounds with ESXI 6.7. No Diskstation found within LAN: I've created a new VM and set my modified synoboot (updated VID/PID/SN/MAC) as an SATA HDD. Booted the 3rd option (Vmware/ESXI) and it detected on the network. Once it was detected, I could then migrate to 6.2. After migration was completed, all of my packages would close within minutes of the system booting up. To resolve this, I had to delete the hidden .xpenoboot that was located at root. Open SSH and use Putty to remove the .xpenoboot folder. Rebooted the system and all the packages would now stay up and running. Hope this helps other users!1 point