Search the Community
Showing results for tags 'asus-iot-h310i-im-a'.
Found 1 result
-
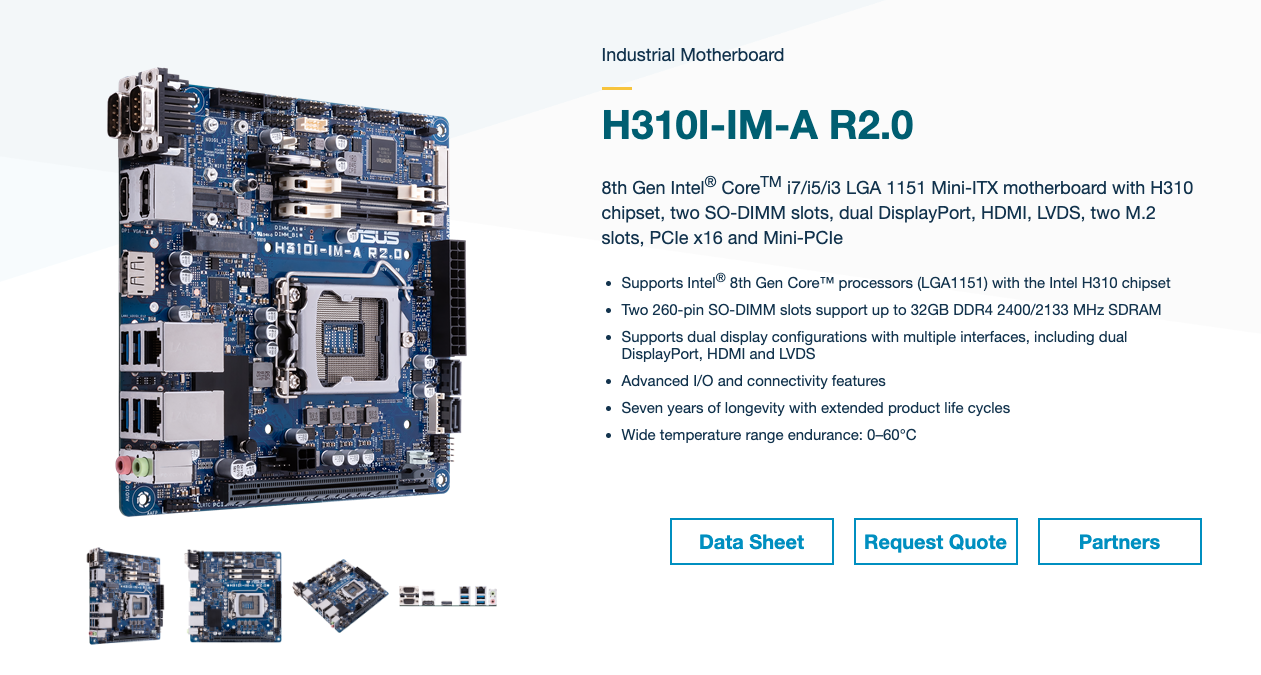
 This time, it will be uploaded to the hardware section after upgrading from the 4th generation Haswell i3-4160T to the 9th generation Coffee Lake G5500, which has been used as the main XPE for many years. This is the H310i-IM-AR2.0 industrial motherboard of ASUS IOT, which starts at $197 7 months ago. Like industrial boards, it has a lot of serial ports, but it was useless to me as I didn't know how to use it at the time. Haha. As you can see, the m.2 wifi/M-Sata slot is visible on the upper left. Among them, M-Sata prepared another 128GB SSD from Samsung and utilized it as a read-write cache. Two built-in Satas are visible in the lower right corner, three for M.2 NVMe slots, and four for M-Sata slots. There are two serials, one HDMI, two DPs, two LANs, and four USB 3.0 ports on the back. These are the parts to be replaced with the JONSBO N1 body equipped with the Haswell board, which is today's replacement target. The cooler is a bit over-spec, but I have prepared a Noctua NH-L9x65. Thermal paste uses ZF extreme, which is the highest virtual level, among the available THERMAGIC types. I am planning to use one 256GB KIOXIA M.2 NVMe as a read-only cache for Volume 2, but I am worried about heat generation and rear interference, so I have prepared a review M2F08 M.2 laptop heat sink. At first, I was going to use Samsung M-SATA 256GB, but I changed it to 128GB because it was out of order. I know it doesn't work in the synology, but I tried to install it under M-SATA because one of the m.2 Bluetooth/WIFI modules, DW1830, was left.You can't see it because it's covered.) This is the Gigabyte Z87N-WIFI Intel Dual-LAN ITX motherboard for nearly two years. This board was also a model that was very difficult to find in the used market, but I'm attached to it because I even paid extra money to buy it. It's hard to see because it's covered by a cooler, but it has a lot of high-end capacitors, so I've been using it stably. The KIOXIA M.2 NVMe is installed on the exclusive heat sink for the M2F08 M.2 laptop. There was only one shake on the front end of the memory module, so if it was installed as it is, there was no gap in the rear part, so there was a possibility of board interference again. Therefore, the heat-resistant rubber ring shown on the screen was inserted in the middle to adjust the spacing. This is the back of the review M2F08M.2 laptop heat sink with KIOXIA M.2 NVMe. Apply THERMAGIC ZF Extreme Thermal Paste. I've used it a few times in the past, but it's a thermal paste that I can't really get used to. It spreads so poorly that everything sticks to the spatula. It's a little suspicious that the liquid ingredient has dried up in the thermal paste. It is the process of assembling a Noctua cooler. It's my first time using Noctua, but I understand why it's Noctua. I couldn't upload the cooler packaging on the photo, but the completeness of each package and the subform is no joke. There is also a separate AMD kit and sufficient thermal paste, and a cable for controlling cooler speed is also attached, but it is omitted from the picture. It looks like it is equipped with Noktua's cooler backplace. It's said that it'll be a big trouble if you put it on the front and back, but in fact, it doesn't seem to make a difference^^ It looks like a mounting bar with a cooler attached to it. You can change the shape by turning it 90 degrees, considering the direction of the wind. In my case, the Jonsbo N1 basic cooler blew in from the front to the back, and I decided the direction as follows. H310i-IM-A seems to be installed fine on Jonsbo N1. The case is cramped, so it's a little easier if you push it gently with a back panel inserted in the back of the board. Install the Dell Perc H200 card and cover the five hard drives installed in the Jonsbo N1. This is what I saw from the top of the Jonsbo N1. This is what I saw from the right side of the Jonsbo N1. Finally, I applied it with SSD/M.2 NVMe cache. I thought the SSD and M.2 NVMe would be bundled with RAID1 in read-write mode, but I couldn't create a cache like that. DS3622xs+ does not show NVMe officially supported or not in the outline.


- 15 replies
-
- 3
-

-
- industrial-mobo
- asus-iot-h310i-im-a
- (and 1 more)