For any Proxmox VE users that may be struggling with direct passthrough of an NVMe PCI controller (not para-virtualized via QEMU) - which means real SMART value, etc. - I was able to accomplish this by doing the following:
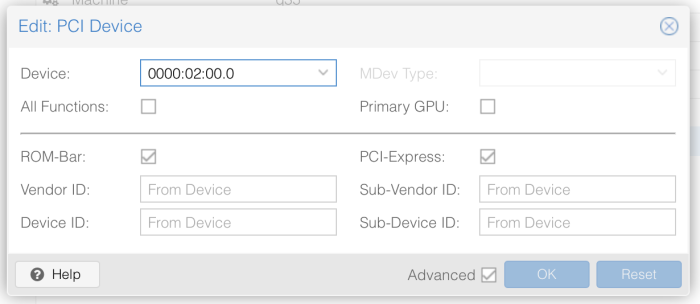
Create Q35 machine with OVMF firmware. Uncheck creation of an EFI disk (note there'll be a warning when booting the VM due to the missing EFI disk, but it doesn't matter). Add a PCI device, choose your NVMe controller, and make sure to check the 'PCI Express' checkbox. This checkbox is only available in a Q35 machine, and at least in my case was the key to making this work. Here's what mine looks like - this is my NVMe drive:
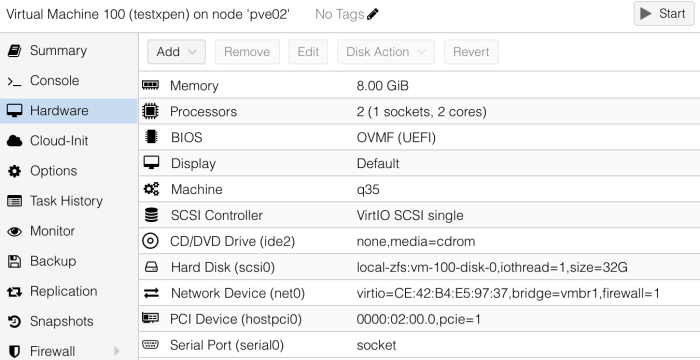
Add whatever other devices (e.g. SATA controllers or virtual disks) to your VM. You can also add a serial console if you find it useful, but remember you'll have to choose the noVNC option to see the BIOS screen. Download your bootloader of choice - TCRP or arpl (I tested both successfully), and extract the .img file to somewhere on your PVE host. If using TCRP, make sure to grab the UEFI img file. I extracted to /var/lib/vz/template/iso/<vmid>-arpl.img so that it displays in the PVE GUI, but it really doesn't matter.
Add the following line to /etc/pve/qemu-server/<vmid>.conf, making sure to update the path to the TCRP/arpl .img file.
args: -device 'nec-usb-xhci,id=usb-bus0,multifunction=on' -drive 'file=<path-to-arpl-img-file>,media=disk,format=raw,if=none,id=drive-disk-bootloader' -device 'usb-storage,bus=usb-bus0.0,port=1,drive=drive-disk-bootloader,id=usb-disk-bootloader,bootindex=999,removable=on'
You can now boot the VM, and walk through the TCRP/arpl configuration, then boot and install DSM as normal (make sure to select USB boot if using TCRP), and follow the steps earlier in this thread to update /etc.defaults/extensionPorts. I needed to reboot xpenology after updating the file in order for the NVMe drive to show up.
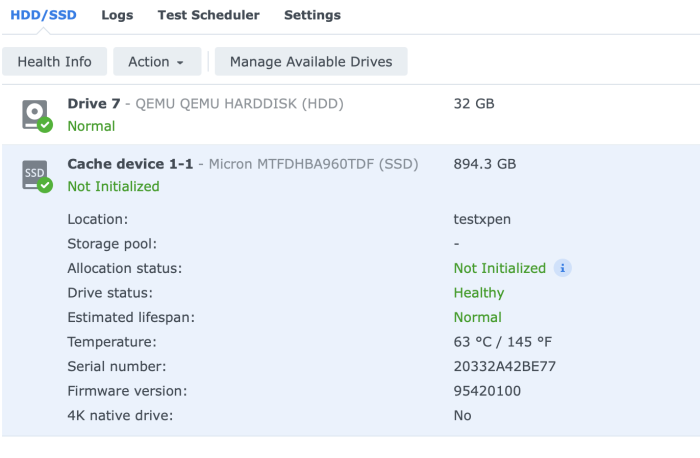
And here is a the drive in DSM, with SMART data and everything! (yes, it is a little too warm..)
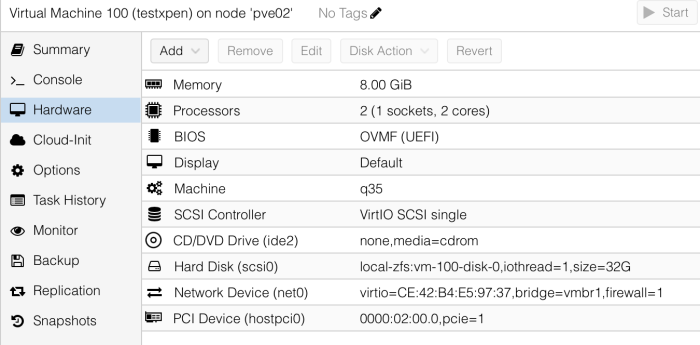
Here are screenshots/configurations of my VM:
VM conf file:
# cat /etc/pve/qemu-server/100.conf
agent: 1
args: -device 'nec-usb-xhci,id=usb-bus0,multifunction=on' -drive 'file=/var/lib/vz/template/iso/100-arpl.img,media=disk,format=raw,if=none,id=drive-disk-bootloader' -device 'usb-storage,bus=usb-bus0.0,port=1,drive=drive-disk-bootloader,id=usb-disk-bootloader,bootindex=999,removable=on'
bios: ovmf
boot: order=ide2
cores: 2
hostpci0: 0000:02:00.0,pcie=1
ide2: none,media=cdrom
machine: q35
memory: 8192
meta: creation-qemu=7.1.0,ctime=1672872380
name: testxpen
net0: virtio=CE:42:B4:E5:97:37,bridge=vmbr1,firewall=1
numa: 0
ostype: l26
scsi0: local-zfs:vm-100-disk-0,iothread=1,size=32G
scsihw: virtio-scsi-single
smbios1: uuid=44f382c2-7279-44a9-b06e-af44c19d713d
sockets: 1
vmgenid: 89bdbe7c-9d16-4405-ad60-cab2cf605383
udevadm output from within xpenology:
# udevadm info /dev/nvme0n1
P: /devices/pci0000:00/0000:00:1c.0/0000:01:00.0/nvme/nvme0/nvme0n1
N: nvme0n1
E: DEVNAME=/dev/nvme0n1
E: DEVPATH=/devices/pci0000:00/0000:00:1c.0/0000:01:00.0/nvme/nvme0/nvme0n1
E: DEVTYPE=disk
E: MAJOR=259
E: MINOR=0
E: PHYSDEVBUS=pci
E: PHYSDEVDRIVER=nvme
E: PHYSDEVPATH=/devices/pci0000:00/0000:00:1c.0/0000:01:00.0
E: SUBSYSTEM=block
E: SYNO_ATTR_SERIAL=20332A42BE77
E: SYNO_DEV_DISKPORTTYPE=CACHE
E: SYNO_INFO_PLATFORM_NAME=broadwellnk
E: SYNO_KERNEL_VERSION=4.4
E: SYNO_SUPPORT_USB_PRINTER=yes
E: SYNO_SUPPORT_XA=no
E: TAGS=:systemd:
E: USEC_INITIALIZED=916119
/etc.defaults/extensionPorts:
# cat /etc.defaults/extensionPorts
[pci]
pci1="0000:00:1c.0"
Note that the versions I used to test this method are:
Proxmox VE 7.3-3
TinyCore RedPill 0.9.3.0
arpl 1.0 beta 9
DSM 7.1.1