

hendry
-
Posts
122 -
Joined
-
Last visited
Posts posted by hendry
-
-
3 minutes ago, Peter Suh said:
ds920 and ds3615 have different methods of mapping sata ports.
It is necessary to check whether the sataport auto mapping of ds920 is wrong in tc.
Can't I send the log?i was success install DSM 7.0.1 on DS3615xs before
but failed on DSM 7.1
-
Just now, Peter Suh said:
ds920 and ds3615 have different methods of mapping sata ports.
It is necessary to check whether the sataport auto mapping of ds920 is wrong in tc.
Can't I send the log?tc@box:~$ lspci -tvnnq -[0000:00]-+-00.0 Intel Corporation 440FX - 82441FX PMC [Natoma] [8086:1237] +-01.0 Intel Corporation 82371SB PIIX3 ISA [Natoma/Triton II] [8086:7000] +-01.1 Intel Corporation 82371SB PIIX3 IDE [Natoma/Triton II] [8086:7010] +-01.3 Intel Corporation 82371AB/EB/MB PIIX4 ACPI [8086:7113] +-02.0 Cirrus Logic GD 5446 [1013:00b8] +-03.0 Red Hat, Inc Virtio network device [1af4:1000] +-04.0 NEC Corporation uPD720200 USB 3.0 Host Controller [1033:0194] +-05.0 Intel Corporation 82801IR/IO/IH (ICH9R/DO/DH) 6 port SATA Controller [AHCI mode] [8086:2922] +-06.0 Red Hat, Inc Virtio console [1af4:1003] \-07.0 Red Hat, Inc Virtio memory balloon [1af4:1002]
-
if using DS3615xs it can detect harddrive, but failed when installing DSM pat file.

-
after trying to boot, there's no hard drive detected..

-
7 minutes ago, blackmix said:
That work, i used it. copy pat file on tc
scp tc@x.x.x.x:/home/tc/X .

-
why the result loader.img is so big ?
i found 2 others bootloader size is smaller..

the resulted is bigger

-
Just now, blackmix said:
Use scp
ok.. will try later..
thanks..
-
6 minutes ago, Peter Suh said:
I mean the img file.
but the .pat file, how to download it from tc ?
i have used winscp & filezilla but always download failed..
can i mount shared folder using cifs or nfs type inside tc ?
-
2 minutes ago, Peter Suh said:
I wasn't interested in it because TC took care of it, so there was no reason to download it and use it, but when I looked it up, it's here.
/home/tc/redpill-load/loader.imgwhy no reason not to download the .pat file from tc ?
the pat file is used to install DSM right ?
-
1 minute ago, Peter Suh said:
It is recommended to use Util that supports sftp.
In MacOS I use portx.tried winscp but always getting incorrect mac packet when downloading the file..
i also didn't find the .img file as the result of bootloader created. which folder is it ?
-
How to get the .pat file downloded from the redpill build script into pc ?
and where's the resulted bootloader img file ?
-
1 minute ago, dodo-dk said:
Yes, this is right for virtio drivers in Proxmox.
But ACPI/Powerbutton doesnt work with 7.1.then this command is correct to add virtio drivers support on 7.1 ?
i plan to run this loader on xpenology docker from uxora.
-
1 minute ago, Peter Suh said:
If so, replace it with the acpid of the pocopico.
./rploader.sh ext bromolow-7.0.1-42218 add https://github.com/pocopico/redpill-load/raw/develop/redpill-acpid/rpext-index.json
this is for DSM 7.1 not 7.0.1 since building loader for 7.0.1 success and running fine..
what does this command means ? it adds acpid drivers ? and how about virtio ?
-
4 minutes ago, Peter Suh said:
As far as I know, we use ext below for Sata, no?
./rploader.sh ext bromolow-7.0.1-42218 add https://raw.githubusercontent.com/pocopico/rp-ext/master/vmw_pvscsi/rpext-index.jsonnot really sure..
but u can find it on this site
-
1 minute ago, Peter Suh said:
Also, is it necessary to add this part manually as a part?
TC automatically adds ACPI in the build process and uses the one from Pocopico.
Remove this part../rploader.sh ext bromolow-7.0.1-42218 add https://github.com/jimmyGALLAND/redpill-ext/raw/master/acpid/rpext-index.json
if i remove this part, then the loader does not have virtio drivers..
-
2 minutes ago, Peter Suh said:
Do not use sudo any more.
Sudo is used on its own in the rploader where sudo is needed.
Just do it as a tc user.nope.. i didn't type sudo, just ./rploader.sh ......
so, how to add virtio-9p drivers which compatible with DSM 7.1 for DS3615xs ?
Or for now there's no supported DSM 7.1 drivers for 3615xs ?
-
1 minute ago, Peter Suh said:
Yes, there is no setting value corresponding to the link below.
https://raw.githubusercontent.com/jimmyGALLAND/redpill-ext/master/acpid/rpext-index.json
did u mean, when i run this command
./rploader.sh ext bromolow-7.1.0-42661 add https://github.com/jimmyGALLAND/redpill-ext/raw/master/acpid/rpext-index.jsonmeans, it doesn't find the recipe for DS3615xs which cause these errors ?
that command i use to add virtio-9p drivers inside redpill kernel.
-
35 minutes ago, gadreel said:
I do not know if this is the same:
https://github.com/pocopico/redpill-load/blob/master/redpill-virtio/rpext-index.json
so, before build the loader, what should i do ?
execute this command ?
./rploader.sh ext bromolow-7.1.0-42661 add https://github.com/pocopico/redpill-load/blob/master/redpill-virtio/rpext-index.json
-
26 minutes ago, Peter Suh said:
Is the current installation a virtual environment like Proxmox or ESXI?
Before asking a question, it is important to reveal whether it is BareMetal or VM first.
I don't have much experience with VM, so it won't help
There will be experienced users in this forum.
Yes, i build it inside VM.
Then it means, for DS3615xs not support acpi for DSM 7.1 ?
But on DSM 7.0.1 it's okay.. no problem..
Which model has success build loader for DSM 7.1 ?
-
Just now, gadreel said:
It seems not. Maybe check pocopico repo.
The extension jg.acpid was found. However, the extension index has no recipe for ds3615xs_42661 platform.
then the errors when building DS3615xs seems it doesn't has acpi drivers ?
which DSM model which has acpi drivers ?
and how to add virtio-9p drivers in this loaders for DSM 7.1 ?
-
hi.
have virtio-9p included with this loader ?
i'm using this instructions on uxora site..
sudo ./rploader.sh clean bromolow-7.0.1-42218 sudo ./rploader.sh update now sudo ./rploader.sh serialgen DS3615xs ./rploader.sh ext bromolow-7.0.1-42218 add https://github.com/jimmyGALLAND/redpill-ext/raw/master/acpid/rpext-index.json find . -name "*json" -exec grep -l "jumkey/redpill-load/raw/develop/redpill-virtio" {} \; | xargs -I {} sed -i "s/jumkey\/redpill-load\/raw\/develop\/redpill-virtio/uxora-com\/rpext\/raw\/master\/virtio_9p/g" {} sudo ./rploader.sh build bromolow-7.0.1-42218 -
On 4/15/2022 at 2:02 PM, Peter Suh said:
The approval of the new topic has been delayed so much that I share the full version 7.1 guide first.
If you are using an existing 7.0.1 after the version of the Synology DSM was updated to 7.1, you may want to update to 7.1
or this is a guide for those who want to install 7.1 from the beginning.
For those who are new to this article, I will share it with you by adding and subtracting it from the existing 7.0.1 guide.
It is a translation from Korean to English using a translator.
Please understand if there is a slight misunderstanding.
Existing RedPill, released last year, can generate IMG files directly through the compilation process of the bootloader only if Linux is available separately
In the case of tinyCore RedPill, it comes completely with tinyCore Linux in the form of a USB boot image
It's much easier without having to install and prepare linux separately.
You can add the drivers you want to build after you select them and add them directly.
The latest version of tinycore supports a total of 7 models (DS3622xs+/DS918+/DS3615xs/DS3617xs/DS1621+/DS920+/DVA3221)
You can continuously change the boot loader on your own without re-imaging it (model/sn/mac, etc.)
Tinycore supports both img for native installation and vmdk for virtual environments.
1.Preparing Bootloader IMG
Use the Download button in the middle of the beam link below.Download the gz file
In it 0.4.6 version img.You can decompress the gz file one more time and use the img file.
(Full File)
https://github.com/pocopico/tinycore-redpill
(for LEGACY / EFI)
https://github.com/pocopico/tinycore-redpill/raw/main/tinycore-redpill.v0.4.6.img.gz
(for VMWARE)
https://github.com/pocopico/tinycore-redpill/raw/main/tinycore-redpill.v0.4.6.vmdk.gz
2. Bootloader IMG File USB Recording
Use the above tinycore-redfill.v0.4.6.img file to burn it with USB with a convenient image tool such as WinImage or Rufus.
You don't need to adjust the configuration file in advance to modify the VID/PID/Serial/MAC/SATAPortMap like the JUN loader.
If you want to create a USB image on a Mac or Linux like me, you can use the DD command below in the terminal.
(Assuming that the DEVICE ID of the USB verified by diskutil is disk4)
sudo diskutil unmountDisk /dev/disk4
sudo dd if=/Users/MyAccount/Downloads/tinycore-redpill.v0.4.5.img of=/dev/disk4 bs=1m
sudo diskutil eject /dev/disk4
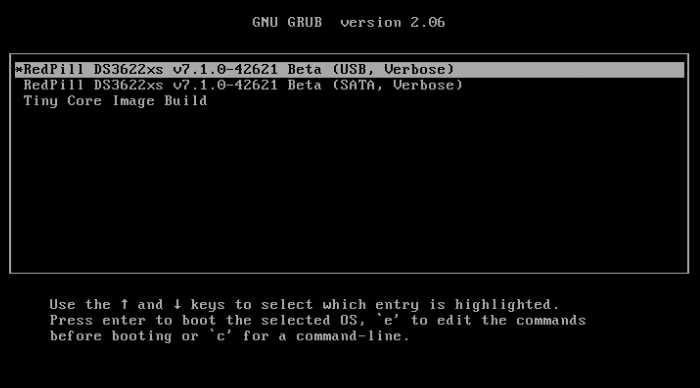
3.Starting TinyCore Linux
USB boot by plugging it into a PC for xpenology (UEFI 1 partition or USB CSM can be booted)
The tinyCore Linux (tinyCore Image Build menu) is running and appears.
Run the far right icon terminal app here.
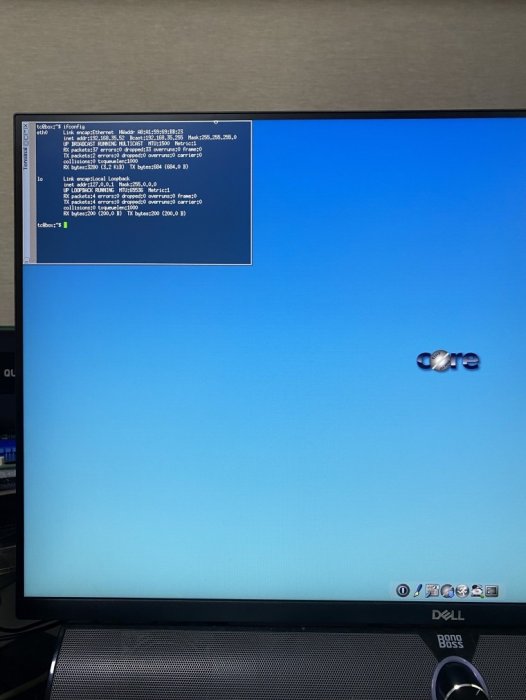
Check the ip address automatically assigned an en0 LAN card with ifconfig.
[tinyCore Linux Screen]
4. Adjust CONFIG after SSH connection ( In fact, the command is executed in number 7 below, and this is a preliminary explanation. )
Ssh connection with putty etc. from PC other than xpenology. ( id:tc / pass : P@ssw0rd )
I'm connecting.
Tinycore Redfill is stabilizing right now
PocoPico, the original author of this program, fixes bugs from time to time and announces rebuilding.
There's a possibility that this rebuild will happen from time to time
Even with the final image version of 0.4.6, changes can still be updated in real time over the Internet.
Sometimes the rploader.sh file itself changes if there is a bug.
If you've migrated from JUN xpenology,
at tc@box:~$user_config.json
Existing grub such as VID/PID/Sn/Mac/SataPortMap in user_config.json file.Refer to the cfg and move it as it is.
For new installers, perform serial GEN/USB VID, PID auto-detect, SataPortMap auto-detect, etc. as shown below.
For the next process, I will share the command focusing on the platform that I have completed the most normal verification.
tc@box:~$./rploader.sh serialgen (select one from DS3622x+/DS918+/DS3615xs/DS3617xs/DS1621+/DS920+/DV3221)
tc@box:~$ ./rploader.sh identifyusb now
tc@box:~$./rploader.sh satamap now (no HBA card user required)
You can see that the contents of user_config.json have been changed automatically.
Finally, the commonality of existing users and new installers is
tc@box:~$catuser_config.json If you assume that there are 4 internal Sata ports,
SataPortMap = "4",
DiskIdxMap = "00"
Please check if it's changed to the back.
After find.synology.com, you may not be able to find SATA HDDs during DSM installation.
The following is an example of a 6-port SATA additional expansion card.
SataPortMap = "46",
DiskIdxMap = "0000"
(Except for those who use H200, H310, H710, etc. cards, you don't have to clear the options for this SataPortMap and DiskIdxMap itself and use it.
Please erase the lines of the above two options with the vi editor and organize them well so that there are no Syntex errors. Of course.
./rploader.sh satamap now command is not required.)
5.BIOS Internal SATA Port Hot Plug disable -> enable Handling (Important)
To avoid temporarily reducing the number of SATA PortMap maps set above by the number of HDDs physically connected by the Sata cable during the DSM installation process:
Make sure to turn on the Hot Plug function.
This reduces the probability of encountering an error message stating that the above automatically recognizes the number of SATAPortMaps and the HDD is not found.
Please refer to the link below for the relevant details highlighted by TheSTREET.
http://www.2cpu.co.kr/nas/37891
6.Add boot loader extension driver after SSH connection (optional)
7.Build Boot Loader After SSH Connection (Two Step Update - TSU)
If you are done adding the above extension drivers, build the bootloader at the end.
After 7.0.1 build, check if the custom-module -> /mnt/sdb3/auxfiles directory is created well with the ll command.
Without this directory, the second 7.1.0 build will fail.
If you do not see the custom-module -> /mnt/sdb3/auxfiles directory,
Please do the 7.0.1 build again.
[DS3622xs+]
./rploader.sh update now
./rploader.sh fullupgrade now
./rploader.sh serialgen DS3622xs+
./rploader.sh identifyusb now
./rploader.sh satamap now
./rploader.sh build broadwellnk-7.0.1-42218
(run if custom-module -> /mnt/sdb3/auxfiles is missing)
ll /mnt. (Check the 3rd partition in usb)
sudo ln -s /mnt/sdb3/auxfiles /home/tc/custom-module
./rploader.sh clean now
./rploader.sh build broadwellnk-7.1.0-42661
./rploader.sh clean now; rm -rf /mnt/sdb3/auxfiles; rm -rf /home/tc/custom-module; ./rploader.sh backup now;
[DS918+]
./rploader.sh update now
./rploader.sh fullupgrade now
./rploader.sh serialgen DS918+
./rploader.sh identifyusb now
./rploader.sh satamap now
./rploader.sh build apollolake-7.0.1-42218
(run if custom-module -> /mnt/sdb3/auxfiles is missing)
ll /mnt. (Check the 3rd partition in usb)
sudo ln -s /mnt/sdb3/auxfiles /home/tc/custom-module
./rploader.sh clean now
./rploader.sh build apollolake-7.1.0-42661
./rploader.sh clean now; rm -rf /mnt/sdb3/auxfiles; rm -rf /home/tc/custom-module; ./rploader.sh backup now;
[DS3615xs]
./rploader.sh update now
./rploader.sh fullupgrade now
./rploader.sh serialgen DS3615xs
./rploader.sh identifyusb now
./rploader.sh satamap now
./rploader.sh build bromolow-7.0.1-42218
(run if custom-module -> /mnt/sdb3/auxfiles is missing)
ll /mnt. (Check the 3rd partition in usb)
sudo ln -s /mnt/sdb3/auxfiles /home/tc/custom-module
./rploader.sh clean now
./rploader.sh build bromolow-7.1.0-42661
./rploader.sh clean now; rm -rf /mnt/sdb3/auxfiles; rm -rf /home/tc/custom-module; ./rploader.sh backup now;
[DVA3221]
./rploader.sh update now
./rploader.sh fullupgrade now
./rploader.sh serialgen DVA3221
./rploader.sh identifyusb now
./rploader.sh satamap now
./rploader.sh build denverton-7.0.1-42218
(run if custom-module -> /mnt/sdb3/auxfiles is missing)
ll /mnt. (Check the 3rd partition in usb)
sudo ln -s /mnt/sdb3/auxfiles /home/tc/custom-module
./rploader.sh clean now
./rploader.sh build denverton-7.1.0-42661
./rploader.sh clean now; rm -rf /mnt/sdb3/auxfiles; rm -rf /home/tc/custom-module; ./rploader.sh backup now;
The last line doesn't get restored even if you reboot later
It is the process of organizing the folders where the pat file exists and reducing the capacity and completing the backup.
8-1.Using the bootloader (update user)
tc@box:~$ sudo poweroff
Place the 7.1 bootloader on the bottom well
In the existing 7.0.1 henol boot state, obtain the DSM 7.1.0-42661.pat file separately from the Sinology Download Center
https://www.synology.com/ko-kr/support/download
Click the Control Panel -> Update and Restore -> DSM Update -> Manual DSM Update button and proceed with the update to the prepared pat file above.
If you are asked to wait 10 minutes after the update, use the telnet connection method that appears in the NAS column by searching for the title telnet
I'll power off.
-> using putty and telnet it using user=root without password. after you type root then enter, it will goes to linux prompt.
By the way, if there are a lot of actual packages installed, it says that you have to wait 20 minutes.
Very few packages appear to wait 10 minutes.
If you don't want to let me go to the Wi-Telnet connection process, check the monitor to see if you want to power down when rebooting or when rebooting
I think you can change it quickly to enter TC Linux.
.png.50b0d36133540c283ba5be895a284d76.png)
Replace the USB with the 7.1 boot loader prepared above and proceed with the boot
You can use it. (There's nothing else I can do for you.)
If you want to update from 7.0.1 to 7.1,
Process 8-1 in the guide above, and if you're using it, boot from USB and enter Tinycore Linux again
You can start from number 3. Tynicore Linux is the third menu, so you have to switch quickly in 4 seconds.
This is a method that can be carried out without preparing one more USB memory, but the existing 7.0.1 boot loader may be erased
You can use the new functions, backuploader now and restoreloader now action
8-2.Use bootloader (new installer)
After successfully completing the build above, reboot the xpenology with USB using the command below.
tc@box:~$ sudo reboot
The settings or ext drivers that were backed up remain the same
The setting values are restored from the mydata.tgz file and remain intact at the next Tiny Core Image Build boot for modification.
(The default setting for automatic entry within 4 seconds is USB, Verbose at the top. If you don't touch it with your keyboard, it will automatically enter USB mode.)
xpenology On-Screen After PC Boots
In the case of the existing RedPill, you will be asked to find it at find.synology.com like the existing Jun loader
For this tinyCore,
Decompressing Linux... Parsing ELF... done.
Booting the kernel.
This is the message. There is a delay of 1 to 2 minutes from the IP allocation, so please wait a little bit.
In this state, browse to find.synology.com on another PC and you will find the xpenology IP.
After that, you can proceed with the installation process of the Synology DSM as you are working on the existing xpenology.
i follow this instructions of building loader for bromollow 7.1 DS3615xs
but when building, it stop with errors :
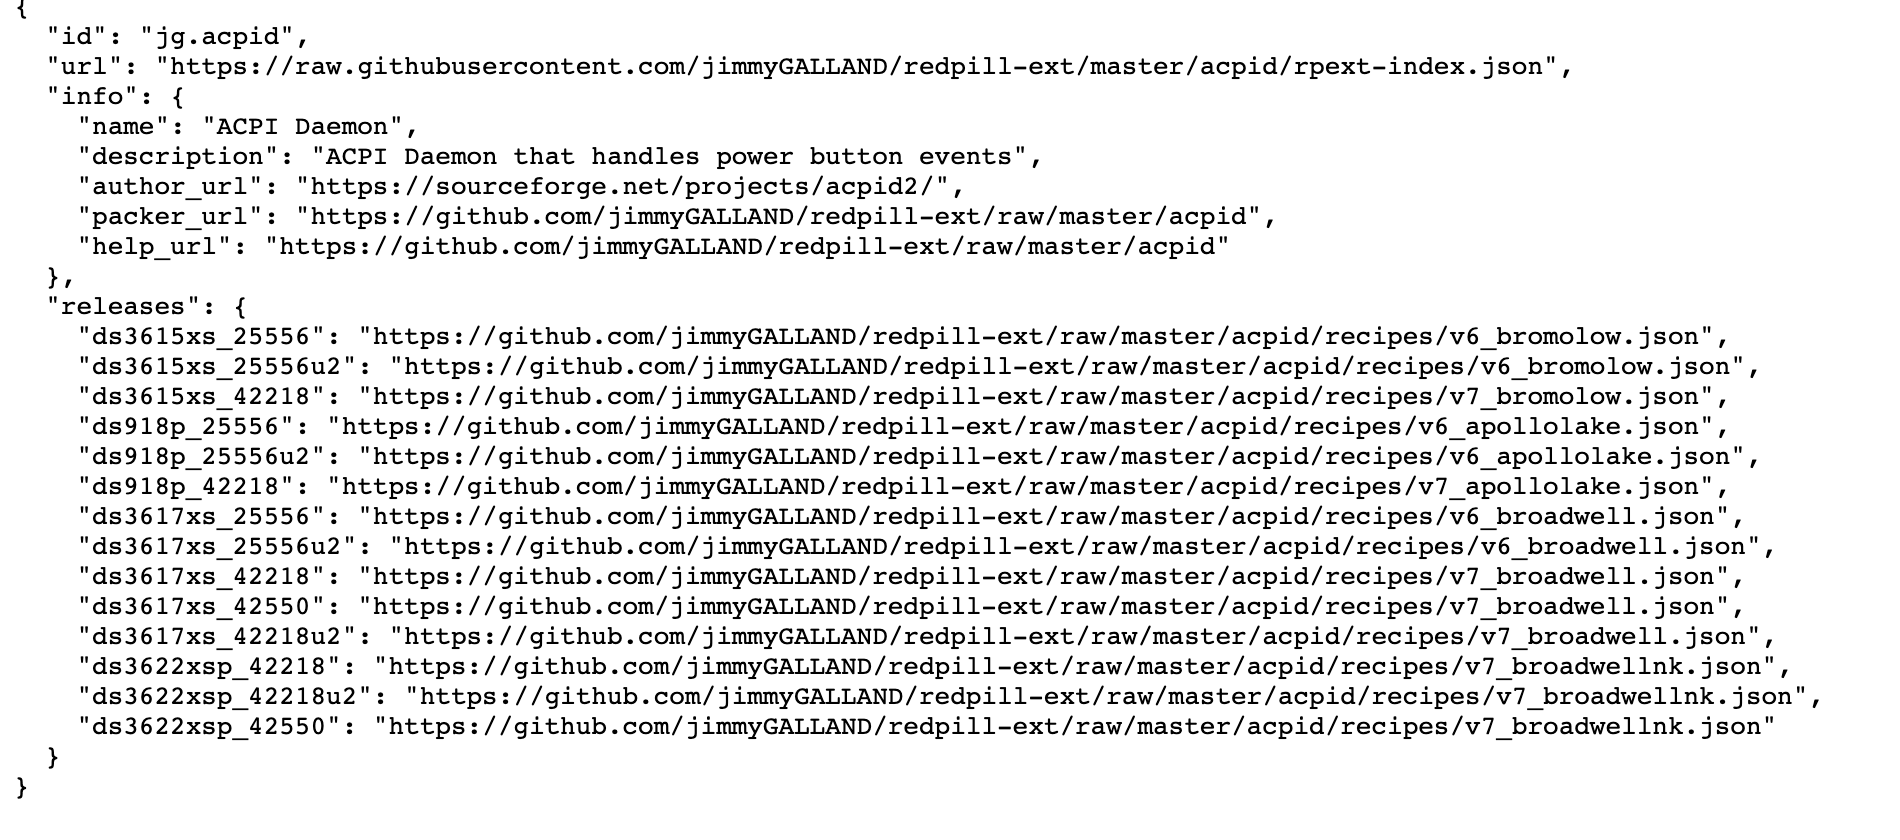
[#] Checking runtime for required tools... [OK]
[#] Updating ds3615xs_42661 platforms extensions...
[-] The extension jg.acpid was found. However, the extension index has no recipe for ds3615xs_42661 platform. It may not be
[-] supported on that platform, or author didn't updated it for that platform yet. You can try running
[-] "ext-manager.sh update" to refresh indexes for all extensions manually. Below are the currently known information about
[-] the extension stored locally:
[#] ========================================== jg.acpid ==========================================
[#] Extension name: ACPI Daemon
[#] Description: ACPI Daemon that handles power button events
[#] To get help visit: https://github.com/jimmyGALLAND/redpill-ext/raw/master/acpid
[#] Extension preparer/packer: https://github.com/jimmyGALLAND/redpill-ext/raw/master/acpid
[#] Software author: https://sourceforge.net/projects/acpid2/
[#] Update URL: https://raw.githubusercontent.com/jimmyGALLAND/redpill-ext/master/acpid/rpext-index.json
[#] Platforms supported: ds3617xs_25556u2 ds3617xs_42218 ds3615xs_25556u2 ds3617xs_42550 ds3617xs_25556 ds918p_25556 ds3622xsp_42218 ds3622xsp_42218u2 ds3617xs_42218u2 ds3622xsp_42550 ds3615xs_25556 ds918p_42218 ds918p_25556u2 ds3615xs_42218
[#] =======================================================================================


[-] Failed to update recipe for jg.acpid extension for platform ds3615xs_42661. The script will terminate as you do not
[-] have previously downloaded recipe which can be used if download fails. Try again later. If problem
[-] persists contact the extension packer for support (displayed below)
[#] ========================================== jg.acpid ==========================================
[#] Extension name: ACPI Daemon
[#] Description: ACPI Daemon that handles power button events
[#] To get help visit: https://github.com/jimmyGALLAND/redpill-ext/raw/master/acpid
[#] Extension preparer/packer: https://github.com/jimmyGALLAND/redpill-ext/raw/master/acpid
[#] Software author: https://sourceforge.net/projects/acpid2/
[#] Update URL: https://raw.githubusercontent.com/jimmyGALLAND/redpill-ext/master/acpid/rpext-index.json
[#] Platforms supported: ds3617xs_25556u2 ds3617xs_42218 ds3615xs_25556u2 ds3617xs_42550 ds3617xs_25556 ds918p_25556 ds3622xsp_42218 ds3622xsp_42218u2 ds3617xs_42218u2 ds3622xsp_42550 ds3615xs_25556 ds918p_42218 ds918p_25556u2 ds3615xs_42218
[#] =======================================================================================

[!] Cannot continue due to previous errors (see above)

*** Process will exit ***
[!] Failed to update all extensions for ds3615xs_42661 platform - see errors above

*** Process will exit ***
FAILED : Loader creation failed check the output for any errors
what's wrong ?
-
On 3/2/2022 at 7:02 AM, uxora-com said:
It still works for me, I think it is something to do with your macvlan directly connected to the vswitch instead of a ethX interface.
Well it does not work
- posix acl does not seem to be compiled in 9p modules, even if it works it is not use by dsm which use proprietary syno_acl compile in their fs
- xattr seems to works but it's not use by dsm
- Dsm office seems to be based on synoacl (for security and share management) and cannot work without it
So there is nothing much to do about that.
HTH,
then there's no way to give permission same as synology has given on 9p mount shared as below ?
ash-4.4# ls /volume1 -ale
total 4
drwxr-xr-x   1 root                root                 386 Mar  3 09:58 .
drwxr-xr-x  22 root                root                4096 Feb 28 19:40 ..
drwxr-xr-x   1 root                root                 204 Mar  3 09:58 @appconf
drwxr-xr-x   1 root                root                 204 Mar  3 09:58 @appdata
drwxr-xr-x   1 root                root                 204 Mar  3 09:58 @apphome
drwxr-xr-x   1 root                root                 204 Mar  3 09:58 @appstore
drwxr-xr-x   1 root                root                 204 Mar  3 09:58 @apptemp
drwxrwxrwx   1 root                root                 120 Feb 28 19:20 @database
drwxrwxrwx+  1 root                root                  78 Mar  3 09:59 @eaDir
         [0] everyone::allow:rwxpdDaARWcCo:fd-- (level: 0)

drwx--x--x+  1 root                root                  34 Mar  1 18:28 homes
         [0] group:administrators:allow:rwxpdDaARWc--:fd-- (level: 0)
         [1] owner::allow:rwxpdDaARWcCo:fd-- (level: 0)
         [2] everyone::allow:--x----------:fd-- (level: 0)

d---------+  1 root                root                  12 Mar  1 18:19 music
         [0] group:administrators:allow:rwxpdDaARWc--:fd-- (level: 0)

d---------+  1 root                root                  12 Mar  3 09:59 photo
         [0] group:administrators:allow:rwxpdDaARWc--:fd-- (level: 0)

drwxr-xr-x   1 root                root                  88 Feb 28 19:41 @S2S
drwxrwxrwx   1 root                root                  12 Mar  3 09:58 surveillance
drwxr-xr-x   1 SurveillanceStation SurveillanceStation  404 Mar  3 10:01 @surveillance
drwxr-xr-x   1 root                users                 22 Mar  1 18:30 @SynoDrive
drwxr-xr-x   1 SynoFinder          SynoFinder            26 Feb 28 19:20 @SynoFinder-etc-volume
drwxr-xr-x   1 SynoFinder          SynoFinder            84 Feb 28 19:20 @SynoFinder-log
drwxr-xr-x   1 root                root                  24 Mar  1 18:22 @SynologyApplicationService
drwxrwxrwt   1 root                root                  46 Mar  3 09:59 @tmp
drwxrwxrwx   1 root                root                  62 Mar  1 18:50 @userpreference
why docker macvlan for static ip not working ? but dhcp one is working..
as i saw on the virtual switch on the QNAP nas itself, it seems the nas create 1 interface named qvs0 which has mac address same as real eth1 interface port. on qvs0 interface has ip address from the router.
you can see this figure i show you...
[~] # ifconfig docker0 Link encap:Ethernet HWaddr 8E:45:A1:9B:B6:F4 inet addr:10.100.5.1 Bcast:10.100.5.255 Mask:255.255.255.0 UP BROADCAST RUNNING MULTICAST MTU:1500 Metric:1 RX packets:1207 errors:0 dropped:0 overruns:0 frame:0 TX packets:24740 errors:0 dropped:0 overruns:0 carrier:0 collisions:0 txqueuelen:1000 RX bytes:63796 (62.3 KiB) TX bytes:6321764 (6.0 MiB) eth0 Link encap:Ethernet HWaddr 24:5E:BE:40:26:F9 UP BROADCAST MULTICAST MTU:1500 Metric:1 RX packets:0 errors:0 dropped:0 overruns:0 frame:0 TX packets:0 errors:0 dropped:0 overruns:0 carrier:0 collisions:0 txqueuelen:1000 RX bytes:0 (0.0 B) TX bytes:0 (0.0 B) Interrupt:132 eth1 Link encap:Ethernet HWaddr 24:5E:BE:40:26:FA UP BROADCAST RUNNING MULTICAST MTU:1500 Metric:1 RX packets:179478129 errors:0 dropped:19721 overruns:0 frame:0 TX packets:20858775 errors:0 dropped:0 overruns:0 carrier:0 collisions:0 txqueuelen:1000 RX bytes:179571334415 (167.2 GiB) TX bytes:6765255544 (6.2 GiB) Interrupt:133 lo Link encap:Local Loopback inet addr:127.0.0.1 Mask:255.0.0.0 UP LOOPBACK RUNNING MTU:65536 Metric:1 RX packets:6541413 errors:0 dropped:0 overruns:0 frame:0 TX packets:6541413 errors:0 dropped:0 overruns:0 carrier:0 collisions:0 txqueuelen:1000 RX bytes:2039041101 (1.8 GiB) TX bytes:2039041101 (1.8 GiB) lxcbr0 Link encap:Ethernet HWaddr B6:B1:EB:13:DE:0F inet addr:10.100.3.1 Bcast:10.100.3.255 Mask:255.255.255.0 UP BROADCAST RUNNING MULTICAST MTU:1500 Metric:1 RX packets:6369404 errors:0 dropped:0 overruns:0 frame:0 TX packets:105214576 errors:0 dropped:0 overruns:0 carrier:0 collisions:0 txqueuelen:1000 RX bytes:1510851333 (1.4 GiB) TX bytes:99263118332 (92.4 GiB) lxdbr0 Link encap:Ethernet HWaddr BA:FA:9B:C6:A4:6E inet addr:10.100.7.1 Bcast:10.100.7.255 Mask:255.255.255.0 UP BROADCAST RUNNING MULTICAST MTU:1500 Metric:1 RX packets:0 errors:0 dropped:0 overruns:0 frame:0 TX packets:21915 errors:0 dropped:0 overruns:0 carrier:0 collisions:0 txqueuelen:1000 RX bytes:0 (0.0 B) TX bytes:2971302 (2.8 MiB) qvs0 Link encap:Ethernet HWaddr 24:5E:BE:40:26:FA inet addr:192.168.10.2 Bcast:192.168.10.255 Mask:255.255.255.0 inet6 addr: fe80::265e:beff:fe40:26fa/64 Scope:Link UP BROADCAST RUNNING MULTICAST MTU:1500 Metric:1 RX packets:156085163 errors:0 dropped:148 overruns:0 frame:0 TX packets:15473562 errors:0 dropped:0 overruns:0 carrier:0 collisions:0 txqueuelen:1000 RX bytes:153744465305 (143.1 GiB) TX bytes:5821617644 (5.4 GiB) veth29b1ea5 Link encap:Ethernet HWaddr B6:B1:EB:13:DE:0F UP BROADCAST RUNNING MULTICAST MTU:1500 Metric:1 RX packets:105188 errors:0 dropped:0 overruns:0 frame:0 TX packets:173221 errors:0 dropped:0 overruns:0 carrier:0 collisions:0 txqueuelen:0 RX bytes:25534182 (24.3 MiB) TX bytes:233515172 (222.6 MiB) veth608a897 Link encap:Ethernet HWaddr 8E:45:A1:9B:B6:F4 UP BROADCAST RUNNING MULTICAST MTU:1500 Metric:1 RX packets:1207 errors:0 dropped:0 overruns:0 frame:0 TX packets:24636 errors:0 dropped:0 overruns:0 carrier:0 collisions:0 txqueuelen:0 RX bytes:80694 (78.8 KiB) TX bytes:6296240 (6.0 MiB) vethgw01 Link encap:Ethernet HWaddr 42:68:85:B6:18:3F inet addr:253.253.253.253 Bcast:253.253.253.255 Mask:255.255.255.0 UP BROADCAST RUNNING NOARP MTU:1500 Metric:1 RX packets:0 errors:0 dropped:0 overruns:0 frame:0 TX packets:21423 errors:0 dropped:0 overruns:0 carrier:0 collisions:0 txqueuelen:1000 RX bytes:0 (0.0 B) TX bytes:2874483 (2.7 MiB) vnet0 Link encap:Ethernet HWaddr FE:54:00:B7:F2:3D UP BROADCAST RUNNING MULTICAST MTU:1500 Metric:1 RX packets:267250 errors:0 dropped:0 overruns:0 frame:0 TX packets:11551350 errors:0 dropped:0 overruns:0 carrier:0 collisions:0 txqueuelen:1000 RX bytes:153308345 (146.2 MiB) TX bytes:10424552052 (9.7 GiB) -
why if i tried using fixed ip on macvlan configuration, cannot work ?
i already follow the docker run command from your github site..
can u pls try it again ?


TinyCore RedPill Loader (TCRP)
in Loaders
Posted
yes.. i build the loader inside VM like Proxmox.
I don't care which model, as long as it success installing DSM 7.1.
How about DS3615xs ? why the installation process failed ?