

mandreto10
-
Posts
19 -
Joined
-
Last visited
Posts posted by mandreto10
-
-
On 1/21/2019 at 8:53 AM, Hostilian said:
It's a rough guide to try to help.. I don't need my efforts to help others 'marked' thank you very much.. DH...
If you want to do another, more complete, guide than the one I put together in about 30 minutes - 5 Months ago - feel free to do so in another thread!
Muddying the waters with guides for other operating systems doesn't really help AND the ('missing') info is already in many locations on this very helpful site....
You could have, instead, added the links and maybe the other little guides (freely available in many other articles here that are dedicated to those very topics) that I so naughtily missed in my 30 minute effort to put something down on 'paper' - but no, you went down another route..
An excellent guide can be found here: https://xpenology.com/forum/topic/13061-tutorial-install-dsm-62-on-esxi-67/
An intelligent and simplified introduction for any novice can be found here (written by munchgeil1): https://xpenology.com/forum/topic/14019-esxi-65-ds918-jun-104-cannot-create-vm-error-scsi03/?tab=comments#comment-104964
-
12 hours ago, munchgeil1 said:
Hey mandreto10...
Hi! You sound very frustrieted! Let me help you. There is lot of information on this forum....It can be confusing for new person.
Here is a very good guide: https://xpenology.com/forum/topic/13061-tutorial-install-dsm-62-on-esxi-67/
This guide will work on ESXI 6.5 and 6.7. Make sure you read through the entire post, as there are few important modifications. Specifically changes to Network Card...This link contains all files you need in one place. It has screen shots. The fourth link seems broken. Don't worry about that file. For now, don't go to any other forum site, as it will confuse you.
Can you try this and see if it works? If you have any problems, then just write what it is. There is usually a solution.
Now to your general questions:
For install you must have 3 files:
-
File 1 (aka Jun's bootloader, .IMG file):
-
Jun's loader is one file in .IMG format. The name is often "bootloader.IMG". This file tricks Synology (DSM) into thinking that you are installing DSM on a Synology device, versus your own.This is the most important file to download on this forum! This is the "hack".
-
You MUST edit this IMG file with OSFMount image mounter (Win, free). If you don't have Windows, download and install Windows 10 into VM on ESXI. You can use evaluation version for free.
-
You need to edit IMG file to set the correct Serial Number (SN) and MAC address.
- SN gives your a Synology a unique identity, and allows you to create an account with Synology, so that you can access your Synology drive over internet. It seems you are well-versed in porting. You can ignore SN. You are right, you will have better speeds and privacy with your own VPN.
- MAC allows you to find synology drive on your own network, when you type http://http://find.synology.com/ in your browser. You can manually set MAC address (any address really), but you must insure you specify the same address in your VM setting under "Network Setting". If your http://http://find.synology.com doesn not find synology, this is number one reason why this happens.
- Don't worry about PID and VID.
-
You need to edit IMG file to set the correct Serial Number (SN) and MAC address.
- After you edit this file save the changes.
-
You MUST edit this IMG file with OSFMount image mounter (Win, free). If you don't have Windows, download and install Windows 10 into VM on ESXI. You can use evaluation version for free.
-
Jun's loader is one file in .IMG format. The name is often "bootloader.IMG". This file tricks Synology (DSM) into thinking that you are installing DSM on a Synology device, versus your own.This is the most important file to download on this forum! This is the "hack".
-
File 2 (file .VMDK)
- This file is what is loads VM and enables to you start installation process. This file brings that black terminal screen when you installed other OS.
- You can use VMDK file from above link or generate your own using StartWind V2V Image converter (Win, free) from the IMG file you edited above. It doesn't matter.
-
File 3 (PAT file)
- This file contains synology DSM OS. This file has same perpose to .ISO files used for Windows, Ubunti and other installs!
- This file is found on sYnology website. For exmaple for the installation link I gave you, the PAT file will be located here: https://www.synology.com/en-global/support/download/DS3615xs#utilities
- You probably never saw PAT file, because Synology devices install DSM over internet or come pre-installed with it. PAT file is used in cases where your Synology device crashes or something bad happens to it and you have to reinstall the entire DSM. Just like when you have to reinstall your Windows OS.
Now to ESXI!...
-
The process for installing DSM is different from that for other OS, but it's very easy.
-
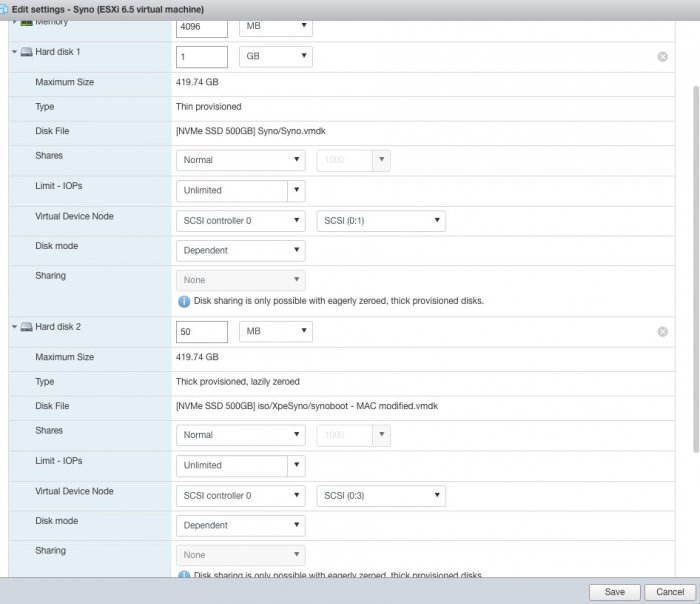
You must use one Harddrive that points to VMDK file
- this is almost the same as using CD/DVD drive and pointing it to .ISO image, like you did for Windows installation.
-
You must use the second hard drive that will have actual DSM installed, and all your volumes. You can set minimum 16GB and expand as you wish.
- You can add any number of other drives later (after you install Synology), for additional volumes.
-
For each harddrive you add, you must add a separate SATA controller. There must be one added SATA controller for each harddrive you add. SATA controller is something that helps move data from your harddrive through Virtual Machine into Synology and back.
- Some users use IDE. I suggest you use SATA.
- Don't worry about details on SATA, IDE, ISCS...etc.
-
You must use one Harddrive that points to VMDK file
-
Note:
- There is no .ISO file for Xpenology/Synology....you only work with .IMG, VMDK and PAT files.
- SATA drives you specify in VM, will not slow down your NVMe. Your NVMe will work as fast as it should.
-
When booting you may have to choose to boot in Legacy mode versus UEFI mode. Note that this is boot for Virtual MAchine, and not boot for your ESXI server (bare metal boot). In other words, don't worry that Legacy booting in VM will break your ESXI server. (And I hope you boot your ESXI in UEFI mode :-)...
- Bottom line, lot of things in VM (but not all) will just create some fog or glue to make your Synology work with your hardware, so don't go to much into details.
I hope this helps.
Ask questions if you have.
THANK YOU SO MUCH!
You made the maze of confusing information simple and easy to understand and follow. I needed OS up and running, not a degree in computer science.
Your recommendations worked flawlessly!
You must be incredibly intelligent! Not everyone has the ability to simplify like you just did.
THANK YOU!!!!!
-
File 1 (aka Jun's bootloader, .IMG file):
-
4 hours ago, luchuma said:
its all there
#menuentry "DS3615xs 6.2 Baremetal $VERSION" --class os {
#        set img=
#        savedefault
#        loadlinux 3615 usb
#        loadinitrd
#        showtips
#}
#
#menuentry "DS3615xs 6.2 Baremetal $VERSION Reinstall" --class os {
#        set img=
#        loadlinux 3615 usb mfg
#        loadinitrd
#        showtips
#}
#
#menuentry "DS3615xs 6.2 Baremetal AMD $VERSION" --class os {
#        set img=
#        set zImage=bzImage
#        savedefault
#        loadlinux 3615 usb
#        loadinitrd
#        showtips
#}

menuentry "DS3615xs 6.2 VMWare/ESXI $VERSION" --class os {
        set img=
        savedefault
        loadlinux 3615 sata
        loadinitrd
        showtips
}
you only need menuentry for esxi
other lines has # at front so they are hidden
Boot options: Makes sense. Thanks.
SN/MAC: How did you know to set that up? Did you just pick any? From where?
-
1 hour ago, Hostilian said:
You obviously don't know the difference between VMWare Workstation (that this quick guide was written for) and ESXi - which was the two guides you linked...
Maybe your guides should be linked in an ESXi tutorial, rather than Workstation??
I quoted those guides because because I thought they were more complete. I though your guide is incomplete because you did not:
-
Provide hyperlinks to the files you mentioned.
- "Download Jun's DS3617 .img file - 1.03b."
-
download from where? What is the explicit hyperlink you used to get the file?
- Here is an example of a complete one: https://xpenology.com/forum/topic/13061-tutorial-install-dsm-62-on-esxi-67/
- There are dozens of sources of files on this forum, some link to Mega server, some somewhere else.
-
Provide changes to IMG file.
- VID, PID, MAC, SN, Boot loading options (commenting out #)
- It's unclear whether you omitted those changes on purpose or due to neglect.
-
State which option to choose when converting to VMDK. There are 4 options:
- VMWare Workstation growable image
- VMWare Workstation pre-allocated image
- Stream-optimized image
- ESXi Server image
-
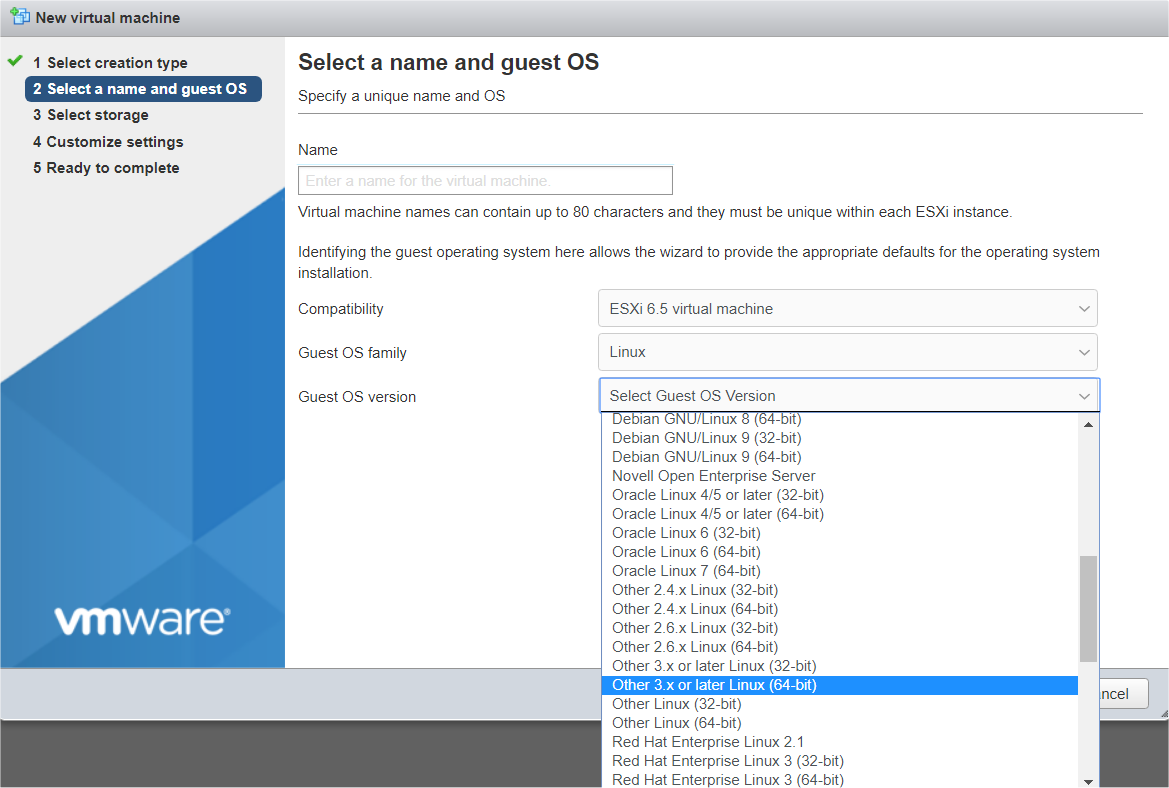
VM choice is awkward:
- " - Guest OS = Linux. Version = Other linux 4.x or later - 64bit."
-
I have 6.5 version, and choices are
- Other linux 3.x or later - 64 bit
- Other linux - 64 bit
-
Provide hyperlinks to the files you mentioned.
-
12 hours ago, flyride said:
Maybe some baseline perspective would be helpful.
Synology sells hardware that runs open-source software on it which they brand as DSM. They would prefer that nobody uses this software outside of their paid hardware platform, so they put in failsafe checks to disable the software when their hardware is not detected. XPEnology intends to defeat those failsafe checks and allow DSM to run on other hardware. But the capabilities of DSM are defined by Synology (NVMe support, for example), and we can extend some of those capabilities by leveraging the hardware options available to us (using ESXi to map NVMe drives into DSM, for example).
I currently own Synology, with my own porting set up (their list of routers isn't up to date), and my own access from internet (less dependent on Syno account).
QuoteMost who want to DSM using XPEnology have a base understanding of what DSM is and does, and may understand its limitations, having used it on actual Synology hardware before, so the above statements are neither controversial or offensive.
I think I do have basic understanding of DSM after owning it for several years.
I do not have basic understanding of what Xpenology does, because there is not coherent guide and introduction. It also doesn't help that when someone mentions a reference, they either don't provide the link (hyperlink), or the hyperlink is invalid.
IMO, the problem is not my lack of understanding Synology, but lack of organization of basic information on this site. The best product is worthless, if user guide is not user-friendly.
Ater 20+ hours it is unclear to me:
- Exactly WHAT is Jun's loader? Is it:
- IMG file
- VMDK file
- IMG+ VMDK file
- IMG + VMDK + some other patch files?
The answer to that questions should be straight forward and mere seconds. This is important, because some guides show reference to IMG file only, while others to both IMG and VMDK files. It's important for users to know WHAT they are looking for, and when they download it to KNOW whether it is complete (set of files) or not.
That should have been stated here:
and it isn't. It says what bootloader DOES, but not what it IS in terms of ACTUAL FILES that user need to download from Xpenology.com!
It should have stated: "Bootloader is ONE/A SET of files" and "here is an example of a Bootlader file name", "and "here is where you find all bootloaders: hyperlink"
What is the AUTHORITATIVE SOURCE for Jun's loader?
In other words, where is ONE single page that lists them. Is it this:
- Does the user generate VMDK from IMG, or must VDMK be downloaded from this website (and from where)?
- I've seen some users providing reference to already pre-made VMDK, while others state one must generate their own VMDK using image converter.
- Exactly WHAT and WHY needs to be modified in .IMG image file? (Or maybe IMG and VMDK file). What happens if it's NOT modified
- MAC (I assume without this Synology cannot be detected on network)
- PID, VID?
-
SN
- Where are SN generators?
- Here:
- Here: https://xpenogen.github.io/serial_generator/index.html
- Here: https://github.com/brianpow/synology-sn-mac-generator/blob/master/Synology NAS Serial Number and MAC address Generator for Mobile Browser.htm
- or here: https://idmedia.no/wp-content/uploads/2015/07/Synology-mod-new.xlsm
- If it's somehwere on Xpenology forum, where?
It should take mere seconds for knowledgable person to create a table, with first column listing changes required, second stating how to do it, third, why it's needed, and foruth what happens if these changes are not made. This needs to be done ONCE ONLY!
This is vaguely and incompletely explained here:
Personally, I could not care less for Syno services (nor for their support, who damaged the volume on my harddrive during one of their "support" sessions, when attempting to clean up the mess that iDrive created). I don't trust any of my data running through their service, so I set up my own service. With personal VPN, DDNS and correct ports configured, I can access my NAS from anywhere, without Syno "service" (if you insist calling it a "service").
- Exactly how to set up Jun's Loader in ESXI?
- The way EVERY one of these OSs are installed in ESXI , aside from USB, (Ubuntu, Kubuntu, Mac OS, Windows 11, Linux Oracle) is by:
- Uploading ISO image (ISO!, not VMDK or IMG) to data storage
- Creating VM
- Adding CD/DVD drive
- pointing CD/DVD drive to ISO file
- Adding Hard drive, where system and files will be installed - it's THAT EASY!
It's not only easy, but it's logical and takes seconds to learn, BECAUSE(!) it replicates the process all of us have done at least once in our lives. Majority has installed an OS either from CD/DVD (up until 5 or so years ago) or from USB drive (more recently).
If Xpenology does it differently, it's logical to point that out and provide detailed, explicit and explanatory guide on how to do it, with image shots. This can be done ONCE only. I can't imagine this would require more than 30 minutes to do it.
What would you choose: Spend an hour creating a complete, thorough User Guide or spend hours answering newbies questions?
Xpenology does not have ISO file, but VMDK and IMG. Xpenology doesn't need CD/DVD drive to load the image, and this is nowhere stated.
It's not clear whether user needs ONE, TWO, or more Hard drives to install Synology on a PC that has one HDD/SDD; let alone when more HDDs are involved.
It's not clear whether harddrives for Xpenology/Synology need to be thin or thick provisioned. I've seen guides where users SWORE that only one option should be choosen (the opposite, of course).
QuoteMany who deploy DSM using XPEnology for the first time do so on baremetal (without virtualization) because the behavior of the system and how it relates to the hardware is closest to the experience they have had with actual Synology hardware.
ESXi adds more complexity to the installation but increases hardware options and capabilities. It's a bit easier to make functional if already familiar with a baremetal install of DSM under XPEnology, and practical knowledge of ESXi is also very helpful.
The reason I chose to instal ESXI on bare metal is exclusively because I wanted to run several OSs including pfSense.
-
12 hours ago, flyride said:
XPEnology is not an operating system. DSM is the operating system.
The SATA configuration option you are referring to is ESXi, not XPEnology, and not DSM.
Regardless of how we define things, perhaps when created your VM, you selected something other than the recommended "Other 3.x or later Linux (x64)" as the tutorial instructs.
Can you please provide reference to that tutorial? I have seen at least a dozen tutorials so far on this website.
This one doesn't have files any longer:
Did you mean this one:
or this one:
or maybe this one:
or this one:
12 hours ago, flyride said:
In any case, it does take some time to navigate the versions and information out there, since nobody is getting paid for it.
-
1 hour ago, flyride said:
DSM 6.2 on DS918 as compiled by Synology supports NVMe drives for cache only. Not for installation/boot/data, which must be SATA.
But I don't think that's the issue here, it seems that maybe you don't fully understand how devices are represented in ESXi.
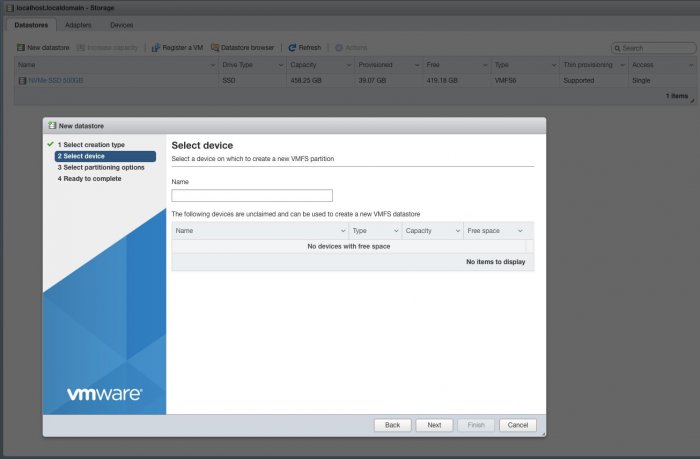
Your NVMe drive seems to be attached to ESXi as a datastore (which is fine).
Then you are trying to configure a virtual SCSI controller (which won't work with DSM 6.2).
I'm not sure if you created a virtual data disk or not but you need something to attach to the controller.
You can definitely create a virtual disk on your NVMe datastore and present it to your VM as a SATA-connected drive.
You can also create a physical RDM pointer to your NVMe drive and present it to the VM as a SATA-connected drive. But you can't use it as an ESXi datastore at the same time (you will need something else for your datastore).
In each of the above cases, you will have NVMe performance but DSM will think it's a SATA drive.
Again, I appreciate feedback.
IMO, the error is in Xpenology bootloaders, or a maze of its, often outdated, conflicting and/or incomplete user guides.
I just tried to install FreeNAS (10 minutes exercise vs almost 20+ hours of going through Xpenology forums). When I try to install FreeNAS, I can clearly see SATA controller as an option!!
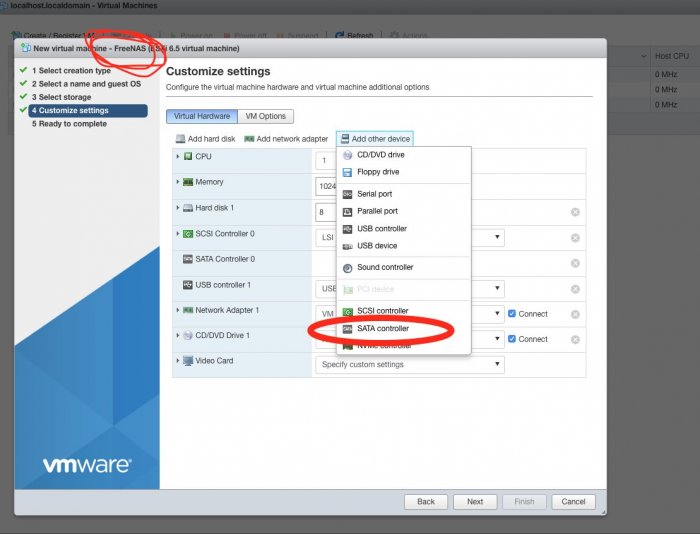
I verified that I have SATA controller as an option for EVERY of the following operating systems listed, EXCEPT for Xpenology.
Ubuntu,
Kubuntu
Mac OS
Windows 10
Linux Oracle
FreeNAS
How do you explain that?
-
44 minutes ago, flyride said:
DSM 6.2 on DS918 as compiled by Synology supports NVMe drives for cache only. Not for installation/boot/data, which must be SATA.
I appreciate the answer.
Fair enough.
IMO, this should be clearly stated somewhere on this forum, in a place titled "Hardware Requirements"! This is a limitation, given that NVMe drives are replacing SATA drives....
QuoteBut I don't think that's the issue here, it seems that maybe you don't fully understand how devices are represented in ESXi.
Correct!
QuoteYour NVMe drive seems to be attached to ESXi as a datastore (which is fine).
Correct.
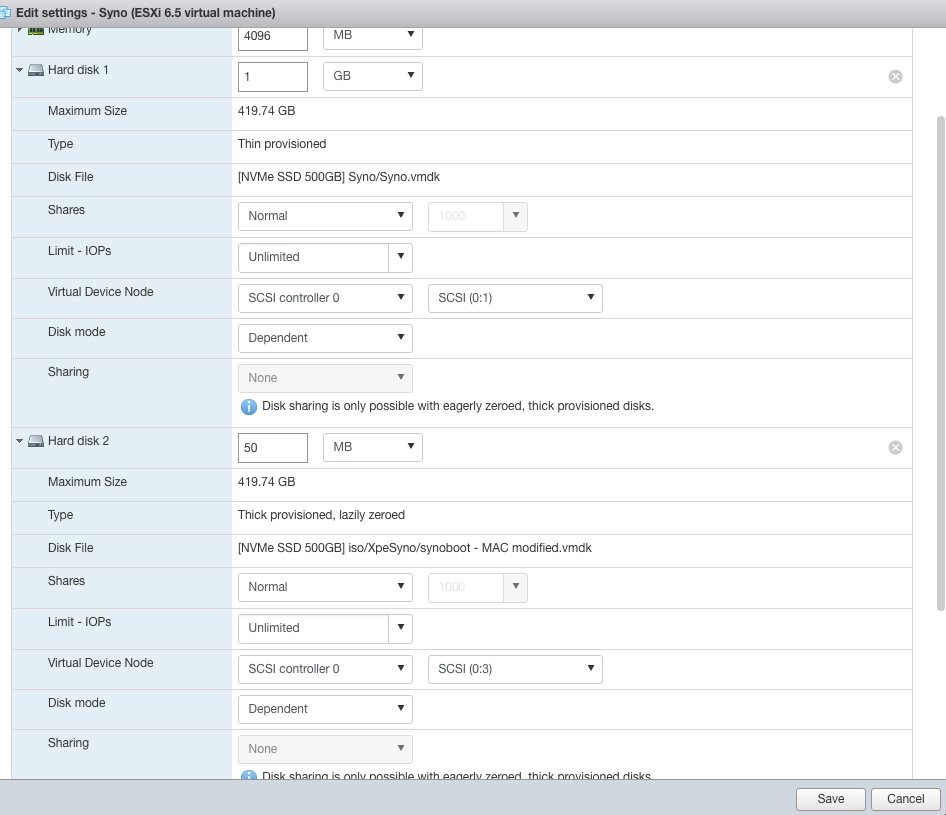
QuoteThen you are trying to configure a virtual SCSI controller (which won't work with DSM 6.2).
QuoteI'm not sure if you created a virtual data disk or not but you need something to attach to the controller.
I create Virtual Machines first, then defined within that virtual machines a virtual disk.
How is reverse possible?
QuoteYou can definitely create a virtual disk on your NVMe datastore and present it to your VM as a SATA-connected drive.
How is that done?
I always created VM first, then created virtual harddrive within a Virtual Machine.
QuoteYou can also create a physical RDM pointer to your NVMe drive and present it to the VM as a SATA-connected drive. But you can't use it as an ESXi datastore at the same time (you will need something else for your datastore).
I don't understand what RDM is.
QuoteIn each of the above cases, you will have NVMe performance but DSM will think it's a SATA drive.
That sounds good, so how is virtual drive created, without first creating VM? There is no SSD drive listed when I try to do that.
-
4 minutes ago, flyride said:
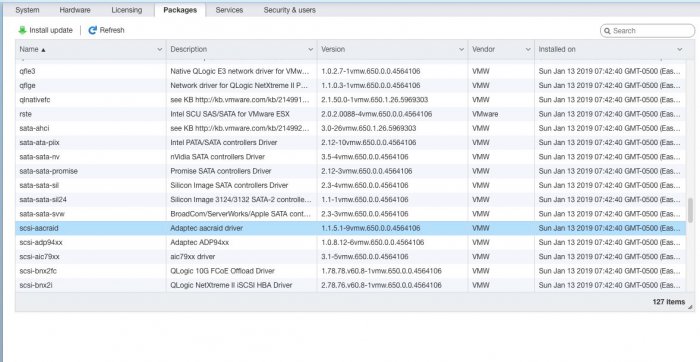
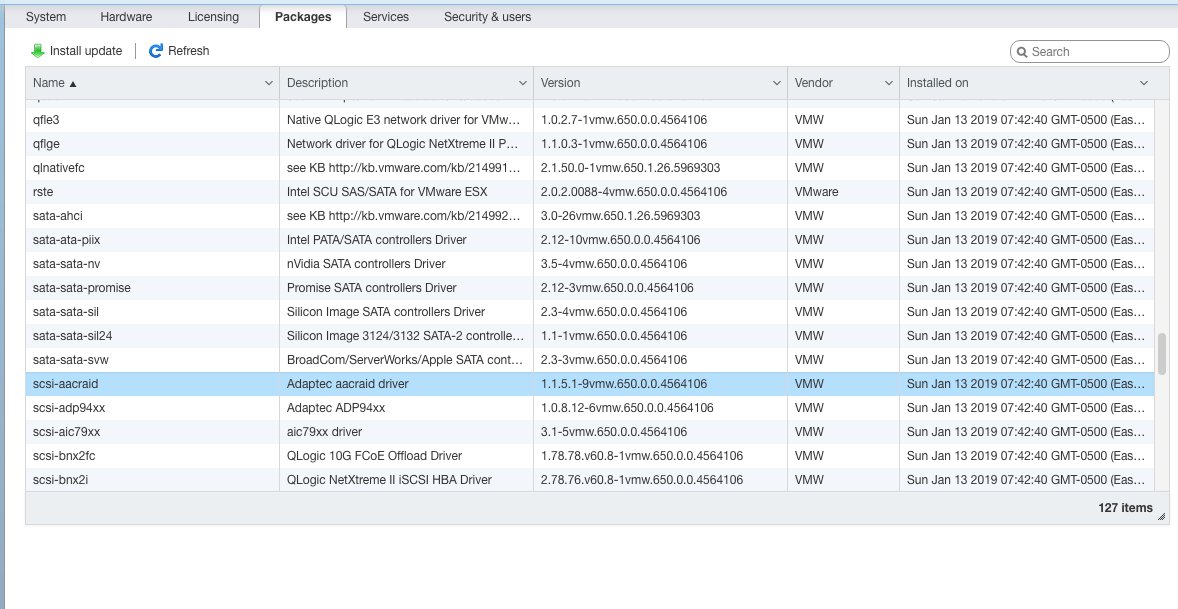
Patchlevel? Unsure about why you don't have it. But it is required for 6.2.x so you will need to solve it.
I see SATA driver installed. But NOTE that I have PCIE SSD (M.2) wit NVMe protocol. I do not have anything plugged into SATA drives.
This website specifically says that 918 supports NVMe, and NVME is a PCIE interface not SATA. Not so?
-
51 minutes ago, flyride said:
This is an ESXi error, nothing to do with XPEnology.
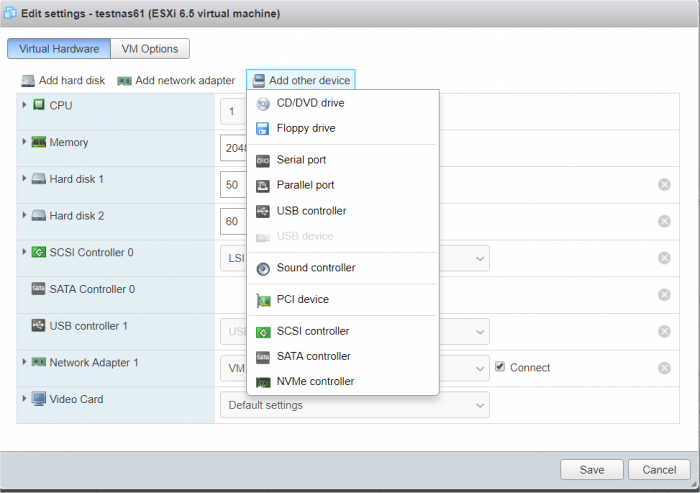
You need to use a virtual SATA controller for 1.04b bootloader not SCSI. Set up SATA Controller 0 with the bootloader as disk 0. Set up a second SATA Controller 1 with your data drive(s)
Where is SATA controller?
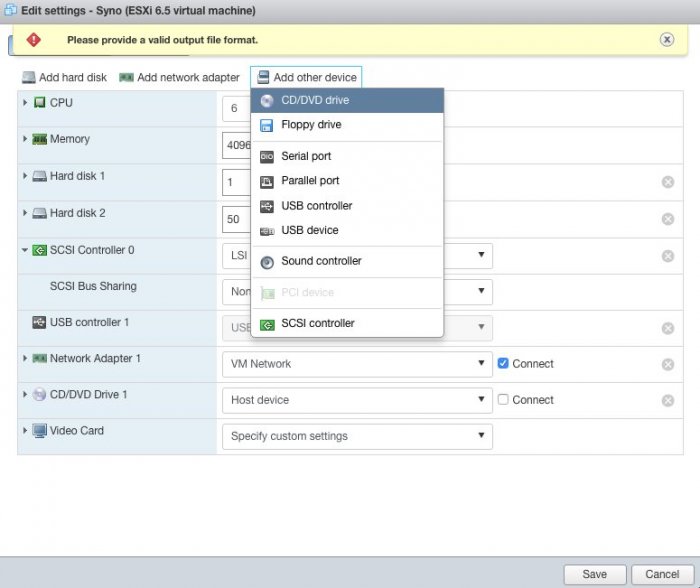

Is this what you mean? If yes, the package is already installed. Where do you set it up for Syno?

-
Does anyone know hot to get past this error? What is ISCI anyway? In previous Guest OS (Mac, Win), I never had to do anything about it.


-
Does anyone know why these errors happen?

-
"set SN and mac1 fro example 0011322CA785"
Where did you get SN from?
"mark boot option lines you dont need in esxi"
How do you determine which lines are not needed? Is there a guide?
-
2 hours ago, mandreto10 said:
I downloaded .ISO file. I changed MAC address.
Is there step by step instruction on what to do next on ESXI, and how to install Xpenology on ESXI?
Does .ISO file need to be converted to .VMDK?
When you create VM, do you add one or two HDD? Where do you put .ISO and where .VMDK file?
How do you know which PID and VID to use?
-
On 1/11/2019 at 8:24 AM, NeoID said:
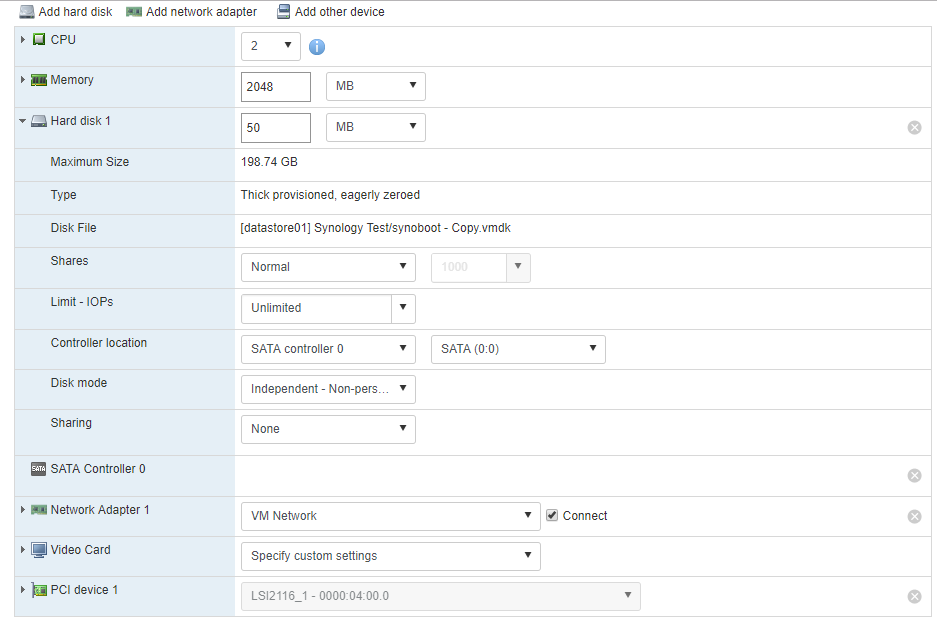
I will answer my own post as it might help others or start a at least shine some light on how to configure the sata_args parameters.
As usually I've modified grub.cfg and added my serial and mac before commenting out all menu items except the one for ESXi.When booting the image Storage Manager gave me the above setup which is far from ideal. The first one is the bootloader attached to the virtual SATA controller 0 and the other two are my first and second drive connected to my LSI HBA in pass-through mode. In order to hide the drive I added DiskIdxMap=1F to the sata_args. This pushed the bootloader out of the 16 disk boundary so I was left with the other two data drives. In order to move them to the beginning of the slots I also added SasIdxMap=0xfffffffe. I've testet multiple values and decreased the value one by one until all drives aligned correctly. The reason for why you see 16 drives is because maxdrives in /etc.defaults/synoinfo.conf was set to 16. Not exactly sure why it is set to that value and not 4 or 12, but maybe it's changed based on your hardware/sata ports and the fact that my HBA has 16 drives? No idea about that last part, but it seems to work as intended.
set sata_args='DiskIdxMap=1F SasIdxMap=0xfffffffe'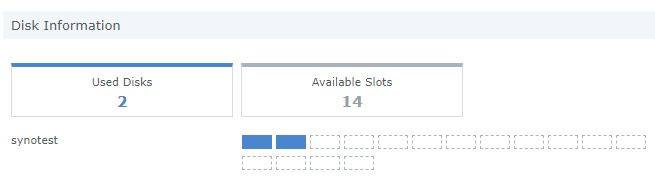
Hi,
When you say"As usually I've modified grub.cfg and added my serial and mac before commenting out all menu items except the one for ESXi."
Where did you find instructions on what to comment out, and which serial (I assume serial number of Synology device, not serial port?), to provide?
Why do you need to comment out anything in .cfg file?
Please clarify.
-
I downloaded .ISO file. I changed MAC address.
Is there step by step instruction on what to do next on ESXI, and how to install Xpenology on ESXI?
Does .ISO file need to be converted to .VMDK?
When you create VM, do you add one or two HDD? Where do you put .ISO and where .VMDK file?
-
On 8/12/2018 at 11:19 AM, Hostilian said:
Hi all
I just spent 20 minutes testing this in VMWare Workstation 14. Worked fine!
")
Process probably isn't that different from ESXi - and you can always move the box into ESXi if you wanted to..Step by step.. Sorry, didn't do any pictures, but if you know your way around Vmware, it won't be an issue..
Process!
Download Jun's DS3617 .img file - 1.03b.
Convert the img file to VMDK (vmware disk) using Starwind v2v image converter (free program).Create the new Synology VM..
note.. Move the vmdk file, created earlier, into the new VM's folder.
- Create the new VM you want to use for Synology.. Hardware compatibility ESXi 6.5 (so you can move it around).
- Guest OS = Linux. Version = Other linux 4.x or later - 64bit.
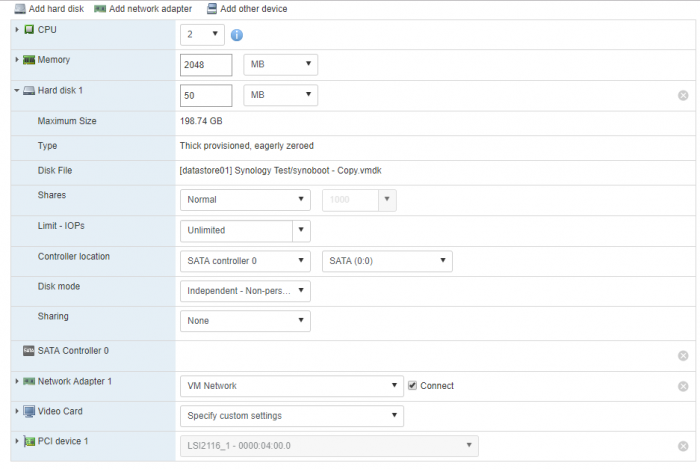
- Add a new SATA hard disk and opt to use an existing virtual disk. Use the VMDK created above as it's source.
- Create 2x SCSI disks (your main Syno disks) of whichever size you need.
- Remove soundcard, USB drives and add serial port. You probably won't need a CDRom drive either.Edit the VM's settings!
- Ensure that 'BIOS' is the boot method (not UEFI) - see Advanced section on Options tab. *UEFI might work - didn't test it..Start the VM and open the BIOS settings - or else you'll find it will try to boot to the network..
- Edit the VM's BIOS - by hitting escape when starting it - and change the boot order to ensure the SATA drive is first in the boot order. Not SCSI.. Not network. Only the SATA drive first!That's it configured, now to install DSM.. You can follow the standard procedure for this..
- Boot the machine and scan the network for the allocated IP..
- Install the PAT file for DSM 6.2..
- Reboot, set a static IP address, update to U2 etc.Job done.. Hopefully this is of some use!
#H
This is better guide:
So is this:
-
Hi,
I narrowed down my search to ryzen 5 2600 or i-5 9600K - for home NAS and virtualization.
The two resource intesive activities will be 5G oracle database maintenance and queries + Plex + Resilio Sync...everything else (mail server, web server) is very low use.
I intend to instal ESXi on bare metal (Type 1)
What are your thoughts on these two CPU in terms of:
- Performance and temperature/cooling req.?
- Ryzen 5 2600's support for virtualization; I heard AMD is less mature for virtualization compared to Intel...is that true?
- Installation issues with ESXi and Ryzen 5 2600 (some reported purple screen of death)
Thanks.


ESXI 6.5, DS918+, Jun 1.04, - Cannot create VM - ERROR "SCSI0:3"
in DSM 6.x
Posted · Edited by mandreto10
Thank you for the feedback.
I asked simple and specific questions, and I am thankful to the one forum user who stepped in to provide simple answers, and to the one who wrote a simple but useful guide. I made commends very explicit. Many users stated that they spent hours trying to make it work, because guides were incomplete.
I hope you have a wonderful day.