
cpresco
-
Posts
17 -
Joined
-
Last visited
-
Days Won
1
Posts posted by cpresco
-
-
2 hours ago, oswaldini said:
I bought used H370M-ITX, i5-8400 and 16GB RAM for €158 ($170). I hunted for this motherboard because it has 2x LAN and 6x SATA. I'm getting rid of my Dell 7010 with a Dell Perc H310. I'm on a tight budget so I'll probably order 3x WD Red Plus 4TB drives, the old two WD Red 2TB will be left for non-essential data.
You can use the usb serial port to leave the PCIe slot empty. Here I found drivers for DSM: https://github.com/robertklep/dsm7-usb-serial-drivers
For my needs I don't need additional 2.5Gb or 10Gb NIC, it will aggregate 2x1Gb NIC. I'll probably add a serial port soon.
The cable for the serial connection on my Lantronix Spider KVM requires a 9pin serial port and I have tried a 9pin serial to USB converter but wasn't able to get any output from that configuration. The driver you reference was likely the missing component and is likely an excellent candidate to be added to default ARPL/TCRP installs.
I believe you'll be happy with the H370M-ITX, i5-8400 and 16GB RAM, I would have migrated to a similar configuration (H370M-ITX, i5-9400t and 16GB RAM) if I hadn't found the IMB-1211-D.
-
11 hours ago, oswaldini said:
Hi, I want to buy H370M-ITX/ac. This motherboard has two network cards: Intel I219V and I211AT - will both NICs work? The information I found are not unequivocal.
I have an Asrock H370M-ITX/ac and was considering migrating from the Jetway NF9J-Q87 I'm currently using. I last tested with ARPL 1.09 using a spare USB stick and spare hard drives and recall seeing that both the i219v and i211at were available in DSM. The WiFi NIC was not available (I believe that is to be expected). The reason I have not migrated to the Asrock H370M-ITX/ac is because the Asrock H370M-ITX/ac doesn't have onboard serial ports(which in my opinion are essential for troubleshooting) but I was able to add a serial port via a PCIe card in the single available PCIe slot on the Asrock H370M-ITX/ac.
I have since decided on migrating to an Asrock IMB-1211-D which has onboard serial ports which leaves the PCIe slot available for a future upgrade like a 2.5Gb NIC.
Additionally I'd also highly recommend using a Lantronix Spider KVM with motherboards that don't have out-of-band management port(HP iLO or Dell iDrac are examples). The Lantronix Spider KVM also provides a serial connection that is accessible via SSH.
-
 1
1
-
-
38 minutes ago, idaanx said:
Could you be a bit more specific, what is the stock governor in your case?
This thread could be relevant to this discussion about governors in Xpenology/TCRP/ARPL.
-
1
-
-
1 minute ago, nemesis122 said:
like this ?
Yes. I have the User field set as root on the General tab with a similar scheduled task.
-
 1
1
-
-
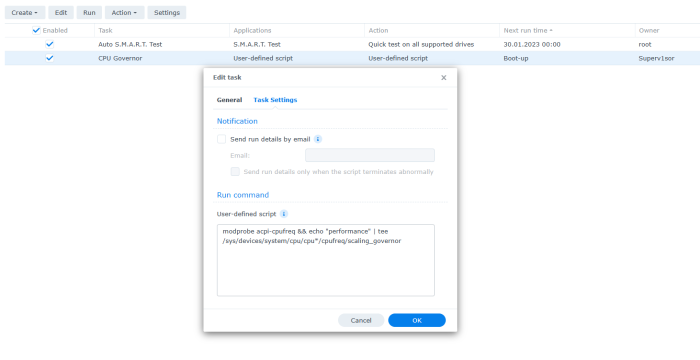
6 minutes ago, nemesis122 said:
The Problem is when i set this command after a reboot or when the server was switched off you have to set again ...
modprobe acpi-cpufreq && echo "performance" | tee /sys/devices/system/cpu/cpu*/cpufreq/scaling_governorYou could try setting that with a Boot-up User-defined script in Control Panel/Task Scheduler.
-
1
-
-
3 hours ago, AuxXxilium said:
You know that the cpufreq gov "performance" is setting your CPU to always operate at maximum frequency?
5 minutes ago, idaanx said:This is false but I just noticed the 3615xs does indeed not scale down, this might be because of the mperf kernel module or old kernel, not sure...
But I have previously successfully tested the freq. scaling on the 920+ (or 918+ can't remember) and just did it again on the 3622xs.
On DSM 7 and these models (and probably the others) there are only 3 governors to choose from, performance is the default set by Synology too.
Performance: scales up and down as needed
Powersave: stays looked in the lowest frequency
Userspace: can be set to a specific upper frequency and also scales down
As you can see /proc/cpuinfo doesn't show realtime results, which is also why a lot of people think frequency scaling and turbo boosting is not working even on a real Synology.
Per https://www.kernel.org/doc/Documentation/cpu-freq/governors.txt
2.1 Performance ----- The CPUfreq governor "performance" sets the CPU statically to the highest frequency within the borders of scaling_min_freq and scaling_max_freq.
Per https://wiki.archlinux.org/title/CPU_frequency_scaling#Scaling_governors
Governor Description
performance Run the CPU at the maximum frequency, obtained from /sys/devices/system/cpu/cpuX/cpufreq/scaling_max_freq.
Per https://documentation.suse.com/sled/15-SP3/html/SLED-all/cha-tuning-power.html
Performance governor
The CPU frequency is statically set to the highest possible for maximum performance. Consequently, saving power is not the focus of this governor.
Per https://wiki.gentoo.org/wiki/Power_management/Processor
Option Module Supported Processors Note
'performance' governor cpufreq_performance Sets the frequency statically to the highest available CPU frequency. For Intel core processors, this should be selected as default.
-
1
-
-
13 minutes ago, fbelavenuto said:
Guys, I've been missing lately but it's due to the rush at work and personal life, I didn't abandon it, I just don't have time, ok?
Understood and the status update is appreciated.
-
14 minutes ago, fbelavenuto said:
You're not wrong, I did a wrong thing to take advantage of the same release number, that's all.
The most correct would be to have me launched with another number (in this case 8 )
Your efforts in creating ARPL and responsiveness to issues that are being reported are impressive and appreciated.
-
1
-
3
-
-
2 hours ago, Brunox said:
You can't downgrade from 7.0.1-42218U3 to 7.0.1-42218! I don't think TC supports the U3 (but it's not necessary either) If I were you, I would first update to DS918 7.1.0-42621 and/or 7.1.0-42661, and only then create a new loader for DS3622-7.1.0-42661, the migration to DS3622 then takes place automatically with the first Boot the newly created loader!
Don't forget to back up your HDD data before!!!
I believe in an earlier post Peter Suh recommended migrating an exiting DS918+/7.0.1-42218 to DS3622xs+/7.0.1-42218 before upgrading to 7.1.0-42661.
I'm going to try these steps on spare hardware with DS918+/7.0.1-42218 that is similar to my in-use DS918+/7.0.1-42218 system.
Data backup is #1 on the list of steps before doing this on my in-use DS918+/7.0.1-42218 system.
")
Brunox, your reply is appreciated.
I'd be interested to know/hear anyone's experience with migrating an existing DS918+/7.0.1-42218 to DS3622xs+/7.0.1-42218.
-
21 hours ago, cpresco said:
@anyone
I'm considering migrating from DS918+ to DS3622xs+ for various reasons and recommendations I've seen in this thread.
DSM is currently at 7.0.1-42218U3. TCRP is 0.4.5. Hardware is in my sig.
Are these the correct steps for migrating an existing DS918+/7.0.1-42218U3 to DS3622xs+/7.0.1-42218U3?
1. Backup all data
2. Create a new USB loader with TCRP 0.4.6 from pocopico github
3. Remove existing USB loader and boot with new USB loader
4. Select Tiny Core Image Build during boot
5. Run following commands
./rploader.sh update now
./rploader.sh fullupgrade now
./rploader.sh clean now./rploader.sh serialgen DS3622xs+
./rploader.sh identifyusb now
./rploader.sh satamap now./rploader.sh build broadwellnk-7.0.1-42218
I'm guessing that DSM will do it's own migration when I access DSM after the reboot.
Once I have a successful migration to DS3622xs+/7.0.1-42218U3 I'll be considering the upgrade to DSM7.1 and am guessing that would be the two step update but I'm not sure what the sequence of events/commands would be for that.
Anyone?
-
@anyone
I'm considering migrating from DS918+ to DS3622xs+ for various reasons and recommendations I've seen in this thread.
DSM is currently at 7.0.1-42218U3. TCRP is 0.4.5. Hardware is in my sig.
Are these the correct steps for migrating an existing DS918+/7.0.1-42218U3 to DS3622xs+/7.0.1-42218U3?
1. Backup all data
2. Create a new USB loader with TCRP 0.4.6 from pocopico github
3. Remove existing USB loader and boot with new USB loader
4. Select Tiny Core Image Build during boot
5. Run following commands
./rploader.sh update now
./rploader.sh fullupgrade now
./rploader.sh clean now./rploader.sh serialgen DS3622xs+
./rploader.sh identifyusb now
./rploader.sh satamap now./rploader.sh build broadwellnk-7.0.1-42218
I'm guessing that DSM will do it's own migration when I access DSM after the reboot.
Once I have a successful migration to DS3622xs+/7.0.1-42218U3 I'll be considering the upgrade to DSM7.1 and am guessing that would be the two step update but I'm not sure what the sequence of events/commands would be for that.
-
- Outcome of the update: UNSUCCESSFUL
- DSM version prior update: DSM 7.0.1-42218 UPDATE 3
- Loader version and model: Tinycore-Redpill UEFI v0.4.6 DS918+
- Using custom extra.lzma: NO
- Installation type: Baremetal
- Additional comments:
Tried updating to DSM 7.1-42621 Release Candidate
Update completes and reboots successfully and Synology Assistant is able to find updated DSM through a scan but the status is Recoverable and the version reported is 7.0.1-42218 (update 3 is now missing from the version).
-
44 minutes ago, Null said:
dsm 7.1 has launched,when will our loader update?
To be clear, DSM 7.1-42621 Release Candidate has been released.
-
I have successfully migrated an existing DSM 6.2.3-25426 Update 3/Jun Loader 1.04b/DS918+ installation to DSM 7.0.1-42218 Update 3/tinycore-redpill 0.4.5/DS918+ without any issues.
DSM 7.0.1-42218 Update 3/tinycore-redpill 0.4.5/DS918+ has been running for about a week now.
-
@pocopico Using the tinycore-redpill.v0.4.4.img from github I was able to successfully build a bootable USB stick for DS918+ and install 7.0.1-42218 then upgrade to 7.0.1-42218 Update 2 without any issues.
Test/spare hardware details:
Motherboard: ASRock IMB-181-L
CPU: i5-4590T
Memory: 12GB DDR3
Hard Drives: 2 x WD30EFRX-68N32N0
A Mini PCI-E PCI Express to SATA 3.0 Dual Ports Adapter was used in the mSATA port on the IMB-181-L with both WD30EFRX-68N32N0 drives connected to the added SATA ports to test/confirm that drives attached to the Mini PCI-E PCI Express to SATA 3.0 Dual Ports Adapter SATA ports would be recognized by DSM.
Both drives were recognized by DSM without any issues and a Synology Hybrid RAID (SHR) (With data protection for 1-drive fault tolerance) storage pool was successfully created.
My current non-test/in-use system details are:
Motherboard: Jetway NF9J-Q87
CPU: i3-4130T
Memory: 16GB DDR3
Hard Drives: 4 x HUS728T8TALE6L4 (RAID type is Synology Hybrid RAID (SHR) (With data protection for 2-drive fault tolerance))
USB Boot Drive: Sandisk 32GB USB stick with Jun's loader 1.04
DSM Version: 6.2.3-25426 Update 3 for DS918+
The i5-4590T and Mini PCI-E PCI Express to SATA 3.0 Dual Ports Adapter are planned to be migrated to the Jetway NF9J-Q87 as part of the upgrade.
What would the upgrade path be with tinycore-redpill.v0.4.4 from an existing install of DSM 6.2.3-25426 Update 3 to DSM 7.0.1-42218 Update 2?
I am guessing these would be the high-level steps?
1. Backup all data to external USB drives from 4 x HUS728T8TALE6L4 storage pool.
2. Create new bootable USB stick with tinycore-redpill.v0.4.4.img
3. Boot and configure tinycore-redpill.v0.4.4 USB stick on Jetway NF9J-Q87
4. Boot configured tinycore-redpill.v0.4.4 USB stick on Jetway NF9J-Q87
5. Upgrade DSM 6.2.3-25426 Update 3 to DSM 7.0.1-42218
6. Upgrade DSM 7.0.1-42218 to DSM 7.0.1-42218 Update 2 via DSM web UI
I am guessing that step 5 will be a prompt to supply the PAT file similar to performing a new install?
Please let me know if I missed anything and your efforts to build/support tinycore are impressive/appreciated.
-
1
-
-
Thecus N2810 specs
Processor
Intel® Celeron® N3050 1.6GHz burst up to 2.16GHz Dual-Core (N2810)
Intel® Celeron® N3060 1.6GHz burst up to 2.48GHz Dual-Core (N2810 v2)System Memory
2GB DDR3
Memory expandable up to
8GB Memory Compatibility List
LAN Interface
RJ-45x2: 10/100/1000 BASE-TX Auto MDI/MDI-X
WOL supported
USB Interface
USB 3.0 host port x3 (front x1, back x2)
LED Indicator
Power LED: White
WAN/LAN1 LED: White
LAN LED: White
USB LED: Activity/Failure: White/RedHDMI Output
HDMI port (back x1)
Disk Interface
2 x SATA for internal, support SATA II / SATA III hard disk
Power Supply
48W extend power adapter
Thermal/Fan control
Thermal sensor on processor temperature
System FAN speed controlled by temperatureSystem Clock
Battery-backed up system clock
Power Management
Auto power on after shutdown due to power loss
Buttons
Power button
Buzzer
Adjustable frequency alarm
Environment
Temperature: 0°C to 40°C (Operation)
-40°C to 70°C (Non-operation)
Humidity: 0 ~ 80 % R.H. (Non-condensing)Chassis
2bays Tower Metal Chassis
Dimensions (HxWxD)146 x 102 x 213 (mm)/ 5.17 x 4.02 x 8.39 (in)
Certificates
CE/FCC/C-Tick/VCCI/BSMI
RoHS
WEEE

Automated RedPill Loader (ARPL)
in Loaders
Posted
Yeah... this doesn't look great.