

darkknigt
-
Posts
26 -
Joined
-
Last visited
Posts posted by darkknigt
-
-
18 hours ago, IG-88 said:
just be patient until romorrow, i'm working on it
i could send you a link for a test i did that will work for systems using realtek nic and ahci for storage (like most mITX boards with apollo or gemini lake)
i guess that can be misleading, for hp microserver you will need broadcom driver (onboard) and "no extra.lzma" can mean you used jun's default extra.lzma (part of the loader) or you deleted the extra.lzma completely from the loader
the driver inside jun's default extra.lzma might work with 6.2.3 in some (lot's) cases but its not that universal to copy back jun's extra.lzma, depending on the hardware it might end in success but can also fail
there will be cases where storage is not working or where network does not work (i've seen problems here with a igb.ko based network adapter, e1000e and realtek did work)
Thanks, but incredibly it has been solved using the original Jun's loader, without changing the extra.lzma
Now with Asrock J4105 and DSM 6.2.3 Works Ok with original Jun's loader
-
Has anyone managed to recover the installation? I am using an Asrock J4105 and it does not work

-
On 1/25/2019 at 11:13 AM, Olegin said:
I modified extra.lzma for 1.04b (thank's @TeleDDim for idea).
Ho to change it on working xpenology:
Admin@your_DS:~$ sudo -i
Password:
root@your_DS:~# mkdir -p /tmp/synoboot_part1
root@your_DS:~# cd /dev
root@your_DS:/dev# mount -t vfat synoboot2 /tmp/synoboot_part1
root@your_DS:/dev# ls /tmp/synoboot_part1
checksum.syno  extra2.lzma  extra.lzma  grub_cksum.syno  rd.gz  Sone.9  zImage
root@your_DS:/dev# cd /
root@your_DS:~# chown -R root:root /your_path_with_new_extra.lzma/extra.lzma
root@your_DS:~# chmod+x /your_path_with_new_extra.lzma/extra.lzma
root@your_DS:~# cp /your_path_with_new_extra.lzma/extra.lzma /tmp/synoboot_part1/
root@your_DS:~# exit
And reboot your system from webGUI.
What's new:
1. Guys say that working HDD hibernation, I can not check, because Docker and a VMM is running in my xpenology.
2. VM's now caching RAM and increased the speed of copying files for which RAM size is sufficient.
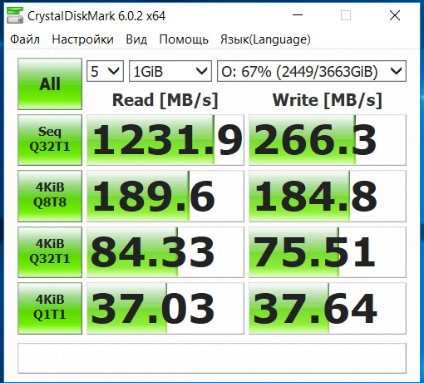
HDD:
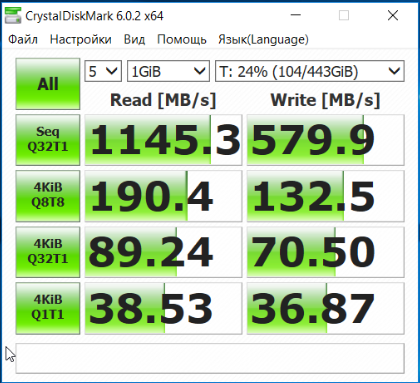
SSD:
Please try and report here 😉
Hi!
How have you modified the extra.lzma to solve Hibernation?
I use an extra.lzma to make my realtek network card work and if I put yours it stops working. Can you help me? -
On 3/9/2020 at 6:28 PM, LimitedModz said:
Hello,
i've already read some posts about hibernation but couldn't find the answer i'm searching for.
I'm intersted in HDD hibernation mode because I don't use my DS daily and it's in my living room. I can clearly hear the disks spinning while watching a movie etc.
The function in the control panel isn't working as expected, I only could find one entry where the DS stated "Internal disks woke up from hibernation." The rest of the time the disks were spinning even if the DS wasn't in use.
The only package i have installed is "Synology Drive Server: When there are any devices connected to Synology Drive server." and i'm using DDNS
- DSM version prior update: DSM 6.2.2-24922 UPDATE 5
- Loader version and model: JUN'S LOADER v1.04b - DS918+
- Using custom extra.lzma: 0.8_syno ds918+
- Installation type: BAREMETAL - ASRock J4105-ITX
In this post
is an "fix" described how to get hibernation to work.
But i'm not sure what happens after the reboot because I have already used a custom extra.lzma used to get my network card to work.
Dont work. When you change the extra.lzma and reboot, the network card disabled.
-
On 1/24/2020 at 6:06 PM, IG-88 said:
there is a driver ax88179_178a.ko in the extra.lzma, so asix ax188179 based usb nic's should work
there is also a 5GBit nic usb driver present, in my latest extra.lzma, should work with 1Gbit too
Hi!
With loader 1.04b and this adapter fails when it is updated to 6.2.2.
Is there any way to include the extra.lzma after updating?
What extra.lzma is the one I should use? I have seen that there are several
-
On 1/24/2020 at 6:06 PM, IG-88 said:
Gracias!
On 1/24/2020 at 6:06 PM, IG-88 said:there is a driver ax88179_178a.ko in the extra.lzma, so asix ax188179 based usb nic's should work
there is also a 5GBit nic usb driver present, in my latest extra.lzma, should work with 1Gbit too
-
On 12/12/2016 at 11:22 PM, trublu said:
The Plugable USB3-E1000 works with Quicknick's and Jun's loaders.
Hi, is the adapter still working well in DSM 6.2.2?
-
On 12/7/2019 at 1:04 PM, toyanucci said:
Yes, lifetime plex pass. Is there any bios setting I may need to set or something? The only thing I changed in the bios is to power back on it power is ever lost.
i dont touch any on BIOS config. Sorry.
Did you verify that hardware transcoding was active at the end of the installation?
-
6 hours ago, toyanucci said:
@darkknigt So I've done my bare metal setup and hw transcoding seems to be enabled but I am having issues with the new plex server versions. Both the beta and the newest release version from plex's site don't hw transcode, they just get stuck at the playback screen when transcoding is attempted but when I install the plex version from the package center hw transcoding works fine. Have you encountered this problem? What plex server version are you running?
I'm update plex manualy and HW transcoding work fine ¿are you Plex Pass? Plex Pass its necesary for HW transcoding
-
9 hours ago, toyanucci said:
I'll just stick with 6.2.1 for now then.
You mentioned using an Intel ethernet card...is there a recommended one I can add on that would work?
In the forum they comment that the problems in the updates with the network adapters disappear when using Intel network cards. I have not tried it, currently 6.2.1 is enough for me.
-
9 hours ago, toyanucci said:
I ordered some parts to make a build using the Asrock J4105. Just waiting on the motherboard now which comes friday. I've made the usb so just to do the setup and I should be good to go.
My question is this...is HW transcoding working with 6.2.2 with the 918+ serial number and mac addresses or should I just stick to 6.2.1? Just checking if there was any update on this.
Thanks in advance!
If you don't use Intel ethernet adapter ( mother board net card is Realtek) and update to 6.2.2 you lost HW Transcoding and SW Transcoding.
-
On 10/27/2019 at 9:04 AM, guillep84 said:
Hola,
A mi la transcodificación no me funciona, probado con varias películas y nada.
cd /dev/dri : directorio no encontrado
cat /usr/syno/etc/codec/activation.conf :{"success":true,"activated_codec":["h264_dec","h264_enc","mpeg4part2_dec","hevc_dec","aac_dec","aac_enc","ac3_dec","vc1_dec","vc1_enc"],"token":"123456789987654abc"}
Intenté con varias versiones de Video Station, 2.3.4, 2.4.1, 2.4.5, 2.4.6 y nada.
Alguna solución? Se puede volver a la versión anterior de DSM?
Gracias.
Me ha pasado lo mismo.
Placa Asrok J4105 ITX
-
1 hour ago, Manu_2020 said:
Sí instalas directamente no te arrancará el sistema
¿Oki, y para futuras actualizaciones habrá que tocar algo?
-
On 10/19/2019 at 8:24 PM, Manu_2020 said:
Actualización de DSM_DS918+_23739 a DSM_DS918+_24922 Update3
Hola a todos, como veo que hay poco material en castellano he decidido subir este tutorial para actualizar la versión de DSM_DS918+_23739 a DSM_DS918+_24922 Update3 en un NAS con placa Asrock j5005-itx.
Los méritos son de "real3x" por aportar el extra.lzma sin el cúal no sería posible, gracias. yo solo ayudo con el idioma y poco más.
ATENCIÓN, recominedo encarecidamente hacer una cópia de seguridad antes de tocar nada (NO ME RESPONSABILIZO DE NADA). Una vez hecha la cópia yo recomendaría coger un disco duro diferente que no uses y otro USB para probar primero, si funciona correctamente volver a hacer el proceso con los discos duros y USB habituales.
Vamos allá.
- Entramos en el NAS y abrimos el "Panel de Control"
- Habilitamos "SSH" en el NAS (panel de control>Terminal y SNMP>Terminal>Habilitar servicio SSH)
- Ahora vamos a Windows 10. Pulsamos las teclas "Windows + Q" y ponemos CMD (Símbolo del sistema) en el recuadro
- En la ventana del Símbolo del Sistema que se abrirá, ejecutaremos los siguientes comandos:ssh tu_usuario@tu_IP_del NAS
ssh tu_usuario@tu_IP_del NAS- Cambiar los datos por tu usuario y direción IP de tu NAS
- Introducir "yes" y pulsar Intro, después introducir la contraseña de tu usuario del NAS
- Entramos como "root" con el siguiente comando:sudo -i- introducimos de nuevo la contraseña de usuario del NAS
- Introducimos los siguientes comandos de uno en uno:
echo 1 > /proc/sys/kernel/syno_install_flag
mkdir -p /mnt/synoboot1
mkdir -p /mnt/synoboot2
mount /dev/synoboot1 /mnt/synoboot1
mount /dev/synoboot2 /mnt/synoboot2
- Ahora salimos introduciendo "exit" y otra vez "exit"
- Descargamos el archivo extra.lzma que esta adjunto abajo en el link. Gracias a "real3x" (debes estar registrado para su descarga)
- Cópialo a la carpeta "home" de tu ordenador
- En la ventana de "Simbolo de Sistema" debes estar en tu carpeta "home" (ej. C:\Users\tu_usuario>) si no estas, puedes ir con el comando:cd \Users\tu_usuario- Introduce el siguiente comando:
scp \extra.lzma tu_usuario@tu_ip:/tmp- Introduce tu contraseña y verás que se ha transferido el archivo.
- Ahora volvemos a acceder al NAS como root:
ssh tu_usuario@tu_IP_del NAS- Cambiar los datos por tu usuario y direción IP de tu NAS
- Introducir "yes" y pulsar Intro, después introducir la contraseña de tu usuario del NAS
- Entramos como "root" con el siguiente comando:
sudo -i- Introduce de nuevo la contraseña de usuario del NAS
- Ahora borraremos el archivo extra.lzma que hay en el USB con el comando:
rm /mnt/synoboot2/extra.lzma- Copiamos el archivo que antes hemos subido a la carpeta temporal "/tmp" con el comando:
cp /tmp/extra.lzma /mnt/synoboot2/- Borramos con este comando:
rm -rf /usr/lib/modules/update/*- Salimos introduciendo "exit" y otra vez "exit"
- Reiniciamos el NAS
Una vez arranque ya podemos actualizar a la versión DSM_DS918+_24922 Update3.
Yo lo he hecho descargando y seleccionado el archivo manualmente
Actualizar y restaurar>actualización de DSM>
Esperar a que actualice y arranque de nuevo.Saludos. 👍
- real3x Link real3x mod¿El extra Izma este solo se puede poner una vez instalado? ¿No sirve para hacer una instalación limpia?
-
¿No hay manera de instalar directamente esta versión?
-
11 hours ago, AaronNiu said:
i use ASrock J3455-ITX install ds918+ dsm6.2.2 with loaded 1.0.4b , also slow boot
sorry for my english
Hola!
I'm watching for mount a custom NAS with https://www.amazon.es/gp/product/B01MQ0EUBS/ref=ox_sc_act_title_4?smid=A1AT7YVPFBWXBL&psc=1
Works fine with last version of DSM.
Support transcoding than DS918+?
-
Hola
Tengo un Proliant N40L con DSM 5.2-5967 Update 2 y CloudSync me va extremadamente lento.
¿Alguien ha tenido algun problema con el antes?
A extremadamente lento me refiero a conexiones de Kb/s en lugar de Mb/s
A estas velocidades es imposible tener la nube sincronizada decentemente con el NAS.
-
Thanks for the feedback.
I was not sure whether to upgrade or not, but now that you've done it you've encouraged me.
Any recommendation?
-
Joder. Menos mal que montamos estos cacharros para que no pasen estas cosas.
-
¿creeis que merece la pena actualizar de la ultima versión de DSM 5 a la 6?
Es que me da miedo perder el contenido de los discos. Mi servidor es un Proliant N40L
-
Antes de montar xpenology saca toda la información de los discos duros o la perderas. Xpenology se instala en todos los discos cuando creas volumenes nuevos. El USB solo es para arrancar el sistema, no sirve para nada más.
Con respecto al SSD no creo que te sirva de mucho, personalmente lo usaria para otra cosa o lo vendería.
-
Entonces actualizamos directamente desde el panel de control o hay que esperar a tener un nuevo xpenoboot?
-
Si, tenia pensado no actualizar hasta pasado un tiempo.
Muchas gracias por la ayuda.
-
Muchisimas gracias!
Entiendo por tu comentario que las updates (cuando salgan) puedo hacerlo directamente desde el synology sin tocar nada.
DSM 6.2.3-25423 - Recalled on May 13
in DSM Updates Reporting
Posted
- Outcome of the update: UNSUCCESSFUL
- DSM version prior update: DSM 6.2.2-24922 Update 6
- Loader version and model: Jun's Loader v1.04b - DS918+
- Using custom extra.lzma: Yes - extra.lzma/extra2.lzma for loader 1.04b_mod ds918+ DSM 6.2.2 v0.8_syno
- Installation type: BAREMETAL - Asrock J4105
- Additional comment : After update the integrated network card (Realtek) does not work. The USB network card that I have works but detects that the installation must be repaired and once it is repaired neither of the two cards works
Outcome of the update: SUCCESSFUL
- DSM version prior update: DSM 6.2.2-24922 Update 6
- Loader version and model: Jun's Loader v1.04b - DS918+
- Using custom extra.lzma: No
- Installation type: BAREMETAL - Asrock J4105
- Additional comment : All network cards works without changes in jun's loader. It'sn necesary change extra.lzma