

Hemps
-
Posts
24 -
Joined
-
Last visited
Posts posted by Hemps
-
-
Those that are on DSM 7.1, did you just update from within DSM or do you have to build it from Tinycore?
-
Got it working:
https://ip:port/webapi/auth.cgi?api=SYNO.API.Auth&version=3&method=login&account=username&passwd=password&format=%20cookie
at the end leave a space between format =cookie
so dont use format=cookie, rather format= cookie
https://ip:port/webapi/entry.cgi?api=SYNO.ActiveBackup.Activation&method=set&version=1&activated=true&serial_number=serialno
-
 3
3
-
 4
4
-
-
I just get 103 false, on 7.0.1-42218
Tried all the workarounds, =cookie as well.
Clean browser etc
Changed password
-
What would be the easiest way to setup replication between 2x Synology units located offsite from each other?
Without it having a dedicated external ip.
-
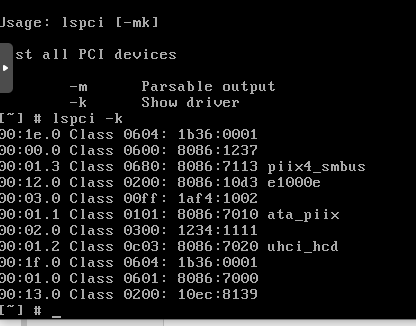
Need some help to get Qnap running with Network on Proxmox as it needs e1000e nic
I added
args: -netdev type = tap, id = net0, ifname = tap102i0 -device e1000e, mac = 6E: 7B: 02: 79: A8: B0, netdev = net0, bus = pci.0, addr = 0x12, id = net0
to vm conf file
If I try boot into tiny core, no ip from dhcp but it shows nic is there
-
I just block all ip's except the ones that need access on our local network, so single ip then also single ip from the outside.
Also disable admin account
Strong passwords
-
-
Native hardware, Xeon with Intel nics and a Dual Core with Realtek nics
Download https://mega.nz/folder/LJ4wyaDY#MxOC2UgNqC-Y6gQXu-IUFA
Write .img using Win32DiskImager
Boot from usb and press down arrow after Bios info, you want to slect Qnap menu option (a)
It'll open Tinycore, then open terminal
sudo su
vi ./my_create_qnap_boot
i to edit
Change Model, Patched, download to reflect options below, quts or hero
Esc
:wq to save
sudo ./my_create_qnap_boot
It should connect and download, let it all complete
Reboot from usb and let it do its thing, does take a while.
A mac address and IP should appear, login via browser
Latest QutsMODEL_TYPE="QY380_QY390_10_11"
PATCHED_FIRMWARE="TS-X85_20201123-4.5.1.1495"
DOWNLOAD_URL="https://download.qnap.com/Storage/TS-X85/"Latest QutsHero
MODEL_TYPE="QY380_QY390_10_11"
PATCHED_FIRMWARE="TS-X85_20201119-h4.5.1.1491"
DOWNLOAD_URL="https://download.qnap.com/Storage/QuTShero/TS-X85/" -
AMD
MODEL_TYPE="QZ140_QZ170_10_10"
PATCHED_FIRMWARE="TS-X77_20201123-4.5.1.1495"
DOWNLOAD_URL="https://download.qnap.com/Storage/TS-X77/" -
Thanks I managed to get the Realtek drivers by installing AMD firmware, it then detected both Realtek nics and is running smoothly.
-
1
-
-
Apparently on the Chinese forum they have got Realtek nics to work using AMD supported models firmware, can anyone confirm if it'll work.
MODEL_TYPE="TS-677-1600-8G"
PATCHED_FIRMWARE="TS-X77_20201123-4.5.1.1495"
DOWNLOAD_URL="https://download.qnap.com/Storage/TS-X77/"Anyone know how to get the Vendor Code to fill in correct MODEL_TYPE?
-
http://www.92nas.com/forum.php?mod=viewthread&tid=46
Maybe this one -
QY030_QY060_14_10
TS-873
X73
8
How to determine which architecture to download? Go
to https://www.qnap.com.cn/zh-cn to inquire about your product, and download the corresponding APP for what is the "processor" and "processor architecture" in the "Specification Information".
X64, X86 are suitable for Intel or AMD CPU series NAS; Arm is suitable for NAS using Arm chips. -
I have the latest Quts running on an old Xeon server, want to get it running on a DEsktop with Realtek network but no luck for me.
Download https://mega.nz/folder/LJ4wyaDY#MxOC2UgNqC-Y6gQXu-IUFA
Write .img using Win32DiskImager
Boot from usb and press down arrow after Bios info, you want to select Qnap menu option (a)
It'll open Tinycore, then open terminal
sudo su
vi ./my_create_qnap_boot
i to edit
Change Model, Patched, download to reflect options below, quts or heroMODEL_TYPE="QY380_QY390_10_11"
PATCHED_FIRMWARE="TS-X85_20201123-4.5.1.1495"
DOWNLOAD_URL="https://download.qnap.com/Storage/TS-X85/"
Esc
:wq to save
sudo ./my_create_qnap_boot
It should connect and download, let it all complete
Reboot from usb and let it do its thing, does take a while.
A mac address and IP should appear, login via browser -
question:
can quts work with realtek network cards or is Intel only supported?
-
I'm testing latest firmwares
MODEL_TYPE="QZ290_10"
PATCHED_FIRMWARE="TS-X53D/TS-X53D/TS-X53D_20201123-4.5.1.1495
DOWNLOAD_URL="https://download.qnap.com/Storage/TS-X53D/TS-X53D_20201123-4.5.1.1495but get the following feedback
root@box:/home/tc# sudo ./my_create_qnap_boot
Clear the boot, Please wait a while.
sh: DOWNLOAD_URL=https://download.qnap.com/Storage/TS-X53D/TS-X53D_20201123-4.5.1.1495.zip: unknown operand
sh: DOWNLOAD_URL=https://download.qnap.com/Storage/TS-X53D/TS-X53D_20201123-4.5.1.1495.zip: unknown operand
Unable to establish the QNAP RAM disk.
I checked here for the links
https://forum.qnap.com/viewtopic.php?f=5&t=158076
-
For remote access I use Zerotier, works a treat.
-
So I used an old Xeon server, 4gb ram and 120gb SSD in it.
Got past the missing hdd issues on the desktop unit, logged into QTS but now Storage and Snapshots just spins round and round.
Is it installing something maybe, I formatted the SSD before I added it to the system to NTFS.
I assume because it got past the missing hdd issue that the SSD is fine?
Edit: 10min later I rebooted it and this time reboot took longer so was hopeful, it has now allowed me to add a volume.
-
Thanks, another thing regarding pocopico's info, I cant login in at NAS login using admin/admin
-
Hi guys need some help.
So I want to run Qnap on Proxmox 6.2, I created a VM, downloaded vmdk and converted it to qcow2.
https://mega.nz/folder/LJ4wyaDY#MxOC2UgNqC-Y6gQXu-IUFA
Added it to Proxmox and booted fine, I can connect to it but I'm stuck on adding a hard drive?
I created a Sata Qcow and added it but it still doesn't detect the hard drive and asks that the drive be formatted as well.
Any ideas?
-
I use Zerotier
-
So I managed to restore a firmware to another flash drive and boot off it BUT network is missing, otherwise everything else is there.
Reckon I'll try an older laptop or find machine matching some specs to a QNAP unit.
-
There is some info on a Chinese forum where they have got it all working.
-
Zerotier or freelan work well
Automated RedPill Loader (ARPL)
in Loaders
Posted
For those that want to get it working on ProxMox.
Proxmox 7
Create VM 100
Guest OS Linux
Hard Disk SATA 1 100GB or whatever
CPU: 4 cores
8gb Ram
e1000 network
Download, extract and copy - https://github.com/fbelavenuto/arpl/releases/download/v0.1-alpha2/arpl-0.1-alpha2.img.zip
Copy .img to the location on proxmox below, I used filezilla
/mnt/pve/storage01/arpl.img
Shell on proxmox node
qm importdisk 100 /mnt/pve/storage01/arpl.img local
in the hardware settings, double-click and add as SATA Disk 0
Put the sata0 device in the first place in the boot order, activate it and start the VM.