

steve23094
-
Posts
20 -
Joined
-
Last visited
Posts posted by steve23094
-
-
On 3/11/2019 at 6:14 PM, jensmander said:
Which PAT did you download? The version which is linked in the appropriate download links thread or a newer file from synology? You should always use the PAT linked in the forum.
How did you try to roll back? With the former DS3615XS or the DS918?
If nothing helps you can try to delete all system partitions on each hdd and start over. You‘ll loose your settings and installed apps but any storage pool/raid will remain intact.
Thank you for your reply.
There is no link to a PAT in the 6.2 loader thread. However, I have tried both 6.2 and 6.2.1.
I have tried to rollback using both 3615 and 918.
I have tried deleting the system partitions, mentioned in my original post.
TBH. I have almost given up because I’m not getting any help here. I’m considering buying a 918+. My only concerns with that is the disks are encrypted, I assume that shouldn’t cause a problem otherwise nobody would ever be able to migrate in that situation. But I don’t know what order my disks are in and I know you have to install them in the correct order. Obviously I can’t boot into DSM to check. I might not have installed them in order by SATA connector on my motherboard, because of cabling issues in my case. What happens if I install the disks in the wrong order? Does it destroy your array? Or do you get the opportunity to swap them around?
-
God damn it. I have tried to roll back to 6.1 and 6.1.7 and keep getting 'The file is probably corrupted'. I now have a bricked system. Can nobody help?
-
Any chance somebody can please take a quick look at my thread here? https://xpenology.com/forum/topic/14255-failed-to-install-file-the-file-is-probably-corrupted/
I’m stuck on an install and would really appreciate some guidance.
Thanks in advance.
-
I’m really hoping someone can help out with this as to what I can try next, because right now I have a hosed system.
-
Just an extra bit of info I mistakenly left out. My CPU is an Intel i3-6300T, which is Skylake.
-
So I have been trying to migrate from a DS3615XS with Jun's loader 1.02b to DS918+ and Jun's loader 1.04b.
I have a baremetal Asus Z170M Plus which has an Intel I219V NIC. Posts by other users say that this is a compatible NIC.
My NAS is being picked up by the Synology app and web service, it is listed as a 918 and migratable,
Jun's loader appears to load fine.
I have tried using a manual install of PAT 6.2 and 6.21.
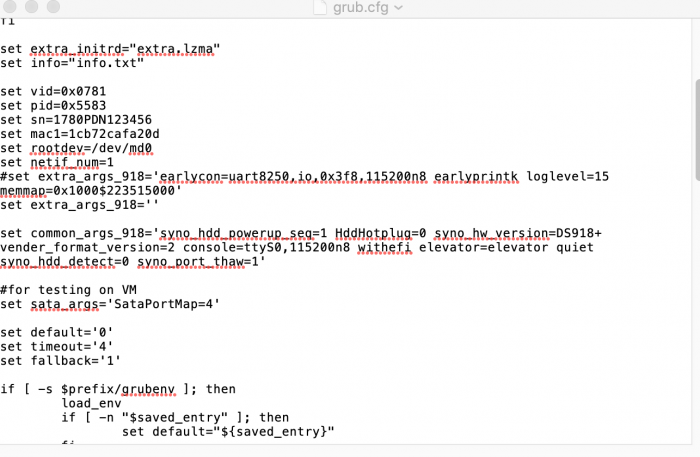
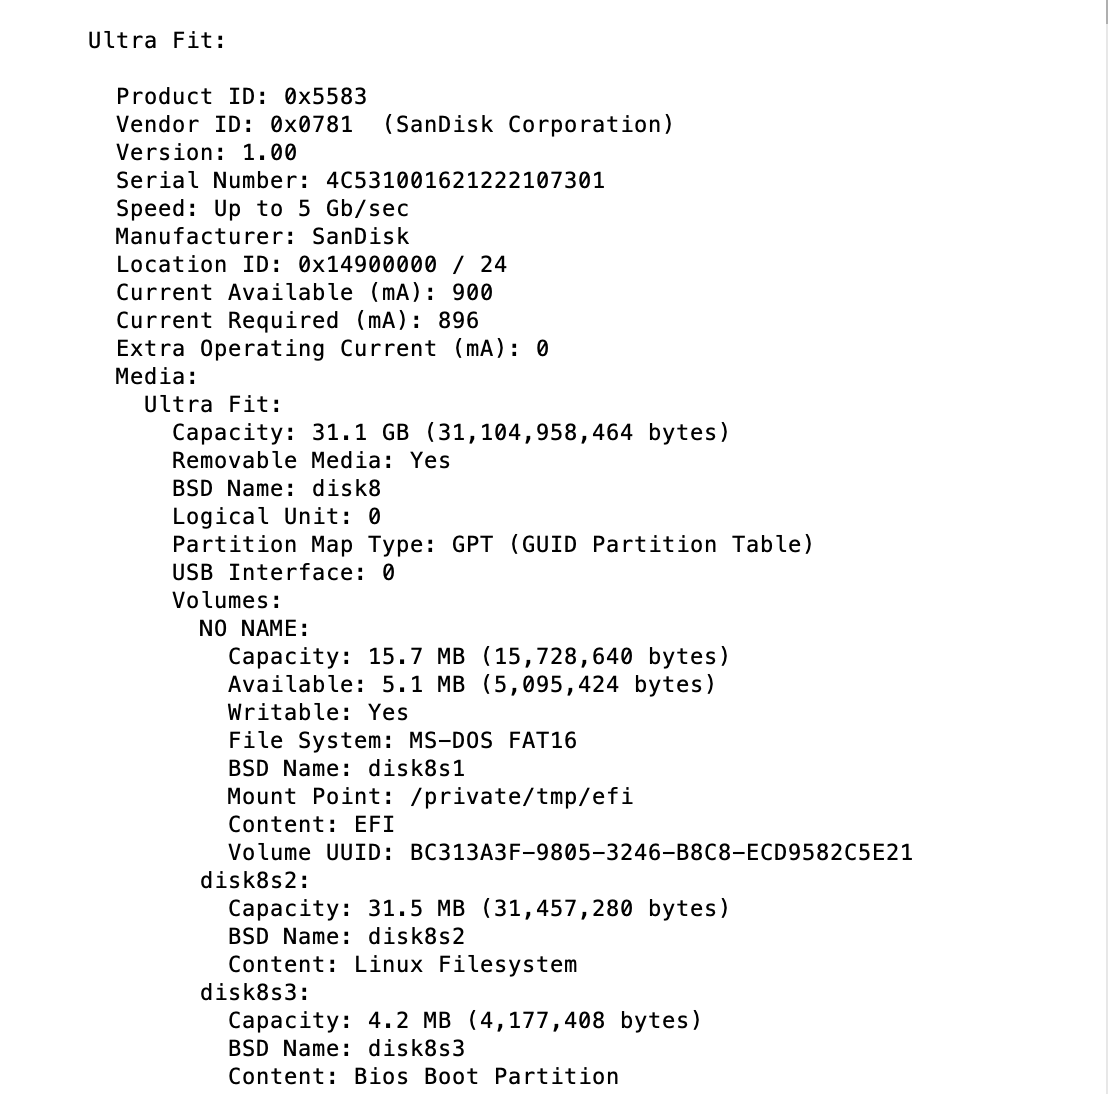
I am getting the error message, 'Failed to install file. The file is probably corrupted (13)'. I know this is often an error in your PID or VID so I have attached screenshots of my PID/VID and Grub file.
I have also tried downloading the latest PAT direct to the device, and receive an error message, 'Failed to download the DSM installation file. Please check the network connection and try again (46)'. I think there might be a clue here.
Right now I have probably blown away my DSM installation, I was getting desperate so I tried a fresh DSM install migration (formatting DSM, but keeping your data).

-
All this divergence is getting confusing.
I’m running a 3615, bare metal, 6.1.7, with i3 6300t Skylake, EFI boot.
Am I better waiting until everything sorts itself out into one loader? Or maybe Change my system from 3615 to 918?
-
49 minutes ago, Polanskiman said:
This looks to me like a USB issue or simply a file corruption in the loader during the computer reboot. USB keys are not the most reliable devices that's why I chose high-end usb keys for bootloaders. I never use el cheapo usb keys or free usb keys you get in events. I have probably over 30 of those laying around but only use them for testing purposes and non-critical applications. Even high-end usb keys may in certain events go bad.
It’s a Sandisk. I’ll look into getting another one just in case.
-
I don't really know tbh. I'm just relieved it came back to life. Perhaps it's an indication my USB key is failing?
I selected to recover and everything sprung back to life. All my settings and data was intact, DSM now running 6.1.4-15217 Update 5. I breathed a big sigh of relief.
-
So some good news. I have managed to get the text from the loader up on screen. The server is discoverable from the app and the web assistant. In the web assistant the server says 'Recoverable'. I'm a bit nervous about what to do now my versions are out of sync so I don't screw anything up. What is the best next step to take?
-
14 hours ago, aol said:
Sounds like you have video output from the box and if I understand you you get the normal BIOS output but you do not see the normal output from booting the stick, e.g., you should see the menu, and after a few seconds, the screen should post a few lines of text indicating it's begun booting and then nothing more will appear there.
If you are not getting that output then find.synology.com won't work.
Rebuilding the stick may have caused a problem if you were not careful to rebuild the grub.cfg with the correct vid, pid, SN and possibly mac. Building the stick on a mac is simpler than on a Windows machine, simply
sudo dd if=/path/to/102b.img of=/dev/disk3 bs=1m
in terminal. determine the correct /dev/disk3 path using diskutil list. Your USB stick will be /dev/diskN.
Then you need to mount the EFI folder of the stick, edit grub.cfg, set the vid/pid/SN/mac, unmount and done.
So that should be your focus, getting the system to display the right text on boot.
I have rebuilt my USB stick (fourth time). This is the content of my grub.cfg file:
set vid=0x0781
set pid=0x5583
set sn=1130LWN018623
set mac1=1CB72CAFA20D
set rootdev=/dev/md0
set netif_num=1
set extra_args_3615=''
set common_args_3615='syno_hdd_powerup_seq=0 HddHotplug=0 syno_hw_version=DS3615xs vender_format_version=2 console=ttyS0,115200n8 withefi elevator=elevator quiet syno_port_thaw=1'
set sata_args='sata_uid=1 sata_pcislot=5 synoboot_satadom=1 DiskIdxMap=0C SataPortMap=1 SasIdxMap=0'
set default='0'
set timeout='4'
set fallback='1'
-
9 minutes ago, sbv3000 said:
I would first disconnect your raid drives to avoid data corruption
Then test your hardware will boot with a live ubuntu image to make sure its all ok.
You might need to reset the bios to defaults and then setup again for XPE boot disk
Test your XPE boot disk works and you can find the diskstation
If that all works then your hardware should be working ok.
However your XPE boot disk will be out of sync with your installed version so;
Use a spare HDD - boot XPE and install DSM6.1, then go though the updates to 6.1.4 U5, that will update your boot disk to match the DSM on your raid drives.
Then you can shutdown, disconnect the spare hdd, reconnect your raid and boot up
I can boot okay with a Live Ubuntu image.
The XPE boot disk is the problem, I’m not getting any text.
I don’t have a spare disk lying around, so I’m not sure how I can fix the out of sync problem.
-
- Outcome of the update: UNSUCCESSFUL
- DSM version prior update: DSM 6.1.4 15217 - Update 3
- Loader version and model: Jun's Loader v1.02b - DS3615xs
- Installation type: Baremetal (Asus Z170M Plus)
- Additional comments: Hosed my system. More details here:
EDIT by Polanskiman: issue has been resolved. Problem was unrelated to the update but rather to the USB key.
-
 1
1
-
-
Hi,
I was running DSM 6.1.4-15217 Update 3 with Jun's 1.02b loader. Everything was operating fine until I tried to upgrade to Update 5 via the web interface. Now my server won't boot. The upgrade appeared to go okay but on reboot my Xpenology server wouldn't start up. I'm running on bare metal on an Asus Z170M Plus m/board.I tried re-imaging my USB key again and it still won't boot. My BIOS splash screen shows up but the text that is normally displayed with the loader doesn't. Synology Assistant app or web interface can't find the server.
I'm running a Mac and don't have access to Windows. I'm using the method here
to create my USB key, the same I used successfully previously.
Thanks. -
I'm wondering whether the serial number I sourced is wrong. What is the correct place to get them from now?
-
On 06/09/2017 at 11:09 PM, sbv3000 said:
Have you checked with syno assistant?
You might have corrupted the grub file serial setting (can happen with some editors). Also, its my understanding that you dont need a 'real' serial number and mac unless using a syno account (an abuse of syno services I think) so you could use any sequence
For editing grub, have you tried swapping the usb disk to another usb port, it should then mount for editing, not sure how that might affect your next boot
Syno Assistant is blank too.
-
So I recently upgraded my bare metal box to 6.1.3 running the DS3615xs profile. Everything seems to be operating okay but in the info section of DSM the serial number is blank, should it be?
I seem to remember my previous version had a serial number present. I'm using the native MAC address of my NIC. I have edited the grub.cfg file and included a serial number generated from here:- https://xpenology.github.io/serial_generator/serial_generator_new.html
(Just as an aside, is there an easy way to access the grub.cfg file through the NAS? Unplugging it and mounting it into macOS is a bit of a pain).
-
25 minutes ago, steve23094 said:
Hello,
This doesn't work.
I presume you have to rename the loader file to synoboot.img because they are named as DS3617xs 6.1 Jun's Mod V1.02b etc. I did that.
The problem is the mkdir /Volumes/efi step. It results in a Permission denied.
I'm running macOS 10.12.6. I think you have tried to create a directory where it's no longer allowed.
Thank you.
I was right. You're no longer allowed to write to /Volumes. For anybody else: Change the reference from Volumes to another folder. I used /tmp
e.g. mkdir /tmp/efi and sudo mount -t msdos /dev/disk2s1 /tmp/efi
-
Quote from PolanskimanOn 11/20/2016 at 3:13 PM, Polanskiman said:
Download the loader, unzip it and put the image file (synoboot.img) directly on the desktop.
1 - If your flash drive is plugged, unplug it.
2 - Open terminal. Issue the following commands:
cd /
cd ~/Desktop
diskutil list
The last command should bring up the list of your drives. Below is what it shows on mine:
TlMBP:Desktop Tl$ cd /
TlMBP:/ Tl$ cd ~/Desktop
TlMBP:Desktop Tl$ diskutil list
/dev/disk0
  #:                       TYPE NAME                    SIZE       IDENTIFIER
  0:      GUID_partition_scheme                        *500.1 GB   disk0
  1:                        EFI EFI                     209.7 MB   disk0s1
  2:          Apple_CoreStorage                         200.3 GB   disk0s2
  3:                 Apple_Boot Recovery HD             650.0 MB   disk0s3
  4:                  Apple_HFS Funky                   298.8 GB   disk0s4
/dev/disk1
  #:                       TYPE NAME                    SIZE       IDENTIFIER
  0:                  Apple_HFS Yosemite               *199.9 GB   disk1
                                Logical Volume on disk0s2
                                CC0A6E92-5D3B-4FF8-A35F-ACF567B573CD
                                Unencrypted
Now plug your flash drive and issue the diskutil list command again:
TlMBP:Desktop Tl$ diskutil list
/dev/disk0
  #:                       TYPE NAME                    SIZE       IDENTIFIER
  0:      GUID_partition_scheme                        *500.1 GB   disk0
  1:                        EFI EFI                     209.7 MB   disk0s1
  2:          Apple_CoreStorage                         200.3 GB   disk0s2
  3:                 Apple_Boot Recovery HD             650.0 MB   disk0s3
  4:                  Apple_HFS Funky                   298.8 GB   disk0s4
/dev/disk1
  #:                       TYPE NAME                    SIZE       IDENTIFIER
  0:                  Apple_HFS Yosemite               *199.9 GB   disk1
                                Logical Volume on disk0s2
                                CC0A6E92-5D3B-4FF8-A35F-ACF567B573CD
                                Unencrypted
/dev/disk2
  #:                       TYPE NAME                    SIZE       IDENTIFIER
  0:     FDisk_partition_scheme                        *31.0 GB    disk2
  1:                 DOS_FAT_32                         41.1 MB    disk2s1
  2:                 DOS_FAT_32                         49.4 MB    disk2s2
You can see my flash drive (31GB) now with the identifier disk2. Note that your flash drive identifier could be something else (disk3, disk4...) so don't just copy paste.
Now issue the following command:
sudo diskutil unmountDisk /dev/disk2
You might be asked for your password. Here is what I get:
TlMBP:Desktop Tl$ diskutil unmountDisk /dev/disk2
Unmount of all volumes on disk2 was successful
Then issue the following command. Same comment: BE SURE TO USE THE RIGHT IDENTIFIER. There is no turning back on this one. If you mistakenly use the identifier of some other disk, it will overwrite it with the image. SO BE VERY CAREFUL.
sudo dd if=synoboot.img of=/dev/rdisk2 bs=1m
You should see this:
TlMBP:Desktop Tl$ sudo dd if=synoboot.img of=/dev/rdisk2 bs=1m
50+0 records in
50+0 records out
You are done.
If you want to access the content of the drive you have to issue the following commands:
Verify again your flash drive identifier. YES AGAIN. You will need the disk partition identifier this time:
diskutil list
You should get this:
TlMBP:Desktop Tl$ diskutil list
/dev/disk0
  #:                       TYPE NAME                    SIZE       IDENTIFIER
  0:      GUID_partition_scheme                        *500.1 GB   disk0
  1:                        EFI EFI                     209.7 MB   disk0s1
  2:          Apple_CoreStorage                         200.3 GB   disk0s2
  3:                 Apple_Boot Recovery HD             650.0 MB   disk0s3
  4:                  Apple_HFS Funky                   298.8 GB   disk0s4
/dev/disk1
  #:                       TYPE NAME                    SIZE       IDENTIFIER
  0:                  Apple_HFS Yosemite               *199.9 GB   disk1
                                Logical Volume on disk0s2
                                CC0A6E92-5D3B-4FF8-A35F-ACF567B573CD
                                Unencrypted
/dev/disk2
  #:                       TYPE NAME                    SIZE       IDENTIFIER
  0:      GUID_partition_scheme                        *31.0 GB    disk2
  1:                        EFI NO NAME                 31.5 MB    disk2s1
  2: 0FC63DAF-8483-4772-8E79-3D69D8477DE4               15.7 MB    disk2s2
  3:        Bios Boot Partition                         4.2 MB     disk2s3
Note the EFI NO NAME partition with the identifier disk2s1 of the flash drive. This is the one we want. Then issue:
mkdir /Volumes/efi
Followed by:
sudo mount -t msdos /dev/disk2s1 /Volumes/efi
Your flash drive is now mounted. Edit what you need and eject when done. If you need to mount the flash drive again issue the last 2 commands. Always beware of the disk ID.
HideHello,
This doesn't work.
I presume you have to rename the loader file to synoboot.img because they are named as DS3617xs 6.1 Jun's Mod V1.02b etc. I did that.
The problem is the mkdir /Volumes/efi step. It results in a Permission denied.
I'm running macOS 10.12.6. I think you have tried to create a directory where it's no longer allowed.
Thank you.

Failed to install file. The file is probably corrupted
in DSM 6.x
Posted · Edited by steve23094
Thanks for your reply.
i found a post here from someone that said they had 6.2 running with an i219. Maybe it was a typo.
Nevertheless I have tried to roll back with the same result. So something else is going on.