Search the Community
Showing results for tags 'bootstick'.
Found 2 results
-
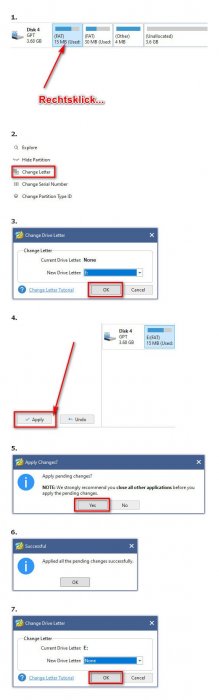
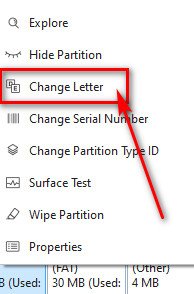
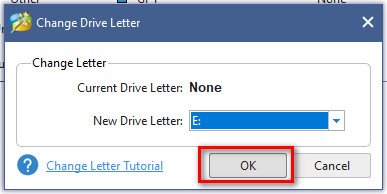
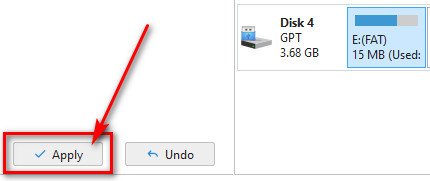
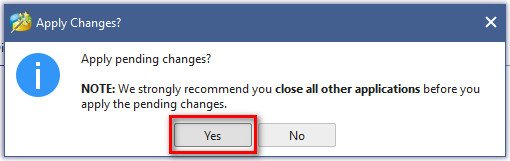
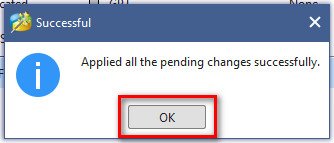
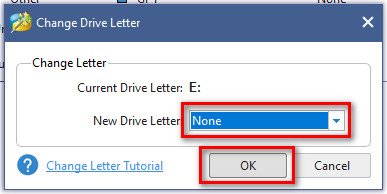
 If you want to modify your grub.cfg of your written boot stick or want to access the partitions (adding extra.lzma from @IG-88) you can use a free portable tool. Notes: - the grub.cfg is located in the folder "grub" on the first partition (15MB) - the extra.lzma is on the second partition (30MB) 1.) Download MiniTool Partition Wizard Free Edition (portable): https://www.partitionwizard.com/download/v12-portable/pw12-free-64bit.zip 2.) Unzip it and launch the "partitionwizard.exe" with administrative rights. 3.) Plug in your boot stick. Partition Wizard will automatically recognize the new drive. In this example it is drive no. 4. Now select the 1st partition of your stick (15MB) -> rightclick and select "Change Letter" in the context menu. 4.) Select a desired drive letter and click on "OK". 5.) In the lower left pane of the tool click on "Apply" and confirm the pending changes: If everything went OK you should see a success message: Now you have full access to the 1st partition with the Explorer or your favourite file manager. If you're done with any modifications it's advisable to unmount the drive letter. The steps are nearly the same. 6.) Right click the 1st partition again -> "Change Letter" -> select "New Drive Letter: none" -> "OK" -> click on "Apply" to the lower left and confirm the changes.
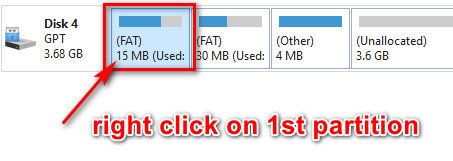
-
Da die Frage nach dem (nachträglichen) Ändern eines bestehenden Bootsticks häufiger aufkommt, anbei eine kleine Anleitung zum Einbinden der Partitionen Eures Bootsticks (enthält u.a. die grub.cfg sowie die extra.lzma). Die grub.cfg befindet sich auf der 1. Partition (15MB), die extra.lzma auf der 2. Partition (30MB). 1.) MiniTool Partition Wizard Free Edition (portable) herunterladen: https://www.partitionwizard.com/download/v12-portable/pw12-free-64bit.zip 2.) Zip entpacken und aus dem Verzeichnis die "partitionwizard.exe" starten („Als Administrator ausführen“). 3.) Den Stick einstecken. Partition Wizard erkennt das neue Laufwerk automatisch. Klickt nun in der Übersicht Eurer Laufwerke die erste Partition des Sticks (Bild1) mit der rechten Mousetaste an und wählt "Change Letter" (Bild 2). 4.) Wählt bei "New Drive Letter:" den gewünschten Buchstaben aus (Bild 3), bestätigen mit OK. 5.) Jetzt unten links im Programmfenster auf "Apply" klicken (Bild 4). Bestätigt den Hinweis (Bild 5) mit "Yes". Wenn es keine Probleme gegeben hat, den nachfolgenden Dialog mit „OK“ bestätigen (Bild 6). 6.) Nun ist die Partition ganz normal im Explorer bzw. Dateimanager Eurer Wahl verfügbar. Im Ordner "grub" befindet sich die "grub.cfg", welche mit Notepad oder (besser) Notepad++ bearbeitet werden kann (neue VID/PID bspw., Serial, MAC, usw.). 7.) Zum "unmounten" wieder in Partition Wizard wechseln, die erste Partition des Sticks wieder rechtsklicken -> "Change Letter" -> "New Drive Letter: none" (Bild 7) -> "OK" -> unten links auf "Apply" und den Hinweis wieder mit "Yes" bestätigen. Abschließend den Stick „sicher entfernen“.