Search the Community
Showing results for tags 'redpill'.
Found 17 results
-
1.This is a shell script that executes several commands at once as described in the "Redpill Tinycore Loader DSM 7.1 Build" guide. To use, you can download and untar it as follows and use it in the /home/tc directory. Helps build DSM 7.1 by managing the PAT file directory required for decryption. ( It currently supports the latest version of the DSM, 7.1.0-42661 update 1 nanopack version. ) Automatically add mac2 to user_config.json file for dual NIC, a feature that TC doesn't have. ( Manual Response Version ) wget https://github.com/PeterSuh-Q3/tinycore-redpill/raw/main/m.sh.gz; tar -zxvf m.sh.gz; ( Auto Answer Version with y ) wget https://github.com/PeterSuh-Q3/tinycore-redpill/raw/main/my.sh.gz; tar -zxvf my.sh.gz; Where y is unnecessarily asked, it automatically responds. Usage: ./my.sh <Synology Model Name> <Option> <Option> <Option> Options: noconfig, noclean, manual - noconfig: SKIP automatic detection change processing such as SN/Mac/Vid/Pid/SataPortMap of user_config.json file. - noclean: SKIP the 💊 RedPill LKM/LOAD directory without clearing it with the Clean now command. However, delete the Cache directory and loader.img. - manual: Options for manual extension processing and manual dtc processing in build action (skipping extension auto detection) Please type Synology Model Name after ./my.sh ./my.sh DS918+ ./my.sh DS3617xs ./my.sh DS3615xs ./my.sh DS3622xs+ ./my.sh DVA3221 ./my.sh DS920+ ./my.sh DS1621+ # Update : add noconfig, noclean, manual combination options # 2022.05.06 You can use it like this. ./my.sh DS918+ noconfig noclean manual ----------------------------------------------------------------------------------------------------- 2. Deploy scripts that you can leverage if you need to add a separate ext manually for VM users. It includes the fuction to add exts created by @FOXBI with multiple selections like capture. For the instructions on how to use, you can download and decompress as below and use it in /home/tc directory. ( Auto Answer Version with y ) wget https://github.com/PeterSuh-Q3/tinycore-redpill/raw/main/myv.sh.gz; tar -zxvf myv.sh.gz; The way to use it is existing same as my.sh. Where y is unnecessarily asked, it automatically responds. ---------------------------------------------------------------------------------------- Usage: ./myv.sh <Synology Model Name> <Options> Options: noconfig, noclean, manual - noconfig: SKIP automatic detection change processing such as SN/Mac/Vid/Pid/SataPortMap of user_config.json file. - noclean: SKIP the 💊 RedPill LKM/LOAD directory without clearing it with the Clean now command. However, delete the Cache directory and loader.img. - manual: Options for manual extension processing and manual dtc processing in build action (skipping extension auto detection) Please type Synology Model Name after ./myv.sh ./myv.sh DS918+ ./myv.sh DS3617xs ./myv.sh DS3615xs ./myv.sh DS3622xs+ ./myv.sh DVA3221 ./myv.sh DS920+ ./myv.sh DS1621+ CAUTION) Not all exts correspond to 7.1.0-42661. Please check @pocopico's ext GITHUB in advance and use it. We do not respond to errors caused by unsupported revisions.

-
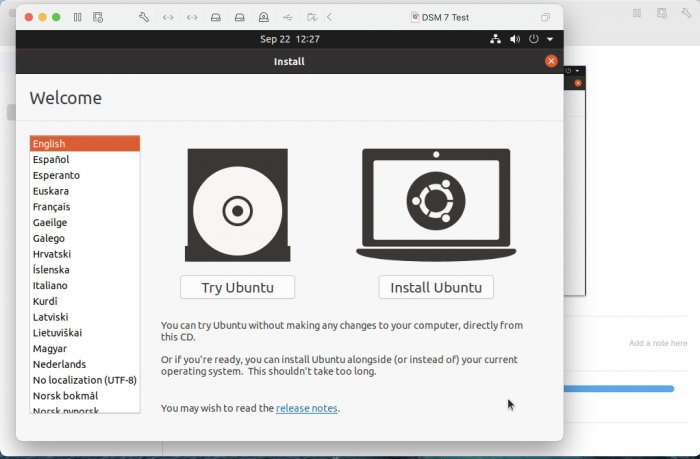
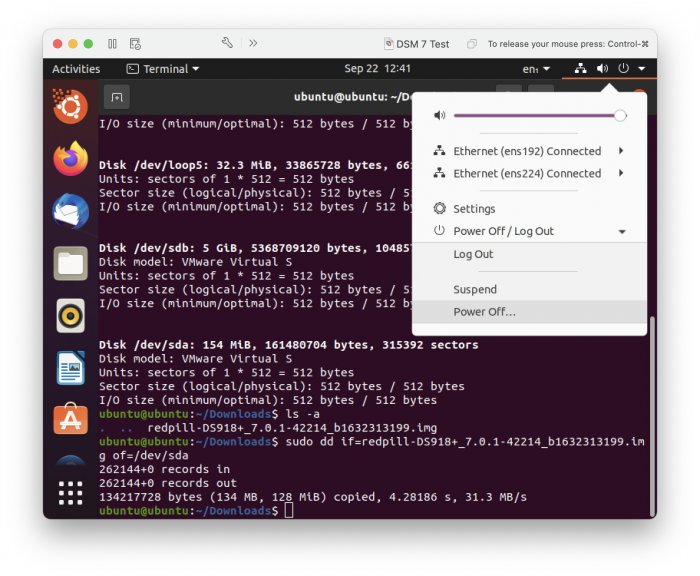
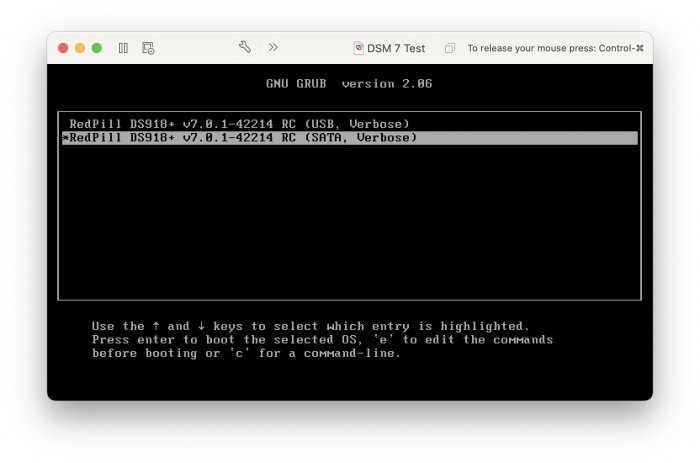
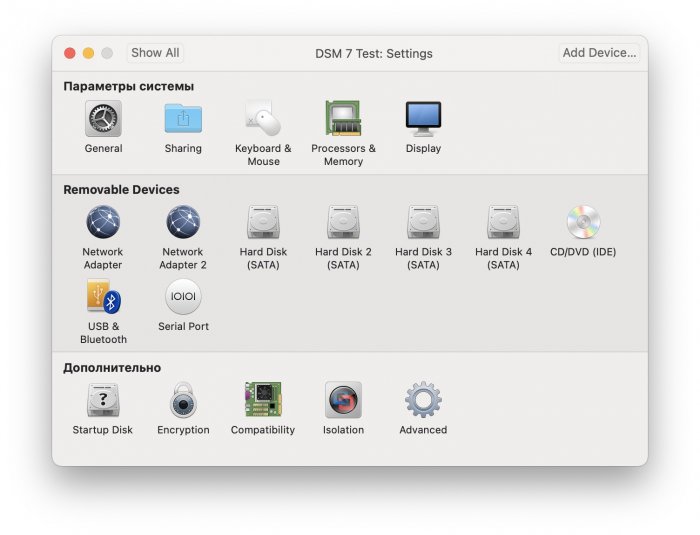
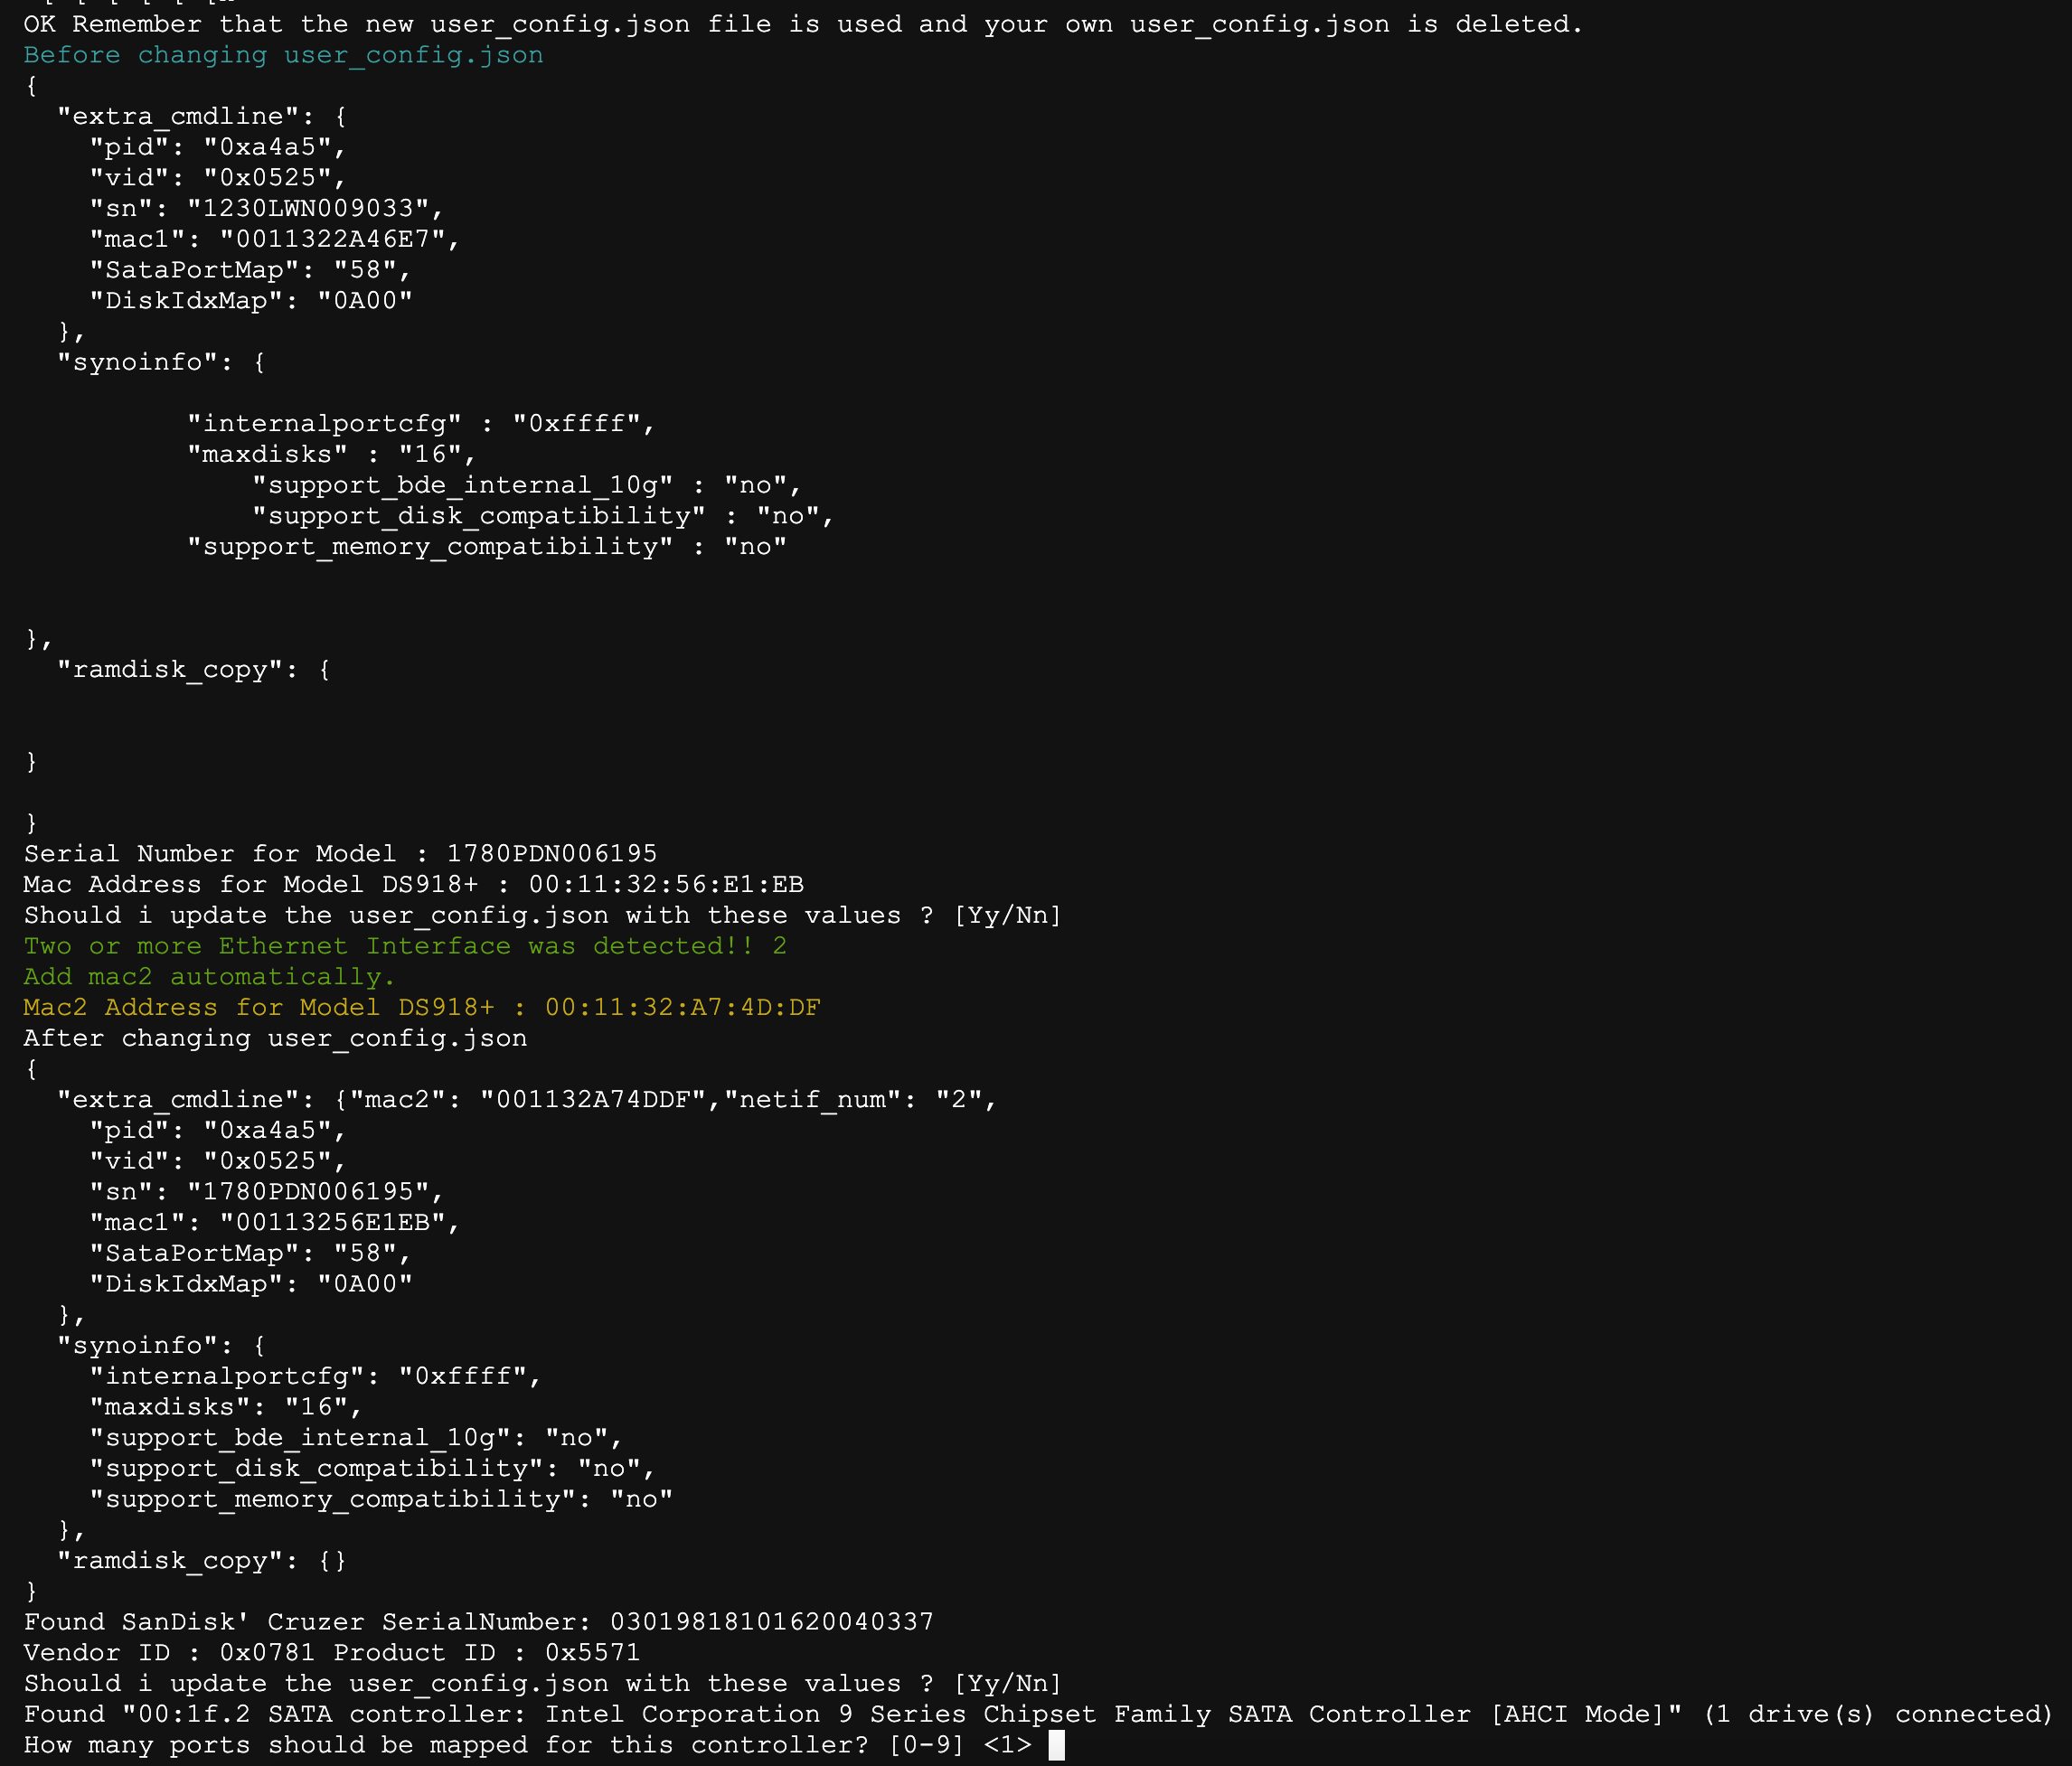
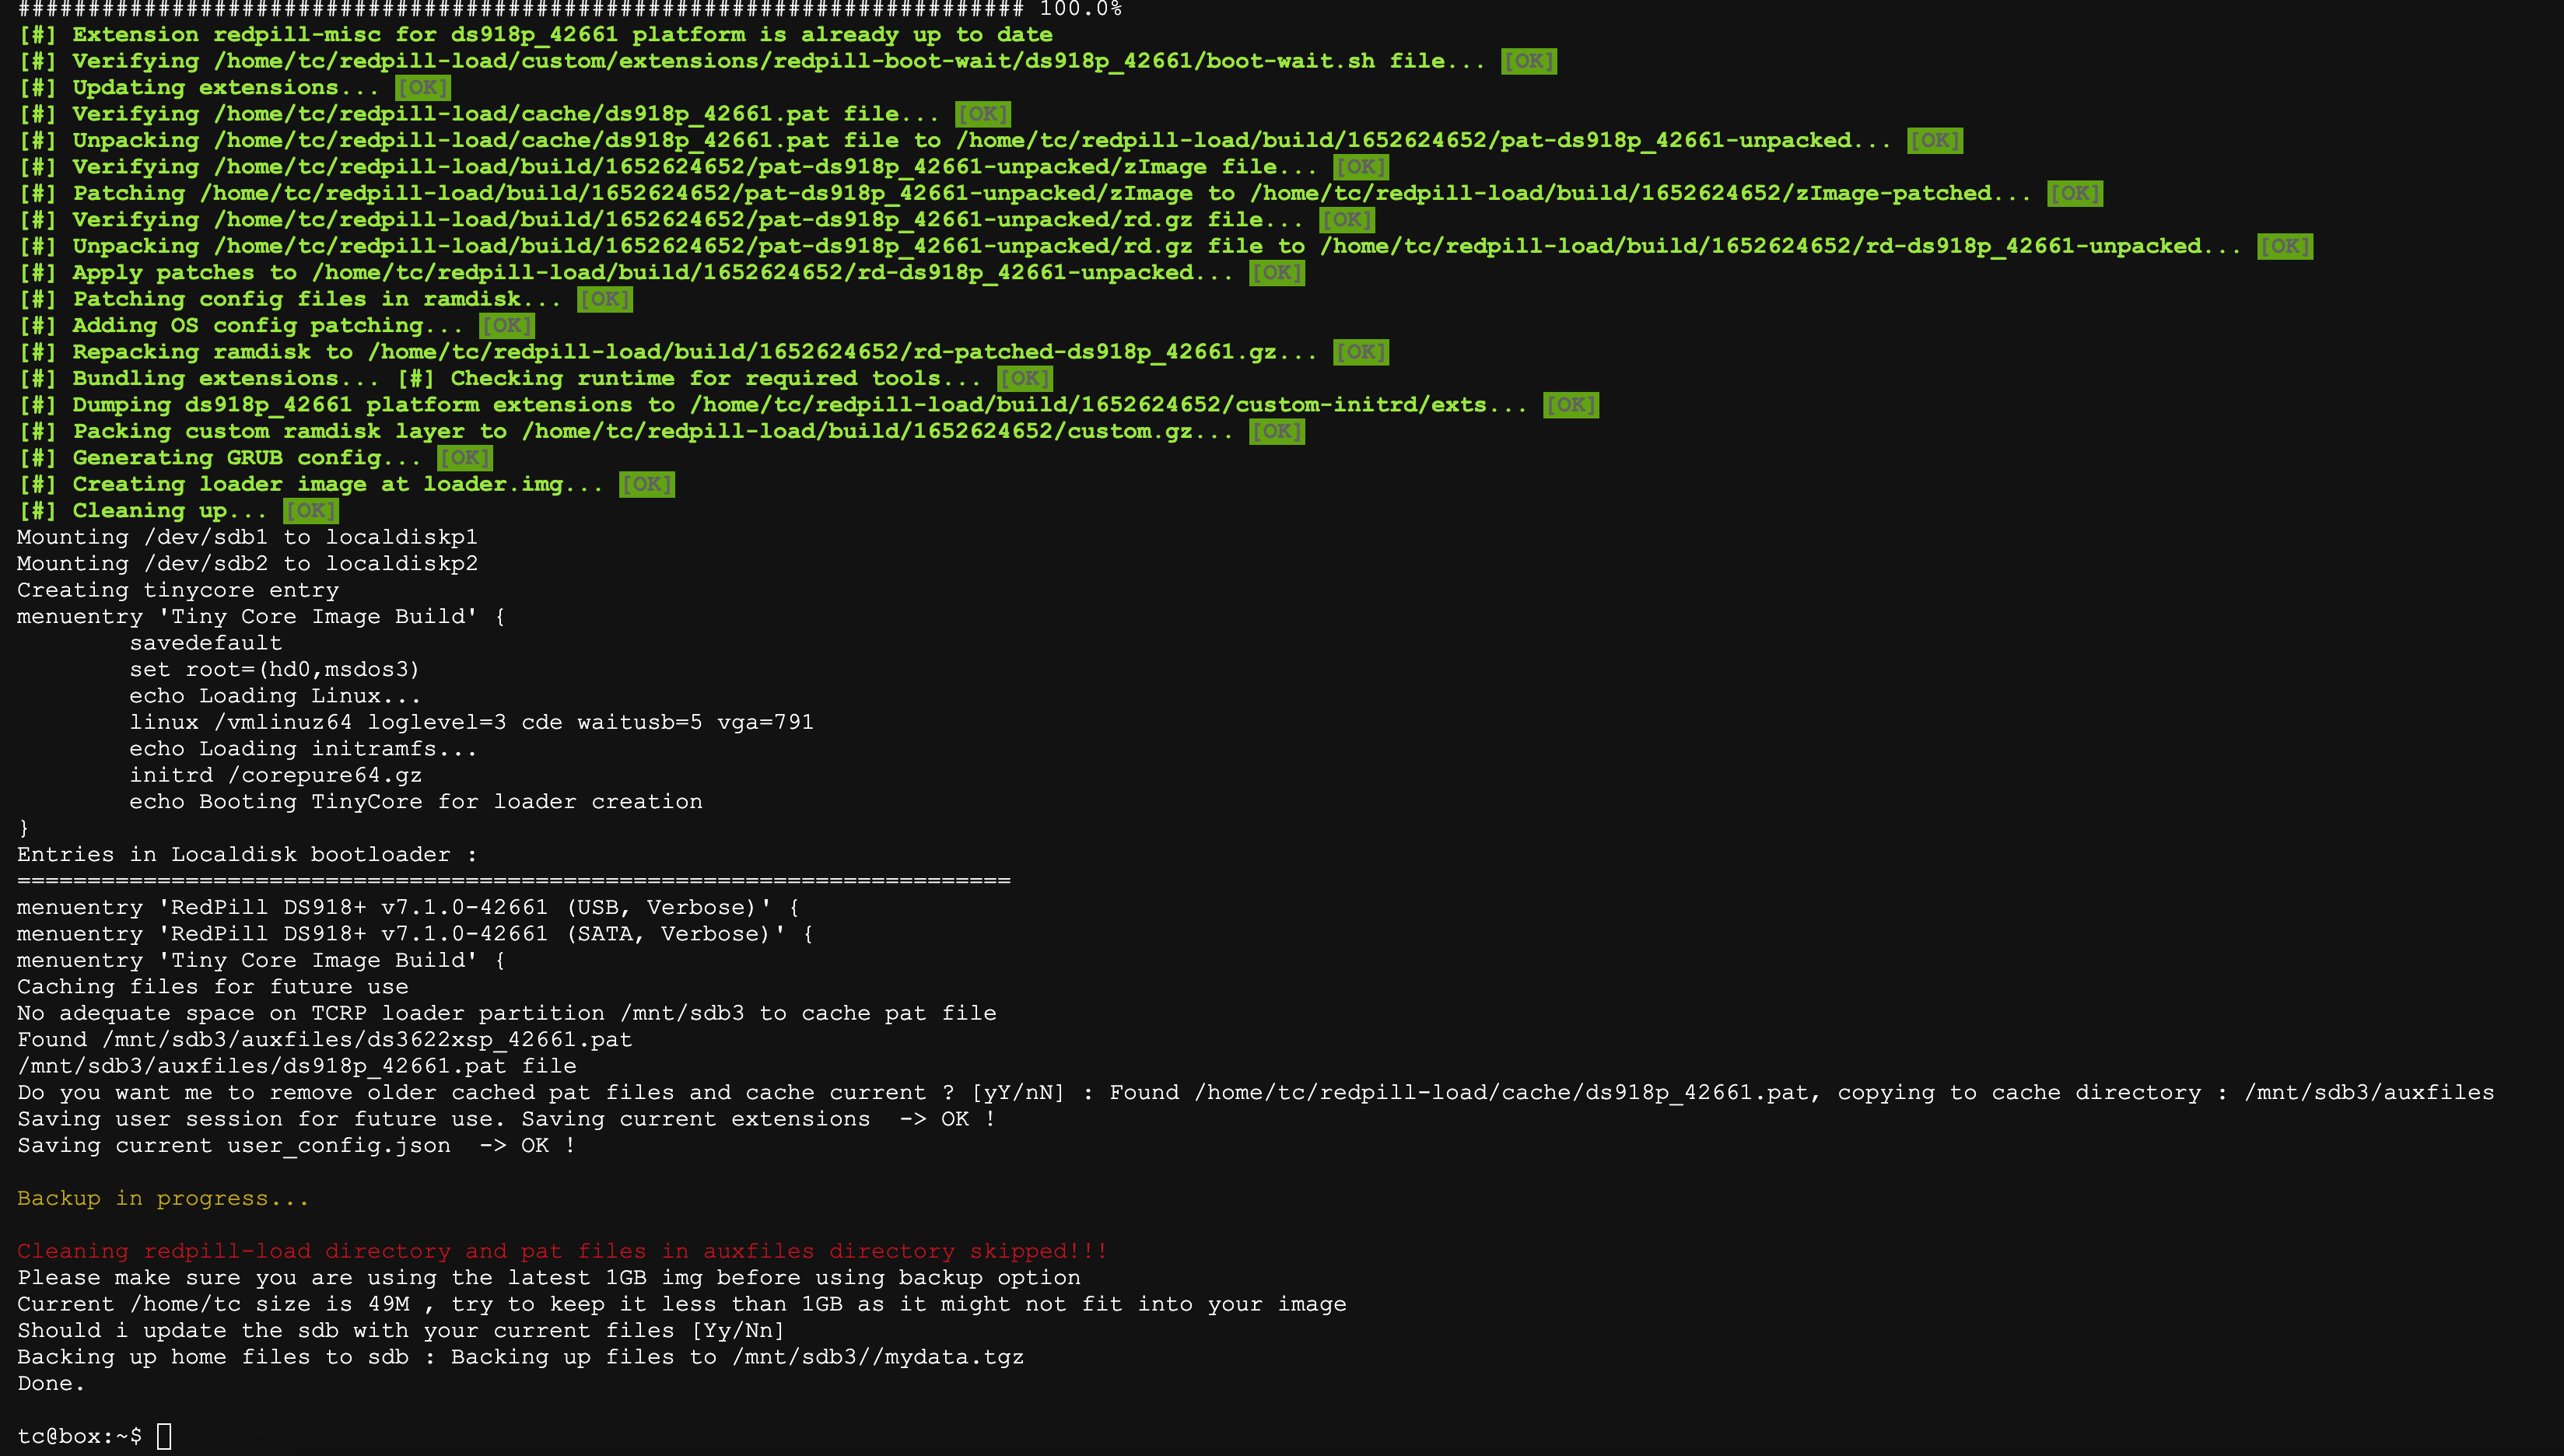
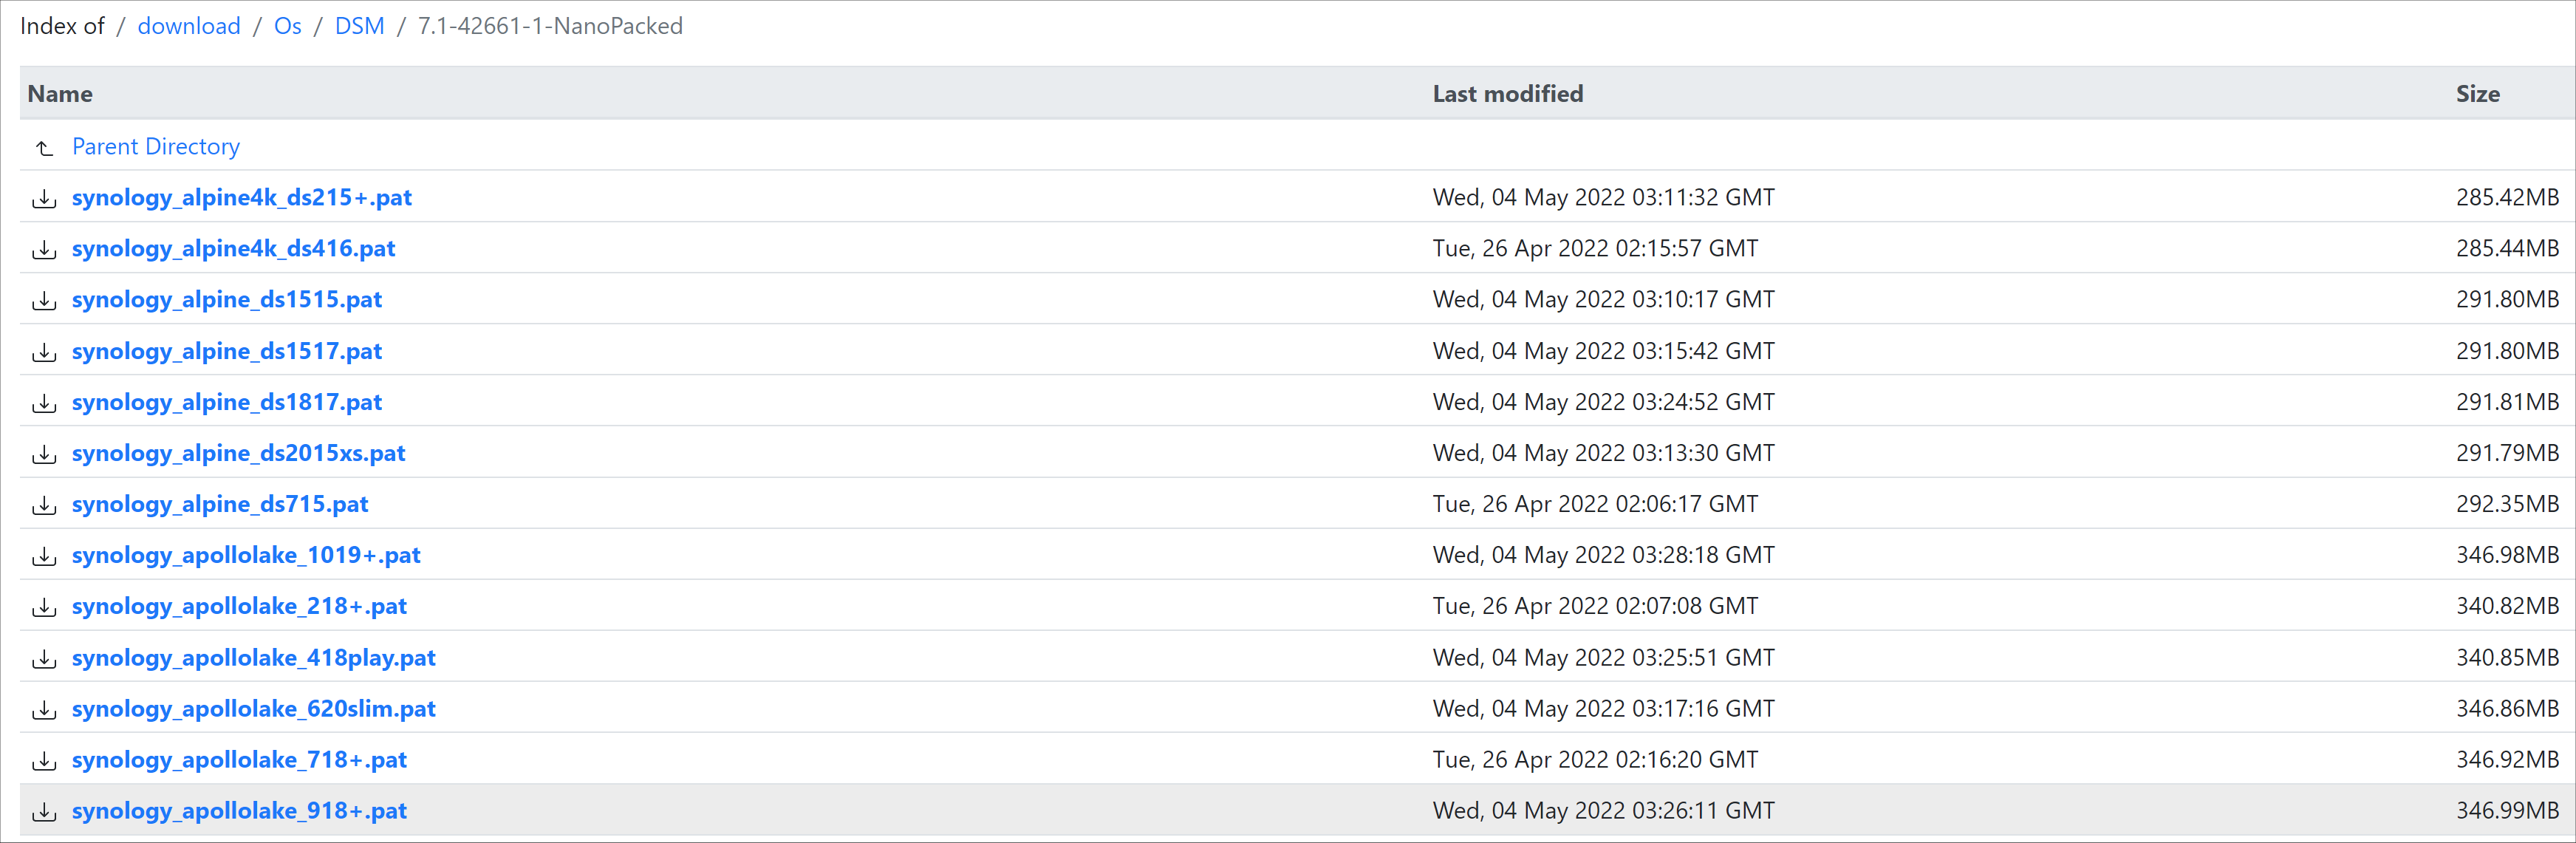
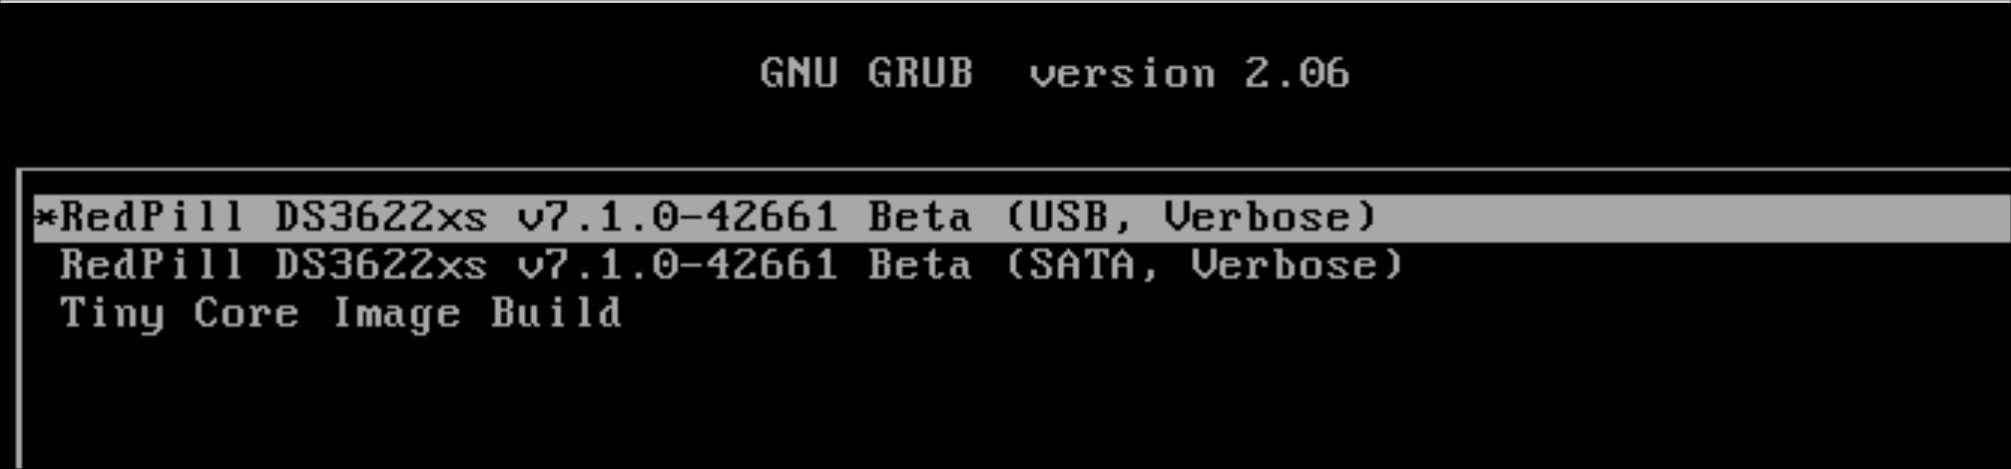
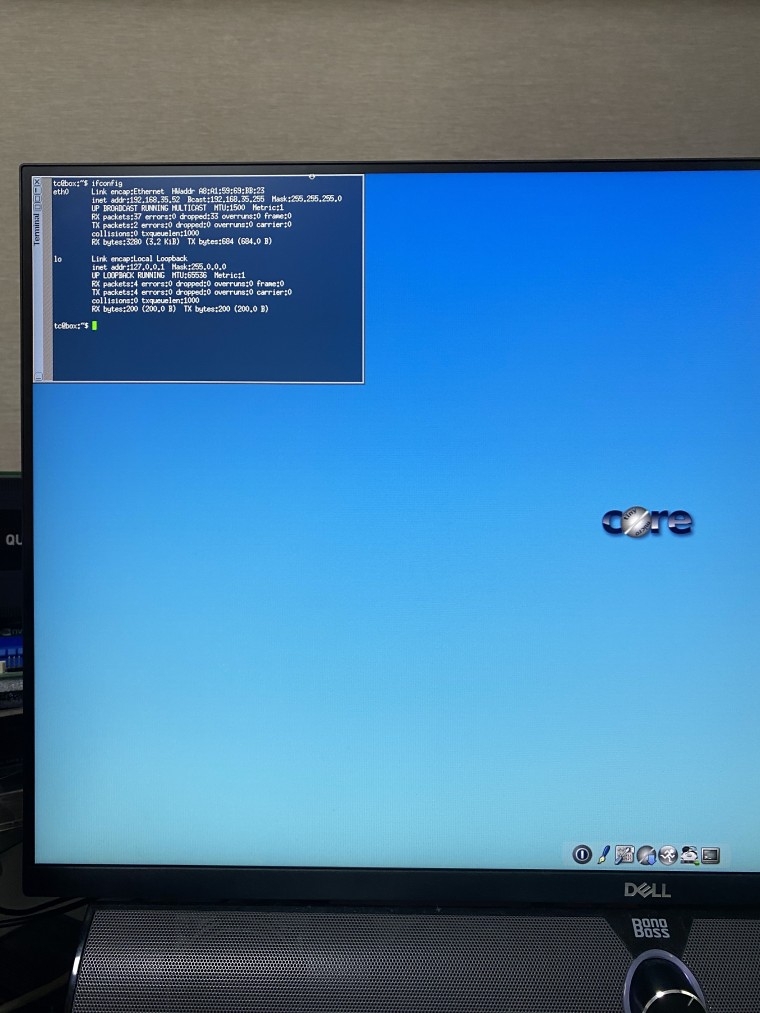
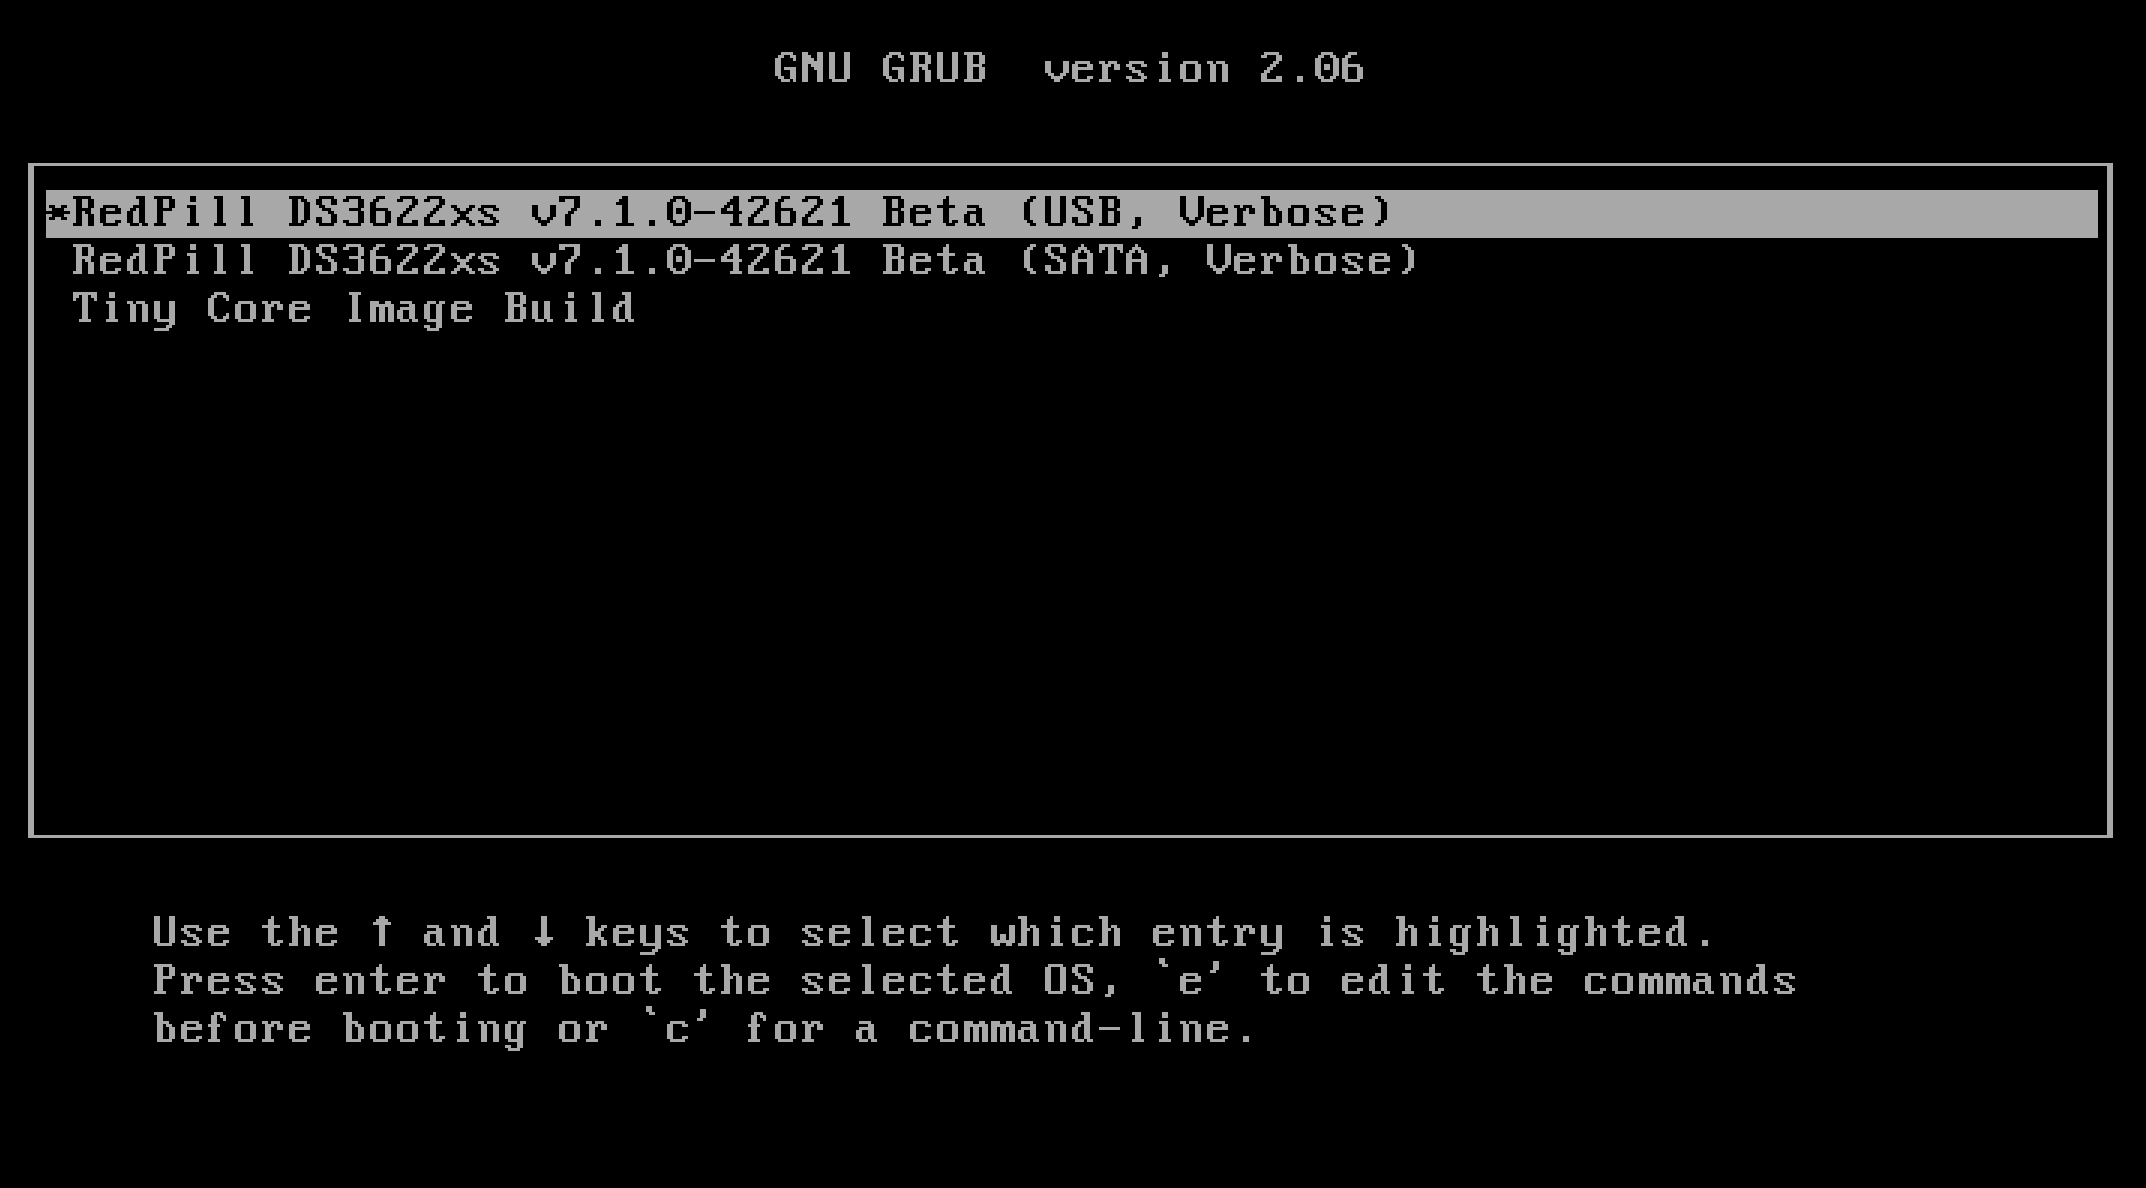
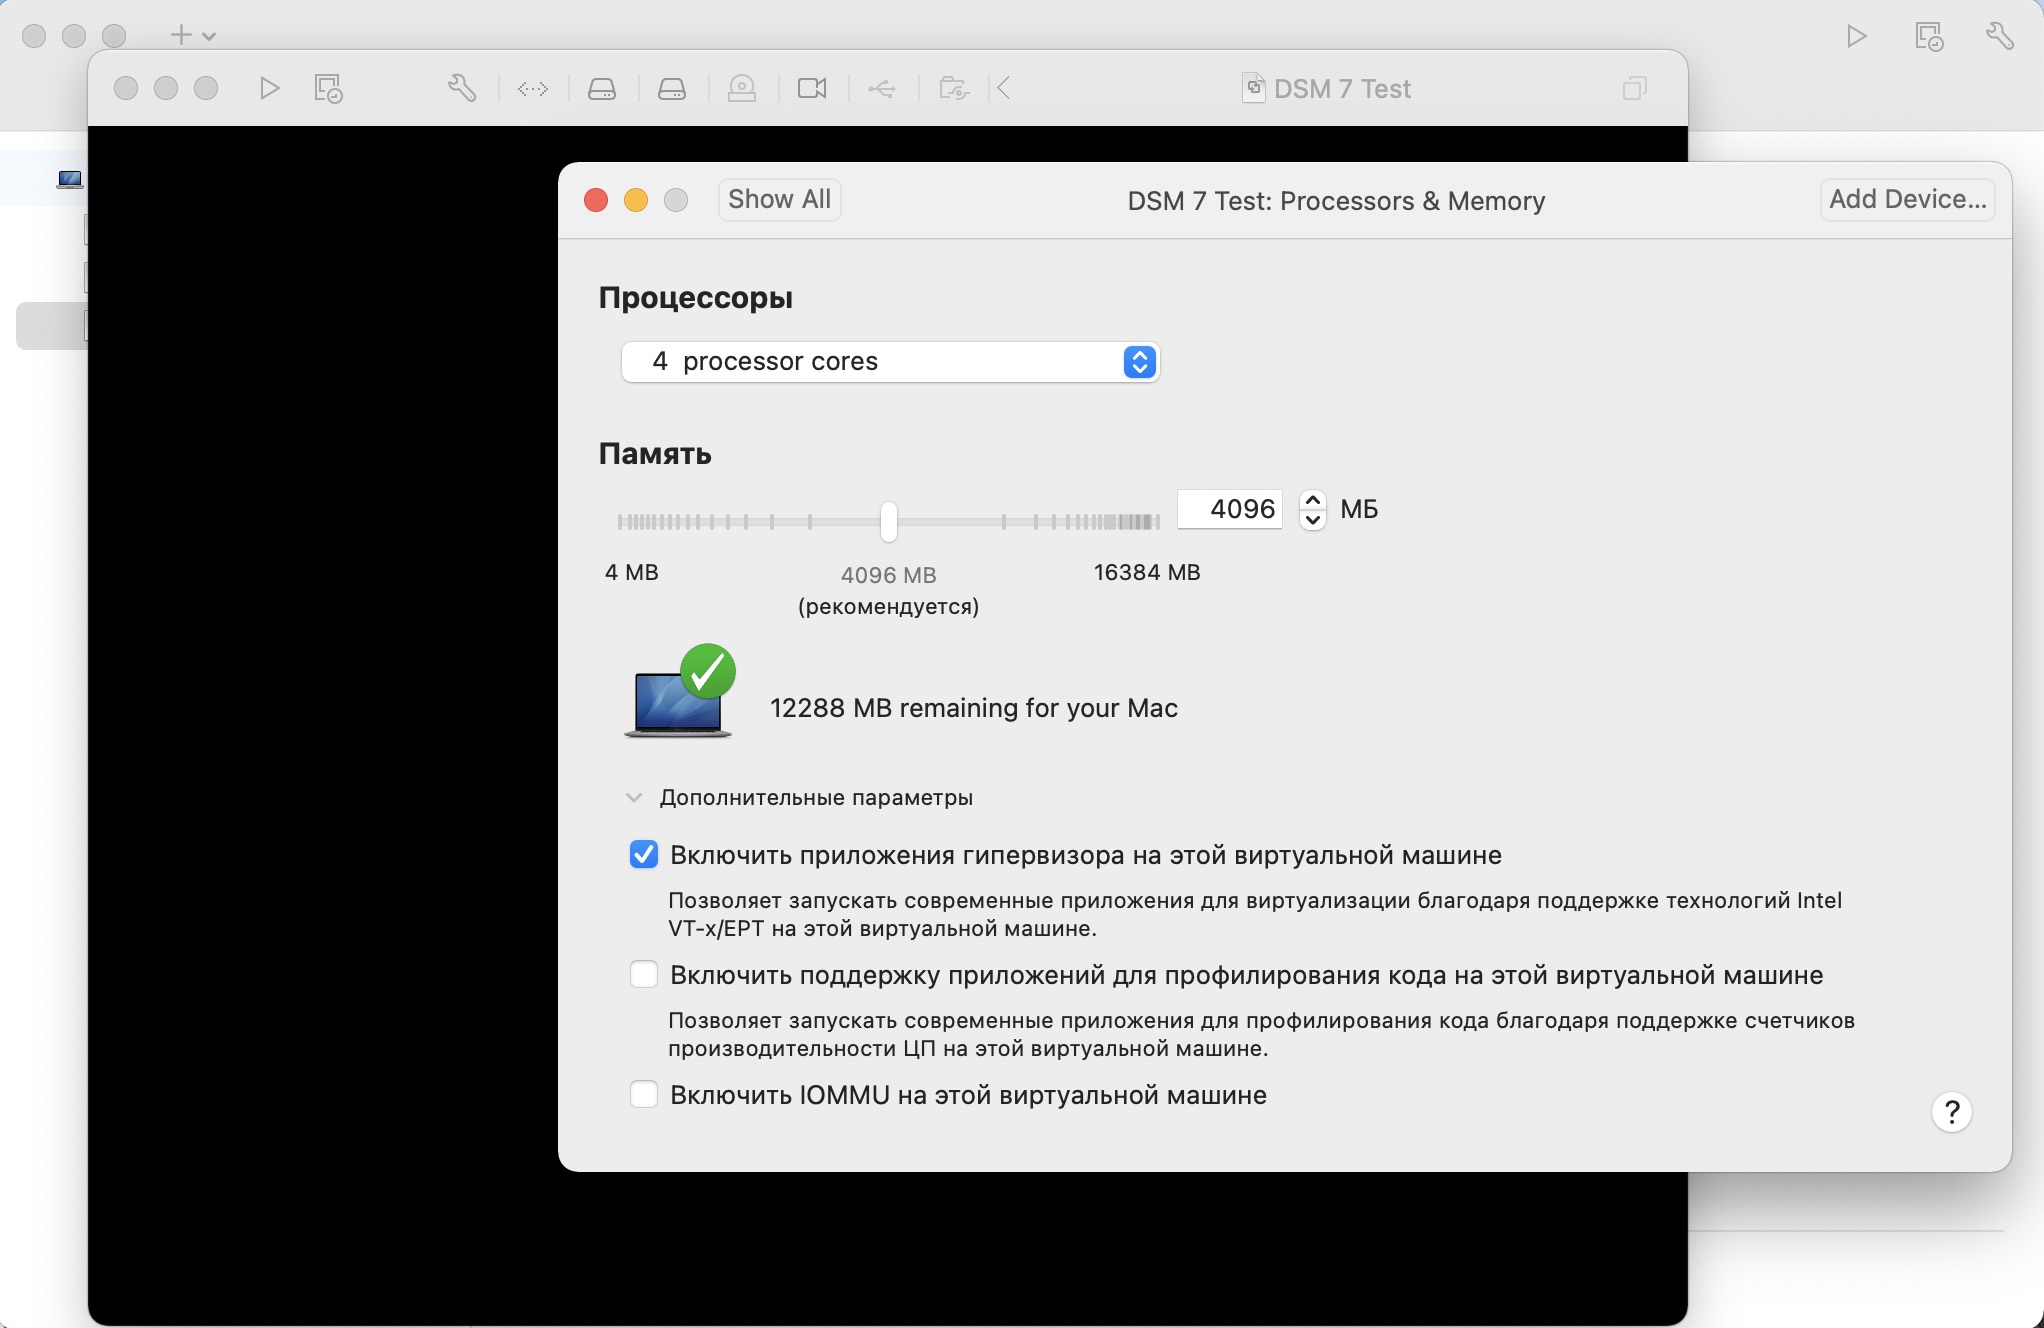
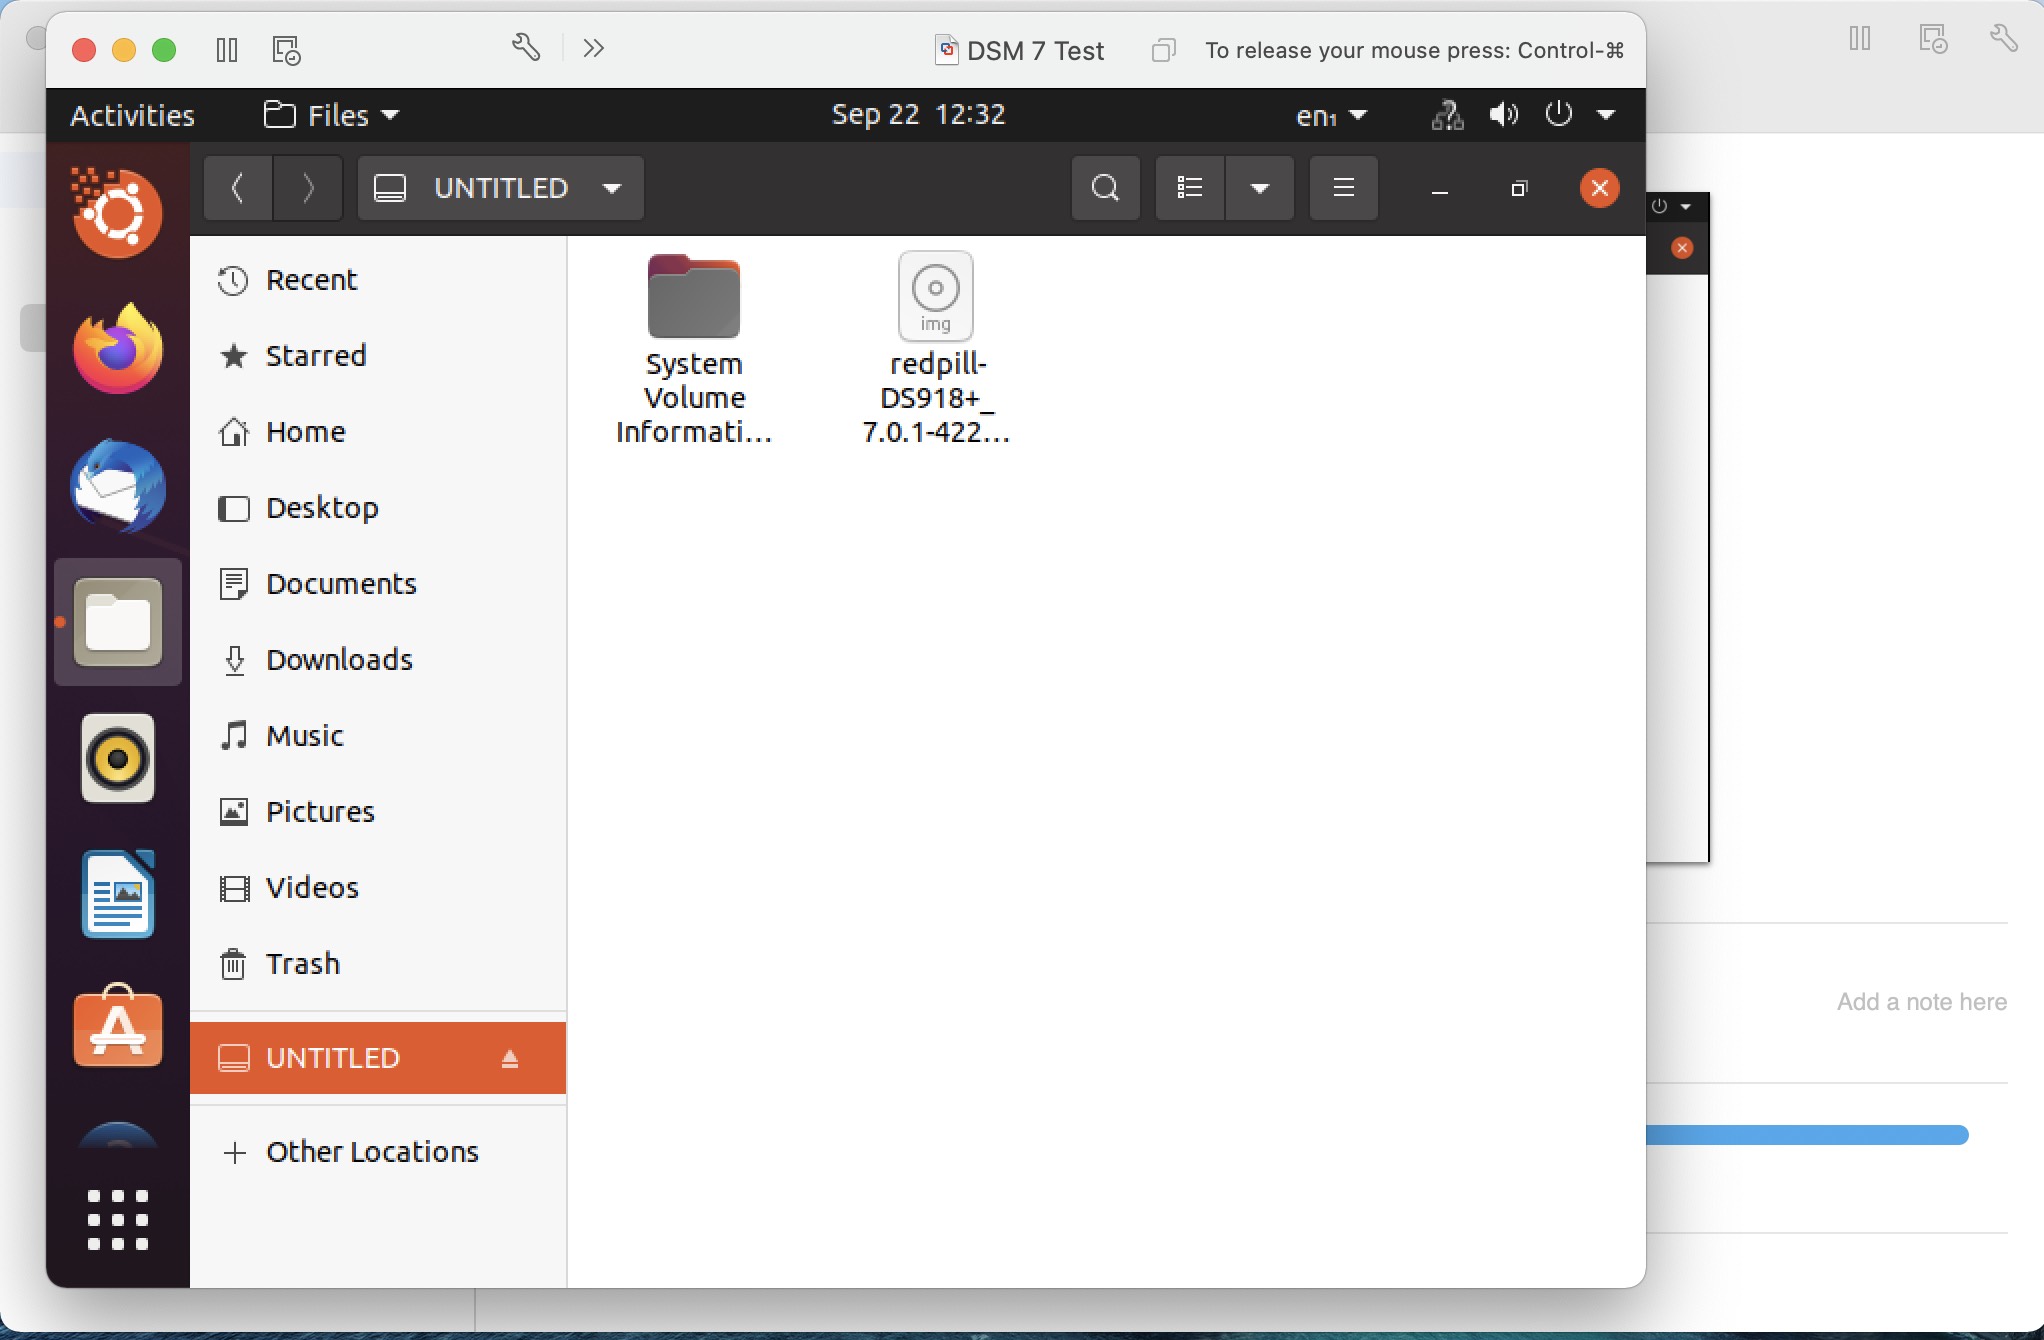
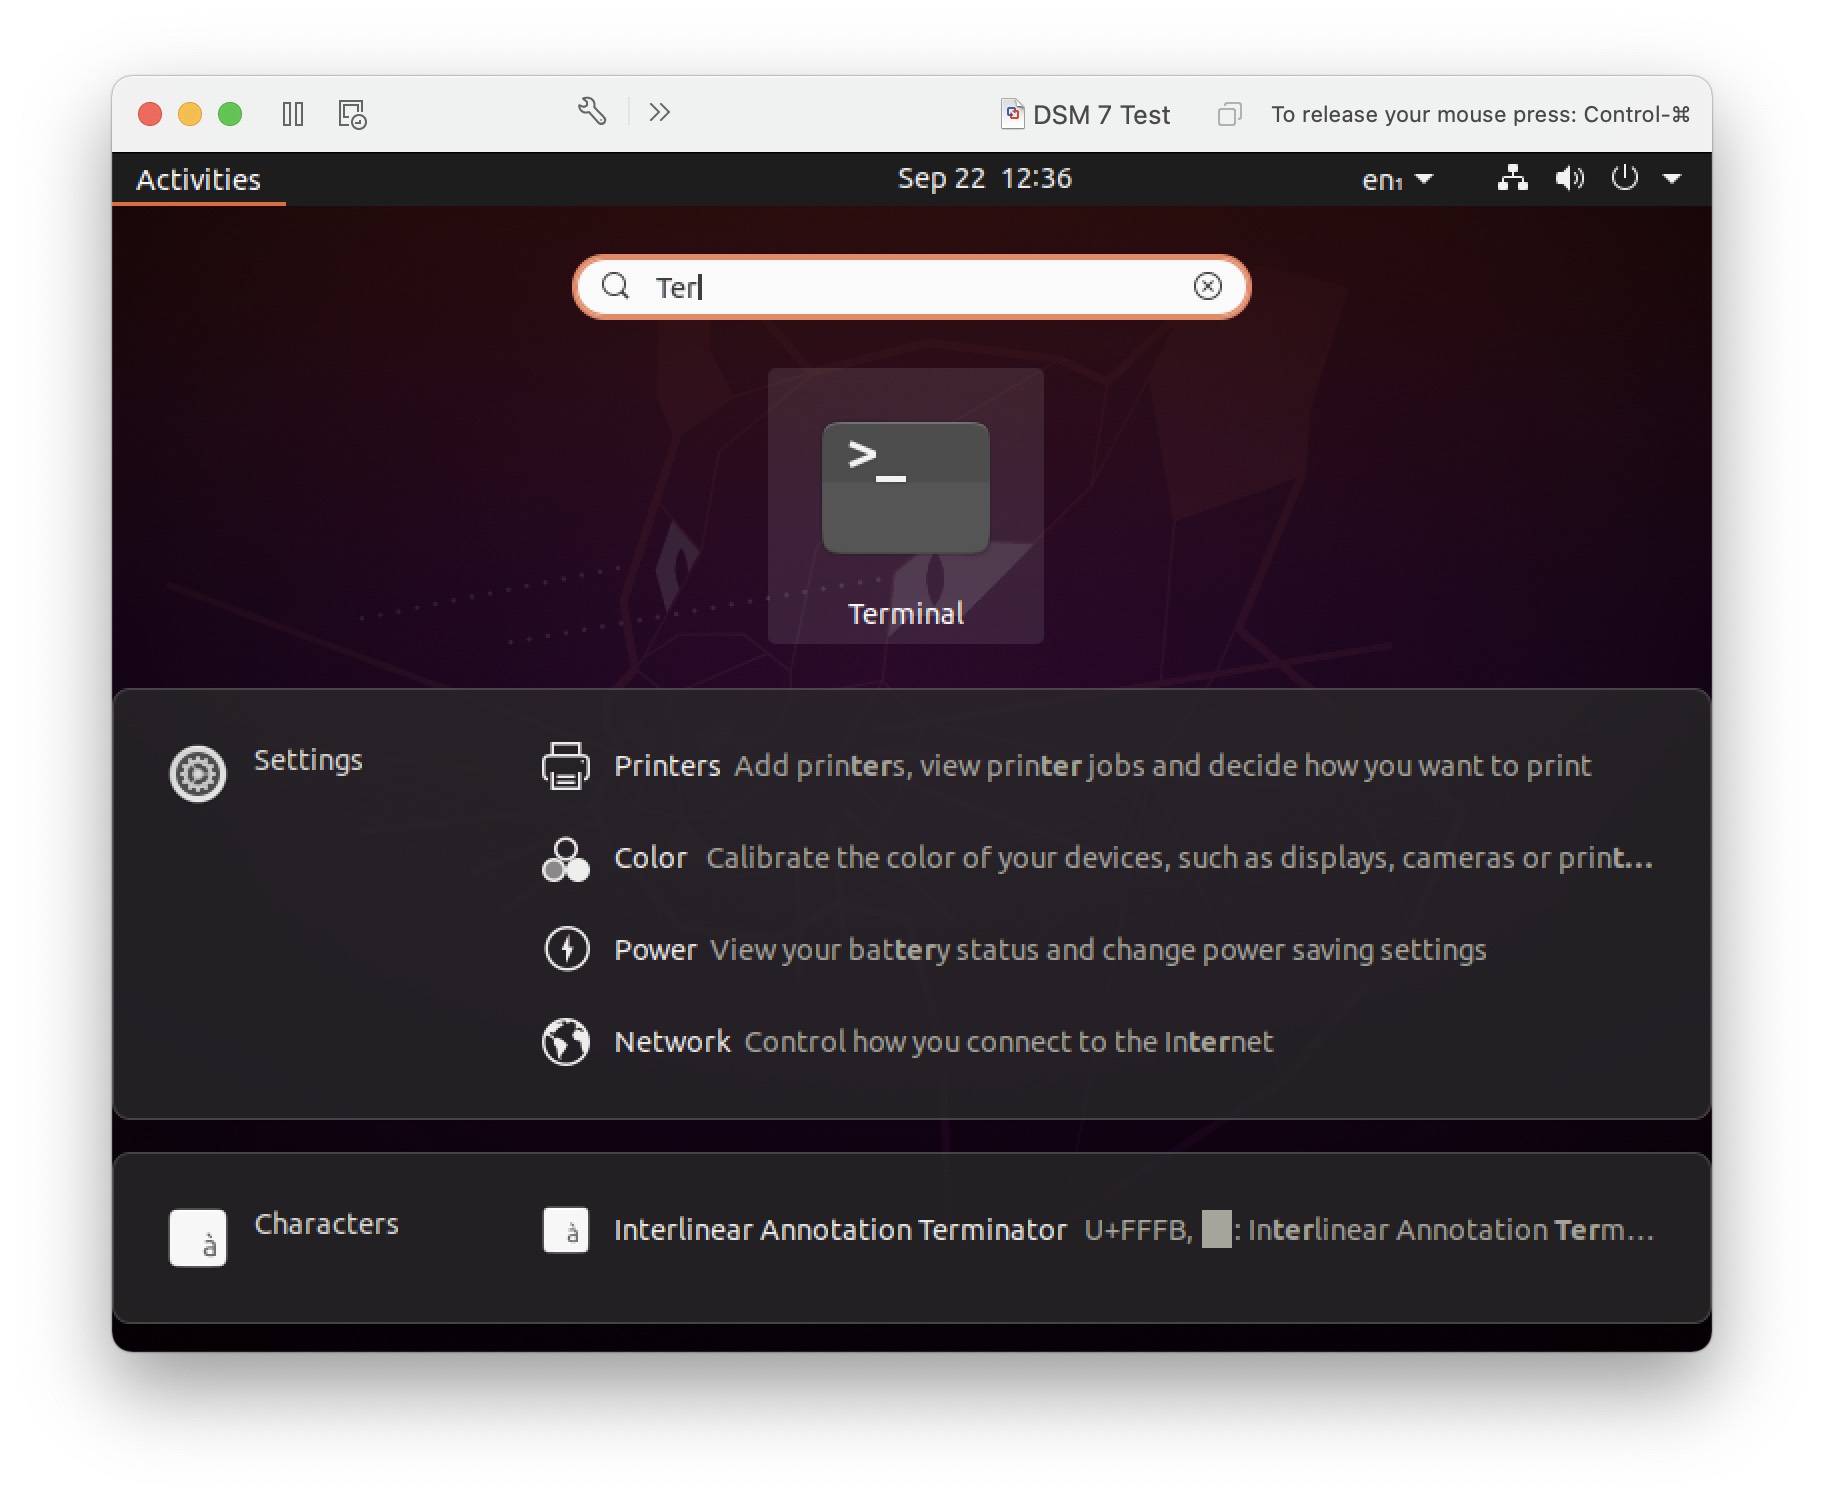
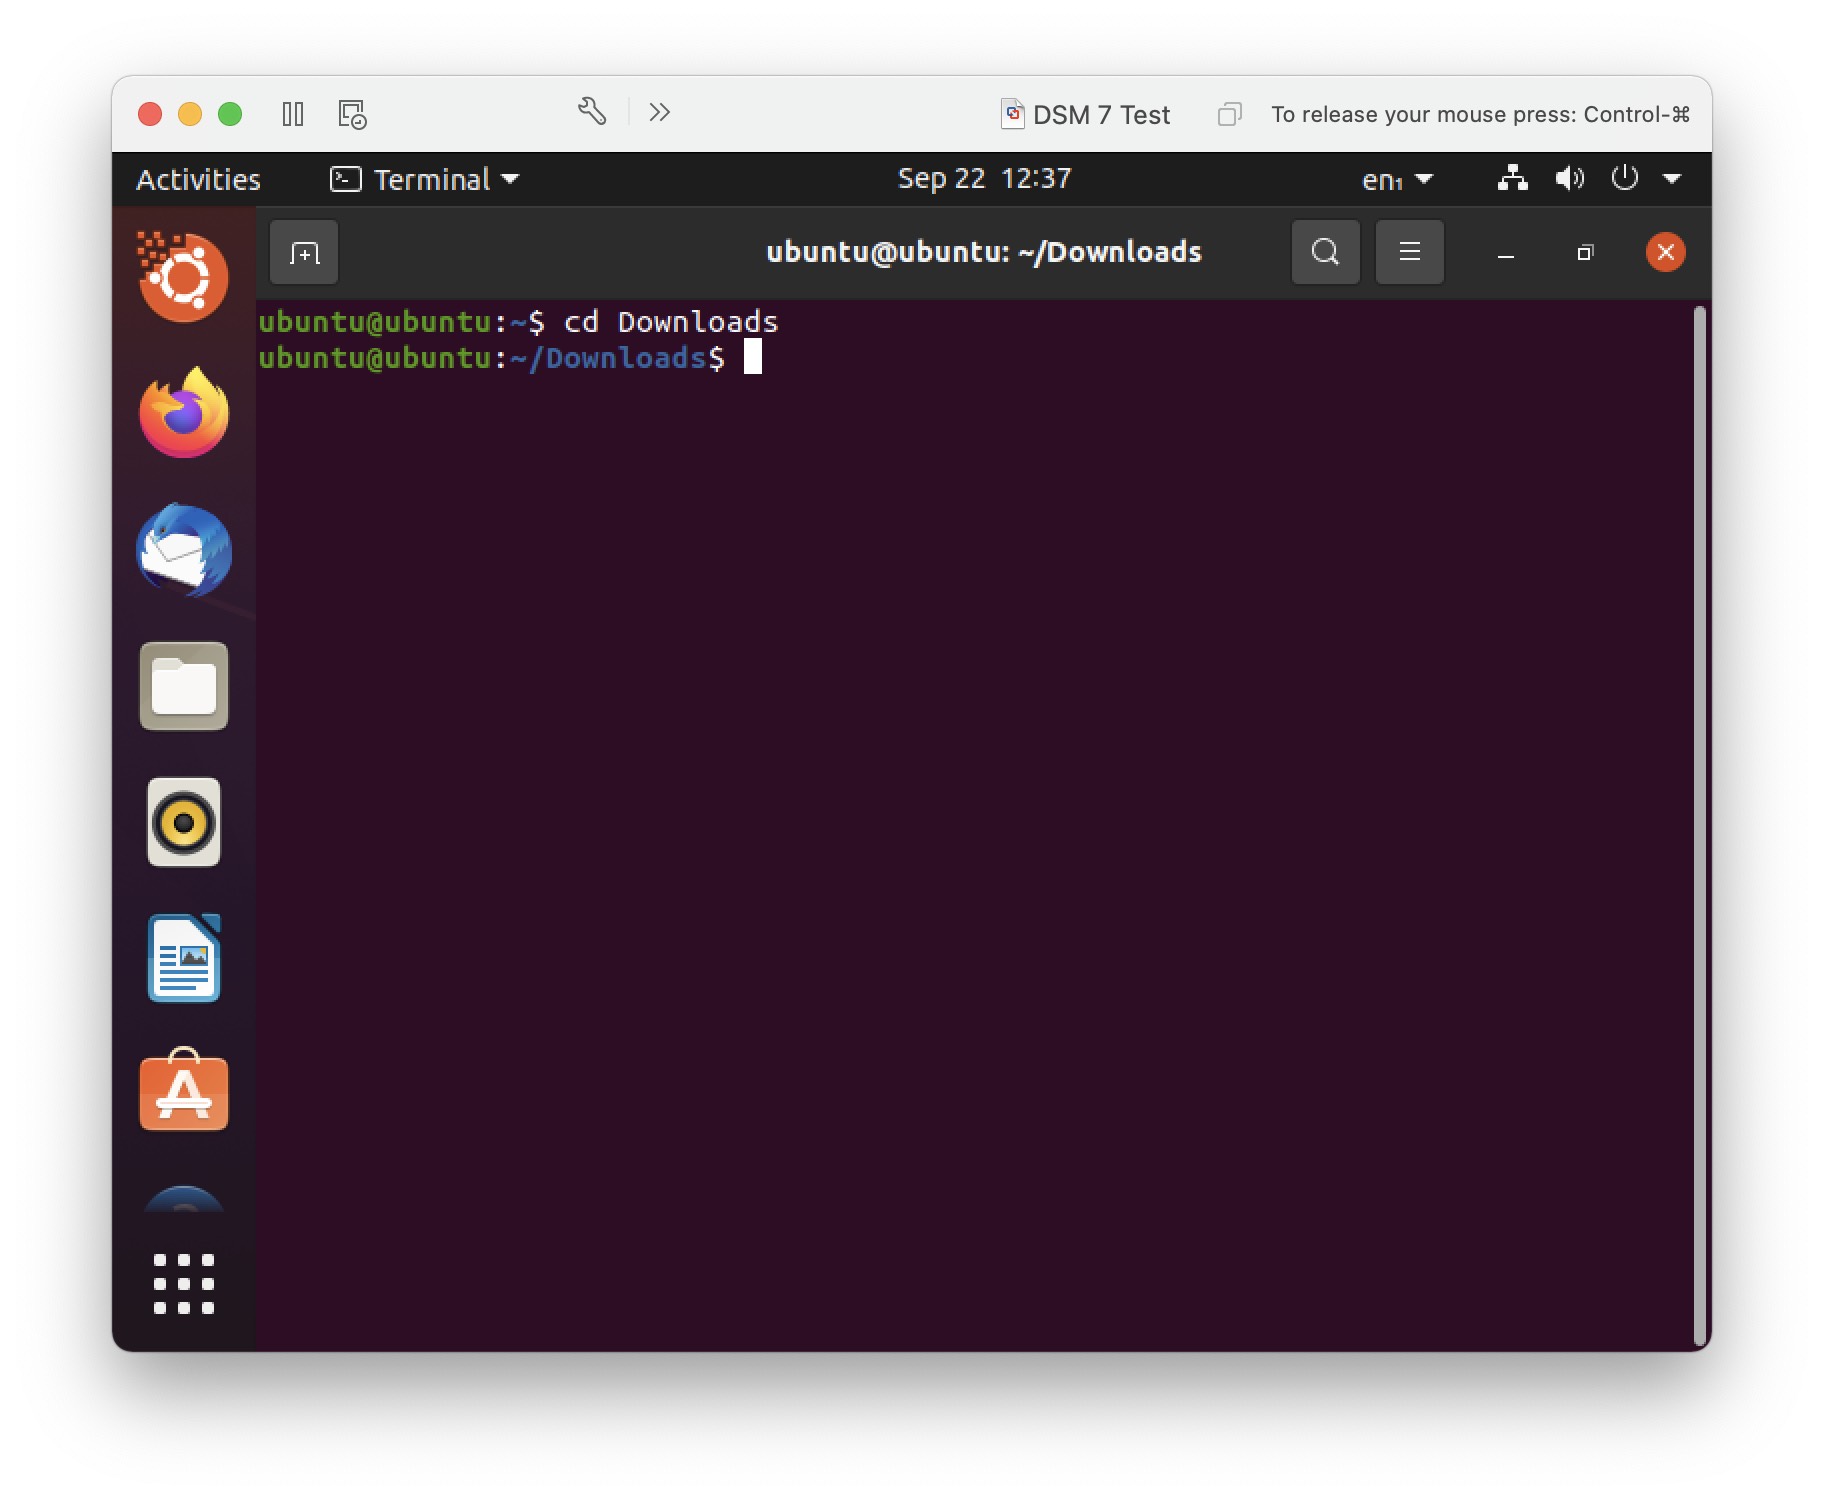
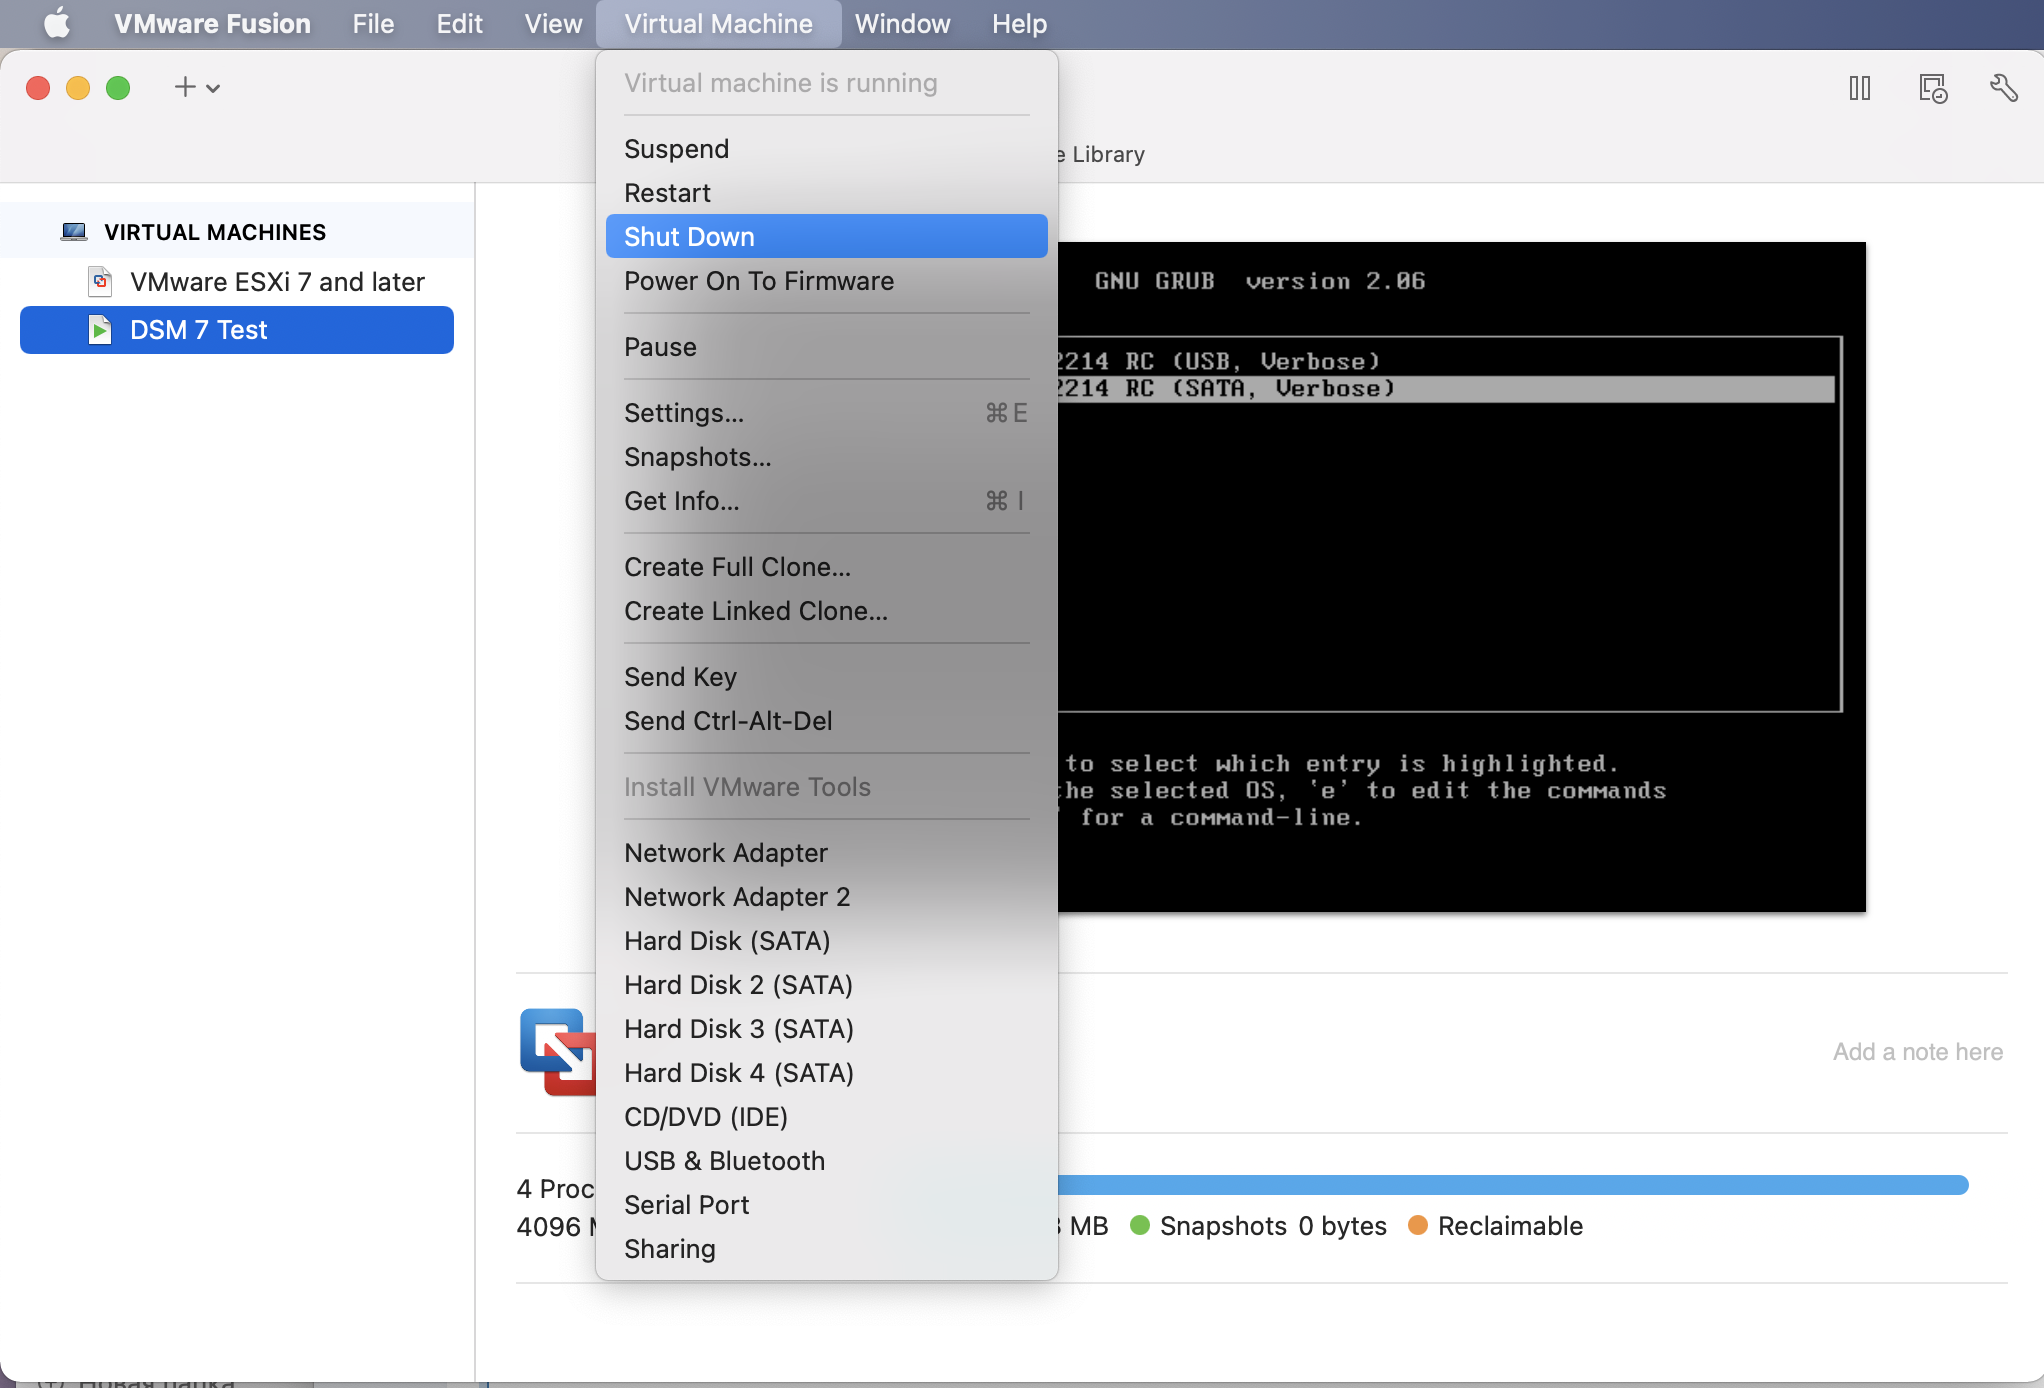
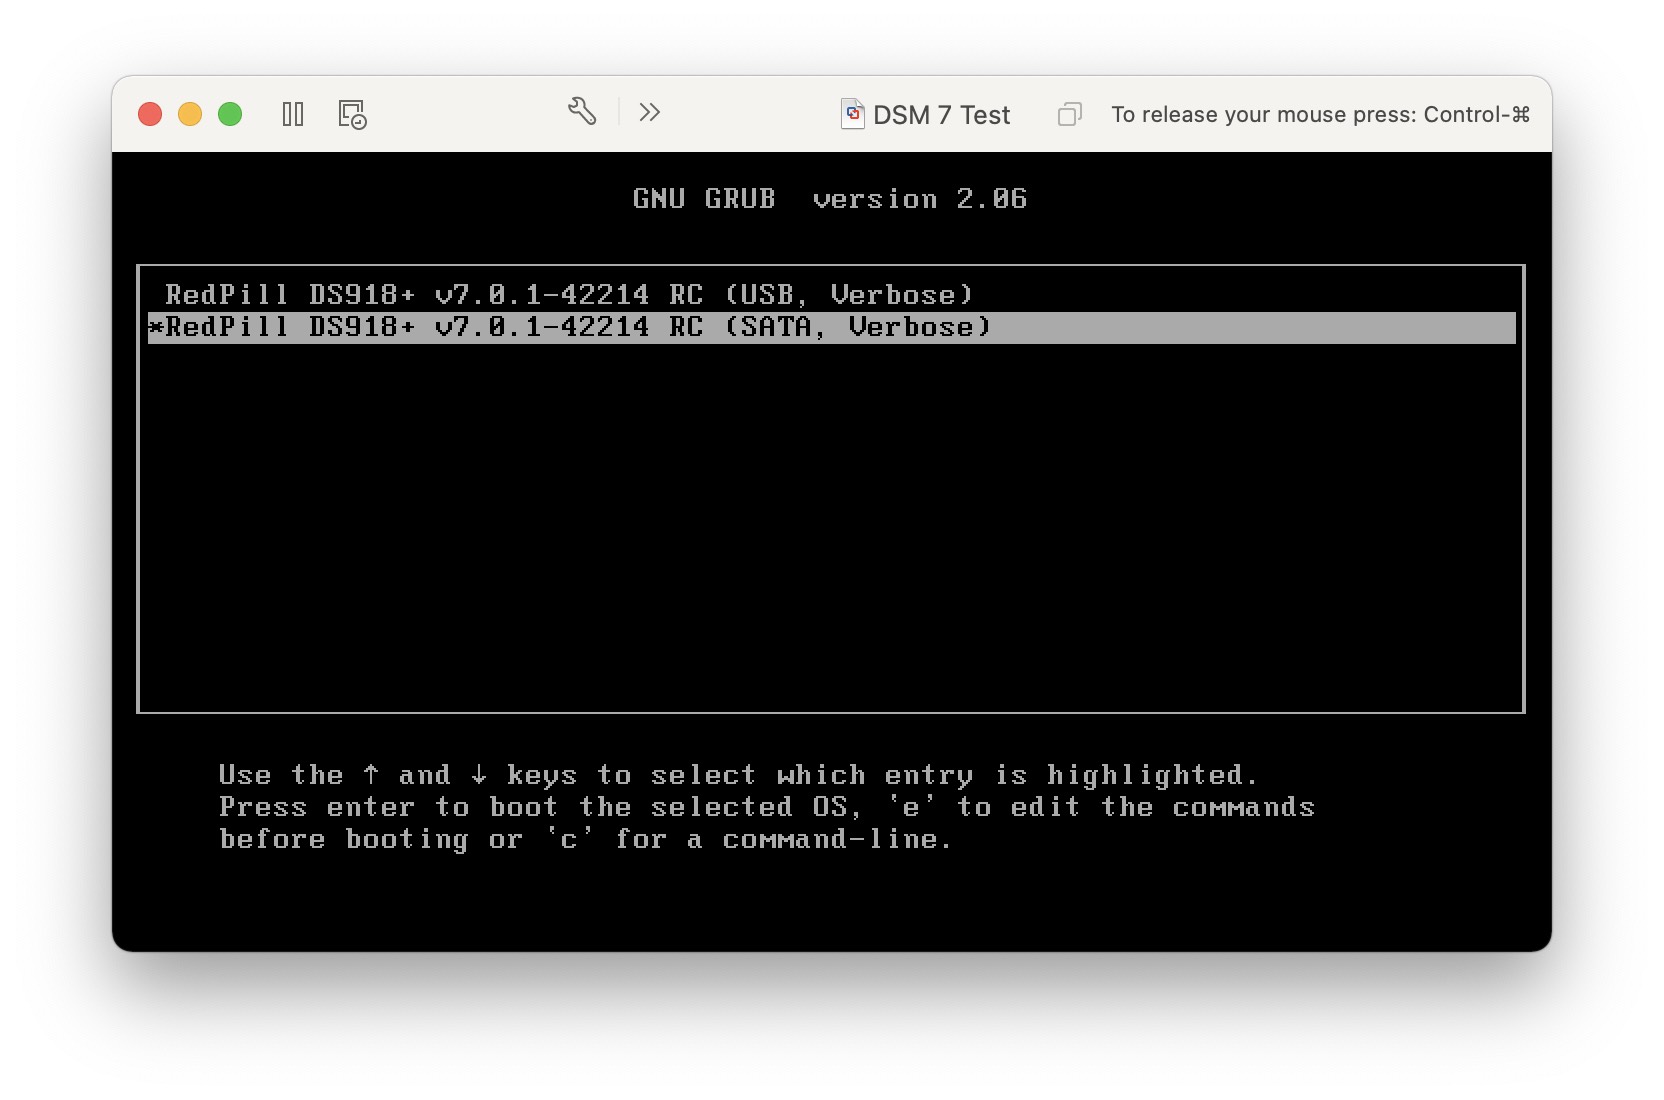
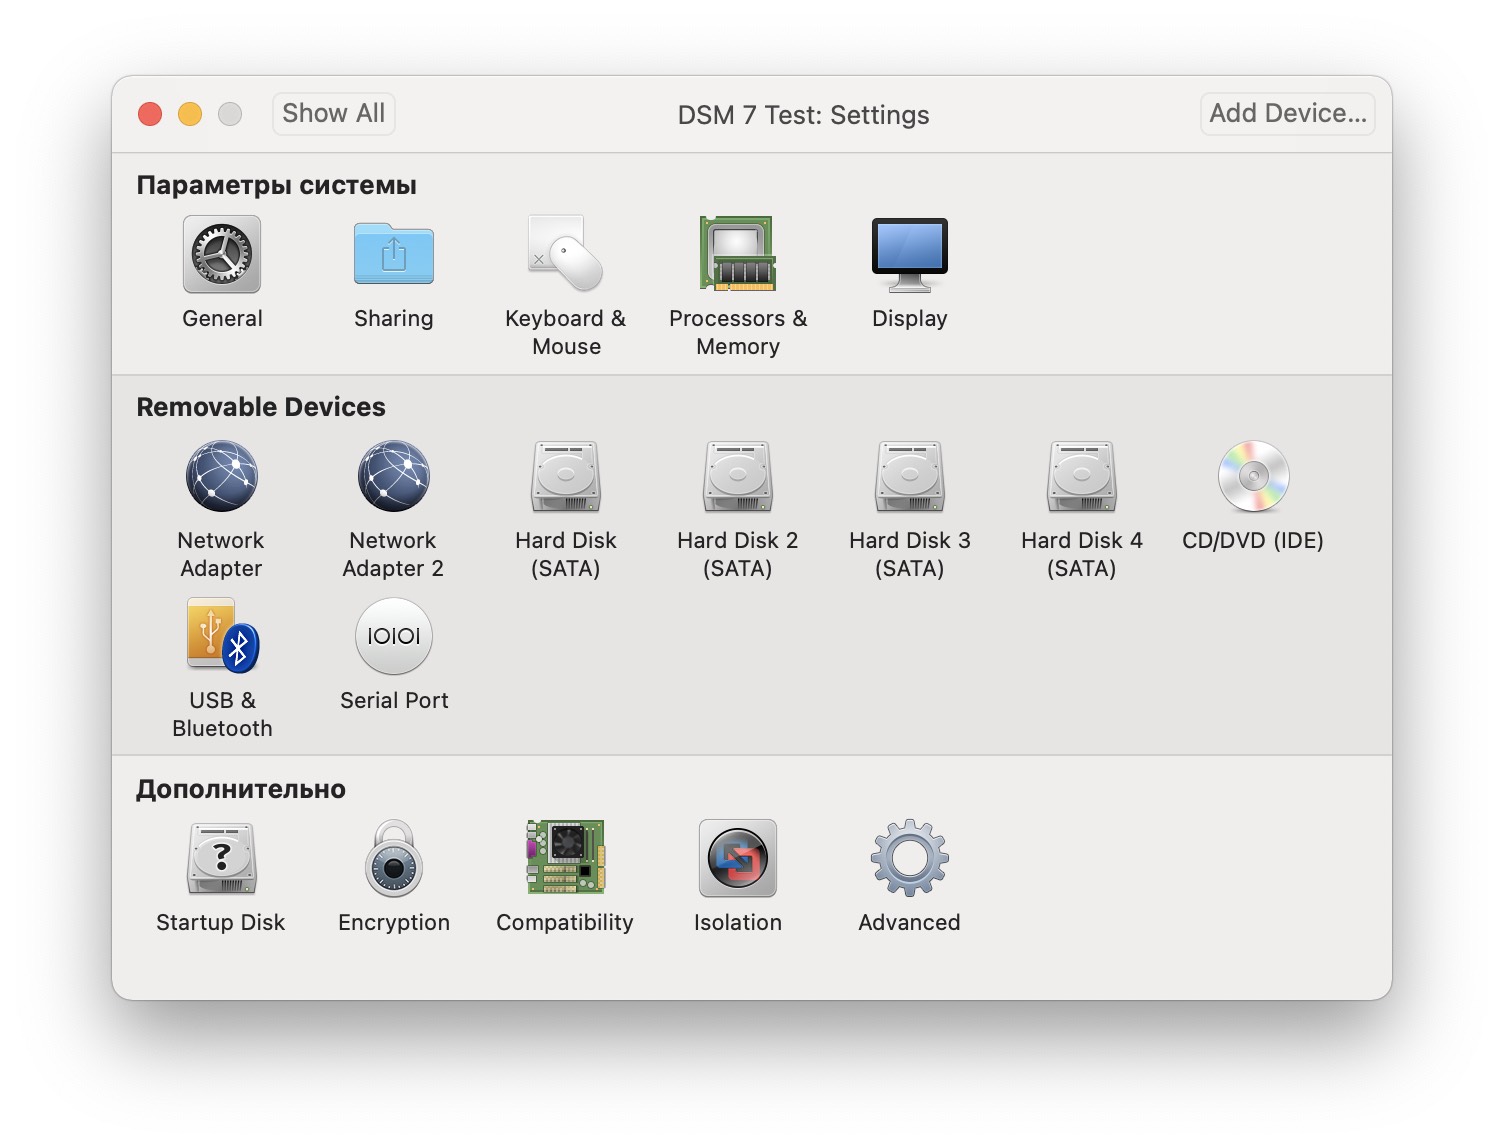
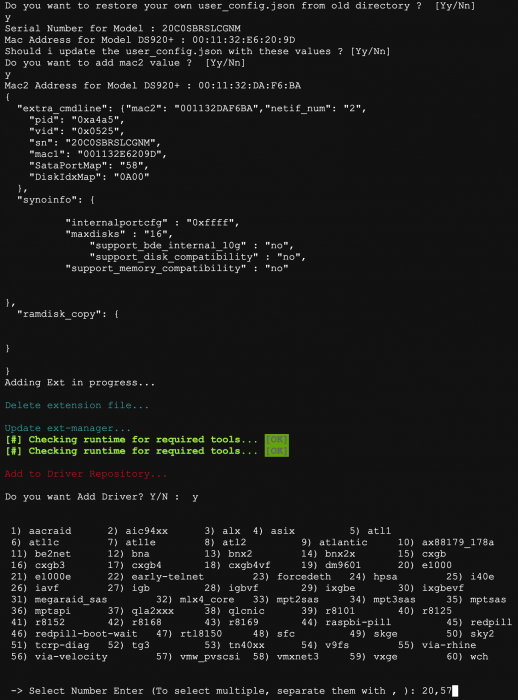
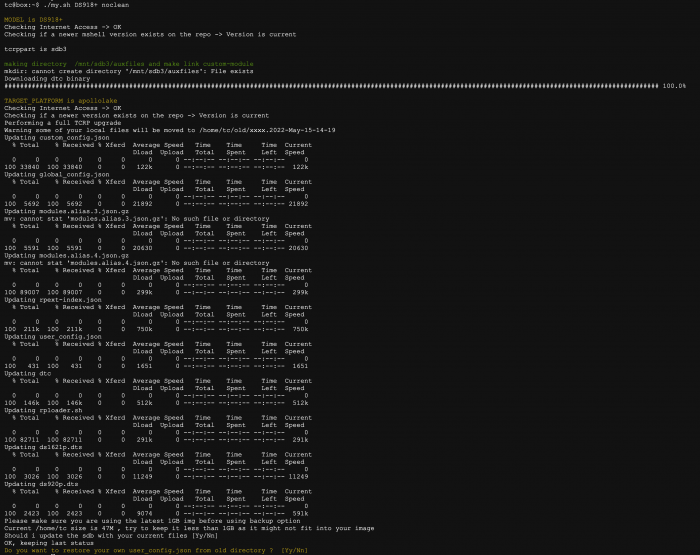
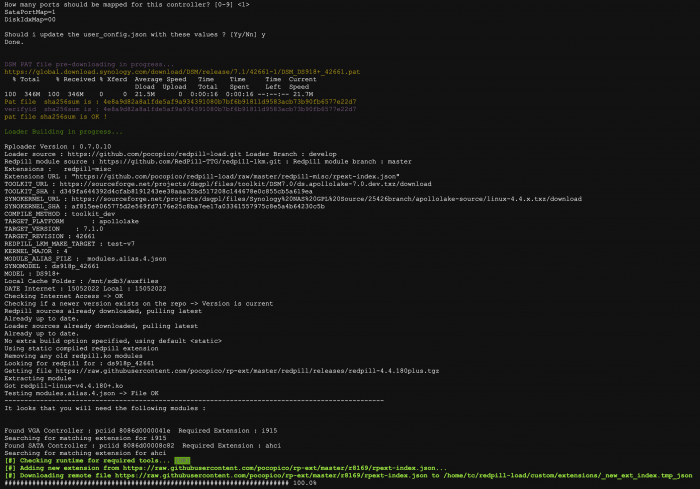
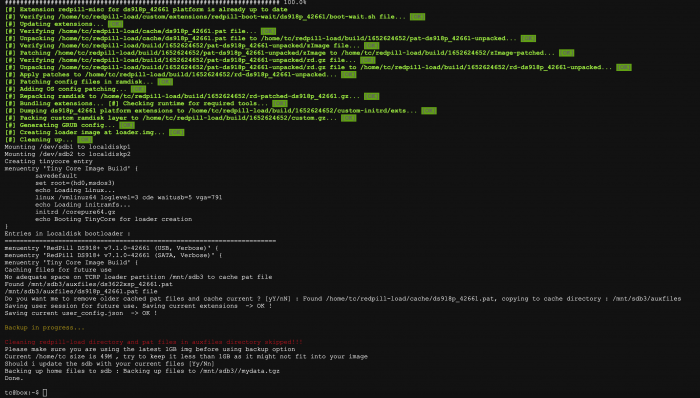
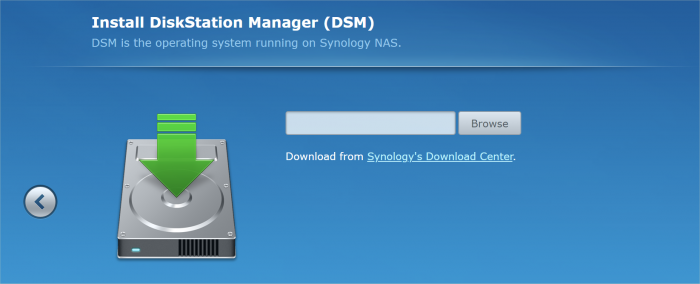
 Loader Information and Background RedPill is the core technology that enables DSM 7.x to run on non-Synology hardware. This post is intended to serve as a definitive tutorial/reference for configuring @pocopico's TinyCore RedPill (TCRP) loader. It explains how to install TCRP on baremetal, i.e. with DSM as the only operating system on your NAS hardware. A tutorial to install TCRP using the ESXi hypervisor is located here. There are other hypervisor tutorials in the Tutorials and Guides forum. TCRP uses a two step-process. First, a Linux OS (TinyCore) boots and evaluates the NAS hardware configuration. Therefore, it is best to have the hardware you plan to use (disk controllers and network cards in particular) installed prior to starting the TCRP setup. Then, an individualized loader (RedPill) is created. This loader is used to install and run DSM. After that, you can switch between starting DSM with RedPill, and booting back into TinyCore to adjust and rebuild the loader as needed. Basic Linux command line skills are needed to complete the installation. The tutorial provides examples of the commands that are needed, but exact syntax and capitalization are critical. If unfamiliar, research and review the following minimal list of commands: ls show the files in the current directory cat <file> show the contents of the specified file pwd show the current directory name cd <directory path> change to the specified directory (same rules as Windows, except with forward slashes instead of backslashes). With no argument, it returns to the “home” TCRP directory vi <file> a file editor, for manual editing of configuration files if required Ongoing Development This tutorial is maintained for consistency with the pocopico stable repository. Since TCRP is completely open-sourced, anyone can fork their own repo and contribute to development, and pocopico now maintains a separate development repo. As the best features and ideas are fully vetted and tested, they may be incorporated into the stable repo over time. If you use a repo, script or shell other than the pocopico stable repo, the loader may behave quite differently and the instructions and troubleshooting steps in this tutorial might no longer apply. In an open-source community, you can use any development resource you want, but you add the additional responsibility of understanding, vetting and testing that code on your system. Migration Step 1. Choose a DSM Platform/Architecture Evaluate your intended NAS hardware and your the intended use of DSM, and select a platform that best meets your needs. Reference information here: https://xpenology.com/forum/topic/61634-dsm-7x-loaders-and-platforms/ Write down the selected platform (e.g. DS918+), the corresponding architecture (e.g. apollolake) and whether the platform uses SataPortMap/DiskIdxMap or Device Tree for slot mapping. This information will be needed later. Now, make sure the NAS hardware is compatible, and prepare it correctly: x86-64-compatible CPU with two cores or more Each platform have maximum threads support! Any threads in excess will be ignored For certain platforms, Intel CPUs must be 4th generation “Haswell” or newer with FMA3 instruction set The corresponding AMD CPU architecture is “Piledriver” or newer AMD-based systems may require deactivation of the C1E option in the BIOS 2GB of RAM or more 2GB or larger USB flash drive Configure the BIOS to boot from the USB flash drive ONLY SATA disk controllers are preferred, but SCSI/SAS are compatible IMPORTANT: All SATA controllers must be configured to AHCI mode SATA controllers with port multipliers are not compatible ATA controllers are not compatible (disable embedded ATA in BIOS if possible) At least one SATA/SCSI/SAS drive (HDD or SSD), minimum size 21GB IMPORTANT: Enable SATA port hotplug on each disk port, if hotplug is supported by the BIOS/controller IMPORTANT: Disable M.2 SATA ports that are not in use, if supported by the BIOS/controller NVMe drives are not usable except as dedicated cache devices Host Bus Adapters are not currently compatible with Device Tree platforms Install any NVMe drives intended as cache devices On Device Tree platforms, NVMe drives must be installed prior to loader installation in order for them to be recognized Step 2. Download TCRP and Write Image to the USB Flash Drive The latest pocopico stable loader code is always linked here: https://xpenology.com/forum/topic/7848-links-to-loaders/ Download the tinycore-redpill 7.x loader and save it to your personal computer. Then, open it with a zip manager to show the boot images: tinycore-redpill.vX.X.X.img.gz (for BIOS/CSM/Legacy boot from USB flash drive) tinycore-redpill-uefi.vX.X.X.img.gz (for UEFI/EFI boot from USB flash drive) tinycore-redpill.vX.X.X.vmdk.gz (for virtual machine SATABOOT from disk image) Select the boot image that matches the boot capability of the NAS motherboard. If unsure, choose BIOS/CSM/Legacy boot. Save the gzip file to your personal computer, then open it with a zip archive manager and save the uncompressed version. Write the uncompressed image to the USB flash drive using Win32DiskImager or other appropriate tool. The USB flash drive is used to store TinyCore and the RedPill loader that it generates. It is a permanent component of an operational XPEnology system. Do not remove it, even after the DSM installation is complete and the NAS is fully up and running. Step 3. Boot into TinyCore and Complete Pre-Configuration Updates Start your NAS with the USB flash drive installed and TinyCore will boot. Then, launch a command-line session with either of these methods: Click the Terminal icon at the bottom right of the TinyCore desktop to launch a console window Use a ssh client (e.g. PuTTY) on your computer to connect a network-based console Consult your DHCP server/router for the IP address assignment (TinyCore's host name is "box") Login credentials: tc/P@ssw0rd When the Linux command line prompt ($) is displayed, update the TCRP script ./rploader.sh update Checking Internet Access -> OK Checking if a newer version exists -> There is a newer version on the repo should we use that ? [yY/nN] Y OK, updating, please re-run after updating Updating tinycore loader with latest updates Backing up files to /mnt/sda3//mydata.tgz Then, update the TCRP support files ./rploader.sh fullupgrade <downloads snipped> Current /home/tc size is 114M , try to keep it less than 1GB as it might not fit into your image Should i update the sda with your current files [Yy/Nn] Y Backing up home files to sda : Backing up files to /mnt/sda3//mydata.tgz Finally, choose a DSM release number Each DSM build as provided by Synology has a release number. You can display the combinations of platforms and releases supported by TCRP by just running the script with no arguments ./rploader.sh <command help snipped> Available platform versions: ---------------------------------------------------------------------------------------- apollolake-7.0-41890 apollolake-7.0.1-42218 apollolake-7.1.0-42661 broadwell-7.0.1-42218 broadwell-7.1.0-42661 broadwellnk-7.0.1-42218 broadwellnk-7.1.0-42661 bromolow-7.0.1-42218 bromolow-7.1.0-42661 denverton-7.0.1-42218 denverton-7.1.0-42661 geminilake-7.0.1-42218 geminilake-7.1.0-42661 v1000-7.0.1-42218 v1000-7.1.0-42661 Step 4. Configure System-Specific Parameters Custom system parameters are stored in the user_config.json file. This can be manually edited, or TCRP can help determine appropriate values for the hardware. USB flash drive VID/PID: TCRP can query the USB flash drive for the hardware vid/pid values that DSM uses to identify the loader during bootup ./rploader.sh identifyusb Found: Superdisk Flash SerialNumber: 123456 Vendor ID: 0x1234 Product ID: 0x0001 Should i update the user_config.json with these values ? [Yy/Nn] Y Serial number/MAC: TCRP can automatically generate a serial number for the platform selected in step 1. Additionally, it will generate a random MAC address for the NAS network card. If you prefer to use the actual hardware MAC address instead, append "realmac" to the command. Example 1: random MAC address ./rploader.sh serialgen DS3622xs+ Serial Number for Model : 20C0SQRLR47QM Mac Address for Model DS3622xs+ : 00:11:32:80:B2:36 Should i update the user_config.json with these values ? [Yy/Nn] Y Example 2: real MAC address ./rploader.sh serialgen DS3622xs+ realmac Serial Number for Model : 2150SQRGS7N5T Mac Address for Model DS3622xs+ : 00:11:32:57:3A:9B Real Mac Address : 00:0C:24:62:3E:3D Notice : realmac option is requested, real mac will be used Should i update the user_config.json with these values ? [Yy/Nn] Y Drive Slot Mapping: TCRP can try to determine how to map the NAS disk controller ports to DSM slots. If the chosen platform uses SataPortMap/DiskIdxMap for port mapping, the command below will do this. If it uses Device Tree for slot mapping, the command may be skipped, as the Device Tree is configured automatically during the loader build. ./rploader.sh satamap Found "02:02.0 SATA AHCI controller" Detected 4 ports/2 drives. Override # of ports or ENTER to accept: <4> Recommended settings: SataPortMap=4 DiskIdxMap=00 Should I update the user_config with these values ? [Yy/Nn] Y If the port count is not what you expect, it may be due to the motherboard design servicing physical ports with multiple controllers, or because of M.2 SATA slot support. If necessary, the port count can be overridden with whatever you like. NOTE: If you see a WARNING message, it is certain that either some of your drives are inaccessible or the DSM install will encounter problems. Evaluate and investigate the issue. The satamap command can be rerun as many times as needed to understand the system. Manual Review: With prior loaders (such as Jun's), the configuration of these parameters was completely manual. There is no single setup that works for all hardware. Even after using the tools above, please review and verify the parameters, understand what they do, and manually edit if needed. Whatever changes rploader.sh makes to the user_config.json file can be reviewed by displaying the file contents cat user_config.json and overridden by editing the file vi user_config.json You can also add a simpler editor, nano tce-load -iw nano nano user_config.json And there is also a graphical editor accessible from the TinyCore desktop Step 5. Optional: Manually Add Driver Extensions While TCRP can automatically add drivers based on the detected NAS hardware, it isn’t foolproof. You might want to build a loader for a device you don’t actually have yet. And there are features that are "opt-in" only. So, a process exists to manually add drivers and other functionality. Extensions are stored in repositories hosted on the web. All the extensions in the main repository are viewable here: https://github.com/pocopico/rp-ext To list all the extensions recommended by TCRP's hardware detection algorithm, use ./rploader.sh listmods <architecture>-<version>-<DSMreleasenumber> ./rploader.sh listmods apollolake-7.1.0-42661 To add a specific extension, choose from the list and reference the architecture from Step 1. ./rploader.sh ext <architecture>-<version>-<DSMreleasenumber> <extensionurl> ./rploader.sh ext apollolake-7.1.0-42661 add https://raw.githubusercontent.com/pocopico/rp-ext/master/redpill-acpid/rpext-index.json ./rploader.sh ext denverton-7.1.0-42661 add https://raw.githubusercontent.com/pocopico/rp-ext/master/v9fs/rpext-index.json The examples illustrate adding ACPI and VIRTIO support. These are often chosen enhancements to a basic installation. Step 6. Build the Loader When all preparation steps are complete, build the loader using the command structure ./rploader.sh build <architecture>-<version>-<DSMreleasenumber> Example #1: DS3622xs+, auto detect hardware ./rploader.sh build broadwellnk-7.1.0-42661 Example #2: DS918+, use preselected drivers ./rploader.sh build apollolake-7.1.0-42661 manual TCRP will download resources from the Internet to complete the complex process of the loader build. When finished, it will write it to the USB flash drive and add new items to the GRUB boot menu. Review the output for any errors and make corrections if necessary. Step 7. Optional Backup Tasks Save the TinyCore configuration state as the default, so that the next boot of TInyCore starts with all your settings ./rploader.sh backup Back up the generated RedPill loader partition to available space on the USB flash drive ./rploader.sh backuploader Step 8: Restart and Boot DSM Using the Grub USB Option Cleanly shutdown and reboot with the TinyCore command exitcheck.sh reboot First, the GRUB Menu is displayed. If necessary, use the arrow keys to ensure that USB is selected and press ENTER. The loader will show some initialization information and silently boot DSM. Nothing else will be displayed unless a serial console is attached (see the Troubleshooting section below). Wait a few minutes, then launch either https://find.synology.com or the Synology Assistant desktop utility. If the loader is working properly, a new "SynologyNAS" will be displayed as Not installed (for a new build) or the name of your existing Migratable NAS (if upgrading from a previous version). Use your browser to connect to the NAS. If "Something went wrong" is displayed, jump to the Basic Troubleshooting section below. Otherwise, browse to the Synology Download Center and download the DSM install PAT file that matches the platform and release number specified in the loader build. Do not use the PAT file stored in TinyCore. It has modifications that are incompatible with DSM installation. However, its name may help identify the correct PAT file to download below. There can be several files that appear to be candidates. PAT files marked VirtualDSM will not work. Also there can be patch PAT files with the same numbering. These will not work and will usually be smaller than 50MB. The correct PAT file is 300MB or larger. Once the correct DSM PAT file is saved to your personal computer, upload it to the NAS. Follow the prompts to complete the installation. FOR UPGRADES ONLY: If Synology Assistant shows Not installed, or if prompted to erase the disks during the upgrade, STOP! Some or all of your array disks are not visible to DSM. This must be resolved via troubleshooting and reconfiguration before installing DSM 7.x. IMPORTANT: During the install, always select DSM manual updates. If a new install completes normally, but then fails after the reboot, it may be that DSM has attempted to auto-update itself with incompatible code. Basic Troubleshooting Where to Post for Help It’s easy for requests for installation help to get lost in various unrelated forum threads. Post requests for help as a new topic in the DSM Installation Forum. At a minimum, state the hardware configuration, selected platform, DSM version, user_config.json information (delete or redact the serial number and configured MAC address) and any information from debugging analysis that you have done. DON’T post general requests for help on this thread. Please DON’T post general requests for help on TCRP or RedPill development threads unless providing feedback on a dev issue.


- 156 replies
-
- 40
-

-

-
 Hello. If you are using an existing 7.0.1 after the version of the Synology DSM was updated to 7.1, you may want to update to 7.1 or this is a guide for those who want to install 7.1 from the beginning. For those who are new to this article, I will share it with you by adding and subtracting it from the existing 7.0.1 guide. It is a translation from Korean to English using a translator. Please understand if there is a slight misunderstanding. Existing RedPill, released last year, can generate IMG files directly through the compilation process of the bootloader only if Linux is available separately In the case of tinyCore RedPill, it comes completely with tinyCore Linux in the form of a USB boot image It's much easier without having to install and prepare linux separately. You can add the drivers you want to build after you select them and add them directly. The latest version of tinycore supports a total of 7 models (DS3622xs+/DS918+/DS3615xs/DS3617xs/DS1621+/DS920+/DVA3221) You can continuously change the boot loader on your own without re-imaging it (model/sn/mac, etc.) Tinycore supports both img for native installation and vmdk for virtual environments. 1.Preparing Bootloader IMG Use the Download button in the middle of the beam link below.Download the gz file In it 0.4.6 version img.You can decompress the gz file one more time and use the img file. (Full File) https://github.com/pocopico/tinycore-redpill (for LEGACY / EFI) https://github.com/pocopico/tinycore-redpill/raw/main/tinycore-redpill.v0.4.6.img.gz (for VMWARE) https://github.com/pocopico/tinycore-redpill/raw/main/tinycore-redpill.v0.4.6.vmdk.gz 2. Bootloader IMG File USB Recording Use the above tinycore-redfill.v0.4.6.img file to burn it with USB with a convenient image tool such as WinImage or Rufus. You don't need to adjust the configuration file in advance to modify the VID/PID/Serial/MAC/SATAPortMap like the JUN loader. If you want to create a USB image on a Mac or Linux like me, you can use the DD command below in the terminal. (Assuming that the DEVICE ID of the USB verified by diskutil is disk4) sudo diskutil unmountDisk /dev/disk4 sudo dd if=/Users/MyAccount/Downloads/tinycore-redpill.v0.4.5.img of=/dev/disk4 bs=1m sudo diskutil eject /dev/disk4 3.Starting TinyCore Linux USB boot by plugging it into a PC for xpenology (UEFI 1 partition or USB CSM can be booted) The tinyCore Linux (tinyCore Image Build menu) is running and appears. Run the far right icon terminal app here. Check the ip address automatically assigned an en0 LAN card with ifconfig. [tinyCore Linux Screen] 4. Adjust CONFIG after SSH connection Ssh connection with putty etc. from PC other than xpenology. ( id:tc / pass : P@ssw0rd ) I'm connecting. Tinycore Redfill is stabilizing right now PocoPico, the original author of this program, fixes bugs from time to time and announces rebuilding. There's a possibility that this rebuild will happen from time to time Even with the final image version of 0.4.6, changes can still be updated in real time over the Internet. Sometimes the rploader.sh file itself changes if there is a bug. If you've migrated from JUN xpenology, at tc@box:~$user_config.json Existing grub such as VID/PID/Sn/Mac/SataPortMap in user_config.json file.Refer to the cfg and move it as it is. For new installers, perform serial GEN/USB VID, PID auto-detect, SataPortMap auto-detect, etc. as shown below. For the next process, I will share the command focusing on the platform that I have completed the most normal verification. tc@box:~$./rploader.sh serialgen (select one from DS3622x+/DS918+/DS3615xs/DS3617xs/DS1621+/DS920+/DV3221) tc@box:~$ ./rploader.sh identifyusb now tc@box:~$./rploader.sh satamap now (no HBA card user required) You can see that the contents of user_config.json have been changed automatically. Finally, the commonality of existing users and new installers is tc@box:~$catuser_config.json If you assume that there are 4 internal Sata ports, SataPortMap = "4", DiskIdxMap = "00" Please check if it's changed to the back. After find.synology.com, you may not be able to find SATA HDDs during DSM installation. The following is an example of a 6-port SATA additional expansion card. SataPortMap = "46", DiskIdxMap = "0000" (Except for those who use H200, H310, H710, etc. cards, you don't have to clear the options for this SataPortMap and DiskIdxMap itself and use it. Please erase the lines of the above two options with the vi editor and organize them well so that there are no Syntex errors. Of course. ./rploader.sh satamap now command is not required.) 5.BIOS Internal SATA Port Hot Plug disable -> enable Handling (Important) To avoid temporarily reducing the number of SATA PortMap maps set above by the number of HDDs physically connected by the Sata cable during the DSM installation process: Make sure to turn on the Hot Plug function. This reduces the probability of encountering an error message stating that the above automatically recognizes the number of SATAPortMaps and the HDD is not found. Please refer to the link below for the relevant details highlighted by TheSTREET. http://www.2cpu.co.kr/nas/37891 6.Add boot loader extension driver after SSH connection (optional) (You can skip this part. The required expansion driver is automatically discovered and received during BUILD 6 process.) A detailed list of extension drivers can be found below. https://github.com/pocopico/rp-ext The supported platforms are as follows: DS918 apollake, DS3615xs bromolow, DS3617xs broodwell, and ds3622xs+broadwellnk. In my case, I added three types of extension drivers: Realtech, Intel LAN, and DELL PERC as follows. tc@box:~$ ./rploader.sh ext broadwellnk-7.0.1-42218 add https://raw.githubusercontent.com/pocopico/rp-ext/master/r8101/rpext-index.json tc@box:~$ ./rploader.sh ext broadwellnk-7.0.1-42218 add https://raw.githubusercontent.com/pocopico/rp-ext/master/r8125/rpext-index.json tc@box:~$ ./rploader.sh ext broadwellnk-7.0.1-42218 add https://raw.githubusercontent.com/pocopico/rp-ext/master/r8152/rpext-index.json tc@box:~$ ./rploader.sh ext broadwellnk-7.0.1-42218 add https://raw.githubusercontent.com/pocopico/rp-ext/master/r8168/rpext-index.json tc@box:~$ ./rploader.sh ext broadwellnk-7.0.1-42218 add https://raw.githubusercontent.com/pocopico/rp-ext/master/r8169/rpext-index.json tc@box:~$ ./rploader.sh ext broadwellnk-7.0.1-42218 add https://raw.githubusercontent.com/pocopico/rp-ext/master/igp/rpext-index.json tc@box:~$ ./rploader.sh ext broadwellnk-7.0.1-42218 add https://raw.githubusercontent.com/pocopico/rp-ext/master/e1000/rpext-index.json tc@box:~$ ./rploader.sh ext broadwellnk-7.0.1-42218 add https://raw.githubusercontent.com/pocopico/rp-ext/master/e1000e/rpext-index.json tc@box:~$ ./rploader.sh ext broadwellnk-7.0.1-42218 add https://raw.githubusercontent.com/pocopico/rp-ext/master/mpt3sas/rpext-index.json 7.Build Boot Loader After SSH Connection (Two Step Update - TSU) If you are done adding the above extension drivers, build the bootloader at the end. After 7.0.1 build, check if the custom-module -> /mnt/sdb3/auxfiles directory is created well with the ll command. Without this directory, the second 7.1.0 build will fail. If you do not see the custom-module -> /mnt/sdb3/auxfiles directory, Please do the 7.0.1 build again. [DS3622xs+] ./rploader.sh update now ./rploader.sh fullupgrade now ./rploader.sh serialgen DS3622xs+ ./rploader.sh identifyusb now ./rploader.sh satamap now ./rploader.sh build broadwellnk-7.0.1-42218 ./rploader.sh clean now ./rploader.sh build broadwellnk-7.1.0-42661 ./rploader.sh clean now; rm -rf /mnt/sdb3/auxfiles; rm -rf /home/tc/custom-module; ./rploader.sh backup now; [DS918+] ./rploader.sh update now ./rploader.sh fullupgrade now ./rploader.sh serialgen DS918+ ./rploader.sh identifyusb now ./rploader.sh satamap now ./rploader.sh build apollolake-7.0.1-42218 ./rploader.sh clean now ./rploader.sh build apollolake-7.1.0-42661 ./rploader.sh clean now; rm -rf /mnt/sdb3/auxfiles; rm -rf /home/tc/custom-module; ./rploader.sh backup now; [DS3615xs] ./rploader.sh update now ./rploader.sh fullupgrade now ./rploader.sh serialgen DS3615xs ./rploader.sh identifyusb now ./rploader.sh satamap now ./rploader.sh build bromolow-7.0.1-42218 ./rploader.sh clean now ./rploader.sh build bromolow-7.1.0-42661 ./rploader.sh clean now; rm -rf /mnt/sdb3/auxfiles; rm -rf /home/tc/custom-module; ./rploader.sh backup now; The last line doesn't get restored even if you reboot later It is the process of organizing the folders where the pat file exists and reducing the capacity and completing the backup. 8-1.Using the bootloader (update user) tc@box:~$ sudo poweroff Place the 7.1 bootloader on the bottom well In the existing 7.0.1 henol boot state, obtain the DSM 7.1.0-42661.pat file separately from the Sinology Download Center https://www.synology.com/ko-kr/support/download Click the Control Panel -> Update and Restore -> DSM Update -> Manual DSM Update button and proceed with the update to the prepared pat file above. If you are asked to wait 10 minutes after the update, use the telnet connection method that appears in the NAS column by searching for the title telnet I'll power off. -> using putty and telnet it using user=root without password. after you type root then enter, it will goes to linux prompt. By the way, if there are a lot of actual packages installed, it says that you have to wait 20 minutes. Very few packages appear to wait 10 minutes. If you don't want to let me go to the Wi-Telnet connection process, check the monitor to see if you want to power down when rebooting or when rebooting I think you can change it quickly to enter TC Linux. Replace the USB with the 7.1 boot loader prepared above and proceed with the boot You can use it. (There's nothing else I can do for you.) If you want to update from 7.0.1 to 7.1, Process 8-1 in the guide above, and if you're using it, boot from USB and enter Tinycore Linux again You can start from number 3. Tynicore Linux is the third menu, so you have to switch quickly in 4 seconds. This is a method that can be carried out without preparing one more USB memory, but the existing 7.0.1 boot loader may be erased You can use the new functions, backuploader now and restoreloader now action 8-2.Use bootloader (new installer) After successfully completing the build above, reboot the xpenology with USB using the command below. tc@box:~$ sudo reboot The settings or ext drivers that were backed up remain the same The setting values are restored from the mydata.tgz file and remain intact at the next Tiny Core Image Build boot for modification. (The default setting for automatic entry within 4 seconds is USB, Verbose at the top. If you don't touch it with your keyboard, it will automatically enter USB mode.) xpenology On-Screen After PC Boots In the case of the existing RedPill, you will be asked to find it at find.synology.com like the existing Jun loader For this tinyCore: Decompressing Linux... Parsing ELF... done. Booting the kernel. This is the message. There is a delay of 1 to 2 minutes from the IP allocation, so please wait a little bit. In this state, browse to find.synology.com on another PC and you will find the xpenology IP. After that, you can proceed with the installation process of the Synology DSM as you are working on the existing xpenology.

-
 I have managed to compile the i915.ko module (and associated modules) for Intel 10th Gen CPUs (i.e. 9BC8 etc.) Tested and working on DS918+ 7.0.1-42218 up3; Redpill loader on baremetal instance. The patched i915 module from IG88 had issues and would end up in a hardlockup/kernel panic for me. For anyone who wants to test, i have attached the compiled modules. https://www.filehosting.org/file/details/3054890/i915.7z https://www104.zippyshare.com/v/oPItjx82/file.html https://dailyuploads.net/41tops2ix61g
 -
Hello~! I am xpenology user. And I am an IT engineer who creates shell scripts as hobbies. Please understand that it is written by a google translate site. because i’m korean who is not fluent in English. I created built Redpill Multi boot loader. Multiple DSMs can be used as one loader Requirement ============================================================= 1, Redpill-Multiloader_7.1-42661.img file Download Please understand that Google Drive is used because of its large capacity. There is a link below. 2. It is the same as using the existing Redpill Tinycore or a separately made loader. 3. ESXi Enviroment (Bootloader SATA1 (1:0), DataDisk SATA0 (0:0)) or Baremetal Enviroment (It can be used by making a USB with rufus or dd, etc.) How to RUN Redpill Multiloader ============================================================= 1. Redpill-Multiloader_7.1-42661.zip decompression 2. Modify /boot/grub/grub.cfg by mounting the first partition on OSFmount or TC #==================================================================================== ## User config - Your values Change #==================================================================================== set sn=1234SQRDD5678 set netif_num=1 set mac1=001122334455 set SataPortMap=9 set DiskIdxMap=0 set SasIdxMap=0 The USB or Boot oder part is an additional setting and does not necessarily need to be modified. 3. Convert Redpill-Multiloader_7.1-42661.img to Redpill-Multiloader_7.1-42661.vmdk, Redpill-Multiloader_7.1-42661-flat.vmdk 4. Register as boot disk in ESXi VM (default SATA1 (1:0)) 5. Enter GRUB and use the desired DSM version How to ADD Ext Driver (for Baremetal & ESXi, How to make USB Stick include) ============================================================= Additional notes ============================================================= 1. It is built by default for EXSi and can be modified after additional builds if necessary. (I'll update the method further.) 2. Due to variable processing for sn, mac, etc., it is temporarily modified in GRUB state and cannot be used. 3. The video has been processed only with the popular DS918+, DS920+, DS1621+, DS3622xs+, and DVA3221, and DS3615xs and DS3617xs are also available. 4. USB is handled as a submenu, and pressing ESC will return to the upper menu. 5. In the future, we plan to make Multiloader production possible directly on TC through tr_cb.sh. https://xpenology.com/forum/topic/60469-tinycore-redpill-create-boot-image-usb-tr_cb-v099-r01/ ## Update v2.0.0-r02- 2022.04.29 - Modification of efi classification conditional statement and redistribution of images - How to add Ext Driver Video production Attachement ============================================================= Download : (Google drive link - 400MB) - Please understand that Google Drive is used because of its large capacity https://drive.google.com/file/d/1t1cOPMmlSg3c65mXJBeI_44yor_sp9Xl/view?usp=sharing Finally comment ============================================================= I'm an ESXi user, so the Native test is lacking.(Check only basic bootability) Please note that there may be errors. If you tell me the test results and points for improvement, I'll reflect them. Have Nice Day!! Thank you~!!!
- 34 replies
-
- 10
-
-
-
- mutiloader
- redpill
- (and 4 more)
-
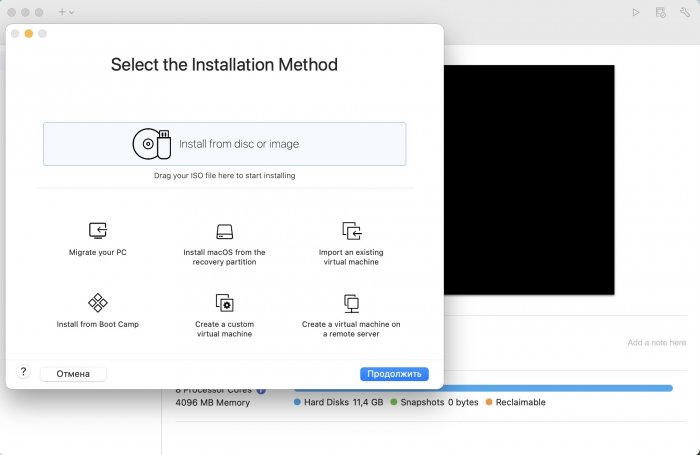
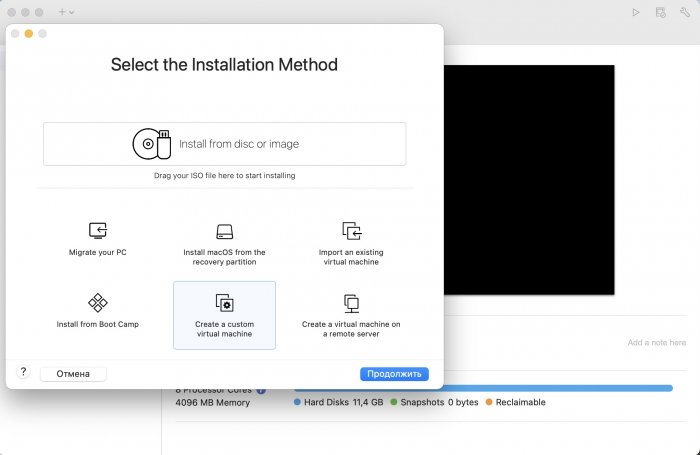
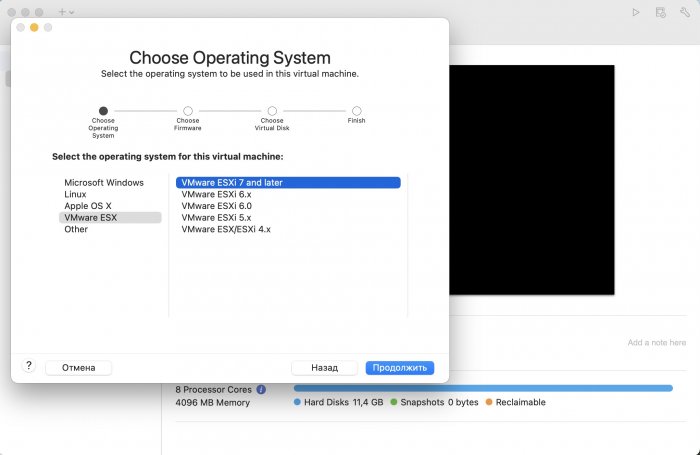
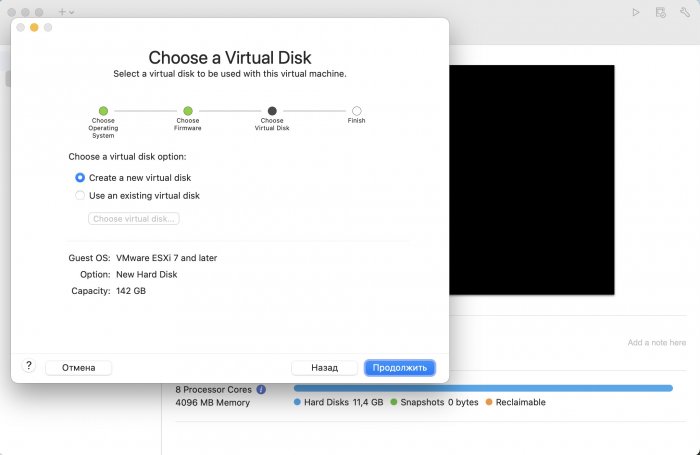
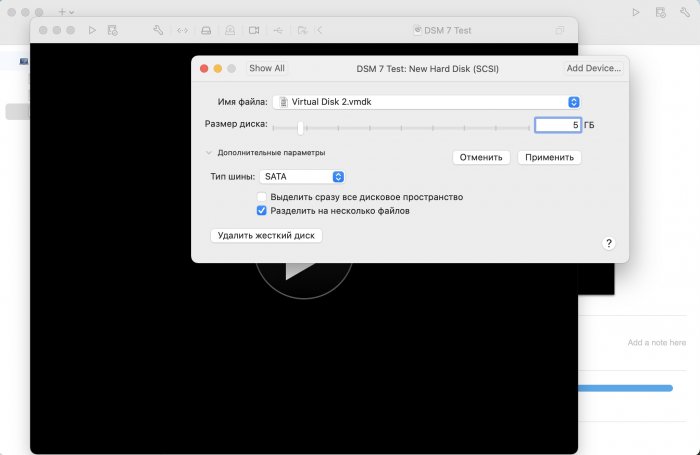
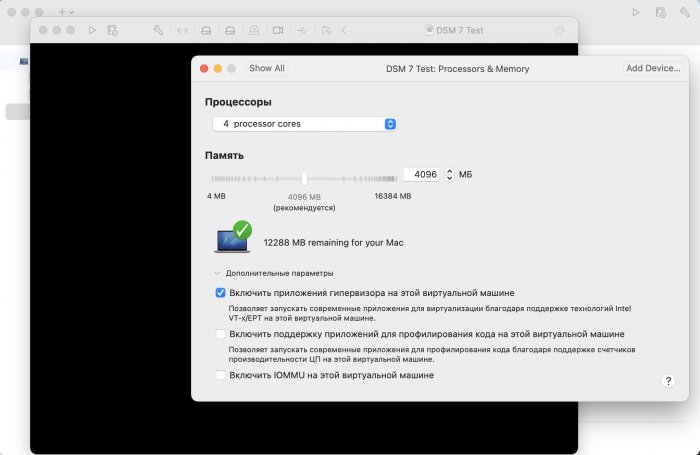
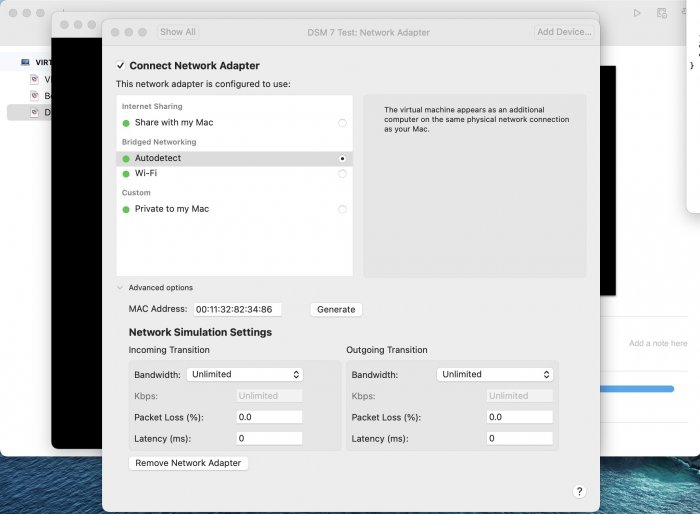
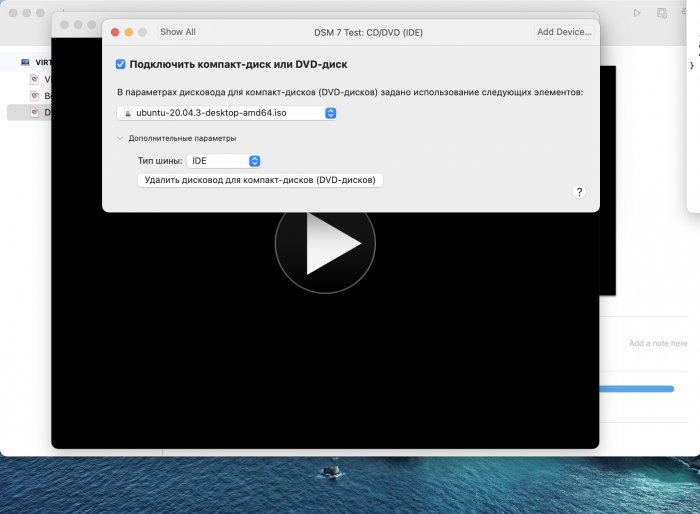
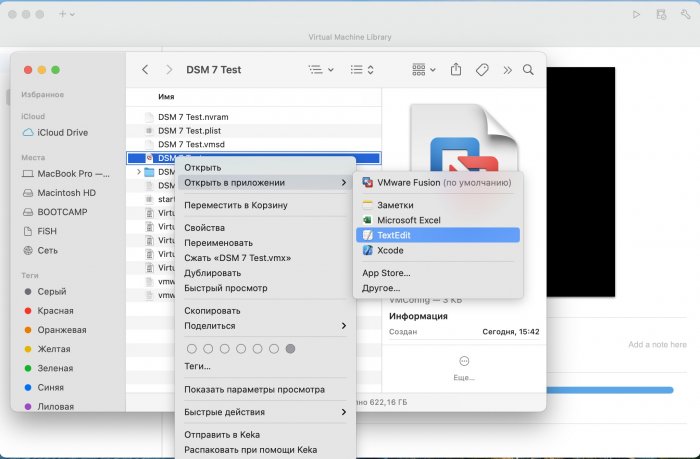
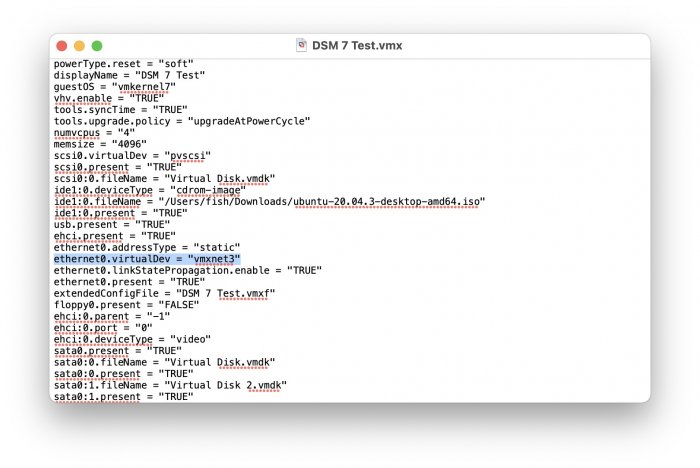
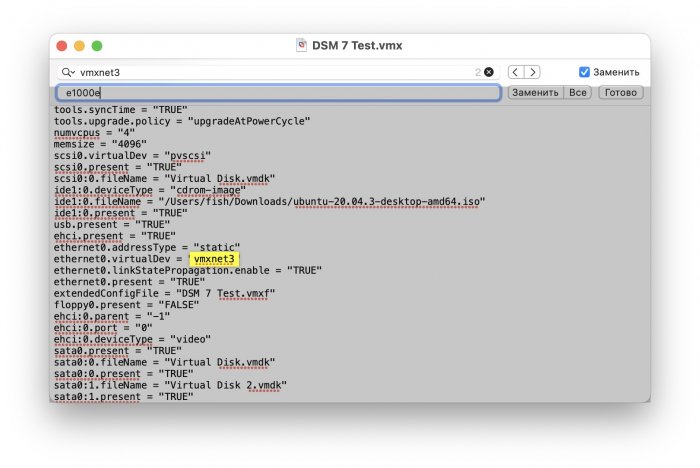
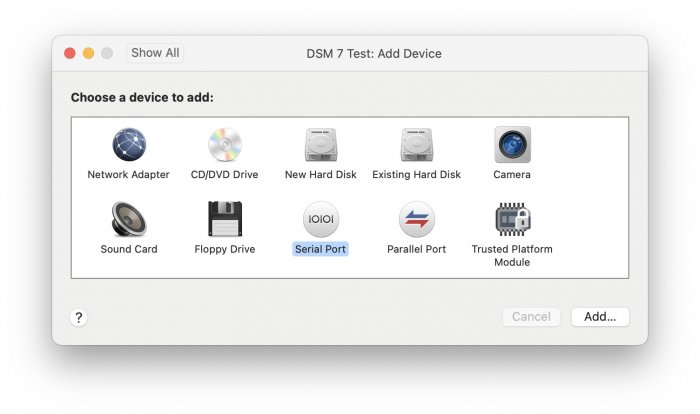
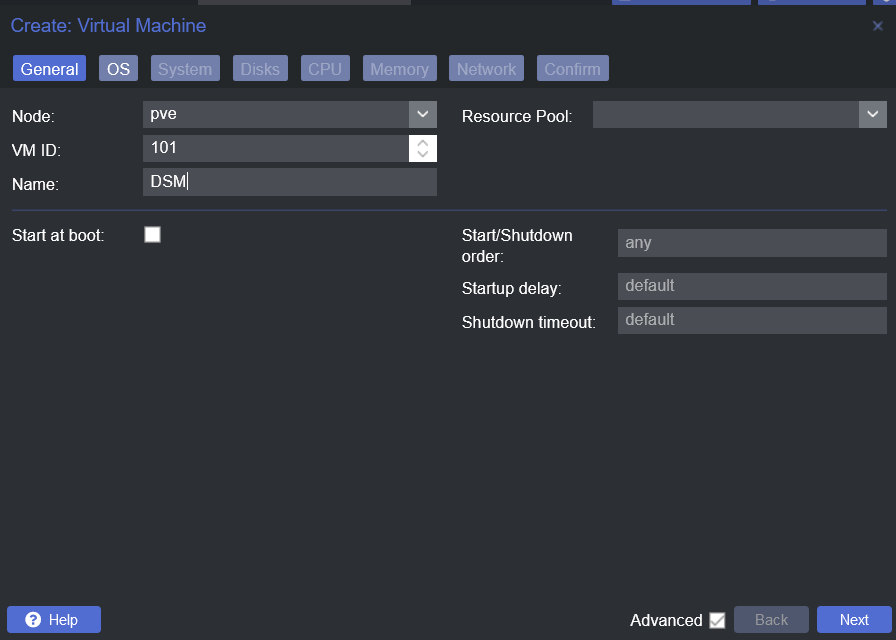
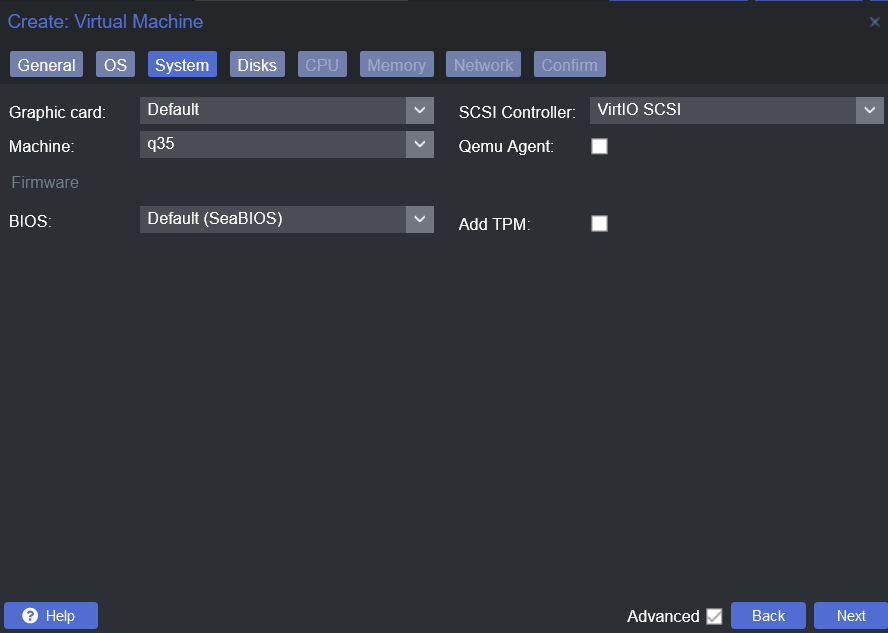
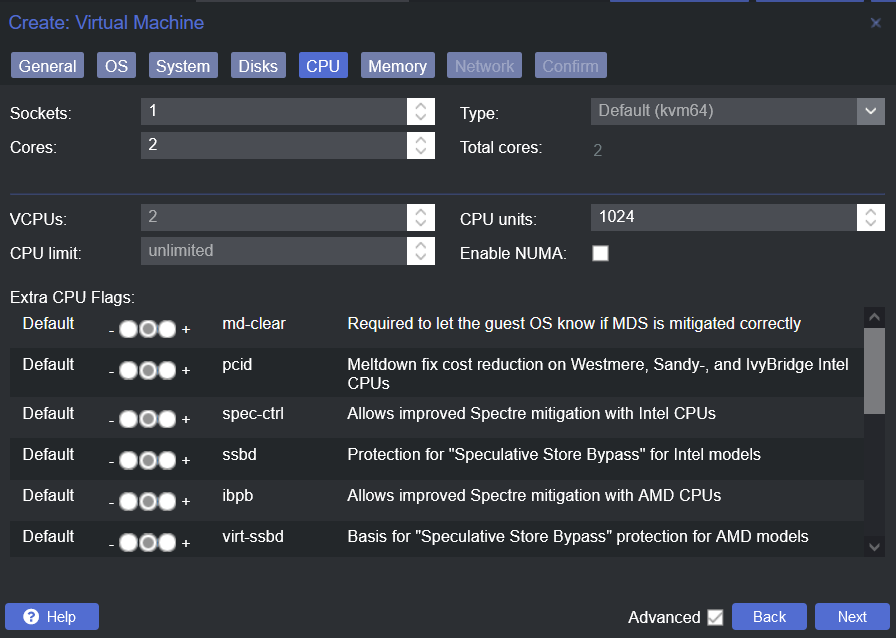
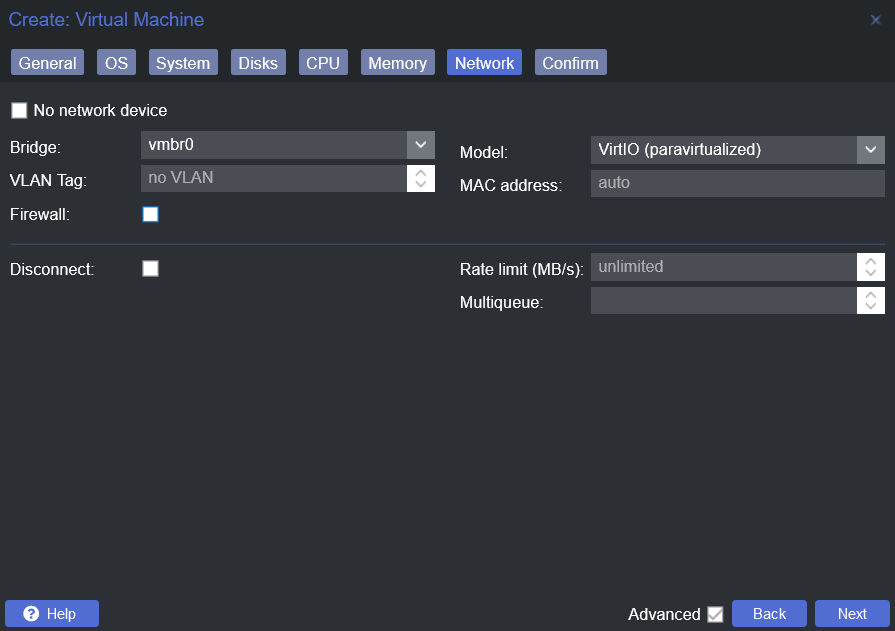
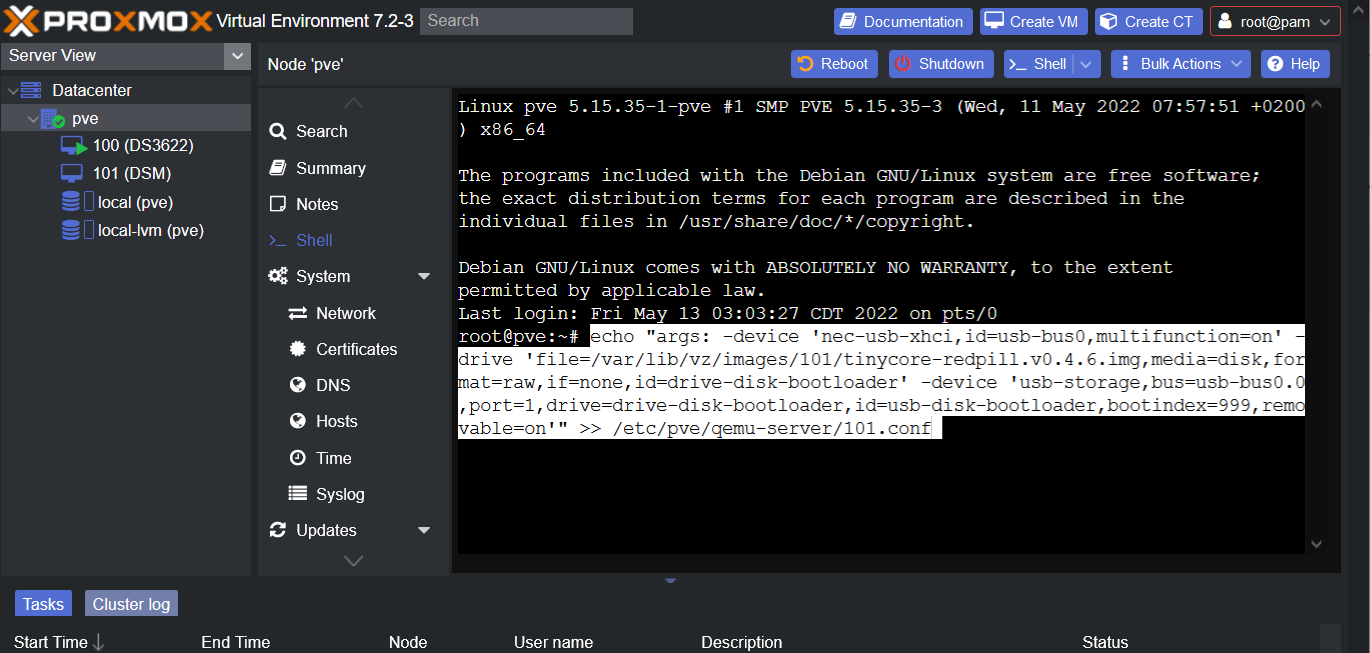
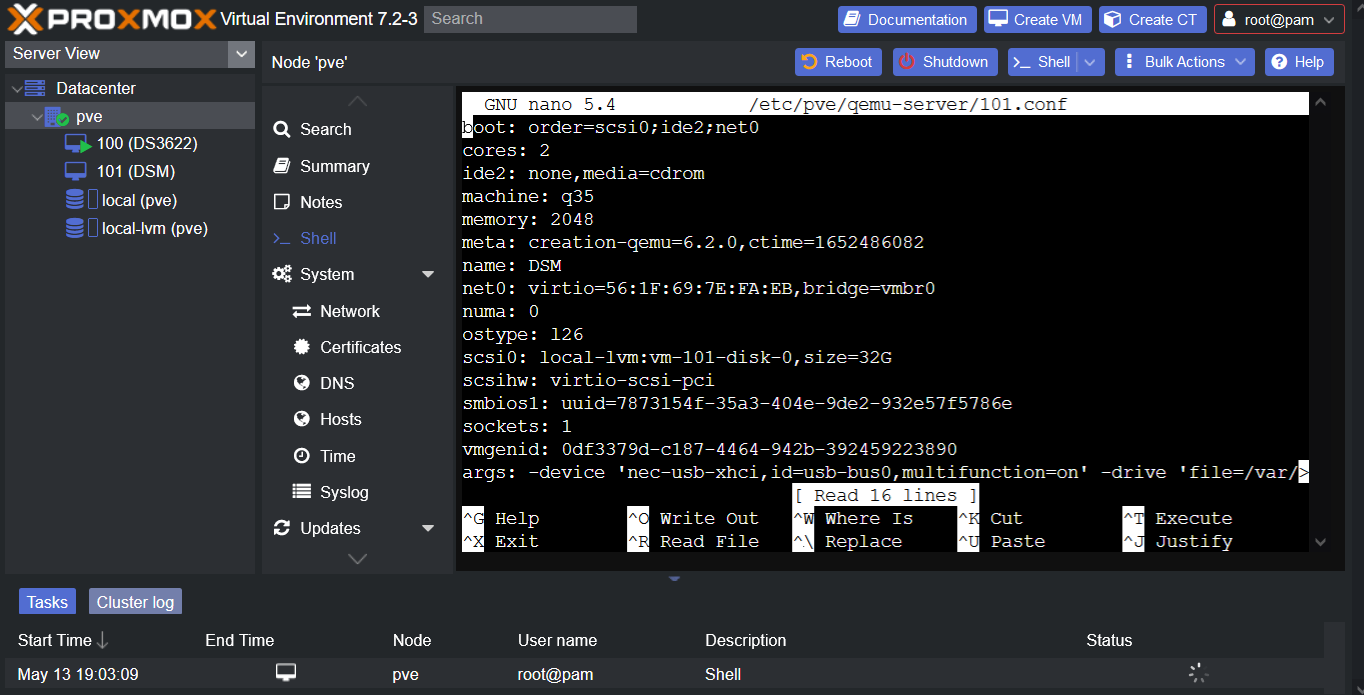
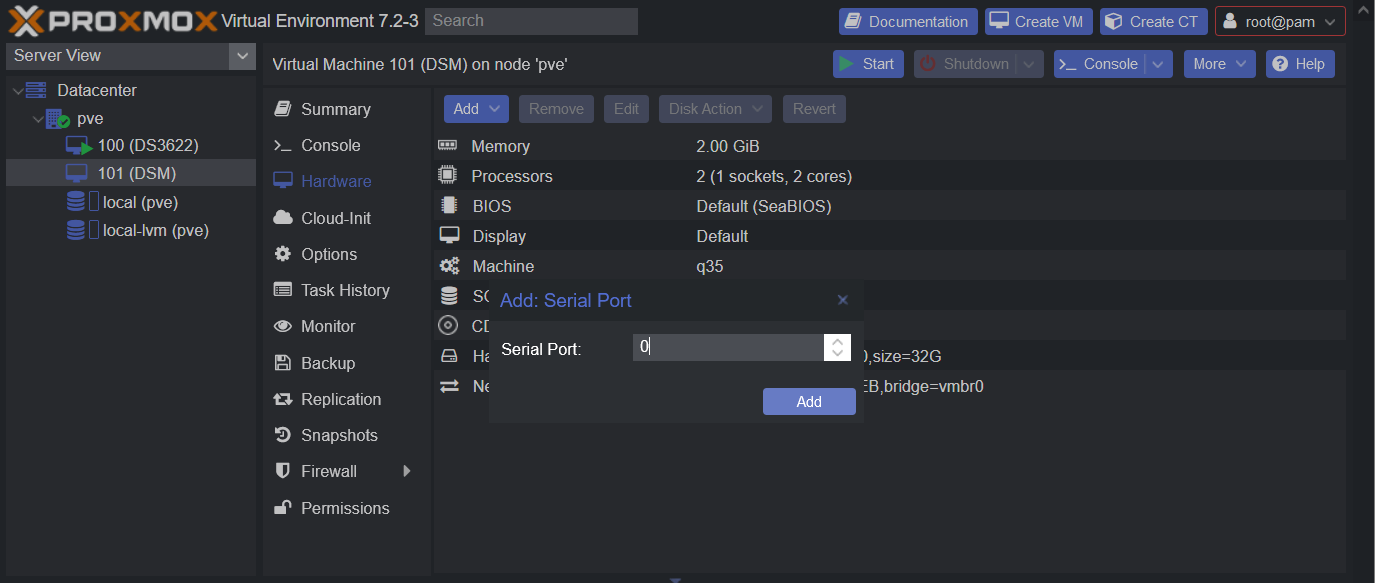
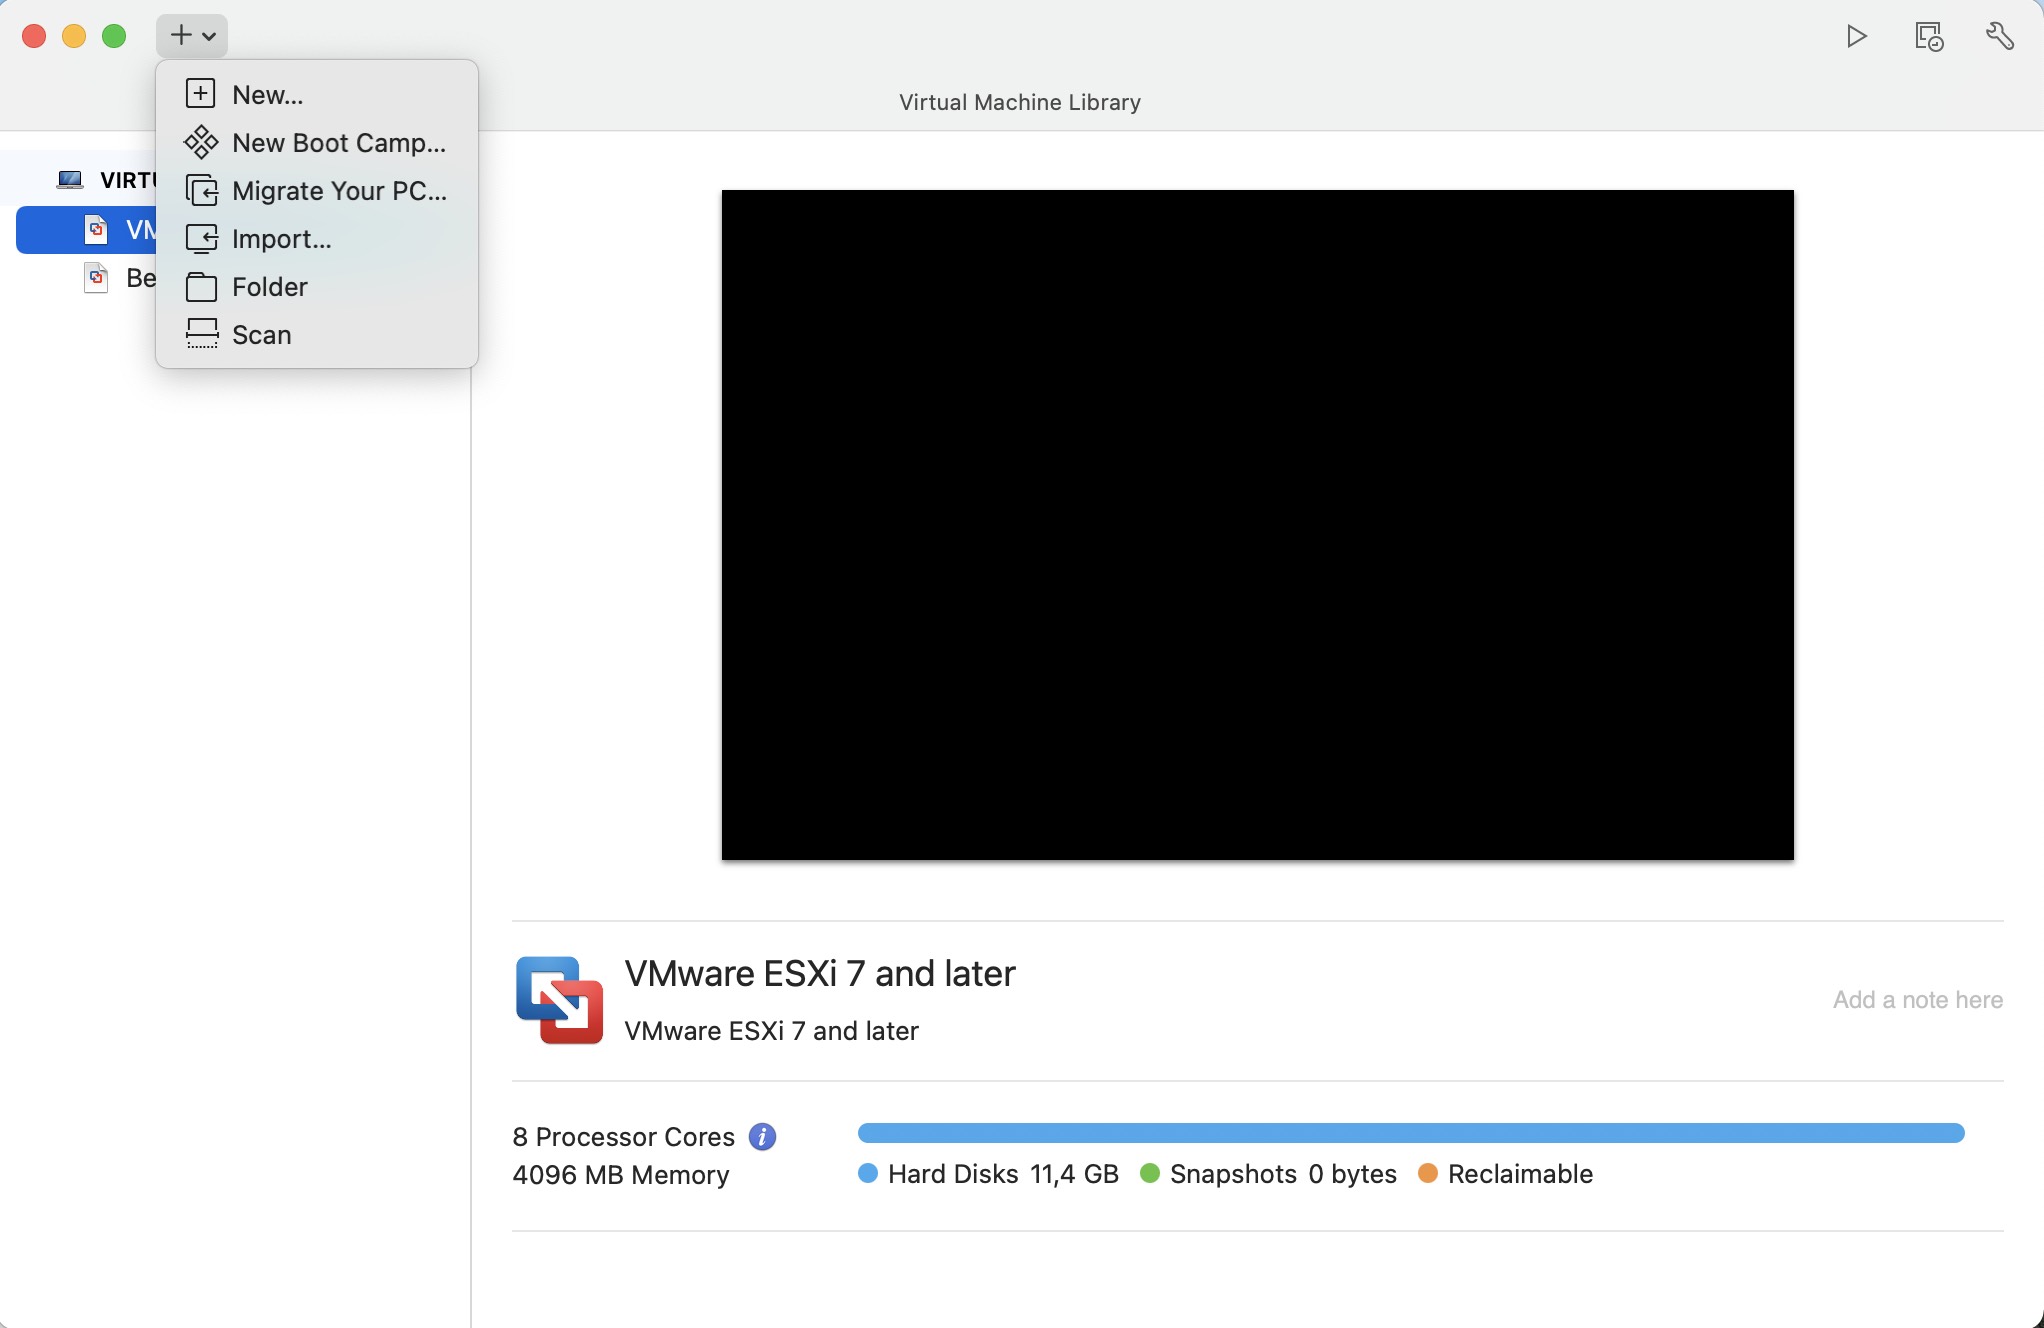
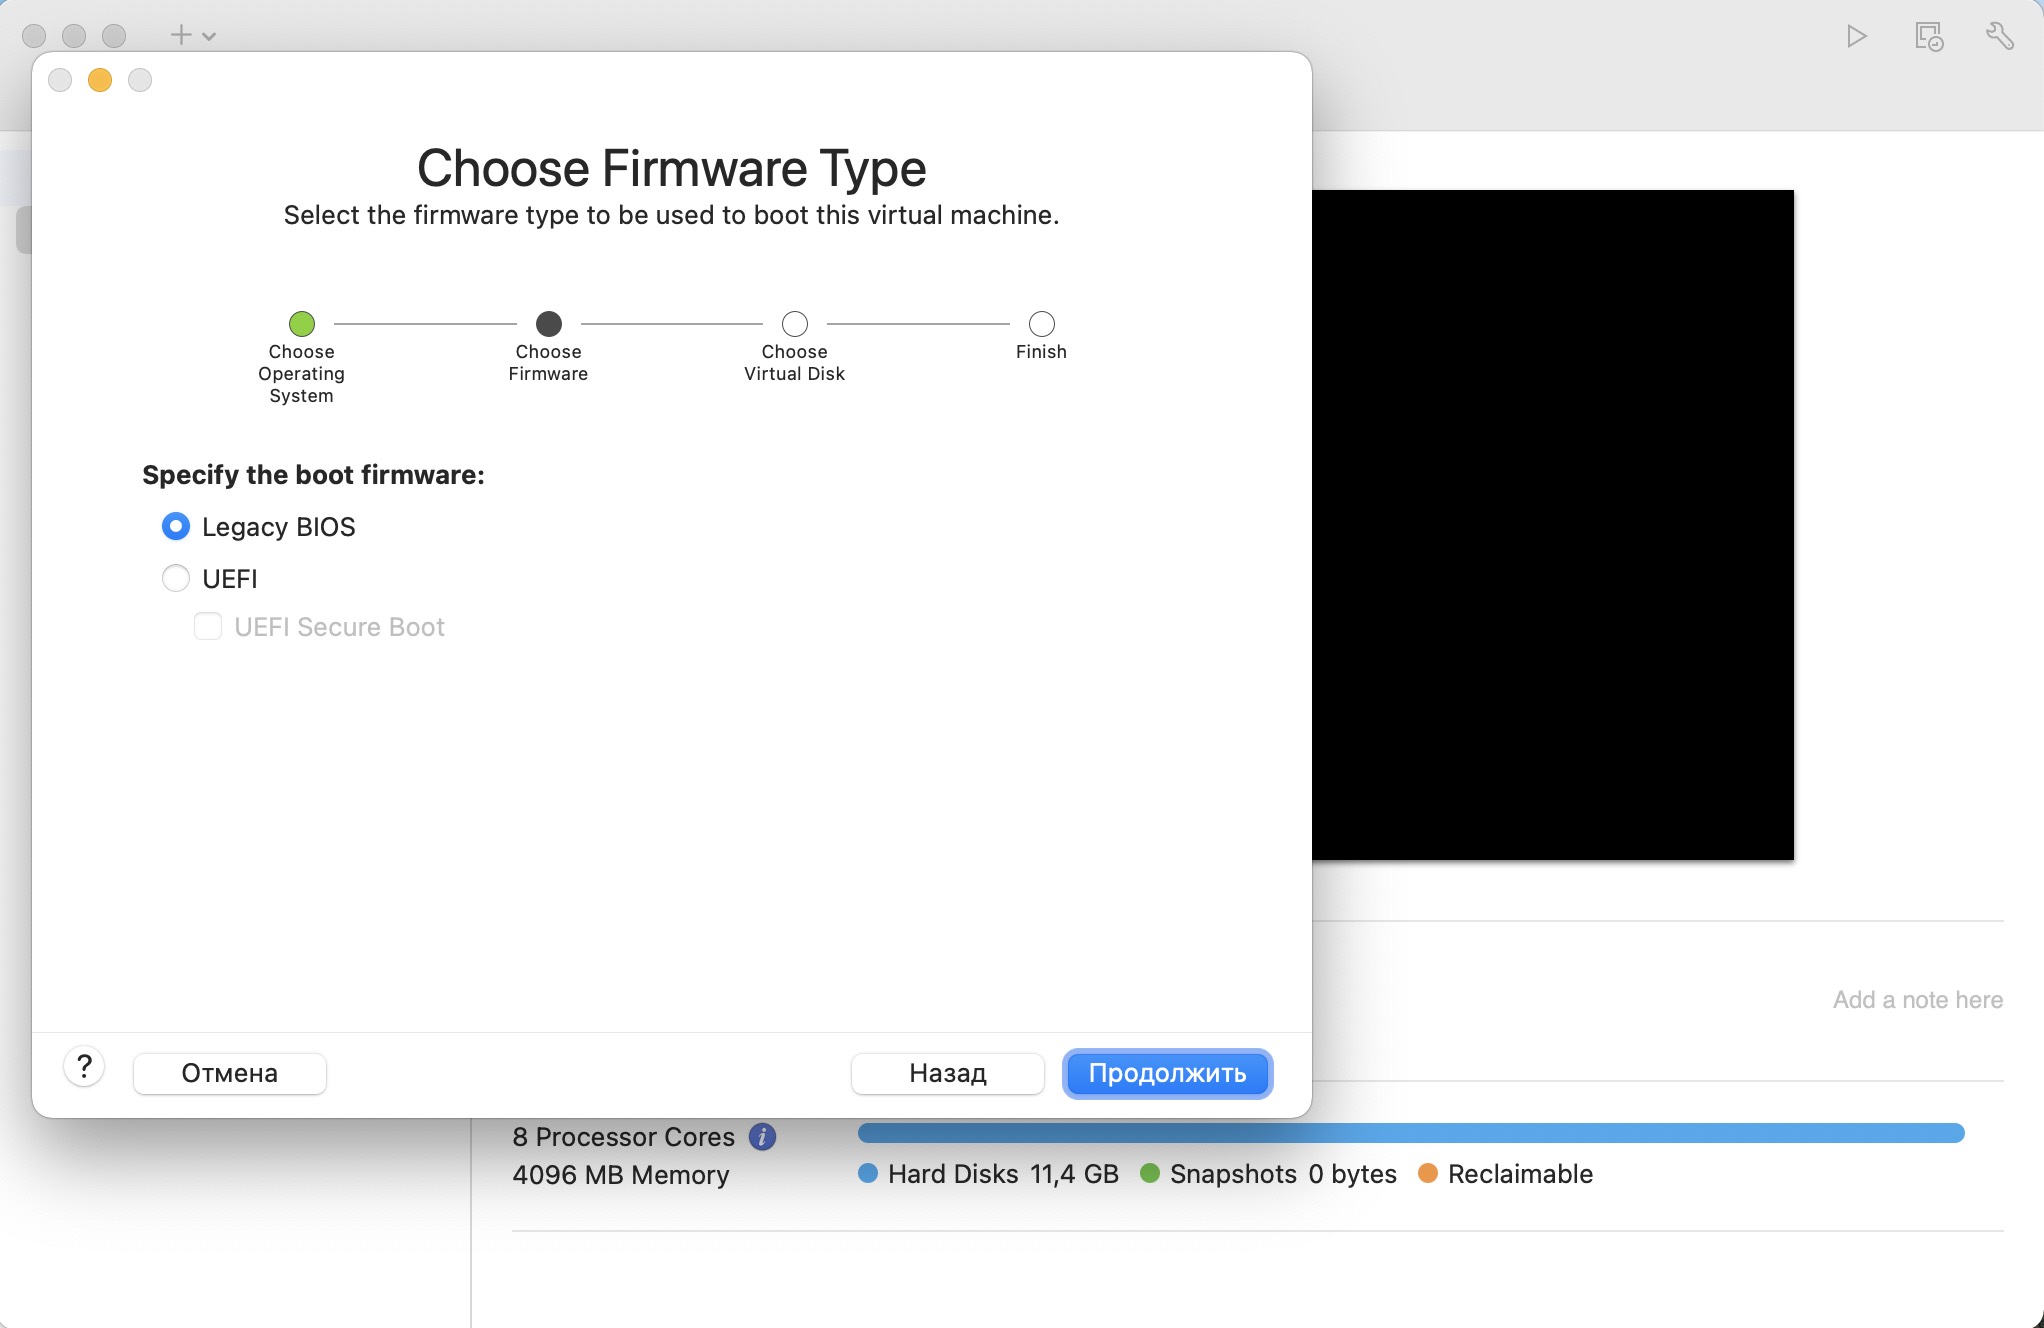
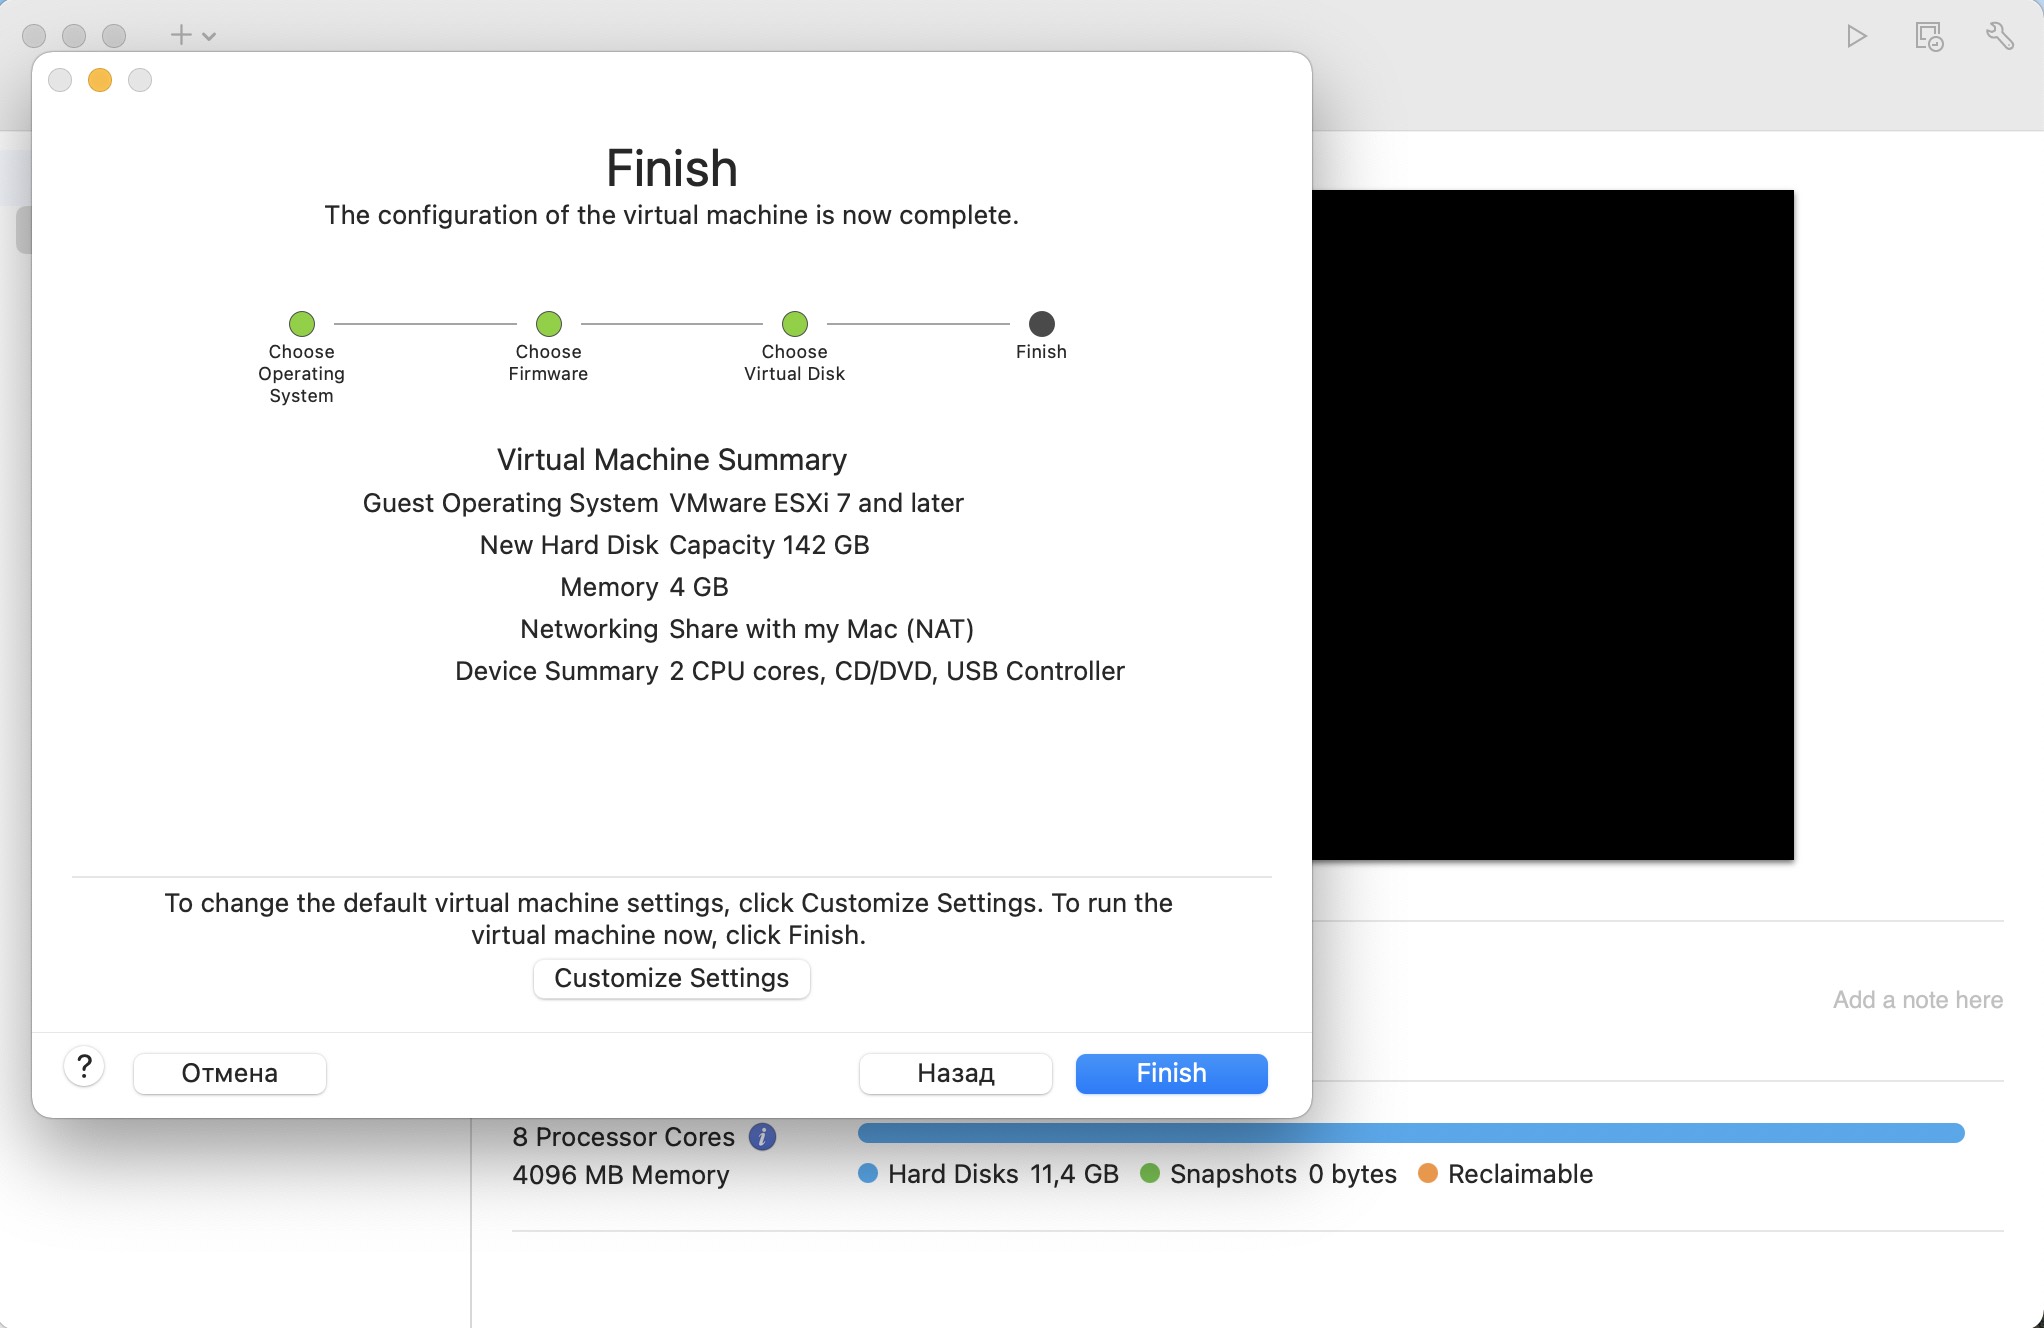
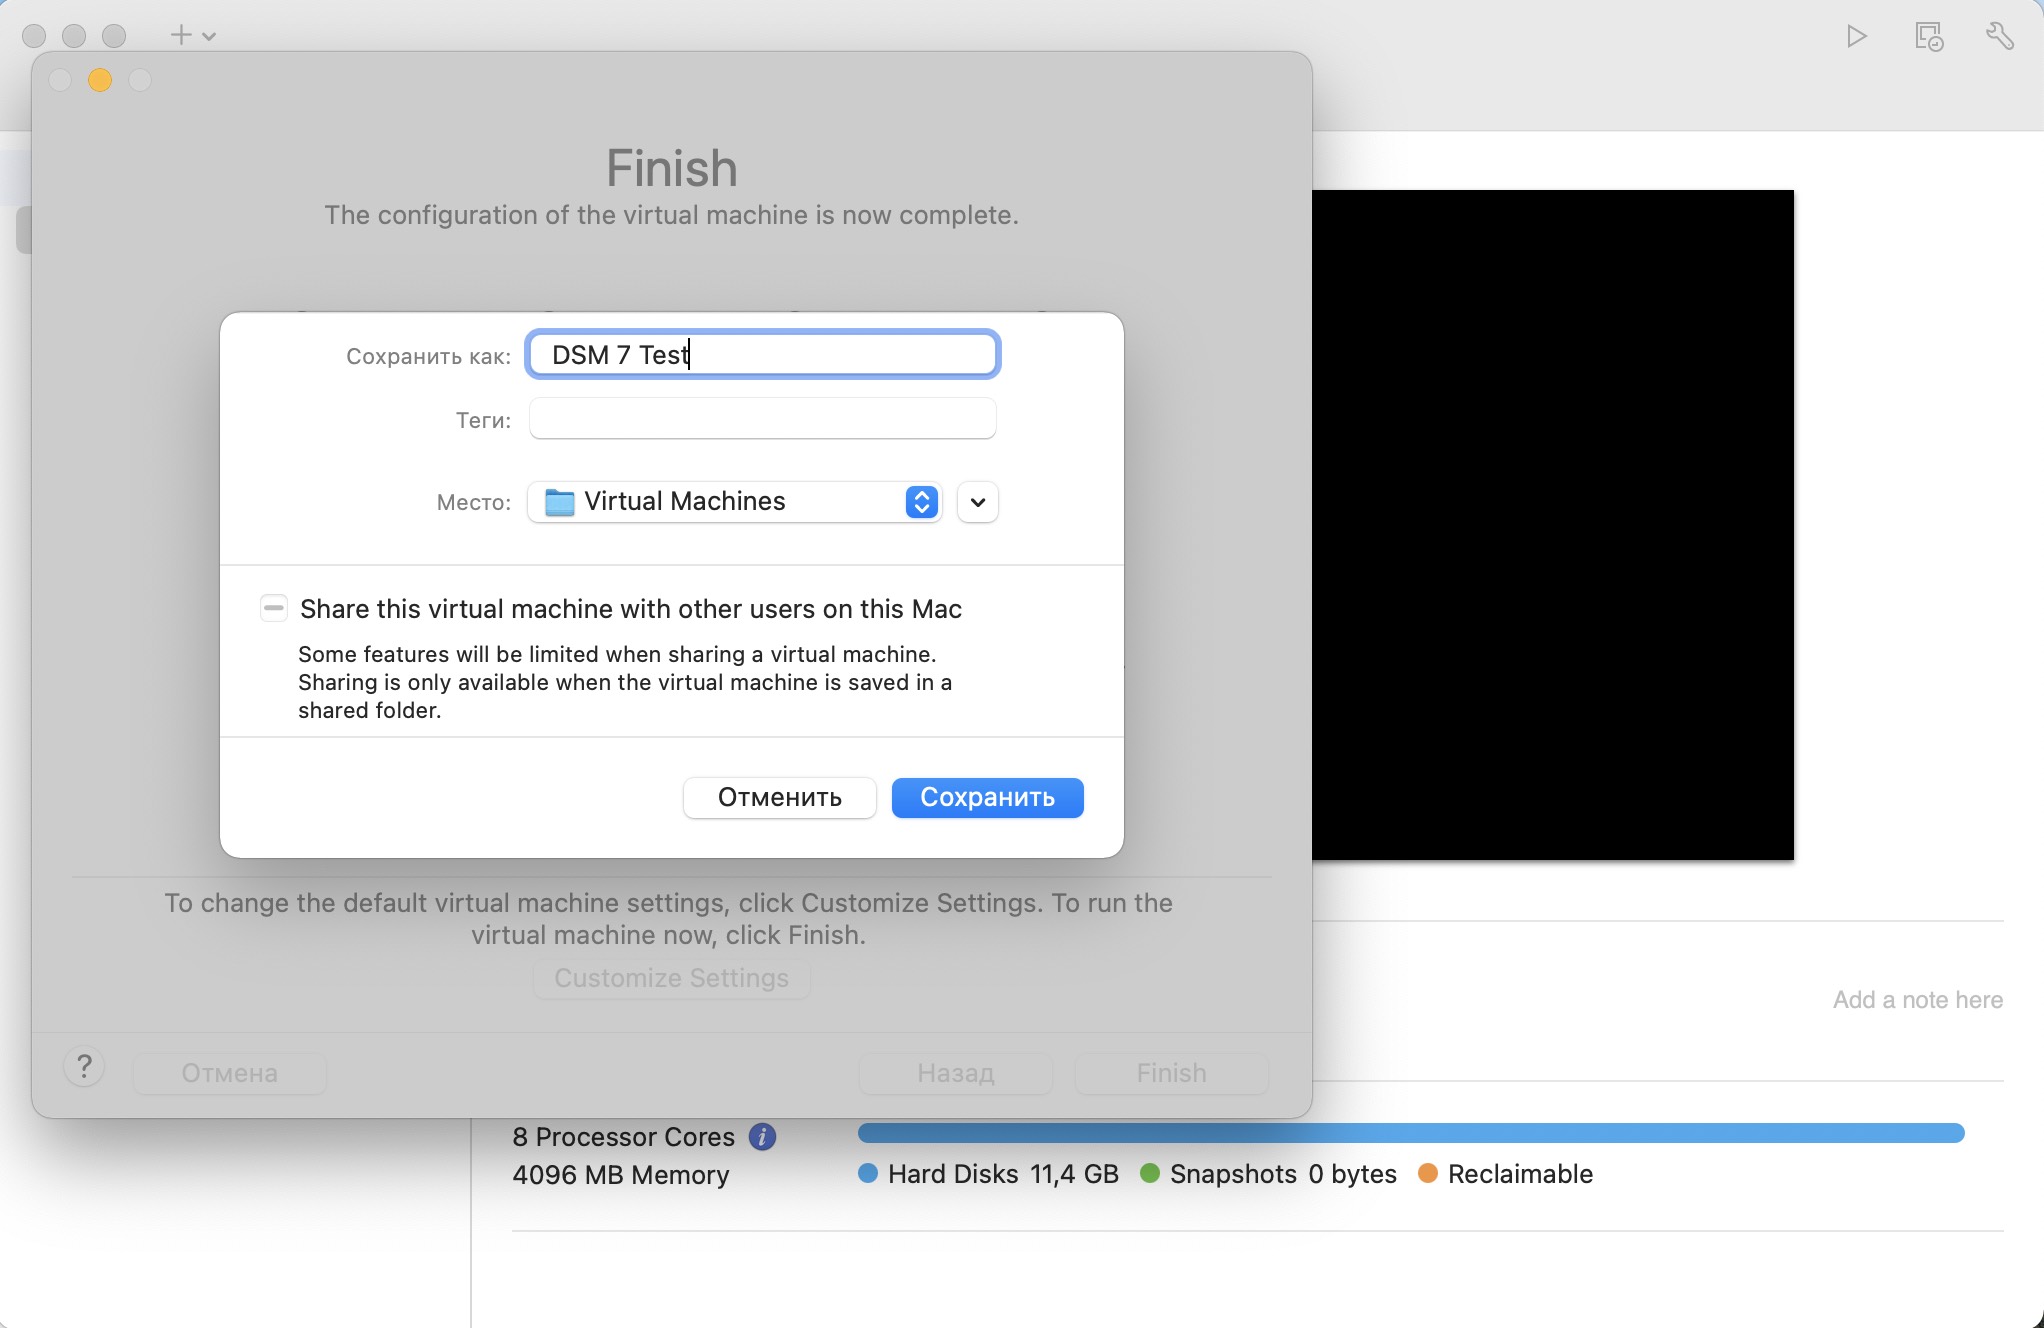
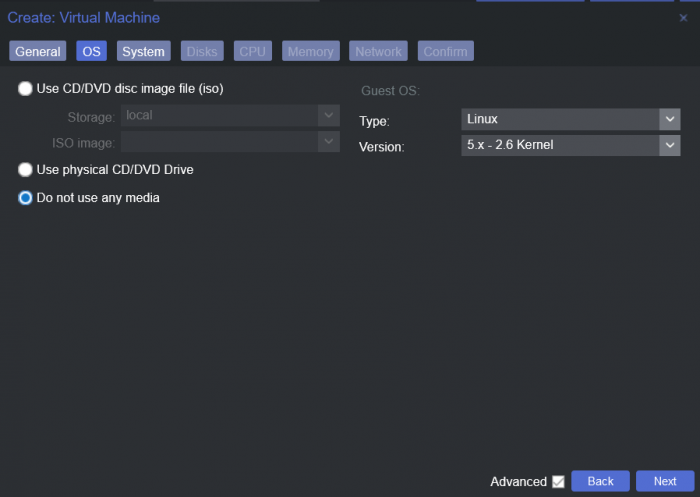
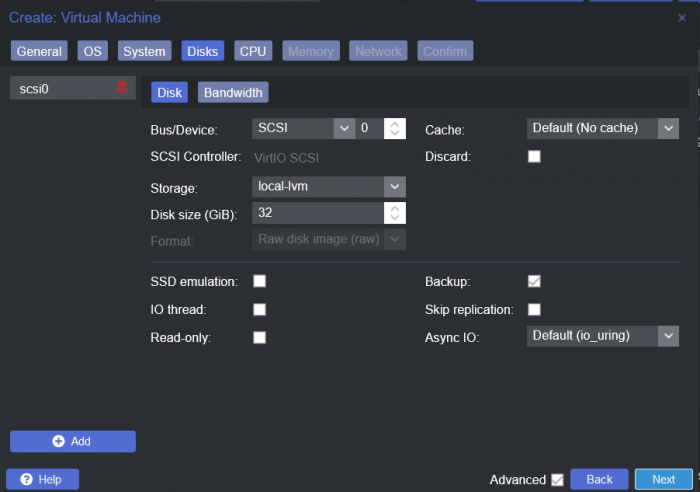
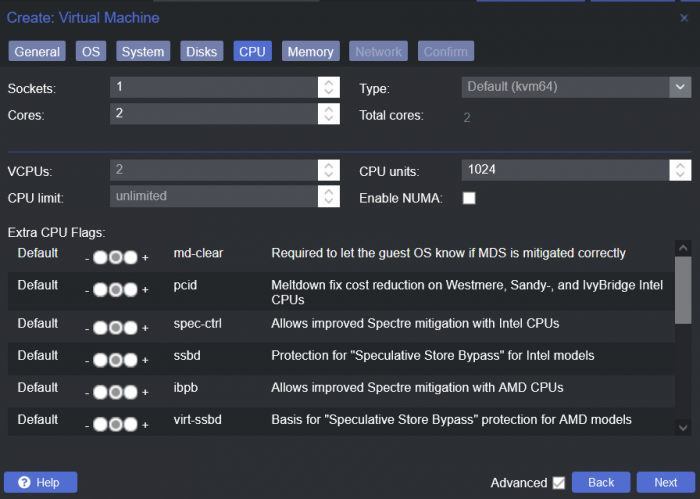
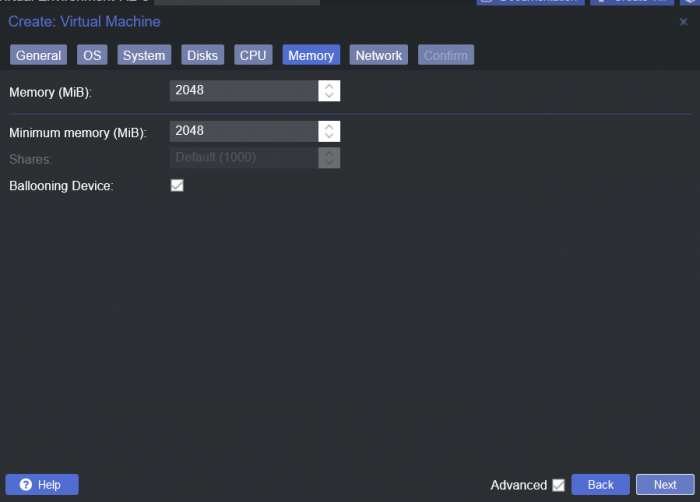
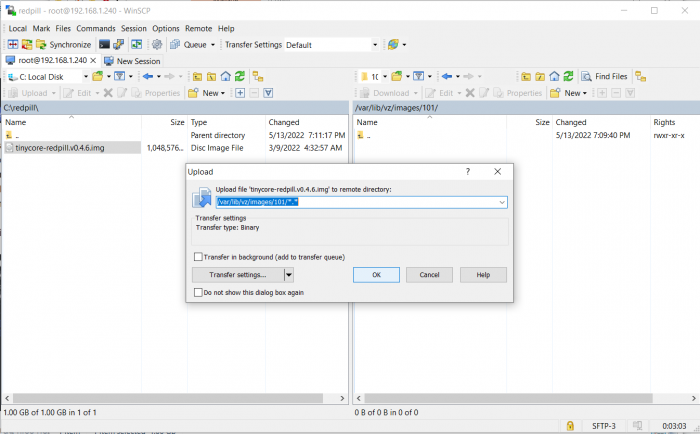
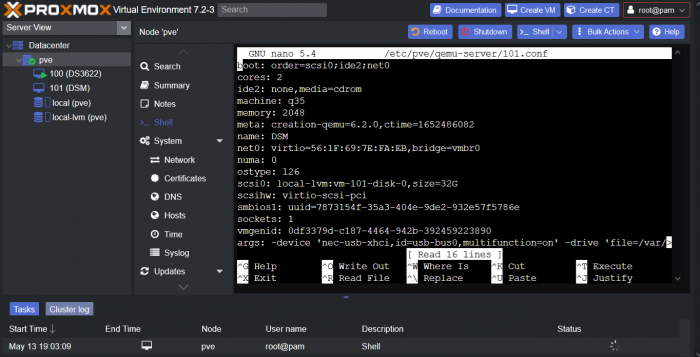
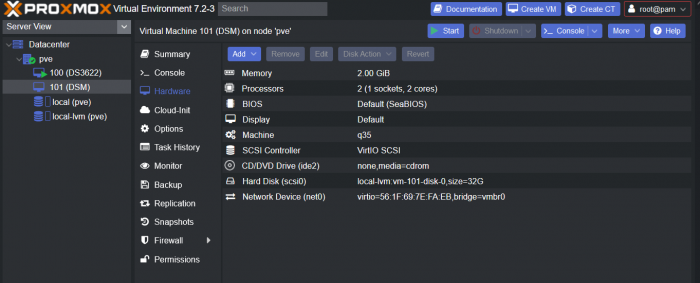
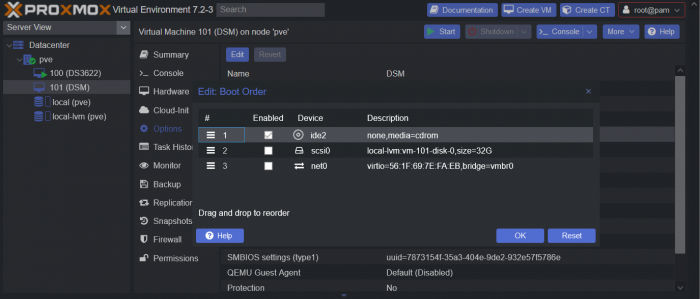
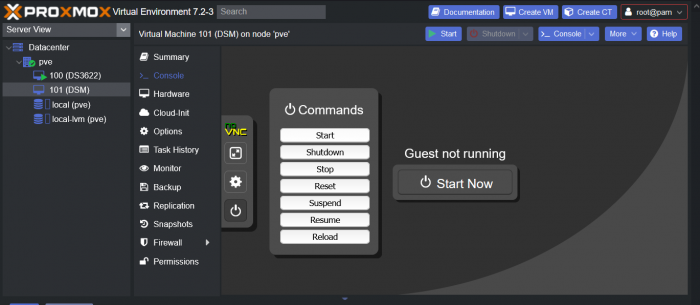
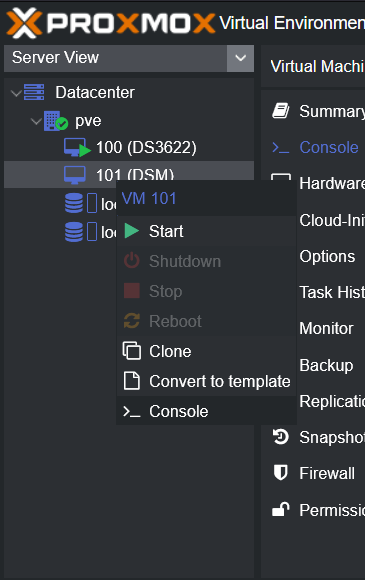
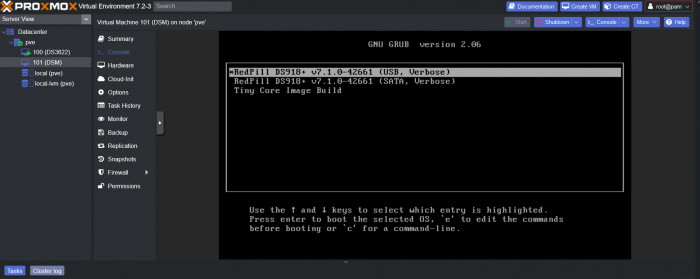
This is a simple guide and step by step tutorial on how I got tiny core red pill loader running and working on a proxmox server. This not the only way, just the way I do it and it seems to work. You will need a few things downloaded and ready to access on your local machine. The tiny core red pill image from @pocopico DOWNLOAD Putty for windows (or your mac equivalent) DOWNLOAD WinSCP for windows (or mac equivalent) DOWNLOAD and of course a working server with proxmox installed and running. DOWNLOAD The correct .pat dsm installation file downloaded directly from synology.com (you can handle this one on your own 😉) From proxmox create a VM. Most of the defaults work, change these according to your specific needs and requirements, I personally used: Q35, virtio nic, HDD is your choice, 2 cores and 2gb ram (again your choice). System Q35 is not required either, i440x works too, this is just what I used and it works. HDD is whatever you want, or pass thru complete drives or controllers.. again your choice based on your setup. Same for nic, cpu and ram. Just be sure to Use NO MEDIA in the OS section * REMEMBER THE VM ID # * you will need it later * Remember, do not use any media is selected here. Now, load WinSCP and connect to your proxmox server using your local ip and proxmox credentials. There on the right side, navigate to /var/lib/vz/images/ and create a folder/directory of whatever the vm number was you created, in these pictures its 101 so in this case it should be /var/lib/vz/images/101/ On the left side in WinSCP navigate to where you downloaded and extracted the tcrp image Copy the extracted tcrp img from your local machine to your proxmox vm directory Alternatively, you can enter a couple of command lines in the main pve node shell to download and extract the tcrp image without using winscp at all, but I do it the hard way. Either way works so its up to you. The alternative method is open the main pve node shell in proxmox and enter these commands (use copy and paste for each line) # set vm id to whatever it was at time of creation id=101 # create image directory, download and uncomporess mkdir -p /var/lib/vz/images/${id} curl --location https://github.com/pocopico/tinycore-redpill/raw/main/tinycore-redpill.v0.4.6.img.gz --output /var/lib/vz/images/${id}/tinycore-redpill.v0.4.6.img.gz gzip --decompress /var/lib/vz/images/${id}/tinycore-redpill.v0.4.6.img.gz --keep Now, at this point one way or another you should have a dir of your vm # in the correct location with the tcrp extracted image inside ready to issue the following commands, so now click your main pve node on the left panel and choose shell and paste this command there. (edit the 101 vm # with whatever your vm # is) echo "args: -device 'nec-usb-xhci,id=usb-bus0,multifunction=on' -drive 'file=/var/lib/vz/images/101/tinycore-redpill.v0.4.6.img,media=disk,format=raw,if=none,id=drive-disk-bootloader' -device 'usb-storage,bus=usb-bus0.0,port=1,drive=drive-disk-bootloader,id=usb-disk-bootloader,bootindex=999,removable=on'" >> /etc/pve/qemu-server/101.conf Now type nano and the last part of the above command (the directory part) to verify the entry into your vm .conf file so in this case nano /etc/pve/qemu-server/101.conf You easily verify the entry into the bottom of the .conf file of your vm, now press control x to exit. Now select your vm and choose hardware from the column Here using the Add button you should add a serial 0 console to monitor your dsm loader if needed (helpful for troubleshooting) and if you are adding hdd or using pass thru of hba controllers or sata controllers or any other specific hardware for your build add it here. Now select Options from the list column, and select only ide2 CD-ROM (uncheck all others) and make cd-rom priority #1 by dragging it to the top. Now you are ready to spin up your vm and build your loader. You can watch the process of booting by right clicking on the vm number/name and select >_ console a new window will open and you will see lines of code fly by, but only in this console monitor window. This is an optional step. At this point you should be booting tcrp and ready to build your loader... @Peter Suh has a great tutorial for that linked here. Follow his directions for building your loader. Use putty to SSH into tcrp to build the loader, The main thing when building if you used virtualized nic card, add the v9fs ext to get network port working, use this command before executing the redpill build command in putty. ./rploader.sh ext <build platform> add https://raw.githubusercontent.com/pocopico/rp-ext/master/v9fs/rpext-index.json After you successfully build your loader, and during the reboot, go back to proxmox gui and when you see the booting menu screen, press UP to select BOOT FROM USB, VERBOSE then press enter... that is very important. You only have to do this once, and it will save and retain that selection until you change it again. You do not want to boot from sata! At this point you load your browser, go to find.synology.com or use synology search application on your pc, or simply go to the ip of your new vm dsm and complete the process. If you had your console monitor opened from above, you should see sign in prompt, if you scroll up a little bit you will also see the ip of your dsm vm. If you successfully booted from usb, everything will work. If you did not change that during the first reboot, and you are booting from sata, you will most likely get a failure to install dsm. You will need to power down the vm, re-start the vm, and choose boot from usb verbose. If this guide helped you, please press the thanks button for me. 🖖😀 And remember to thank @pocopico and @Peter Suh Enjoy!


- 83 replies
-
- 15
-
-
-
I'm using AMD AM3+ Phenom 2 X4 965 https://www.amd.com/en/products/cpu/965 with motherboard GA-970-D3 https://www.gigabyte.com/Motherboard/GA-970A-D3-rev-30#ov and using 8GB of RAM. As Booting comes up in ARPL AND TCRP both got stuck and no sign of LAN light and activity, so I done some research I encountered that RTL-8111F drivers module are missing and I tried e1000 LAN card but get the Ip address and showing activity light but got stuck and no ping at all waited whole night and unsuccessful... Does this Processor do support ARPL or TCRP Any Help would be appreciated.. Thanks in Advance....
-
This guide is dedicated to installing DSM 7.0.1 BareMetal. It is a translation from Korean to English using a translator. Please understand if there is a slight misunderstanding. Existing RedPill, which has been released since last year, can generate IMG files directly through the bootloader compilation process only if Linux is available separately. This tinyCore RedPill provides a USB boot image with tinyCore Linux. It's much easier to work without having to install Linux separately. As usual, you can add the desired driver directly from the selection header and build it. Tinycore supports the following platforms (DS918+/DS3615xs/DS3617xs/DS3622xs+/DS1621+/DV3221/DS920+). You can continuously change the bootloader without re-creating the image (model/sn/mac, etc.) Tinycore supports both legacy versions for baremetal and virtual environments. 1. Prepare bootloader IMG file With the Download button in the middle of the GITHUB link below.Download the gz file. In it, 0.4.6 version img.You can unzip the gz file again and use the img file. (All files) https://github.com/pocopico/tinycore-redpill (for LEGACY) https://github.com/pocopico/tinycore-redpill/raw/main/tinycore-redpill.v0.4.6.img.gz (for UEFI) https://github.com/pocopico/tinycore-redpill/raw/main/tinycore-redpill-uefi.v0.4.6.img.gz (for VMWARE) https://github.com/pocopico/tinycore-redpill/raw/main/tinycore-redpill.v0.4.6.vmdk.gz 2. Bootloader IMG file USB recording Use the above tinycore-redpill.v0.4.6.img file to burn to USB with convenient image tools such as WinImage and Rufus. There is no need to pre-adjust the configuration file to modify the VID/PID/Serial/MAC/SATAPortMap like JUN loader. If you want to create a USB image on Mac or Linux, you can use the following DD command at the terminal. (Suppose the USB DEVICE ID identified by diskutil is disk4) sudo diskutil unmountDisk /dev/disk4 sudo dd if=/Users/MyAccount/Downloads/tinycore-redpill.v0.4.6.img of=/dev/disk4 bs=4m agree eject. 3.tinyCore Linux Boot USB boot by plugging into the PC you want to use as XPENOLOGY (you can start using UEFI 1 partition or USB CSM) Only TinyCore Linux menu appears and runs automatically Start the terminal app on the far right icon. Use the ifconfig command to verify the ip address where the en0 LAN card is automatically allocated. 4. CONFIG adjustment after SSH connection Connect ssh from another PC, such as putty. ( id:tc / pass : P@ssw0rd ) After connecting, update to the latest version with the following command. tc@box:~$ ./rploader.sh update now Tinycore Redpill is still in a stable state of stabilization. PocoPico, the developer of this program, will frequently fix bugs and announce rebuilding. There's a possibility that this rebuild will happen from time to time. Even if you use the first IMG file version of 0.4.6, you can continue to receive real-time updates of changes through the Internet. Therefore, before using it for the first time, please make sure to download the final patch status with the update option. If you've continued to migrate from JUN's XPhenology, tc@box:~$vi user_config.json The user_config.json file's VID/PID/Sn/Mac/SataPortMap, etc. are existing grub.Please refer to the cfg and insert it as it is. For new installers, perform serial GEN/USB VID, PID auto detect, SataPortMap auto detect, etc. as follows. The next process is DS3622xs+, which is currently undergoing the most stable session first. I will focus on explaining. tc@box:~$ ./rploader.sh serialgen DS3622xs+ tc@box:~$ ./rploader.sh identifyusb now tc@box:~$./rploader.sh satamap now (HBA card users are not required) You can see that the contents of user_config.json are changed automatically. Finally, it is common for existing users and new installers. tc@box:~$catuser_config.json, assuming there are 4 built-in sata ports. SataPortMap = "4", DiskIdxMap = "00" Please check if it is changed to the back. After find.synology.com, you may not be able to find the SATA HDD during DSM installation. The following is an example when a 6-port SATA expansion card is installed. SataPortMap = "46", DiskIdxMap = "0000" (For those who use cards such as H200, H310, H710, etc., exceptional, you do not need to erase the option of this SataPortMap and DiskIdxMap itself. Please erase the lines of the above two options in the vi editor and organize them well so that they don't end with Syntex errors. Of course. ./rploader.sh satamap now command is not required.) 5.BIOS built-in SATA port Hot Plug disable -> enable (important) To avoid temporarily reducing the SataPortMap value set above by the number of HDD physically connected by Sata cable during DSM installation, Be sure to turn on the Hot Plug function. This reduces the probability of encountering an error message saying that the HDD cannot be found because the number of SataPortMap automatically above is recognized as normal recognized. However, if M.2 and Sata ports are Muxed Sata ports that share Lane, it should be considered unusable. 6. Build bootloader after SSH connection When you have finished adding the above extension driver, you will finally build the bootloader. tc@box:~$ ./rploader.sh build broadwellnk-7.0.1-42218 The list of supported platforms can only be found in Help with the following commands: tc@box:~$ ./rploader.sh 7. backup and reboot for bootloader use After successfully completing the build, back up the configuration with the following command and restart the genology with USB. tc@box:~$ filetool.sh -b &&/usr/bin/exitcheck.sh Or tc@box:~$ ./rploader.sh backup now tc@box:~$ sudo reboot It has the same effect. The backed up settings and ext drivers remain the same. The next time TinyCore Linux starts for correction, the setting value will be restored from the mydata.tgz file. 8. Launch the Grub Menu BareMetal must select the first USB boot menu. The first USB menu will be automatically selected. The last selected menu will be stored and used for the next boot. 9. Installing DSM with find.synology.com On an XPhenology PC, There is a delay of about 1 to 2 minutes for IP allocation, so please wait a little longer. There is nothing more to do on this XPhenology PC once you have checked the Kernel boot message. Now look for XPhenology on another PC at find.synology.com. If found successfully, proceed with the initial installation of DSM or the expected migration DSM installation process.


-
 Hi all. Wondering if anyone can help. HP N36L. On upload of the .pat - i get to 56% and it spits "Failed to install DSM. Failed to install the file. The file is probably corrupted." Any ideas on what to try? original commands: "update", "fullupgrade", "serialgen DS3622xs+", "identifyusb", "satamap", "backup", "build broadwellnk-7.0.1-42218", "clean", "build broadwellnk-7.1.0-42661", "backup", "exitcheck.sh reboot" On seeing the error message, i have tried: rebooted into TCRP, "update", "fullupgrade", "identifyusb", "backup", "SUDO postupdate broadwellnk-7.1.0-42661", "exitcheck.sh reboot" BTW: xpen is awesome. you guys are awesome. JUNs bootloader awesome. redpill awesome. Incredible work and much appreciated!! PS: HP N36L BIOS 041: C1E Disabled, WOL Enabled
-
 Hello! TL;DR: We've developed a new loader for v6.2.4/v7+ which contains a way to install custom extensions/drivers/mods. We're looking for feedback of the extension manager & kindly asking for drivers to be made compatible with it. First of all, let us thank you guys for all the driver packages you were always preparing - we used them ourselves. As some of you may be aware we are developing a new loader called RedPill. There's a long thread in the developer's section of the forum: Today we've added a long-awaited functionality of custom drivers. We've chosen to go with a more modular approach rather than offering a clone of Jun's loader functionality of extra.lzma archive. Our solution relies on a simple extension manager which is responsible for downloading and packing drivers automatically. This lets users install only the drivers they need while also mixing-and-matching multiple ones. With "extra.lzma" the limitation was that users either had to build their own packages or choose between having the HBA driver or VirtIO driver... that, in our opinion, was a poor experience. Additionally, the new format allows you to keep a single git repository containing both the metadata for RedPill extension manager and the build environment you use to compile drivers. We would like to collect your opinion on the new extension manager we created and ask you to port your drivers to the new format. We prepared two documents: https://github.com/RedPill-TTG/redpill-load/blob/master/docs/extensions-overview.md (summary of what the extension manager is capable of and how to use it manually) https://github.com/RedPill-TTG/redpill-load/blob/master/docs/extensions-for-devs.md (document intended for people creating extensions/compiling drivers detailing the architecture) In addition, we published two packages, which can serve as an example: https://github.com/RedPill-TTG/redpill-virtio (VirtIO driver) https://github.com/RedPill-TTG/redpill-boot-wait (shell-only package; this will be similar to how e.g. a CPU governor mod can be implemented) There's currently no central way to discover packages but is it planned. For now we're simply collecting links to indexes in a separate git repo - https://github.com/RedPill-TTG/redpill-extensions - you can just toss a link there from the GitHub web UI without cloning the repo. What do you all think? special cc @IG-88 p.s. We didn't post this in the driver's extensions subforum as this topic isn't intended for users. When some drivers are built and the official beta version of RedPill is published we will create a separate thread there.
- 41 replies
-
- 14
-
-
-
 @flyride Since the first TinyCore release I have my DS918+ up and running. Recently I came into the possession of a X550-T2 (2 ports) and I would like to use it. My DS918+ it's not a baremetal but a VM. I know how to pass-through 1 of the ports. The question here is how do add the ixbe driver to loader in order to identify the new network card without messing everything up. Any particular commands that I need to run? I prefer not to rebuild the loader because a lot of stuff have change in TCRP since then... for example Jumkey's ACPI used to work on DS918+ not it does not. Any advice is much appreciated...
 -
 I build DVA3221 under PVE 7. Hope to Turn off the kvm. I used the following command to add ACPI. But it doesn't seem to work. Where did I do something wrong? ./rploader.sh ext denverton-7.1.0-42661 add https://github.com/pocopico/redpill-load/raw/develop/redpill-acpid/rpext-index.json I see someone suggesting that you use https://github.com/jumkey/redpill-load/tree/develop/redpill-acpid/rpext-index.json. Is there any difference between them?
 -
 Dear all, today I tried to install from scratch a new DSM_DS918+ 7.1-42661. Just one Harddisk connected to SATA0 and did the steps (I did this already several times with other hardware). But today I have a new issue. The first *.pat file installation seems to be successful, but after reboot I always get the "Welcome Back" Message, and I have to re-install it several times... now Idea what is wrong
 -

Tinycore Redpill Create Boot Image & USB (tr_cb v0.9.9-r02)
FOXBI posted a topic in Software Modding
Hello~! This is a topic I have been writing for a long time since I wrote the ch_cpuinfo topic. I am xpenology user. And I am an IT engineer who creates shell scripts as hobbies. Please understand that it is written by a google translate site. because i’m korean who is not fluent in English. I created a tool to help image or USB creation After Tinycore + Redpill build. Requirement ============================================================= Tinycore, Build completion status Howto Run ============================================================= 1. Download attached file on your PC (tr_cb.tar) or See the source page on github -> http://github.com/FOXBI/tr_cb 2. Start up your Tinycore and upload it. (using sftp....) Alternatively, you can paste the source directly from the shell. or wget, gitclone ... 3. Connect to ssh by tc account. 4. Progress as tc user. 5. Build (rploader or tr_st, ....) 6. Check Directory location # pwd /home/tc 7. Decompress file & check file: # tar xvf tr_cb.tar # ls -lrt # chmod 755 tr_cb.sh 8. Run to Source file # ./tr_cb.sh When you execute it, proceed according to the description that is output. Additional notes ============================================================= 1. You can proceed only when the build has been completed. 2. In the case of USB, it will not proceed unless the USB is plugged in. 3. Please note that all data will be deleted in the case of USB. 4. In case of USB, it may take some time depending on the capacity. 5. In case of USB, VID and PID are automatically put in grub.cfg. 6. In the case of USB, the default is hd0, which is the default boot order. 7. Image is created in /home/tc/ in the form of model name_version.img and is quickly created in 150MB. 8. Image is changed to hd0 -> hd1 according to the boot order based on the environment being built. Changelog ============================================================= Update v0.9.9-r02 - 2022.04.27 - A typo was identified and corrected in the USB creation function Attachement ============================================================= Download : tr_cb.tar Finally comment ============================================================= I'm an ESXi user, so the Native test is lacking.(Check only basic bootability) Please note that there may be errors. If you tell me the test results and points for improvement, I'll reflect them. Have Nice Day!! Thank you~!!!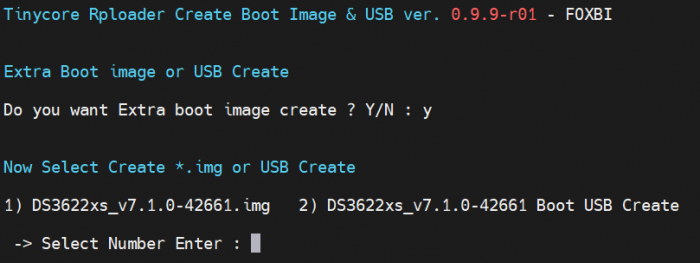
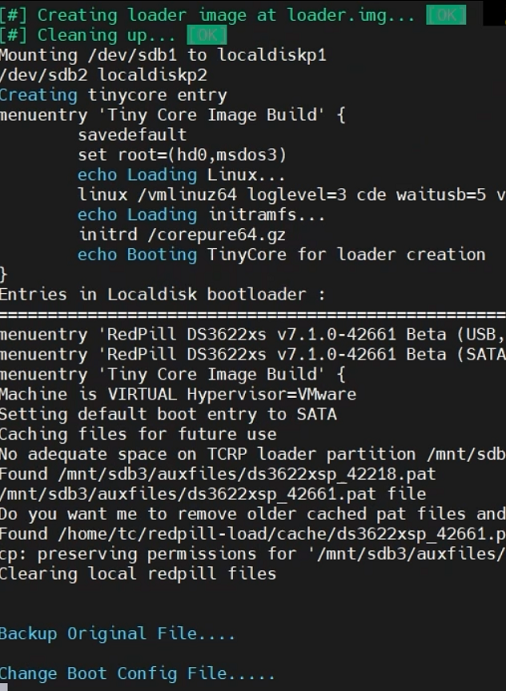
-
- 4
-
-
-
- boot image
- boot usb
- (and 4 more)
-
 I am using pocopico's tinycore-redpill to build bromolow-7.0.1-42218 for my HP microserver Gen8. At first everything seemed to work fine, but because of some boot issues (my USB wasn't found most of the time, probably because of a BIOS issue), I updated my BIOS to a new version. Ever since, I cannot get my Xpenology working anymore. Booting the system from my USB works fine and https://find.synology.com successfully finds my system, even uploading the DSM_DS3615xs_42218.pat goes well. But as soon as it needs to restart the system and the 10 minutes has been passed, I get a "Something went wrong" message (see below image): Revisiting the same URL (https://xxx.xxx.xxx.xxx:5000) results in a new installation process: I cannot resolve the issue.... for some reason it doesn't finish the installation correctly, but I don't know why. Any thoughts? BIOS version: HP BIOS J06 04/02/2013 My user_config.json { "extra_cmdline": { "pid": "0x1666", "vid": "0x0951", "sn": "*************", "mac1": "00********70", "mac2": "00********71", "mac3": "00********72", "mac4": "00********73", "netif_num": "4", "SataPortMap": "6", "DiskIdxMap": "00" }, "synoinfo": { "internalportcfg" : "0xffff", "maxdisks" : "16" }, "ramdisk_copy": {} }
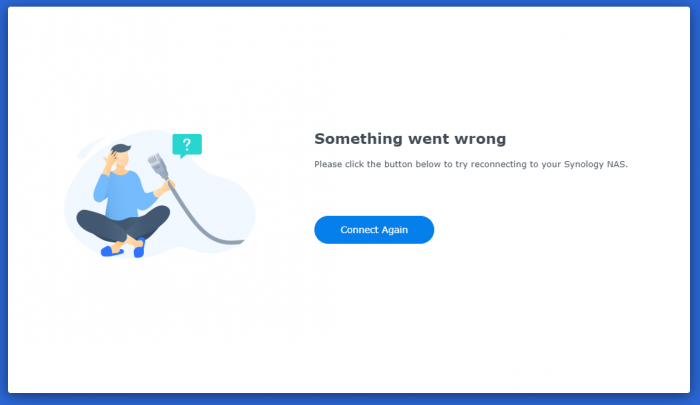
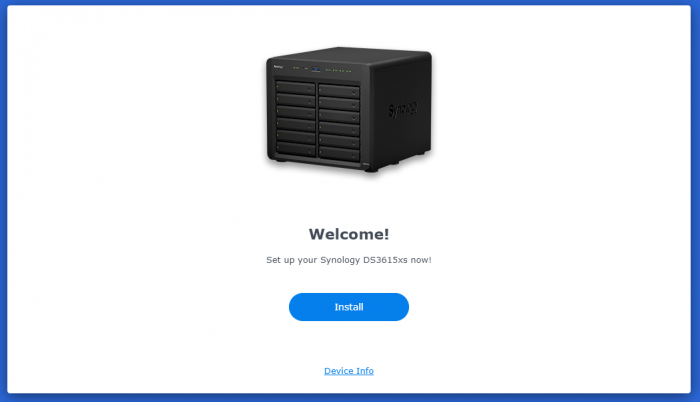
-
Hello guys, i am new to community! I always was windows user and i never had linux experience. This is the reason i open this topic because i cant fully understand the existing topics. I'm really sorry! In the past months i installed DSM 5.2 on my PC with jun's bootloader and i was ok. But now i want to go to DSM 7 because everything is outdated. I tried to install redpill's for DS918+. I edited the grub file but synology assistant never finds my machine. I think the problem is the lan driver. My motherboard is G41M-VS3. I found drivers of Contributors pocopico and jimmyGALLAND here https://github.com/pocopico/rp-ext but i cant understand how to add them. I would like to have a very starter guide because it's easy for me to get lost. Thanks in advance and really sorry for this! Edit: Now i understood that i opened this topic in wrong section and i feel worse. Really sorry!
-
Ввиду участившихся просьб с подобным вопросом, решил накидать небольшую инструкцию. Нам понадобится: macOS 11.5.2 VMware 12.1.2 Образ загрузчика RedPill отдельным файлом на флешке. В моем случае для инструкции это файл redpill-DS918+_7.0.1-42214_b1632313199.img (Инструкция по сборке в macOS). Собрал специально для данной темы с данными, которые не соответствуют реальным устройствам и приведены ниже. В них мак-адреса сетевых карт и серийный номер взяты с потолка. { "extra_cmdline": { "pid": "0x0001", "vid": "0x46f4", "sn": "14A0PDN849204", "netif_num": "2", "mac1": "001132823486", "mac2": "001132823487", "DiskIdxMap": "1000", "SataPortMap": "4" }, "synoinfo": {}, "ramdisk_copy": {} } Live CD Ubuntu 20.04.03 Помнить сочетания control+command для того, чтобы включить мышку после запуска виртуальной машины Записать мак адресы, чтобы были под рукой для настройки виртуальной машины Поехали! Будет штук 40 картинок и немного описания. 1. Создаем новую виртуальную машину 2. Выбираем пункт Create a custom virtual machine 3. VMware ESX ->VMware ESXi 7 and later 4. Тип биоса Legacy 5. Создать новый виртуальный диск 6. Выбираем Customize Settings 7. Придумываем имя 8. Это основное окно настройки нашей виртуальной машины. Тут мы будем добавлять (кнопка Add Device в правом верхнем углу) и удалять устройства. 9. Выбираем диск SCSI, и в его настройках исправляем на SATA, а размер указываем 150мб под загрузчик. Позже на него мы запишем созданный образ redpill-DS918+_7.0.1-42214_b1632313199.img используя Live CD c Ubuntu. Все диски у нас будут SATA! После завершения настройки этого диска нажимаем Add Device, выбираем добавить новый диск. 10. Создаем второй диск, для DSM, размер можно взять любым, главное условие, чтобы емкости хватило. Позже мы добавим еще парочку, но чтобы не запутаться, начнем с одного. На данном этапе рекомендую выбирать размер дисков для DSM большей емкости, потому что при 5ГБ после установки у вас не останется места, и система не даст создать раздел под данные. Это даст вам возможность их потом не ресайзить как мне во время написания инструкции. Но если все таки кто-то столкнется, просто установите виртуальную машину, и в настройках измените раздел в с 5 гб, на тот, который будет вам нужен и удобен. Я его изменил на 20 гб, и все работает после загрузки. 11.Выбираем желаемое количество выделяемой памяти и количества используемых ядер для виртуальной машины 12. Настраиваем сетевой интерфейс который у нас уже имеется. Тут важны два параметра: нужны выбрать Autodetect и пописать мак-адрес первый из тех, что задавался при сборке загрузчика в apollolake_user_config.json. В данном случае - 001132823486 13. Создаем новый сетевой интерфейс, настройки как у предыдущего, только мак-адрес вставляем следующий 001132823487 14. Заходим в настройки CD/DVD. Ставим галочку в чекбоксе "подключить" и выбираем образ Ubuntu, который предварительно скачали. И стартуем виртуальную машину. 15. Выбираем пункт Try Ubuntu 16. По окончании загрузки попадаем на рабочий стол 17. Вставляем флешку с образом загрузчика. Система спросит что с ней сделать, выбираем примонтировать к виртуальной машине. Открываем файловый менеджер, ищем наше устройство USB, и копируем с него образ в папку Downloads 18.Переходим в портал приложений, и в поисковой строке набираем Terminal и запускаем его. 19. Набираем команду, чтобы перейти в папку, в которой лежит наш образ загрузчика cd Downloads 20. Водим команду, чтобы вывести список доступных разделов, нас интересует тот, что на 150 мб (/dev/sda) sudo fdisk -l 21. Вводим команду, чтобы посмотреть список файлов в каталоге, в котором мы находимся, и убедится, что скопированный нами образ на месте. Это даст возможность легко скопировать его имя полностью. ls -a 22. Следующей командой мы запишем образ redpill-DS918+_7.0.1-42214_b1632313199.im на раздел /dev/sda sudo dd if=redpill-DS918+_7.0.1-42214_b1632313199.img of=/dev/sda 23. Выключаемся. 24. После того, как виртуальная машина выключилась правой кнопкой Show in Finder 25. Выбираем нашу виртуальную машину, вызываем контекстное меню, и просим показать содержимое пакета. 26. Ищем указанный файл, и просим открыть его текстовым редактором. 27. Первое, что нам нужно сделать, это прописать нужный сетевой драйвер виртуальной машины, иначе она не будет обнаруживаться в сети 28. Ищем "vmxnet3" и меняем на "e1000e". Сетевых интрефейса у нас два, потому замены должно быть тоже две. В конечном итоге все должно выглядеть как-то так. ethernet0.virtualDev = "e1000e" ethernet1.virtualDev = "e1000e" 29. После все предыдущих манипуляций должна быть примерно следующая картина. Посмотрев на которую я понял, что забыл добавить последовательный порт для лога. 30. Поэтому выбираем Add Device и добавляем, заодно указываем, куда сохранять лог. 31. Стартуем машину (выбираем режим SATA, потому что в нем игнорируются значения PID/VID), даем ей немного поработать (минуту-две), потому что как выяснилось, некоторые настройки в файл *.vmx прописываются чуть позже. На этом этапе она уже должна определяться в сети, но видеть диски не будет. Это мы исправим дальше. 32. Останавливаем виртуалку (Shut down ) 33. Добавляем еще парочку дисков как в пункте 10 (размер может совпадать, диски должны быть SATA). Этот пункт не обязателен, но я его добавил, чтобы было понятнее, что и для чего мы еще будем редактировать в фале *.vmx 34. Возвращаемся к пункам 24 - 27, в которых мы редактировали тип драйвера сетевого интерфейса, только теперь займемся настройками наших виртуальных HDD. Суть заключается в том, что нам нужно разнести виртуальный диск, на который записан загрузчик, и с дисками, на которых будет жить DSM, на разные виртуальные контроллеры. Номер контроллера или устройства начинается с нуля! Следуя этой логике, нам нужно сделать так, чтобы загрузчик был на контроллере с номером "0", а остальные диски - с номером "1". Получаем: sata0 - контроллер на котором сидит диск (устройство sata0:0) с загрузчиком, sata1 - контроллер на котором сидят диски для DSM (устройства sata1:0, sata1:1, sata1:2) Каждый контроллер для дисков тоже определяется в настройках, и имеет свои свойства, которые выглядят следующим образом: sata0.present = "TRUE" sata0.pciSlotNumber = "35" sata1.present = "TRUE" sata1.pciSlotNumber = "36" Как и каждое устройство (диск в нашем случае): sata0:0.fileName = "Virtual Disk.vmdk" sata0:0.present = "TRUE" sata0:0.redo = "" sata1:0.fileName = "Virtual Disk 2.vmdk" sata1:0.present = "TRUE" sata1:0.redo = "" sata1:1.fileName = "Virtual Disk 3.vmdk" sata1:1.present = "TRUE" sata1:1.redo = "" sata1:2.fileName = "Virtual Disk 4.vmdk" sata1:2.present = "TRUE" sata1:2.redo = "" 35. Итоговый файл у меня выглядит вот так: .encoding = "UTF-8" config.version = "8" virtualHW.version = "18" pciBridge0.present = "TRUE" pciBridge4.present = "TRUE" pciBridge4.virtualDev = "pcieRootPort" pciBridge4.functions = "8" pciBridge5.present = "TRUE" pciBridge5.virtualDev = "pcieRootPort" pciBridge5.functions = "8" pciBridge6.present = "TRUE" pciBridge6.virtualDev = "pcieRootPort" pciBridge6.functions = "8" pciBridge7.present = "TRUE" pciBridge7.virtualDev = "pcieRootPort" pciBridge7.functions = "8" vmci0.present = "TRUE" hpet0.present = "TRUE" nvram = "DSM 7 Test.nvram" virtualHW.productCompatibility = "hosted" powerType.powerOff = "soft" powerType.powerOn = "soft" powerType.suspend = "soft" powerType.reset = "soft" displayName = "DSM 7 Test" guestOS = "vmkernel7" vhv.enable = "TRUE" tools.syncTime = "TRUE" tools.upgrade.policy = "upgradeAtPowerCycle" numvcpus = "4" memsize = "4096" scsi0.virtualDev = "pvscsi" scsi0.present = "TRUE" scsi0:0.fileName = "Virtual Disk.vmdk" ide1:0.deviceType = "cdrom-image" ide1:0.fileName = "/Users/fish/Downloads/ubuntu-20.04.3-desktop-amd64.iso" ide1:0.present = "TRUE" usb.present = "TRUE" ehci.present = "TRUE" ethernet0.addressType = "static" ethernet0.virtualDev = "e1000e" ethernet0.linkStatePropagation.enable = "TRUE" ethernet0.present = "TRUE" extendedConfigFile = "DSM 7 Test.vmxf" ehci:0.parent = "-1" ehci:0.port = "0" ehci:0.deviceType = "video" sata0.present = "TRUE" sata1.present = "TRUE" sata0:0.fileName = "Virtual Disk.vmdk" sata0:0.present = "TRUE" ethernet0.address = "00:11:32:82:34:86" ethernet1.addressType = "static" ethernet1.virtualDev = "e1000e" ethernet1.present = "TRUE" ethernet1.linkStatePropagation.enable = "TRUE" ethernet1.address = "00:11:32:82:34:87" ehci:0.deviceId = "0x8020000005ac8514" numa.autosize.cookie = "40012" numa.autosize.vcpu.maxPerVirtualNode = "4" uuid.bios = "56 4d 9f 5f d2 3b 6a f5-ae a1 7d 94 e0 ca 92 6a" uuid.location = "56 4d 9f 5f d2 3b 6a f5-ae a1 7d 94 e0 ca 92 6a" sata0:0.redo = "" pciBridge0.pciSlotNumber = "17" pciBridge4.pciSlotNumber = "21" pciBridge5.pciSlotNumber = "22" pciBridge6.pciSlotNumber = "23" pciBridge7.pciSlotNumber = "24" scsi0.pciSlotNumber = "160" usb.pciSlotNumber = "32" ethernet0.pciSlotNumber = "192" ethernet1.pciSlotNumber = "224" ehci.pciSlotNumber = "33" vmci0.pciSlotNumber = "34" sata0.pciSlotNumber = "35" scsi0.sasWWID = "50 05 05 6f d2 3b 6a f0" svga.vramSize = "268435456" vmotion.checkpointFBSize = "4194304" vmotion.checkpointSVGAPrimarySize = "268435456" vmotion.svga.mobMaxSize = "268435456" vmotion.svga.graphicsMemoryKB = "262144" vmci0.id = "-523595158" monitor.phys_bits_used = "45" cleanShutdown = "FALSE" softPowerOff = "FALSE" usb:1.speed = "2" usb:1.present = "TRUE" usb:1.deviceType = "hub" usb:1.port = "1" usb:1.parent = "-1" svga.guestBackedPrimaryAware = "TRUE" sata1:0.present = "TRUE" sata1:0.fileName = "Virtual Disk 2.vmdk" floppy0.present = "FALSE" serial0.fileType = "file" serial0.fileName = "/Users/fish/Desktop/log" serial0.present = "TRUE" sata1:0.redo = "" sata1.pciSlotNumber = "36" sata1:1.fileName = "Virtual Disk 3.vmdk" sata1:1.present = "TRUE" sata1:2.fileName = "Virtual Disk 4.vmdk" sata1:2.present = "TRUE" sata1:2.redo = "" sata1:1.redo = "" usb:0.present = "TRUE" usb:0.deviceType = "hid" usb:0.port = "0" usb:0.parent = "-1" P.S. Постарался максимально подробно расписать и показать все то, что придется сделать, чтобы запустить DSM 7 в виртуалке на macOS. Пытался рассказать так, чтобы была понятна логика в тех местах, где она присутствует. Некоторые вещи всплыли уже в процессе оформления поста, когда все перепроверял (история с ресайзом дисков), так что другие ошибки тоже могу быть, но на суть они не влияют.