Search the Community
Showing results for tags 'partition'.
Found 4 results
-
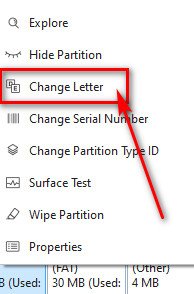
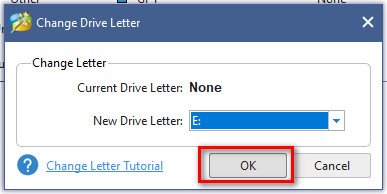
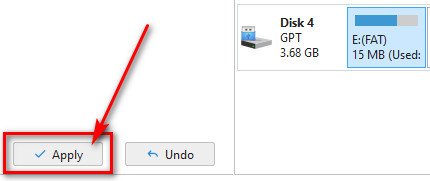
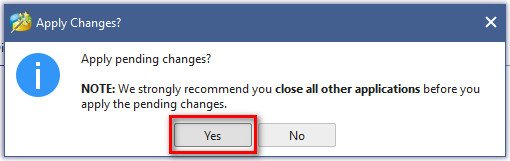
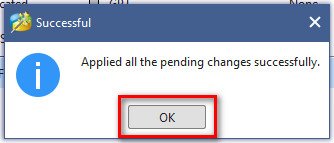
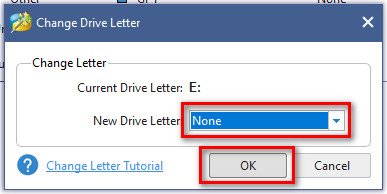
 If you want to modify your grub.cfg of your written boot stick or want to access the partitions (adding extra.lzma from @IG-88) you can use a free portable tool. Notes: - the grub.cfg is located in the folder "grub" on the first partition (15MB) - the extra.lzma is on the second partition (30MB) 1.) Download MiniTool Partition Wizard Free Edition (portable): https://www.partitionwizard.com/download/v12-portable/pw12-free-64bit.zip 2.) Unzip it and launch the "partitionwizard.exe" with administrative rights. 3.) Plug in your boot stick. Partition Wizard will automatically recognize the new drive. In this example it is drive no. 4. Now select the 1st partition of your stick (15MB) -> rightclick and select "Change Letter" in the context menu. 4.) Select a desired drive letter and click on "OK". 5.) In the lower left pane of the tool click on "Apply" and confirm the pending changes: If everything went OK you should see a success message: Now you have full access to the 1st partition with the Explorer or your favourite file manager. If you're done with any modifications it's advisable to unmount the drive letter. The steps are nearly the same. 6.) Right click the 1st partition again -> "Change Letter" -> select "New Drive Letter: none" -> "OK" -> click on "Apply" to the lower left and confirm the changes.
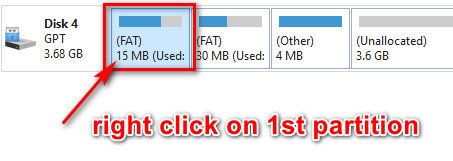
-
 Bonjour à tous, Depuis plusieurs mois (même quelques années maintenant), j'ai un problème récurrent sur mon NAS : je perds régulièrement un HDD. Je suis en Raid 5, mais je ne me rappelle plus si c'est du Raid 5 classique ou celui de Synology qui est plus souple mais propriétaire. Je tourne sous DSM 6.1.7-15284 avec le loader de Jun (v1.02 il me semble), mais j'ai ce problème depuis longtemps et je l'avais déjà avec d'autres versions de DSM et du loader. Mon NAS est indentifié comme étant un DS3615xs. Le problème est donc le suivant : j'ai 4 HDD et régulièrement, je perds le 4ème. Le système m'indique alors : Le RAID Group 1 (Groupe1) sur Serveur_NAS est passé en mode dégradé [3/4]. La plupart du temps, je répare et ça tient un certain temps (très aléatoire), puis ça recommence. Mais de temps en temps, le système n'arrive pas à réparer le HDD en panne. Je précise que j'ai changé mes 4 HDD, ça le faisait avant avec les anciens et ça le fait encore. Et les 4 nouveaux HDD n'ont pas la même capacité de stockage et ne sont pas de la même marque. Donc je pense que c'est soit le système, soit la CM, soit... un câble peut-être ? Le HDD qui dégage est indiqué comme ayant un "échec de partition système". Au niveau tests SMART, aucun souci. Et si je sors le disque de la baie NAS, que je formate et que je le remets, ça passe. Le Raid se reconstruit et ça fonctionne. Mais au bout de quelques jours ou semaines, j'ai de nouveau un plantage. Sur la carte mère, les 4 HDD sont branchés sur les 4 ports qui permettent une gestion du Raid par la CM (ports 3 à 6). J'ai d'autres ports Sata, mais je n'ai pas essayé de brancher différemment car je n'étais pas sûr de pouvoir me passer des fonctions de gestion du Raid de la CM (il me semble que la gestion est logicielle via le DSM, mais pas certain). Si vous avez des conseils, je suis preneur. Merci
 -
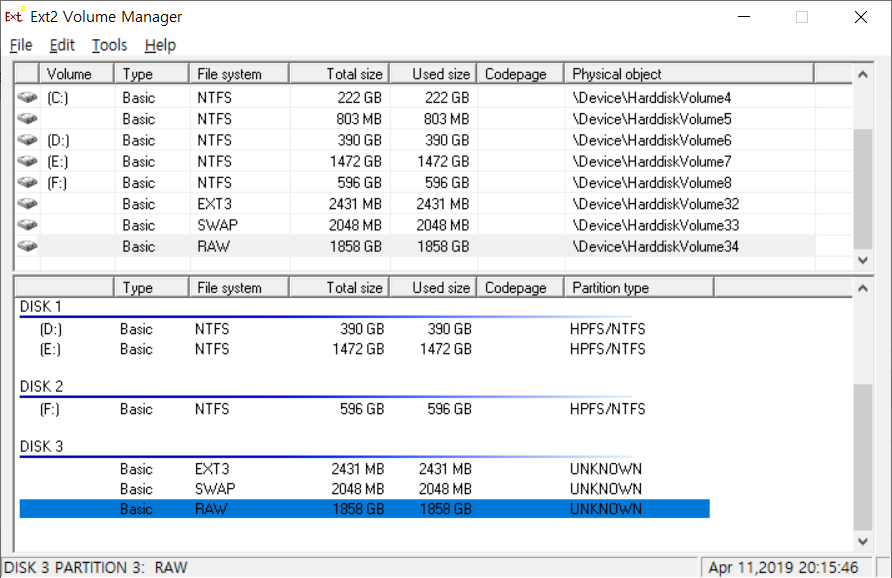
ds3615에서 쓰던 HDD를 가지고 있습니다. 새로 918+를 j4105 보드에 설치한 후 (여기에는 새로운 하드를 붙혔습니다. ) ds3615에서 쓰던 hdd를 usb로 연결해서 기존 자료를 백업하려고 하는데 외부장치의 usb로 가면 파일 시스템이 지원하지 않음으로 나옵니다. 윈도우에 연결해 보면 메인 파티션이 raw로 나옵니다. (ext2fsd 사용) 하드가 고장났다 해서 새로 설치한 918+의 HDD를 떼서 윈도우에 붙혀봐도 동일하게 메인 파티션이 raw로 나옵니다. 이 raw 파티션에 중요한 데이터들이 다 들어 있는데 혹시 살릴 수 있는 방법이 없을까요?

-
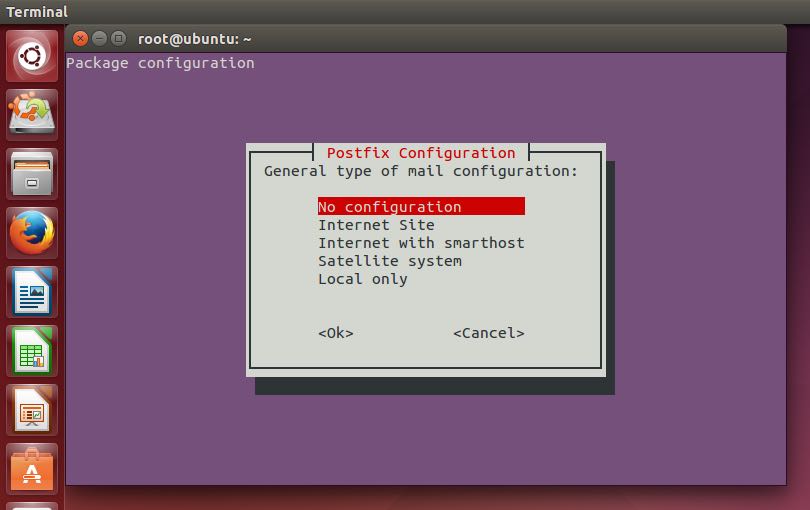
 If you can't access your Xpenology box but you still wish to try and 'fix' some configuration files or perhaps you wish to finally make that backup that you should have done before fiddling with the root user, then you can access the content of the system partition and data partitions through a Live Ubuntu CD (or whatever unix flavoured OS you so desire). Here is how to: 1 - Make a Live Ubuntu USB drive. Ideally it is more convenient to make a persistent Live Ubuntu USB drive but that's not required for this tutorial and it would just complicate things unnecessarily. 2 - Once you're done burning Ubuntu on the USB flash drive, go plug it in your Xpenology box and boot from it. 3 - Once in Ubuntu, launch Terminal. You will need to first be root so type: sudo -i 4 - Now install mdadm and lvm2 by typing the following command: apt-get install mdadm lvm2 You should get the following Postfix Configuration menu: Select as shown in the pictures above. If you wish to mount the data partition alone then proceed with the following command: 5 - To mount the data partition, simply issue this command and you are done: mdadm -Asf && vgchange -ay If you also wish to mount the system partition then proceed with the following commands (adapt to your case accordingly): 6 - Then you need to check your raid array and partitioning of your drives: fdisk -l | grep /dev/sd In my case I see this. Note I only have 2 drives /dev/sda and /dev/sdb root@server:/etc.defaults# fdisk -l | grep /dev/sd Disk /dev/sda: 1.8 TiB, 2000398934016 bytes, 3907029168 sectors /dev/sda1 256 4980735 4980480 2.4G fd Linux raid autodetect /dev/sda2 4980736 9175039 4194304 2G fd Linux raid autodetect /dev/sda3 9437184 3907015007 3897577824 1.8T f W95 Ext'd (LBA) /dev/sda5 9453280 3907015007 3897561728 1.8T fd Linux raid autodetect Disk /dev/sdb: 1.8 TiB, 2000398934016 bytes, 3907029168 sectors /dev/sdb1 256 4980735 4980480 2.4G fd Linux raid autodetect /dev/sdb2 4980736 9175039 4194304 2G fd Linux raid autodetect /dev/sdb3 9437184 3907015007 3897577824 1.8T f W95 Ext'd (LBA) /dev/sdb5 9453280 3907015007 3897561728 1.8T fd Linux raid autodetect System partitions are the ones labeled sda1, sdb1. If you have more drives in the array, subsequent system partitions will probably be called sdc1, sdd1 so on and so forth. You get the point. 7 - Once you figured out all system partitions, you can examine the foreign endian array members by issuing (this is for my case, with 2 drives): mdadm -Ee0.swap /dev/sda1 /dev/sdb1 If you have 3 drives then you add /dev/sdc1. You get the idea. 8 - Finally, assemble the array and fix the byte order (this is for my case, with 2 drives): mdadm -AU byteorder /dev/md0 /dev/sda1 /dev/sdb1 Same comment as previous command; add any additional system partitions that you may have. Beware of the /dev/md0. It's normal, not a mistake. Your system partition should now be mounted and you can navigate through the system files. Simply unmount the drives and shutdown the machine when you are done. If for some reason you need to reboot and want to access the partitions again then you will need to re-install mdadm and lvm2 because the Live Ubuntu USB is not persistent. --------- Reference: https://www.synology.com/en-global/knowledgebase/DSM/tutorial/Storage/How_can_I_recover_data_from_my_DiskStation_using_a_PC http://xpenology.com/forum/viewtopic.php?f=2&t=22100&p=83631&hilit=version#p83631 http://xpenology.com/forum/viewtopic.php?f=2&t=20216&p=74659&hilit=mdadm#p74659 >> Thanks to Jun
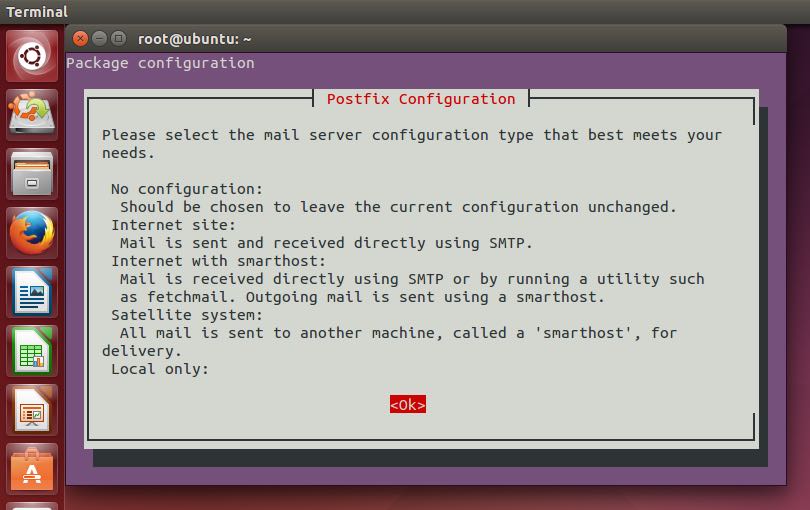
- 51 replies
-
- 11
-

-