Search the Community
Showing results for tags 'dsm'.
-
 Dear all, I am trying top Install Xpenology on a spare desk computer that i have. I out in a sigle disk with 6TB capacity. I burned the image via Rufus on a USB Stick. The Stick boot correctly and the dsm installation start, but It stops at 95%. If i refresh the Page, the installation progress Starts again from 56% and stops 95%. There Is something that i can check to understand where and how i have made something wrong? Thanks in Advance for all the reply that i Will receive. 👋👋
 -
Dear all, I am trying top Install Xpenology on a spare desk computer that i have. I out in a sigle disk with 6TB capacity. I burned the image via Rufus on a USB Stick. The Stick boot correctly and the dsm installation start, but It stops at 95%. If i refresh the Page, the installation progress Starts again from 56% and stops 95%. There Is something that i can check to understand where and how i have made something wrong? Thanks in Advance for all the reply that i Will receive. 👋👋
-
 Please help me, I want to use ABB but i can't activate trough the os, the web interface, the offline activation and the special url. everytime it shows an error. please help me with this
 -
Bonjour. Comment en peux faire installer un DSM 7.1 ARPL sur serveur VPS en KVM ? .un grand merci
-
Hi everyone I am installing XPEnology on a decommissioned Datto Siris 3 NAS (replacing Datto OS and OMV). I am able to to every step fine, but when the first DSM boot is done, the device will not connect to my network. I have tried 7.1.0 images for DS3617xs (Broadwell, matches CPU generation) and the DS3622xs+ (Broadwellnk), and no go. TC detects both NICs and is able to get a DHCP address, and I can SSH to it just fine. I am doing the: update, upgrade, usbs, MAC (realmac), SATA, listmods, and build. After the build, the device can boot DSM but it will NOT connect to the network at all. Maybe I am using an incompatible version? The Datto Siris 3 I am using has the following specs: Intel Xeon D-1521 2.40 GHz 32GB Memory 120GB internal SSD, 2x 2TB Seagate drives 2x Intel Ethernet X552/X557-AT 10GBASE-T It is installing the ixgbe extension in the mod search. Thanks in advance!!
-

DSM upgrade from 5.2 to 6.1.7 OK - Issues with installed packages
cypher posted a question in General Questions
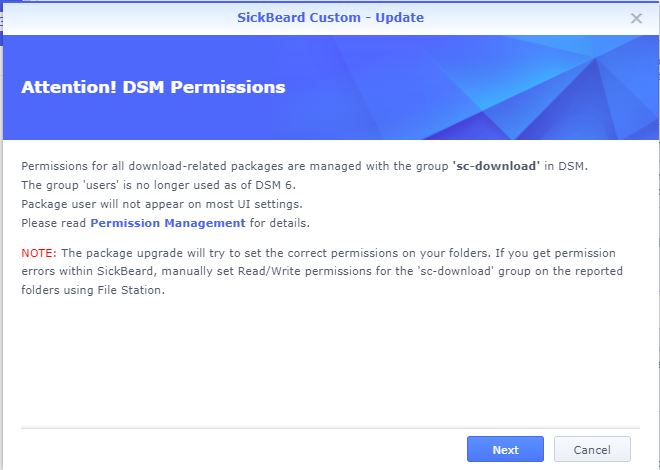
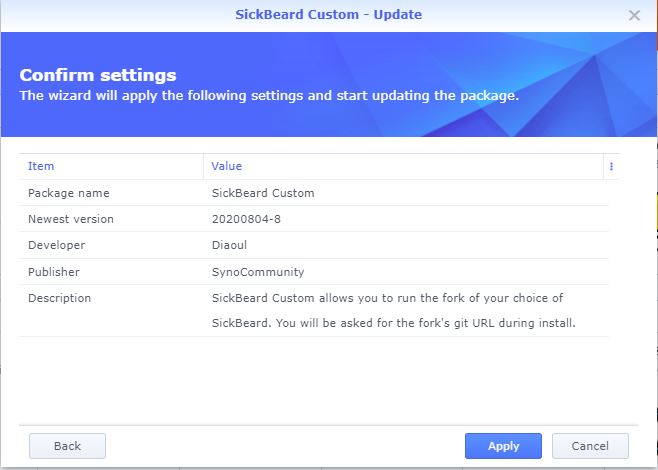
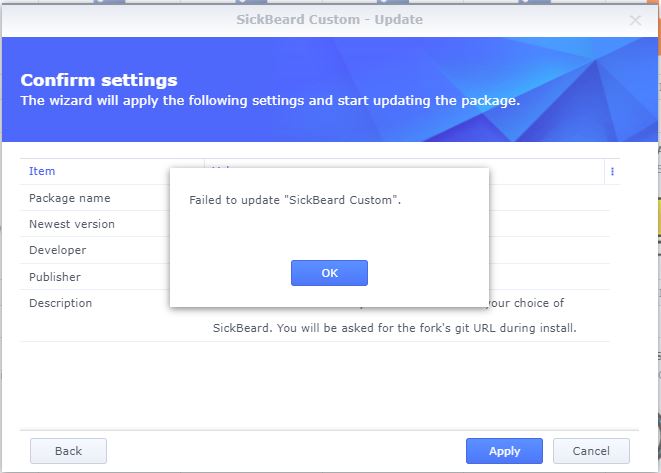
Hi All, Having read the guide - Tutorial: Install/Migrate DSM 5.2 to 6.1.x (Jun's loader) - Tutorials and Guides - XPEnology Community I decided to update my old DSM installation was on 5.2 and mainly used as a Plex server. I needed to update as my Roku update the Plex client and this needed a newer plex Server version which I couldn't install due to the DSM version I was on. Everything all worked OK with the upgrade and I'm now on DSM 6.1.7. I updated Plex and that is all working as expected (including on the Roku plex client). Sickbeard I need an updated version - I saw people make reference to this version - SiCKRAGE Synology DSM6 Repository but doesn't seem to allow me to save the spk file when I click on it, it loads the contents of the file rather than downloading. Having checked the here - How to install on a Synology via Packages - Guides and HowTo's - SiCKRAGE Forums and noted the pre-req for Pyhton 3.1 (so this is installed as well as 2.7.18-25), but that only mentions a Fresh install and not an upgrade to an existing instance. So I went to just update the package in Synology Package centre. My current Installed Version is 20180629-7 Newest Version is 20200804-8 Clicking on upgrade, I noted this made mention of a change to permissions and sc-download would be used instead. It also noted that "The package upgrade will try to set the correct permissions on your folders. If you get permission errors with transmission manually set Read/Write Permissions using File Station. clicking Next and then Apply It immediately comes back with a "Failed to update "Sickbeard Custom" I seem to recall that Sickrage split into 2 dev paths ?? My original install would have been from the synocommunity package prby 5 -6 years ago now. Anyone got any nuggets of information they can share please ?? or even a link to the package and I can try a manual installation. TRANSMISSION I then checked Transmission and Sickrage (both were showing as stopped), trying to run them it failed. I already had the synocommity package URL but it wasn't showing any packages, Checked this page "Invalid Location" error when trying to add SynoCommunity Repo - Nam Vu Personal Site (very useful) to get the link updated. Now I have options for upgrades for Pythion, Git, Transmission, Sickrage Installed the update from Transmission (now running 3.00-20. I noted this made mention of a change to permissions and sc-transmission would be used instead. It also noted that "The package upgrade will try to set the correct permissions on your folders. If you get permission errors with transmission manually set Read/Write Permissions using File Station. NP I though, all updated and upon starting Transmission, some of the previous partial downloads (ones in sub folders - MyTVshow epidode 6) were all reporting as No data found! Ensure your drives are connected or use "Set Location". To re-download, remove the torrent and re-add it. Any partial torrent that was just an individual file (example - myfile.mkv.part) seemed OK I even added a new torrent (complete series as this would be a folder) and when it started it looked OK, but then failed (same error message as above). I checked the settings.json to ensure the correct paths were still listed (they were) so incomplete downloads would go to /downloads/transmission/incomplete/ Checked File Station, for the permissions of an existing sub folder (MyTVshow epidode 6) and noticed the sc-transmission user was not listed. I added this user and restarted Transmission, but no difference. My Downloads folder structure is: /downloads/transmission/downloaded/ /downloads/transmission/incoming/ /downloads/transmission/incomplete/... I went about adding sc-transmission to the top level and replicating changes down giving it read/write access. Restarted Transmission again and now I have made it worse in that ever file reports back as No data found! Ensure your drives are connected or use "Set Location". To re-download, remove the torrent and re-add it. I was surprised at this as, as I thought adding Read / write to every sub folder for the sc-transmission user would resolve the issue. Checking an individual file (I've now resorted to putty, I can see the file permissions are all borked. The user rights are set to sc-transmission, however the group rights are still as the legacy account "transmission" drwxrwxrwx+ 2 sc-transmission transmission 4096 Oct 19 13:21 - Individual file drwxrwxrwx+ 3 sc-transmission transmission 4096 May 30 2018 - Sub Folder Rather than me making matters worse, but I think i'm going to have to run a chown -R sc-transmission:sc-transmission ./* from the /downloads folder Has anyone else been through the upgrade of Transmission client and had a successful result afterwards ?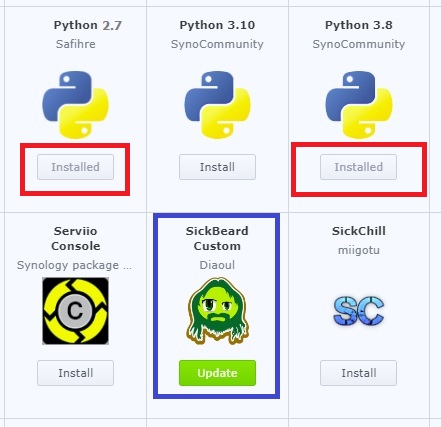
-
7.1.1-42962 Update 2 Что нового Когда пользователи выбирают Outlook в качестве поставщика службы системных уведомлений, им необходимо будет войти с помощью OAuth 2.0, который является более безопасным методом проверки подлинности. Ранее настроенные учетные записи Outlook будут перенесены на «Пользовательский SMTP-сервер». Мы настоятельно рекомендуем перенастроить параметры аутентификации, чтобы обеспечить безопасность вашей учетной записи Outlook. Исправленные проблемы Исправлена проблема, из-за которой проверка файловой системы на томах ext4 приводила к остановке работы параметров квот в DSM. Исправлена проблема, из-за которой после миграции жестких дисков пользователи не могли правильно смонтировать кэши SSD, которые не были перенесены на новое устройство. Исправлена проблема, из-за которой Universal Search не мог найти данные в общих папках на томах, созданных в DSM 7.1.1. Исправлена проблема, из-за которой пользователи не могли получить доступ к DSM с определенных устройств. Исправлена ошибка, из-за которой пользователи не могли получить доступ к DSM через службу Bonjour. Исправлена проблема, из-за которой сетевая карта E10G18-T1 не могла быть обнаружена на пассивном сервере при создании кластера Synology High Availability с RC18015xs+. Исправлена проблема, из-за которой модели с платформой ЦП AMD Ryzen V1000 не могли автоматически регулировать скорость вращения вентилятора после перезагрузки системы.
-
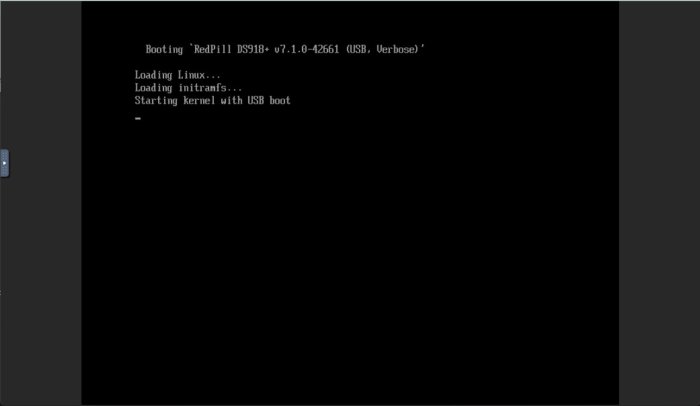
This tutorial is a supplement to the ESXi TCRP installation tutorial located here: https://xpenology.com/forum/topic/62547-tutorial-install-dsm-7x-with-tinycore-redpill-tcrp-loader-on-esxi/ Installing DSM 7.1.0.-42661 on UNRAID 6.10.3 I have been trying to install DSM 7.1 on my unraid server for the last night. After some problems and testing I have created this guide to install DSM 7.1 on UNRAID working perfectly. This is my vm config: STEP 1-Virtual machine creation: Download tiny core from https://github.com/pocopico/tinycore-redpill Select CentOS VM Template and apply correct options from the attached image. Select Q35-6.2 Select 3.0 (qemu XHCI) Load tiny red core as vdisk1 USB by selecting manually (you can create previously the name of the folder for the VM inside /domains and upload the tinycore img ) Create secondary disk 50G or whatever you want (this is your data storage for synology) as vdisk2 SATA Select Network model: e1000 Save. Uncheck "Start VM after creation" Edit again vdisk2 in the advanced xml template (top right corner) to controller='1' (if we don't do this tiny red core will not detect the disk properly when doing the satamap and will not install DSM correctly and will ask you to reinstall the *.pat infinitely) STEP 2-Start VM and connect via SSH Start VM and load tiny red core Once the OS is loaded, open the terminal and enter ifconfig to find out the ip of the machine Connect via ssh (with Putty) to the obtained IP address. user: tc password: P@ssw0rd STEP 3-Run the following commands: To update tiny red core with the latest data ./rploader.sh update now ./rploader.sh fullupgrade now To generate random mac and serial numbers (copy mac address generated to set on unraid vm template later) ./rploader.sh serialgen DS918+ (or whatever version you want, you can see all versions available with command info ./rploader.sh) To map the connected disks ./rploader.sh satamap now To record the vid/pid from usb ./rploader.sh identifyusb now To install NIC drivers (sometimes it loads the e1000e module instead of the e1000 and it doesn't work, adding this command will make sure that the e1000 module for the NIC is loaded correctly) For e1000 Network Card run: ./rploader.sh ext apollolake-7.1.0-42661 add https://raw.githubusercontent.com/pocopico/rp-ext/master/e1000/rpext-index.json NOTE: change version according your selection for CPU and DSM version For virtio-net Network Card run: ./rploader.sh ext apollolake-7.1.0-42661 add https://raw.githubusercontent.com/pocopico/rp-ext/master/v9fs/rpext-index.json NOTE: change version according your selection for CPU and DSM version To build the image ./rploader.sh build apollolake-7.1.0-42661 STEP 4-Download your .pat for your correct cpu architecture from official repo or mega download for this version apollolake , we will need it to install DSM later. https://global.download.synology.com/download/DSM/release/7.1/42661-1/DSM_DS918%2B_42661.pat - Offical repo STEP 5-Edit VM settings on advanced xml mode and install *.pat After doing all the above we shut down the machine. Edit the virtual machine on xml advanced mode (if we change mac address in normal editing mode you will lose controller="1" option set for vdisk2 we did previously so you will have to set it again everytime you change and/or save a setting from normal mode, try to edit always in xml advanced mode), look for MAC address and set the MAC generated by tiny red core. Save Start VM Select the first option USB and leave it a few minutes until we find it with synology assistant Open WebGui and install *.pat We now have DSM 7.1 working on unraid. There is other method with SATA boot but I have to test it better. Hope this guide help someone. Regards.
-
I have an issue HDD has crashed according to DSM i've managed to pull out the drive and read it but the main folder is encrypted i have the decryption key is there any way to use it outside DSM to decrypt it? thanks
-
Установка и настройка DSM на основе версии 6.2.3 Ну вот, муки поиска позади и вы пришли к эпохальному решению создать сервер на основе Хрени.....)))) Надеюсь, что подошли к этому шагу с долей познаний и оценили свои возможности. Данный мануал является общим, без акцента на частные настройки и особенности применяемого вами железа, такие как настройки БИОС_а и хардово-софтовые нюансы вашего железа. Процедура описана на основе последней возможной (на данный момент) для установки версии DSM. Но она применима и на ранние версии DSM 6 . Более древние уже не помню ))) Итак начнём....... Берём флешку. Определяем vid pid. Редактируем grub.cfg. Записываем загрузчик 1.03b для 3615 - 3617 или 1.04b для 918+ Загрузчики: https://mega.nz/#F!yQpw0YTI!DQqIzUCG2RbBtQ6YieScWg!7AoyySoS Файлы DSM 6.2.3-25426: https://archive.synology.com/download/Os/DSM/6.2.3-25426 Обновление только вручную, предварительно скачав файлы !!!! Не обновляться до версии 6.2.4 Нежно "втыкиваем" наш загрузчик в USB и запускаем процесс установки. Можно подключить монитор и что то там увидеть, но я уже давно делаю это "вслепую". По умолчанию запускается Установка. И если всё же подключили монитор, то он вас обрадует этой надписью:"Happy Hacking" - Счастливый взлом. То есть всё хорошо ))) Далее, запускаем Synology Assistant или идём на find.synology.com для поиска своего сервера. Я пользуюсь Synology Assistant_ом, потому и описание будет с ним. Во избежании недопонимания и подобных трудностей бытия, уточняю..... Поиск сервера посредством Synology Assistant или на find.synology.com, осуществляется с ДРУГОГО Компа. С ДРУГОГО, а не с того, на который ставили Сервер. Synology Assistant - почитать: https://www.synology.com/ru-ru/knowledgebase/DSM/help/Assistant/assistant Synology Assistant - скачать: https://archive.synology.com/download/Utility/Assistant/6.2-24922 Нашли свой сервер, вошли по ip и запускаете дальнейшую установку Установка вручную и только так. Находим ранее скачанный файл DSM и подсовываем его. Ну а далее всё интуитивно понятно Создаём учётную запись Предложение по созданию Synology QuickConnect_а отметаем, так как для его работы необходима Реальная Валидная пара. Эту функцию стоит запустить сразу, а то потом она будет вылезать постоянно. Тоже самое, запустить и забыть. Вся безопасность в наших руках ))) Не успели запустить, а уже устарело .... ))) Идём в Центр пакетов и обновляемся. Идём в Панель управления Видим свою версию DSM и предложение обновиться до 6.2.4. Ни в коем случае не обновляемся. Загрузчика, на момент написания мануала, на эту версии НЕТ. Полезная функция Резервирования настроек. Резервируйте их при каждой манипуляции с обновлениями. Потом восстановить настройки будет проще. Нам необходима Папка общего доступа. Туда мы будем складывать файлы И тут нас посылает система к созданию Раздела. Без него никак. Опять таки, всё интуитивно понятно и просто идёте предложенным путём. Но внимательно читаем Создаём Пул хранения. Руководствуемся предложениями Мастера создания Выбираем необходимое или же идём по пути умолчания. Выбираем диск. Он у меня один, если у вас несколько, можно создать сразу RAID-массив. Просто перетягиваем его слева на право Пул готов, пошла проверка. Теперь необходимо создать Том Процесс проверки запущен, но он не мешает дальнейшим настройкам Создаём раздел Выбор файловой системы на ваше усмотрение. Гуглим и читаем мануалы. Я использую Btrfs Процесс проверки диска. Уже ближе к концу Ну вот мы уже имеем Раздел. В Диспетчере хранения имеются инструменты контроля за дисками Информация о состоянии. Смарт. Тесты Возвращаемся в Файл Стейшен, создаём Папки общего доступа. Выбор значений за вами. Редактирование разрешений за вами. Читайте внимательно. Советую, после первичных настроек, запустить эту утилиту . Она поможет настроить интернет на сервере. Очень полезная утилита Так же советую использовать Довланд Стейшен в качестве качалки торрентов. Простая и достаточно эффективная утилита. Сам её использую Нюанс настройки.... По умолчанию, почему то прописано ограничение на отдачу. Значение "20" заменить на значение"0" После настроек, советую открыть так называемый ROOT доступ: https://www.synology.com/ru-ru/knowledgebase/DSM/tutorial/General_Setup/How_to_login_to_DSM_with_root_permission_via_SSH_Telnet Ну вот вроде и всё.... Основные аспекты первоначальной настройки я охватил, остальное изучите в процессе эксплуатации.
-
Друзья, давно не заходил на форум Хрень предложила апдейт до DSM 6.2.4-25554 и я по глупости согласился Хрень пропала((( после перезагрузки не достучаться. Есть ли у кого инструкция по откату, ну если он возможен? Предыдущее обновление прошло на ура, а вот это закончилось кирпичом(( железо HP N40L
-
I have a system with a j5005 motherboard, in the past (about a half year ago) i installed DSM on this system, i changed to OpenMedaVault but now i want to go back to DSM. What system (DS918+ or 36...) is the best to use? Also what is the newest DSM version to use?
-
Hello everyone, I have install DSM on my Qnap TS559 pro+, all work without problem except the hibernation. I have the problem with 6.2.3 and I have downgrade to 6.2.2 but same problem. Anyone know how can I resolve the problem ?
-
-
Multiple vulnerabilities allow remote authenticated users to execute arbitrary commands or conduct denial-of-service attacks, or allow remote attackers to delete arbitrary files via a susceptible version of DiskStation Manager (DSM). Note: Synology recommends to update DSM to 6.2.2-24922-4. Before updating please check the updates report section. If your system is not open to the internet (NAT, port forwarding, QuickConnect, etc.) you should be safe. Further infos on Synology website.
-
Всем доброго вечера! Прошу помощи у форумчан, пришел с работы пытаюсь зайти на хренолоджи (установлен на обычный атом, висящий в коробке за монитором), а ом мне в ответ - у вас нет прав на доступ в данное устройство DSM, абсолютно под всеми учетными записями админскими, пользовательскими и дефолтно админскими. Понимаю, что оперативно никто не ответит, но ужасно срочно нужен файл с хранилища, без которого кердык - беглый просмотр веток форума не помог, может кто сталкивался с таким? PS Под рутом запустил в консоль хотя-бы...

-
Всем доброго времени суток! Повторю вопрос 2х летней давности, кто-нибудь нашел способ установить Asterisk или FreeSwitch или Yate без докера ? Или может есть самосборные пакеты? Поделитесь плиз опытом
-
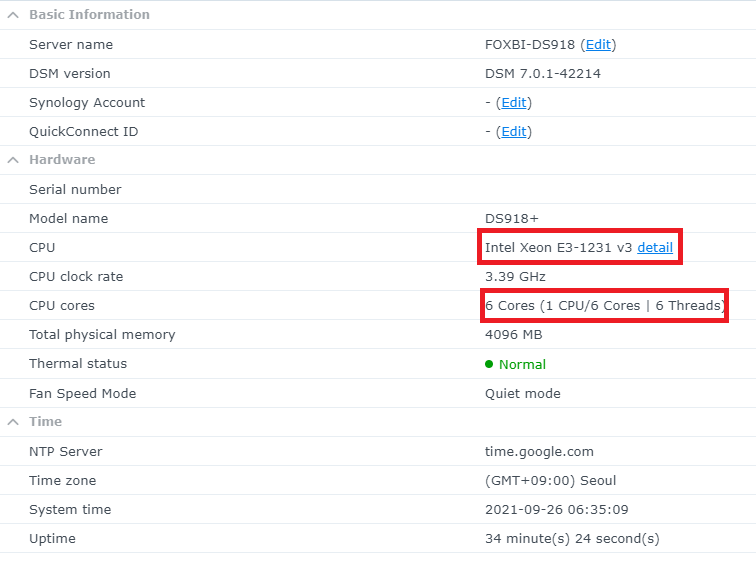
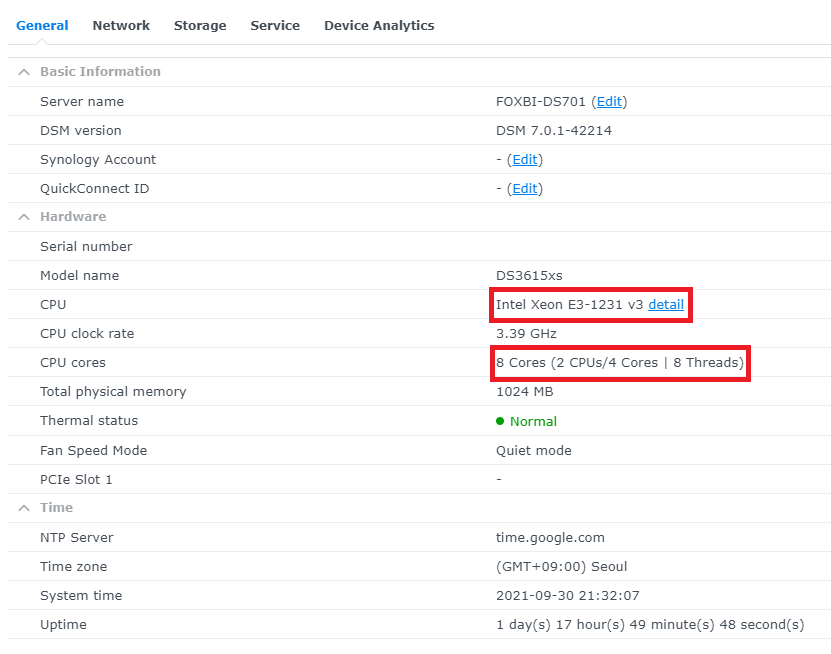
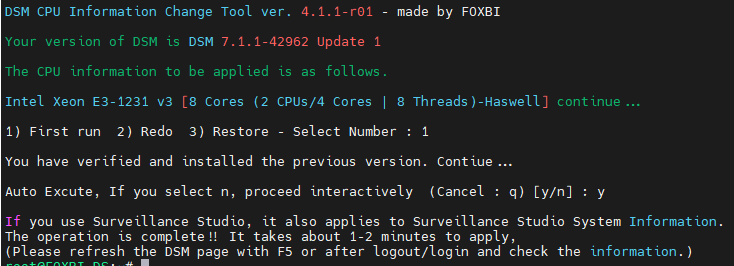
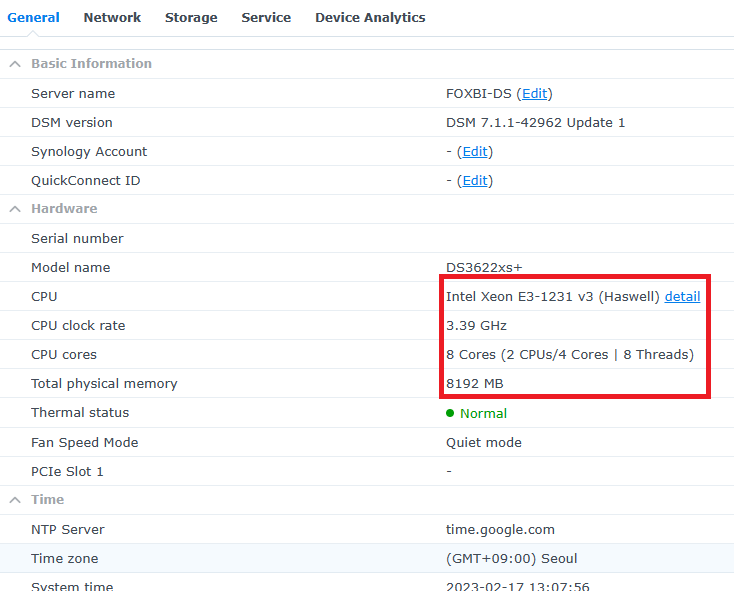
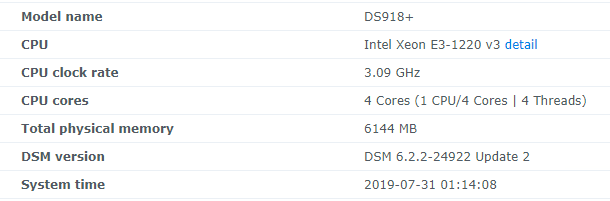
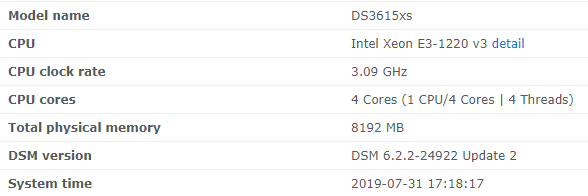
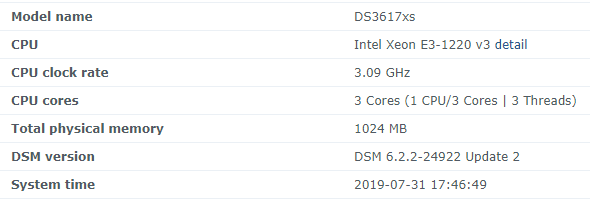
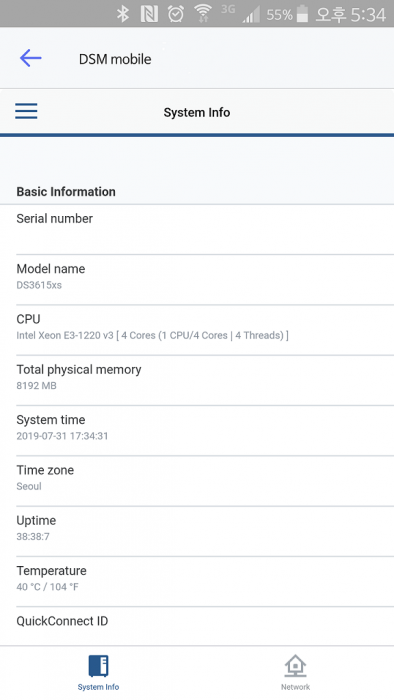
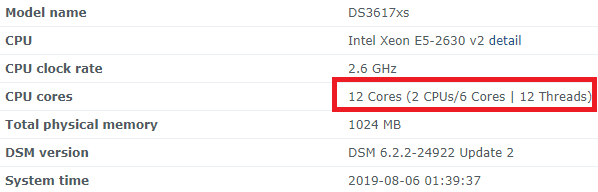
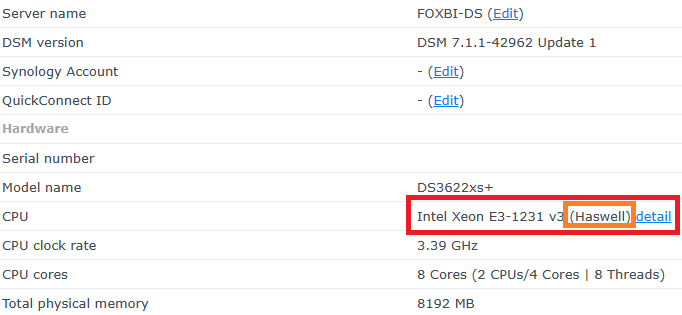
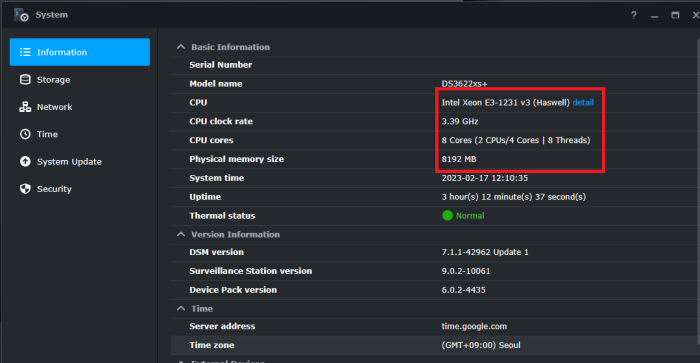
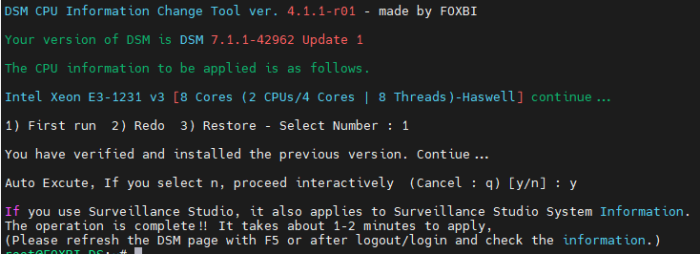
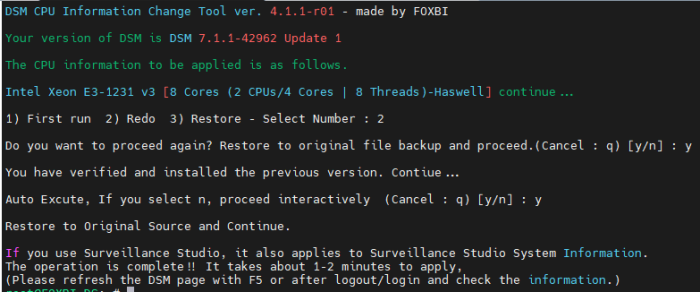
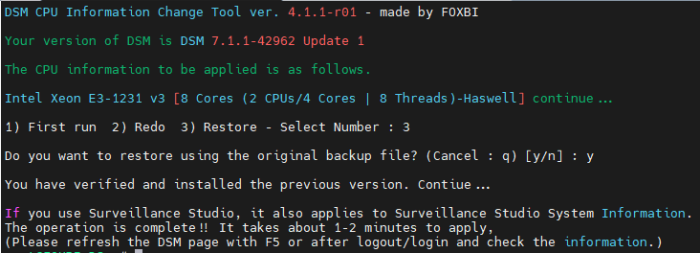
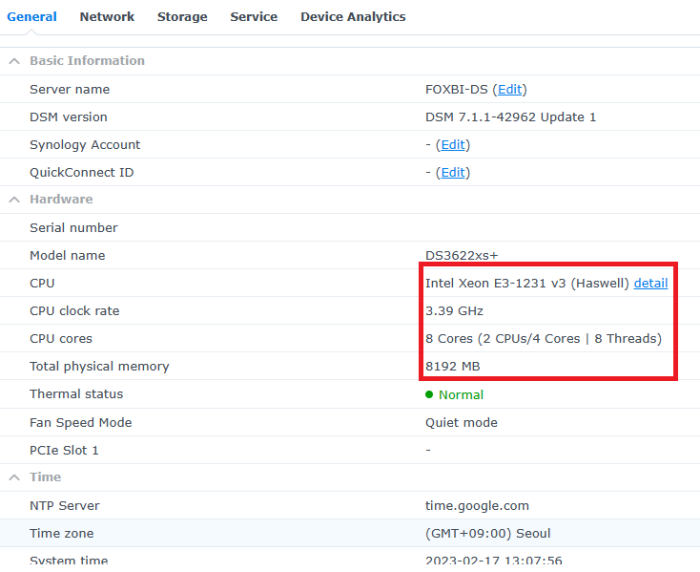
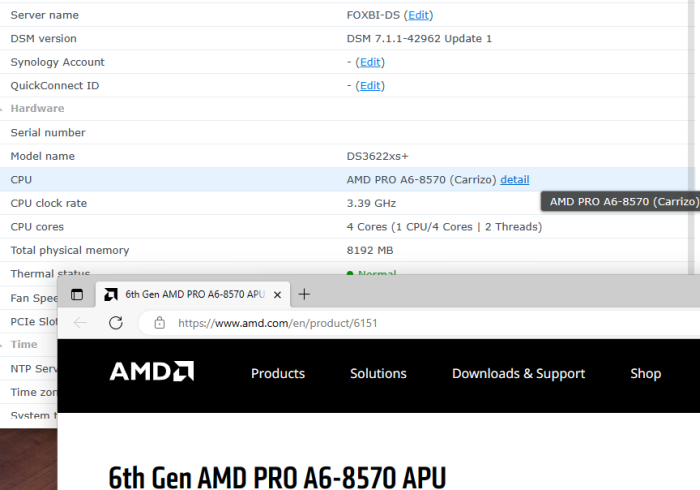
Hello! I am xpenology user. And I am an IT engineer who creates shell scripts as hobbies. Please understand that it is written by a google translate site. because i’m korean who is not fluent in English. I created a tool to change cpu information for Xpenology’s users. Modify the actual cpu name and cores of your pc or server. Howto Run ============================================================= 1. Download attached file on your PC (ch_cpuinfo.tar) (ch_cpuinfo_en.tar) / (ch_cpuinfo_kr.tar is file for korean) 2. Upload file to your DSM location (by filestation, sftp, webdav etc....) 3. Connect to ssh by admin account. (dsm > control panel > terminal & snmp > terminal > enable ssh check) 4. Switch user to root: sudo su - (input admin password) 5. Change directory to where ch_cpuinfo.tar file is located: cd /volume1/temp 5-1. in another way, Download ch_cpuinfo.tar with wget wget https://github.com/FOXBI/ch_cpuinfo/releases/download/ch_cpuinfo/ch_cpuinfo.tar 6. Decompress file & check file: tar xvf ch_cpuinfo.tar ls -lrt (check root’s run auth) 7. Run to Binary file ./ch_cpuinfo or ./ch_cpuinfo.sh (If you use busybox in DSM 5.x, you can use it as a source file) 8. When you execute it, proceed according to the description that is output. 9. Check your DSM’s CPU name, CPU cores at “information center” made a video of the how to run ch_cpuinfo. Extra Action If you want to use ch_cpuinfo in your language Modify and use the LANG.txt file in the same path as ch_cpuinfo. It is possible to use after changing the English content of each variable after translation and changing the value of CUSTLANG in line 8 to Y. Sample image(by Google trans) ==================================================== Addtional, Adjust binary to excute file made by shc(http://www.datsi.fi.upm.es/~frosal) The tool does not inclue worms, bad code. If you want to edit the CPU information yourself manually, please refer to the contents below. ——————————————————————————————————————————————————————————————— Location : /usr/syno/synoman/webman/modules/AdminCenter Source : admin_center.js / admin_center.js.gz(above 6.2) Add Before -> if(Ext.isDefined(h.cpu_vendor)&&Ext.isDefined(h.cpu_family)&&Ext.isDefined(h.cpu_series)){ o.push([_T("status","cpu_model_name"),String.format("{0} {1} {2}",h.cpu_vendor,h.cpu_family,h.cpu_series)])} if(Ext.isDefined(h.cpu_cores)){o.push([_T("status","cpu_cores"),h.cpu_cores])} Add contents: h.cpu_vendor="Intel";h.cpu_family="Xeon";h.cpu_series="E3-1220 V3";h.cpu_cores="4 Cores (1 CPU/4 Cores | 4 Threads)"; h.cpu_detail="<a href='https://ark.intel.com/content/www/us/en/ark/search.html?_charset_=UTF-8&q=E3-1220 V3' target=_blank>detail</a>" Change contens: String.format("{0} {1} {2}",h.cpu_vendor,h.cpu_family,h.cpu_series) to String.format("{0} {1} {2} {3}",h.cpu_vendor,h.cpu_family,h.cpu_series,h.cpu_detail) ——————————————————————————————————————————————————————————————— Finally, All descriptions are based on version 6.2, and the actual executable file supports 5.x, 6.x and 7.x Publish the source through github(https://github.com/FOXBI/ch_cpuinfo). For versions DSM 6.x and later, you can use the binary as before. If you use busybox in DSM 5.x, you can use it as a source file(ch_cpuinfo.sh). Please contact me by comment or bug report, i’ll respond to you as much as possible within my ability. Test & Made Environment ———————————————————————————————————— Base Server : HP ML310e v2 gen8 + VMware ESXi 6.0 + RDM DSM : DSM 6.2.3-25426 Update 3 (DS3615xs) Base Server : HP ML310e v2 gen8 + VMware ESXi 6.0 DSM : DSM 7.0.1-42214 (DS3615xs) Base Server : HP ML310e v2 gen8 + VMware ESXi 6.0 DSM : DSM 7.0.1-42214 (DS918+) Base Server : HP ML310e v2 gen8 + VMware ESXi 6.0 DSM : DSM 6.2.4-25556 (DS3615xs) Base Server : Intel E5-2630 v2 + VMware ESXi 6.7u2 DSM : 6.2.2-24922 Update 2 (DS3617xs) ———————————————————————————————————— Change Log Update new version (ch_cpuinfo ver 4.2.0-r01) 2023.02.18 - Application of AMD's CPU information collection function improvement - xpenlib(cpu_info.sh) refered https://github.com/FOXBI/xpenlib/blob/main/cpu_info.sh Update new version (ch_cpuinfo ver 4.2.1-r01) 2023.03.05 - Fixed error when users of previous version perform redo with version 4.2.0-r01 (Thanks for the @Mentat report.) I am sorry for not being able to actively respond to your inquiries due to busy life. Thank you!! Have a nice day!! Cheer up!! We can do it!! Reduce activity & Stay home & Wear a Mask!! Let's overcome COVID-19 !! Let's pray and support together for the two countries where the earthquake caused great damage and many deaths and missing people. ============================================= Download links: ch_cpuinfo ver 4.2.0-r01 - new version update -> ch_cpuinfo ver 4.2.1-r01 - new version update -> ch_cpuinfo.tar Reference images # 1.04b + DS918+ # 1.03b + DS3615xs # 1.03b + DS3617xs # Normal output is possible even when using more than 8core. # Support DSM 7.x


- 394 replies
-
- 54
-

-

-
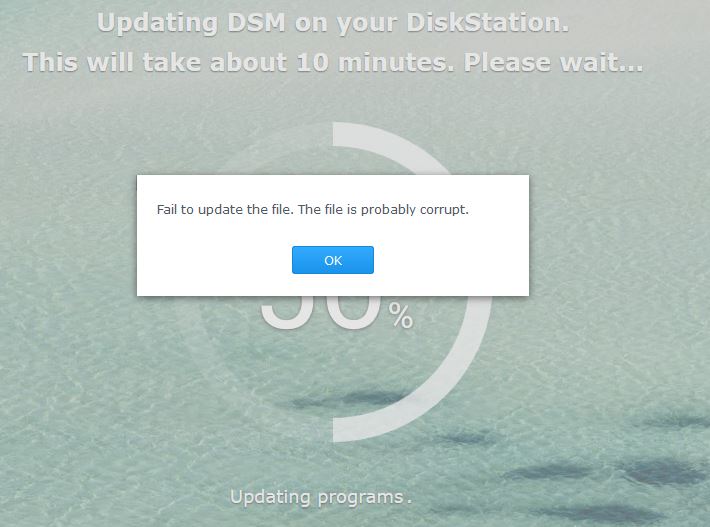
 I 'm using my NAS PC for quite some time (over three years) and it is the first time that DSM doesn't update. Everytime a new update is released, I wait to see if it's safe to do it and only when I see it 's OK, I'm doing it. This time the update procedure is failing and the below error message is displayed. Does anyone know how to fix it? Or should I pass this update? Please advise.
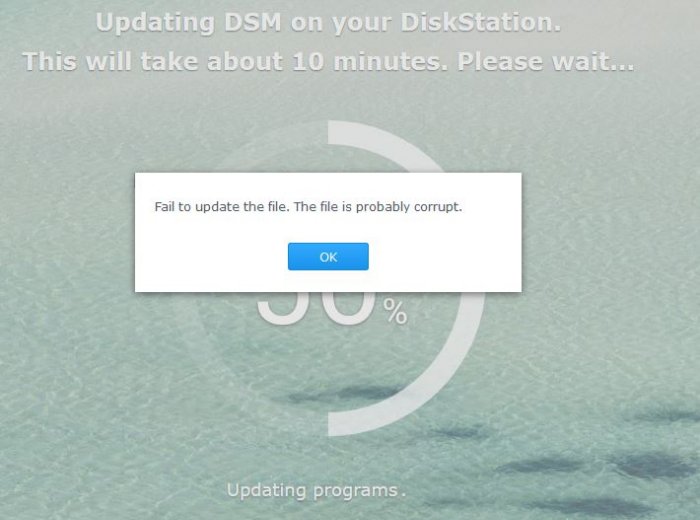
-
Hi, I've just got an XPEnology install up and running with Jun's loader under a Proxmox hypervisor. Everything seems to be working fine, persisting across reboots etc, but I'm just wondering where the DSM configuration data is stored? I have 4 SATA disks configured for direct passthrough and a RAID5 volume placed on them, and I boot the system using the synoboot.img from the loader. But where is all the DSM data stored? I can't see the synoboot.img changing and I don't know where else it would go.
-
Hello, I have succesfully installed DSM 6.1.4 on a IoMega PX4-300D (Intel D525 Atom Dual Core CPU). Everything works perfectly, except the fact that the little monitor on the front stays unused with iomega logo. I've been searching for ways to get it to work and by looking around i've found this git: https://github.com/Wireheadbe/lenovoEMC-300d The guy managed to get the display working on a linux distro. I've tried to fiddle around and so far i git cloned the release and managed to install imagemagick through ipkg, but i'm unable to do the "make go" instruction as i cannot find build-essentials package. Anyone has an idea on how to build the folder ums8485md and/or ways to make this to work? Thanks in advance!
-
Hello, I have a Problem with my Server. Server: Dual XEON X5650 Mainboard: Supermicro 8DTH Ram: 48GB Samsung ECC DDR3 USB-Stick as first and only boot device The server was running a long time good, but after an Update it changed. The Server does not boot anymore from the old USB stick so i made a new one but there the Server booted but i can‘t finde it in the Software. After that the server had sometimes a blackscreen with a blinking cursor, sometimes it couldn‘t load the kernel and somtimes only a blckscrean. I mad a few more USB sticks but no one woked. I tried it in a other computer, there it worked.
-
DSM: 6.1.6-15266 - Результат обновления: УСПЕШНЫЙ - версия DSM до обновления: DSM 6.1.5-15254 U1 - версия и модель загрузчика: Jun's Loader v1.02b - DS916 + - железо: Gigabyte N3150N-D3V - дополнительные комментарии: требуется перезагрузка!
-
Hello folks, I have search on the forum and internet and I can't find an information on how to do it. There is some tutorial to do it without esxi but not with it. Currently, I don't have enough space on other disk to save everything and make a fresh install. So I would like to update without loosing any data. Does someone already did it ? For my understanding, I should select Jun's mod 1.02b vmdk file and start it as a primary drive. But will it update or overwrite the current xpenology? Thx, David
-
Hello I managed to install in N40l xpenology DSM 6.1.5-15254 with jun loader v1.02b. All seems to work fine (i have slow transfer through samba) but that is not working is when i must restart the server i can find the server . The only way is to select the second option from usb boot that is "DS3615xs 6.1 Baremetal with Jun's Md v1.02b Reinstall"