Search the Community
Showing results for 'detected that the hard drives'.
-
I have this system loaded Cstate disabled C1E disabled only using UEFI with LSI 9211-8i IT mode and HBA see it load up in Boot up fine. The Disk shows up but getting errors disk is saying conflict even when its the only disk installed and when other disk are installed it shows them up as external drives not sure why...
-
 edit 14.05.2020: 6.2.3 is back online as v25426, for newer coffeelake cpu's with problems using hardware transcoding (dev/dri present after boot) there is a new videostation that fixes the problem https://xpenology.com/forum/topic/28321-driver-extension-jun-104b-for-dsm623-for-918/?do=findComment&comment=144918 edit2 02.06.2020: as @richv31 pointed out here https://xpenology.com/forum/topic/21663-driver-extension-jun-103b104b-for-dsm622-for-3615xs-3617xs-918/?do=findComment&comment=148564 there seems to be a serious problem with 918+ and scsi/sas drivers, at least with mpt2sas/mpt3sas, not just with 6.2.2/6.2.3 it also happens with jun's original loader 1.04b and dsm 6.2.0 (23824), breaking raid sets after not properly waking up from hdd hibernation means potential data loss i had a two disk raid1 set on a lsi 9211-8i and after disks spinning down only one came up and i saw some really worrying messages on the serial console, i was not able to log in to the system, not on the web gui, even not on the serial console, the whole system was in lock down and only switching off seemed to work as of the problems with not getting s.m.a.r.t. values i used juns old original raid_class.ko, scsi_transport_sas.ko, scsi_transport_spi.ko to get the old state back (replacing my newly made ones from more recent synology kernel source 24922 ) in 0.11/0.12 - these version inherit the problem that seems to be present since the beginning with loader 1.04b anyone using mpt2sas/mpt3sas and disk hibernation on 918+ should disable it for now to not risk any data loss the new 0.13 for 918+ will have the raid_class.ko, scsi_transport_sas.ko, scsi_transport_spi.ko from kernel source 24922, that version did work on testing on my system without breaking anything and without such alarming errors on wakeup of disks, there will be no smart data but at least it seems safer then disks not waking up properly for "proper" lsi sas controller support i'd suggest using 3615 or 3617 as it is "native" in these units and should work better, maybe there are kernel options missing in the 918+ kernel and that cant be fixed, if anyone finds out more just add a comment (i might not have the time to dig into this) the other alternative is to use sata/ahci instead of scsi/sas with 918+, that works without problems on my system using 918+ (12 disks), JMB585 based controller seem to be the best choice atm as they support pcie 3.0 and can have up to 2000 MByte/s for its 5 sata ports (the older marvell and asm chips use only pcie 2.0 limiting the data rate to 500 MB/s or 1000 MB/s, even 8 port controller with two of the older chips use a pcie bridge chip with just two lanes making them terrible choice for a high port count - might be ok with just one or two 1GBit nic's but will at least limit the rebuild speed and ssd's should be kept away from these controllers and place in internal sata ports) for Instructions about installing or updating please read "Driver extension jun 1.03b/1.04b for DSM6.2.2 for 3615xs / 3617xs / 918+" if i have time i will write more in this place the new package is not well tested i just did some tests with hardware i have at hand (ahci, e1000e, r8168, igb, bnx2x, mpt2sas/mpt3sas) and tested update from 6.2.2 to 6.2.3 basically synology reverted the kernel config change made in 6.2.2 back to what was before so old drivers from original 1.04b loader (and older driver i made before 6.2.2) should work again - but as synology also introduced there own new i915 driver with 6.2.3 there will be a conflict when jun's i915 driver is loaded with 6.2.3 there are two positive new things, synology released a nearly recent kernel source code (24922) and 6.2.3 has a new i915 driver supporting as much gpu hardware as jun's backported i915 driver in loader 1.04b - so there is no need for jun's i915 driver anymore and in theory we should have good support for apollo lake, gemini lake and other newer hardware but it seems not all new UHD630 is supported as there is dev id "3E98" unsupported (i5-9400, i5-9600k, i7-9700t, i7-9700), ark.intel.com and wikichip.og are usually good sources to check the id https://ark.intel.com/content/www/us/en/ark/products/134898/intel-core-i5-9400-processor-9m-cache-up-to-4-10-ghz.html edit: there seems to be versions of the i5-9400 with a "3E92" GPU this versions don t need the patched driver, they will run with the default driver, /dev/dri should be present ootb, it also can be checked in /var/log/dmesg when searching for "[8086:3e92]" https://en.wikichip.org/wiki/intel/core_i5/i5-9400 there is also a good document from intel listing all coffeelake's https://01.org/sites/default/files/documentation/intel-gfx-prm-osrc-cfl-vol01-configurations.pdf coffeelake cup's without driver support (no hardware transcoding), SKU numbers should be listed when buying and can be checked on the box i9 SKU S82 i7 SKU S82 i5 SKU S6f2 a new 10th gen i5-10500 / i3-10300 have device id's "9BC8" and there are no "9xxx" numbers in the driver we use so don't expect any newer gen10 cpu to work with hardware transcoding even when it "only" has UHD630 igpu edit: there are also even lower end 10th gen cpus (2 core) with a different GPU device id "9BA8" like G5920, G5925, G6400 with a iGPU UHD 610, the equivalent in the 9th gen would be a G5400 and that comes with pci device id's 3E90/3E93, so we need to edit a different entry when patching for this edit: i made a modded i915 driver were the pci device id of the 9th gen UHD 630 iGPU (3E92/3E93) is replaces with the device id's of the newer/different UHD 610/630 iGPU's that are unsupported 8086:3E92 => iGPU UHD 630, Low End Desktop 9 Series (original driver) -> 8086:3E98 => iGPU UHD 630, High End Desktop 9 Series (i5-9400, i5-9600k, i7-9700t, i7-9700) 8086:9BC8 => iGPU UHD 630, Low End Desktop i5-10500, i5-10600T and lower 8086:9BC5 => iGPU UHD 630, High End Desktop i510600K and higher 8086:3E93 => iGPU UHD 610, Low End Desktop 9 Series -> 8086:9BA8 => iGPU UHD 610, low End Desktop Series like G6400 the zip file contains 3 versions in every one is 3E92 replaced with the one we want to get working, as its just a crude binary patch i choose 3E92 as it seemed the most similar device, was tested for 3E98 iGPU and seemed to work, for the 10th there is at least one positive feedback with plex its intended to be used with the extra/extra2 from this thread as this removes jun's old i915 driver (not just one file) that will prevent synologys new driver to work properly the patched i915.ko file is supposed to be copied to /usr/lib/modules/ and replaces the original file from synology for 6.2.3 Update3 (added 9BA8 support) https://gofile.io/d/4fFJA5 https://dailyuploads.net/x3e0nkxk6p0e https://usersdrive.com/zfl9csl91xwr.html https://www34.zippyshare.com/v/304gfbnO/file.html SHA256: EC2447F47FEE6457FE3F409E26B83E5BF73023310E10A624575A822FDBC10642 a little warning, in worst case the system might crash or freeze when transcoding and and such undefined states and hard resets can result i data loss (cache) or damaged raids (depending on the load of the system at this time) so until its more tested it should not be used on system with "important" data and a recent backup - ok i know its a little over cautious but i dont like the thought someone looses data because of this nice to have feature (software mdadm raids can be repaired in most cases if the worst happens) -> positive feedback for a i5-9400, i5-9600K, i9-9900T (8086:3E98) to fully working -> positive feedback for a G6400 (8086:9BA8) to have /dev/dri -> one user positive feedback for a i5-10600T (8086:9BC8) to fully working with plex -> one user negative feedback for a i5-10500 (8086:9BC8) to get /dev/dri devices but no transcoding with emby -> one user negative feedback for a i9-10900 (8086:9BC5) system does not boot anymore - seems to be a solid hands off? edit: there is a driver source patch for 10th gen that came up along 7.x and 9BC5 was confirmed to work with this new driver, so anyone with a 10th gen gpu and trouble can change to 7.x (tc rp loader) ot can try these 6.2.3 modules from this link (i915_918_623.7z) https://xpenology.com/forum/topic/59909-i915ko-backported-driver-for-intel-10th-gen-ds918-ver-701-up3/?do=findComment&comment=277236 i completely removed jun's i915 drivers from the extra/extra2 and changed/added the i915 firmware needed, also i took care of the "old" i915 drivers on the installed system in /usr/lib/modules/update/, they are now deleted on boot so if you come from 6.2.2 and used extra/extra2 std or recovery or you did already used juns original 1.04b extra/extra2, it should work as soon as you boot up (when drivers in "update" are not present then the default drivers from synology will be used and with the added i915 in place it will work on most intel gpu's up to coffee lake) the driver versions are the same as in the 6.2.2 extra/extra2 but are newly compiled, as every driver from 6.2.2 is renewed all the old drivers are overwritten and there should be no crashing drivers on boot (which can prevent proper shutdown or reboot) we now have one universal i915 driver (and not jun's and synologys) its back to one package for all cpu/gpu, if needed there will be a recovery version too i only did test a new created loader from 1.04b image file with zImage and rd.gz from "DSM_DS918+_25426.pat" and the new extra.extra2, it will also work with the 6.2.0 kernel that is by default in the 1.04b image if there are problems getting hardware transcoding to work it might help to disable vt-x/vt-d in bios (reported on a J5005 Gemini Lake), but there are other possible reasons because of the licensing thats needed for this to work, but at least it will not hurt as as lon as you dint intent to use the vmm package if you accidentally updated 6.2.2 to 6.2.3 and now have problems like no network after boot, no proper shutdown/reboot or missing /dev/dri (hardware transcoding) then you just copy the new extra/extra2 to your already updated usb drive (the update to 6.2.3 already installed the new kernel on it) with latest updates of win10 there is no drive letter anymore, its possible to still do it with the tools already used for creating the usb drive, read the usb to a imgae file with "Win32DiskImager 1.0" (activate "read only allocated partitions"), mount that image with osfmount (like in the tutorial section), overwrite old /extra/extra2.lzma and write the image back to usb with Win32DiskImager extra.lzma/extra2.lzma for loader 1.04b ds918+ DSM 6.2.3 v0.13.9 some intel and realtek driver updated so hopefully more onboard nic's will work (like realtek 8125), also realtek 8152 is newer so all 2.5G usb solutions from realtek schould work, there is still no way for the intel 2.5G nic as there is no standalone driver for older kernel versions, removed fireware, added bnxt_en and sr_mod/cdrom, nic Killer E2500, added *vf.ko in rc.modules https://pixeldrain.com/u/jHa2eYrc https://gofile.io/d/mUFYxQ 1CED32FCF63EB54DAA44335FA1EFBCE408D41A3E16D55771D35B0FD423F0B9CF extra.lzma/extra2.lzma for loader 1.04b ds918+ DSM 6.2.3 v0.13.3 scsi/sas disks will have no s.m.a.r.t. infos with lsi sas controllers (see edit2 above), newer atlantic.ko driver 2.3.4, r8125 added to rc.modules, used latest source for realtek drivers r8101/r8125/r8152/r8168/r8169, bna.ko firmware corrected https://pixeldrain.com/u/pkBY9XjC https://gofile.io/d/FvoFdo SHA256: EF6F26999C006A29B3B37A7D40C694943100F0A9F53EC22D50E749F729347EC6 for special purpose and tests, extra.lzma/extra2.lzma for loader 1.04b ds918+ DSM 6.2.3 v0.12.1 - this version shows s.m.a.r.t. info and serial of disks for lsi scsi/sas but might corrupt the raid when disk hibernation is active (see warning above) https://pixeldrain.com/u/kZJdPj1H https://gofile.io/d/nsglbX SHA256: 9089D38A4975AB212553DA7E35CE54027DE4F84D526A74A46A089FC7E88C1693 extra.lzma for loader 1.03b ds3615 DSM 6.2.3 v0.12.1_test, added virtio/9p, CDROM drivers, nic Killer E2500 lhttps://pixeldrain.com/u/Rx4tV6ay https://gofile.io/d/RnX1QA SHA256: E72820BF648CFD7F6075DEEB1208A3E0D8A61F38289AE17AC7E355910B9B0E0E extra.lzma for loader 1.03b ds3615 DSM 6.2.3 v0.11_test, same added drivers as for 6.2.2 like newer intel drivers, 10G nics, ... https://pixeldrain.com/u/5aN77nWf https://gofile.io/d/PMIDrX SHA256: 5DE93F95841CC01F9E87EE4EE2A330084B447E44EBAA6013A575A935D227D4AF extra.lzma for loader 1.03b ds3617 DSM 6.2.3 v0.12_test (2/2022), added virtio/9p, CDROM drivers, nic Killer E2500 https://pixeldrain.com/u/xmhCVxck https://gofile.io/d/VRtmC1 SHA256: B9AC8705D5D9DCEED1C0315346E4F2C7C4CD07C4ED519FC9901E8E368A3AE448 extra.lzma for loader 1.03b ds3617 DSM 6.2.3 v0.11.2_test, same added drivers as for 6.2.2 like newer intel drivers, 10G nics, ... (0.11.2 because i forgot bnx2/bnx2x firmware and mpt2/mp3 driver problem when updating from 6.2.2 in 0.11) https://pixeldrain.com/u/zwAJzKa9 https://gofile.io/d/0Tx8A7 SHA256: D467914E55582D238AC5EC4D31750F47AEB5347240F2EAE54F1866E58A8BD1C9
 -
Bonjour à tous, J'aimerai changer ma config qui consomme un peu trop par quelque chose d'un peu plus écolo et pouvoir le laisser allumer h24 sans trop perdre en performance. J'ai donc fait quelques recherches et je suis tombé sur ces 2 cartes mères de marque Topton sur Ali : celle-ci sur une base N5105 ou Pentium N6005 et celle-ci sur une base de Celeron J6413 Sur le papier ça donne : 6 SATA 3.0 2 NVMe m2 4 RJ45 2.5Gbits HDMI 2.0 1 PCIe x1 Voici le Comparatif CPU Mark des CPU avec en dernier celui que j'ai actuellement. La baisse de perf est pour moi acceptable au regard des économies que je ferai sur ma facture d'électricité. En parcourant le forum anglais et russe, plusieurs utilisateurs on réussi facilement à mettre DSM 7.2 avec arpl DS920+ donc de ce coté je suis rassuré. Reste le sujet Plex pour lequel j'ai beaucoup d'attente en terme de transcodage hard 😕 Qu'en pensez-vous ?
-
Hi all, I have been using Xpenology 7.1.1 on ESXI for a good while but with many changes to ESXI i would like to migrate to another hypervisor. I currently pass though a LSI 2008 HBA controller where the VM has direct access to the disks. I have installed Proxmox on a new boot drive on the same original server as before. Proxmox all setup, PCI Passthrough all working and migrated the VM fine and everything boots as it should. In the Xpenology VM now hosted by Proxmox, i am missing a few drives which has put the original disk arrays into a bit of a state. This is what i know: In ESXI you have two storage controllers, one for the RedPill Boot virtual image and the other controller for any other virtual disks. I don't have any other virtual disks as i am passing through the entire controller. In Proxmox, you can only have one SATA controller. I think the number of sata ports of the old virtual controller must be different from the new controller putting all the disk mapping into disarray (pun intended). It has put all disks out of sync with respect of where it thinks they should be. Has anybody successfully migrated an ESXI Xpenology VM to Proxmox whilst using PCIE passthrough? Has anybody got any suggestions? Thank you in advance, Dan.
-
Hi guys I'm running arpl on a hp gen 8 microserver, model ds3622xs, dsm 7.2.1 69057 update 4 with the latest arpl release. When I insert a USB drive a message pops up saying a newly inserted drive has been detected, if I go to storage manager it's there to be formatted. Anyone any ideas how to recognise the usb drive as a usb. TIA
-

ANY loader that supports 40 drives + lsi hba?
Captainfingerbang posted a question in General Questions
My buddy is in need of a loader rr, arc,tcrp etc etc that allows for 40 drives, PLUS allows for using am HBA card like lsi 9x00 or close. Like HD6500 but with the ability to install and use hba cards.. Anything like this out there? Even if its a mish mash of patches/drivers ? -
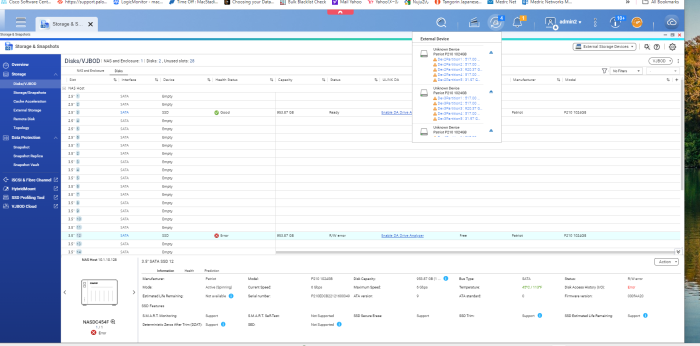
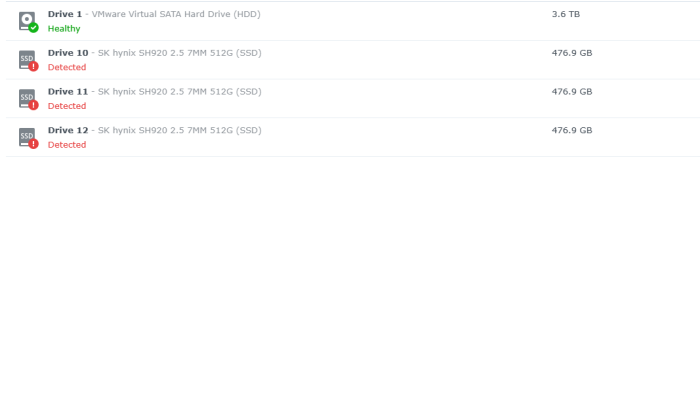
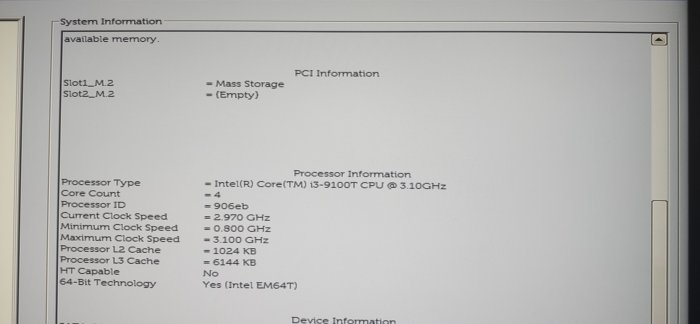
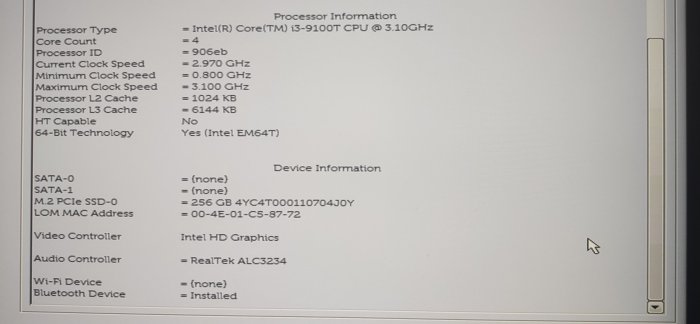
After nearly more than one year I have a problem on my DS3622x (on ESXi-7.0U3o-22348816) Today in the morning I rebooted and Redpill Friend updated to 0.0.6 and I lost three drives. I checked them in the BIOS on the LSI SAS9211-8i IT controller and all are visible. I am not quite sure what could happened. I thought maybe something crashed so I decided to update to DSM 7.2, (I was going to do it anyway ) so I did it and I used new tinycore-redpill.v0.10.0.0.vmdk file and create new bootloader I used the same MAC and SN. I have one physical drive (HDD) connected to SATA port on the motherboard and 6 SSD drives connected to above SAS controller -> pass-through. After I type ./rploader.sh satamap tc@box:~$ ./rploader.sh satamap Machine is VIRTUAL Hypervisor=VMware Found SCSI HBAs, We need to install the SCSI modules scsi-5.10.3-tinycore64 is already installed! Succesfully installed SCSI modules Found "02:00.0 VMware SATA AHCI controller" Detected 30 ports/1 drives. Mapping SATABOOT drive after maxdisks Found "02:01.0 VMware SATA AHCI controller" Detected 30 ports/1 drives. Defaulting 8 virtual ports for typical system compat ibility Override # of ports or ENTER to accept <8> Found SCSI/HBA "03:00.0 LSI Logic / Symbios Logic SAS2308 PCI-Express Fusion-MPT SAS-2 (rev 05)" (0 drives) Computed settings: SataPortMap=18 DiskIdxMap=1000 Should i update the user_config.json with these values ? [Yy/Nn] y Done. I created bootloader and proceed with installation and upgrade. In the new system I still cannot see these three drives: ( I attached pictures) I would like ask for the advice or help what I can do. Thanks M

-
 Is there an in-depth tutorial on how DSM/Xpen responds to changes in SATA disks? (perhaps also covering USB). I ask because so far all I can find are forum responses "do this", "edit sataportmap/DiskIdxMap values", "I did this..." Do I have to reinstall/recover whenever I rearrange drives? I'm hoping for an in-depth planning guide that covers a lot of general info, AFTER INSTALL, on what happens / what-to-do when adding/rearranging SATA drives, controllers, swapping out drives (e.g. for single-disk volumes), covering all scenarios. And perhaps about attaching/removing USB dives too. Again, so all I've found are posts that address specific issues when somebody is migrating a drive, or adding a new drive... I'm hoping to find a broad tutorial that answers questions I don't have yet. More... Rather than one-time build a reasonably spec'd box, I'm using misc leftover hardware, so I expect to have a lot of sata drive changes over time (tho I expect that's not ideal, I'm just the type that will tweak-as-I-go.) My choice hardware is very limiting (Lenovo M900 tiny), and I know I should just use more suitable stuff, but... I'm still in discovery mode, and when I get far along then I'd like to avoid having to rebuild from scratch. So what's specifically eluding me is... Using ARC loader, I seem to need at least one Sata drive to install -- I can't install on NVMe? Even tho I thought I'm installing on the USB stick, is it really installing on a base sata drive? What happens if I wish to remove the 1st (only) sata drive at a later time to upgrade it? Does this 1st sata drive get used for core DSM apps, so it's required and can't be removed? Is rearranging SATA drives a matter of "edit config file and cross fingers"? No dynamic behavior by DSM? If I were to use a JBOD sata box (my sata port supports port-multiplier), and occasionally pop in a drive, or delete a volume and remove a drive, whether I'll have to edit the If I were to add an ASMedia or JMB585 secondary sata controller, then could I jockey sata drives on those? I've been monkeying with DS920+, which doesn't seem to have satamap command ... should I switch to DS3622xs+? So with this external sata JBOD 5-bay drive rack, if it's so much trouble to swap drives, I could instead connect it with a USB-SATA bridge (instead of attaching it to an add-on sata controller), and use via File Station(?) That would be quite limiting -- no software DSM-based RAID (I'm fine with that), but would I otherwise be able to share files via apps like Plex Server off of those USB-attached drives? Any links to tutorials that address these topics? Thanks!!!
 -

new sata/ahci cards with more then 4 ports (and no sata multiplexer)
vbz14216 replied to IG-88's topic in Hardware Modding
Well well well, the WD drives mentioned a few months ago are still ok. But 1 out of my 2x HGST 7K1000 without noncq which ran fine for around year suddenly got kicked out of its own RAID1 array(within its own storage volume), degrading the volume. During that time I was testing Hyper Backup to another NAS, the HB ended without issues so I still have a known good backup in case if anything went wrong. dmesg and /var/log/messages listed some (READ) FPDMA QUEUED error and the ATA link was reset twice before md decided to kick the partitions out. I powered down the NAS, used another PC to make sure the drive was all good(no bad sectors) and erased the data preparing for a clean array repair. Before loading the kernel I added more noncq parameter to libata for all remaining SATA ports. Deactivate the drive, then a power cycle to make it recognized as an unused drive. The array was successfully repaired after some time, followed by a good BTRFS scrub. Analysis: This drive simply went "Critical" without any I/O error or bad sector notice from log center. /proc/mdstat showed the drive(sdfX) got kicked out from md0(system partition) and md3(my 2nd storage array, mdX at whichever your array was). Interestingly enough md1(SWAP) was still going, indicating the disk was still recognized by the system(instead of a dead drive). root@NAS:~# cat /proc/mdstat Personalities : [raid1] md3 : active raid1 sdd3[0] sdf3[1](F) 966038208 blocks super 1.2 [2/1] [U_] md2 : active raid1 sde3[3] sdc3[2] 1942790208 blocks super 1.2 [2/2] [UU] md1 : active raid1 sdf2[0] sdd2[3] sde2[2] sdc2[1] 2097088 blocks [12/4] [UUUU________] md0 : active raid1 sde1[0] sdc1[3] sdd1[2] sdf1[12](F) 2490176 blocks [12/3] [U_UU________] The other drive with identical model in the same R1 array has a different firmware and fortunately didn't suffer from this, preventing a complete volume crash. Upon reading /var/log/messages I assume md prioritized the dropped drive for reading data from array, which caused the drive to get kicked out in the first place: Continuing with a BTRFS warning followed by md doing its magic by rescheduling(switch over for redundancy): There's no concrete evidence on what combination of hardware, software and firmware can cause this so there isn't much point in collecting setup data. Boot parameter for disabling NCQ on select ports, or simply libata.force=noncq to rid of NCQ on all ports: libata.force=X.00:noncq,Y.00:noncq dmesg will say NCQ (not used) instead of NCQ (depth XX). This mitigates libata NCQ quirks at the cost of some multitask performance. I only tried RAID 1 with HDDs, not sure if this affects RAID5/6/10 or Hybrid RAID performance. NCQ bugs can also happen on SSDs with queued TRIM, reported as problematic on some SATA SSDs. A bugzilla thread on NCQ bugs affecting several Samsung SATA SSDs: https://bugzilla.kernel.org/show_bug.cgi?id=201693 It's known NCQ does have some effects on TRIM(for SATA SSDs). That's why libata also has noncqtrim for SSDs, which doesn't disable NCQ as a whole but only the queued TRIM. Do note that writing 1 to /sys/block/sdX/device/queue_depth may not be the solution for mitigating queued TRIM bug on SSDs, as someone in that thread stated it doesn't work for them until noncq boot parameter is used. (I suppose noncqtrim should just do the trick, this was the libata quirk for those drives.) Since this option doesn't seem to cause data intergrity issues, maybe can be added as advanced debug option for loader assistant/shell? Dunno which developer to tag. I suspect this is one of the oversights on random array degrades/crashes besides bad cables/backplanes. For researchers: /drivers/ata/libata-core.c is the one to look into. There are some (old) drives applied with mitigation quirks. Still... I do not take responsibility on data corruption, use at your own risk. Perform full backup before committing anything. -
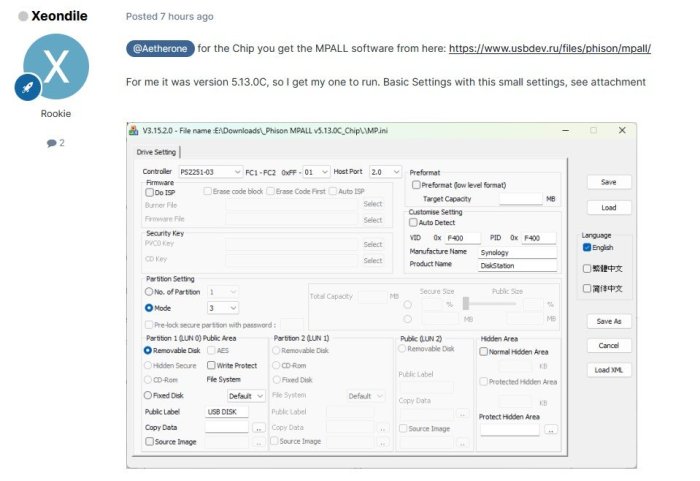
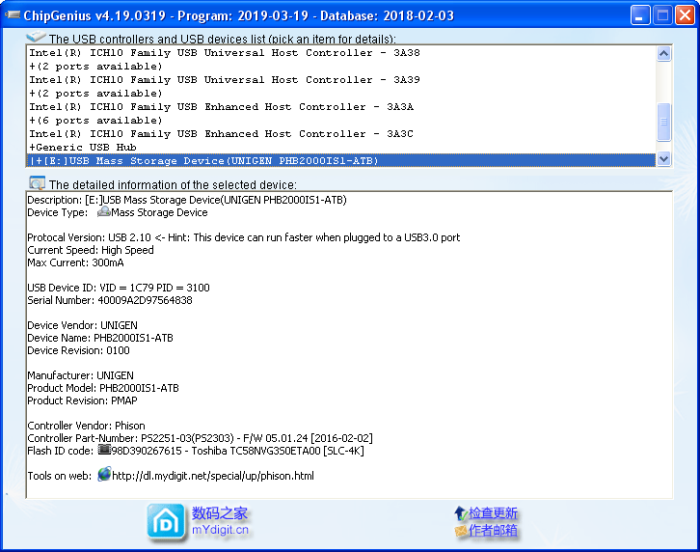
HA! After a whole lot of fiddling I got the right combination of files to flash my Phison drives to F400. Turns out the various packages on usbdev.ru are incomplete - I needed "Phison_MPALL_v5.13.0C.rar" for an operational flashtool AND "firmware_ps2251-03.rar" for the correct firmware files to flash my units. Thanks to @Xeondile for the correct settings once this lot was cobbled together. BEFORE AFTER The settings once the firmware BIN was loaded into the folder. As above, some caution would be advised - a small number of online virus checkers flag these as potentially hostile but none of them can agree on exactly what the malware is so I'm not convinced it's a false positive given what these programs are designed to do. Still, be careful & use them offline, preferably from a disposable temporary Windows install.

-
HA! After a whole lot of fiddling I got the right combination of files to flash my Phison drives to F400. Turns out the various packages on usbdev.ru are incomplete - I needed "Phison_MPALL_v5.13.0C.rar" for an operational flashtool AND "firmware_ps2251-03.rar" for the correct firmware files to flash my units. Thanks to @Xeondile for the correct settings once this lot was cobbled together. BEFORE AFTER Some caution would be advised - a small number of online virus checkers flag these as potentially hostile but none of them can agree on exactly what the malware is so I'm not convinced it's a false positive given what these programs are designed to do. Still, be careful & use them offline, preferably from a disposable temporary Windows install.

-
DSM 6.2.3 will not work with these drivers, if you install or update you will fall back to "native" drivers that come with DSM, like no realtek nic on 3615/17 but on 918+ or no mpt2/mpt3sas on 918+ or no broadcom onboard nic on HP microserver or Dell server read this if you want to know about "native" drivers https://xpenology.com/forum/topic/13922-guide-to-native-drivers-dsm-617-and-621-on-ds3615/ synology reverted the changes made in 6.2.2 so the old drivers made for 6.2.(0) are working again and there are new drivers made for 6.2.3 too (we got recent kernel source from synology lately) https://xpenology.com/forum/topic/28321-driver-extension-jun-104b-for-dsm623-for-918/ This is the new 2nd test version of the driver extension for loader 1.04b and 918+ DSM 6.2.2, network drivers for intel and realtek are now all latest and the same as in 3615/17 from mid. december (also broadcoam tg3 driver is working), tries to address the problems with the different GPU's by haveing 3 versions of the pack additional information and packages for 1.03b and 3615/3617 are in the lower half under a separate topic (i will unify the 918+ and 3615/17 parts later as they are now on the same level again) mainly tested as fresh install with 1.04b loader with DSM 6.2.2, there are extra.lzma and extra2.lzma in the zip file - you need both - the "extra2" file is used when booting the 1st time and under normal working conditions the extra.lzma is used (i guess also normal updates - jun left no notes about that so i had to find out and guess). Hardware in my test system used additional driver: r8168, igb, e1000e, bnx2x, tn40xx, mpt2sas The rest of the drivers just load without any comment on my system, i've seen drivers crashing only when real hardware is present so be warned, i assume any storage driver beside ahci and mps2sas/mpt3sas as not working, so if you use any other storage as listed before you would need to do a test install with a new usb and a single empty disk to find out before doing anything with your "production" system i suggest testing with a new usb and a empty disk and it that's ok then you have a good chance for updating for updating its the same as below in the 3615/17 section with case 1 and 2 but you have extra.lzma and extra2.lzma and you will need to use https://archive.synology.com/download/DSM/release/6.2.2/24922/DSM_DS918+_24922.pat most important is to have zImage and rd.gz from the "DSM_DS918+_24922.pat" file (can be opened with 7zip) together with the new extra/extra2, same procedure as for the new extra for 3615/17 (see below) all 4 files extra.lzma, extra2.lzma (both extracted from the zip downloaded), zImage and rd.gz go to the 2nd partition of the usb (or image when using osfmount), replacing the 4 files there if you want the "old" files of the original loader back you can always use 7zip to open the img file from jun and extract the original files for copying them to usb if really wanting to test with a running 6.2.x system then you should empty /usr/lib/modules/update/ and /usr/lib/firmware/i915/ before rebooting with the new extra/extra2 rm -rf /usr/lib/modules/update/* rm -rf /usr/lib/firmware/i915/* the loader will put its files on that locations when booting again, this step will prevent having old incompatible drivers in that locations as the loader replaces only files that are listed in rc.modules and in case of "syno" and "recovery" there are fewer entries, leaving out i915 related files, as long as the system boots up this cleaning can be done with the new 0.8 test version there a 3 types of driver package, all come with the same drivers (latest nic drivers for realtek and intel) and conditions/limitations as the 3615/17 driver set from mid. december (mainly storage untested, ahci and mpt3sas is tested). 1. "syno" - all extended i915 stuff removed and some firmware added to max compatibility, mainly for "iGPU gen9" (Skylake, Apollo Lake and some Kaby Lake) and older and cases where std did not work, i915 driver source date: 20160919, positive feedback for J3455, J1800 and N3150 2. "std" - with jun's i915 driver from 1.04b (tested for coffee lake cpu from q2/2018), needed for anything newer then kaby lake like gemini lake, coffee lake, cannon lake, ice lake, i915 driver source date: 20180514 - as i had no source i915 driver is the same binary as in jun's original extra/extra2, on my system its working with a G5400, not just /dev/dri present, tested completely with really transcoding a video, so its working in general but might fail in some(?) cases, also 8th/9th gen cpu like i3/i5 8100/9400 produce a /dev/dri, tested with a 9400 and it does work 3. "recovery" - mainly for cases where the system stops booting because of i915 driver (seen on one N3150 braswell), it overwrites all gpu drivers and firmware with files of 0 size on booting so they can't be loaded anymore, should also work for any system above but guarantees not having /dev/dri as even the firmware used from the dsm's own i915 driver is invalid (on purpose) - if that does not work its most likely a network driver problem, safe choice but no transcoding support start with syno, then std and last resort would be recovery anything with a kernel driver oops in the log is a "invalid" as it will result in shutdown problems - so check /var/log/dmesg the often seen Gemini Lake GPU's might work with "std", pretty sure not with "syno", most (all?) testers with gemini lake where unsuccessful with "std" so if you don't like experimenting and need hardware transcoding you should wait with the version you have the "_mod" on the end of the loader name below is a reminder that you need to to "modding" as in make sure you have zImage and rd.gz from DSM 6.2.2 on you usb for booting, the new extra.lzma will not work with older files 0.8_syno ds918+ - extra.lzma/extra2.lzma for loader 1.04b_mod ds918+ DSM 6.2.2 v0.8_syno https://gofile.io/d/mVBHGi SHA256: 21B0CCC8BE24A71311D3CC6D7241D8D8887BE367C800AC97CE2CCB84B48D869A Mirrors by @rcached https://clicknupload.cc/zh8zm4nc762m https://dailyuploads.net/qc8wy6b5h5u7 https://usersdrive.com/t0fgl0mkcrr0.html https://www104.zippyshare.com/v/hPycz12O/file.html 0.8_std ds918+ - extra.lzma/extra2.lzma for loader 1.04b_mod ds918+ DSM 6.2.2 v0.8_std https://gofile.io/d/y8neID SHA256: F611BCA5457A74AE65ABC4596F1D0E6B36A2749B16A827087D97C1CAF3FEA89A Mirrors by @rcached https://clicknupload.cc/h9zrwienhr7h https://dailyuploads.net/elgd5rqu06vm https://usersdrive.com/peltplqkfxvj.html https://www104.zippyshare.com/v/r9I7Tm0K/file.html 0.8_recovery ds918+ - extra.lzma/extra2.lzma for loader 1.04b_mod ds918+ DSM 6.2.2 v0.8_recovery https://gofile.io/d/4K3WPE SHA256: 5236CC6235FB7B5BB303460FC0281730EEA64852D210DA636E472299C07DE5E5 Mirrors by @rcached https://clicknupload.cc/uha07uso7vng https://dailyuploads.net/uwh710etr3hm https://usersdrive.com/ykrt1z0ho7cm.html https://www104.zippyshare.com/v/7gufl3yh/file.html !!! still network limit in 1.04b loader for 918+ !!! atm 918+ has a limit of 2 nic's (as the original hardware) If there are more than 2 nic's present and you can't find your system in network then you will have to try after boot witch nic is "active" (not necessarily the onboard) or remove additional nic's and look for this after installation You can change the synoinfo.conf after install to support more then 2 nic's (with 3615/17 it was 8 and keep in mind when doing a major update it will be reset to 2 and you will have manually change this again, same as when you change for more disk as there are in jun's default setting) - more info's are already in the old thread about 918+ DSM 6.2.(0) and here https://xpenology.com/forum/topic/12679-progress-of-62-loader/?do=findComment&comment=92682 I might change that later so it will be set the same way as more disks are set by jun's patch - syno's max disk default for this hardware was 4 disks but jun's pach changes it on boot to 16!!! (so if you have 6+8 sata ports then you should not have problems when updating like you used to have with 3615/17) Basically what is on the old page is valid, so no sata_*, pata_* drivers Here are the drivers in the test version listed as kernel modules: The old thread as reference !!! especially read "Other things good to know about DS918+ image and loader 1.03a2:" its still valid for 1.04b loader !!! This section is about drivers for ds3615xs and ds3617xs image/dsm version 6.2.2 (v24922) Both use the same kernel (3.10.105) but have different kernel options so don't swap or mix, some drivers might work on the other system some don't at all (kernel oops) Its a test version and it has limits in case of storage support, read careful and only use it when you know how to recover/downgrade your system !!! do not use this to update when you have a different storage controller then AHCI, LSI MPT SAS 6Gb/s Host Adapters SAS2004/SAS2008/SAS2108/SAS2116/SAS2208/SAS2308/SSS6200 (mpt2sas) or LSI MPT SAS 12Gb/s Host Adapters SAS3004/SAS3008/SAS3108 (mpt3sas - only in 3617), instead you can try a fresh "test" install with a different usb flash drive and a empty single disk on the controller in question to confirm if its working (most likely it will not, reason below) !!! The reason why 1.03b loader from usb does not work when updating from 6.2.0 to 6.2.2 is that the kernel from 6.2.2 has different options set witch make the drivers from before that change useless (its not a protection or anything), the dsm updating process extracts the new files for the update to HDD, writes the new kernel to the usb flash drive and then reboots - resulting (on USB) in a new kernel and a extra.lzma (jun's original from loader 1.03b for dsm 6.2.0) that contains now incompatible drivers, the only drivers working reliable in that state are the drivers that come with dsm from synology Beside the different kernel option there is another thing, nearly none of the new compiled scsi und sas drivers worked They only load as long as no drive is connected to the controller. ATM I assume there was some changes in the kernel source about counting/indexing the drives for scsi/sas, as we only have the 2.5 years old dsm 6 beta kernel source there is hardly a way to compensate People with 12GBit SAS controllers from LSI/Avago are in luck, the 6.2.2 of 3617 comes with a much newer driver mpt3sas then 6.2.0 and 6.2.1 (13.00 -> 21.00), confirmed install with a SAS3008 based controller (ds3617 loader) Driver not in this release: ata_piix, mptspi (aka lsi scsi), mptsas (aka lsi sas) - these are drivers for extremely old hardware and mainly important for vmware users, also the vmw_pvscsi is confirmed not to work, bad for vmware/esxi too Only alternative as scsi diver is the buslogic, the "normal" choice for vmware/ESXi would be SATA/AHCI I removed all drivers confirmed to not work from rc.modules so they will not be loaded but the *.ko files are still in the extra.lzma and will be copied to /usr/modules/update/ so if some people want to test they can load the driver manually after booting These drivers will be loaded and are not tested yet (likely to fail when a disk is connected) megaraid, megaraid_sas, sx8, aacraid, aic94xx, 3w-9xxx, 3w-sas, 3w-xxxx, mvumi, mvsas, arcmsr, isci, hpsa, hptio (for some explanation of what hardware this means look into to old thread for loader 1.02b) virtio driver: i added virtio drivers, they will not load automatically (for now), the drivers can be tested and when confirmed working we will try if there are any problems when they are loaded by default along with the other drivers they should be in /usr/modules/update/ after install To get a working loader for 6.2.2 it needs the new kernel (zImage and rd.gz) and a (new) extra.lzma containing new drivers (*.ko files) zImage and rd.gz will be copied to usb when updating DSM or can be manually extracted from the 6.2.2 DSM *.pat file and copied to usb manually and that's the point where to split up between cases/way's case 1: update from 6.2.0 to 6.2.2 case 2: fresh install with 6.2.2 or "migration" (aka upgrade) from 6.0/6.1 Case 1: update from 6.2.0 to 6.2.2 Basically you semi brick your system on purpose by installing 6.2.2 and when booting fails you just copy the new extra.lzma to your usb flash drive by plugging it to a windows system (witch can only mount the 2nd partition that contains the extra.lzma) or you mount the 2nd partition of the usb on a linux system Restart and then it will finish the update process and when internet is available it will (without asking) install the latest update (at the moment update4) and reboot, so check your webinterface of DSM to see whats going or if in doubt wait 15-20 minutes check if the hdd led's are active and check the webinterface or with synology assistant, if there is no activity for that long then power off and start the system, it should work now Case 2: fresh install with 6.2.2 or "migration" (aka upgrade) from 6.0/6.1 Pretty much the normal way as described in the tutorial for installing 6.x (juns loader, osfmount, Win32DiskImager) but in addition to copy the extra.lzma to the 2nd partition of the usb flash drive you need to copy the new kernel of dsm 6.2.2 too so that kernel (booted from usb) and extra.lzma "match" You can extract the 2 files (zImage and rd.gz) from the DSM *.pat file you download from synology https://archive.synology.com/download/DSM/release/6.2.2/24922/DSM_DS3615xs_24922.pat or https://archive.synology.com/download/DSM/release/6.2.2/24922/DSM_DS3617xs_24922.pat These are basically zip files so you can extract the two files in question with 7zip (or other programs) You replace the files on the 2nd partition with the new ones and that's it, install as in the tutorial In case of a "migration" the dsm installer will detect your former dsm installation and offer you to upgrade (migrate) the installation, usually you will loose plugins, but keep user/shares and network settings DS3615: extra.lzma for loader 1.03b_mod ds3615 DSM 6.2.2 v0.5_test https://gofile.io/d/iQuInV SHA256: BAA019C55B0D4366864DE67E29D45A2F624877726552DA2AD64E4057143DBAF0 Mirrors by @rcached https://clicknupload.cc/h622ubb799on https://dailyuploads.net/wxj8tmyat4te https://usersdrive.com/sdqib92nspf3.html https://www104.zippyshare.com/v/Cdbnh7jR/file.html DS3617: extra.lzma for loader 1.03b_mod ds3617 DSM 6.2.2 v0.5_test https://gofile.io/d/blXT9f SHA256: 4A2922F5181B3DB604262236CE70BA7B1927A829B9C67F53B613F40C85DA9209 Mirrors by @rcached https://clicknupload.cc/0z7bf9stycr7 https://dailyuploads.net/68fdx8vuwx7y https://usersdrive.com/jh1pkd33tmx0.html https://www104.zippyshare.com/v/twDIrPXu/file.html
- 923 replies
-
- 42
-

-

-

-
 Thanks. I will do that, once I get the new hard drives to maximize my NAS capacity. Currently I am with TT loader (previously ARPL) which works great, although doesn't update easily. I am also interested to know if there is any easy to implement patch for Fan control? as all the guides I've seen requires some serious Linux knowledge, and mostly are also too dated.
 -
From Intel 8th gen to Intel 12th/13th/14th gen in DSM 6.2.3
IG-88 replied to ed_co's question in General Questions
i had a (cheap) jmb585 m.2 and it never worked stable, i also had concerns about flimsy pcb (might crack or parts get damaged when pressing to hard like inserting cables when already mounted in m.2, also the force 5 or 6 sata cables to that flimsy thin board can be a problem, that needs some adjustment too to not run into problems when working inside the system after placing the m.2 adapter), had more success with m.2 cable based adapter that terminated in a pcie 4x slot but also there was no universal solution as one with a slightly longer cable did not work stable with one specific controller, i ended up only using this m.2 contraptions for 10G nic) or not at all) and did spread the needed sata ports over the pcie 4x and 1x slots of the m-atx board i use (pcie 1x slot with jmb582) - a few bugs more for the controllers is better then a shredded btrfs volume (that is often hopeless beyond repair in a situation like this - learned that the hard way, but i also do backups of my nas ...) most normal housings cant have more then 12-14 3.5" hdd's and that often can be achieved with a m-atx or atx board and more ahci adapters for small money (like 6 x onboard, 5-6 sata by one jmb585 or asm1166 in a 4x slot and one or two 2port adapters in 1x slots - the 16x slot or one 4x slot might already be used for a 10G nic in my scenarios, if a 16x and and a 4x slot is free then two 2x/4x cards can add 10-12 sata disks to the 6 sata onboard ...) -
i use arpl with a dva1622 and 6 disks (original has 2) and arc with 3622 and 13 disks (original 12), no problems, in the graphics you see a box with the original amount of slots but in using there is just the "normal" and old 26 disk limit, you will see all disks in HDD/SSD listing of disks you might want to change from 918+ to something newer as 918+ might loose its support and might not get updates as long as newer models (the guarantee is about 5 years, anything above that depends) depending on the features you need (like intel quick sync video) there might be some limits of models you can choose in the loader there is also a model specific cpu thread limit in the kernel but as you use a low spec cpu for you new system that wont be much of a problem, only thing with new er intel cpu's might be that the old 4.x kernel in its original form does not support 12th gen intel qsv and it depends on the loader how far that support is working as it needs extra drivers from the loader, so you might need to read up on that in the loaders doku or here in the forum (i use a older intel cpu with the dva1622 that is working with syno's original i915 driver so i'm not that much up to knowing whats the best solution now, dva1622 comes with a nice feature set ootb when the i915 supports the cpu but there was also some interesting stuff going on with sa6400 and its 5.0 kernel with i915 extended drives, initially here https://github.com/jim3ma but i guess some of it might have found its way to other loaders by now) in genral it does nor matter if the original unit has a amd or intel cpu for just the basic NAS stuff, only when using KVM based VMM from synology or specific things like intel qsv it becomes important (as kernels per from synology are tailored for cpu's to some degree and the most obvious is the thread limit) i'd suggest to use a different usb thumb drive and a single empty disk (maybe two to connect to the last sata port to see how far it gets) to do some tests (you can keep the original usb and he disks you use now offline (just disconnect the disks), play with the loaders model until you find your sweet spot and then use that configured loader to upgrade to the new model and dsm version (7.1 is still fine and as its a LTS version it will get updates at least as long as 7.2)m when creating a system from scratch with empty disks the partitions layout for system and swap will be different with 7.1/7.2 but upgrading from 6.2 and keeping the older smaller partitions is supported by synology so there is no real need to start from scatch for 7.x https://kb.synology.com/en-global/DSM/tutorial/What_kind_of_CPU_does_my_NAS_have
-
Before installing XPEnology using DSM 7.x, you must select a DSM platform and loader. XPEnology supports a variety of platforms that enable specific hardware and software features. All platforms support a minimum of 4 CPU cores, 64GB of RAM, 10Gbe network cards and 16 drives. Each can run "baremetal" as a stand-alone operating system OR as a virtual machine within a hypervisor. A few specific platforms are preferred for typical installs. Review the table and decision tree below to help you navigate the options. NOTE: DSM 6.x is still a viable system and is the best option for certain types of hardware. See this link for more information. DSM 7.x LOADERS ARE DIFFERENT: A loader allows DSM to install and run on non-Synology hardware. The loaders for DSM 5.x/6.x were monolithic; i.e. a single loader image was applicable to all installs. With DSM 7.x, a custom loader must be created for each DSM install. TinyCore RedPill (TCRP) is currently the most developed tool for building 7.x loaders. TCRP installs with two step-process. First, a Linux OS (TinyCore) boots and evaluates your hardware configuration. Then, an individualized loader (RedPill) is built and written to the loader device. After that, you can switch between starting DSM with RedPill, and booting back into TinyCore to adjust and rebuild as needed. TCRP's Linux boot image (indicated by the version; i.e. 0.8) changes only when a new DSM platform or version is introduced. However, you can and should update TCRP itself prior to each loader build, adding fixes, driver updates and new features contributed by many different developers. Because of this ongoing community development, TCRP capabilities change rapidly. Please post new or divergent results when encountered, so that this table may be updated. 7.x Loaders and Platforms as of 06-June-2022 Options Ranked 1a 1b 2a 2b 2c 3a 3b DSM Platform DS918+ DS3622xs+ DS920+ DS1621+ DS3617xs DVA3221 DS3615xs Architecture apollolake broadwellnk geminilake v1000 broadwell denverton bromolow DSM Versions 7.0.1-7.1.0-42661 7.0.1-7.1.0-42661 7.0.1-7.1.0-42661 7.0.1-7.1.0-42661 7.0.1-7.1.0-42661 7.0.1-7.1.0-42661 7.0.1-7.1.0-42661 Loader TCRP 0.8 TCRP 0.8 TCRP 0.8 TCRP 0.8 TCRP 0.8 TCRP 0.8 TCRP 0.8 Drive Slot Mapping sataportmap/ diskidxmap sataportmap/ diskidxmap device tree device tree sataportmap/ diskidxmap sataportmap/ diskidxmap sataportmap/ diskidxmap QuickSync Transcoding Yes No Yes No No No No NVMe Cache Support Yes Yes Yes Yes Yes (as of 7.0) Yes No RAIDF1 Support No Yes No No Yes No Yes Oldest CPU Supported Haswell * any x86-64 Haswell ** any x86-64 any x86-64 Haswell * any x86-64 Max CPU Threads 8 24 8 16 24 (as of 7.0) 16 16 Key Note currently best for most users best for very large installs see slot mapping topic below AMD Ryzen, see slot mapping topic obsolete use DS3622xs+ AI/Deep Learning nVIDIA GPU obsolete use DS3622xs+ * FMA3 instruction support required. All Haswell Core processors or later support it. Very few Pentiums/Celerons do (J-series CPUs are a notable exception). Piledriver is believed to be the minimum AMD CPU architecture equivalent to Intel Haswell. ** Based on history, DS920+ should require Haswell. There is anecdotal evidence gradually emerging that DS920+ will run on x86-64 hardware. NOT ALL HARDWARE IS SUITABLE: DSM 7 has a new requirement for the initial installation. If drive hotplug is supported by the motherboard or controller, all AHCI SATA ports visible to DSM must either be configured for hotplug or have an attached drive during initial install. Additionally, if the motherboard or controller chipset supports more ports than are physically implemented, DSM installation will fail unless they are mapped out of visibility. On some hardware, it may be impossible to install (particularly on baremetal) while retaining access to the physical ports. The installation tutorial has more detail on the causes of this problem, and possible workarounds. DRIVE SLOT MAPPING CONSIDERATIONS: On most platforms, DSM evaluates the boot-time Linux parameters SataPortMap and DiskIdxMap to map drive slots from disk controllers to a usable range for DSM. Much has been written about how to set up these parameters. TCRP's satamap command determines appropriate values based on the system state during the loader build. It is also simple to manually edit the configuration file if your hardware is unique or misidentified by the tool. On the DS920+ and DS1621+ platforms, DSM uses a Device Tree to identify the hardware and ignores SataPortMap and DiskIdxMap. The device tree hardcodes the SATA controller PCI devices and drive slots (and also NVMe slots and USB ports) prior to DSM installation. Therefore, an explicit device tree that matches your hardware must be configured and stored within the loader image. TCRP automatic device tree configuration is limited. For example, any disk ports left unpopulated at loader build time will not be accessible later. VMware ESXi is not currently supported. Host bus adapters (SCSI, SAS, or SATA RAID in IT mode) are not currently supported. Manually determining correct values and updating the device tree is complex. Device Tree support is being worked on and will improve, but presently you will generally be better served by choosing platforms that support SataPortMap and DiskIdxMap (see Tier 1 below). CURRENT PLATFORM RECOMMENDATIONS AND DECISION TREE: VIRTUALIZATION: All the supported platforms can be run as a virtual machine within a hypervisor. Some use case examples: virtualize unsupported network card virtualize SAS/NVMe storage and present to DSM as SATA run other VMs in parallel on the same hardware (as an alternative to Synology VMM) share 10GBe network card with other non-XPEnology VMs testing and rollback of updates Prerequisites: ESXi (requires a paid or free license) or open-source hypervisor (QEMU, Proxmox, XenServer). Hyper-V is NOT supported. Preferred Configurations: passthrough SATA controller and disks, and/or configure RDM/RAW disks This post will be updated as more documentation is available for the various TCRP implementations.
- 76 replies
-
- 42
-
-
-
 This project started about two weeks ago at the suggestion of @wjz304 . A guide that can be processed with Jun's loader in DSM 6 already exists as shown below. This method requires a lot of manual work through MS Windows. Redpil plans to create a simpler automatic script as a menu function. https://github.com/PeterSuh-Q3/tinycore-redpill/blob/main/menu_m.sh#L1688 The part where tcrp-mshell is slightly different from rr is tcrp, as its name suggests, is a redpill loader that uses tinycore Linux, so it includes one more kernel. The kernels used by rr and tcrp are as follows. 1. rr kernel (tcrp is friend kernel) 2. dsm kernel (same for tcrp) 3. tc kernel (tcrp only) rr contains all the functions that the tc kernel and friend kernel must perform in the rr kernel. This is why the menu starts directly with ./menu.sh in the rr kernel. The reason I explained these kernels is Ultimately, these kernel files (2 per kernel) must be ported to the hard drive. The existing DSM 6 Jun's loader had a kernel size of only 50M, so 100M of spare space at the end of the first hard drive was sufficient. However, Red Pill is equipped with various kernels, and the files for each kernel are close to 100M. 1. tc kernel (20M, mydata.tgz backup file is variable) 2. Friend kernel (61M fixed size) 3. dsm kernel (based on ds3622xs+ 7.2.1-69057, 82M initrd-dsm is variable [including driver modules and addons for each model]) The loader on the original USB stick is all in the 3rd partition with a lot of free space. It is impossible to store all of this in 100M on one hard drive. Give up less and only take items 2 and 3 and use 2 hard drives. Two hard drives created as Basic or JBOD type are required. Assuming that the structure of each hard drive on which the storage pool is created is of the above two types, It consists of system partition 8G + 2G and data partition (the entire remaining area). I thought there was only about 100M space behind the data partition. If you look closely, there is about 128M more free space between the system partition and data partition. You will see that the Start / End sectors are not connected and are empty. In the meantime, create an extended partition, sd#4, and create additional logical partitions where the bootloader partitions should exist. This capture shows bootloader partitions 1, 2, and 3 split into two hard drives. The first partition has 98M space. Contains the friend kernel from number 2 above. Because the location of the kernel changed, modifications were made to a separate grub.cfg. The existing boot loader searches for (hd0, msdos1) and includes the part where grub is set to boot. Use grub-install to readjust it to point to (hd0,msdos5) = /dev/sd#5. Activate /dev/sd#5, which corresponds to the first partition of the boot loader, to Active so that the hard drive can boot grub on its own. The second partition does not require a lot of space, but The important part contains rd.gz extracted from the original dsm pat file. When an update for SmallFixVersion is detected, it automatically assists in update processing through Ramdisk automatic patching. Currently, DSM 7.2.1-69057 is a file required to automatically update U0 to U4. In the 3rd partition The DSM kernel for each model is included. This is a kernel file that keeps changing and being regenerated every time you rebuild the loader. The intermediate file custom.gz (contains rd.gz and the driver) is also included. Because the size is not trivial, the final result, initrd-dsm, contains almost the same content. We have found a way to exclude it and have recently reflected it in the friend kernel version upgrade in advance. In the case of rr, the size of custom.gz and initrd-dsm contains too many modules (e.g. wifi module, etc.) compared to tcrp. As it is, only 2 hard drives are insufficient. I am not sure if wjz304 is well aware of this and is adjusting the kernel size related to this. With this preparation in place, you can boot with the bootloader implanted using only two BASIC type hard drives. For this purpose, remove the original bootloader, USB or SATA DOM bootloader. Up to this point, I have implemented the bootloader script and completed the first test. Following this topic, I would like to separately explain the problems and solutions I would like to consider.

-
Update: external USB stick partitions DD imaged and restored back to the stock DOM, all buttoned up and running very nicely. While I had the lid off I tried extra ram again under DSM7 - 6GB upset it as expected, just instantly maxing a CPU core with any interaction at all. However, unlike my DSM6 experience, 4GB is running fine and dandy. System is responsive and behaves as expected - no sign at all of the CPU usage bug. Interesting. Since DSM7.1.1 supports it, I also tested SMB multichannel - which works surprisingly well with some transfers hitting over 200MBps until the tiny ancient 120Gb SSD I've been using for testing runs out of cache 🤐. Watching htop shows SMB-MC pinning the CPU pretty hard though. Well worth the effort to buy this old workhorse a few more years. 😎
-
Hi! I've been going for the latest (DS923+) model and changed the configuration to allow for 5 drives as in my build. However, this new model does not support the onboard graphics chip in my build (based on 8700K CPU, possibly to be upgraded to 9900T CPU in the future). Which would be a better choice? DS920+ or DVA1622? Does anyone know if they will allow intel 630 GPU support for Llama-GPT or image AI docker builds? Thanks!
-
What is this? tc@box:~$ ./rploader.sh satamap now usb Loader BUS: usb Found SCSI HBAs, We need to install the SCSI modules scsi-5.10.3-tinycore64 is already installed! Succesfully installed SCSI modules Found "00:1f.2 Intel Corporation 8 Series/C220 Series Chipset Family 6-port SATA Controller 1 [AHCI mode] (rev 05)" Detected 6 ports/5 drives. Override # of ports or ENTER to accept <6> Found SCSI/HBA "01:00.0 LSI Logic / Symbios Logic SAS2008 PCI-Express Fusion-MPT SAS-2 [Falcon] (rev 02)" (0 drives) lspci: -s: Invalid slot number Found SCSI/HBA "" (0 drives) lspci: -s: Invalid slot number Found SCSI/HBA "" (0 drives) lspci: -s: Invalid bus number Found SCSI/HBA "" (0 drives) lspci: -s: Invalid slot number Found SCSI/HBA "" (0 drives) lspci: -s: Invalid slot number Found SCSI/HBA "" (0 drives) lspci: -s: Invalid slot number Found SCSI/HBA "" (84 drives) lspci: -s: Invalid slot number Found SCSI/HBA "" (0 drives) lspci: -s: Invalid slot number Found SCSI/HBA "" (0 drives) lspci: -s: Invalid slot number Found SCSI/HBA "" (0 drives) lspci: -s: Invalid slot number Found SCSI/HBA "" (0 drives) lspci: -s: Invalid slot number Found SCSI/HBA "" (0 drives) lspci: -s: Invalid slot number Found SCSI/HBA "" (0 drives) lspci: -s: Invalid slot number Found SCSI/HBA "" (0 drives) lspci: -s: Invalid slot number Found SCSI/HBA "" (0 drives) lspci: -s: Invalid slot number Found SCSI/HBA "" (0 drives) Computed settings: SataPortMap=6 DiskIdxMap=00 Should i update the user_config.json with these values ? [Yy/Nn] n OK remember to update manually by editing user_config.json file tc@box:~$ exit In fact, the model is Controladora Fujitsu Lsi 9211-8i Model: D2607-a21. Is that error means that my HBA is not been recognised? 5 of 6 HDD on HBA is been shown on DSM.
-
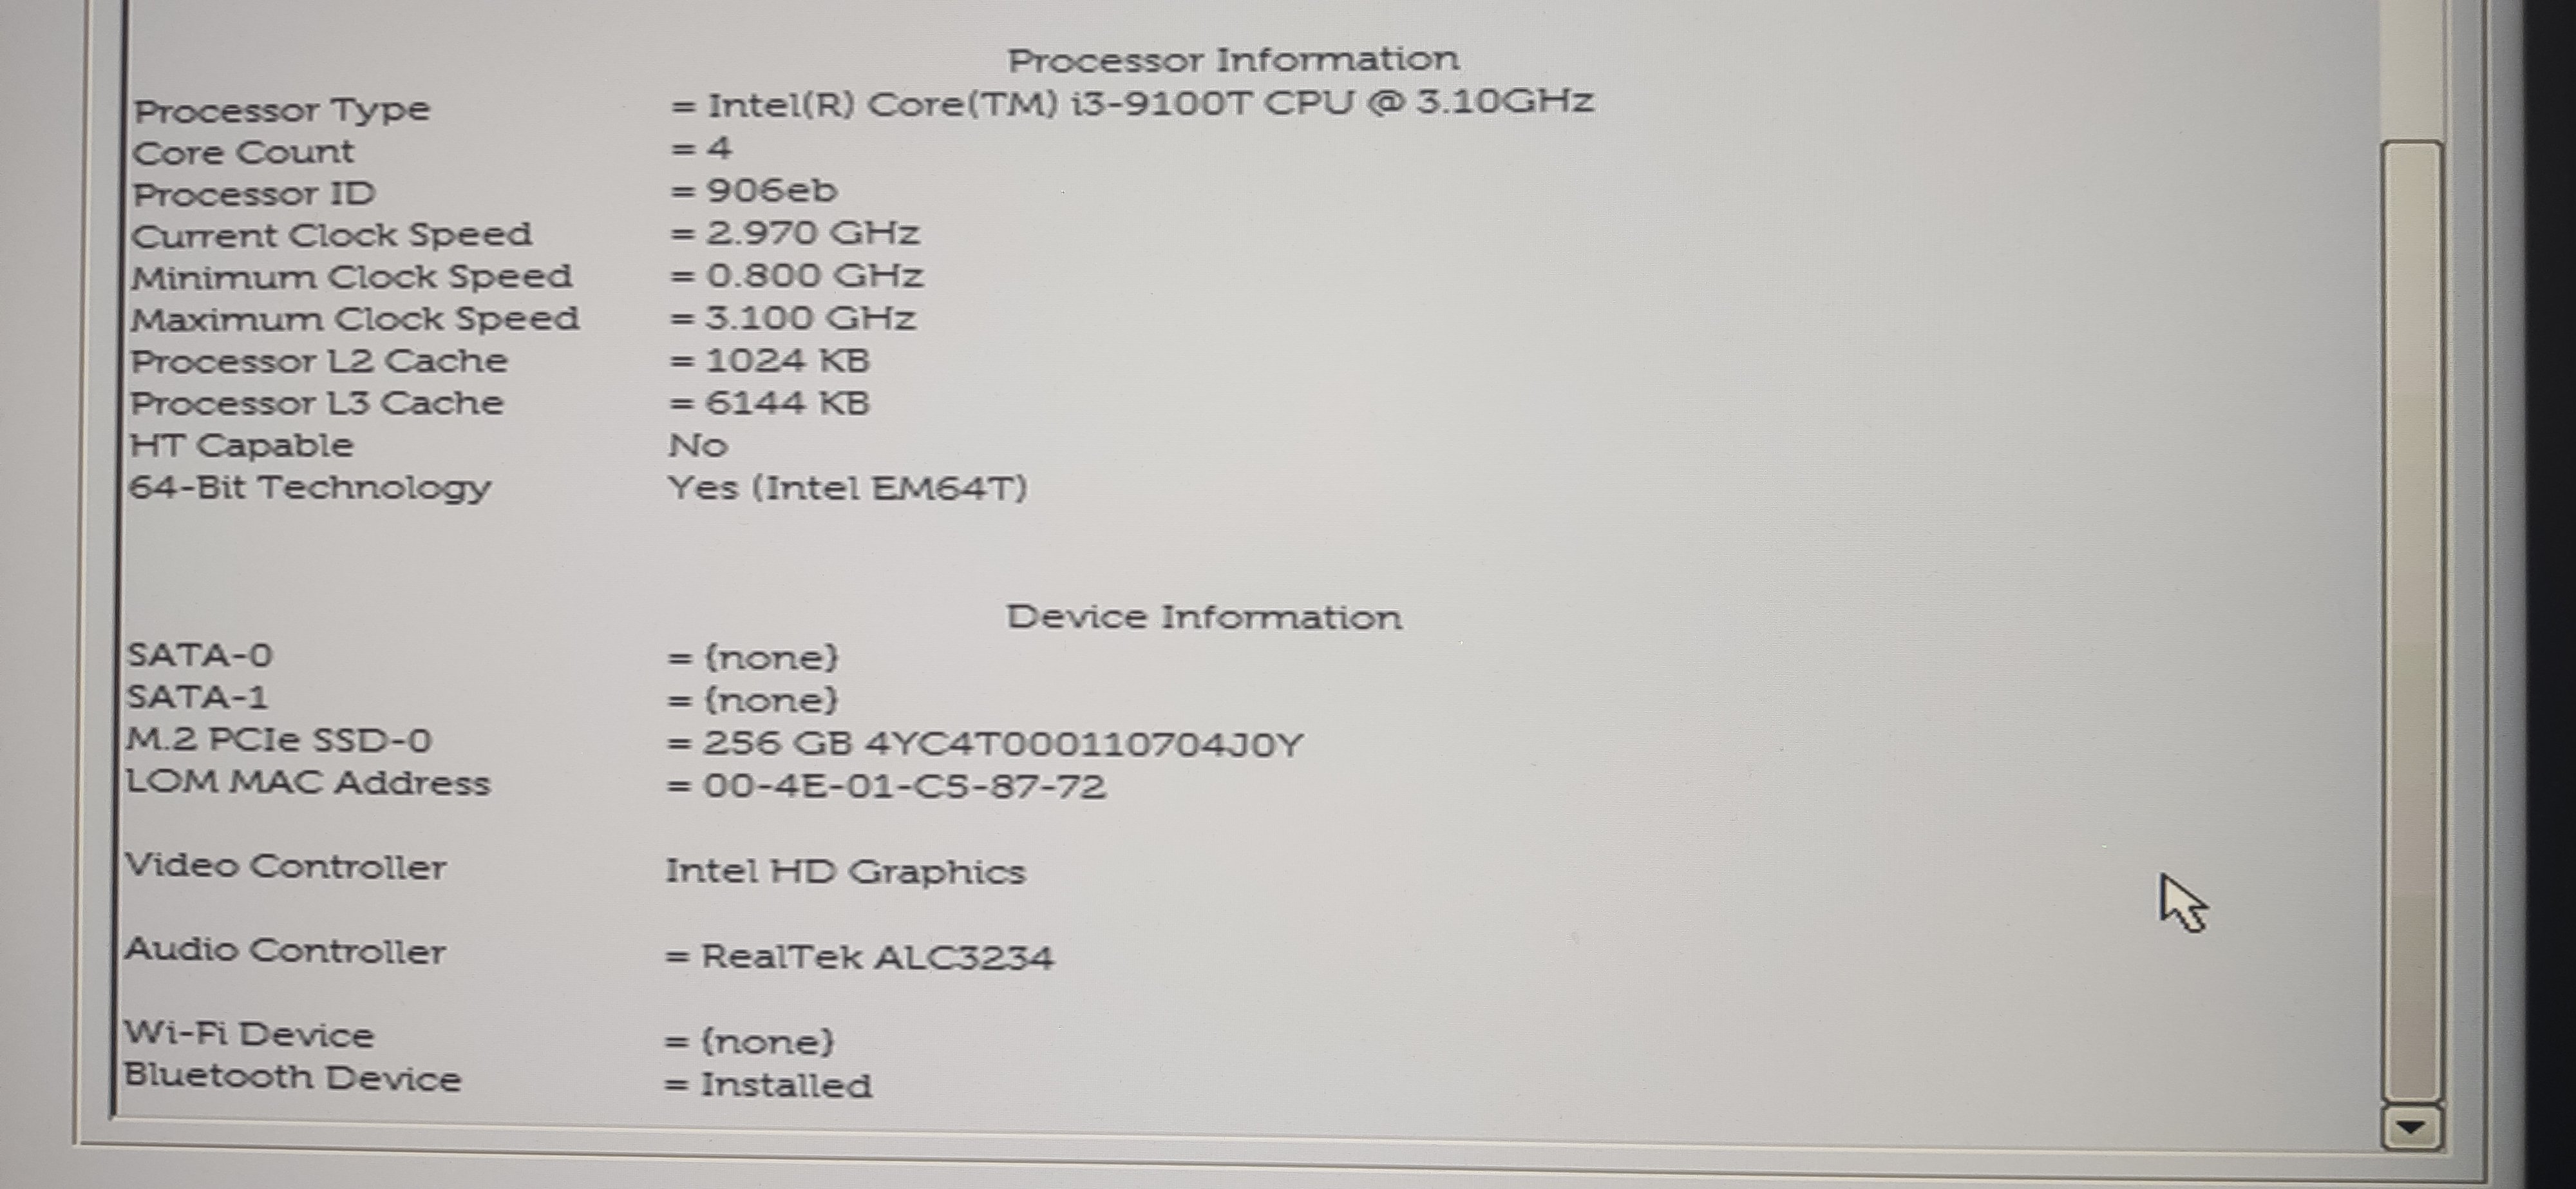
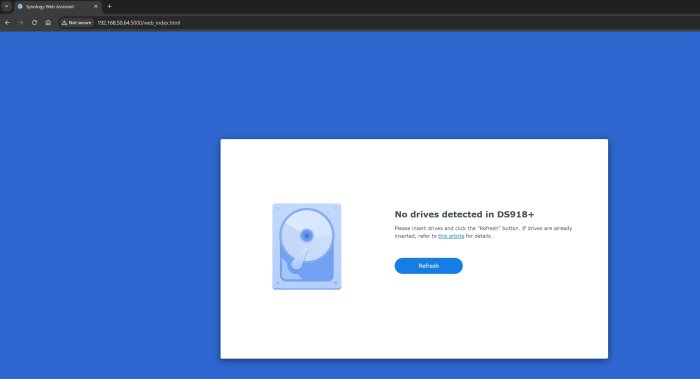
Hi, I am a noob and I want some help to manage to install DSM OS on Dell Optiplex 3070. The problem is after I prepare the boot loader and connect to IP I have the message "No drives detected on DS918+" I attached also print screens from Bios in which you can see that I have a 256 Gb ssd where I want to install the DSM OS. Thank you, Best regards, Ciprian

-
Yes! 24.3.11 is what I'm running -- thank you pointing me to the wiki Sorry about my poor wording--I was trying to not run on with a bunch of irrelevant info. I was just trying to ask how to setup so I can jockey drives on and off the NAS without having to reconfigure sata port maps each time -- whether I could do that with eSATA, or if I need to use a USB sata-port-multiplied multi-bay box instead. So here's the long version. Re sata add-in controller, and port-mulitpliers -- If I hang a 5-bay port-multipied box off of a sata port (say add-in controller), then should I have all my bays pre-populated when I run the DSM install? Or Will I have to reboot DSM whenever I install/remove a drive? (more about install locationn below) If I forego the add-in controller, then I could run the 5-bay off the primary/single sata port. But does that mean I'll have to dedicate one of the bays for DSM install?, and then when I setup a protected volume it would be across other bays? Installing a large 2TB SSD in the one/only sata port (second volume on NVMe), I find DSM installation doesn't do much in the way of asking where you want to install (which drive, or create a small partition so that you're not installing on a huge volume), and Storage Manager doesn't show you where the OS lives. But I guess that makes sense--Synology likes to keep it simple: one large RAID volume. (more below on adding a miniPCIe sata controller for an extra sata port). So an asymetric sata port/drive landscape, multiple drives, either each on one sata port, or all on a port-multiplied port (eSATA), and/or both --- does ARC/DSM ask which to install on? .. or if to create raid volume, and how to lay out the drives? Would I install with only the one drive installed that I want DSM to live on, then later populate other sata ports? These details is what all the write-ups are missing, from what I found so far (from a planning perspective). Is DSM designed for Synology hardware where the controller/ports are always a nice symetric layout -- detect drives, provision a raid container accross all the present drives, format btrs, and install.? From the beginning... I have in mind that I would use an external sata JBOD box (it can do RAID too, but I'd leave it in JBOD mode) as a hub to attach miscellaneous spare hard drives as needed, say when I need some extra room sorting old data, checking their contents before permanently abandoning them, or for extra room on the NAS (yes, unprotected -- none of the drives on this NAS are to be in raid/mirror/stripe/concatinated/etc). Maybe the drive(s) is just scratch space, or maybe have data and I want to sort through it ... so the 5-bay SATA enclosure just offers a place to attach drives instead of hanging them off a USB/sata dongle on my laptop or other PCs. These drives might be serving a purpose to the NAS when I'm fooling with a NAS app (Plex?) and need a bit of extras storage space there, or simply the NAS just gives me a place to plug the drive in while I sort the data on it from a PC across the network, or maybe it provides scratch space when I need someplace to drop 500GB of files. So the assumption is that I attach drive(s) now and then, might be for a day/week/month, might have a file system EXT4 or NTFS, etc. And that after plugging in the drive to a JBOD bay, I would go into DSM UI and share the drive so I can access it accros the network. Or, I maybe I'd repartition it and create a voume that a DSM app could use. Not doing raid, concatination or spanning. As for eSATA vs USB... I'm a nas noob. The only other NAS I have experience with is my little Thecus N0204, two drives, USB, (well, large Network Appliance 25 years ago.) So I don't speak the lingo of Synology, Qnap, etc in terms of this tech. I'm unsure whether my mode with misc drives is better done with the SATA JBOD box or a USB-based setup. I have two other two-bay USB external boxes. Instead of straight sata, I could use a USB bridsge, eS3U31, on the 5-bay converting it to USB. eS3U31 is prob no less robust than the USB/SATA bridge in the 2-bay USB boxes. Anyway, the point is that I want to just be able to jockey drives without restating the DSM--on the fly drive jockeying. So if the answer is: with eSATA your going to need to at least reboot DSM, or in worst case: edit config files each time to change the SATA landscape. Then this isn't my path. maybe you tell me: The only time you'll need to reconfigure DSM is when you add/remove SATA controller ports, such as installing one of the mini SATA controllers; but plugging/unplugging drives into the JBOD box will be on-the-fly. If that's the case then Yay! No USB in the middle! But if the former, since I also have USB 2-bay boxes, then perhaps I use the 5-bay SATA as expanded permanant storage rather than as jump drives and limiting myself to only the one internal SATA and NVMe drives. (more in the next paragraph...) More... So the DSM-NAS is a server, replacing a bunch of of other PCs I have running... I have an ESXi server running one VM with a Docker container serving Sync for my address book and calendar. DSM does that. I have another PC running as a fiile server. DSM does that. I have an old Thecus nas sharing an iTunes folder..., another PC serving IMAP..., another doing backups... So this DSM will replace the others. You'd rightly argue that if I'm consolodating all these services into one box then surely I'd want a non-mini PC with plenty of drives, reduntanly protected, maybe RAID 6. (sigh) And you'd be right, I am lamenting... Since the PC I've chosen is so limited on SATA ports (just one, and one NVMe; For years I've dabbled in building mini PCs for home always-on/servers, using ITX and smaller, and was doing this long before Lenovo, Dell, and HP had their lines of SFF and minis), I've contrived to squeeze a M.2/miniPCIe sata controller in and run a sata port to the back-panel--either as eSATA jack or run the cable straight through to an external port-multiplied JBOD box. If this doesn't work then I'll just use a USB bridge and call it a day... Back to my lamented mini PC... Maybe I'm better off using the 5-bay JBOD box as DSM permanent storage--5 bays is a nice number for that. Put the whole shebang on a 5-drive Raid-6. But I was trying to keep to SSD drives, and didn't want to break the bank by buying 5 large SSDs. (my misc 2.5" drives are mostly mechanical). Maybe I can run 3 bays for permanant, and have two bays for jockying temp drives??? Install with 3 bays populated, then other 2 will be jocky-able? I guess if I'm doing raid then I can buy cheaper lower-endurance SSDs. So I expect to have to learn how to customize the sata portmap, but I just don't want to have to do it after the initial configuration. Yes, I've been slowly piecing together the process, but this is such a mature project that I hoping to find a broader guide on ins and outs of the sata port map config.
-
Ah HA! Can't upgrade 12-13 Hackinology from DSM 6.2.4 to 7.0.1, it'll throw that "Incompatible upgrade file" error. Can FRESH install 7.1.1 once you've reset the system (or fed it new drives or whatever). So glad I've got a stash of old small SATA SSDs kicking about.
- 291 replies
-
- 1
-
-
- 08-0220usb14
- firmware
- (and 4 more)
-
Good plan, I did that. In the end it was deceptively easy to persuade my DS1812+ it is really a DS1813+ instead. I didn't bother to downgrade, just installed a blank old SSD, did the file exchange and booted it up ... tada! DS1813+ reporting for duty! To summarise for those who follow (keeping in ind I kept mine simple - one drive; last DS1812+ OS installed; no important data to lose - even if this works, your DSM version is going to be out of date so I'd be VERY cautious about exposing this to the internet). 1. Starting with a working NAS unit, log in to the SSH console and dd if=/dev/synoboot of=/volume1/myShare/DS1812+synoboot-6.2.4u7.img I'm not sure if you need any SynoCommunity packages to get DD. They're pretty worth it for lots of useful utilities. We've started here because a backup image of your Synology is flat out a GOOD thing to have. Remember to put it somewhere safe (NOT on the NAS!) 2. boost your ram to 2 or 3gb. Single rank memory for these old units. Samsung seems to have a decent rep. 4Gb and above trigger the CPU usage bug for me so as nice as that much free ram is, it's at significant performance cost. 3. The really hard part - find a USB stick you can boot the machine from. It has to be something with an older chipset where the manufacturing tools have been leaked. USB-A or small port DOM doesn't matter, making the stick F400/F400 is the important bit. For me a Toshiba flash based DOM didn't work even with the MFG tools, but a 4Gb Lexar Jumpdrive Firefly did. Strictly, you don't need the DOM if you have a working stock flash and a backup, but I'm cautious like that. 4. Once you have the stick, flash it with the DD image you used up there. I used Rufus under Windows to do mine. 5. Open the NAS, remove the stock DOM and see if it'll boot from your DIY media. 6. Assuming it booted, you now need the DS1813+ PAT file. Since my unit was updated to 6.2.4u7, I grabbed the appropriate 1813+ version "DSM_DS1813+_25556.pat". This is where you refer back to post #35 in this thread - open "DSM_DS1813+_25556.pat" with 7zip and extract 4 files (Thanks DSfuchs for the image). Windows didn't want to play ball for me with mounting the tiny DOM partitions so I used a Linux box instead. If you're handy with the command line or "Midnight Commander" you can do this right on the NAS (if you're brave enough, on the stock DOM no less). With an abundance of caution, I made two folders in the second partition - 1812 files and 1813 files. Move the four relevant files to the 1812 folder for safekeeping and copy the 1813 files to the root of the partition. That's it, job done. Yeah, it seems too easy but it's really all there is for this. Dismount the stick, plug it into the bootable port on the NAS, slot in a blank drive and fire it up. After a couple of nervous minutes, my unit emitted a happy beep and showed up on the network as a DS1813+ (original serial number and MAC addresses to boot). With a blank drive in it, I fed the installer the "DSM_DS1813+_25556.pat" file and let it do it's thing. Network performance appears unchanged, all my usual swath of apps installed fine, no complaints anywhere I can see. It's just working 🤑 Next step I guess will be to make a new backup of the USB boot image (see step 1 above) and then see if it'll upgrade to DSM 7. After that, I guess I'll give it a few weeks to be absolutely sure and then look at cloning the USB stick back to the stock DOM and buttoning the old girl up for the next 4-5-6 years. Thanks for the advice DSfuchs!


-
To restore the VERSION file, I would use a 2nd DSM installation. So remove all drives and reinstall a free/empty hard drive, may be an old laptop drive, in slot 1 (far left) with DSM. Then insert the first/leftmost of the removed hard drives into the 2nd slot during operation. Don't put together hard drives online or anything like that! Then make the system partition available via SSH/root via the point "/mnt": mount /dev/sdb1 /mnt cd /mnt/etc.defaults Copy a working VERSION here, from the new DSM or it's share, or repair it using the editor "vi". power off 1. Remove the spare hard drive form slot 1, 2.=>1 and switch it on again to test. The data volume will be missing, but if DSM boots up properly it will be there again with all disks when you restart.