Search the Community
Showing results for 'SataPortMap'.
-
I was able to get all my instances of 7.1.1 updated to 7.2.1 pretty smoothly using that method. In fact, I changed loaders and re-built to 7.2.1 all in one step to save time, and that worked okay. The only hiccup I noticed when using your loader is that the SataPortMap and DiskIdxMap values set in your loader or even by manual editing of the user_config.json file are NOT saved when building the loader. After the build, both those values in the user_config.json file are reset to nothing and just show "". And when rebooting to boot into DSM, the loader SATA boot options line also shows no set values for these. I have to hit "e" add them in that screen manually to the SATA boot line, and then it seems to save them and use them in the future. Why would setting them in your loader build settings or user_config.json before build not be honored and actually save the values for use when booting DSM?
-
 [HBA Recommended settings from flyride] Not EUDEV , Use Only DDSML (If you use TCRP-mshell ) "SataPortMap": "12", "DiskIdxMap": "1000", "SasIdxMap: "0" "MaxDisks: "24"
 -
Hi all, This is my first attempt at installing Xpenology, I have a DS918+ for my own use and would like to convert an old Windows Home Server for a family member. I'm guessing the drivers for CN896 North Bridge or VIA VT8251 South Bridge are not loaded, it's picked up one of them as "JMicron Technology Corp. JMB363 SATA/IDE Controller (rev 02)" but I'm not sure how to proceed. Motherboard: VIA EPIA SN 18000G with 4GB DDRII 667 CPU: VIA C7 1.8GHz NanoBGA2 processor with FSB 800 MHz 4 S-ATA II connectors VIA CN896 North Bridge VIA VT8251 South Bridge http://cdn.viaembedded.com/eol_products/docs/epia-sn/operating_guide/OG_EPIA-SN_v1.10.pdf I have 4 1TB SATA 3.5" drives connected but only two are showing - any idea how I can add the other two? I used win32diskimager-1.0.0-install.exe to install tinycore-redpill.v0.9.4.9.img ./rploader.sh update ./rploader.sh fullupgrade ./rploader.sh identifyusb Found MEMUP SerialNumber: 077B15B105A3 Vendor ID : 0x13fe Product ID : 0x1e20 Should i update the user_config.json with these values ? [Yy/Nn] ./rploader.sh serialgen DS3622xs+ Interface selected : eth0 Serial Number for Model = 20C0SQRLJFDVP Mac Address for Model DS3622xs+ = 00:11:32:AC:B8:D2 Should I update the user_config.json with these values ? [Yy/Nn] ./rploader.sh satamap Found "02:00.0 JMicron Technology Corp. JMB363 SATA/IDE Controller (rev 02)" Detected 2 ports/2 drives. Override # of ports or ENTER to accept <2> 4 Non-numeric, overridden to 0 Computed settings: SataPortMap=1 DiskIdxMap=00 Should i update the user_config.json with these values ? [Yy/Nn] n OK remember to update manually by editing user_config.json file ./rploader.sh build ds3622xsp-7.2.0-64570 DSM_DS3622xs+_64570.pat ./rploader.sh backup ./rploader.sh backuploader exitcheck.sh reboot
-
Добрый день! Dual-Core AMD Opteron(tm) Processor 2212 Встроенный SATA Marvell. В БИОС выставляется только режим АТА. Использовал несколько загрузчиков. ARPL, ARС, TCRP - Загрузка доходит до Booting the kernel. Захожу по IP:5000 но диски не находятся "No Drives Detected". Также пробовал RAID контроллер, но результат такой же. --------------------------------------={ TinyCore RedPill Friend }=-------------------------------------- TCRP Friend Version : 0.0.9 0.0.8g Added retry processing when downloading rp-lkms.zip of ramdisk patch fails 0.0.8h When performing Ramdisk Patch, check the IP grant status before proceeding. Thanks ExpBox. 0.0.9 Added IP detection function on multiple ethernet devices IP Detecting on eth0 IP Address : 192.168.10.121, Module Processing Method : DDSML Detecting upgrade : Ramdisk OK ! zImage OK ! Checking for latest friend -> OK, latest Loader BUS: usb Running on 4 Processor Dual-Core AMD Opteron(tm) Processor 2212 With 1.9G Memory System has 0 SAS/RAID HBAs and 2 Network cards System is running in Legacy boot mode Model : DS723+, Serial : 2270TQRMAXPFL, Mac : 00188B77519C, DSM Version : 7.2.1-69057, Update : 0, RedPillMake : prod zImage : /mnt/tcrp/zImage-dsm initrd : /mnt/tcrp/initrd-dsm cmdline : withefi disable_mtrr_trim=1 earlyprintk syno_hw_version=DS723+ console=ttyS0,115200n8 netif_num=2 synoboot2 pid=0xc95a earlycon=uart8250,io,0x3f8,115200n8 mac2=00188B77519D mac1=00188B77519C sn=2270TQRMAXPFL SMBusHddDynamicPower=1 vid=0x125f elevator=elevator loglevel=15 DiskIdxMap vender_format_version=2 log_buf_len=32M root=/dev/md0 SataPortMap syno_ttyS1=serial,0x2f8 syno_ttyS0=serial,0x3f8 Access http://192.168.10.121:7681 via the TTYD web terminal to check the problem. (If you have any problems with the DSM installation steps, check the /var/log/linuxrc.syno.log file in this access) Default TTYD root password is blank До загрузки DSM root@tcrpfriend:~fdisk -l Disk /dev/sda: 3.76 GiB, 4040748544 bytes, 7892087 sectors Disk model: USB Flash Drive Units: sectors of 1 * 512 = 512 bytes Sector size (logical/physical): 512 bytes / 512 bytes I/O size (minimum/optimal): 512 bytes / 512 bytes Disklabel type: dos Disk identifier: 0xf110ee87 Device Boot Start End Sectors Size Id Type /dev/sda1 * 2048 147455 145408 71M 83 Linux /dev/sda2 147456 301055 153600 75M 83 Linux /dev/sda3 301056 2097151 1796096 877M 83 Linux Disk /dev/sdb: 3.64 TiB, 4000787030016 bytes, 7814037168 sectors Disk model: HGST HDN724040AL Units: sectors of 1 * 512 = 512 bytes Sector size (logical/physical): 512 bytes / 4096 bytes I/O size (minimum/optimal): 4096 bytes / 4096 bytes Disklabel type: gpt Disk identifier: 8BBD78AE-5304-BB4C-963E-4B8EC06708DB Disk /dev/sdc: 3.64 TiB, 4000787030016 bytes, 7814037168 sectors Disk model: HGST HDN724040AL Units: sectors of 1 * 512 = 512 bytes Sector size (logical/physical): 512 bytes / 4096 bytes I/O size (minimum/optimal): 4096 bytes / 4096 bytes Disklabel type: gpt Disk identifier: B1990E24-817F-414D-9CB4-D38AD70E2428 root@tcrpfriend:~# После загрузки "Junior mode" SynologyNAS> lspci -k 0000:00:01.0 Class 0604: Device 1166:0036 0000:00:02.0 Class 0600: Device 1166:0205 Subsystem: Device 1166:0201 0000:00:02.2 Class 0601: Device 1166:0234 Subsystem: Device 1028:01eb 0000:00:03.0 Class 0c03: Device 1166:0223 (rev 01) Subsystem: Device 1028:01eb 0000:00:03.1 Class 0c03: Device 1166:0223 (rev 01) Subsystem: Device 1028:01eb 0000:00:03.2 Class 0c03: Device 1166:0223 (rev 01) Subsystem: Device 1028:01eb Kernel driver in use: ehci-pci 0000:00:04.0 Class 0300: Device 1002:515e (rev 02) Subsystem: Device 1028:01eb 0000:00:07.0 Class 0604: Device 1166:0140 (rev a2) Kernel driver in use: pcieport 0000:00:08.0 Class 0604: Device 1166:0142 (rev a2) Kernel driver in use: pcieport 0000:00:09.0 Class 0604: Device 1166:0144 (rev a2) Kernel driver in use: pcieport 0000:00:0a.0 Class 0604: Device 1166:0142 (rev a2) Kernel driver in use: pcieport 0000:00:0b.0 Class 0604: Device 1166:0144 (rev a2) Kernel driver in use: pcieport 0000:00:18.0 Class 0600: Device 1022:1100 0000:00:18.1 Class 0600: Device 1022:1101 0000:00:18.2 Class 0600: Device 1022:1102 0000:00:18.3 Class 0600: Device 1022:1103 0000:00:19.0 Class 0600: Device 1022:1100 0000:00:19.1 Class 0600: Device 1022:1101 0000:00:19.2 Class 0600: Device 1022:1102 0000:00:19.3 Class 0600: Device 1022:1103 0000:01:00.0 Class 0200: Device 14e4:1659 (rev 21) Subsystem: Device 1028:01eb Kernel driver in use: tg3 0000:02:00.0 Class 0200: Device 14e4:1659 (rev 21) Subsystem: Device 1028:01eb Kernel driver in use: tg3 0000:03:0d.0 Class 0604: Device 1166:0104 (rev c0) 0000:03:0e.0 Class 0101: Device 1166:024b Subsystem: Device 1028:01eb 0000:06:00.0 Class 0604: Device 8086:032c (rev 09) 0000:07:08.0 Class 0100: Device 1000:0054 (rev 01) Subsystem: Device 1028:1f06 Kernel driver in use: mptsas 0001:01:00.0 Class 0106: Device 1b4b:9235 (rev 11) SynologyNAS> SynologyNAS> fdisk -l Disk /dev/synoboot: 3853 MB, 4040748544 bytes, 7892087 sectors 1018 cylinders, 125 heads, 62 sectors/track Units: sectors of 1 * 512 = 512 bytes Device Boot StartCHS EndCHS StartLBA EndLBA Sectors Size Id Type /dev/synoboot1 * 0,32,33 9,45,36 2048 147455 145408 71.0M 83 Linux Partition 1 has different physical/logical start (non-Linux?): phys=(0,32,33) logical=(0,33,3) Partition 1 has different physical/logical end: phys=(9,45,36) logical=(19,3,20) /dev/synoboot2 9,45,37 18,188,42 147456 301055 153600 75.0M 83 Linux Partition 2 has different physical/logical start (non-Linux?): phys=(9,45,37) logical=(19,3,21) Partition 2 has different physical/logical end: phys=(18,188,42) logical=(38,105,46) /dev/synoboot3 18,188,43 130,138,8 301056 2097151 1796096 877M 83 Linux Partition 3 has different physical/logical start (non-Linux?): phys=(18,188,43) logical=(38,105,47) Partition 3 has different physical/logical end: phys=(130,138,8) logical=(270,75,2) SynologyNAS>
-
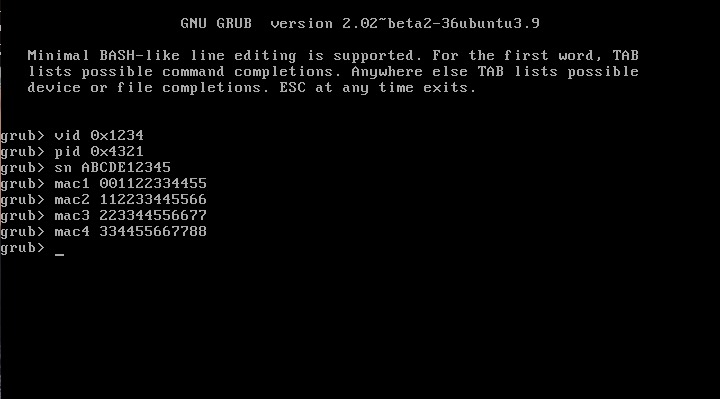
Ce tuto est une mise à jour du tuto que j'ai déjà fait l'année dernière. Le tuto ci-dessous permet d'installer/migrer DSM 5.2 à DSM 6.1.7 directement sans devoir à passer par DSM 6.0.2. Si pour une raison ou une autre vous voulez migrer à DSM 6.0.2 d'abord ou alors tout simplement vous ne voulait pas migrer à DSM 6.1.7 mais souhaiter migrer à DSM 6.0.2 uniquement alors utilisez le lien ci dessus. Pour mettre à jour DSM 6.0.2 à DSM 6.1.7 voir ici. Comme la plupart de vous doivent déjà le savoir Jun a réussi un exploit en créant un loader permettant l'installation de DSM 6 sur du matériel non Synology. Voici le fil de la discussion pour ceux que ça intéressent: https://xpenology.com/forum/topic/6253-dsm-6xx-loader/. Il va vous falloir quelques outils. Je pars du principe que vous êtes sous Windows 10, 8, 7, Vista ou XP. Si vous êtes sur un MAC OS et que vous comprenez l'anglais réfèrerez vous au post que j'ai fait sur comment écrire et monter l'image sur une clef USB. Vous pouvez ensuite revenir sur ce tuto après avoir effectué les manips nécessaires sur MAC OS. Si vous avez des doutes n'hésitez pas à laisser un commentaire. Si vous êtes à DSM 5.1 ou sur une version antérieur, il faut tout d'abord mettre à jour DSM à la version 5.2. Si vous faites une installation fraîche de DSM 6.1 alors vous êtes bon pour la suite. Simplement omettez toute référence à DSM 5.2 Voici ce dont vous avez besoin: - Win32 Disk Imager. Application permettant de rendre une clef USB bootable. - Une clef USB que l'on utilisera pour y mettre le loader. 4GB suffiront largement. Je conseille une clef de marque (Kingston, SandDisk ou autre). Cela évitera les problèmes dans le future. - Comment connaitre le VID et PID de votre clef usb >>> voir ici - Un éditeur de texte avancé. Notepad++ fera l'affaire. L'éditeur de text Notepad inclu avec Windows est déconseillé. - DSM 6.1.7. Télécharger un des fichiers relatifs à un des 3 modèles suivant: DS3615sx ou DS3617sx ou DS916+. Télécharger uniquement le fichier avec l'extension ".pat" et non celui avec l'extension ".pat.md5". Les fichiers PAT viennent directement des serveurs de Synology, donc sans aucune altération. - Le loader (miroir) officiel v1.02b de Jun. Ce loader est hybrid c'est à dire qu'il marche en EFI ou BIOS donc il devrait marcher sur une majorité de machines capable de lire du GTP. Pour les machines plus vielles qui ne peuvent lire que du MBR ce loader ne marchera pas. Utilisez alors l'image du loader v1.02b faites par @Genesys construite à partir du loader de Jun mais faite avec une table de partitionnement de type MBR. Note: Le loader v1.02b de Jun est compatible avec les CPU Intel. Pour les CPU AMD cela n'est pas entièrement le cas mais plusieurs personnes ont mentionnée qu'il était possible d'utiliser ce loader. Il serait d'après eux nécessaire de désactiver la fonction C1E dans le BIOS (applicable aux machines HP comme le N40L ou N54L par exemple). Si vous avez un autre model/marque de machine AMD ne me demandez pas, je ne sais pas. Il faudra que vous regardiez dans le bios et fassiez des tests vous même. Partagez voter expérience ca en aidera surement d'autres. - Le ramdisk personnalisé extra.lzma. Ce ramdisk est optionnel et ne doit être utiliser que si le ramdisk par défaut inclus dans le loader ne permet pas la détection du matériel. Je le fourni pour ceux qui pourraient avoir des problèmes de détection réseau ou de contrôleurs de disques non reconnus. Ce ramdisk personnalisé contient des modules (drivers) additionnels qui ont été compilé par @IG-88 avec le code source de DSM 6.1.3. Je ne garantie pas qu'ils marchent tous. Vous devrez remplacer (ou renommer, au cas ou!) le ramdisk par défaut extra.lzma par celui ci. Si vous avez des questions spécifiquement liées au ramdisk de IG-88 merci de les poster directement dans le fil de discussion de IG-88, pas ici. - Faites attention à branchez vos HDD successivement en commençant par le premier port SATA normalement décrit comme SATA0 sur les cartes mères. Vérifiez avec le fabriquant de votre carte mère. Si vous faites une migration à partir de DSM 5.2 alors laissez tel quel. - OSFMount. Application permettant de modifier le fichier grub.cfg directement sur l'image. Ceci n'est pas strictement nécessaire car Jun a rendu possible la configuration du VID/PID, S/N et MAC directement à partir du Menu Boot Grub. Si vous préférez utiliser la nouvelle méthode il suffit d'omettre le Point 4, lisez plutôt la Note 4 et reprenez le tuto à partir du Point 5. SVP LISEZ TOUT LE TUTO AVANT DE FAIRE N'IMPORTE QUOI L'utilisation de ce loader relève de votre entière responsabilité. Ne me tenez pas responsable si vous perdez vos données ou que votre NAS part en fumée. Sachez aussi que ce loader contient moins de drivers que sous DSM 5.2 donc si il est primordiale pour vous d'avoir une machine opérationnelle h24 je vous conseille de lire en bas du tuto les drivers disponibles. Si votre module n'est pas inclus alors il vous faudra les compiler vous même ou utiliser le ramdisk personnalisé qui se trouve ci-dessus. Ne me demandez pas de compiler des modules à votre place, je ne le ferais pas. NE METTEZ PAS A JOUR DSM AU DELA DE LA VERSION 6.1.7 AVEC LE LOADER v1.02b. EN D'AUTRES TERMES NE METTEZ PAS A JOUR DSM A LA VERSION 6.2 A bon entendeur. Maintenant que vous avez tout ce qu'il vous faut, passons aux choses sérieuses: 1 - Faites un backup de vos données et de votre configuration avant toute chose. Cela évitera la pleurniche plus tard. Imprimez ce tuto si nécessaire. 2 - Eteignez votre NAS. Déconnectez votre clef USB avec votre loader 5.2. Je conseille que vous mettiez de coté la clef USB que vous utilisez actuellement avec DSM 5.2 et prenez une nouvelle clef USB pour DSM 6.1. Cela évitera de la refaire si l'upgrade ne marche pas pour vous et que vous avez besoin de revenir à DSM 5.2. 3 - Allez à votre PC, branchez votre clef USB et lancez votre application de choix permettant de voir le VID et PID de votre clef USB. Notez ça quelque part car vous en aurez besoin sous peu. 4 - Maintenant lancez OSFMount. Sélectionnez "Mount New", puis choisissez votre loader (fichier au format .img) dans "Image File". Une autre fenêtre s'ouvre. Sélectionnez la partition 0 (celle de 15 MB). Cliquez Ok. Sur la fenêtre principale décochez la case "Read only drive". Cliquez Ok. La partition de l'image devrait maintenant être montée dans votre explorateur de fichiers. Vous pouvez maintenant aller au dossier /grub et remplacer (ou renommé) le ramdisk par défaut extra.lzma par celui que j'ai fourni un peu plus haut. Maintenant revenez en arrière et aller dans le dossier /grub et éditer le fichier grub.cfg avec votre éditeur de texte avancé. Si vous avez besoin de remplacer le ramdisk par défaut par le ramdisk extra.lzma personnalisé il vous faudra alors aussi monter la partition 1 (celle de 30MB) avec OSFMount. Le contenue du fichier grub.cfg est le suivant: Je ne mets uniquement ici que la portion du code qui nous intéresse dans le cadre de ce tuto: [...] set extra_initrd="extra.lzma" set info="info.txt" set vid=0x058f set pid=0x6387 set sn=C7LWN09761 set mac1=0011322CA785 set rootdev=/dev/md0 set netif_num=1 set extra_args_3615='' set common_args_3615='syno_hdd_powerup_seq=0 HddHotplug=0 syno_hw_version=DS3615xs vender_format_version=2 console=ttyS0,115200n8 withefi elevator=elevator quiet' set sata_args='sata_uid=1 sata_pcislot=5 synoboot_satadom=1 DiskIdxMap=0C SataPortMap=1 SasIdxMap=0' set default='0' set timeout='1' set fallback='1' [...] Les données à modifier sont les suivantes: vid=0x090C par vid=0x[le vid de votre clef usb] pid=0x1000 par pid=0x[le pid de votre clef usb] sn=C7LWN09761 par sn=générez votre sn ici avec le modèle DS3615xs ou DS3617xs ou DS916+ (cela va dépendre que quel loader vous avez choisi) mac1=0011322CA785 par mac1=[l'adresse MAC du port réseau #1]. Vous pouvez rajouter set mac2=[l'adresse MAC du port réseau #2] si vous avez un 2ième port réseau et ainsi de suite jusqu'à mac4 mais ceci n'est pas nécessaire. Conseil: changez timeout='1' par timeout='4' - Cela rallonge la durée d'affichage du Menu Boot Grub lorsqu'il apparaitra à l'écran. Une fois finie l'édition du fichier grub.cfg, sauvegardez les changements et fermez l'éditeur de texte. Sur OSFMount cliquez sur "Dismount all & Exit". Vous êtes maintenant fin prêt à écrire l'image sur votre clef USB. 5 - Utilisez Win32 Disk Imager pour rendre votre clef USB bootable avec l'image que vous venez d'éditer. 6 - Ejectez votre clef USB chaude et brulante proprement. Branchez la sur votre NAS (évitez les ports USB 3.0). Démarrez la machine et accédez immédiatement à votre BIOS afin de le reconfigurer pour que le boot se fasse à partir de la nouvelle clef usb. Faites les changements nécessaires pour redémarrer en UEFI ou en legacy bios, c'est à vous de choisir. Aussi, dans le BIOS, les HDD doivent être configurés en AHCI et non pas en IDE. Finalement et si possible, activez dans le BIOS le port série si il ne l'est déjà pas. Toutes les cartes mère n'ont pas forcément de port série. Si c'est le cas pour vous alors ce n'est pas bien grave, le loader se chargera du problème. Sauvegarder les changements fait au BIOS et redémarrez. 7 - Une fois redémarré, si vous avez un écran connecté au NAS vous verrez le Menu Boot Grub suivant: CONSEIL: avant même que le Menu Boot Grub n'apparaisse cliquez de façon répétée les touches haut ou bas. Cela aura comme effet d'arrêter le compte à rebours et vous donnera le temps de choisir la ligne que vous voulez. Vous verrez l'écran suivant après avoir fait entrer: Si vous avez démarrer la clef USB en mode EFI vous ne verrez normalement pas les 3 dernières lignes. Rien de grave. 8 - Retournez à votre PC et lancez de préférence Synology Assistant ou alors allez à http://find.synology.com. Normalement si vous avez bien tout suivi votre NAS devrait être détectée sur votre réseau local au bout d'une minute environ (j'ai testé avec un machine virtuelle et ça a prit ~55 secondes). Il suffit ensuite de suivre les indications pour soit faire une installation fraîche soit faire la migration de DSM 5.2 à DSM 6.1. A un moment donné DSM vous demandera le fichier PAT (DSM_DS3615xs_15217.pat ou DSM_DS3617xs_15217.pat ou DSM_DS916+_15217.pat) que vous avez normalement déjà téléchargé. 9 - Une fois finie la MAJ ou l'installation fraîche, accédez à votre NAS comme d'habitude. Il vous faudra surement mettre à jour plusieurs applications. Vous pouvez ensuite mettre à jour DSM 6.1.7 jusqu'à DSM 6.1.7 (critical update 3). Il est possible que vous soyez obligé de faire un reboot forcé. Certaines personnes ont dû refaire la clef usb aussi. Désactivez la mise à jour automatique dans DSM. Si besoin est, voici ou télécharger les fichiers individuels (DSM et updates): https://xpenology.com/forum/topic/7294-links-to-dsm-and-critical-updates/ 10 - Voila c'est fini. Si vous avez des questions cherchez le forum/Google d'abord. Si vous êtes toujours bloqué alors posez votre question en donnant les spécifications de votre matériel (model carte mère, contrôleur LAN, contrôleur disk etc) faute de quoi votre post sera supprimé ou sciemment ignoré. -------------- Note 1: Si après avoir suivi le tuto votre NAS n'est pas accessible via http://find.synology.com ou Synology Assistant la raison la plus probable c'est que les drivers de votre carte réseau n'ont pas été inclus dans le loader. Faites un effort et utilisez Google pour savoir quel module votre carte réseau et/ou votre contrôleur de disque utilisent sous linux suite à quoi vérifiez que ces modules soient inclus dans le ramdisk personnalisé. Si vous le voyez alors utilisez le ramdisk personnalisé. Si rien ne marche alors poser votre question. Note 2: Une fois passé à DSM 6.1 sachez que vous n'aurez plus accès au NAS via ssh avec le compte root. Vous pouvez ceci dit y accéder avec votre compte administrateur puis élever les droits en utilisant sudo -i Ceci est tout à fait normal. C'est Synology qui a voulu sécuriser l'accès à DSM. Note 3: Vérifiez bien le VID/PID de votre clef USB avant d'entamer la MAJ. Si lors de la migration vous obtenez l'erreur suivante: "Failed to install the file. The file is probably corrupted. (13)" (ou l'équivalent en français) c'est que le VID/PID ne correspond pas à votre clef USB. Si vous avez toujours des problèmes après avoir bien vérifié le VID/PID alors essayez une autre clef usb. Note 4: Les changements effectués sur le fichier grub.cg peuvent aussi être fait directement à partir du Menu Boot Grub donc en principe il est tout à fait possible d'ignorer le Point 4 et écrire l'image synoboot.img sur votre clef USB sans rien modifier (il suffit de continuer à lire à partir du Point 6). Pour faire les modifications il faut appuyer sur la lettre 'C' lorsque vous voyez le Menu Boot Grub apparaitre. Il faut être vif car vous n'avez qu'une seconde avant que le menu disparaisse. Apres avoir appuyé sur la lettre C vous vous retrouverez dans une invite de commande grub. Pour changer le VID vous devez écrire comme suit: vid 0xLES 4 CHIFFRES VID DE VOTRE CLEF USB Faites la même chose pour pid, sn et mac1. Appuyez sur entrer à chaque commande. Les commandes sont les suivantes: pid 0xLES 4 CHIFFRES PID DE VOTRE CLEF USB sn LE NUMERO DE SERIE DE VOTRE NAS mac1 L'ADRESSE MAC1 DE VOTRE NAS Si vous avez plusieurs cartes réseau vous pouvez les rajouter de la meme manière: Le maximum c'est mac4. Voir ci dessous: mac2 L'ADRESSE MAC2 DE VOTRE NAS mac3 L'ADRESSE MAC3 DE VOTRE NAS mac4 L'ADRESSE MAC4 DE VOTRE NAS Si vous pensez avoir fait une erreur il suffit de refaire la commande. Lorsque vous avez fini appuyez sur Esc et sélectionnez la ligne du menu qui convient. Ci dessous un example a quoi ressemble l'invite de commande grub avec les commandes: Note 5: Si lors de l'installation vous recevez un message d'erreur de type "Nous avons détecté des erreurs sur les disques [numero des disques] et les ports sata ont également été désactivés, remplacer les disques et réessayer" alors il faut rajouter SataPortMap dans l'invite de commande Grub (ou dans le fichier grub.cfg). Appuyer sur la letter C lors du Menu Boot Grub et écrivez ceci: append SataPortMap=XX XX est le nombre de HDD présent. N'oubliez pas de mettre à jour ce paramètres si vous rajouter des HDD. Par ailleurs, si vous êtes amené à utiliser Reinstall, il ne faut pas oublier de sélectionner le mode normal (première ligne du menu grub) lors du reboot automatique après l’installation, sinon le loader sélectionnera à nouveau Reinstall et cela occasionnera des problèmes ultérieurement. @@@@@@@@ Précisions sur ce que veut dire SataPortMap= @@@@@@@@ @@@@@@@@@@@@@@@@@@@@@@@@@@@@@@@@@@@@@@@@@@@@ ############## Problèmes connus ##################### - Sur des machines à coeur unique et lent le "patcher" charge trop tard. - Certains drivers de cartes réseau plantent lorsque le MTU est au delà de 4096 (Jumbo frame). ############# Modules inclus dans le Loader de Jun par défaut ############# ############### Log des modifications du Tuto ###################
-
Bonjour, Comme la plupart de vous doivent déjà le savoir Jun a réussi un exploit en créant un loader permettant l'installation de DSM 6 sur du matériel non Synology. Voici le fil de la discussion pour ceux que ça intéressent: https://xpenology.com/forum/topic/6253-dsm-6xx-loader/. Il va vous falloir quelques outils. Je pars du principe que vous êtes sous Windows 10, 8, 7, Vista ou XP. Si vous êtes sur un MAC OS et que vous comprenez l'anglais réfèrerez vous au post que j'ai fait sur comment écrire et monter l'image sur une clef USB. Vous pouvez ensuite revenir sur ce tuto après avoir effectué les manips nécessaires sur MAC OS. Si vous avez des doutes n'hésitez pas à laisser un commentaire. Si vous êtes à DSM 5.1 ou sur une version antérieur, il faut tout d'abord mettre à jour DSM à la version 5.2. Si vous faites une installation fraîche de DSM 6.0.2 alors vous êtes bon pour la suite. Simplement omettez toute référence à 5.2 Voici ce dont vous avez besoin: - Win32 Disk Imager. Application permettant de rendre une clef USB bootable. - Une clef USB que l'on utilisera pour y mettre le loader. 4Gb suffiront largement. Je conseille une clef de marque (Kingston, SandDisk ou autre). Cela évitera les problèmes dans le future. - Comment connaitre le VID et PID de votre clef usb >>> voir ici - Un éditeur de texte avancé. Notepad++ fera l'affaire. L'éditeur de text Notepad inclu avec Windows est déconseillé. - DSM 6.0.2. Le fichier vient direcement des serveurs de Synology. - Le loader (miroir) officiel v1.01 de Jun. Ce loader est hybrid c'est à dire qu'il marche en efi ou bios. Loader compatible avec CPU Intel et AMD. - Le ramdisk personnalisé extra.lzma (seulement pour DS3615xs). Ce ramdisk est optionnel et ne doit être utiliser que si le ramdisk par défaut inclus dans le loader ne permet pas la détection du matériel. Je le fourni pour ceux qui pourraient avoir des problèmes de détection réseau ou de contrôleurs de disques non reconnus. Ce ramdisk personnalisé contient des modules (drivers) additionnels qui ont été prit dans le loader de Quicknick. Je ne garantie pas qu'ils marchent tous. Vous devrez remplacer (ou renommer, au cas ou!) le ramdisk par défaut extra.lzma par celui ci. Voir la liste des Modules & Firmware en fin de tuto pour le détail. - Faites attention à branchez vos HDD successivement en commençant par le premier port SATA normalement décrit come SATA0 sur les cartes meres. Vérifiez avec le fabriquant de votre carte mère. Si vous faites une migration à partir de DSM 5.2 alors laissez tel quel. - OSFMount. Application permettant de modifier le fichier grub.cfg directement sur l'image. Ceci n'est pas strictement nécessaire car Jun a rendu possible la configuration du VID/PID, S/N et MAC directement à partir du Menu Boot Grub. Si vous préférez utiliser la nouvelle méthode il suffit de ne pas lire le Point 5, lisez plutôt la Note 4 et reprenez le tuto à partir du Point 6. SVP LISEZ TOUT LE TUTO AVANT DE FAIRE N'IMPORTE QUOI L'utilisation de ce loader relève de votre entière responsabilité. Ne me tenez pas responsable si vous perdez vos données ou que votre NAS part en fumée. Sachez aussi que ce loader est basé sur DSM 6.0 Beta 2 branche 7274 et que peu de drivers sont inclus dans le loader donc si il est primordiale pour vous d'avoir une machine opérationnelle H24 je vous conseille d'attendre un peu. Autre chose: NE PAS METTRE DSM A JOUR AU DELA DE LA VERSION 6.0.2 (6.0.3, 6.1, 6.1.X, 6.2) avec le loader v1.01. A bon entendeur. Maintenant que vous avez tout ce qu'il vous faut, passons aux choses sérieuses: 1 - Faites un backup de vos données et de votre configuration avant toute chose. Cela évitera la pleurniche plus tard. Imprimez ce tuto si nécessaire. 2 - Eteignez votre NAS. Déconnectez votre clef USB avec votre loader 5.2. Je conseille que vous mettiez de coté la clef USB que vous utilisez actuellement avec DSM 5.2 et prenez une nouvelle clef USB pour DSM 6.0.2. Cela évitera de la refaire si l'upgrade ne marche pas pour vous et que vous avez besoin de revenir à DSM 5.2. 3 - Allez à votre PC, branchez votre clef USB et lancez votre application de choix permettant de voir le VID et PID de votre clef USB. Notez moi ça quelque part car on va en avoir besoin sous peu. 4 - De-zipper le loader que vous avez normalement déjà téléchargé. Vous aurez maintenant un dossier contenant plusieurs fichiers. Pour du "baremetal" nous avons besoin uniquement du fichier "synoboot.img". 5 - Maintenant lancez OSFMount. Sélectionnez "Mount New", puis choisissez votre fichier synoboot.img dans "Image File". Une autre fenêtre s'ouvre. Sélectionnez la partition 0 (celle de 30 MB). Cliquez Ok. Sur la fenêtre principale décochez le "Read only drive". Cliquez Ok. La partition EFI de l'image devrait maintenant être montée dans votre explorateur de fichiers. Vous pouvez maintenant aller au dossier /image/DS3615xs et remplacer (ou renommé) le ramdisk par défaut extra.lzma par celui que j'ai fourni un peu plus haut. Maintenant revenez en arrière et aller dans le dossier /grub et éditer le fichier grub.cfg avec votre éditeur de texte avancé. Le contenue du fichier est le suivant: Je ne mets uniquement ici que la portion du code qui nous intéresse dans le cadre de ce tuto: [...] set extra_initrd="extra.lzma" set info="info.txt" set vid=0x058f set pid=0x6387 set sn=C7LWN09761 set mac1=0011322CA785 set rootdev=/dev/md0 set netif_num=1 set extra_args_3615='' set common_args_3615='syno_hdd_powerup_seq=0 HddHotplug=0 syno_hw_version=DS3615xs vender_format_version=2 console=ttyS0,115200n8 withefi elevator=elevator quiet' set sata_args='sata_uid=1 sata_pcislot=5 synoboot_satadom=1 DiskIdxMap=0C SataPortMap=1 SasIdxMap=0' set default='0' set timeout='1' set fallback='1' [...] Les données à modifier sont les suivantes: vid=0x090C par vid=0x[le vid de votre clef usb] pid=0x1000 par pid=0x[le pid de votre clef usb] sn=C7LWN09761 par sn=générez votre sn ici avec le modèle DS3615xs ou DS3617xs (cela va dépendre que quel loader vous avez choisi) mac1=0011322CA785 par mac1=[l'adresse MAC du port réseau]. Vous pouvez rajouter set mac2=[l'adresse MAC du port réseau #2] si vous avez un 2ième port réseau et ainsi de suite jusqu'à mac4 mais ceci n'est pas nécessaire. Conseillé: changez timeout='1' par timeout='4' - Cela rallonge la durée d'affichage du Menu Boot Grub à 4s lorsqu'il apparaitra à l'écran. Une fois finie l'édition du fichier grub.cfg, sauvegardez les changements et fermez l'éditeur de texte. Sur OSFMount cliquez sur "Dismount all & Exit". Vous êtes maintenant fin prêt à écrire l'image sur votre clef USB. 6 - Utilisez Win32 Disk Imager pour rendre votre clef USB bootable avec l'image que vous venez d'éditer. 7 - Ejectez votre clef USB chaude et brulante proprement. Branchez la sur votre NAS (évitez les ports USB 3.0). Démarrez la machine et accédez immédiatement à votre BIOS afin de le reconfigurer pour que le boot se fasse à partir de la nouvelle clef usb. Faites les changements nécessaires pour redémarrer en UEFI ou en legacy bios, c'est à vous de choisir. Aussi, dans le BIOS, les HDD doivent être configurés en AHCI et non pas en IDE. Finalement et si possible, activez dans le BIOS le port série si il ne l'est déjà pas. Toutes les cartes mère n'ont pas forcément de port série. Si c'est le cas pour vous alors ce n'est pas bien grave, le loader se chargera du problème. Sauvegarder les changements fait au BIOS et redémarrez. 8 - Une fois redémarré, si vous avez un écran connecté au NAS vous verrez le Menu Boot Grub suivant: Si vous avez un CPU Intel laissez faire et le loader se lancera automatiquement. Si vous avez un CPU AMD il faut sélectionner la 4ième ligne puis entrer. CONSEIL: avant même que le Menu Boot Grub n'apparaisse cliquez de façon répétée les touches haut ou bas. Cela aura comme effet d'arrêter le compte à rebours et vous donnera le temps de choisir la ligne que vous voulez. Vous verrez l'écran suivant après avoir fait entrer: Si vous avez démarrer la clef USB en mode EFI vous ne verrez normalement pas les 3 dernières lignes. Rien de grave. 9 - Retournez à votre PC et lancez de préférence Synology Assistant ou alors allez à http://find.synology.com. Normalement si vous avez bien tout suivi votre NAS devrait être détectée sur votre réseau local au bout d'une minute environ (j'ai testé avec un machine virtuelle et ça a prit autour de 55 secondes). Il suffit ensuite de suivre les indications pour soit faire une installation fraîche soit faire la migration de DSM 5.2 à DSM 6.0.2. A un moment donné on vous demandera le fichier PAT (DSM_DS3615xs_8451.pat) que vous avez normalement téléchargé auparavant si vous avez été méthodique et que vous avez bien lu. 10 - Une fois finie la MAJ ou l'installation fraîche, accédez à votre NAS comme d'habitude. Il vous faudra surement mettre à jour plusieurs applications. Vous pouvez ensuite mettre à jour DSM 6.0.2 jusqu'à DSM 6.0.2-8451 update 11. Il est possible que vous soyez obligé de faire un reboot forcé. Certaines personnes ont dû refaire la clef usb aussi. - NE PAS METTRE DSM A JOUR AUX VERSIONS 6.0.3, 6.1, 6.1.1 ou 6.1.2, 6.1.3, 6.2 avec le loader v1.01. Désactivez la mise à jour automatique dans DSM. 11 - Voila c'est fini. Si vous avez des questions cherchez le forum/Google d'abord. Si vous êtes toujours bloqué alors posez votre question en donnant les spécifications de votre matériel (model carte mère, contrôleur LAN, contrôleur disk etc) faute de quoi votre post sera supprimé. Merci de cliquer sur le bouton 'Like this' si vous avez aimé le tuto. -------------- Note 1: Si après avoir suivi le tuto votre NAS n'est pas accessible via http://find.synology.com ou Synology Assistant la raison la plus probable c'est que les drivers de votre carte réseau n'ont pas été inclus dans le loader. Faites un effort et utilisez Google pour savoir quel module votre carte réseau et/ou votre contrôleur de disque utilisent sous linux suite à quoi vérifiez que ces modules soient inclus dans le ramdisk personnalisé. Si vous le voyez alors utilisez le ramdisk personnalisé. Si rien ne marche alors poser votre question. Note 2: Une fois passé à DSM 6.0.2 sachez que vous n'aurez plus accès au NAS via ssh avec le compte root. Vous pouvez ceci dit y accéder avec votre compte administrateur puis élever les droits en utilisant sudo -i Ceci est tout à fait normal. C'est Synology qui a voulu sécuriser l'accès à DSM. Note 3: Vérifiez bien le VID/PID de votre clef USB avant d'entamer la MAJ. Si lors de la migration vous obtenez l'erreur suivante: "Failed to install the file. The file is probably corrupted. (13)" (ou l'équivalent en français) c'est que le VID/PID ne correspond pas à votre clef USB. Si vous êtes CERTAIN que le VID/PID est correct et que vous continuez à recevoir ce message d'erreur alors essayez de faire un 'Force Install'. Si vous avez toujours des problèmes après avoir bien vérifié le VID/PID et que 'Force Install' ne marche pas non plus alors essayez une autre clef usb. Note 4: Les changements effectués sur le fichier grub.cg peuvent aussi être fait directement à partir du Menu Boot Grub donc en principe il est tout à fait possible d'ignorer le Point 5 et écrire l'image synoboot.img sur votre clef USB sans rien modifier (il suffit de continuer à lire à partir du Point 6). Pour faire les modifications il faut appuyer sur la lettre 'C' lorsque vous voyez le Menu Boot Grub apparaitre. Il faut être vif car vous n'avez qu'une seconde avant que le menu disparaisse. Apres avoir appuyé sur la lettre C vous vous retrouverez dans une invite de commande grub. Pour changer le VID vous devez écrire comme suit: vid 0xLES 4 CHIFFRES VID DE VOTRE CLEF USB Faites la même chose pour pid, sn et mac1. Appuyez sur entrer à chaque commande. Les commandes sont les suivantes: pid 0xLES 4 CHIFFRES PID DE VOTRE CLEF USB sn LE NUMERO DE SERIE DE VOTRE NAS mac1 L'ADRESSE MAC1 DE VOTRE NAS Si vous avez plusieurs cartes réseau vous pouvez les rajouter de la meme manière: Le maximum c'est mac4. Voir ci dessous: mac2 L'ADRESSE MAC2 DE VOTRE NAS mac3 L'ADRESSE MAC3 DE VOTRE NAS mac4 L'ADRESSE MAC4 DE VOTRE NAS Si vous pensez avoir fait une erreur il suffit de refaire la commande. Lorsque vous avez fini appuyez sur Esc et sélectionnez la ligne du menu qui convient. Ci dessous un example a quoi ressemble l'invite de commande grub avec les commandes: Note 5: Si lors de l'installation vous recevez un message d'erreur de type "Nous avons détecté des erreurs sur les disques [numero des disques] et les ports sata ont également été désactivés, remplacer les disques et réessayer" essayer la ligne "Force Install" dans le Menu Boot Grub. Si cela ne marche pas alors il faut rajouter SataPortMap dans l'invite de commande Grub. Appuyer sur la letter C lors du Menu Boot Grub et écrivez ceci: append SataPortMap=XX XX est le nombre de HDD présent. N'oubliez pas de mettre à jour ce paramètres si vous rajouter des HDD. Par ailleurs, si vous êtes amené à utiliser Force Install, il ne faut pas oublier de sélectionner le mode normal (première ligne du menu grub) lors du reboot automatique après l’installation, sinon le loader sélectionnera à nouveau Force Install et cela occasionnera des problèmes ultérieurement. @@@@@@@@ Précisions sur ce que veut dire SataPortMap= @@@@@@@@ @@@@@@@@@@@@@@@@@@@@@@@@@@@@@@@@@@@@@@@@@@@@ ############## Problèmes connus ##################### - Sur des machines à coeur unique et lent le "patcher" charge trop tard. - Certains drivers de cartes réseau plantent lorsque le MTU est au delà de 4096 (Jumbo frame). ############# Modules inclus dans le Loader de Jun par défaut ############# ############# Modules additionnels contenus dans le ramdisk extra.lzma personnalisé ############# ############### Log des modifications du Tuto ###################
-
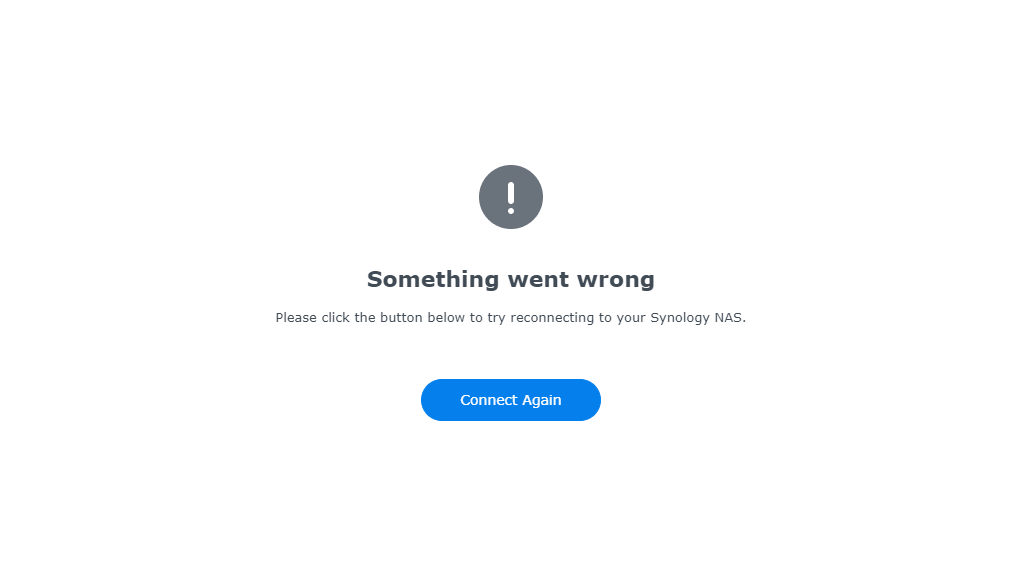
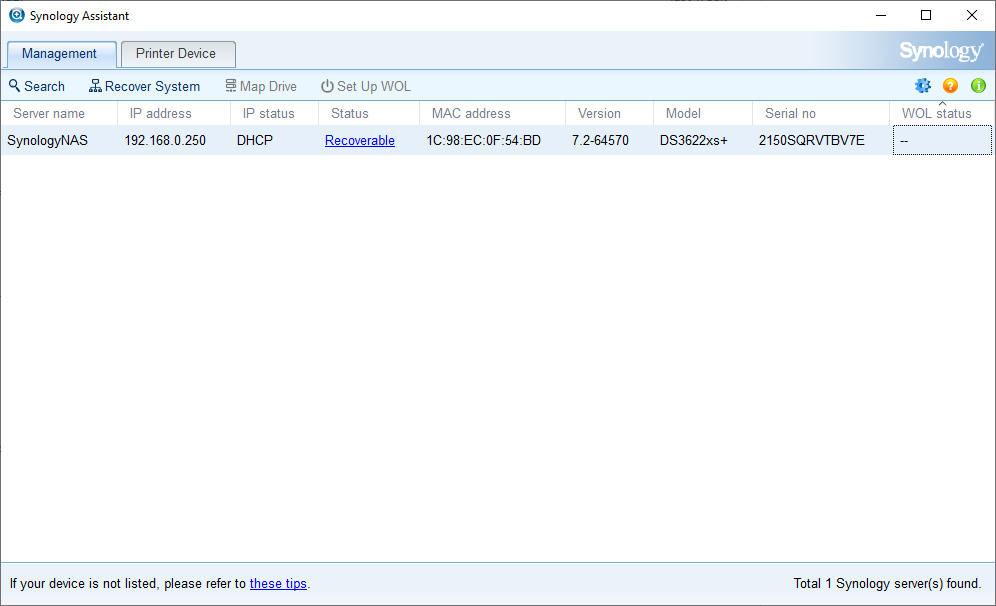
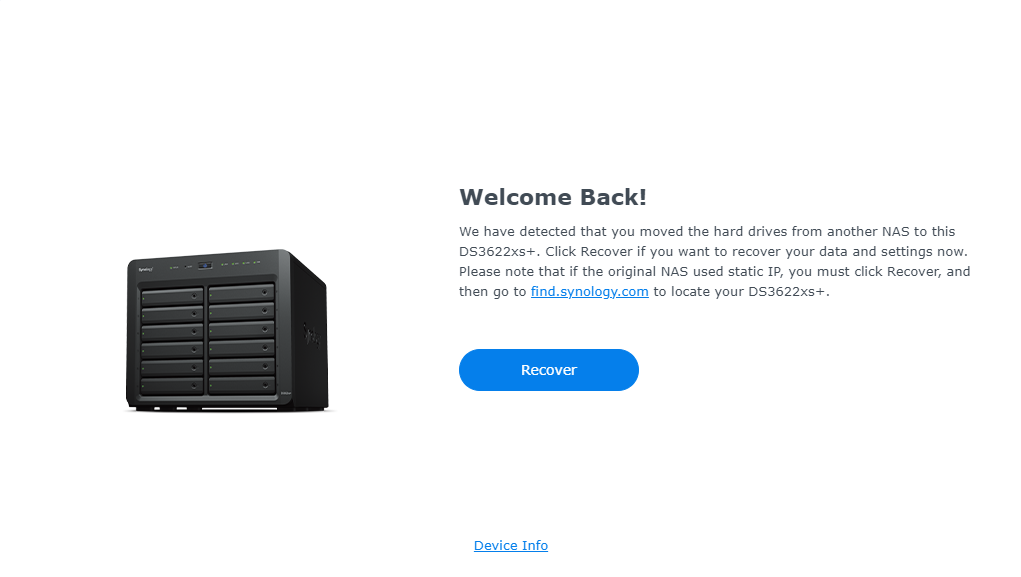
 Hi guys, I have XPEnology installed on a baremetal Gen8 Microserver. Until yesterday I had a stable running DS3622xs+ with DSM 7.1.1-42962. Decided to upgrade to 7.2.0-64570 and at the same time to add the 5th SATA port on the motherboard to the satamap in order to use it for the Survaillance station. Built the loader pretty easily following this Tutorial: Install/Migrate to DSM 7.x with TinyCore RedPill (TCRP) Loader Restarted, bootloader worked, Synology Assistent found the DS, I connected to it and installed DSM 7.2.0-64570 manually from the file I've downloaded from Synology download section beforehand. Restarted again and... the problem. The DS is found but only in Recoverable status. When I chose to Recover it starts installing DSM for a second or two, than restarts and 10 mins later - Something went wrong Then connecting to the DS again just to find it in Recoverable status again. Obviously something's wrong but I can't figure it out myself. Am I missing something in the bootloader? Or else? Can anybody help to identify and resolve the issue? Here's the log of bootloader building process: login as: tc tc@192.168.0.250's password: ( '>') /) TC (\ Core is distributed with ABSOLUTELY NO WARRANTY. (/-_--_-\) www.tinycorelinux.net tc@box:~$ ./rploader.sh update Checking Internet Access -> OK Checking if a newer version exists on the main repo -> Version is current tc@box:~$ ./rploader.sh fullupgrade Performing a full TCRP upgrade Cloning into 'tinycore-redpill'... remote: Enumerating objects: 1178, done. remote: Counting objects: 100% (1178/1178), done. remote: Compressing objects: 100% (956/956), done. remote: Total 1178 (delta 239), reused 1094 (delta 201), pack-reused 0 Receiving objects: 100% (1178/1178), 18.29 MiB | 16.98 MiB/s, done. Resolving deltas: 100% (239/239), done. Please make sure you are using the latest 1GB img before using backup option Current /home/tc size is 49M , try to keep it less than 1GB as it might not fit into your image Should i update the sdf with your current files [Yy/Nn] y Backing up home files to sdf : Backing up files to /mnt/sdf3//mydata.tgz Done. tc@box:~$ ./rploader.sh identifyusb Found Generic Ultra SerialNumber: 000002660A01 Vendor ID : 0x0424 Product ID : 0x4030 Should i update the user_config.json with these values ? [Yy/Nn] y tc@box:~$ ./rploader.sh serialgen DS3622xs+ realmac Serial Number for Model = 2150SQRMXKZ5W Mac Address for Model DS3622xs+ = 00:11:32:39:74:BD Real Mac Address : 00:11:32:08:29:70 Notice : realmac option is requested, real mac will be used Should i update the user_config.json with these values ? [Yy/Nn] y tc@box:~$ ./rploader.sh satamap Found "00:1f.2 Intel Corporation 6 Series/C200 Series Chipset Family SATA AHCI Controller (rev 05)" Detected 6 ports/5 drives. Override # of ports or ENTER to accept <6> 5 Computed settings: SataPortMap=5 DiskIdxMap=00 Should i update the user_config.json with these values ? [Yy/Nn] y Done. tc@box:~$ cat user_config.json { "general": { "model": "DS3622xs+", "version": "7.1.1-42962", "smallfixnumber": "0", "zimghash": "", "rdhash": "", "usb_line": "", "sata_line": "", "redpillmake": "prod", "friendautoupd": "true", "staticboot": "false", "hidesensitive": "false" }, "ipsettings": { "ipset": "", "ipaddr": "", "ipgw": "", "ipdns": "", "ipproxy": "" }, "extra_cmdline": { "pid": "0x4030", "vid": "0x0424", "sn": "2150SQRMXKZ5W", "mac1": "001132082970", "netif_num": "1", "SataPortMap": "5", "DiskIdxMap": "00" }, "synoinfo": { "internalportcfg": "0xffff", "maxdisks": "16", "support_bde_internal_10g": "no", "support_disk_compatibility": "no", "support_memory_compatibility": "no", "maxlanport": "8", "netif_seq": "0 1 2 3 4 5 6 7" }, "ramdisk_copy": {} } tc@box:~$ vi user_config.json tc@box:~$ cat user_config.json { "general": { "model": "DS3622xs+", "version": "7.2.0-64570", "smallfixnumber": "0", "zimghash": "", "rdhash": "", "usb_line": "", "sata_line": "", "redpillmake": "prod", "friendautoupd": "true", "staticboot": "false", "hidesensitive": "false" }, "ipsettings": { "ipset": "", "ipaddr": "", "ipgw": "", "ipdns": "", "ipproxy": "" }, "extra_cmdline": { "pid": "0x4030", "vid": "0x0424", "sn": "2150SQRMXKZ5W", "mac1": "001132082970", "netif_num": "1", "SataPortMap": "5", "DiskIdxMap": "00" }, "synoinfo": { "internalportcfg": "0xffff", "maxdisks": "16", "support_bde_internal_10g": "no", "support_disk_compatibility": "no", "support_memory_compatibility": "no", "maxlanport": "8", "netif_seq": "0 1 2 3 4 5 6 7" }, "ramdisk_copy": {} } tc@box:~$ ./rploader.sh build ds3622xsp-7.2.0-64570 bspatch does not exist, bringing over from repo % Total % Received % Xferd Average Speed Time Time Time Current Dload Upload Total Spent Left Speed 100 10232 100 10232 0 0 100k 0 --:--:-- --:--:-- --:--:-- 100k Rploader Version : 0.9.4.9 Loader source : https://github.com/pocopico/redpill-load.git Loader Branch : develop Redpill module source : https://github.com/pocopico/redpill-lkm.git : Redpill module branch : master Extensions : all-modules eudev disks misc Extensions URL : "https://github.com/pocopico/tcrp-addons/raw/main/all-modules/rpext-index.json", "https://github.com/pocopico/tcrp-addons/raw/main/eudev/rpext-index.json", "https://github.com/pocopico/tcrp-addons/raw/main/disks/rpext-index.json", "https://github.com/pocopico/tcrp-addons/raw/main/misc/rpext-index.json" TOOLKIT_URL : https://sourceforge.net/projects/dsgpl/files/toolkit/DSM7.0/ds.bromolow-7.0.dev.txz/download TOOLKIT_SHA : a5fbc3019ae8787988c2e64191549bfc665a5a9a4cdddb5ee44c10a48ff96cdd SYNOKERNEL_URL : https://sourceforge.net/projects/dsgpl/files/Synology%20NAS%20GPL%20Source/25426branch/bromolow-source/linux-3.10.x.txz/download SYNOKERNEL_SHA : 18aecead760526d652a731121d5b8eae5d6e45087efede0da057413af0b489ed COMPILE_METHOD : toolkit_dev TARGET_PLATFORM : ds3622xsp TARGET_VERSION : 7.2.0 TARGET_REVISION : 64570 REDPILL_LKM_MAKE_TARGET : dev-v7 KERNEL_MAJOR : 4 MODULE_ALIAS_FILE : modules.alias.4.json SYNOMODEL : ds3622xsp_64570 MODEL : DS3622xs+ Local Cache Folder : /mnt/sdf3/auxfiles DATE Internet : 28062023 Local : 28062023 Checking Internet Access -> OK Checking if a newer version exists on the main repo -> Version is current Cloning into 'redpill-lkm'... remote: Enumerating objects: 1715, done. remote: Counting objects: 100% (483/483), done. remote: Compressing objects: 100% (94/94), done. remote: Total 1715 (delta 415), reused 401 (delta 389), pack-reused 1232 Receiving objects: 100% (1715/1715), 5.84 MiB | 5.98 MiB/s, done. Resolving deltas: 100% (1049/1049), done. Cloning into 'redpill-load'... remote: Enumerating objects: 5098, done. remote: Counting objects: 100% (1929/1929), done. remote: Compressing objects: 100% (912/912), done. remote: Total 5098 (delta 1031), reused 1891 (delta 999), pack-reused 3169 Receiving objects: 100% (5098/5098), 125.93 MiB | 9.28 MiB/s, done. Resolving deltas: 100% (2582/2582), done. No extra build option or static specified, using default <static> Using static compiled redpill extension Removing any old redpill.ko modules Looking for redpill for : ds3622xsp_64570 Getting file https://raw.githubusercontent.com/pocopico/rp-ext/master/redpillprod/releases/redpill-broadwellnk-4.4.302.tgz Extracting module Getting file https://raw.githubusercontent.com/pocopico/rp-ext/master/redpillprod/src/check-redpill.sh Got redpill-linux-v4.4.302+.ko Starting loader creation Found tinycore cache folder, linking to home/tc/custom-module Checking user_config.json : Done Entering redpill-load directory Removing bundled exts directories Cache directory OK Found build request for revision greater than 42218 Downloading extractor v2 % Total % Received % Xferd Average Speed Time Time Time Current Dload Upload Total Spent Left Speed 100 389M 100 389M 0 0 106M 0 0:00:03 0:00:03 --:--:-- 106M OK old pat downloaded !!! Creating temp folder /tmp/pat Checking for cached pat file Found tinycore cache folder, linking to home/tc/custom-module Could not find pat file locally cached Configdir : /home/tc/redpill-load/config/DS3622xs+/7.2.0-64570 Configfile: /home/tc/redpill-load/config/DS3622xs+/7.2.0-64570/config.json Pat URL : https://global.download.synology.com/download/DSM/release/7.2/64570-1/DSM_DS3622xs%2B_64570.pat Downloading pat file from URL : https://global.download.synology.com/download/DSM/release/7.2/64570-1/DSM_DS3622xs%2B_64570.pat % Total % Received % Xferd Average Speed Time Time Time Current Dload Upload Total Spent Left Speed 100 390M 100 390M 0 0 94.6M 0 0:00:04 0:00:04 --:--:-- 94.6M File //mnt/sdf3/auxfiles/ds3622xsp_64570.pat, is encrypted File //mnt/sdf3/auxfiles/ds3622xsp_64570.pat, has been cached but its encrypted, re-running decrypting process Checking for cached pat file Found tinycore cache folder, linking to home/tc/custom-module Found locally cached pat file /home/tc/custom-module/ds3622xsp_64570.pat File /home/tc/custom-module/ds3622xsp_64570.pat, is encrypted Extracting encrypted pat file : /home/tc/custom-module/ds3622xsp_64570.pat to /tmp/pat option -f with value `/home/tc/custom-module/ds3622xsp_64570.pat' option -C with value `/tmp/pat' 0 Creating unecrypted pat file ds3622xsp_64570.pat to /home/tc/redpill-load/cache folder VERSION Pat file sha256sum is : 7bdf581843d5553ffdc2f9681257a3ca8f6cddc8d90364646a909fff626cd634 Checking config file existence -> OK Editing config file -> Verifying config file -> OK ! Clearing temp folders Processing add_extensions entries found on /home/tc/custom_config.json file : all-modules eudev disks misc Adding extension "https://github.com/pocopico/tcrp-addons/raw/main/all-modules/rpext-index.json", [#] Checking runtime for required tools... [OK] [#] Adding new extension from https://github.com/pocopico/tcrp-addons/raw/main/all-modules/rpext-index.json... [#] Downloading remote file https://github.com/pocopico/tcrp-addons/raw/main/all-modules/rpext-index.json to /home/tc/redpill-load/custom/extensions/_new_ext_index.tmp_json ######################################################################### 100.0% [OK] [#] ========================================== all-modules ========================================== [#] Extension name: all-modules [#] Description: Adds All modules Support [#] To get help visit: <todo> [#] Extension preparer/packer: https://github.com/pocopico/tcrp-addons/tree/main/all-modules [#] Software author: https://github.com/pocopico [#] Update URL: https://raw.githubusercontent.com/pocopico/tcrp-addons/main/all-modules/rpext-index.json [#] Platforms supported: ds1621p_42218 ds920p_64570 dva3221_42661 ds3615xs_64570 ds3617xs_42218 dva3221_64570 ds920p_42661 fs6400_42661 dva3221_42962 ds1019p_42218 ds918p_42661 fs6400_42218 ds3622xsp_42962 rs3618xs_42962 dva1622_42218 ds920p_42962 ds1621p_42661 ds923p_42962 ds923p_64570 ds3617xs_64570 ds3622xsp_64570 dva3221_42218 ds1621xsp_42661 ds3615xs_42661 fs6400_64570 rs3618xs_64570 ds3622xsp_42661 ds723p_42661 ds2422p_42661 sa6400_42661 ds3622xsp_42218 rs3413xsp_42661 ds723p_42962 ds2422p_42962 fs6400_42962 fs2500_64570 ds1621xsp_64570 dva1622_42962 rs3413xsp_42218 ds1520p_64570 sa6400_42962 ds2422p_42218 fs2500_42962 rs4021xsp_42962 zendofmodel ds3615xs_42962 ds3617xs_42962 ds1621p_64570 rs3618xs_42218 fs2500_42661 sa6400_64570 ds1520p_42218 rs4021xsp_42218 ds723p_42218 dva3219_42962 dva3219_42218 rs4021xsp_64570 ds723p_64570 ds3617xs_42661 ds1621xsp_42962 ds920p_42218 ds918p_42962 rs3618xs_42661 dva1622_42661 ds1520p_42962 ds918p_42218 ds1019p_42962 ds923p_42661 dva3219_42661 ds1621xsp_42218 ds2422p_64570 ds923p_42218 ds918p_64570 dva1622_64570 rs3413xsp_42962 rs3413xsp_64570 ds1019p_64570 ds3615xs_42218 ds1621p_42962 sa6400_42218 dva3219_64570 ds1520p_42661 rs4021xsp_42661 ds1019p_42661 fs2500_42218 [#] ======================================================================================= Adding extension "https://github.com/pocopico/tcrp-addons/raw/main/eudev/rpext-index.json", [#] Checking runtime for required tools... [OK] [#] Adding new extension from https://github.com/pocopico/tcrp-addons/raw/main/eudev/rpext-index.json... [#] Downloading remote file https://github.com/pocopico/tcrp-addons/raw/main/eudev/rpext-index.json to /home/tc/redpill-load/custom/extensions/_new_ext_index.tmp_json ######################################################################### 100.0% [OK] [#] ========================================== eudev ========================================== [#] Extension name: Eudev binaries [#] Description: Eudev binaries will assist with auto module loading [#] To get help visit: https://github.com/pocopico/tcrp-addons/main/eudev/ [#] Extension preparer/packer: https://github.com/pocopico/tcrp-addons/main/eudev/ [#] Software author: https://github.com/pocopico/tcrp-addons/main/eudev/ [#] Update URL: https://raw.githubusercontent.com/pocopico/tcrp-addons/main/eudev/rpext-index.json [#] Platforms supported: ds1621p_42218 ds920p_64570 dva3221_42661 ds3615xs_64570 ds3617xs_42218 dva3221_64570 ds920p_42661 fs6400_42661 dva3221_42962 ds1019p_42218 ds918p_42661 fs6400_42218 ds3622xsp_42962 rs3618xs_42962 dva1622_42218 ds920p_42962 ds1621p_42661 ds923p_42962 ds923p_64570 ds3617xs_64570 ds3622xsp_64570 dva3221_42218 ds1621xsp_42661 ds3615xs_42661 fs6400_64570 rs3618xs_64570 ds3622xsp_42661 ds723p_42661 ds2422p_42661 sa6400_42661 ds3622xsp_42218 rs3413xsp_42661 ds723p_42962 ds2422p_42962 fs6400_42962 fs2500_64570 ds1621xsp_64570 dva1622_42962 rs3413xsp_42218 ds1520p_64570 sa6400_42962 ds2422p_42218 fs2500_42962 rs4021xsp_42962 zendofmodel ds3615xs_42962 ds3617xs_42962 ds1621p_64570 rs3618xs_42218 fs2500_42661 sa6400_64570 ds1520p_42218 rs4021xsp_42218 ds723p_42218 dva3219_42962 dva3219_42218 rs4021xsp_64570 ds723p_64570 ds3617xs_42661 ds1621xsp_42962 ds920p_42218 ds918p_42962 rs3618xs_42661 dva1622_42661 ds1520p_42962 ds918p_42218 ds1019p_42962 ds923p_42661 dva3219_42661 ds1621xsp_42218 ds2422p_64570 ds923p_42218 ds918p_64570 dva1622_64570 rs3413xsp_42962 rs3413xsp_64570 ds1019p_64570 ds3615xs_42218 ds1621p_42962 sa6400_42218 dva3219_64570 ds1520p_42661 rs4021xsp_42661 ds1019p_42661 fs2500_42218 [#] ======================================================================================= Adding extension "https://github.com/pocopico/tcrp-addons/raw/main/disks/rpext-index.json", [#] Checking runtime for required tools... [OK] [#] Adding new extension from https://github.com/pocopico/tcrp-addons/raw/main/disks/rpext-index.json... [#] Downloading remote file https://github.com/pocopico/tcrp-addons/raw/main/disks/rpext-index.json to /home/tc/redpill-load/custom/extensions/_new_ext_index.tmp_json ######################################################################### 100.0% [OK] [#] ========================================== disks ========================================== [#] Extension name: Disks [#] Description: All in one solution for disk issues [#] To get help visit: https://github.com/pocopico/tcrp-addons/main/disks/ [#] Extension preparer/packer: https://github.com/pocopico/tcrp-addons/main/disks/ [#] Software author: https://github.com/pocopico/tcrp-addons/main/disks/ [#] Update URL: https://raw.githubusercontent.com/pocopico/tcrp-addons/main/disks/rpext-index.json [#] Platforms supported: ds1621p_42218 ds920p_64570 dva3221_42661 ds3615xs_64570 ds3617xs_42218 dva3221_64570 ds920p_42661 fs6400_42661 dva3221_42962 ds1019p_42218 ds918p_42661 fs6400_42218 ds3622xsp_42962 rs3618xs_42962 dva1622_42218 ds920p_42962 ds1621p_42661 ds923p_42962 ds923p_64570 ds3617xs_64570 ds3622xsp_64570 dva3221_42218 ds1621xsp_42661 ds3615xs_42661 fs6400_64570 rs3618xs_64570 ds3622xsp_42661 ds723p_42661 ds2422p_42661 sa6400_42661 ds3622xsp_42218 rs3413xsp_42661 ds723p_42962 ds2422p_42962 fs6400_42962 fs2500_64570 ds1621xsp_64570 dva1622_42962 rs3413xsp_42218 ds1520p_64570 sa6400_42962 ds2422p_42218 fs2500_42962 rs4021xsp_42962 zendofmodel ds3615xs_42962 ds3617xs_42962 ds1621p_64570 rs3618xs_42218 fs2500_42661 sa6400_64570 ds1520p_42218 rs4021xsp_42218 ds723p_42218 dva3219_42962 dva3219_42218 rs4021xsp_64570 ds723p_64570 ds3617xs_42661 ds1621xsp_42962 ds920p_42218 ds918p_42962 rs3618xs_42661 dva1622_42661 ds1520p_42962 ds918p_42218 ds1019p_42962 ds923p_42661 dva3219_42661 ds1621xsp_42218 ds2422p_64570 ds923p_42218 ds918p_64570 dva1622_64570 rs3413xsp_42962 rs3413xsp_64570 ds1019p_64570 ds3615xs_42218 ds1621p_42962 sa6400_42218 dva3219_64570 ds1520p_42661 rs4021xsp_42661 ds1019p_42661 fs2500_42218 [#] ======================================================================================= Adding extension "https://github.com/pocopico/tcrp-addons/raw/main/misc/rpext-index.json" [#] Checking runtime for required tools... [OK] [#] Adding new extension from https://github.com/pocopico/tcrp-addons/raw/main/misc/rpext-index.json... [#] Downloading remote file https://github.com/pocopico/tcrp-addons/raw/main/misc/rpext-index.json to /home/tc/redpill-load/custom/extensions/_new_ext_index.tmp_json ######################################################################### 100.0% [OK] [#] ========================================== misc ========================================== [#] Extension name: Misc shell [#] Description: Misc shell [#] To get help visit: https://raw.githubusercontent.com/pocopico/tcrp-addons/main/misc [#] Extension preparer/packer: https://raw.githubusercontent.com/pocopico/tcrp-addons/main/misc [#] Software author: https://raw.githubusercontent.com/pocopico/tcrp-addons/main/misc [#] Update URL: https://raw.githubusercontent.com/pocopico/tcrp-addons/main/misc/rpext-index.json [#] Platforms supported: ds1621p_42218 ds920p_64570 dva3221_42661 ds3615xs_64570 ds3617xs_42218 dva3221_64570 ds920p_42661 fs6400_42661 dva3221_42962 ds1019p_42218 ds918p_42661 fs6400_42218 ds3622xsp_42962 rs3618xs_42962 dva1622_42218 ds920p_42962 ds1621p_42661 ds923p_42962 ds923p_64570 ds3617xs_64570 ds3622xsp_64570 dva3221_42218 ds1621xsp_42661 ds3615xs_42661 fs6400_64570 rs3618xs_64570 ds3622xsp_42661 ds723p_42661 ds2422p_42661 sa6400_42661 ds3622xsp_42218 rs3413xsp_42661 ds723p_42962 ds2422p_42962 fs6400_42962 fs2500_64570 ds1621xsp_64570 dva1622_42962 rs3413xsp_42218 ds1520p_64570 sa6400_42962 ds2422p_42218 fs2500_42962 rs4021xsp_42962 zendofmodel ds3615xs_42962 ds3617xs_42962 ds1621p_64570 rs3618xs_42218 fs2500_42661 sa6400_64570 ds1520p_42218 rs4021xsp_42218 ds723p_42218 dva3219_42962 dva3219_42218 rs4021xsp_64570 ds723p_64570 ds3617xs_42661 ds1621xsp_42962 ds920p_42218 ds918p_42962 rs3618xs_42661 dva1622_42661 ds1520p_42962 ds918p_42218 ds1019p_42962 ds923p_42661 dva3219_42661 ds1621xsp_42218 ds2422p_64570 ds923p_42218 ds918p_64570 dva1622_64570 rs3413xsp_42962 rs3413xsp_64570 ds1019p_64570 ds3615xs_42218 ds1621p_42962 sa6400_42218 dva3219_64570 ds1520p_42661 rs4021xsp_42661 ds1019p_42661 fs2500_42218 [#] ======================================================================================= Updating extension : all-modules contents for model : ds3622xsp_64570 [#] Checking runtime for required tools... [OK] [#] Updating ds3622xsp_64570 platforms extensions... [#] Downloading remote file https://raw.githubusercontent.com/pocopico/tcrp-addons/main/all-modules/releases/broadwellnk.json to /home/tc/redpill-load/custom/extensions/_ext_new_rcp.tmp_json ######################################################################### 100.0% [#] Filling-in newly downloaded recipe for extension all-modules platform ds3622xsp_64570 [#] Downloading remote file https://github.com/pocopico/redpill-modules/releases/latest/download/broadwellnk-4.4.180.tgz to /home/tc/redpill-load/custom/extensions/all-modules/ds3622xsp_64570/broadwellnk-4.4.180.tgz ######################################################################### 100.0% [#] Verifying /home/tc/redpill-load/custom/extensions/all-modules/ds3622xsp_64570/broadwellnk-4.4.180.tgz file... [OK] [#] Downloading remote file https://github.com/pocopico/redpill-modules/releases/latest/download/broadwellnk-4.4.302.tgz to /home/tc/redpill-load/custom/extensions/all-modules/ds3622xsp_64570/broadwellnk-4.4.302.tgz ######################################################################### 100.0% [#] Verifying /home/tc/redpill-load/custom/extensions/all-modules/ds3622xsp_64570/broadwellnk-4.4.302.tgz file... [OK] [#] Downloading remote file https://github.com/pocopico/redpill-modules/releases/latest/download/firmware.tgz to /home/tc/redpill-load/custom/extensions/all-modules/ds3622xsp_64570/firmware.tgz ######################################################################### 100.0% [#] Verifying /home/tc/redpill-load/custom/extensions/all-modules/ds3622xsp_64570/firmware.tgz file... [OK] [#] Downloading remote file https://raw.githubusercontent.com/pocopico/tcrp-addons/main/all-modules/src/install.sh to /home/tc/redpill-load/custom/extensions/all-modules/ds3622xsp_64570/install.sh ######################################################################### 100.0% [#] Verifying /home/tc/redpill-load/custom/extensions/all-modules/ds3622xsp_64570/install.sh file... [OK] [#] Downloading remote file https://raw.githubusercontent.com/pocopico/tcrp-addons/main/all-modules/auxfiles/kmod to /home/tc/redpill-load/custom/extensions/all-modules/ds3622xsp_64570/kmod ######################################################################### 100.0% [#] Verifying /home/tc/redpill-load/custom/extensions/all-modules/ds3622xsp_64570/kmod file... [OK] [#] Successfully processed recipe for extension all-modules platform ds3622xsp_64570 [#] Verifying /home/tc/redpill-load/custom/extensions/all-modules/ds3622xsp_64570/kmod file... [OK] Updating extension : eudev contents for model : ds3622xsp_64570 [#] Checking runtime for required tools... [OK] [#] Updating ds3622xsp_64570 platforms extensions... [#] Downloading remote file https://raw.githubusercontent.com/pocopico/tcrp-addons/main/eudev/recipes/universal.json to /home/tc/redpill-load/custom/extensions/_ext_new_rcp.tmp_json ######################################################################### 100.0% [#] Filling-in newly downloaded recipe for extension eudev platform ds3622xsp_64570 [#] Downloading remote file https://raw.githubusercontent.com/pocopico/tcrp-addons/master/eudev/releases/eudev-6.2.tgz to /home/tc/redpill-load/custom/extensions/eudev/ds3622xsp_64570/eudev-6.2.tgz ######################################################################### 100.0% [#] Verifying /home/tc/redpill-load/custom/extensions/eudev/ds3622xsp_64570/eudev-6.2.tgz file... [OK] [#] Downloading remote file https://raw.githubusercontent.com/pocopico/tcrp-addons/master/eudev/releases/eudev-7.1.tgz to /home/tc/redpill-load/custom/extensions/eudev/ds3622xsp_64570/eudev-7.1.tgz ######################################################################### 100.0% [#] Verifying /home/tc/redpill-load/custom/extensions/eudev/ds3622xsp_64570/eudev-7.1.tgz file... [OK] [#] Downloading remote file https://raw.githubusercontent.com/pocopico/tcrp-addons/master/eudev/releases/eudev-7.2.tgz to /home/tc/redpill-load/custom/extensions/eudev/ds3622xsp_64570/eudev-7.2.tgz ######################################################################### 100.0% [#] Verifying /home/tc/redpill-load/custom/extensions/eudev/ds3622xsp_64570/eudev-7.2.tgz file... [OK] [#] Downloading remote file https://raw.githubusercontent.com/pocopico/tcrp-addons/master/eudev/releases/install.sh to /home/tc/redpill-load/custom/extensions/eudev/ds3622xsp_64570/install.sh ######################################################################### 100.0% [#] Verifying /home/tc/redpill-load/custom/extensions/eudev/ds3622xsp_64570/install.sh file... [OK] [#] Successfully processed recipe for extension eudev platform ds3622xsp_64570 [#] Verifying /home/tc/redpill-load/custom/extensions/eudev/ds3622xsp_64570/install.sh file... [OK] Updating extension : disks contents for model : ds3622xsp_64570 [#] Checking runtime for required tools... [OK] [#] Updating ds3622xsp_64570 platforms extensions... [#] Downloading remote file https://raw.githubusercontent.com/pocopico/tcrp-addons/main/disks/recipes/universal.json to /home/tc/redpill-load/custom/extensions/_ext_new_rcp.tmp_json ######################################################################### 100.0% [#] Filling-in newly downloaded recipe for extension disks platform ds3622xsp_64570 [#] Downloading remote file https://raw.githubusercontent.com/pocopico/tcrp-addons/main/disks/releases/dtc to /home/tc/redpill-load/custom/extensions/disks/ds3622xsp_64570/dtc ######################################################################### 100.0% [#] Verifying /home/tc/redpill-load/custom/extensions/disks/ds3622xsp_64570/dtc file... [OK] [#] Downloading remote file https://raw.githubusercontent.com/pocopico/tcrp-addons/main/disks/releases/install.sh to /home/tc/redpill-load/custom/extensions/disks/ds3622xsp_64570/install.sh ######################################################################### 100.0% [#] Verifying /home/tc/redpill-load/custom/extensions/disks/ds3622xsp_64570/install.sh file... [OK] [#] Downloading remote file https://raw.githubusercontent.com/pocopico/tcrp-addons/main/disks/releases/readlink to /home/tc/redpill-load/custom/extensions/disks/ds3622xsp_64570/readlink ######################################################################### 100.0% [#] Verifying /home/tc/redpill-load/custom/extensions/disks/ds3622xsp_64570/readlink file... [OK] [#] Downloading remote file https://raw.githubusercontent.com/pocopico/tcrp-addons/main/disks/releases/sed to /home/tc/redpill-load/custom/extensions/disks/ds3622xsp_64570/sed ######################################################################### 100.0% [#] Verifying /home/tc/redpill-load/custom/extensions/disks/ds3622xsp_64570/sed file... [OK] [#] Successfully processed recipe for extension disks platform ds3622xsp_64570 [#] Verifying /home/tc/redpill-load/custom/extensions/disks/ds3622xsp_64570/sed file... [OK] Updating extension : misc contents for model : ds3622xsp_64570 [#] Checking runtime for required tools... [OK] [#] Updating ds3622xsp_64570 platforms extensions... [#] Downloading remote file https://raw.githubusercontent.com/pocopico/tcrp-addons/main/misc/recipes/universal.json to /home/tc/redpill-load/custom/extensions/_ext_new_rcp.tmp_json ######################################################################### 100.0% [#] Filling-in newly downloaded recipe for extension misc platform ds3622xsp_64570 [#] Downloading remote file https://raw.githubusercontent.com/pocopico/tcrp-addons/master/misc/releases/install-all.sh to /home/tc/redpill-load/custom/extensions/misc/ds3622xsp_64570/install-all.sh ######################################################################### 100.0% [#] Verifying /home/tc/redpill-load/custom/extensions/misc/ds3622xsp_64570/install-all.sh file... [OK] [#] Downloading remote file https://raw.githubusercontent.com/pocopico/tcrp-addons/master/misc/releases/ttyd.tar.gz to /home/tc/redpill-load/custom/extensions/misc/ds3622xsp_64570/ttyd.tar.gz ######################################################################### 100.0% [#] Verifying /home/tc/redpill-load/custom/extensions/misc/ds3622xsp_64570/ttyd.tar.gz file... [OK] [#] Unpacking files from /home/tc/redpill-load/custom/extensions/misc/ds3622xsp_64570/ttyd.tar.gz to /home/tc/redpill-load/custom/extensions/misc/ds3622xsp_64570/... [OK] [#] Downloading remote file https://raw.githubusercontent.com/pocopico/tcrp-addons/master/misc/releases/sed to /home/tc/redpill-load/custom/extensions/misc/ds3622xsp_64570/sed ######################################################################### 100.0% [#] Verifying /home/tc/redpill-load/custom/extensions/misc/ds3622xsp_64570/sed file... [OK] [#] Downloading remote file https://raw.githubusercontent.com/pocopico/tcrp-addons/master/misc/releases/install_rd.sh to /home/tc/redpill-load/custom/extensions/misc/ds3622xsp_64570/install_rd.sh ######################################################################### 100.0% [#] Verifying /home/tc/redpill-load/custom/extensions/misc/ds3622xsp_64570/install_rd.sh file... [OK] [#] Downloading remote file https://raw.githubusercontent.com/pocopico/tcrp-addons/master/misc/releases/lrzsz.tar.gz to /home/tc/redpill-load/custom/extensions/misc/ds3622xsp_64570/lrzsz.tar.gz ######################################################################### 100.0% [#] Verifying /home/tc/redpill-load/custom/extensions/misc/ds3622xsp_64570/lrzsz.tar.gz file... [OK] [#] Unpacking files from /home/tc/redpill-load/custom/extensions/misc/ds3622xsp_64570/lrzsz.tar.gz to /home/tc/redpill-load/custom/extensions/misc/ds3622xsp_64570/... [OK] [#] Downloading remote file https://raw.githubusercontent.com/pocopico/tcrp-addons/master/misc/releases/pciids to /home/tc/redpill-load/custom/extensions/misc/ds3622xsp_64570/pciids ######################################################################### 100.0% [#] Verifying /home/tc/redpill-load/custom/extensions/misc/ds3622xsp_64570/pciids file... [OK] [#] Successfully processed recipe for extension misc platform ds3622xsp_64570 [#] Verifying /home/tc/redpill-load/custom/extensions/misc/ds3622xsp_64570/pciids file... [OK] [#] Checking runtime for required tools... [OK] [#] Updating extensions... [#] Checking runtime for required tools... [OK] [#] Adding new extension from https://github.com/pocopico/tcrp-addons/raw/main/boot-wait/rpext-index.json... [#] Downloading remote file https://github.com/pocopico/tcrp-addons/raw/main/boot-wait/rpext-index.json to /home/tc/redpill-load/custom/extensions/_new_ext_index.tmp_json ######################################################################### 100.0% [OK] [#] ========================================== boot-wait ========================================== [#] Extension name: RedPill Bootwait [#] Description: Simple extension which stops the execution early waiting for the boot device to appear [#] To get help visit: https://github.com/RedPill-TTG/redpill-boot-wait [#] Extension preparer/packer: https://github.com/RedPill-TTG/redpill-boot-wait [#] Software author: https://github.com/pocopico/tcrp-addons/main/disks/ [#] Update URL: https://raw.githubusercontent.com/pocopico/tcrp-addons/main/boot-wait/rpext-index.json [#] Platforms supported: ds1621p_42218 ds920p_64570 dva3221_42661 ds3615xs_64570 ds3617xs_42218 dva3221_64570 ds920p_42661 fs6400_42661 dva3221_42962 ds1019p_42218 ds918p_42661 fs6400_42218 ds3622xsp_42962 rs3618xs_42962 dva1622_42218 ds920p_42962 ds1621p_42661 ds923p_42962 ds923p_64570 ds3617xs_64570 ds3622xsp_64570 dva3221_42218 ds1621xsp_42661 ds3615xs_42661 fs6400_64570 rs3618xs_64570 ds3622xsp_42661 ds723p_42661 ds2422p_42661 sa6400_42661 ds3622xsp_42218 rs3413xsp_42661 ds723p_42962 ds2422p_42962 fs6400_42962 fs2500_64570 ds1621xsp_64570 dva1622_42962 rs3413xsp_42218 ds1520p_64570 sa6400_42962 ds2422p_42218 fs2500_42962 rs4021xsp_42962 zendofmodel ds3615xs_42962 ds3617xs_42962 ds1621p_64570 rs3618xs_42218 fs2500_42661 sa6400_64570 ds1520p_42218 rs4021xsp_42218 ds723p_42218 dva3219_42962 dva3219_42218 rs4021xsp_64570 ds723p_64570 ds3617xs_42661 ds1621xsp_42962 ds920p_42218 ds918p_42962 rs3618xs_42661 dva1622_42661 ds1520p_42962 ds918p_42218 ds1019p_42962 ds923p_42661 dva3219_42661 ds1621xsp_42218 ds2422p_64570 ds923p_42218 ds918p_64570 dva1622_64570 rs3413xsp_42962 rs3413xsp_64570 ds1019p_64570 ds3615xs_42218 ds1621p_42962 sa6400_42218 dva3219_64570 ds1520p_42661 rs4021xsp_42661 ds1019p_42661 fs2500_42218 [#] ======================================================================================= [#] Checking runtime for required tools... [OK] [#] Updating all-modules extension... [#] Downloading remote file https://raw.githubusercontent.com/pocopico/tcrp-addons/main/all-modules/rpext-index.json to /home/tc/redpill-load/custom/extensions/_new_ext_index.tmp_json ######################################################################### 100.0% [#] Extension all-modules index is already up to date [#] Updating boot-wait extension... [#] Downloading remote file https://raw.githubusercontent.com/pocopico/tcrp-addons/main/boot-wait/rpext-index.json to /home/tc/redpill-load/custom/extensions/_new_ext_index.tmp_json ######################################################################### 100.0% [#] Extension boot-wait index is already up to date [#] Updating disks extension... [#] Downloading remote file https://raw.githubusercontent.com/pocopico/tcrp-addons/main/disks/rpext-index.json to /home/tc/redpill-load/custom/extensions/_new_ext_index.tmp_json ######################################################################### 100.0% [#] Extension disks index is already up to date [#] Updating eudev extension... [#] Downloading remote file https://raw.githubusercontent.com/pocopico/tcrp-addons/main/eudev/rpext-index.json to /home/tc/redpill-load/custom/extensions/_new_ext_index.tmp_json ######################################################################### 100.0% [#] Extension eudev index is already up to date [#] Updating misc extension... [#] Downloading remote file https://raw.githubusercontent.com/pocopico/tcrp-addons/main/misc/rpext-index.json to /home/tc/redpill-load/custom/extensions/_new_ext_index.tmp_json ######################################################################### 100.0% [#] Extension misc index is already up to date [#] Updating misc extension... [OK] [#] Checking runtime for required tools... [OK] [#] Updating ds3622xsp_64570 platforms extensions... [#] Downloading remote file https://raw.githubusercontent.com/pocopico/tcrp-addons/main/all-modules/releases/broadwellnk.json to /home/tc/redpill-load/custom/extensions/_ext_new_rcp.tmp_json ######################################################################### 100.0% [#] Extension all-modules for ds3622xsp_64570 platform is already up to date [#] Downloading remote file https://raw.githubusercontent.com/pocopico/tcrp-addons/main/boot-wait/recipes/universal.json to /home/tc/redpill-load/custom/extensions/_ext_new_rcp.tmp_json ######################################################################### 100.0% [#] Filling-in newly downloaded recipe for extension boot-wait platform ds3622xsp_64570 [#] Downloading remote file https://raw.githubusercontent.com/pocopico/tcrp-addons/main/boot-wait/src/boot-wait.sh to /home/tc/redpill-load/custom/extensions/boot-wait/ds3622xsp_64570/boot-wait.sh ######################################################################### 100.0% [#] Verifying /home/tc/redpill-load/custom/extensions/boot-wait/ds3622xsp_64570/boot-wait.sh file... [OK] [#] Successfully processed recipe for extension boot-wait platform ds3622xsp_64570 [#] Downloading remote file https://raw.githubusercontent.com/pocopico/tcrp-addons/main/disks/recipes/universal.json to /home/tc/redpill-load/custom/extensions/_ext_new_rcp.tmp_json ######################################################################### 100.0% [#] Extension disks for ds3622xsp_64570 platform is already up to date [#] Downloading remote file https://raw.githubusercontent.com/pocopico/tcrp-addons/main/eudev/recipes/universal.json to /home/tc/redpill-load/custom/extensions/_ext_new_rcp.tmp_json ######################################################################### 100.0% [#] Extension eudev for ds3622xsp_64570 platform is already up to date [#] Downloading remote file https://raw.githubusercontent.com/pocopico/tcrp-addons/main/misc/recipes/universal.json to /home/tc/redpill-load/custom/extensions/_ext_new_rcp.tmp_json ######################################################################### 100.0% [#] Extension misc for ds3622xsp_64570 platform is already up to date [#] Verifying /home/tc/redpill-load/custom/extensions/boot-wait/ds3622xsp_64570/boot-wait.sh file... [OK] [#] Updating extensions... [OK] [#] Verifying /home/tc/redpill-load/cache/ds3622xsp_64570.pat file... [OK] [#] Unpacking /home/tc/redpill-load/cache/ds3622xsp_64570.pat file to /home/tc/redpill-load/build/1687938332/pat-ds3622xsp_64570-unpacked... [OK] [#] Verifying /home/tc/redpill-load/build/1687938332/pat-ds3622xsp_64570-unpacked/zImage file... [OK] [#] Patching /home/tc/redpill-load/build/1687938332/pat-ds3622xsp_64570-unpacked/zImage to /home/tc/redpill-load/build/1687938332/zImage-patched... [OK] [#] Verifying /home/tc/redpill-load/build/1687938332/pat-ds3622xsp_64570-unpacked/rd.gz file... [OK] [#] Unpacking /home/tc/redpill-load/build/1687938332/pat-ds3622xsp_64570-unpacked/rd.gz file to /home/tc/redpill-load/build/1687938332/rd-ds3622xsp_64570-unpacked... [OK] [#] Apply patches to /home/tc/redpill-load/build/1687938332/rd-ds3622xsp_64570-unpacked... [OK] [#] Patching config files in ramdisk... [OK] [#] Adding OS config patching... [OK] [#] Repacking ramdisk to /home/tc/redpill-load/build/1687938332/rd-patched-ds3622xsp_64570.gz... [OK] [#] Bundling extensions... [#] Checking runtime for required tools... [OK] [#] Dumping ds3622xsp_64570 platform extensions to /home/tc/redpill-load/build/1687938332/custom-initrd/exts... [OK] [#] Packing custom ramdisk layer to /home/tc/redpill-load/build/1687938332/custom.gz... [OK] [#] Generating GRUB config... [OK] [#] Creating loader image at loader.img... [OK] [#] Cleaning up... [OK] Mounting /dev/sdf1 to localdiskp1 Mounting /dev/sdf2 to localdiskp2 Copying custom.gz to sdf3 Bringing over my friend ######################################################################### 100.0% ######################################################################### 100.0% ######################################################################### 100.0% bzImage-friend checksum OK ! initrd-friend checksum OK ! Entries in Localdisk bootloader : ======================================================================= menuentry 'RedPill DS3622xs v7.2.0-64570 (USB, Verbose)' { menuentry 'RedPill DS3622xs v7.2.0-64570 (SATA, Verbose)' { Updated user_config with USB Command Line : withefi earlyprintk syno_hw_version=DS3622xs+ console=ttyS0,115200n8 netif_num=1 pid=0x4030 earlycon=uart8250,io,0x3f8,115200n8 syno_port_thaw=1 mac1=001132082970 sn=2150SQRMXKZ5W vid=0x0424 elevator=elevator loglevel=15 HddHotplug=0 DiskIdxMap=00 syno_hdd_detect=0 vender_format_version=2 syno_hdd_powerup_seq=0 log_buf_len=32M root=/dev/md0 SataPortMap=5 Updated user_config with SATA Command Line : withefi earlyprintk syno_hw_version=DS3622xs+ console=ttyS0,115200n8 netif_num=1 pid=0x4030 earlycon=uart8250,io,0x3f8,115200n8 synoboot_satadom=1 syno_port_thaw=1 mac1=001132082970 sn=2150SQRMXKZ5W vid=0x0424 elevator=elevator loglevel=15 HddHotplug=0 DiskIdxMap=00 syno_hdd_detect=0 vender_format_version=2 syno_hdd_powerup_seq=0 log_buf_len=32M root=/dev/md0 SataPortMap=5 Generating GRUB entries for model :ds3622xsp_64570 in /home/tc Generating default grub.cfg for model generate Generated successfully Added USB entry Added SATA entry Added TCRP entry Added TCRP FRIEND entry cp: cannot create regular file '/home/tc/redpill-load/part1/boot/grub/grub.cfg': Permission denied menuentry 'RedPill DS3622xs+ 7.2.0-64570 (USB, Verbose)' { menuentry 'RedPill DS3622xs+ 7.2.0-64570 (SATA, Verbose)' { menuentry 'Tiny Core Image Build' { menuentry 'Tiny Core Friend' { Copying grub file /home/tc/grub.cfg to /home/tc/redpill-load/localdiskp1/boot/grub/grub.cfg menuentry 'RedPill DS3622xs+ 7.2.0-64570 (USB, Verbose)' { menuentry 'RedPill DS3622xs+ 7.2.0-64570 (SATA, Verbose)' { menuentry 'Tiny Core Image Build' { menuentry 'Tiny Core Friend' { Setting next grub entry Setting next grub entry to Friend : Tiny Core Friend Grub entry has been set to : Tiny Core Friend Ramdisk in not compressed 51766 blocks 42632 blocks 94396 blocks Cleaning up files Caching files for future use No adequate space on TCRP loader partition /mnt/sdf3 to cache pat file Found /mnt/sdf3/auxfiles/ds3622xsp_64570.pat file Removing older cached pat files to cache current Found /home/tc/redpill-load/cache/ds3622xsp_64570.pat, copying to cache directory : /mnt/sdf3/auxfiles Saving user session for future use. Saving current extensions -> OK ! Saving current user_config.json -> OK ! tc@box:~$ ./rploader.sh backup Please make sure you are using the latest 1GB img before using backup option Current /home/tc size is 267M , try to keep it less than 1GB as it might not fit into your image Should i update the sdf with your current files [Yy/Nn] y Backing up home files to sdf : Backing up files to /mnt/sdf3//mydata.tgz Done. tc@box:~$ ./rploader.sh backuploader Backing up current loader Checking backup folder existence The backup folder holds the following backups total 0 Creating backup folder 2023-Jun-28-07-49 Mounting partition 1 Mounting partition 2 Listing backup files : total 27348 -rwxrwxrwx 1 root root 10496913 Jun 28 07:49 partition2.tgz -rwxrwxrwx 1 root root 17505230 Jun 28 07:49 partition1.tgz Partition 1 : 623 files and directories Partition 2 : 12 files and directories DONE tc@box:~$ exitcheck.sh reboot tc@box:~$
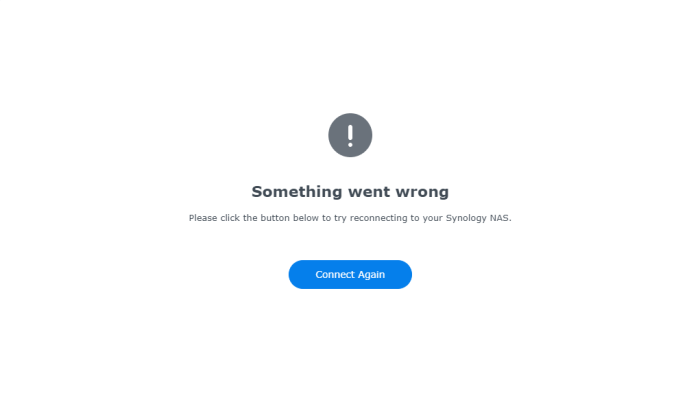
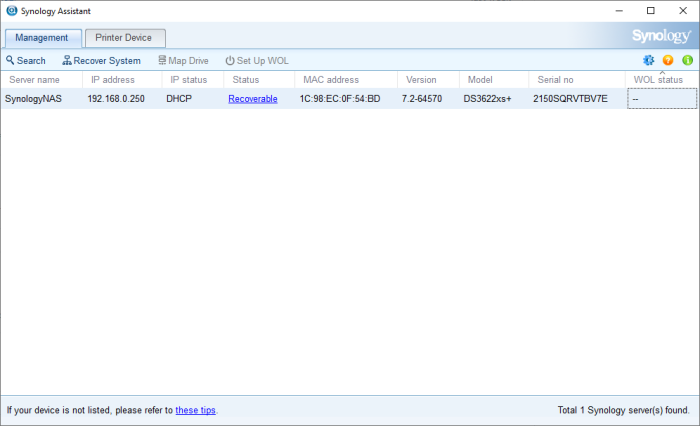
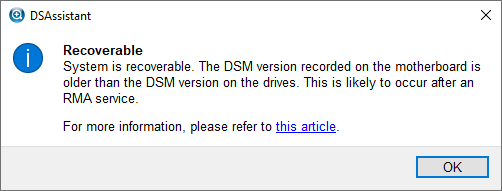
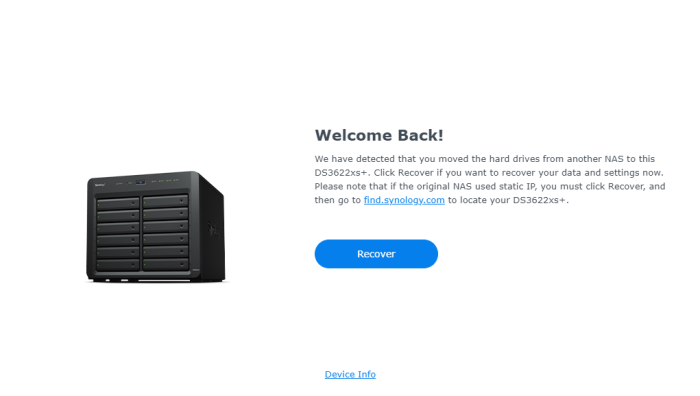
-
TinyCore RedPill Loader Build Support Tool ( M-Shell )
Peter Suh replied to Peter Suh's topic in Software Modding
Probably you are using 2 USB sticks before/after. In fact, the only items that need to be imported from the previous stick are Synology SN, SataportMap DiskIdxMap, etc. An easy way is to take good notes and then copy them down in the same way. -
 I've succeded in installing DSM 5.2 with the XPEnoboot_DS3615xs_5.2-5644.5.img back in the days and now I feel like upgrading to the latest DSM with said RedPill boot image but it's not working. People suggested using this tutorial or basically just the steps below after booting with TCRP then it fails to see 4 disks attached to a SATA card that I added to my setup when DSM 5.2 was installed without any problems if I recall it right. ./rploader.sh update now ./rploader.sh fullupgrade now ./rploader.sh serialgen DS3622xs+ ./rploader.sh serialgen DS3622xs+ realmac ./rploader.sh satamap ./rploader.sh identifyusb now ./rploader.sh backup ./rploader.sh build broadwellnk-7.1.0-42661 ./rploader.sh backuploader exitcheck.sh reboot The satamap part gives me problems, but it detects and maps the right number of disks in TCRP, 5 on my internal SATA controller and 4 on my HBA: tc@box:~$ ./rploader.sh satamap Found SCSI HBAs, We need to install the SCSI modules scsi-5.10.3-tinycore64 is already installed! Succesfully installed SCSI modules Found "00:1f.2 Intel Corporation 7 Series/C210 Series Chipset Family 6-port SATA Controller [AHCI mode] (rev 04)" Detected 6 ports/5 drives. Bad ports: 6. Override # of ports or ENTER to accept <6> Found SCSI/HBA "01:01.0 Silicon Image, Inc. SiI 3114 [SATALink/SATARaid] Serial ATA Controller (rev 02)" (4 drives) lspci: -s: Invalid slot number Found SCSI/HBA "" (0 drives) lspci: -s: Invalid slot number Found SCSI/HBA "" (0 drives) lspci: -s: Invalid bus number Found SCSI/HBA "" (0 drives) lspci: -s: Invalid slot number Found SCSI/HBA "" (0 drives) lspci: -s: Invalid slot number Found SCSI/HBA "" (0 drives) lspci: -s: Invalid slot number Found SCSI/HBA "" (0 drives) lspci: -s: Invalid slot number Found SCSI/HBA "" (0 drives) lspci: -s: Invalid slot number Found SCSI/HBA "" (0 drives) lspci: -s: Invalid slot number Found SCSI/HBA "" (0 drives) lspci: -s: Invalid slot number Found SCSI/HBA "" (0 drives) lspci: -s: Invalid slot number Found SCSI/HBA "" (0 drives) lspci: -s: Invalid slot number Found SCSI/HBA "" (0 drives) lspci: -s: Invalid slot number Found SCSI/HBA "" (0 drives) lspci: -s: Invalid slot number Found SCSI/HBA "" (0 drives) Computed settings: SataPortMap=6 DiskIdxMap=00 WARNING: Bad ports are mapped. The DSM installation will fail! Should i update the user_config.json with these values ? [Yy/Nn] y Done. I've searched here and there but didn't find anything so I contacted the RedPill developers and they said I need the sata_sil and libata modules because there is no extension for that but how do I do that and what does this mean? I guess they are kernel modules to support the hardware because the HBA is not recognised/working after installing the DSM pat-file but if someone could give me a few pointers'd be happy. My hardware is and old HP Compaq Elite 8300 chassis, I've reverted back to 5.2: And these are the disks: Thanks!
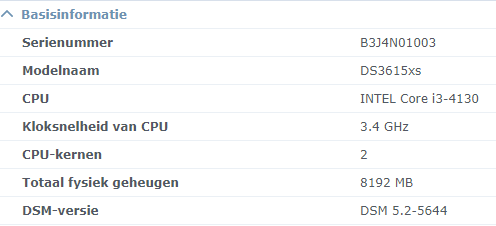
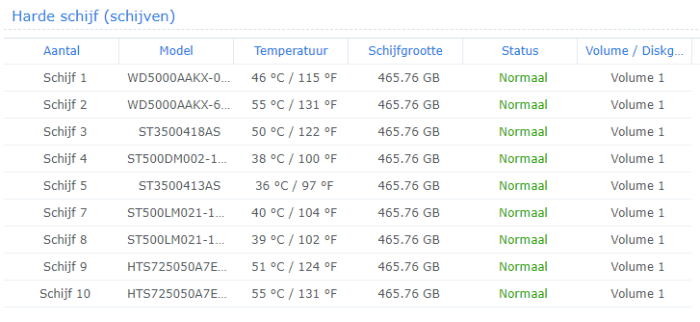
-

TinyCore RedPill Loader Build Support Tool ( M-Shell )
carlozo replied to Peter Suh's topic in Software Modding
for me doesn t work on esxi 7 u3 ds3622xs+ can t find disks i edit the user config manual sataportmap 1 and diskidxmap 0A00 sata 0 0.0 sata1 1.0 doesnt work cant find disks 3 days ago work with ds1823xs+ i start the vm and look to the user config the network cars stay the same but sataportmap and diskidxmap go back to """, look like after i made changes manual and after i build and reboot don t keep what i change -
Thanks for your reply! Tried directly again with SATA1 (0:0) and (0:1), but still no luck. Out of ideas, I deleted SATA Controller 1 and moved storage disk to SATA0 (0:1) and now I am able to install DSM. Could it be something with SataPortMap/DiskIdxMap? I don't know. My production VM has a LSI2008 attached via passtrough, but I still read about problems with mpt3sas. I think it's a good idea to stick at 7.1.1 for some time.
-
Before the DSM installation, my DSM (sataportmap=8) can't find HDD Disk because of SATAPORTMAP setting. So I want to know SATAPORTMAP values of below motherboard. * Motherboard : Intel S2600GZ (C602 Chipset), 8 HDD bays & 2 SATA 6G Ports * HDD : 2.5" SATA HDD 8ea
-
TCRP is another REDPILL loader that is the basis of ARPL. The loader and installed DSM never invade the data partition area. It is involved in the system partition. Have you completed installing DSM 7.2 U3 using ARPL? If so, if you change the loader to TCRP, the process of restoring to 7.2 U3 will appear once. After that, you will reach the top. Don't be surprised by this. This is the recommended setting for the combination of DS3622xs+ and HBA. Please set as below. Please feel free to choose the bay size. Not EUDEV , Use Only DDSML "SataPortMap": "12", "DiskIdxMap": "1000", "SasIdxMap: "0" "MaxDisks: "24"
-
Hi Guys, Today I'm trying to install a vmware Xpenology nas. The vmware server is ESXI 6.7 u3. The motherboard is supermicro x9sri-f-0. There is a 4 ports SCU controller on this board. I passthrough this controller to vm guests. I tried it in window 10 and ubuntu 20. The SCU controller shows in both system and the 4 disks could be used. While in the Xpenology NAS, the DSM installation is successful, except the SCU controller won't show. The load is Tinycore-Redpill, I downloaded the loader from https://github.com/pocopico/tinycore-redpill I followed the instruction of The diskstation is DS3622xs+ and DSM version is 7.1.1. And I think the passthrough to the Xpenology vmware is successful because if I boot to "tinycore image build", and run fdisk -l, I saw the 4 disks. And if I run "satamap", the output shows: Found "02:01.0 Vmware SATA AHCI controller" 30Ports/1 drives. Mapping SATABOOT drive after max disks. Found "02:02.0 Vmware SATA AHCI controller" 30Ports/1 drives. Default 8 virtual ports for typical system compatibility. Found SCSI/HBA" 03:00.0 Intel Corporation C602 chipset 4-Port SATA Storage Control Unit(rev 06)" (4 drives) I did try to play with SataPortMap and DiskIdxMap. But I couldn't get these disks show in DSM. Then I also ssh to the DSM and run lspci, I found a PCI passthrough device without driver. So I'm just wondering. Do I need SCU driver for DSM to get the disks show? I have to install the driver for windows 10 and ubuntu seems support it by default. How about DSM 7.1.1? Does it have the driver? BTW, I also have another two general question regarding use TCRP loader. 1. After modified user_config.json, do I need to rebuild the loader to make it take effect? I rebuilded every time. Just want to confirm it's must. 2. After rebuild the loader, do I need to reinstall DSM to make the changes take effect? I guess it shouldn't need to but I still reset the DSM and reinstall. However no luck to get the disks show. Thanks
-
 oh, I found the solution they need to edit sataportmap in loader
 -
.thumb.jpg.5487221b3b2d688ffe9cbcb810a32255.jpg)
TinyCore RedPill Loader Build Support Tool ( M-Shell )
wjz304 replied to Peter Suh's topic in Software Modding
Yes, my suggestion is to abandon SataPortMap and DiskIdxMap, If there are any issues, they can be improved by modifying internalportcfg, esatportcfg, usbportcfg, and maxdisks -

TinyCore RedPill Loader Build Support Tool ( M-Shell )
shibby replied to Peter Suh's topic in Software Modding
without it i cannot use internal ports on motherboards... for me SataPortMap=68 works correct (6x ports on motherboards, 8x ports from H310) -
TinyCore RedPill Loader Build Support Tool ( M-Shell )
wjz304 replied to Peter Suh's topic in Software Modding
The calculation of SataPortMap and DiskIdxMap should be combined with the specific information of the controller, rather than WYSIWYG. The table above calculates internalportcfg, esatportcfg, usbportcfg, and maxdisks. recommended not to set SataPortMap and DiskIdxMap -
TinyCore RedPill Loader Build Support Tool ( M-Shell )
shibby replied to Peter Suh's topic in Software Modding
@wjz304 and that is solution for my issue. It looks like DS3622xs+ has limit to 12 drives. I changed internal/esata/usbportcfg to 24 drives and now i see all my disks 1-6 - internal sata ports on motherboard 7 - empty? i dont know what is it and why is it here? 8-15 - 8 drives from H310 SataPortMap=68 DiskIdxMap=0000
-

TinyCore RedPill Loader Build Support Tool ( M-Shell )
Vodka2014 replied to Peter Suh's topic in Software Modding
Hi @shibby This is interesting. So since i have 4 Disks on the LSI 9211-4i what should I try and use ? I am using the below: "DiskIdxMap": "1000", "SataPortMap": "12", "SasIdxMap: "0", "MaxDisks: "16" -
TinyCore RedPill Loader Build Support Tool ( M-Shell )
shibby replied to Peter Suh's topic in Software Modding
I built another baremetal with H310 IT-mode (latest DS3622xs+ with Friend). When i set as you mention then i see all 8 drives connected to H310 but i also have 2 drives connected to motherboard (sata1 and 2) and those 2 drives has not been detected. In default configuration (DiskIdxMap=0, SasIdxMap=0 SataPortMap) 2 drives connected directly to motherboard are detected as bay 1 and 2 but not all drives connected to H310 are detected - it shows only 5 drives in bay 8,9,10,11,12 - it looks like channels are duplicated (channel A - 8,9,10,11 and channel B - 9,10,11,12). I tried a lot of "DiskIdxMap & SataPortMap" combinations and always some of drives has not been detected. I don`t understand "logic" of those two variables but FINALLY with: DiskIdxMap=0011 SataPortMap=24 SasIdxMap=0 MaxDisks=24 all drives has been detected - maybe not perfectly but it works!! 1-2 bay - motherboards sata 1 and 2 3 bay is empty? 4-11 bay - 8 drives connected to H310 BUT for test i connected another drive... to sata6 port on motherboard, then all H310`s drives disapper only sata1&2 has been showed. WTF... if I understand correctly SataPortMap=xyz means: - x - numer of sata port on 1st controller - y - numer of sata port on 2nd controller - z - numer of sata port on 3rd controller ... So in my example should be 68 (6 ports on internal controller and 8 ports on H310). But how to understand DiskIdxMap?? How should i set it?
-

Why my external USB drive showing as uninitialized drive instead of usb_share?
Marawan replied to Marawan's question in General Questions
I solved this problem by changing the model to DS920+ which uses device tree for drive slot mapping. Now external USB drives are treated as so and not as fixed drives, and they appear as usb_share shared folder. But this model loader has support only for SATA controller, No support for SCSI/HBA controllers which means DSM cannot see drives attached to SCSI/HBA controllers. But that was fine in my case since I use SATA only. Despite this I'm still waiting for a solution to other models using sataportmap/diskidxmap slot mapping like DS3622xs+.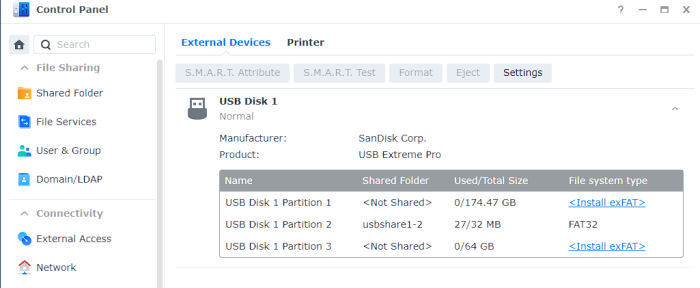
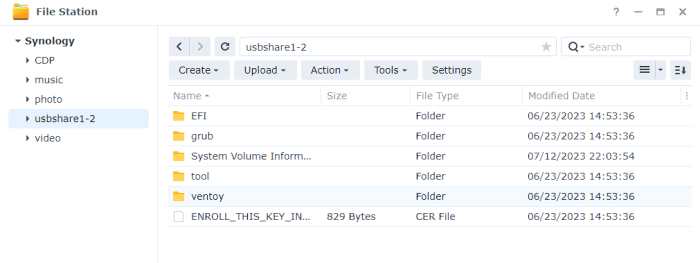
-
Just installed xpenology with dsm 6.1 (ds3615) with juns loader 1.02b on the PX6-300d (6 drive NAS). Pretty straight forward using this guide to boot from usb. GUIDE: Customer OS on PX6-300D 1) Had to plug the USB in the back usb port. 2) Entered the PID/VID/SN and mac1 and mac2 3) also required to enter: SataPortMap=6 After that it booted right up and installed DSM with the synology assistant. Working good so far with no issues and all 6 bays can be utilized.
-

aprl and sataportmap config when using hp p222 pci controller on gen8 microserver
wanye replied to wanye's question in General Questions
so i eventually got everything working.... i ended up running TCRP and it correctly worked out sataportmap=1 / diskidxmap=0, i got a recovery screen upon boot, and am now repairing the various broken apps/user permissions due to the 6.22>7.0.1 upgrade i'll have a crack at a full howto once i get a moment, but might have to wait till i get back off holiday -
This is the method proposed by "TheSTREET," which is not active in the forum here but is active in NAS-related forums in Korea. I've had a lot of trouble.Before the introduction...I have shortened the following words... Please don't get confused.... It's a word that I made to make it easier for you to understand.It's not a jargon, so please don't use it.LOL BSx = Bios SATA (number) - Sata number recognized by biosimilar sata controller chipsets DSx = DSM SATA (number) - Sata number recognized by DSM VSC = Virtual SATA Controller CSC = Chipset SATA Controller - INDEX - 1. Why do BIOS and Chipset talk? 2. Does Sataportmap and diskidxmap disable or disable Sataport? 3. VSC and Conclusion 1. About BIOS and chipset. I understand that you all know the BIOS...Let's move on. I know you're wondering, why the chipset? This is very closely related to SATA errors. In general, we take the C610 series (X99) chipsets as an example. This one basically has two CSCs.In fact, Windows and Linux also recognize two CSCs. SATA (Basic) and SSATA (Secondary SATA). In terms of specifications, SATA has six 6Gbps sataports...SSATA has four.Logically, I have 10. But when I work on DS3622xs+, if you set the option to 64..DS5 and DS6 are listed as inactive or unrecognized. So, after checking Intel's official data chart... Yes... As you can see, the CSC 0-3 Burnport is a fixed port with a sata-only signal, and the 4-5 channels have a different Muxed signal that shares lines 1 and 2 of PCIE and also shares with USB 3.0 ports. So I'm sure your chipsets are fixed, but there's also a port with mops that change their roles. I'm expecting it. It's literally a hard drive, and with that lane of USB or PCIE, the operating system is supposed to switch signals. For your information, BS4 and BS5 are using the DS5 and DS6 ports in Henology.Butroder doesn't handle it properly because it's shared. Let's stop talking about BIOS and chipset and move on to number two. 2. Does Sataportmap and diskidxmap disable or disable Sataport? This is important.We always keep our hard drives fixed while using Henology. So I thought about it and tested it...It's very simple.I've decided to think... In the case of NARS, if the hard drive fails, we replace it with a hot swap and rebuild the data, right? NARS has a hot-swappable option in each bay by default.The signal from each sataport is fixed... Yes, I am. After all the tests I've done so far...It doesn't work where you have the Muxed signal.In a CSC BS with a fixed signal... I left the hot swap option on...Sataport deactivation and unrecognized error has disappeared. Also, in the case of Muxed signals, Synalys NARS...It's a signal that's not working.I think it's more like that. In other words, the substrates of Synthetic are specially manufactured.Similar to a PC, but different...I have a lane. This is my own test, so...We need your experimental information. I'll wrap it up in the next chapter. 3. VSC and Conclusion After installing DSM during the test...I found something strange. Checking out lspci...I found the bus below. 0001:09:00.0 SATA controller [0106]: Marvell Technology Group Ltd. 88SE9235 PCIe 2.0 x2 4-port SATA 6 Gb/s Controller [1b4b:9235] (rev 11) 0001:0c:00.0 SATA controller [0106]: Marvell Technology Group Ltd. 88SE9235 PCIe 2.0 x2 4-port SATA 6 Gb/s Controller [1b4b:9235] (rev 11) It's strange. I'm sure it's Intel's main board.Even though we don't use a sata controller in addition...The Marvel sata controller was recognized... That's also four ports at 1:09:00... ...and four ports at 1:0c:00. So I thought... Redfill bootloader creates VSC and portmaps it so that it responds 1:1 with CSC. I'm crazy about the idea. As you all know, the Marvel sata controller...With a fixed signal for sata, not for mopsd... Satan Controller...Well? Yeah. . . . . . . . . . . . . . . . . . . .Of course you can't handle it.So if you use sataportmap to put in the Mukseed port... Then, it is highly likely that it can display messages such as hard recognition and errors... Let me summarize the important points now. ! IMPORTANT ! 1. Find the fixed sataport using the datasheet of each chipset. 2. Avoid using Muxed signals as much as possible. 3. Enable the HotPlug (or HotSWAP) feature on each SATA port in the BIOS. If you leave any information about chipsets you need in the comments...After work, I will find it and upload it to you'll find it. Thank you. P.S : After Use SataPortMap = 44 plugging in the hard drive, it was recognized and used immediately.(laughs)