

Balrog
-
Posts
143 -
Joined
-
Last visited
-
Days Won
1
Posts posted by Balrog
-
-
After upgrading from DSM 6.2 Update 3 to DSM 7.1.0-42661 Update 2 I see that there are some failing systemd services:
root@test4:~# systemctl list-units --state failed UNIT LOAD ACTIVE SUB DESCRIPTION ● syno-oob-check-status.service loaded failed failed Out of Band Management Status Check ● synoindex-checkpackage.service loaded failed failed synoindex check if there are any synoindex-related packages ● SynoInitEth.service loaded failed failed Adjust NIC sequence LOAD = Reflects whether the unit definition was properly loaded. ACTIVE = The high-level unit activation state, i.e. generalization of SUB. SUB = The low-level unit activation state, values depend on unit type. 3 loaded units listed. Pass --all to see loaded but inactive units, too. To show all installed unit files use 'systemctl list-unit-files'.
I got some news about the failed services!It seems that DSM 7.x phone home information at every boot and, if e.g. "Photos" is installed, even every 30 seconds(!):
journalctl -u pkg-SynologyPhotos-js-server.service -b Jun 11 09:58:31 test4 systemd[1]: Starting SynologyPhotos JS Server... Jun 11 09:58:31 test4 synocloudserviceauth[15672]: cloudservice_get_api_key.cpp:21 Cannot get key Jun 11 09:58:31 test4 synocloudserviceauth[15672]: cloudservice_register_api_key.cpp:293 Register api key failed: Auth Fail Jun 11 09:58:31 test4 synofoto-bin-push-service[15669]: pushservice_update_ds_token.c:52 fgets failed Jun 11 09:58:31 test4 synofoto-bin-push-service[15669]: pushservice_update_ds_token.c:147 Can't set api key Jun 11 09:58:31 test4 systemd[1]: pkg-SynologyPhotos-js-server.service: control process exited, code=exited status=1I think I got a solution.
")
Just disable these services:
systemctl disable pkg-SynologyPhotos-js-server.service systemctl stop pkg-SynologyPhotos-js-server.serviceThere are 2 other systemd-services which runs at every boot and as they are depended by other services they can not be easily deactivated but we can "mask" them which means that the symlink from systemd will be made to `/dev/null`.
 So this service can't start anymore also.
systemctl mask syno-oob-check-status.service systemctl mask SynoInitEth.serviceAfter a reboot there are no more failed systemd services:
root@test4:~# systemctl list-units --state failed 0 loaded units listed. Pass --all to see loaded but inactive units, too. To show all installed unit files use 'systemctl list-unit-files'.WIN!
As I don't know if the disabled services are important for a DSM update one can enable/activate them before updating in future:
systemctl enable pkg-SynologyPhotos-js-server.service systemctl unmask syno-oob-check-status.service systemctl unmask SynoInitEth.service rebootI think the disabled services can't do any harm as they are failing anyway.
But beware: I dont know any sideeffects till now!
I will have an eye on the services anyway the next days.")
I got another test-installation where I got 2 additional failing services (but again: I do not see anything not working or missing):
root@test2:~# systemctl list-units --state failed UNIT LOAD ACTIVE SUB DESCRIPTION ● syno-mount-usbfs.service loaded failed failed Mount usb fs ● syno-oob-check-status.service loaded failed failed Out of Band Management Status Check ● synoindex-checkpackage.service loaded failed failed synoindex check if there are any synoindex-related packages ● SynoInitEth.service loaded failed failed Adjust NIC sequence`synoindex-checkpackage.service` may be related to `Universal Search` but I am not 100% sure.
I appreciate any additional thoughts and information about these failing services.
-
 1
1
-
-
I am back in business!!
In the end the solution was easy!
With the typo in the script rploader.sh the DiskIdxMap is not correct.
So the first time (with the typo) i got:
Computed settings: SataPortMap=126 DiskIdxMap=000103As I only have 1 VMDK (as a single virtual SSD) as data disk and 4 HDDs on the physical internal SATA-Controller of the Microserver Gen8 this even works and I was able to do the upgrade from DSM 6.2U3 to DSM 7.1.
The step where things went a little bit wrong were as I updated to DSM 7.1U2. I have to boot after the update into TCRP again and fire up:
sudo ./rploader.sh update sudo ./rploader.sh postupdate broadwellnk-7.1.0-42661 exitcheck.sh rebootThen I read about the type in rploader.sh and recognize my fault about the missing second NIC in the user_config.json.
I added the second NIC, repaired the rploader.sh and got this (new & correct) satamap in the end:
Computed settings: SataPortMap=126 DiskIdxMap=100002Then I compiled the loader again:
sudo ./rploader.sh clean sudo ./rploader.sh fullupgrade sudo ./rploader.sh listmods broadwellnk-7.1.0-42661 sudo ./rploader.sh build broadwellnk-7.1.0-42661 sudo ./rploader.sh backup exitcheck.sh rebootAfter the next reboot I got the page "Welcome back: Click here to migrate your diskstation".
And here is the trick:
- DO NOT JUST REBOOT into DSM after click on "Migrate"!
- Reboot again in TCRP and run (once again):
sudo ./rploader.sh postupdate broadwellnk-7.1.0-42661 exitcheck.sh rebootThe "postupdate"-command will throw a lot of messages about a lot of existing files and folders. But in the end there will be the message:
... The new smallupdate version will be : 7.1-42661-2 Do you want to use this for the loader ? [yY/nN] : y Recreating ramdisk 52185 blocks Adding fake sign ...The next boot will be successfully and the NAS will be normal, stable and functional.
So i learned: If a minor patch is installed on top of a major DSM-Release, one have to boot into TCRP again and run the "postupdate"-function again even after a "Migration" when changing e.g. the NIC-Settings and recreating the whole boot-loader.
I still have some error messages but I got these also on my other installations:
root@diskstation:~# systemctl list-units --state failed
  UNIT                           LOAD   ACTIVE SUB    DESCRIPTION
● syno-oob-check-status.service  loaded failed failed Out of Band Management Status Check
● synoindex-checkpackage.service loaded failed failed synoindex check if there are any synoindex-related packages
● SynoInitEth.service            loaded failed failed Adjust NIC sequence

LOAD   = Reflects whether the unit definition was properly loaded.
ACTIVE = The high-level unit activation state, i.e. generalization of SUB.
SUB    = The low-level unit activation state, values depend on unit type.

3 loaded units listed. Pass --all to see loaded but inactive units, too.
To show all installed unit files use 'systemctl list-unit-files'.
Do someone knows if these failing services are important or irrelevant?
The NICs are running fine and I miss nothing and can't see anything which is not running correctly.
-
1
-
-
10 hours ago, flyride said:
You can force a DSM reinstall but retain Storage Pools and Volumes with synodsdefault --reinstall
This can be executed from junior mode shell (serial console).
https://xpenology.com/forum/topic/9392-general-faq/?do=findComment&comment=89619
This will lose all system settings but not data. If you have a dss backup most of it can be restored.
I don't know how to make it just do a patch.
So for today I went the "easy route":
- I made a backup from the TCRP before testing to build a new loader without the typo in the loader-script.
- I attached the backup as SATA0:0 on my VM.
- DSM boots fine for now into 7.1 U2 (of course with the error on the 2.nd NIC and some error messages at boot, but this wont hurt for now).
- So I am able to make a full backup now.
I will work on this issue again at the weekend if I got more time for this issue.
I remember some old information about boot and mounting e.g. an Linux Live ISO, mounting the 2.4 GByte-RAID1 where DSM is installed and change some files to be able to "simulate" an upgrade situation again. But I do not know what files to change exactly anymore...
In the worst case I can wipe the 2.4 Gbyte-RAID1 and make a full "new installation". But I will test this scenario first on another test-installation.
-
Thank you very much!
I will try it later without hurry and give feedback afterwards.
-
I have a little bit trouble with another installation (also a VMware based installation as DS3622xs+) :
- Yesterday I went straight into the little type bug where awk-F"/" should be awk -F"/" but I build the loader with these settings (my fault...)
- The loader starts well in the end besides some error messages at booting and I was able to install DSM 7.1.0-42661
- I upgraded successfully to DSM 7.1.0-42661u2 with
sudo ./rploader.sh update sudo ./rploader.sh postupdate broadwellnk-7.1.0-42661 exitcheck.sh reboot- Today I want to re-create the boot loader and booted into TCRP, adjusted the typo ( awk -F"/" ) and re-run the whole process.
- "satamap" found indeed different Mappings as the first time with the typo.
- I added also a missing second NIC manually into the user_config.json which forgot yesterday:
cat user_config.json

{
  "extra_cmdline": {
    "pid": "0xa4a5",
    "vid": "0x0525",
    "sn": "<SN>",
    "mac1": "<MAC1>",
    "mac2": "<MAC2>",
    "netif_num": "2",
    "SataPortMap": "126",
    "DiskIdxMap": "100002"
  },
  "synoinfo": {
    "internalportcfg": "0xffff",
    "maxdisks": "16",
    "support_bde_internal_10g": "no",
    "support_disk_compatibility": "no",
    "support_memory_compatibility": "no"
  },
  "ramdisk_copy": {}
}
- the process of autoloading the addons and building the loader went well:
sudo ./rploader.sh listmods broadwellnk-7.1.0-42661
sudo ./rploader.sh build broadwellnk-7.1.0-42661
sudo ./rploader.sh backup
exitcheck.sh shutdown
- I adjusted the MAC-Adresses of the vNICs with the calculated settings from TCRP and started the VM.
- The boot messages looks very good without the error messages from the first time and both NICs were adressed well and the vNIC which is connected gets an DHCP-Address assigned.
Now the NAS will be found every time as "Recoverable" and not "Migratable".
I can reboot multiple times but the system wont "repair" itself.
How I am able to force DSM to let me install the pat-file again?
Should I rebuild the loader with a different type (e.g. DS-918) and do a "Migration"and the back to DS3622xs+ with another new builded loader?
I do not want to corrupt anything as I am sure that the installation itself is in good shape.
-
- Outcome of the update: SUCCESSFUL
- DSM version prior update: DSM 6.2.3-25426 Update 3
- Loader version and model: Tinycore-Redpill v0.8 - DS3622xs+
- Using custom extra.lzma: NO
- Installation type: VMware ESXi 7.0 update 3
- Additional comments: I upgraded one of my backup NAS with a flashed Dell H200 HBA succesfully in 2 steps- step 1: from DSM 6.2.3-25426 Update 3 to DSM 7.1.0-42661 (like described in the tutorial "Tutorial: Install/Migrate to DSM 7.x with TinyCore RedPill (TCRP) Loader")
- step 2: Upgraded to DSM 7.1.0-42661u2 via GUI
- After Step 2 update, booted into TCRP and run:
./rploader.sh update sudo ./rploader.sh postupdate broadwellnk-7.1.0-42661 exitcheck.sh reboot-
 1
1
-
-
2 minutes ago, pipsen said:
Hello,
I have installed 7.1.0-42661 Update 1 on my vmware to test updates. I realized, that updating to "Update 2" ends in a recovery loop. This is what I tried next:- Applying Update 2 in DSM
- Reboot after update directly to TCRP
- ./rploader update (was already up to date)
-
./rploader postupdate 918+
- answered "yes" to both questions, whether 42661-2 shall be used
- sudo reboot
After reboot, I can not see my DSM any more in network. What did I forget? Is the "postupdate" really the only command? Or is it necessary to apply again the "build" command afterwards?
Please try:
sudo ./rploader postupdate 918+After I used the "sudo" with the "postupdate"-command my test installation with DS3622xs+ boots correctly.
-
- Outcome of the update: SUCCESSFUL
- DSM version prior update: DSM 7.1-42661
- Loader version and model: Tinycore-Redpill v0.8 - DS3622xs+
- Using custom extra.lzma: NO
- Installation type: VMware ESXi 7.0 update 3
- Additional comments: After update, booted into TCRP and:./rploader.sh update sudo ./rploader.sh postupdate broadwellnk-7.1.0-42661The sudo was important as without I got an error:
...
Creating temp ramdisk space
Mounting partition sdb1}
Mounting partition sdb2}
Extracting update ramdisk
unlzma: /mnt/sdb2/rd.gz: Compressed data is corrupt
cpio: dev/net/tun: Cannot mknod: Operation not permitted
cpio: dev/console: Cannot mknod: Operation not permitted
52176 blocks
Found Version : 7.1-42661-2
Do you want to use this for the loader ? [yY/nN] : y
Extracting redpill ramdisk
cpio: dev/console: Cannot mknod: Operation not permitted
cpio: dev/net/tun: Cannot mknod: Operation not permitted
cpio: lib not created: newer or same age version exists
...
cpio: ./etc/shadow: Cannot open: Permission denied
...
Just run the command again with sudo and DSM boots correctly after Update 2. -
Thank you very much for the new repositories!
After looking around it seems that all of them are the "good solution" with a SPK at the end so it will be installable natively in DSM without docker.
I think the SPK solution will be have a hard time running on DSM 7.x as there is no root-access for a SPK anymore, if I am not completly wrong.
I see today that I was not the first one with the idea to update the dockerfile from "yale-wp" and have found this (much better written) update to it:
https://github.com/delta-whiplash/docker-xpenology-open-vm-tools
This docker image runs under an actual Ubuntu and is even downloadable from the docker registry with one command:
docker run -d --restart=always --net=host -v /root/.ssh/:/root/.ssh/ --name open-vm-tools whiplashorus/docker-xpenology-open-vm-toolsI deleted my github repository as the one from "delta-whiplash" is much better. But it is all about to learn and become better.
Sadly I am not able to modify the first post, so I would appreciate if a mod can exchange the wget link at "# 2." with
wget https://github.com/delta-whiplash/docker-xpenology-open-vm-tools/archive/refs/heads/master.zipor even delete the whole Thread as it is not needed to build the image personally if it can be downloaded and started with a single line.
I will tag some members I think they may be interested in a working VMware Tools solution too: @pocopico , @haydibe , @WiteWulf
-
1
-
-
This howto shows how to compile and run the current VMware Tools in a docker container.
After a long time of not having enough free time to look at Xpenology I finally got the opportunity to study at which point the project is. (I read a looot of threads
).
I tested today if I am able to migrate a test installation from a DSM 6.2.3 (DS 3615) to DSM 7.1.0-42661 (DS3622xs) under VMware ESXi.
Thanks to the very good Tutorials from @flyride (THANK YOU VERY MUCH!) from here:
and here
I was able to do the migration.
Also a big THANK YOU to all other contributors to this project too! Awesome solutions were build the last months!
Afterwards I was looking around what is running and what is missing in my new DSM 7.1.0.
The most visible missing part were the VMware Tools.
Even Docker runs (till now) stable and without problems.
After looking around the topic "VMware Tools under DSM 7" I found an 5 year old repository which contains the information about a Docker container for the VMware Tools.
I am aware that a 5 year old container is not safe to run today but the author added the source Dockerfile also in the repository, so I am able to have a look HOW the docker image was build.
I am no real Developer so my knowledge about docker is a little bit limited but I managed with a few changes to build the container with an actual Debian Image as a base containing the current VMware-Tools.
So these steps worked perfectly for me:
## 1. Prerequisites
- Install Docker in DSM
- Enable SSH access in DSM
- Login via ssh as admin:ssh admin@ds
- become root:sudo -i
- cd into docker-dir:cd /volume1/docker__________________________________________
## 2. Download Source Repo
The original Repository is here:
https://github.com/yale-wp/docker-xpenology-open-vm-tools- I forked it and adjusted it a little bit: https://github.com/MrE101/docker-xpenology-open-vm-tools
- Download the current repo as a zip-file to the current directory (/volume1/docker):
wget https://github.com/MrE101/docker-xpenology-open-vm-tools/archive/refs/heads/master.zip__________________________________________
## 3. Extract Source Repo
root@ds4:/volume1/docker# 7z x master.zip__________________________________________
## 4. Adjust Dockerfile
- cd into extraction-directory:
root@ds4:/volume1/docker# cd docker-xpenology-open-vm-tools-master/__________________________________________
## 5. Compile the Image and run the Docker-Container afterwards
- compile the docker image and name the image "open-vm-tools":
docker build -t open-vm-tools -f Dockerfile .- Start the container from the new image:
docker run -d --restart=always --net=host -v /root/.ssh/:/root/.ssh/ --name open-vm-tools open-vm-toolsWith this command the container will run at every boot.
__________________________________________The ESXi is happy and I am happy too.
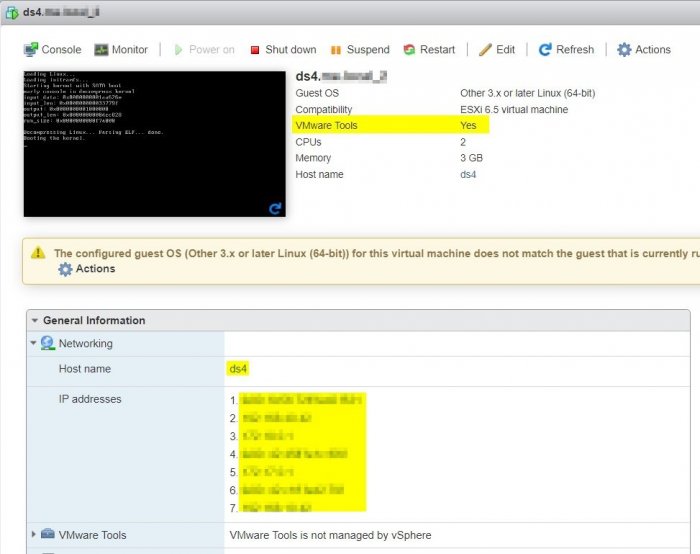
Even the IP addresses (IPv4 & IPv6 including the docker addresses) are shown!
I have tested successfully a "shutdown guest" and "reboot guest".
So for me everything works as expected.
Feel free to use or correct my findings as needed.
I am sure that my solution is not the best but it works for me.
-
10 hours ago, haydibe said:
You need to use v0.5.4 of the script OR just change the url and branch in the global_settings.json. Just copy the values for load repo from one of the other profiles.
Ahhh, v0.5.4 did the trick! Thank you very much for the hint! Now the loader will compile.
I only get some warnings:
...
include/linux/kfifo.h:390:37: warning: initialization of 'unsigned char' from 'int *' makes integer from pointer without a cast [-Wint-conversion]
...
/opt/redpill-lkm/config/cmdline_delegate.c:405:74: warning: value computed is not used [-Wunused-value]
...
/opt/redpill-lkm/config/runtime_config.c:168:53: warning: passing argument 2 of 'validate_nets' discards 'const' qualifier from pointer target type [-Wdiscarded-qualifiers]
I will be able to test the image hopefully tomorrow.
-
I am currently not able to build the Apollolake 7.0 image for #41890:
...
 > [stage-1 3/9] RUN git clone https://github.com/RedPill-TTG/redpill-lkm.git  -b master  /opt/redpill-lkm &&     git clone https://github.com/jumkey/redpill-load.git -b 7.0-41890 /opt/redpill-load:
#6 0.438 Cloning into '/opt/redpill-lkm'...
#6 1.081 Cloning into '/opt/redpill-load'...
#6 1.426 fatal: Remote branch 7.0-41890 not found in upstream origin
------
executor failed running [/bin/sh -c git clone ${REDPILL_LKM_REPO}  -b ${REDPILL_LKM_BRANCH}  ${REDPILL_LKM_SRC} &&     git clone ${REDPILL_LOAD_REPO} -b ${REDPILL_LOAD_BRANCH} ${REDPILL_LOAD_SRC}]: exit code: 128
Is the remote branch for 7.0-41890 deactivated and I have missed this?
-
Hello together!
I have never read such a good thread ever before!! Absolutely awesome!
Thanks to @ThorGroup, @haydibe, @flyride, @mcdull and all other I forgot for the very good information!
I am very busy at work so I can't work much in here but I read a lot.
I have spin up an Ubuntu 20.04 VM via Vagrant under VMware Workstation (under Windows) and was able to build with the help of the docker from @haydibe in a few minutes the loader (Apollolake, 6.2.4 and 7.0). (Testing of the loaders are note done yet due to lack of time).
If anyone is interested in a "Vagrant how to", leave a short note: I have documented everything and can post it here.
-
1
-
1
-
-
So, I just go the lazy route:
- Deinstall Docker 20.10.3-0552 without wiping the config and images
- manual download the old docker: https://global.download.synology.com/download/Package/spk/Docker/18.09.0-0519/Docker-x64-18.09.0-0519.spk
- install Docker 18.09.0-0519
- all Containers including Wireguard are up and running
For the long term I have to move Wireguard to another machine but for now everything is running fine.
-
I just updated the docker package in DSM to 20.10.3-0552.
Now the Wireguard-Docker container won't run anymore:
root@bla:/volume1/docker/wireguard# docker-compose up
Removing wireguard
Starting c3e3ba4b8f24_wireguard ... error

ERROR: for c3e3ba4b8f24_wireguard  Cannot start service wireguard: OCI runtime create failed: sysctl "net.ipv4.ip_forward" not allowed in host network namespace: unknown

ERROR: for wireguard  Cannot start service wireguard: OCI runtime create failed: sysctl "net.ipv4.ip_forward" not allowed in host network namespace: unknown
ERROR: Encountered errors while bringing up the project.
I have to look a little bit later how I manage to make this work again.
So just a warning about updating to the latest docker version in DSM for all.
-
Today I worked a little bit on the wireguard setup and changed the the first setup from the normal "docker run"-command to "docker-compose".
I append the working "docker-compose.yml" as I have some struggles with the current syntax for the host-network-mode.
Just copy the file to the same directory as the wg0.conf (for me its /volume1/docker/wireguard) .
Afterwards you can use the following commands to start and stop the container:
# cd /volume1/docker/wireguard

# docker-compose up -d
Building with native build. Learn about native build in Compose here: https://docs.docker.com/go/compose-native-build/
Creating wireguard ... done

# /volume1/docker/vps# docker-compose down
Stopping wireguard ... done
Removing wireguard ... done
Docker-compose is much better for future additions and changes to the installation than the direct docker-command.
I hope its useful for others as well.
-
8 hours ago, ferno said:
...
Can I ask why you installed the NOCTUA? What the server running too hot? I have E3-1230V2 running on my 2 GEN8 and never had any issues with high temps with the stock cooling.
I have a couple of these lying around and might put them in front of the grill to push some extra air though.
Hi Ferno!
As i wrote:
On 3/7/2021 at 7:10 AM, Balrog said:I think without an additional PCIe card (in detail the QNAP QM2-2P10G1TA with its tiny and high noise fan under load (in idle its quiet!)) it is not really necessary to add the additional fan, but for the sake of completeness I added this information as well.
- if the temperature of the NVME ssd is at 310 K (36,9°C) the QNAP Card is quiet and comfortable.
- if the temperature of the NVME goes up to about 317 K (43,9°C) the little fan on the QNAP Card rises up the rpm and have an annoying high frequency noise.
- with the additional Nocuta I can manage the temperature of the NVME pretty much the whole time at about 307 K (32,9°C) and the Nocuta has a lot warmer and pleasant sound character than the QNAP fan.
I have to say that there is not QNAP to blame: It is the little space between the card slot and the case itself which produces the high pitch noise if the fan ramps up the rpm. I have the same QNAP QM2-2P10G1TA Card in a good old Microserver 8 and its pretty quiet so I do not need to change there anything regarding the noise emission.
- Temperatures of other sensors in the Microserver 10+ will win much also from the additional fan:
- The "BMC" sensor was original at maximum on 81,3°C. With the Noctua I get 74.0 °C (with an ambient sensor temperature of about 21-23°C).
Your posted fan seems to do the same that my solution does. So it maybe will work the same.
You will not need any additional cooling if you are not using the QNAP QM2-2P10G1TA in my opinion.
Regarding the other question I can't help as I don't use any transcoding.
-
Hi@sebg35! I think I have to make some points more clear:Hi Balrog, which loader did you use ? I saw that you have an nvme card from QNAP So it seems that is should be the 918+.
Any issue with the CPU ? As only one core should be seen by the 918+ ?
I switch from 918+ to 3617xs in order to use all core from the xeon Processor but i can't use an nvme card as the 3617xs will not recognize it.
- I use the 2tb-nvme-ssd as a local storage for the esxi-host as I have a bunch of VMs and not only the xpenology vm itself
- I use a 256 Gbyte-part as vmdk of the nvme as a "volume1" (without redundancy and formatted with btrfs) in xpenology for e.g. Docker container
- I do regularly backups of the Xpenology vm with Veeam so I have some sort of redundancy/backup of "volume1" (not in real-time but it's okay for me as the data of my docker containers do not change that much)
- the main data is on the 4 x 14TB-HDDs in RAID10. The risc of data lost at a rebuild with RAID5 is way too high for me with this high density HDDs and the speed is awesome.
- so I use NO ssd-cache for now.
- I use 4 cpu cores of the Xeon 2236 for the Xpenology VM.
- All 4 cores are used with full power and I do not have seen slowdowns anywhere.
- it does not make sense to give all 12 cpu-cores (6 physical cores+6 hyperthreading) to the Xpenology VM as I need also free cpu cores for my other VMs and have to make sure that the "CPU ready times" are not raising up. "High Ready times" under ESXi occurs if there is an over provisioning of cpu cores to multiple VMs and some VMs want the cpu for them but do not get the resources which are blocked by other VMs.
In short: "more CPU-Cores" for a VM do not necessary result in "more speed" or "more power" for the VM in every case. There is a break even where one gets a worse speed for the VM with more cpu cores attached to it.
- yes: I use the 918+ image
-
1
-
-
6 hours ago, ferno said:
Hi Balrog,
Yep, I am going to install it tomorrow, the 64GB is already in.
I will just run it with 4 HD drives a usb stick and a Seagate one touch attached to the USB3 port like they showed on the STH site.
Th only expansion I would love is a Nvidia P400 for Transcoding but don't want to stress the PSU and since this server will run 24/7 I don't want it to draw more than 70W when not handling heavy workloads. My Gen8 Now draws 50W with 2 dimms 4 internal drives, internal usb and external USB drive.
My ESXI ML310 Gen8 also the same with 32Gb and 4 10Tb drives some 7200rpm Seagates (noisy bastards compared to my WD reds in the other servers).
If you have the notes it would be greatly appreciated!
As promised here some notes I have choosen to remember:
Enable passthrough of the onboard Cannon Lake AHCI controller:
- enable SSH access in ESXi and login as root
- edit the file "/etc/vmware/passthru.map" (it is NOT "passthrough.map"
:
vi /etc/vmware/passthru.map- add this at the end of this file:
# Intel Cannon Lake PCH-H Controller [AHCI mode]
8086  a352  d3d0     false
- reboot ESXi
- login to the ESXi-GUI and enable passthrough of the Cannon Lake AHCI controller
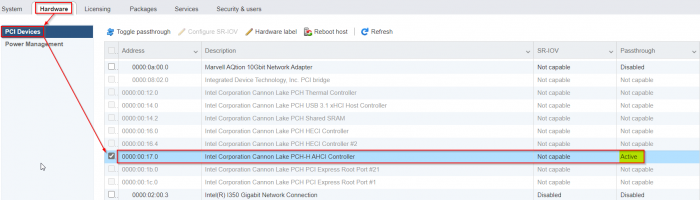
- reboot ESXi again
- Now you are able to attach the Cannon Lake AHCI controller to a VM (like as seen in the screenshots from @flyride)
Pictures of an additional Noctua Fan
- these pictures are my template for my mods (not my pictures!): Noctua NF-A8-5V Fan Pictures on HPE Microserver 10+
- I added an additional fan controller like this one: 5V USB Fan Controller
This allows me to adjust the Nocuta step-less from 0 rpm to max rpm to get the sweet spot of maximum coolness with minimum noise emission.
I think without an additional PCIe card (in detail the QNAP QM2-2P10G1TA with its tiny and high noise fan under load (in idle its quiet!)) it is not really necessary to add the additional fan, but for the sake of completeness I added this information as well.
-
1
-
-
I never used raw device mapping for xpenology.Hi balrog,
How did you do this:
"I have done a passthrough of the whole onboard SATA ahci-controller to the xpenology-vm."
Does ESXI see the SATA controller when in AHCI modus? I thought the only way to pass the hardware on the microservers was by adding a raid card like the P222 ( That is the model that comes to mind but might be a different one) or by doing raw device mappings.
Are you satisfied with the E-2236 Xeon, no issues so far?
There is a little trick for enabling the possibility for the passthrough. I will later have a look in my notes and write it here.
And yes: I am very satisfied with the 2236. It has lots of power (for a home-solution of course). But the Microserver 10+ is at his power supply limits with this kind of cpu, 64 gbit RAM, the Qnap card with Nvme-ssd and 4 HDDs. But I never run a type of hard disk benchmark parallel to a prime95 benchmark over all cpu cores for hours, so this is no problem for me.
It is a pretty little powerful server and till now very reliable. But of course WITH the additional Noctua fan. Without it the temperatures where a little bit high for my taste with the additional Qnap card (plus the annoying high fan noise from the qnap card if it's hotter than about 38-40°C). -
Hi ferno, I have done a passthrough of the whole onboard SATA ahci-controller to the xpenology-vm. The local esxi storage is done via a 2tb-nvme-ssd on a qnap QM2-2P10G1TA. Not the fastest solution for the nvme but I get about 6.6 gbit via iperf3 which is more than the RAID10 of 4 HDDs is able to deliver. I must add that I have to cut a hole onto the right side of the case to be able to attach an additional noctua fan (otherwise the fan from the qnap card has a high annoying noise). With the additional Noctua fan the Microserver is cool and silent enough for me.Hi Balrog, I just bought the exact same setup to replace my bare metal setup on a HPE Microserver Gen8 with a e3-1230v2 and 16GB ram. For the Gen10+ I have installed 64Gb ECC Micron dimes DDR4-3200 EUDIMM (MTA18asf4g72az-3g2b1).
How is your setup handling? I have not installed the new Xeon yet (just got it today) is now running with the new memory and the Pentium G54XX that came with it. So before I install the CPU I would love to hear what your experience is.
Also, did you pass the HD's through to the xpenology? In the past I had ran some test with VMDK's but got issues with several setups loosing disks.
On one of my other servers (Supermicro) I am running ESXI 6.7 with Freenas as a VM with HBA passthrough to freenas and hosting its storage though NFS for the ESXi host on a dedicated internal network bridge. Then I run a xpenology VM and mount the NFS storage in DSM and only use one vmdk as volume1 for local installs. This is not my production xpenology but it works great. The reason why I chose this approach is that if I want to snapshot the VM lets say for testing a new DSM version I don't have to deal with the large amounts of data and even if something goes wrong the most important data will be on a NFS share that can be simultaneous accessed by various systems.
Example. I can use a VM running sabnzbd storing it on the NFS share and with plex on synology access the same data etc. (just a example).
So Now I am wondering how I should go about it for my next setup. Same way I did on the SuperMicro Or just Pass the disks to xpenology and share some storage via Iscsi or NFS to the ESXI host.
Also looking and testing proxmox.
Anyhow, would love to hear what you (or other members) think of it -
I have a Microserver Gen 10+ with a Xeon E-2236 cpu under ESXi 7.0b. For me a VM with 4 CPUs as 918 works fine and fast and with all cores.
So maybe it is an issue with baremetal installations. -
I have played around with deduplication and btrfs in the past. Even with good results.
But as dedup & encryption is not compatible and also one never does run a defragmentation or the deduplication will be destroyed I deleted my tests.
Deduplication is a very interesting feature for me but only if it's supported neat. -
I have some news about other log entries which are anyoing and useless:
The open-vm-tools package logs every 30 seconds this:
root@ds:~# tail -f /var/log/vmware-vmsvc.log
[Oct 09 19:50:17.681] [ warning] [vmsvc] HostinfoOSData: Error: no distro file found
[Oct 09 19:50:17.681] [ warning] [guestinfo] Failed to get OS info.
[Oct 09 19:50:17.683] [ warning] [vmsvc] HostinfoOSData: Error: no distro file found
Solution:
root@ds:~# cat /proc/version > /etc/releaseIf this file exists the open-vm-tools are happy and do not throw any error anymore.
________________________________________________________________
I have mapped a 200 GByte-vmdk on my NVME-SSD into the Xpenology-VM seen as /dev/sdb. For sure it can't give any infos about temperature for this. So every 30 seconds the daemon scemd logs this into /var/log/scemd.log .
As /var/log is distributed as RAID1 over all hard disks also a write access on the main hard disks occour every 30 seconds and will spam into the log-file /var/log/scemd.log:
root@ds:~# tail -f /var/log/scemd.log 2020-10-09T20:14:44+02:00 ds scemd: SmartDataRead(108) read value /dev/sdb fail 2020-10-09T20:14:44+02:00 ds scemd: disk/disk_temperature_get.c:104 read value /dev/sdb fail 2020-10-09T20:14:44+02:00 ds scemd: disk_temperature_update.c:63 Temperature Update Fail 2020-10-09T20:14:50+02:00 ds scemd: SmartDataRead(108) read value /dev/sdb failSolution:
Change the logfile to /tmp/scemd.conf (which will be in memory and lost after a reboot). But as scemd.log will not have any useful information for at all this is a quick and working solution.
One will have to edit 2 files for make it working:
vi /etc/syslog-ng/patterndb.d/scemd.conf
vi /etc.defaults/syslog-ng/patterndb.d/scemd.conf

# original line:
destination d_scemd { file("/var/log/scemd.log"); };

# modified line:
destination d_scemd { file("/tmp/scemd.log"); };
I hope its clear what I mean.
I think it matches the original content pretty well as its also about preventing unwanted content in the logs.
Additions and improvements to this are very welcome!
-
1
-

TinyCore RedPill Loader (TCRP)
in Loaders
Posted
I have some news about the failing services and how to disable them (mostly):