

Andrewcee
-
Posts
17 -
Joined
-
Last visited
Andrewcee's Achievements
Newbie (1/7)
2
Reputation
-
Hi, Sorry hearing you have bricked your 1010 - welcome to the club! I was able to recover the internal NVRAM USB as above, sounding like you have recovered yours maybe? My best guess, is Synology code the VID/PID 0400/0400 into DSM. I could get the new/external USB stick to boot DSM only after carrying out a low-level format of the USB stick and setting PID/VID. You will likely be able to boot Linux (or Windows?!) from USB without reprogramming. I started with loading up DSM6.3 1511 on my 1010. DSM showed me an update was available. I downloaded 6.4 and updated manually, I have still to try an automatic update. I see no reason why the automatic update will not work. I have looked at a couple of the Synology binaries. I remember they list the 1010, 1511, and other models, I have still to find out how they 'know' which model they are running on, be good finding out. I am sure we can change the address of the 1511 esata to be the same as the 1010, if we can find it? As I say, the esata would not work with my DS513 when the 1010 was running DSM5.2 1010, so I don't know if it will ever work. Running xpenology, you are correct. The disk leds do not work, the fan speed is high all the time and cannot be reduced in DSM/xpenology, and I think the blue power led flashes all the time. I guess the xpenology DSM cannot 'see' the 1010 hardware, as we might expect. Thank you for the links, I will have a look ay some point. Thanks!
-
Hello Alma, Thanks! Took a lot of figuring out. I will try giving you some ideas, will hopefully help, I cannot remember exactly the steps I went through to get a working NAS, sorry. Please note, I may be giving wrong advice and/or wrong information in places, be careful and test as you go!! If anything goes wrong or you brick your 1010, I regret I will not be held responsible or liable in any way. DSM... I'm running Synology DSM6.4 for the DS1511+ on DS1010+ hardware. I got it to run xpenology too. Internal/External USB... You will almost certainly need a monitor and a usb keyboard. You can then boot into bios and select to boot from an external USB. Great for testing before committing to write/update the internal USB if you so choose to do. The 1010 will boot fine without the internal USB providing you have an external USB stick programmed with PID/VID to 0400/0400, the same as the internal USB NVRAM card - see me post above. I think they must be 0400/0400 to boot from any USB stick. If you are happy to open up the 1010 you can lift out the processor board and remove the intel USB and programme it via a USB cable. WARNING: If you programme the internal USB, let it finish writing BEFORE disconnecting! You will likely brick it (as I did) if you do not. It is the same process as writing/updating firmware on a Mac, PC or similar, I presume. I rescued my internal USB as described above, although having programmed the internal USB I run with a programmed USB stick permanently plugged in the back of my 1010 and bios set to boot external first. Grub Bootloader... There are two disk images in firmware, Grub is in the 1st. I edited 'grub.conf' / 'menu.lst' (?) commenting out as above. The DS boots 'SYNOLOGY2' by default, if it fails it then boots 'SYNOLOGY1'. '1' allows you to load DSM, '2' is normal running. You may have to experiment as I did, I may be giving you incorrect advice, however... Commenting out the 'Serial' line allows the USB keyboard to work, 'Checksum' prevents the checksum calc at boot running which can cause boot to fail, not sure if removing 'hw_model' does anything much, although does show the hardware during boot. Ramdisks, Disk Images... I remember finding a copy of the internal USB copied from a 1511 somewhere on the web. I seem to remember there being 2 disk images. One for booting and loads the Ramdisk (rd.gz) for loading/updatin DSM, the other was normal running and loaded a different Ramdisk, I believe. Can't remember exactly. I do remember on disk 2 (the larger of the 2) having to change the MAC addresses (2-off on the 1010/1511) and serial number to match that of my 1010 in one of the files, see above. Check the 'vender' file. They are at the start of the file and easily spotted. I used a hex editor and followed the notes in the website. You have to calculate the checksums for each of the 3 updates and write with the hex editor as noted above else your updates will fail during boot. Synology Configurations... I remember most of the firmware looking like normal Linux and needing no modification. The Synology configurations and updates were easy to find, as I recall, and in the likes of /etc. 'synoinfo.conf' lists the system options, service options, service limitations plus lots more in a long list. It lists the model number, i.e. DS1010+ in 2 places, which I will have changed to DS1511+. You might want to set maxlanport=2 if not already set. Well worth looking around the Synology configurations, you will likely learn how they configure everything and find out if you need to change anything else. rd.gz... This is a Ramdisk image, it can be uncompressed with 7-zip. I seem to remember it uncompresses to rd.tar or similar? I remember using tar to compress the uncompressed folders/disk image after any edits, then compressing the tar using 7-zip. Likely there is a better and easier way, I'm no Linux expert! I forget what, if anything, I edited on these. Pretty sure they contain the Synology configuration files and information. Definitely worth looking into as you will likely find out how the DS software boots and works with the hardware, configurations, etc. Final Thoughts... I remember the final solution was much easier than I made it out to be. Key I think are the external USB which must be reprogrammed, and the vendor file with MAC addresses and serial number. Also downloading the 1511 firmware copy sure helps too. I've looked up my backups and have found 2 USB share images, which confirms my thinking there were 2 disk images in USB firmware, the first has the grub bootloader. I'll not post them as I have no idea what state they are in and if they will or will not damage your hardware. There is a UT165 rescue tool on the web, if needed, the internal USB NVRAM is based on the UT165 controller. Tools for programming the USB stick firmware are noted above, likewise a tool for listing the USB internals. I've found backup folders '9MB' and '16MB", these are the disk images in firmware. I found .img files for loading into USB with Winimage, Rufus and the like, one here I have titled 'ds1511 boots ok.img' (???) another 'ds1511+.DSM5.2-5967.U.6.boot.img' (??????). I'm not about to try them on a working NAS! In Service... Fitted with 4-off Seagate Ironwolf drives, the 1010/1511 has been working solidly on DSM6.4 since it was released. The only things which do not work I have noticed are, 1-It will not enter standby mode, 2-WOL does not work, 3-The external Sata for connecting my DS513 does not work when built as both a 1010 and 1511. I tend to think the 1010 I bought may have a faulty external Sata port, hence it was like new inside and perfectly clean, don't know. Ideally I want to use my 513 with my 1010, so bit annoyed this does not work, works fine on my 413. Standby and WOL will be great if they work, saves switching off end of the day and starting the next morning. ....Any ideas?? Sorry I cannot give you step by step instructions, yet if I can do it then anyone can! Hope this helps, shout if you get stuck, may jog my memory.
-
Have successfully built and am running latest DSM6.2.4 on my 1010 set up as a 1511. Can confirm you need a usb stick with PID/VID both set to F400 else the DSM writing settings procedure will fail. Can reprogram the internal usb if you like too. Just need to create a custom made 1511 bootloader with your MAC addresses and 1010 serial number and write to external/internal usb. Have written a rather lengthy post, here...
-
Interesting exercise going back to a 1511. Commenting out the hw_model in grub appears to be key in getting syno_hw_version=DS1511+ to work and thence the 1010 hardware to load up DSM 6.2.3 for a 1511. Successfully booted with my reconfigured usb stick too. That's about it, hope my observations prove helpful to others.
-
Gone the other way - booting from my 3617 usb stick (1511 & 3617 plugged in) and loaded up 3617 25426. Want to check volume utilisation with SSD cache, was 80% plus on 1511 without SSD read/write cache. Update - Gets stuck on Recover. Reboots & comes back to recover. Oh well.... Nice try. Update 2 - Out with the 3617 usb, booting from the 1511 usb, it's booted into 3617 yet boot thinks it's a 1511??? "Time for bed", said Zeberde!!!
-
SSD cache - I see the 1511 does not allow use of SSDs for read or read/write cache for volumes on physical disk as the 3617 does. Unsure how relevant this is given the testing I carried out during data load when I was unable to see any measurable difference in load speed and network traffic when loading small or large files with and without cache. I noted however, the cache usage growing and Storage Manager showing flashing squares within the cache. DSM warned me when shutting down, to disable the cache or suffer loss of data. Maybe it would have sorted itself given time, seems odd having to manually disable cache for a normal shutdown. Even using SSD disks I'd expect data to be retained unless I pulled the SSDs for some reason.
-
MIGRATING DS3617 TO DS1515 Good news! I used a 'new disk' in above 1511 build. I was worried I'd lose my data when refitting the drives and SSD cache from my Xpenology 3617 build. However, Assistant reported my 'moving disks from a 3617 to 1511' and has allowed me to migrate. Essentially, I have installed DSM_1511+_25426.pat, again having booted Synology_2 from my internal usb. All data and the majority of configurations retained.
-
SUCCESS - DS1511+ DSM6.2.3 RUNNING ON DS1010+ HARDWARE I have reconfigured a new ADATA C906 USB stick as follows, lifted from ChipGenius... Description: [E:][F:]USB Mass Storage Device(Synology Diskstation) Device Type: Mass Storage Device Protocal Version: USB 2.00 Current Speed: High Speed Max Current: 200mA USB Device ID: VID = F400 PID = F400 Serial Number: a7100100000000 Device Vendor: Synology Device Name: Diskstation Device Revision: 0100 Manufacturer: Synology Product Model: Diskstation Product Revision: PMAP Controller Vendor: Phison Controller Part-Number: PS2251-70(PS2270) - F/W 07.11.5D [2018-09-21] Flash ID code: 983C98B376E3 - Toshiba [TLC] Tools on web: http://dl.mydigit.net/special/up/phison.html ...this boots okay, although having repaired my original Synology internal USB, I continued my install with that plugged into a rear usb port. I will refit internally as the keyboard allows me to drop into bios for selecting external usb if necessary. Updated /boot/grub/grub.conf... # serial --unit=0 --speed=115200 # terminal serial default 1 timeout 3 # hiddenmenu fallback 0 title SYNOLOGY_1 root (hd0,0) hw_model=DS1511+ kernel /zImage root=/dev/ram0 ihd_num=0 netif_num=1 syno_hw_version=DS1511+ initrd /rd.gz title SYNOLOGY_2 root (hd0,1) # cksum /grub_cksum.syno vender /vender show # hw_model kernel /zImage root=/dev/md0 ihd_num=0 netif_num=1 syno_hw_version=DS1511+ initrd /rd.gz I had a monitor on the vga port and usb keyboard for selecting preferred boot option. My setting hw_model appears to have had no impact. Boot reports syno_hw_version=DS1010+. Nevertheless, Synology Assistant on my MacBook (High Sierra) loads DSM_1511+_25426.pat. I set IP on the MacBook ethernet to 169.254.1.1 / 255.255.0.0 and connected directly to the NAS. Having already modified the vender file in the second usb partition as noted earlier (MAC addresses & serial number + checksums), I booted to Synology_1. Assistant took several minutes and attempts to connect albeit the 1010 LAN led was on/flashing and the yellow status led was flashing, after the bleep. Select the pat file and off it goes, no reporting 'wrong file for 1010'. Install continues and on to reboot, I had to wait 600 seconds (10 minutes) albeit the 1010 had rebooted okay with the Synology_2 option. There were checksum errors reported during boot, yet after 10 minutes Assistant said 'Writing Configuration Files'. I was asked to set a password for admin, I left the network config for later. Connecting using a browser on my MacBook, on into DSM and first job was to reconfigure the network/ethernet ports on the NAS. Then reinstate the ethernet cabling via the switch, connect again and log on to the 1010 (now a 15111) and configure away. I've likely over-complicated the whole process earlier on, yet it has been all part of the learning. It has taken several days, my building a Ubuntu virtual machine and configuring all sorts of tools, some of which which have been necessary for reading/writing the usb stick and modifying the files on usb. For example, out of the box Windows does not read/write ext2 disk partitions, not that I know of anyway. Given my success and the fully-functioning DSM1511+ native configuration (fan speed, for example), for now I'm going to swap to the 1511 install on 1010 hardware, although I have a working build of Xpenology DS3617 which has been running the past couple of days and loading data from my DS413. I can reinstate the 3617, future upgrades depending, although my DS513 is not shown as being supported with the 3617. Maybe it will work given the 1010 hardware? I see the 513 gives disks 'in parallel' on the 1511 yet they have to mounted as separate volume/s on the 513. Likely I will use my 413 for 'off-site' backup (i.e. away from home) and the 1010 with my DS513, the 513 used currently to store two monthly copies of the 413 plus timemachine backups from the MacBook. Hope this helps others. It's been fun, even if it has taken many hours, my getting a 1511 DSM 6.2.3 build running successfully on 1010 hardware. Even better my having fixed the likes of the original usb stick and discovered how to configure a new stick for Synology Diskstation. Have fun!!
-
Have to enable SMB1 in DSM, then can map a networked drive in Windows. Still unable to connect directly from EaseUS, no worries, just go via the mapped drive. Spoke too soon! Can copy from internal PC drive to windows share on DSM, EaseUS cannot connect via mapped drive. Asks for User/Passwork, which it reports as invalid. Another time....
-
How to access shared folder in Xpenology from windows 10 host?
Andrewcee replied to MichaelMEIB's question in General Questions
Just had the exact same problem, unable to mount a share on DSM6.2.3 from Windows (and EaseUS backup on Windows). Enabling SMB1 on DSM fixed my connection issue. Still unable to connect from EaseUS to NAS, but can via a mapped drive in Windows. -
I've read the 1511+ has a slightly faster processor and the network adaptor address is different, else the 1010 and 1511 were said to be identical. Likely as not there will be a rom or something on the main board which configures the box as a 1010, but them why the usb/pid/vid setup and configuration files thereon with model etc within? Who knows? Likely you're advice is sound, better to start with the 3617 version and look to get the Synology hardware functions working, although a simple resistor will set the fan speed and who needs fairy lights? Further progress can wait for now. I've run into a problem connecting EaseUS Todo Backup to the 1010 running 3617 6.2.3. I've a DS413 running 6.2.3, my current box, which connects to the shared folder, sub folder, etc, no problem. On the 1010 I can see the shared folder from EaseUS okay and it looks like it logs on, yet it asks for a user/password when connecting to the shared folder insisting the user/password combination is invalid. The configuration of the user and folder look to be identical on both boxes, and yet...??!! I've yet to checkout the forums to see if anyone else has reporting similar issues.
-
Dog has changed a bit 😆 Goal is to get the latest DSM 6.2 update running on the 1010 hardware, plus the satisfaction of getting it working. Delighted I've managed to recover the internal usb, thought it totally screwed, next challenge is persuading the 1010 to think it's a 1511. Checked through all the boot image configuration in the 1st partition, everything looks to be configured for a 1511. The function GetModel in synobios looks as if it's reading parameter gszSynoHWVersion, as best I can tell. I cannot work out what's in gsz..., if anything. Final attempt this evening, the 1010 still insisting it's a 1010. I have seen it boot as a 1511 from previous attempts from an external usb, so for now I dunno.
-
IT WORKS!! I've still to investigate & understand what's going on as my 1010 thinks it is a 1010 despite my loading up the 1511 boot image and confirming beforehand the boot set up is configured for a 1511. Perhaps the disk I've used has remnants from my messing about earlier, probably best to start with a clean and partitioned disk. First things first, however. It has booted successfully from the now clearly fixed and working internal USB plugged into a rear usb socket, and has successfully loaded and booted DSM 5.2 as a 1010+. And we have all leds working correctly, plus fan speed control
-
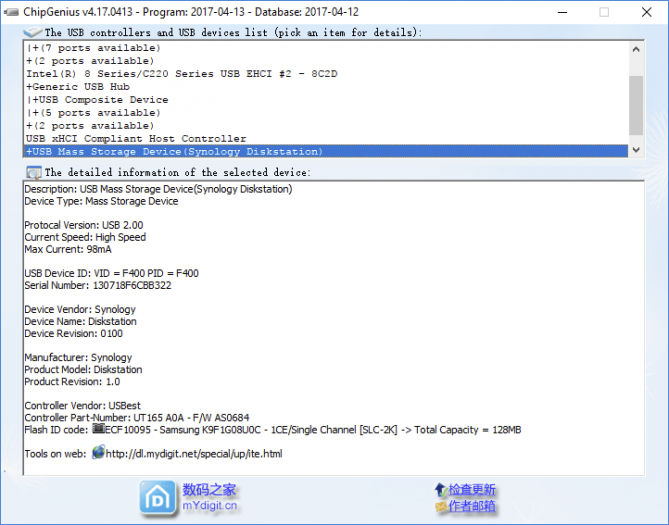
A HUGE THANK YOU to those contributing who have helped enormously in my making huge progress. I have built the NAS using Xpenology, it is working perfectly on DSM V6.2.3 except for the led functions. Good news! Unfortunately however, while trying to reload the internal USB device I screwed it totally by disconnecting while it was programming. Windows could not see it, neither could Mac or Linux. Referring back to this post... ...and specifically this photo... ...I have now SUCCEEDED in getting my Synology USB stick up and running again, thanks to this... https://www.usbdev.ru/articles/testmod/ I shorted pins 29-30 exactly as described below, there are diagrams showing what to do, here are some of instructions translated from Russian... 1. Before connecting the flash drive to the USB port, you need to close the 29 and 30 pins of the memory microcircuit with each other, for example, with a thick needle (this combination may not work on your flash drive, so try to close other pins as well: 30-31, 31-32, 41-42 , 42-43, 43-44). You need to close it very carefully so as not to get to the output powering the memory microcircuit (pin 37). 2. Then, without opening the contacts, connect the flash drive to the USB port (do not use the ports on the front panel of the case!). After determining the flash drive in the system, open the outputs (almost immediately open after connecting - that is, do not hold). In this case, the flash drive will become visible in Windows and will be available in the firmware utilities. At this moment, without disconnecting the flash from the port, you need to start working with the utility designed for this controller. PS: On the Memory Chips page, you can find datasheets and other documentation for some memory chips. ChipGenius can now see the Synology USB, although it was labelled completely differently with new VIP/PIDs. Using the HWUpgv1 (HWUpg.exe) program, I filled in the boxes as per the photo above, pressed <start>, and it promptly fell over on my Windows 10 PC. Firing up a Windows 7 Virtual on my Macbook, it again fell over, yet has programmed the USB exactly as above. Perhaps it'll be best to run in XP? Here's how my USB now looks on ChipGenius... Description: [E:]USB Mass Storage Device(Synology Diskstation) Device Type: Mass Storage Device Protocal Version: USB 2.00 Current Speed: High Speed Max Current: 80mA USB Device ID: VID = F400 PID = F400 Serial Number: a7100140fe12b1 Device Vendor: Synology Device Name: Diskstation Device Revision: 0100 Manufacturer: Synology Product Model: Diskstation Product Revision: 0100 Controller Vendor: USBest Controller Part-Number: UT165 A0A - F/W AS0684 Flash ID code: ECF100954000 - Samsung K9F1G08U0C - 1CE/Single Channel [SLC-2K] -> Total Capacity = 128MB Tools on web: http://dl.mydigit.net/special/up/ite.html Although I have a copy of the original USB, I shall attempt to build the 1010 as a 1511, oddly the original 1010 thinks it is a DS710. I have found a USB image which I have modified to reflect the serial number and MAC addresses of my NAS, with checksums - thanks to FlorisVN and this post... I'm going out with the dog again before moving on to the next step, loading the modified image on to the USB, then trying it on an external usb port, and if successful, dismantling and reinstating. Happy days! P.S. I have been successful in updating the original 1010 (710?) usb image so as to make it a 1010+ with my MACs and Serial, and modifying the synobios.ko 'GetModel' function such it thinks it is a 1010 rather than a 710. The latter is a single byte change, swapping 4E for 55 at or around offset 1440. Noting the changes required, it appears almost certain my original image is from a 710, although I've no idea why as it was running 1010 V5.2 before I started hacking. P.P.S. Can parts of the above process, particularly the internal reformatting (?) of a usb stick with the Synology specifics help with a bog-standard usb stick look like a Synology original? Updating grub it is easily possible to boot from both external and internal usbs, should you wish. Jumping into bios the boot order can be set to boot from the external first, if present. ...Where's my dog???
-
Hi, I screwed my DS1010+ boot - okay, I know...!! Be great eventually to get DSM 6 up on the 1010, let's get to 5.2 for now. Have got to know the DSM internals well, ie. partitions on the internal USB, Grub options, & which files to modify in the the ramdisk image (rd.gz extracted from the pat file). 1st partition boots to ramdisk for loading DSM from Synology Assistant, 2nd boots from the newly created hard disk partitions in the 1010. Synology Assistant insists I go with pat file 'synology_x86_1010+1042.pat'. Outline procedure... Do image copy of internal USB to new USB stuck, working on new copy... Get the ramdisk image rd.gz from the internal USB. Modify synobios.ko with hex editor to pick up DS1010 in place of DS710. IP is set in synogrist.sh to 169.154.1.1 - have tried with this and my own static 192.168.1.120. DSM options set in synoinfo.conf - e.g. raid yes/no, hardware model, plus lots more. Modify synoinfo.conf swap 710 for 1010 (twice). Grub 1st boots from /dev/rd0, option 2 from /dev/md0 (with raid) or /dev/hd0 with no raid. Grub option 1 is working perfectly... Initial build from Synology Assistant works perfectly and reboots 1010. Rebooting with grub option 2 boots perfectly (having disabled checksum) from the new partitions on hard disk, I get the beeb and all leds on, yellow flashing. Synology assistant then stalls on the final step writing configuration, as if it cannot see the NAS. I have follows the instructions here... https://community.synology.com/enu/forum/17/post/10573 ...same result, still cannot see the 1010. Suspecting a network error, more research... * 1010 MAC Addresses: 00 11 32 07 5F 92 & 93. Grub option 2 says same during boot, same as both internal label and rear panel. * Synology Assistant shows MAC Address: 00 E5 E5 CA 54 E7 & IP address 192.168.1.120 (or ditto ...1.2 below). * Using IP scanner on PC, I can see the assigned static IP 192.168.1.120 (or 192.168.1.2) assigned during 1st boot with MAC Address 00 01 E7 90 3A E7, Manufacturer Rocon PLC Research Centre. It is 'live' during option boot 1, yet appears unreachable/offline during option 2 boot. I am connected to LAN1 on the 1010. I don't understand the various MAC addresses, especially why the PC appears to be seeing different MAC addresses. Why can the Assistant talk with the 1010 during boot 1 if the MAC addresses are different? Does it matter? Bizarre or what?! Going out for walk with dog, clear my head. QUESTIONS: Is the suspected MAC address issue material? What IP address to assign NAS during 1st boot, static or dhcp? Can I assign IP during 2nd boot, if so then how - e.g. in grub.conf, or in internal DSM scripts e.g. synobios.ko or setting a parameter in synoinfo.conf? Any more testing to do to check if the 1010 network is live, green led is steady & not flashing? How do I get the 2nd boot to talk, with the PC and Synology Assistant, or indeed communicate at all? Is networking okay and something else at fault. So close to getting everything working. Hopefully when I finish I will have a solution for the 1010+ owners who are unable to boot their boxes, using internal or external USB. Thanks, Andy Edit: Trying work out what boot 1 writes to disk and check content... Have set 'support raid' in config to 'no' in rd.gz in hd0, 1st boot. 1010 disk now formatted ext so can mount and read on PC. sd1 looks to be the boot partition, sd2 is swap, sd3 data. Data contains file SynoUpgrade.tar.gz (found it!) yet nothing of note on sd1. Looks we may still need the ramdisk to boot? Have tried putting content of the hd1.tar on it, looking like it's not booting. Admins - please kindly delete my previous post as failed to comply with rules, sorry.