szararsiz
-
Posts
14 -
Joined
-
Last visited
szararsiz's Achievements
Newbie (1/7)
4
Reputation
-
@snoopy78 Welche Qnap Firmware Version verwenden Sie, vielleicht ist es eine Einschränkung? Ich kann nur kommentieren, leider habe ich nicht viel Erfahrung.
-
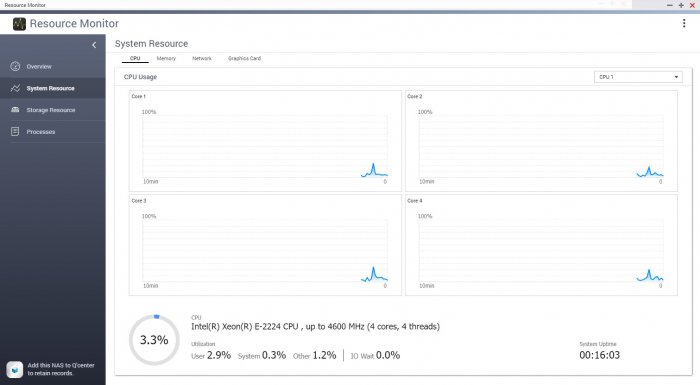
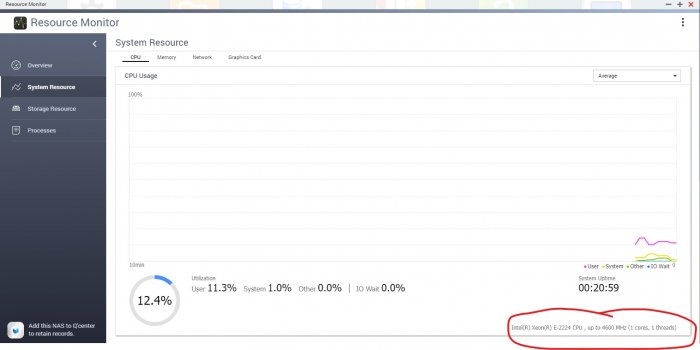
@xenix96 Danke vielmals. Jetzt sind 4 Kerne aktiv.
-
Das Bearbeiten der model.conf-Datei ist mir zu kompliziert, ich habe es noch nicht herausgefunden. Ich habe den ganzen Thread mehrmals gelesen, konnte aber noch nicht anfangen, die Datei zu bearbeiten. Heute werde ich ein letztes Mal lesen und mit der Bearbeitung der Datei model.conf beginnen. Vielen Dank an Sie und andere für Ihre Hilfe. Ich könnte es nicht alleine schaffen.
-
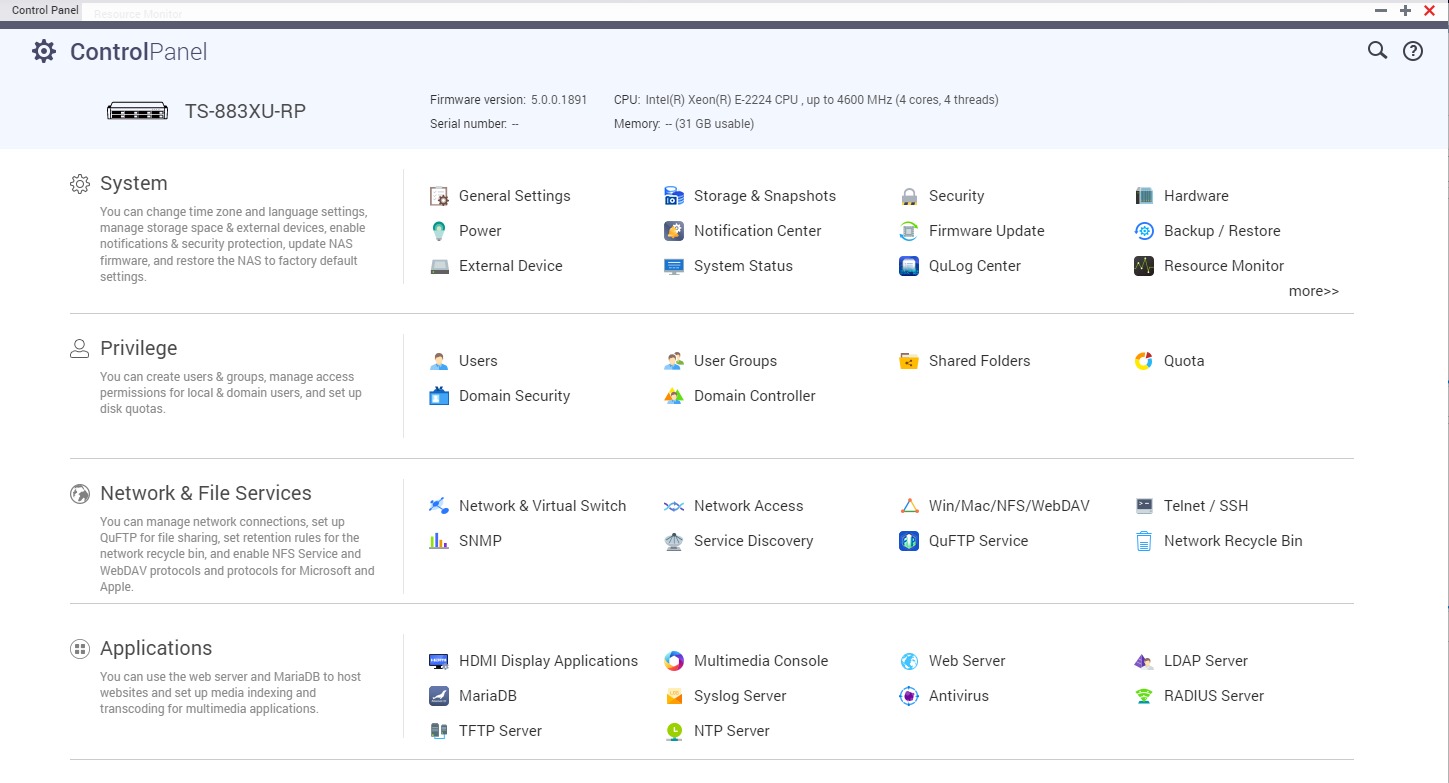
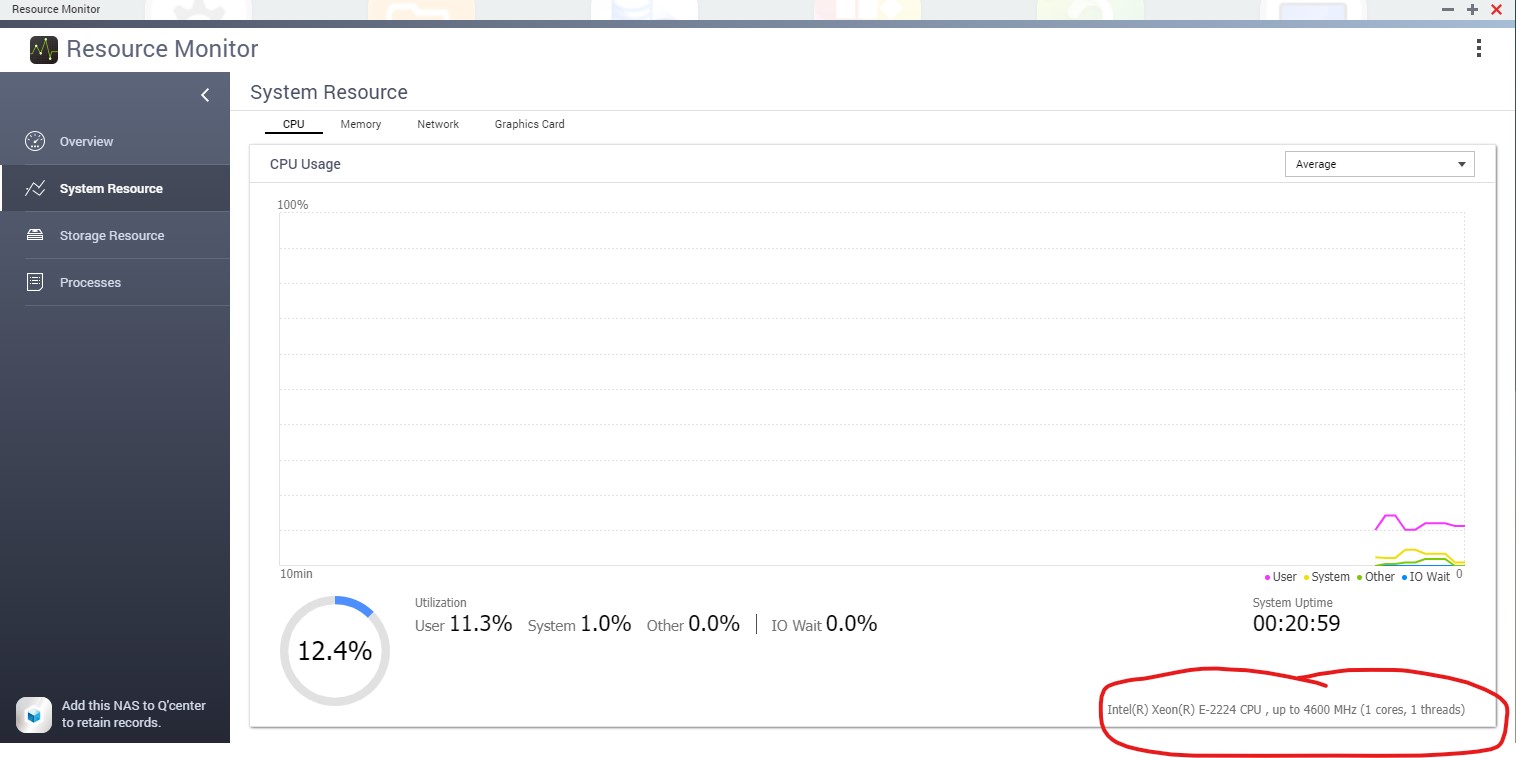
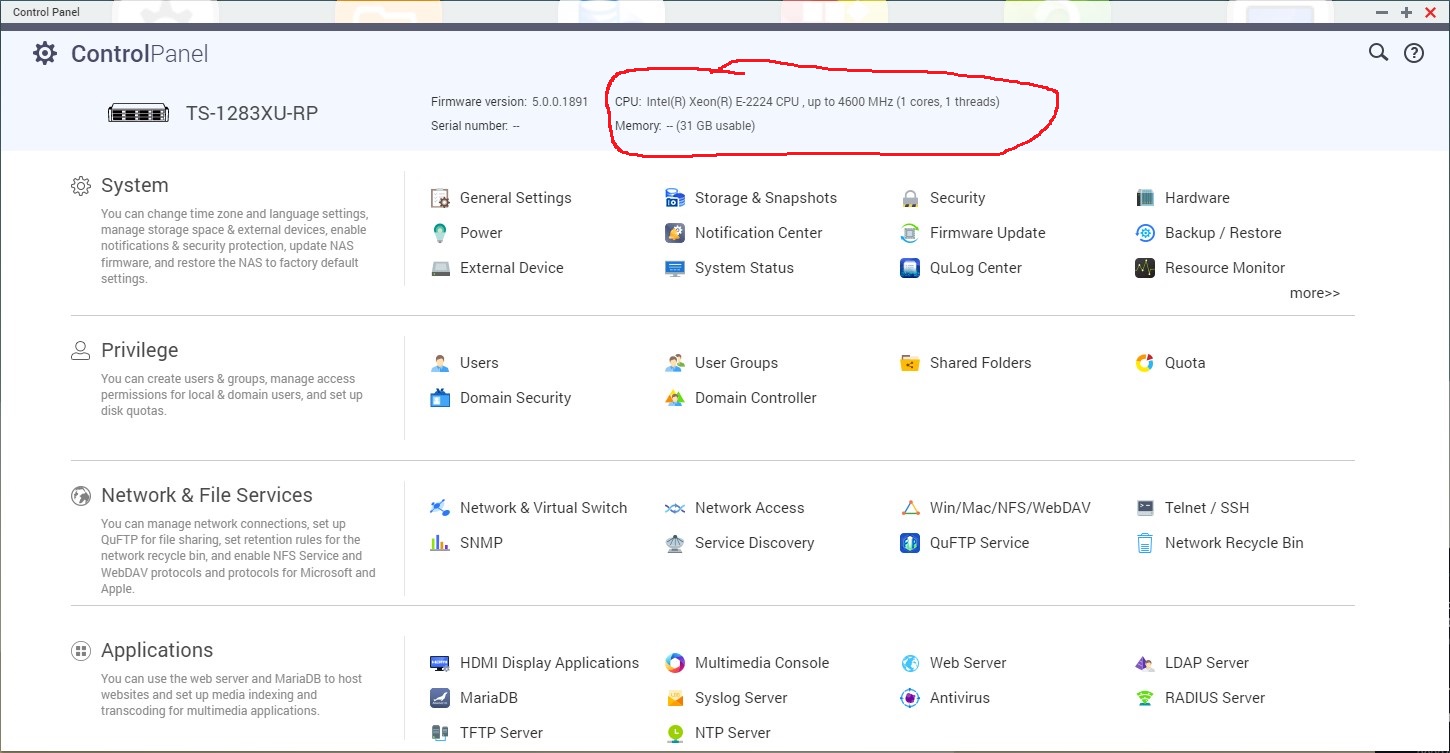
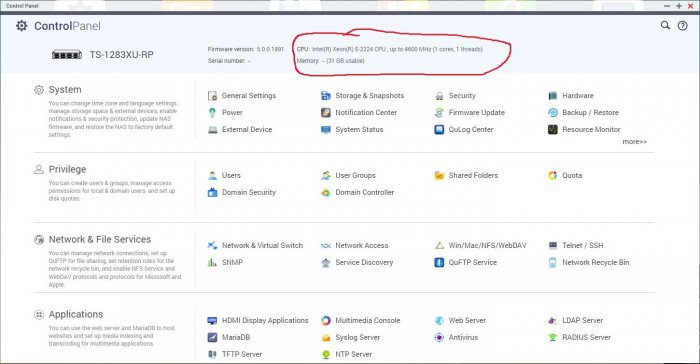
Hallo, ich habe als Ergebnis meiner Experimente seit gestern Abend mehrere Male erfolgreich installiert. Zuerst habe ich das 472-Modell installiert und dann die 1283ux-Modelle. Nachdem ich Qnap mit USB geöffnet habe, habe ich die ersten Installationen mit dem Assistenten durchgeführt und ein Volume mit 1 SSD-Festplatte erstellt. Ich konnte die Virtualisierung und einige Anwendungen erfolgreich installieren. Aber bei beiden Versuchen sah die CPU nur 1 Kern (Intel Xeon E-2224 4 Kern) Gibt es eine Möglichkeit, dies zu beheben?
-
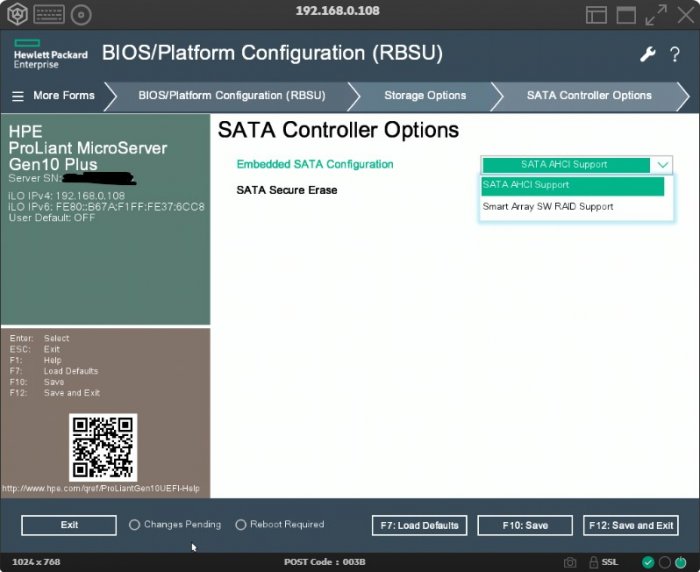
Ja, jetzt habe ich meine Einstellungen überprüft, "SATA AHCI Support" ist aktiv. Hinweis: Ich schreibe immer, indem ich ins Deutsche übersetze, tut mir leid, damit habe ich auch etwas Mühe.
-
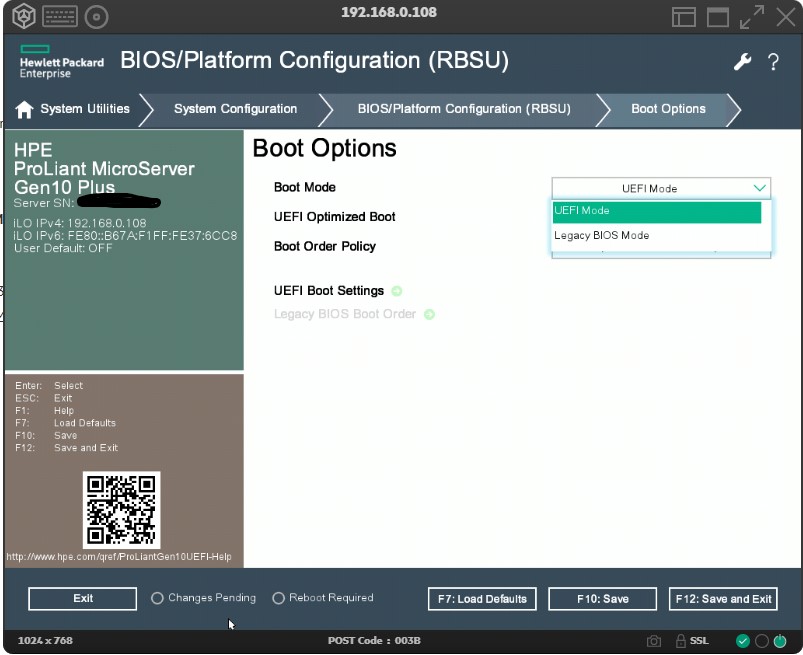
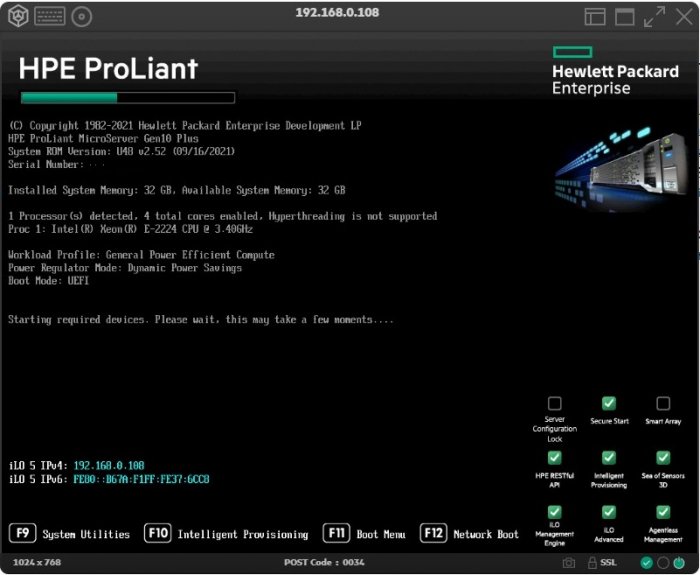
Ich sehe nur 2 Startoptionen.

-
Ja UEFI. Ich habe auch einen Screenshot eingestellt. Ich warte derzeit darauf, dass es mit dem von mir erstellten USB bootet, aber es ist unglaublich langsam.
-
Hallo, Ich habe auch die Datei QNAP-BOOT-EN-v1.00.img von dem neu angegebenen Link zum Testen heruntergeladen und eine USB-Startdiskette erstellt. Der TinyCore-Bildschirm erscheint bei mir nicht, er bleibt auf dem schwarzen Bildschirm, aber ich kann eine Verbindung mit SSH herstellen, indem ich die IP-Adresse des Systems erkenne. Zunächst einmal kann ich das Skript „sudo get_qnap_firmware“ in den kurzen Installationsschritten von @snoopy78 nicht finden. Ich weiß nicht, ob es an der .img-Datei liegt, die ich verwende. Jetzt teile ich die Befehle, die ich nach dem ersten USB-Boot mit SSH eingegeben habe. Connecting to 192.168.0.109:22... Connection established. To escape to local shell, press 'Ctrl+Alt+]'. WARNING! The remote SSH server rejected X11 forwarding request. ( '>') /) TC (\ Core is distributed with ABSOLUTELY NO WARRANTY. (/-_--_-\) www.tinycorelinux.net tc@box:~$ sudo get_qnap_firmware /home/tc/ .Xauthority .xsession hal_app2 .Xdefaults DEVBUS hardware_check .ash_history README.txt modify_your_initrd .ashrc TS-X72_20211221-5.0.0.1891.zip my_create_qnap_boot .local/ VERSION-1.01 original_laojifuli_scripts/ .profile add_modules_files pack_your_initrd .setbackground additional/ pc1 .wbar figure_devices translated_lajifuli_scripts/ .wmx/ hal_app1 tc@box:~$ sudo get_qnap_firmware /home/tc/ .Xauthority .xsession hal_app2 .Xdefaults DEVBUS hardware_check .ash_history README.txt modify_your_initrd .ashrc TS-X72_20211221-5.0.0.1891.zip my_create_qnap_boot .local/ VERSION-1.01 original_laojifuli_scripts/ .profile add_modules_files pack_your_initrd .setbackground additional/ pc1 .wbar figure_devices translated_lajifuli_scripts/ .wmx/ hal_app1 tc@box:~$ sudo get_qnap_firmware /home/tc/TS-X72_20211221-5.0.0.1891.zip sudo: get_qnap_firmware: command not found tc@box:~$ sudo ./my_create_qnap_boot ./my_create_qnap_boot: line 7: TVS-472X: not found Clear the boot, Please wait a while. Uncompressing QNAP original firmware Archive: ./TS-X72_20211221-5.0.0.1891.zip inflating: TS-X72_20211221-5.0.0.1891.img Using 120-bit encryption - (QNAPNASVERSION4) len=1048576 model name = TS-X72 version = 5.0.0 bzImage bzImage.cksum initrd.boot initrd.boot.cksum qpkg.tar qpkg.tar.cksum rootfs2.bz rootfs2.bz.cksum rootfs_ext.tgz rootfs_ext.tgz.cksum ================== DEV_BUS=B00:D23:F0 ================== Patch model system disk controller config. This script will try to determine the DEV_BUS of your devices, please verify generated model.conf Getting model.conf from your initrd folder Total eth devices discovered = 8 [System Network 1] DEV_BUS = B02:D00:F0 [System Network 2] DEV_BUS = B02:D00:F1 [System Network 3] DEV_BUS = B02:D00:F2 [System Network 4] DEV_BUS = B02:D00:F3 [System Network 5] DEV_BUS = B07:D00:F0 [System Network 6] DEV_BUS = B07:D00:F1 [System Network 7] DEV_BUS = B07:D00:F2 [System Network 8] DEV_BUS = B07:D00:F3 Getting Boot Disk information [Boot Disk 1] DEV_BUS = B00:D20:F0 Trying to figure out connected disk bus Found Disks : sda sdb sdc sdd sde [System Disk 6] DEV_BUS = B00:D23:F0 DEV_PORT = -1 [System Disk 11] DEV_BUS = B00:D23:F0 DEV_PORT = -1 [System Disk 12] DEV_BUS = B00:D23:F0 DEV_PORT = -1 [System Disk 13] DEV_BUS = B00:D23:F0 DEV_PORT = -1 sde is a USB Disk on PCI BUS Total USB controllers discovered = 2 [Usb Port 1] DEV_BUS = B00:D20:F0 [Usb Port 2] DEV_BUS = B01:D00:F4 Found more PCI devices than your current model TVS-472X is supporting, maxing selections to that number verify yourself Total PCI Bridges discovered = 2 [System PCIE SLOT 1] DEV_BUS = B00:D01:F0 [System PCIE SLOT 2] DEV_BUS = B00:D27:F0 Finding memory slots Trying to figure out memory modules Loading additional tinycore software dmidecode is already installed! Done with detection, i'm putting modified model.conf back to initrd location Please check the below output for changes we performed in initrd/etc/model.conf ------------------------------------------------------------------------- [System Network 1] DEV_BUS = B02:D00:F0 -- [System Network 2] DEV_BUS = B02:D00:F1 -- [System Network 3] DEV_BUS = B02:D00:F2 [Boot Disk 1] DEV_BUS = B00:D20:F0 [System Disk 1] DEV_BUS=B00:D23:F0 DEV_PORT = 3 -- [System Disk 2] DEV_BUS=B00:D23:F0 DEV_PORT = 2 -- [System Disk 3] DEV_BUS=B00:D23:F0 DEV_PORT = 1 -- [System Disk 4] DEV_BUS=B00:D23:F0 DEV_PORT = 0 -- [System Disk 5] DISK_FORM_TYPE = PD_FORM_M_2_PCIE BUS_TYPE = NVME -- [System Disk 6] DISK_FORM_TYPE = PD_FORM_M_2_PCIE BUS_TYPE = NVME [Usb Port 1] DEV_BUS = B00:D20:F0 -- [Usb Port 2] DEV_BUS = B01:D00:F4 -- [Usb Port 3] DEV_BUS = B00:D20:F0 -- [Usb Port 4] DEV_BUS = B00:D20:F0 -- [Usb Port 5] DEV_BUS = B00:D20:F0 -- [Usb Port 6] DEV_BUS = B00:D01:F0 -- [Usb Port 7] DEV_BUS = B00:D01:F0 -- [Usb Port 8] DEV_BUS = B00:D28:F0 -- [Usb Port 9] DEV_BUS = B00:D28:F0 [System PCIE SLOT 1] DEV_BUS = B00:D01:F0 -- [System PCIE SLOT 2] DEV_BUS = B00:D27:F0 SLOT1_ADDR = 1, 0x50 SLOT2_ADDR = 2, 0x52 ----------------------------------------------------------------={ DONE }=--------- Please verify model.conf and then execute ./pack_your_initrd Re-packing the QNAP RAM disk. Please wait a while. Repair the rootfs2.bz file. Please wait a while. Create QNAP boot disk successful If you need to modify the model file in the mymodel directory, execute sudo cp -f ./mymodel/* ./initrd/etc/ Re-execute sudo ./re_packing to complete boot disk creation Please restart the system if not needed tc@box:~$ ls DEVBUS README.txt TS-X72_20211221-5.0.0.1891.050220222347.zip VERSION-1.01 add_modules_files additional/ figure_devices hal_app1 hal_app2 hardware_check initrd/ model.conf modify_your_initrd my_create_qnap_boot mymodel/ original_laojifuli_scripts/ pack_your_initrd pc1 translated_lajifuli_scripts/ tc@box:~$ ls -al /sys/block /sd* ls: /sd*: No such file or directory /sys/block: total 0 drwxr-xr-x 2 root root 0 Feb 5 23:28 ./ dr-xr-xr-x 12 root root 0 Feb 5 23:28 ../ lrwxrwxrwx 1 root root 0 Feb 5 23:28 loop0 -> ../devices/virtual/block/loop0/ lrwxrwxrwx 1 root root 0 Feb 5 23:28 loop1 -> ../devices/virtual/block/loop1/ lrwxrwxrwx 1 root root 0 Feb 5 23:28 loop10 -> ../devices/virtual/block/loop10/ lrwxrwxrwx 1 root root 0 Feb 5 23:28 loop11 -> ../devices/virtual/block/loop11/ lrwxrwxrwx 1 root root 0 Feb 5 23:28 loop12 -> ../devices/virtual/block/loop12/ lrwxrwxrwx 1 root root 0 Feb 5 23:28 loop13 -> ../devices/virtual/block/loop13/ lrwxrwxrwx 1 root root 0 Feb 5 23:28 loop14 -> ../devices/virtual/block/loop14/ lrwxrwxrwx 1 root root 0 Feb 5 23:28 loop15 -> ../devices/virtual/block/loop15/ lrwxrwxrwx 1 root root 0 Feb 5 23:28 loop16 -> ../devices/virtual/block/loop16/ lrwxrwxrwx 1 root root 0 Feb 5 23:28 loop17 -> ../devices/virtual/block/loop17/ lrwxrwxrwx 1 root root 0 Feb 5 23:28 loop18 -> ../devices/virtual/block/loop18/ lrwxrwxrwx 1 root root 0 Feb 5 23:28 loop19 -> ../devices/virtual/block/loop19/ lrwxrwxrwx 1 root root 0 Feb 5 23:28 loop2 -> ../devices/virtual/block/loop2/ lrwxrwxrwx 1 root root 0 Feb 5 23:28 loop20 -> ../devices/virtual/block/loop20/ lrwxrwxrwx 1 root root 0 Feb 5 23:28 loop21 -> ../devices/virtual/block/loop21/ lrwxrwxrwx 1 root root 0 Feb 5 23:28 loop22 -> ../devices/virtual/block/loop22/ lrwxrwxrwx 1 root root 0 Feb 5 23:28 loop23 -> ../devices/virtual/block/loop23/ lrwxrwxrwx 1 root root 0 Feb 5 23:28 loop24 -> ../devices/virtual/block/loop24/ lrwxrwxrwx 1 root root 0 Feb 5 23:28 loop25 -> ../devices/virtual/block/loop25/ lrwxrwxrwx 1 root root 0 Feb 5 23:28 loop26 -> ../devices/virtual/block/loop26/ lrwxrwxrwx 1 root root 0 Feb 5 23:28 loop27 -> ../devices/virtual/block/loop27/ lrwxrwxrwx 1 root root 0 Feb 5 23:28 loop28 -> ../devices/virtual/block/loop28/ lrwxrwxrwx 1 root root 0 Feb 5 23:28 loop29 -> ../devices/virtual/block/loop29/ lrwxrwxrwx 1 root root 0 Feb 5 23:28 loop3 -> ../devices/virtual/block/loop3/ lrwxrwxrwx 1 root root 0 Feb 5 23:28 loop30 -> ../devices/virtual/block/loop30/ lrwxrwxrwx 1 root root 0 Feb 5 23:28 loop31 -> ../devices/virtual/block/loop31/ lrwxrwxrwx 1 root root 0 Feb 5 23:28 loop32 -> ../devices/virtual/block/loop32/ lrwxrwxrwx 1 root root 0 Feb 5 23:28 loop33 -> ../devices/virtual/block/loop33/ lrwxrwxrwx 1 root root 0 Feb 5 23:28 loop34 -> ../devices/virtual/block/loop34/ lrwxrwxrwx 1 root root 0 Feb 5 23:28 loop4 -> ../devices/virtual/block/loop4/ lrwxrwxrwx 1 root root 0 Feb 5 23:28 loop5 -> ../devices/virtual/block/loop5/ lrwxrwxrwx 1 root root 0 Feb 5 23:28 loop6 -> ../devices/virtual/block/loop6/ lrwxrwxrwx 1 root root 0 Feb 5 23:28 loop7 -> ../devices/virtual/block/loop7/ lrwxrwxrwx 1 root root 0 Feb 5 23:28 loop8 -> ../devices/virtual/block/loop8/ lrwxrwxrwx 1 root root 0 Feb 5 23:28 loop9 -> ../devices/virtual/block/loop9/ lrwxrwxrwx 1 root root 0 Feb 5 23:28 ram0 -> ../devices/virtual/block/ram0/ lrwxrwxrwx 1 root root 0 Feb 5 23:28 ram1 -> ../devices/virtual/block/ram1/ lrwxrwxrwx 1 root root 0 Feb 5 23:28 ram2 -> ../devices/virtual/block/ram2/ lrwxrwxrwx 1 root root 0 Feb 5 23:28 ram3 -> ../devices/virtual/block/ram3/ lrwxrwxrwx 1 root root 0 Feb 5 23:28 ram4 -> ../devices/virtual/block/ram4/ lrwxrwxrwx 1 root root 0 Feb 5 23:28 ram5 -> ../devices/virtual/block/ram5/ lrwxrwxrwx 1 root root 0 Feb 5 23:28 ram6 -> ../devices/virtual/block/ram6/ lrwxrwxrwx 1 root root 0 Feb 5 23:28 ram7 -> ../devices/virtual/block/ram7/ lrwxrwxrwx 1 root root 0 Feb 5 23:28 sda -> ../devices/pci0000:00/0000:00:17.0/ata1/host0/target0:0:0/0:0:0:0/block/sda/ lrwxrwxrwx 1 root root 0 Feb 5 23:28 sdb -> ../devices/pci0000:00/0000:00:17.0/ata2/host1/target1:0:0/1:0:0:0/block/sdb/ lrwxrwxrwx 1 root root 0 Feb 5 23:28 sdc -> ../devices/pci0000:00/0000:00:17.0/ata3/host2/target2:0:0/2:0:0:0/block/sdc/ lrwxrwxrwx 1 root root 0 Feb 5 23:28 sdd -> ../devices/pci0000:00/0000:00:17.0/ata4/host3/target3:0:0/3:0:0:0/block/sdd/ lrwxrwxrwx 1 root root 0 Feb 5 23:28 sde -> ../devices/pci0000:00/0000:00:14.0/usb2/2-3/2-3:1.0/host8/target8:0:0/8:0:0:0/block/sde/ lrwxrwxrwx 1 root root 0 Feb 5 23:28 sdf -> ../devices/pci0000:00/0000:00:14.0/usb3/3-1/3-1:1.0/host9/target9:0:0/9:0:0:0/block/sdf/ lrwxrwxrwx 1 root root 0 Feb 5 23:28 zram0 -> ../devices/virtual/block/zram0/ tc@box:~$
-
Hallo, Vielen Dank, ich habe auch den Server vorbereitet, ich habe mich darauf vorbereitet, mir die Freigaben anzusehen, in denen die Installationstests durchgeführt wurden, und es erneut zu versuchen. Wenn es eine andere .iso-Datei gibt, spart es Zeit, wenn ich es damit versuche.
-
Hallo, Ich glaube, dieser Link wurde gelöscht. file.io Die angeforderte Datei wurde gelöscht
-
Hallo snoopy78, Zunächst einmal vielen Dank für Ihre Hilfe und die Informationen, die Sie geteilt haben. Wird das neue Image mit der zuvor freigegebenen Datei namens QNAP-BOOT-EN-v1.00.img erstellt? Oder gibt es eine neue Version?
-
Since it is only open to members, we can read the leaked articles on other platforms.
-
Hello, as a barematel, I had the same problem when trying to install Microserver Gen10 Plus. I think I need to make some edits in the model.conf file, I'm trying to understand it now. And i'm not a programmer too
-
Hallo, Meine Muttersprache ist nicht Deutsch, ich schreibe mit Übersetzung, ich hoffe es ist verständlich. Zuerst habe ich den ganzen Titel gelesen und versucht, ihn zu verstehen. Ich habe Google Translate verwendet, da es nicht meine Muttersprache ist. Ich habe einen Hp Microserver Gen 10 Plus Xeon E-2224 CPU 48GB DDR4 RAM 1x256GB SSD 3x4TB WD Red HDD Server mit 4 SATA Anschlüssen und USB 3.2 Unterstützung. Jemand verwendet es als NAS Installation auf dieser Hardware? Wo soll ich anfangen? Außerdem sind die geteilten Informationen sehr wertvoll, vielen Dank an alle, die sie geteilt haben. Ich habe Google Translate verwendet, um auf Deutsch zu schreiben. Nochmals, ich entschuldige mich, wenn es irgendwelche falschen Aussagen gibt.