WowaDriver
-
Posts
42 -
Joined
-
Last visited
Everything posted by WowaDriver
-
Hello everyone. As the thread name says, I have to build a small computer or use a ready-made one on which Xpenology is installed to monitor a site with 9x 4K cameras. The focus is therefore only on Surveillance Station. I once tried a Lenovo M700 - 10J0-S3C900 with the following specifications: Processor: Intel i5-6400T QuadCore 4x 2.2GHz (max. Turbo 2.8GHz) 6MB SmartCache Graphics: Intel HD Graphics 530 Memory: 8GB DDR4 RAM Hard disk: 256GB SSD A WD MyBook 8TB external HDD with USB3.0 served as the recording medium. The results are rather sobering. When I open the DSCam app with 6 cameras, it feels like it takes an eternity until the streams are visible. The test was recorded in 24/7 mode with additional motion detection. I don't think the network is a problem here as the cameras only have a 100MB interface. I think it's more likely to be the hard disk. Do you think it would be better to record on a large SSD or NVMe? Thanks for help!
-
Develop and refine the DVA1622 loader
WowaDriver replied to pocopico's topic in Developer Discussion Room
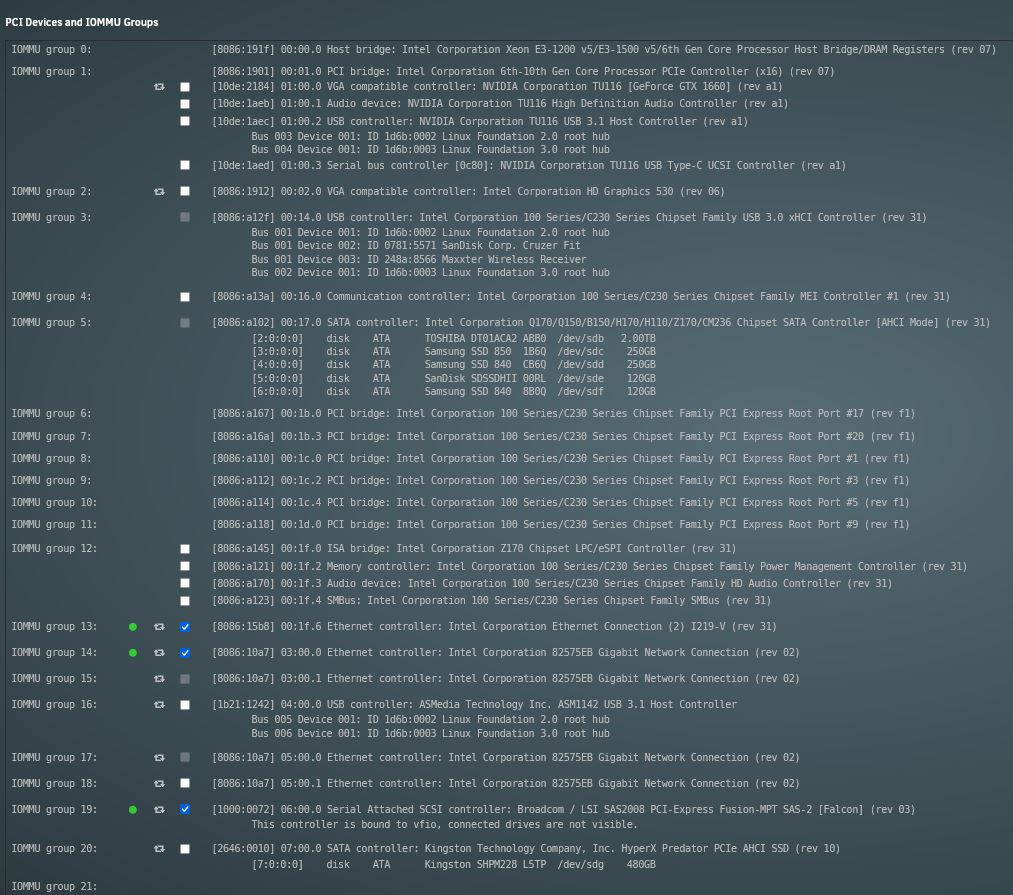
Hi@all, I successfully installed a DVA1622 VM on unraid with the use of the arpl loader by @fbelavenuto. I use for tests a virtual disc and try to passthrough my LSI 9211-8i (Dell H310 HBA) in IT mode with 8 HDD's on it. Problem I got is, only the virtual disc is visible. What I have to do to get my other 8 hdd's? -
@fbelavenuto hi and thanks for the arpl loader. Is it possible to use this with an DVA1622 build? I tried but it show me only the virtual discs on sata 1 controller on unraid. The passthrough lsi hba wasn't shown up...
-
How to install XPEnology (DVA3221) on Unraid
WowaDriver replied to erazor1112's topic in Tutorials and Guides
Hi @all. Does anyone tried to use vmxnet3 for 10Gbe connection? The driver modules are there but and principally it work. But in the network settings tab it show me the devices with a 1gig connection instead of a 10Gbe connection.... Do you guys have a solution here? My physical hardware are a mellanox connect x3 card with two sfp+ ports and one RJ45 onboard port which is also 10Gbe. My plan is you let them work in triple LAG on hypovisor unraid -
I can confirm this. Tried on unraid to passthrough a virtual disk which is on a nvme... no chance
-
Brauche Hilfe beim SATA mapping - (Asus P9D-I + 9211-8i)
WowaDriver replied to Harvey's topic in GERMAN
Frage: Wenn ich mein RAID 5 mit 8 Sata Platten an einem LSI 9211-8i im IT Mode an zwei JMB585 mit je 5xSata umklemme, wird ein RAID rebuild notwendig sein? rein logisch würde ich sagen, nein. Da der LSI im IT mode ebenfalls wie ein SATA Host Controller aggiert und die Platten doch nur durchreicht. Was meint ihr dazu? -
H310 IT Mode + 3x6TB Red + 1.04l DS918+ Speicherpool Absturz
WowaDriver replied to WowaDriver's topic in GERMAN
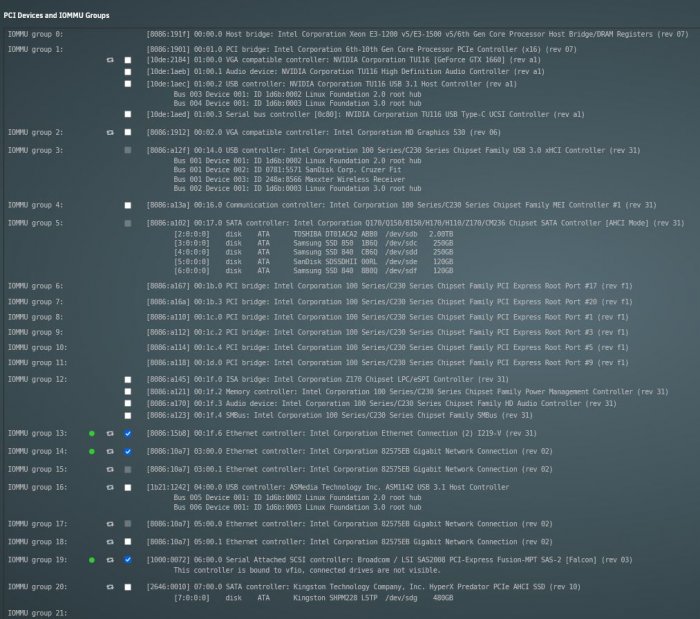
Hallo @all, Hi @IG-88 und Hi @Chili aktuell läuft wie oben beschrieben der HBA im IT mode mit 8 Platten ohne Probleme in einem PCIe 3.0 Port welcher 4x elektrisch angebunden ist. Bei dem Dell 310 HBA handelt es sich aber um einen PCIe 2.0 x8 Stecker. PCIe ist ja grundsätzlich abwärtskompatibel, das ist klar und da er nur mit 4 Lanes angebunden ist - existiert da auch ein gewisser möglicher Flaschenhals. Nun stehe ich vor folgendem Sachverhalt: Ihr sprecht immer wieder vom JMS585 Chip und der einwandfreiere Anbindung von diesem und Funktion von Hibernation. Ich möchte mein Setup etwas ändern und auf eine VM mit Unraid drunter umziehen. Gerne möchte ich auch das die 8 HDD's schlafen gehen. Wenn ich den Dell 310 HBA à la LSI 9811-8i im IT mode ersetze gegen eine Karte mit JMS585 Chip und dort die Platten eins zu eins umstecke, muss dann das RAID neu aufgebaut werden? Ich denke nicht oder? Der LSI reicht die Platten ja genauso wie ein SATA Host Controller durch im IT Mode... Das nächste Problem stellt sich mit den 8 Slots des LSI 9811. Ich habe fertige JMS585 Karten mit 8 Ports nicht finden können. Denke aber über so eine Lösung nach: Adapterkarte PCIe 3.0 x8 zu 2x NVMe M.2 M-Key und diese dann mit zwei von diesen Adaptern zu bestücken: Adapter NVMe M.2 M-Key zu 5x Sata Diese haben dann auch den JMS585 Controller drauf und ich hätte sogar 10 Sata Ports und könnte so 2x alte SATA SDD's 840 Evo (256gb) durchreichen und als Read Write Cache benutzen. So zumindestens die Theorie. Mein dritte Slot am Board ist am Chipsatz angebunden und hat wie beschrieben 4x Lanes elektrisch. Mein Board unterstützt auch Bifrucation aber ich denke nur in den Slots die zur CPU angebunden sind. Die Frage nun, brauche ich Bifrucation zwingend? Würde die Karte mit Performanceeinbußen auch im PCIe 3.0 x4 Slot prinzipiell laufen? Oder habe ich hier Probleme weil eben auf der Adapterkarte nochmals eine Unterteilung zu 2x M.2 NVMe erfolgt? Letzte Frage zum Xpenology Cache grundsätzlich: Dieser läuft ja wenn überhaupt dann nur mit dem 918+ Image, richtig? Habe aktuell das DS3617xs laufen und zum test eine virtuelle V-Disc mit 120gb durchgereicht unter Unraid, welches dann auf einer SSD ausgelagert wurde. Die DS3617xs erkennt due qmu V-Disc auch aber listet diese nur unter HDD und nicht unter SSD und somit lässt diese sich auch nicht als SSD Cache einbinden. Wiedermal viele Fragen und ich hoffe ihr könnt mir helfen. Danke! -
Hey i will build a tinycore VM on unraid. The Question at this moment i had is it only possible to get a ssd cache work if you passthrough a native ssd to the DSM7 VM or can i passthrough a VM disc of 200gb of an native 2tb NVMe and set this "virtual ssd" as a cache in DSM7 ??
-
SurveillanceStation-x86_64-8.2.2-5766
WowaDriver replied to montagnic's topic in Програмное обеспечение
Irgendwelche Fortschirtte an der Front? Есть прогресс на фронте? -
SurveillanceStation-x86_64-8.2.2-5766
WowaDriver replied to montagnic's topic in Програмное обеспечение
Это, конечно, вариант, который я и сам имел в виду, но, честно говоря, я предпочитаю иметь все в виртуальной машине... поскольку DSM уже работает как виртуальная машина под UNRAID... Я надеюсь, что скоро у нас будет решение для DSM 7. -
SurveillanceStation-x86_64-8.2.2-5766
WowaDriver replied to montagnic's topic in Програмное обеспечение
Как вы думаете, появится ли в ближайшем будущем вариант, который будет работать под DSM 7? SS - одна из моих основных задач, которую берет на себя DSM, так что это значительно облегчило бы мне принятие решения о том, обновлять DSM 7 или нет. -
RedPill - the new loader for 6.2.4 - Discussion
WowaDriver replied to ThorGroup's topic in Developer Discussion Room
So now it is possible get to work HDD which are bigger than >2TB ?? -
RedPill - the new loader for 6.2.4 - Discussion
WowaDriver replied to ThorGroup's topic in Developer Discussion Room
Sorry and its offtopic here, but do you tested the old c****** SSS package which the guys used on 6.2.3 with you restart task on DSM7? I think it could be possible to use, because it is a manuel installed package. So you should deinstall the standard SSS on DSM7 and give a try for the c****** one... In the past i tried it up with 6.2.3 it it worked perfectly for my with 9 cams. I prefere SSS because you have the ability to use livecam, which is a kind of webcam recorder for you ios and ipados devices. So here i have to iPads in my house from which i can use the front cam for recording -
RedPill - the new loader for 6.2.4 - Discussion
WowaDriver replied to ThorGroup's topic in Developer Discussion Room
Yes thanks i know this issue, but i hoped that somebody have new insider informations about a possible workaround... so i still have to wait on 6.2.3 -
RedPill - the new loader for 6.2.4 - Discussion
WowaDriver replied to ThorGroup's topic in Developer Discussion Room
@all: Any news about LSi 9211-i8 in IT-Mode compatibilities? I have to passthrough one HBA with 8 HDD's in RADI5 in Unraid -
RedPill - the new loader for 6.2.4 - Discussion
WowaDriver replied to ThorGroup's topic in Developer Discussion Room
Many thanks to the development to all involved! Has anyone managed to create a useful VM with DSM 7 under Unraid? In my case I would have to pass an LSI 9211-8i HBA and an intel NIC for native ethernet? Would anyone share their configuration? -
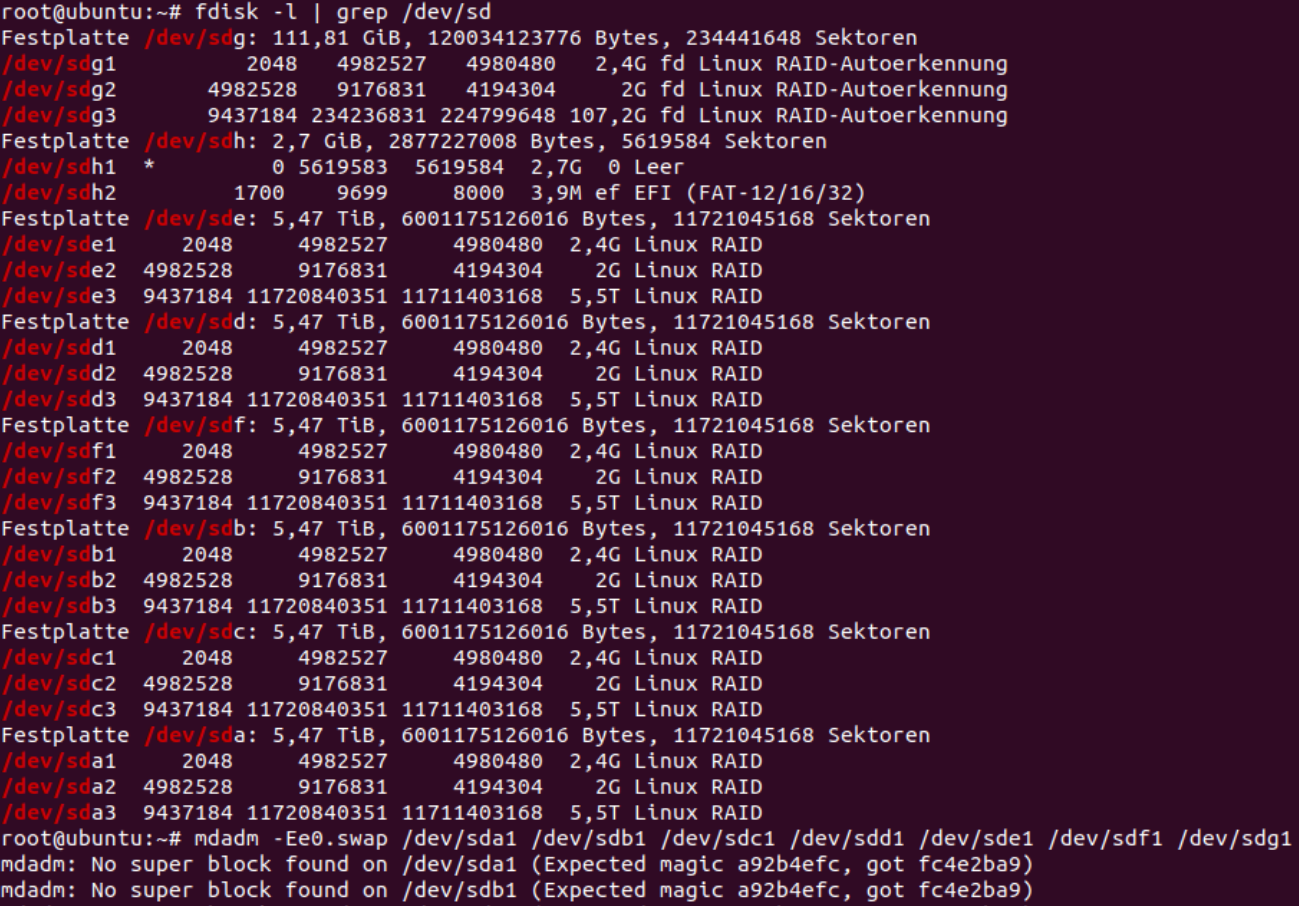
Da mir hier keiner antwortet habe ich die Sache selbst in den Griff genommen. Tutorials sind sicherlich alle zu gebrauchen, aber schlussendlich ist der einfachste Weg die Systemparitionen (2,4GB Linux RAID1 Member: sda1, sdb1, sdc1, ... , sdx1) aller eingebauten Festplatten zu löschen, wenn man ein Update ausgeführt hat und das System nicht mehr zu booten ist. Anschließend einfach eine unbenutzte synoboot.img verwenden und schon wird das System migriert ohne die Datenparitionen anzufassen. Nachteil ist, dass alle installierten Apps, Konfigurationen und Einstellungen natürlich neu installiert werden müssen. Ich für meinen Fall bin froh das alles wieder läuft und alle Daten wieder da sind! Danke trotzdem für alle hier niedergeschriebenen Informationen. Würde mir nur für die Zukunft wünschen, dass die Community bisschen aktiver antworten würde.
-
Tutorial: How to access DSM's Data & System partitions
WowaDriver replied to Polanskiman's topic in Tutorials and Guides
Since no one answers me here I have taken the matter into my own hands. Tutorials are certainly all useful, but finally the easiest way is to delete the system partitions (2.4GB Linux RAID1 members: sda1, sdb1, sdc1, ... , sdx1) of all installed hard disks, if you have performed an update and the system is no longer bootable. Then simply use an unused synoboot.img and the system is migrated without touching the data partitions. Disadvantage is that all installed apps, configurations and settings have to be reinstalled of course. Thanks anyway for all the information written down here. Would only wish for the future that the community would answer a bit more active. -
oder einfach eine NIC passthrough sprich durchreicht, dann ist es nicht nötig einen virtuellen nic (e1000e) zu betreiben
-
Tutorial: How to access DSM's Data & System partitions
WowaDriver replied to Polanskiman's topic in Tutorials and Guides
?????? -
Tutorial: How to access DSM's Data & System partitions
WowaDriver replied to Polanskiman's topic in Tutorials and Guides
I have just been able to test the following: I have unhooked the RAID5 system and started DSM on the SSD with version 6.2.3. Here I have created a volume 1 and placed test data. Then I have again forced an update to the 6.2.4. Now I mounted the bricked system in Linux and deleted the system partition. Then with a new boot image the 6.2.3 was installed again and voila the system runs and the volume 1 on the ssd is still present with the test data. Now the question is something like this then also works with my RAID5? -
Tutorial: How to access DSM's Data & System partitions
WowaDriver replied to Polanskiman's topic in Tutorials and Guides
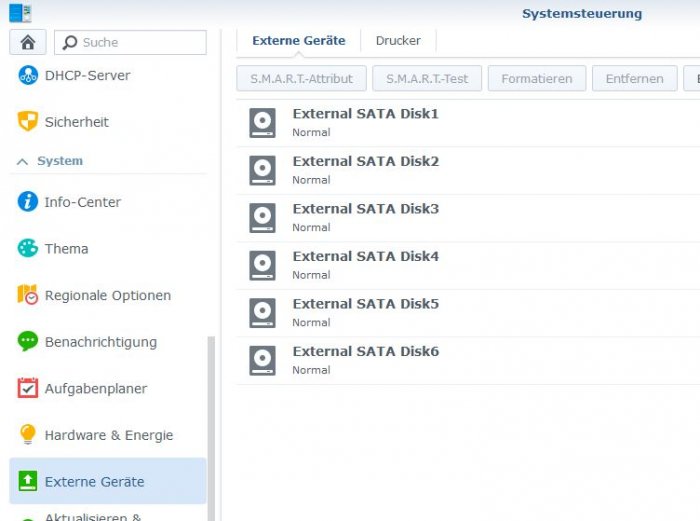
@Polanskiman First of all I would like to thank you for the tutorial! Also I want to thank you for giving your time to solve my problems! I can not get the system partition mounted and would be happy if you could give me a tip on how to proceed. The following scenario and my system: DSM 6.2.3-25426 as a virtual machine on an unraid system 120 GB SSD passthrough for Volume 1 (Systemapps) LSI 9211-8i in IT Mode Passthrough with 6x6TB WD in RAID5 (DATA) As stupid as I am I believed a posting in another forum and tried to update to 6.2.4 -> Brick Since I was still using Baremetall last year and after switching to VM I was able to take over the RAID5 with the LSI controller completely from the Baremetall version, I wanted to undo my update error with this background information as follows. I removed the RAID5 with the LSI controller and set up the virtual machine with only the SSD again with the version 6.2.3. Unfortunately I had to find out that the RAID5 is not taken over now, because in the system partitions there is still information from the 6.2.4 are available and the 6 hard disks are displayed as external hard disks. I was now looking for a solution here in the forum and came to this thread and that of @IG-88 on the subject of downgrade from 6.2.4 to 6.2.3. The problem I have now is that I have already formatted on the SSD and on the system partition which are not identical with the information of the system partitions of the RAID5. Result of your tutorial for me is that it is not possible to assemble the RAID of the system partition. ... Now I had the idea to copy the content of one of the system partitions, which must be all the same (RAID1), from the six RAID5 hard drives and write to the system hard drive of the SSD, so that the original RAID1 of the system partition again consists of 7 hard drives. Unfortunately, this also does not work, because I can not mount a single system partition with the "mount" command... Would it be a good idea to format (not delete) the system disks of all HDD's and use an unused bootimage to force a new installation of 6.2.3. My primary concern is only that the RAID5 system data is preserved. I can quickly reset all apps and system settings. Or is there possibly a better way I can go? The most inelegant way would be to mount the RAID5 of the data partition and back up all the data, then rebuild the RAID5 and import the data again. This would definitely work, since I was already able to mount the RAID5 successfully. Thanks for reading my problems!


-
vorweg sorry für den Doppelpost, aber irgendwie kann ich meinen Beitrag nicht editieren... @IG-88 Ich würde mich freuen wenn du dir mal bei Problem anschauen könntest, da du der Deutschen Sprache mächtig bist und das entsprechend oben verlinkte Tutorial verfasst hast. Ich habe mir mal gestern intensiver die Beiträge hier angeschaut und versucht zu verstehen. So wie ich das verstanden habe ich bei dem misslungenden Update zu 6.2.4 die Systemparition hinüber bzw. der Kernel darin und mit der oben verlinkten Anleitung löschen wir quasi auf allen Platten in der Systemparition sämtliche Informationen zur 6.2.4 und migrieren anschließend alles neu zu einer neu installierten 6.2.3., allright? Mein Ausgangsszenario ist ja ein wenig anders. Meine DSM VM besteht ja aus einer SSD alias Volume1 und dem Raid5 Verbund alias Volume2. Nach dem Brick hatte ich das Raid ja ausgehangen, also nicht mehr der VM durchgereicht und erfolgreich auf der SSD wieder 6.2.3 installiert. Sprich wenn ich jetzt das Raid5 durchreiche kann er es so nicht lesen, weil in deren Systempartitionen Informationen von 6.2.4 drin sind und er mir diese somit als Externe Platten anzeigt, richtig? Kann ich jetzt das Raid5 in einem Linux mounten und nach der oben verlinkten Anleitung von den 6.2.4 Dateien befreien? Oder muss es ein gesamtes System sein, sprich das ich wieder die aktuell auf der SSD vorhandene 6.2.3 auf 6.2.4 update und dann quasi den ursprünglichen "Brick" Zustand habe und muss dann anschließend auf allen Systemparitionen (die der SSD und die des RAID5) von den 6.2.4 Daten befreien und anschließend migrieren? Mir geht hier ebenfalls wie @Thorlaf nur darum das RAID5 wieder zum laufen zu bekommen, sämtliche Settings und Apps können mit geringem Aufwand neu aufgesetzt werden. Vielen Lieben Dank für die Hilfe!!!!
-
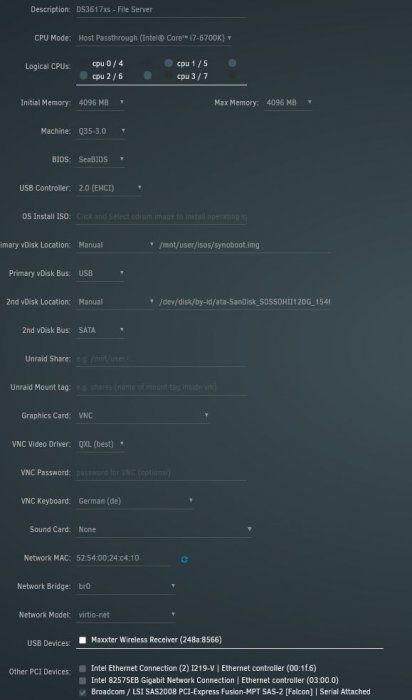
Hallo Leute, die selbe Dummheit wie @Thorlaf habe ich gestern auch gemacht. Hier hängt ebenfalls der Haussegen hängt hier ebenfalls sowas von schief... So doof wie ich bin habe ich versucht, meine Xpenology VM (unter Unraid) von der laufenden Version DSM 6.2.3-25426 auf die neueste DSM 6.2.4-25556 zu aktualisieren. Als Bootimage verwende ich 1.03b für eine DS3617. Das Ende der Geschichte ist, die VM war nicht mehr ansprechbar => Brick! Ich hatte unter Unraid zur VM einen DUAL Intel Nic und einen LSI SAS2008 PCI-Express Fusion-MPT SAS-2 Controller (LSI 9211-8i / Dell H310 HBA im IT-Mode) 1zu1 durchgereicht, an dem 6x WD 6TB Festplatten als RAID5 angeschlossen sind. Also habe ich die VM neu aufgesetzt und die DSM 6.2.3-25426 Version neu installiert (ohne das durchreichen der o.g. Controller Karten). Nun habe ich das Problem, dass wenn ich den LSI-Controller mit den 6x Festplatten durchreiche, dieser die angeschlossenen Platten als 6x externe Festplatten anzeigt und nicht mehr als RAID5. Die Neuinstallation erfolgte nur auf einer SSD welche nicht im RAID war und als Volume 1 diente. Kann ich nach dem oben genannten Vorgehen das RAID5 wieder reparieren? Oder habe ich hier ein anderes Problem? Bitte helft mir, ich weiß nicht, wie ich das RAID5 wiederherstellen kann. Ein Backup ist leider nicht vorhanden, ich hätte nie gedacht, dass das RAID5 durch das Update kaputt gehen könnte.
-
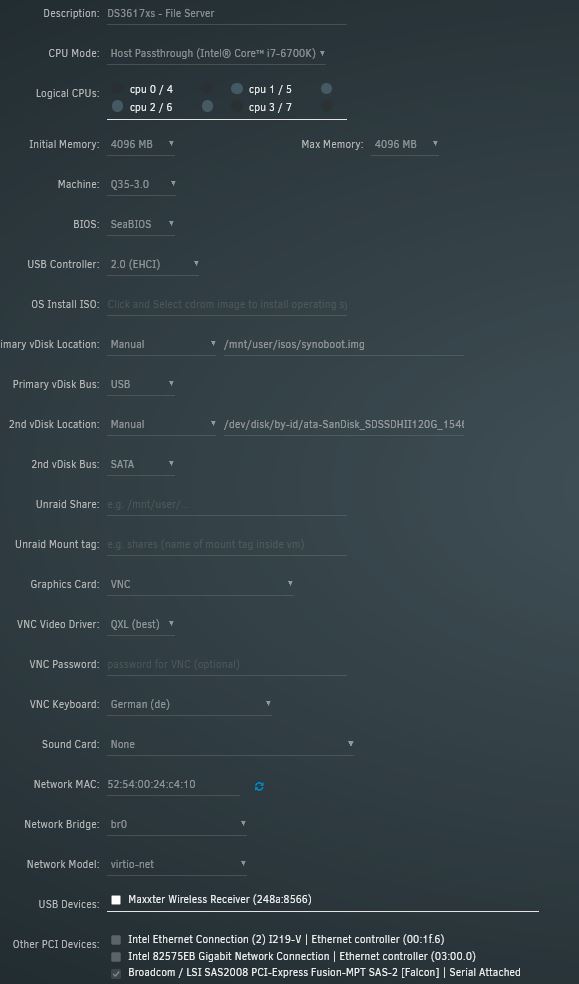
Big problem, need urgent help! Due to my stupidity I tried to update my Xpenology VM from the running version DSM 6.2.3-25426 to the newest DSM 6.2.4-25556. As bootimage I use 1.03b for a DS3617. The end of the story is, the VM was no longer responsive => Brick! I had under Unraid passthrough to the VM a DUAL Intel Nic and a LSI SAS2008 PCI-Express Fusion-MPT SAS-2 controller (LSI 9211-8i / Dell H310 HBA in IT-Mode) to which 6x WD 6TB hard disks are connected as RAID5. So I rebuilt the VM and reinstalled the DSM 6.2.3-25426 version, again. I now have the problem that when I passthrough the LSI controller with the 6x hard drives they show up as 6x external hard drives and no longer as RAID5. Please help me, I don't know how to get back the RAID5. A backup is unfortunately not available, I never thought that the RAID5 could be broken by the update. <?xml version='1.0' encoding='UTF-8'?> <domain type='kvm' id='9'> <name>Xpenology - VM</name> <uuid>a454f1e6-fe15-df14-0475-fceadd9fb72d</uuid> <description>DS3617xs - File Server</description> <metadata> <vmtemplate xmlns="unraid" name="CentOS" icon="default.png" os="centos"/> </metadata> <memory unit='KiB'>4194304</memory> <currentMemory unit='KiB'>4194304</currentMemory> <memoryBacking> <nosharepages/> </memoryBacking> <vcpu placement='static'>4</vcpu> <cputune> <vcpupin vcpu='0' cpuset='1'/> <vcpupin vcpu='1' cpuset='5'/> <vcpupin vcpu='2' cpuset='2'/> <vcpupin vcpu='3' cpuset='6'/> </cputune> <resource> <partition>/machine</partition> </resource> <os> <type arch='x86_64' machine='pc-q35-3.0'>hvm</type> </os> <features> <acpi/> <apic/> </features> <cpu mode='host-passthrough' check='none' migratable='on'> <topology sockets='1' dies='1' cores='2' threads='2'/> <cache mode='passthrough'/> </cpu> <clock offset='utc'> <timer name='rtc' tickpolicy='catchup'/> <timer name='pit' tickpolicy='delay'/> <timer name='hpet' present='no'/> </clock> <on_poweroff>destroy</on_poweroff> <on_reboot>restart</on_reboot> <on_crash>restart</on_crash> <devices> <emulator>/usr/local/sbin/qemu</emulator> <disk type='file' device='disk'> <driver name='qemu' type='raw' cache='writeback'/> <source file='/mnt/user/isos/synoboot.img' index='2'/> <backingStore/> <target dev='hdc' bus='usb'/> <boot order='1'/> <alias name='usb-disk2'/> <address type='usb' bus='0' port='2'/> </disk> <disk type='block' device='disk'> <driver name='qemu' type='raw' cache='writeback'/> <source dev='/dev/disk/by-id/ata-SanDisk_SDSSDHII120G_154682400434' index='1'/> <backingStore/> <target dev='hdd' bus='sata'/> <alias name='sata0-0-3'/> <address type='drive' controller='0' bus='0' target='0' unit='3'/> </disk> <controller type='usb' index='0' model='ich9-ehci1'> <alias name='usb'/> <address type='pci' domain='0x0000' bus='0x00' slot='0x07' function='0x7'/> </controller> <controller type='usb' index='0' model='ich9-uhci1'> <alias name='usb'/> <master startport='0'/> <address type='pci' domain='0x0000' bus='0x00' slot='0x07' function='0x0' multifunction='on'/> </controller> <controller type='usb' index='0' model='ich9-uhci2'> <alias name='usb'/> <master startport='2'/> <address type='pci' domain='0x0000' bus='0x00' slot='0x07' function='0x1'/> </controller> <controller type='usb' index='0' model='ich9-uhci3'> <alias name='usb'/> <master startport='4'/> <address type='pci' domain='0x0000' bus='0x00' slot='0x07' function='0x2'/> </controller> <controller type='pci' index='0' model='pcie-root'> <alias name='pcie.0'/> </controller> <controller type='pci' index='1' model='pcie-root-port'> <model name='pcie-root-port'/> <target chassis='1' port='0x10'/> <alias name='pci.1'/> <address type='pci' domain='0x0000' bus='0x00' slot='0x02' function='0x0' multifunction='on'/> </controller> <controller type='pci' index='2' model='pcie-root-port'> <model name='pcie-root-port'/> <target chassis='2' port='0x11'/> <alias name='pci.2'/> <address type='pci' domain='0x0000' bus='0x00' slot='0x02' function='0x1'/> </controller> <controller type='pci' index='3' model='pcie-root-port'> <model name='pcie-root-port'/> <target chassis='3' port='0x12'/> <alias name='pci.3'/> <address type='pci' domain='0x0000' bus='0x00' slot='0x02' function='0x2'/> </controller> <controller type='pci' index='4' model='pcie-root-port'> <model name='pcie-root-port'/> <target chassis='4' port='0x13'/> <alias name='pci.4'/> <address type='pci' domain='0x0000' bus='0x00' slot='0x02' function='0x3'/> </controller> <controller type='pci' index='5' model='pcie-root-port'> <model name='pcie-root-port'/> <target chassis='5' port='0x14'/> <alias name='pci.5'/> <address type='pci' domain='0x0000' bus='0x00' slot='0x02' function='0x4'/> </controller> <controller type='pci' index='6' model='pcie-root-port'> <model name='pcie-root-port'/> <target chassis='6' port='0x15'/> <alias name='pci.6'/> <address type='pci' domain='0x0000' bus='0x00' slot='0x02' function='0x5'/> </controller> <controller type='pci' index='7' model='pcie-root-port'> <model name='pcie-root-port'/> <target chassis='7' port='0x16'/> <alias name='pci.7'/> <address type='pci' domain='0x0000' bus='0x00' slot='0x02' function='0x6'/> </controller> <controller type='pci' index='8' model='pcie-root-port'> <model name='pcie-root-port'/> <target chassis='8' port='0x17'/> <alias name='pci.8'/> <address type='pci' domain='0x0000' bus='0x00' slot='0x02' function='0x7'/> </controller> <controller type='pci' index='9' model='pcie-root-port'> <model name='pcie-root-port'/> <target chassis='9' port='0x18'/> <alias name='pci.9'/> <address type='pci' domain='0x0000' bus='0x00' slot='0x03' function='0x0' multifunction='on'/> </controller> <controller type='pci' index='10' model='pcie-root-port'> <model name='pcie-root-port'/> <target chassis='10' port='0x19'/> <alias name='pci.10'/> <address type='pci' domain='0x0000' bus='0x00' slot='0x03' function='0x1'/> </controller> <controller type='pci' index='11' model='pcie-to-pci-bridge'> <model name='pcie-pci-bridge'/> <alias name='pci.11'/> <address type='pci' domain='0x0000' bus='0x01' slot='0x00' function='0x0'/> </controller> <controller type='virtio-serial' index='0'> <alias name='virtio-serial0'/> <address type='pci' domain='0x0000' bus='0x02' slot='0x00' function='0x0'/> </controller> <controller type='sata' index='0'> <alias name='ide'/> <address type='pci' domain='0x0000' bus='0x00' slot='0x1f' function='0x2'/> </controller> <controller type='sata' index='1'> <alias name='sata1'/> <address type='pci' domain='0x0000' bus='0x0b' slot='0x01' function='0x0'/> </controller> <interface type='bridge'> <mac address='52:54:00:24:c4:10'/> <source bridge='br0'/> <target dev='vnet0'/> <model type='e1000e'/> <alias name='net0'/> <address type='pci' domain='0x0000' bus='0x03' slot='0x00' function='0x0'/> </interface> <serial type='pty'> <source path='/dev/pts/1'/> <target type='isa-serial' port='0'> <model name='isa-serial'/> </target> <alias name='serial0'/> </serial> <console type='pty' tty='/dev/pts/1'> <source path='/dev/pts/1'/> <target type='serial' port='0'/> <alias name='serial0'/> </console> <channel type='unix'> <source mode='bind' path='/var/lib/libvirt/qemu/channel/target/domain-9-Xpenology - VM/org.qemu.guest_agent.0'/> <target type='virtio' name='org.qemu.guest_agent.0' state='disconnected'/> <alias name='channel0'/> <address type='virtio-serial' controller='0' bus='0' port='1'/> </channel> <input type='tablet' bus='usb'> <alias name='input0'/> <address type='usb' bus='0' port='1'/> </input> <input type='mouse' bus='ps2'> <alias name='input1'/> </input> <input type='keyboard' bus='ps2'> <alias name='input2'/> </input> <graphics type='vnc' port='5901' autoport='yes' websocket='5701' listen='0.0.0.0' keymap='de'> <listen type='address' address='0.0.0.0'/> </graphics> <video> <model type='qxl' ram='65536' vram='65536' vgamem='16384' heads='1' primary='yes'/> <alias name='video0'/> <address type='pci' domain='0x0000' bus='0x00' slot='0x01' function='0x0'/> </video> <hostdev mode='subsystem' type='pci' managed='yes'> <driver name='vfio'/> <source> <address domain='0x0000' bus='0x06' slot='0x00' function='0x0'/> </source> <alias name='hostdev0'/> <address type='pci' domain='0x0000' bus='0x04' slot='0x00' function='0x0'/> </hostdev> <memballoon model='none'/> </devices> <seclabel type='dynamic' model='dac' relabel='yes'> <label>+0:+100</label> <imagelabel>+0:+100</imagelabel> </seclabel> </domain>