

liukuohao
-
Posts
141 -
Joined
-
Last visited
Posts posted by liukuohao
-
-
1 hour ago, dj_nsk said:
First, you need information about your current versions of the DSM and the loader. DSM 7 and the latest up-to-date bootloaders can be updated effortlessly.
So in other words, there is no issue whatsoever in applying the major & minor updates?
-
Hi,
I just want to get some general rule of thumb, what is the best way to update your Xpenology PC.
Ultimately you have to decide whether your Xpenology PC is in production phase or testing phase?
So if it in production phase, update it on a testing Xpenology first, check is there any issue arise, before
updating on your production one in order to prevent unexpected fail login into DSM web interface / data loss,
as such suggested by the forum administrator:
What is the best method of updating?
A) I know I can refer to this place before applying updates: https://xpenology.com/forum/forum/78-dsm-updates-reporting/
B) But I come across this from Google search: https://xpenology.org/updating-minor-versions/
which it teaches you download the updates, but don't apply it, but update it manually through
using SSH client- using Putty and connect into your Xpenology NAS, enter a command and update from there.
Thank you.
-
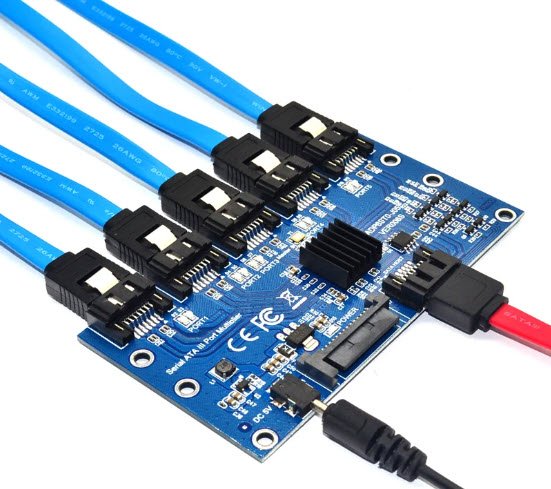
21 hours ago, Trabalhador Anonimo said:
Could you use all 6 sata ports?
I don't see why it can't be supported, which loader you are using?
-
21 hours ago, Trabalhador Anonimo said:
Sata 2 ports uses a port multiplayer
When you said you use a port multiplier, are you using this kind of hardware?
The red cable is connected to your SATA 2 port of your motherboard, for example.
I heard this kind of expansion is flaky. I wouldn't recommend to run in Xpenology.
-
Hi,
Currently, I have a motherboard: GA-B85M-DS3H, it has 4 x SATA3 + 2 SATA2, total of 6 drives, it can support.
CPU is an Intel i7-4770 CPU based on socket 1150, Haswell architecture.
QuoteDSM 7 has a new requirement for the initial installation. If drive hotplug is supported by the motherboard or controller, all AHCI SATA ports visible to DSM must either be configured for hotplug or have an attached drive during initial install.
This motherboard support hot-swappable drives in the BIOS/UEFI.
So, in order to take advantage this feature, I need have 6 drives connected during DSM installation?
I am about to start 1st installation of DSM 7.x, however after reading the is information about selecting the hardware:
DSM 7.x Loaders and Platforms - Tutorials and Guides - XPEnology Community
I windows user for many years, not a linux pro. so naturally, I a bit confused about these terminologies:
1) SataPortMap
2) DiskIdxMap
3) device tree
Questions:
1) If I am to select the architecture: apollolake, DS918+, how many drive would it be display within DSM, the number = 4, right?
2) Can appollolake, DS918+ supports more than 4 drives, but cosmetically, it can only show 4 drives?
3) What happen if I can a extra HBA into the PCI-E x16 slot, which can support 4 more drives, same issue, it will only shows 4 drives?
4) How to map out drives?
5) What is RAIDF1 support means?
Thank you.
-
1 minute ago, IG-88 said:
any tool with reading, writing image (multiple partitions) should work i guess, Win32DiskImager is the one used successfully
Ok thanks man, appreciated.
")
-
2 minutes ago, IG-88 said:
its on the first partiton on the drive, shutdown your nas, remove it, inset it into a linux system, mount 1st partiton, change grub.cfg
win10 creators update was also able to do this but with fall creators update its not working
but on windows you can still do it, use Win32DiskImager to make a image of it, use osfmount to mount the parttion, change grub.cfg, user Win32DiskImager to write the modded version to usb
Thanks for your fast reply.............
")
Can I use Rufus to make a image? Or It has to be Win32DiskImager?
-
Hello guys,
After DSM 6.x is already installed. Is there a way to access the grub.cfg on the usb bootloader drive?
I need to change the serial no.
Previous version of DSM, e.g. within DSM 5, the OS allow user to view the content of the usb bootloader drive, and
access the grub.cfg file using File Station. But under DSM 6.x this method is not available any more.
Any advice will be appreciated.
Thank you.
-
Weird Stuff?? Yeah.....
What lesson you learned here............
First and foremost, back up your important data to a USB 3 portable hard drive.
I suspect your PSU has reached the time to replace a new one.
I suspect motherboard is not getting stable Voltage + Current to support all the devices running.
-
This is a disk image of my pen drive (512MB SD card). Plz try if it works or not: https://drive.google.com/file/d/0Bwkmhb ... sp=sharing
This file is created by:
1. Download Synoboot: https://github.com/Jman420/nanoBoot-DSM ... 3612xs.img
2. Write the file to pen drive.
3. Expand the partition and filesystem to ~100MB. Expansion of ext filesystem is way easier than FAT, and that is one of the reasons why I choose Synoboot.
4. Replace zImage with *ORIGINAL* XPEnology 5.6-5644.5 one.
5. Compress modified ramdisk (with synobios.ko hax) with gzip as rd.gz
6. Add initrd parameter in /boot/grub/grub.conf.
7. dd if=/dev/sdX of=img
updateing I could not get 5644 to boot before using your version, I believe my issue was bzimage instead of zimage (it simply would never load). Anyway now that I got it booted I cant get the pat file to install. It just sits at 0%
Here is what I have tried.
1. Removed hard drives and blanked them out with no partitions.
2. Tried a different set of hard drives
3. Disabled all hard drives but 2.
Nothing allows the pat install to get past 0%. Any ideas? Previous version I could get to boot was 5565.2, no other version after that booted for me till I found your 5644.5
Hi madhits45 from what I gathered you are trying to installed Xpenology using updateing Image.
However, after wasted much time on my own, and consulted a member from the forum.
The updateing image is not suppose to install a fresh Xpenology.
You are supposed to install Xpenology as per Normal way/route.
That is the instruction is found here: http://xpenology.me/xpenoboot-5-2-5644-5-released/
After you have successfully installed, and if you find that your hardware still get corrupted BIOS
every time it reboots Xpenoogy. (Note, it does happen often, only some motherboards do).
You need to create the NEW image on your usb thumb drive using the updateing's version.
Next you are going to use updateing's image to boot your Xpenology. And that will solve the annoying problem of
messing up your motherboard's BIOS setting upon reboot. That is all.

Basically you are replacing updateing image with the official release image, to boot up Xpenology.

-
Hi,
I have got some old 7200rpm IDE hard disks lying doing nothing, I am think of reusing it in DSM.
Modern motherboard only provides 1 IDE connector and that is all you have.
Can add support for old hardware? PATA Host Adapter? See below:
http://www.newegg.com/Product/Product.aspx?Item=N82E16816102012
I am not a Linux geek, so I not sure this link will help or not.
Basically there is no official Linux drivers from Promise.
But someone was kind to share out this link: http://www.lugh.de/promise/
-
We edit the kernel sources instead of patching the synobios.ko file.
But the result is the same : It solve the BIOS reset issue but it breaks the power on/off schedule.
Thank You Trantor
. At least we nailed this annoying problem and users from theforum can use their own choice of motherboard without problem.
But from my side of testing scheduled power off works fine, but not scheduled power on.

-
Using updateing boot image, auto start in power schedule does not work either

So have to keep trying guys!
-
Tried this myself on my Optiplex 760, Definitely fixes reboot function, However you loose the ability to use Power Schedule in control panel, Does not work
Hi derwoodbones
While I am testing updateing boot image just a few minutes ago, my result is different than yours.
My BIOS time is actually incorrect configured by DSM or XPEnoboot. I am not sure which actually set it.

But it is definitely not showing the ACTUAL local time at where I am staying. It is actually 8 hours behind.
If my local time is 19 hours(at night), the BIOS time will show 11 hour (at morning)
However within DSM, it does show the CORRECT time.
So, for my side, under power schedule, auto shutdown works no problem.
And as usual, auto start up does not work for me.

Next I am leave the power off and see whether it will auto boot in the morning.
-
Hi,
still remember that this fix will cause kernel exceptions for example when youre trying to change vom manual time to ntp-based time
Can someone from the forum verify that hoppler is correct?

As for myself, I used to have motherboard = Supermicro PDSME server motherboard
URL = http://www.supermicro.com/products/motherboard/PD/E7230/PDSME.cfm
which give BIOS corrupt = CMOS checksum error upon every reboot during POST.
However this motherboard of mine is DEAD, so I cannot claim for sure that
Updateing image works for me.
-
As there has been some progress on this issue would it be a good idea to make this thread a sticky?
Has everyone try it? If Yes and it does work for ALL kinds of motherboard, why not? [emoji851]
If the Development Team is happy and satisfy this solution works, I don't see why the admin of the forum cannot make it as a sticky. [emoji851]
-
Hi,
This fixes the bios reset issue, but unfortunately the scheduled power on from DSM does not work

Ok, are you using 3rd party power management package? like Advance Power Manager for Synology DS
Link: https://sourceforge.net/projects/advpowermgr4ds/? If so, please reply.
Thank you.
-
Excuse me ladies and gentlemen,
For the benefit to those, who is a real noob like me.
Who does not know a single Linux command usage and meaning.
Can the person who contribute the solution educate the people
step by step on how to circumvent the problem. Please........
I will try to post pictures or diagrams for all user to understand better
if someone can help me. Please........

I love to nail the problem once for all.
Thank you.
-
So here is what I thought and did...
From the discussion pages before, we can infer that the BIOS resetting has something to do with the time setting. And from my NanoBoot build tests we know that synobios.ko is the suspect. So I digged into this file.
0. Extract vmlinux from zImage from XPEnoboot, then extract ramdisk cpio in the vmlinux (why does XPEnology packs the ramdisk with vmlinux?)
1. Extract synobios.ko from ramdisk. Load the file in IDA, and search for time related functions in the function window.
2. There is an imported function named rtc_cmos_write, which fits our demand perfectly: time-related(RTC), operates with hardware(cmos_write) (Actually this is an exported function in common Linux kernel) So I decided to remove all calls to this function in order to block writing to the RTC.

3. List all the cross references to rtc_cmos_write. This is the common procedure for a call:


We need to replace all these calls including argument passing procedure with NOP(0x90), which instructs the processor to do nothing when we reach here.
4. However, the file looks like this in WinHex: (IDA's Hex View is not showing original file)

This is due to the kernel modules are relocatable. The actual jumping address will be filled during runtime, and there is only a stub after the "call" instrcution. So we need to stop the "address filling".
WARNING! Byte offset is different from the instruction offset shown in IDA. You can find the actual byte offset at the bottom left corner of IDA's Hex View. Byte offset should be used for "Navigation -> Goto Offset" in WinHex.
5. ELFs use relocation tables for this. Each item in the table tells the linker where we should fill and what to fill with. However I don't know where the table is placed, and all I can do is to search the address of the stubs. The following picture is search results of the first stub (at 0x0000000000003820, presented as 0x2038000000000000 in little-endian)

This means the stub at 0x0000000000003820(2nd byte of "call rtc_cmos_write" in rtc_correct_wday) will be replaced with rtc_cmos_write's actual address at runtime.
There are a bunch of these stubs which refers to rtc_cmos_write. Since the function rtc_correct_wday looks harmless, let's replace all references to other stubs to the one in this function, 0x0000000000003820. As those stubs won't get filled, we can continue using NOP to skip them.
For example, there is "call rtc_cmos_write" in rtc_bandon_rotate_auto_poweron at 0x38c7 and the jumping target address stub begins at 0x38c8 (zeros omitted), then we search for 0xc838

and change it to 0x2038.

Do the same for all other stubs in rtc_cmos_write calls. Be careful! Don't leave out any reference to the stubs.
Note: all addresses mentioned in step 5 is IDA's instruction address. But since we are searching for hex values, we won't use Goto Offset menu so don't worry about the byte offset.
6. Now, relocation won't interfere with our changes about NOP'ping the "call" instrcutions. It's time to change all bytes shown in step 4 to 0x90. Remember, we are not NOP'ping the one in rtc_correct_wday.
For example, we are removing the "call rtc_cmos_write" at 0x38c7 (0x3937 for byte offset, use Goto Offset menu).
Change like this: (the argument calculating and passing procedure took a bit more (4) instructions...)

Do the same for all other calls to rtc_cmos_write.
Note: if you don't know how to determine where the argument passing procedure starts, just ignore it and NOP the call instruction (0xE8 and 4 following bytes). It may work...
7. You are all set now. Put the modified file back into the cpio archive, copy to your boot disk, and let Grub load this archive as initrd to override the one inside zImage. If you encounter "No space left" error, you can try resizing the partition and filesystem.
Ok guys pls give "updateing" a big thank you for his effort of sharing his work.
I am not in the position to verify the solution is workable or not, hopefully the developer can take a look and nail the problem once for all! [emoji106][emoji106][emoji106]
Sent from my iPhone using Tapatalk
-
hi to all Xpenology community.
Since i recently buy a microserver gen 8 i'd love to put xpenology on it (atm i have windows server 2012 r2 with a dreamspark license) but this bios reset issue trouble me to no end.
It seem to be (imho) a problem at the boot of the machine due to all boot loader x64 based on DS3612(5)xs in general (nanoboot 5.0.3.1 x86 seem to work just fine but it's limited two 2 disk since it's based on DS214Play).
I tried xpenoboot (many versions), gnoboot 4.3, nanoboot 5.0.3.1. They reset the bios also before the installation of dsm os (i mean the first time u boot the machine with it).
I also know that there is some workarounds like set the user bios setting to default or run xpenology on vm.
Now my questions:
do u think the problem is related to the the "x64 build" or to the fact that the boot loader is based on the "DS361(X)xs"?
'cos if related to the x64 build maybe will be possible to "make" a boot loader x86 again maybe base on a DS with at least 4 disk.
as far as you know is it possible to fix this issue in a future release of the current (x64) boot loader?
thank u for your time reading and keep up this awesome project.
best regards
Hello vejta66
I created this post merely to address the issue of RESET BIOS, when you set time to turn on your XPEnologized PC.
The intention is to create the awareness that such a problem exist when you are playing around with XPEnology.
And also share the "workaround solution" and NOT requesting for a permanent fix.
Because, neither me nor the fellow forum user is able to do it, unless we are the core developers.
You need to PM the administrator as to how to solve this problem. So in short, I couldn't offer any help
in answering your question regarding to X64 build.
As far as I know, unless you are willing to change your hardware to a different motherboard, like INTEL DQ35JOE,
there is no reset BIOS issue, but as of now, I CANNOT promise the lastest version of XPEnoboot + the lastest DSM image
will NOT cause BIOS resetting problem. Simply because I couldn't find the time to test it
-
Nope, unfortunately, I am still waiting patiently, unless you willing to buy the developers some beer, may be they consider solving this age old problem.[emoji1]
Sent from my iPhone using Tapatalk
-
I started another before realized this post is very much alive.
My HP DC7900 has CMOS reset everytime booted with Xpenoboot 5.2 USB even before install DSM. Nanoboot 32bit has no such problem. Unfortunately we don't have 32bit Xpenoboot available or otherwise many of us can benefit from headless server. I don't need WOL nor scheduled power on. All I needed is proper power on and shutdown.
Seems I have to compromise. Changing mobo will turn this DC7900 into useless metal.
Wish everyone a happy new year!
Yeah, if you want to the lastest and greatest, using XPEnoboot, then that is the price you pay for.....
unfortunately.If are happy about using Nanoboot, then should continue using it.
Question in my mind never get answer.....under what special reason that the developers were not
able to crack their heads and solve this age old problem????
All the best for the coming year 2016.
-
Hi,
I have a question about this annoying issue. Does it still exists on DSM 5.2 or it's only something "reserved" for 5.0?
I have n54l and everything works great on 5.0 (except Scheduled power-on).
If 5.2 still has this drawback I dunno if it's even worth it to upgrade.
By the way - there is one workaround. Plan shutdowns using Advanced Power Management plugin, and then install DD-WRT on the router and set a cronjob(s) which will turn on the server using WOL on selected time
There is even a possibility (was not trying yet) to invoke the server when someone is trying to access it (but it's not ideal, because You still need to wait 1-2 min for the server to poweron, so firstly You'll get info that it's not available)
Hi Barat, I have not been very active in this post.
Anyway thanks for sharing
Unfortunately, for DSM 5.2, I am pretty sure BIOS reset issue is still exist even though I have not tested.
Unless some one in the forum is willing to beg the differ.

BIOS reset will occur during POST if you have scheduled the PC to shutdown certain time.
Unless, you have tried new motherboards that uses the newest BIOS firmware UEFI.
But still bear in mind, this is not an absolute fix on the problem. There is no 100% guarantee.
You just have to keep trying new motherboards....till you are broke!!! Just kidding....

Question about whether the number of hard drives is supported or not
in General Questions
Posted · Edited by liukuohao
If I am not mistaken, Marvell chipset is flaky. You can google it. Yes, I know this link is about UNraid, but it is based Debian Linux.
https://unraid-guides.com/2020/12/07/dont-ever-use-cheap-pci-e-sata-expansion-cards-with-unraid/
If you want stability, preferably if possible try to get an server grade HBA card and flash it with IT mode.