erazor1112
-
Posts
32 -
Joined
-
Last visited
-
Days Won
1
Everything posted by erazor1112
-
and how do you get a real SN/MAC?
-
How to install XPEnology (DVA3221) on Unraid
erazor1112 replied to erazor1112's topic in Tutorials and Guides
I do not have a gpu yet, but planned for the future which gpu do you use? -
How to install XPEnology (DVA3221) on Unraid
erazor1112 replied to erazor1112's topic in Tutorials and Guides
i did not change that on my unraid, it was automatically set to controller 1 -
How to install XPEnology (DVA3221) on Unraid
erazor1112 replied to erazor1112's topic in Tutorials and Guides
I need to update the documentation With the new version "tinycore-redpill-uefi.v0.9.4.0.img" i just run the following commands: ./rploader.sh update now ./rploader.sh fullupgrade now ./rploader.sh serialgen DVA3221 ./rploader.sh satamap now ./rploader.sh identifyusb now ./rploader.sh build dva3221-7.1.1-42962 ./rploader.sh backup now sudo reboot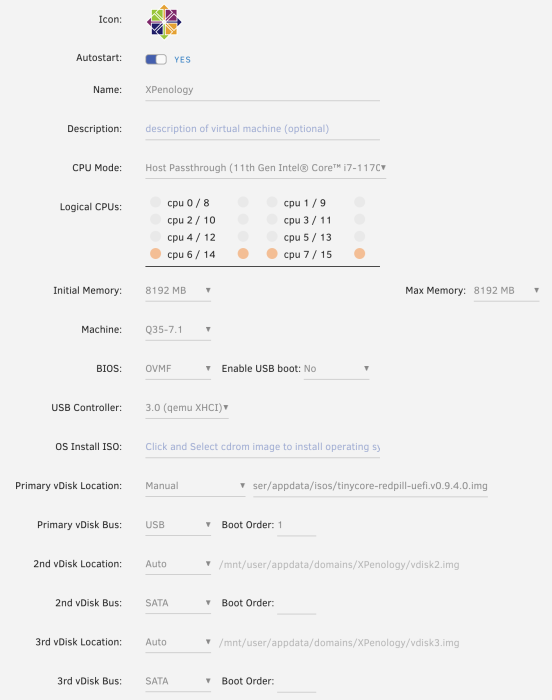

-
How to install XPEnology (DVA3221) on Unraid
erazor1112 replied to erazor1112's topic in Tutorials and Guides
facial recognition is not working for me, i get an error message when creating a task: "Unable to perform this operation because the network connection is unstable or the system is busy. Please try again later. -
How to install XPEnology (DVA3221) on Unraid
erazor1112 replied to erazor1112's topic in Tutorials and Guides
My hole data is sitting on unraid and will be backed up to Backblaze B2 Cloud Storage using "Duplicate" Container. I use the DVA3221 only for suveillance station and have no requirements to backup the video data. (Just rotating the videos some days) -
How to install XPEnology (DVA3221) on Unraid
erazor1112 replied to erazor1112's topic in Tutorials and Guides
Did you download the original file from Synology? https://global.download.synology.com/download/DSM/release/7.1/42661-1/DSM_DVA3221_42661.pat -
How to install XPEnology (DVA3221) on Unraid
erazor1112 replied to erazor1112's topic in Tutorials and Guides
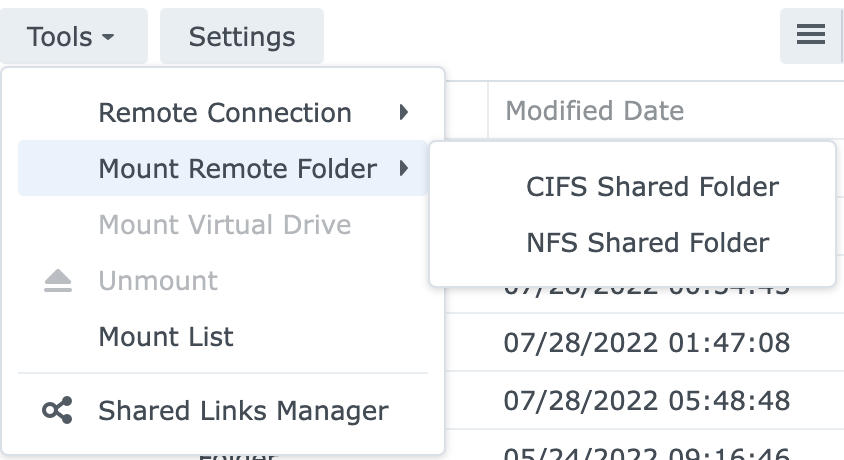
Hi Hannibal, you can use "Mount Remote Folder" in the File Station to mount any unRaid share with NFS or CIFS. You need to mount the unRaid share in a subfolder of the automatically created "photo" folder on the Synology Than Start "Indexing" in the Settings section and the pictures should appear
-
How to install XPEnology (DVA3221) on Unraid
erazor1112 replied to erazor1112's topic in Tutorials and Guides
i remember some similar issue in the past, try to create the vdisk manually with: qemu-img create -f vmdk disk1.vmdk 100G can you send a screenshot with the error message? -
How to install XPEnology (DVA3221) on Unraid
erazor1112 replied to erazor1112's topic in Tutorials and Guides
what is your question? -
i have the same on my dva3221, did you fix the issue?
-
i can confirm that 8 cameras are working fine on my DVA3221 (running on uraid)
-
How to install XPEnology (DVA3221) on Unraid
erazor1112 replied to erazor1112's topic in Tutorials and Guides
Try to connect to the console and check with fdisk http://<ip>:7681 Username: root Password: Empty -
How to install XPEnology (DVA3221) on Unraid
erazor1112 replied to erazor1112's topic in Tutorials and Guides
<?xml version='1.0' encoding='UTF-8'?> <domain type='kvm' id='4'> <name>Xpenology7_DVA3221_Q35</name> <uuid>xxxx-xxxx-xxxx-xxxx-xxxx</uuid> <metadata> <vmtemplate xmlns="unraid" name="CentOS" icon="centos.png" os="centos"/> </metadata> <memory unit='KiB'>4194304</memory> <currentMemory unit='KiB'>4194304</currentMemory> <memoryBacking> <nosharepages/> </memoryBacking> <vcpu placement='static'>4</vcpu> <cputune> <vcpupin vcpu='0' cpuset='6'/> <vcpupin vcpu='1' cpuset='14'/> <vcpupin vcpu='2' cpuset='7'/> <vcpupin vcpu='3' cpuset='15'/> </cputune> <resource> <partition>/machine</partition> </resource> <os> <type arch='x86_64' machine='pc-q35-5.1'>hvm</type> <loader readonly='yes' type='pflash'>/usr/share/qemu/ovmf-x64/OVMF_CODE-pure-efi.fd</loader> <nvram>/etc/libvirt/qemu/nvram/f387ad8f-b0b4-699d-cbf8-77285f38ba78_VARS-pure-efi.fd</nvram> </os> <features> <acpi/> <apic/> </features> <cpu mode='host-passthrough' check='none' migratable='on'> <topology sockets='1' dies='1' cores='2' threads='2'/> <cache mode='passthrough'/> </cpu> <clock offset='utc'> <timer name='rtc' tickpolicy='catchup'/> <timer name='pit' tickpolicy='delay'/> <timer name='hpet' present='no'/> </clock> <on_poweroff>destroy</on_poweroff> <on_reboot>restart</on_reboot> <on_crash>restart</on_crash> <devices> <emulator>/usr/local/sbin/qemu</emulator> <disk type='file' device='disk'> <driver name='qemu' type='raw' cache='writeback'/> <source file='/mnt/user/appdata/isos/tinycore-redpill-uefi.v0.4.6_Q35.img' index='2'/> <backingStore/> <target dev='hdc' bus='usb'/> <boot order='1'/> <alias name='usb-disk2'/> <address type='usb' bus='0' port='1'/> </disk> <disk type='file' device='disk'> <driver name='qemu' type='raw' cache='writeback'/> <source file='/mnt/user/appdata/domains/Xpenology7_DVA3221/vdisk1.img' index='1'/> <backingStore/> <target dev='hdd' bus='sata'/> <alias name='sata0-0-3'/> <address type='drive' controller='0' bus='0' target='0' unit='3'/> </disk> <controller type='pci' index='0' model='pcie-root'> <alias name='pcie.0'/> </controller> <controller type='pci' index='1' model='pcie-root-port'> <model name='pcie-root-port'/> <target chassis='1' port='0x10'/> <alias name='pci.1'/> <address type='pci' domain='0x0000' bus='0x00' slot='0x02' function='0x0' multifunction='on'/> </controller> <controller type='pci' index='2' model='pcie-root-port'> <model name='pcie-root-port'/> <target chassis='2' port='0x11'/> <alias name='pci.2'/> <address type='pci' domain='0x0000' bus='0x00' slot='0x02' function='0x1'/> </controller> <controller type='pci' index='3' model='pcie-root-port'> <model name='pcie-root-port'/> <target chassis='3' port='0x12'/> <alias name='pci.3'/> <address type='pci' domain='0x0000' bus='0x00' slot='0x02' function='0x2'/> </controller> <controller type='pci' index='4' model='pcie-root-port'> <model name='pcie-root-port'/> <target chassis='4' port='0x13'/> <alias name='pci.4'/> <address type='pci' domain='0x0000' bus='0x00' slot='0x02' function='0x3'/> </controller> <controller type='pci' index='5' model='pcie-root-port'> <model name='pcie-root-port'/> <target chassis='5' port='0x14'/> <alias name='pci.5'/> <address type='pci' domain='0x0000' bus='0x00' slot='0x02' function='0x4'/> </controller> <controller type='pci' index='6' model='pcie-root-port'> <model name='pcie-root-port'/> <target chassis='6' port='0x15'/> <alias name='pci.6'/> <address type='pci' domain='0x0000' bus='0x00' slot='0x02' function='0x5'/> </controller> <controller type='pci' index='7' model='pcie-to-pci-bridge'> <model name='pcie-pci-bridge'/> <alias name='pci.7'/> <address type='pci' domain='0x0000' bus='0x03' slot='0x00' function='0x0'/> </controller> <controller type='virtio-serial' index='0'> <alias name='virtio-serial0'/> <address type='pci' domain='0x0000' bus='0x02' slot='0x00' function='0x0'/> </controller> <controller type='sata' index='0'> <alias name='ide'/> <address type='pci' domain='0x0000' bus='0x00' slot='0x1f' function='0x2'/> </controller> <controller type='sata' index='1'> <alias name='sata1'/> <address type='pci' domain='0x0000' bus='0x07' slot='0x01' function='0x0'/> </controller> <controller type='usb' index='0' model='qemu-xhci' ports='15'> <alias name='usb'/> <address type='pci' domain='0x0000' bus='0x00' slot='0x07' function='0x0'/> </controller> <interface type='bridge'> <mac address='xx:xx:xx:xx:xx:xx'/> <source bridge='br0'/> <target dev='vnet7'/> <model type='e1000'/> <alias name='net0'/> <address type='pci' domain='0x0000' bus='0x07' slot='0x02' function='0x0'/> </interface> <serial type='pty'> <source path='/dev/pts/1'/> <target type='isa-serial' port='0'> <model name='isa-serial'/> </target> <alias name='serial0'/> </serial> <console type='pty' tty='/dev/pts/1'> <source path='/dev/pts/1'/> <target type='serial' port='0'/> <alias name='serial0'/> </console> <channel type='unix'> <source mode='bind' path='/var/lib/libvirt/qemu/channel/target/domain-4-Xpenology7_DVA3221_Q/org.qemu.guest_agent.0'/> <target type='virtio' name='org.qemu.guest_agent.0' state='disconnected'/> <alias name='channel0'/> <address type='virtio-serial' controller='0' bus='0' port='1'/> </channel> <input type='tablet' bus='usb'> <alias name='input0'/> <address type='usb' bus='0' port='2'/> </input> <input type='mouse' bus='ps2'> <alias name='input1'/> </input> <input type='keyboard' bus='ps2'> <alias name='input2'/> </input> <graphics type='vnc' port='5901' autoport='yes' websocket='5701' listen='0.0.0.0' keymap='de'> <listen type='address' address='0.0.0.0'/> </graphics> <audio id='1' type='none'/> <video> <model type='qxl' ram='65536' vram='65536' vgamem='16384' heads='1' primary='yes'/> <alias name='video0'/> <address type='pci' domain='0x0000' bus='0x00' slot='0x01' function='0x0'/> </video> <memballoon model='virtio'> <alias name='balloon0'/> <address type='pci' domain='0x0000' bus='0x04' slot='0x00' function='0x0'/> </memballoon> </devices> <seclabel type='dynamic' model='dac' relabel='yes'> <label>+0:+100</label> <imagelabel>+0:+100</imagelabel> </seclabel> </domain> -
How to install XPEnology (DVA3221) on Unraid
erazor1112 replied to erazor1112's topic in Tutorials and Guides
No, drives have been detected all the time. -
Now Online, How to install XPEnology on Unraid (without GPU)
-
I wrote a complete instruction how to install it on unraid. It is on "pending approval" but should be available soon.
-
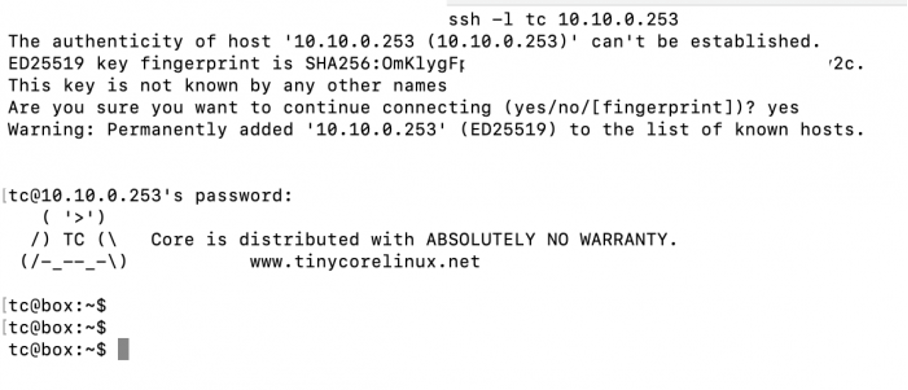
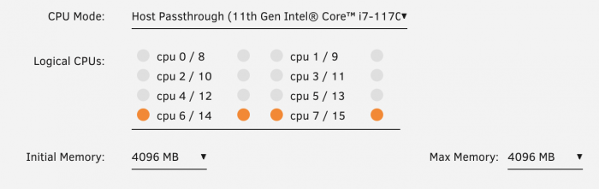
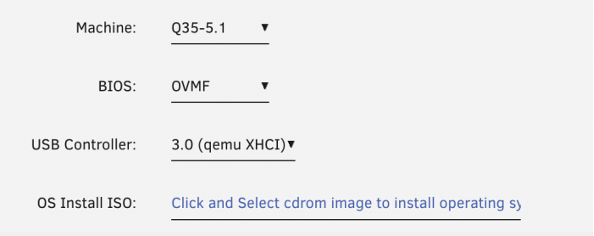
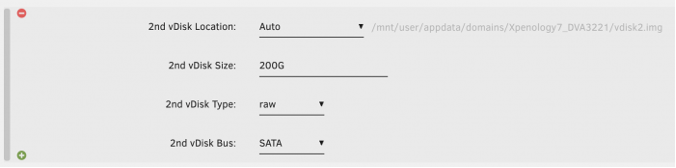
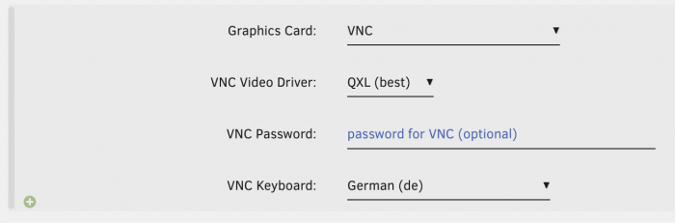
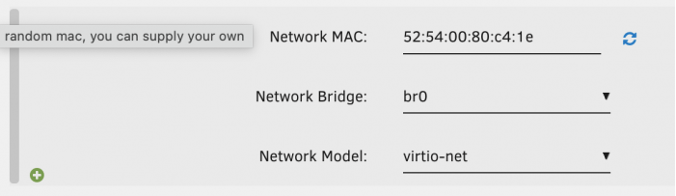
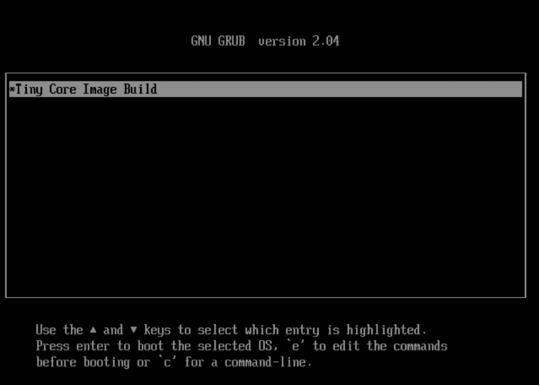
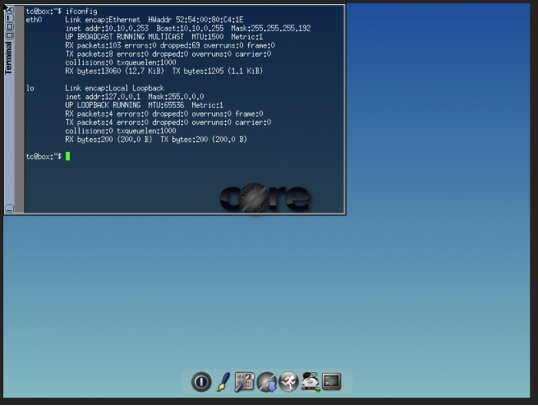
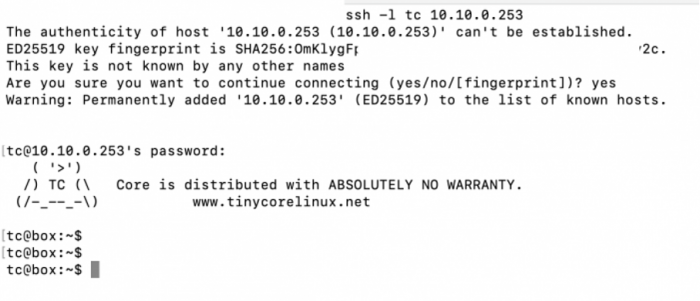
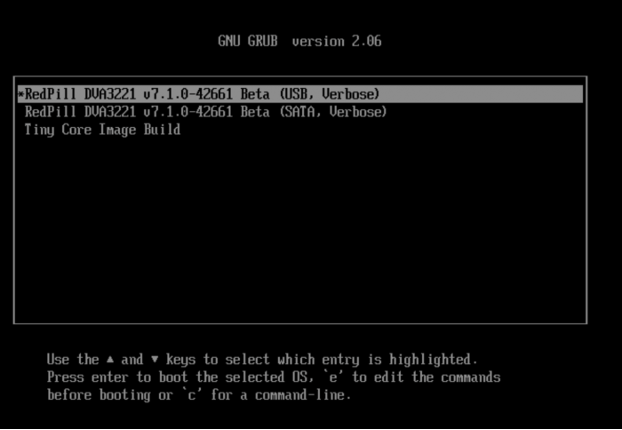
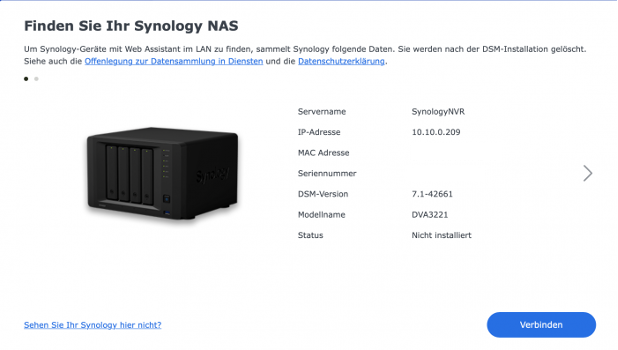
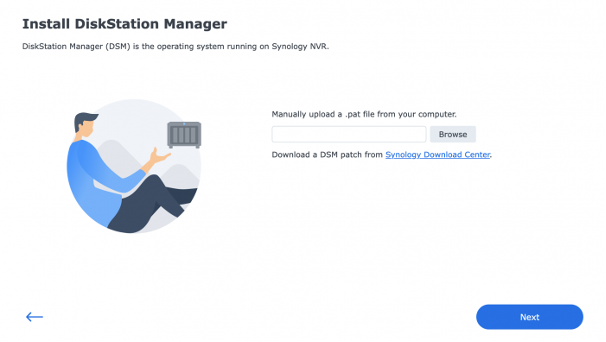
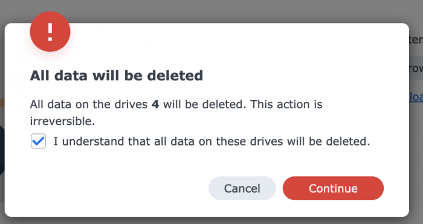
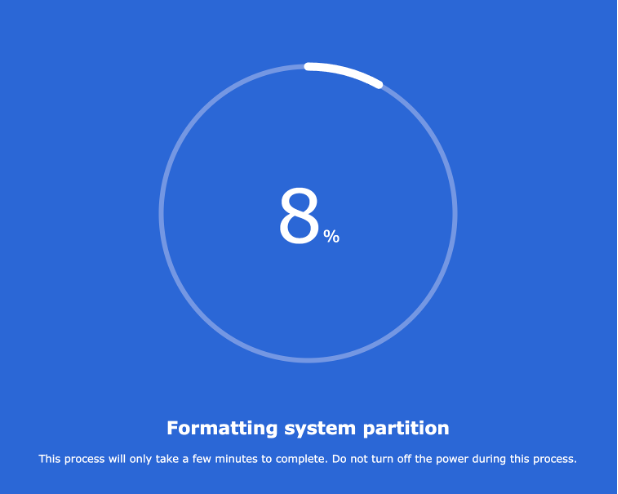
Here is a walkthrough how to install XPenology (DVA-3221) on Unraid. My Setup: Unraid Version 6.10.0 Mainboard: ASRock H570M-ITX/ac CPU: 11th Gen Intel i7-11700K Memory: 32GB Memory 1.) Add a new Virtual Machine Use CentOS Template and type in a Name 2.) CPU Mode: Host Passthrough 3.) Logical CPUs: 4 cores (should also work with more or less) I remove CPU0 / 8 because this is also used by unraid itself. 4.) Initial Memory: 4096 MB (should also work with more or less) 5.) Machine: Q35-5.1 (Successfully tested with Q35-6.1) 6.) Bios OVMF 7.) USB Controller 3.0 (qemu XHCI) 8.) Download tinycore redpill 0.4.6 uefi image from @pocopico https://github.com/pocopico/tinycore-redpill 9.) 1st Disk = Choose Manual and enter the path to "tinycore-redpill-uefi.v0.4.6.img" 10.) vDisk Bus must be USB 11.) 2nd Disk = Choose Auto and enter a vDisk size 12.) Leave vDisk Type raw 13.) Set vDisk Bus to SATA 14.) Graphics Card : VNC (other settings can remain on default) 15.) Choose Network Model "virtio-net" Works also with e1000 which needs to be manual entered in Form View. 16.) Save and start the Virtual Machine 17.) You should see the Grub Loader with "Tiny Core Image Build" (System will automatically boot) 18.) Open the Terminal and check the IP Address by using "ifconfig" 19.) Connect with ssh to Tiny Core ssh -l tc @<IP ADDR> Username: tc Password: P@ssw0rd 20.) Run the following commands and answer all with Yes ./rploader.sh update now ./rploader.sh fullupgrade now ./rploader.sh serialgen DVA3221 ./rploader.sh satamap now ./rploader.sh identifyusb now For e1000 Network Card run: ./rploader.sh ext denverton-7.1.0-42661 add https://raw.githubusercontent.com/pocopico/rp-ext/master/e1000/rpext-index.json For virtio-net Network Card run: ./rploader.sh ext denverton-7.1.0-42661 add https://raw.githubusercontent.com/pocopico/rp-ext/master/v9fs/rpext-index.json ./rploader.sh build denverton-7.1.0-42661 manual ./rploader.sh backup now sudo reboot 21.) Grub Loader should now have 3 options, You need to Boot the USB Entry! 22.) Boot Screen should show: 23.) Open a browser and try to find the Appliance using http://find.synology.com 24.) Download DVA3221 42261 PAT File from Synology https://global.download.synology.com/download/DSM/release/7.1/42661-1/DSM_DVA3221_42661.pat 25.) Manually upload the .pat file using the browse button. 26.) Confirm to delete All data on the drives 27.) DSM will be installed and is reachable on the same IP Address after the reboot. That's it. Have Fun. Btw. DVA3221 has 8 Camera Licenses included for Surveillance Station and it Works also with Version Surveillance Station 9.0.0-7660


-
@pocopico thanks, now it works also with virtio without any error messages is there a reason to prefer using virtio or does it not matter?
-
I use also the e1000 but this works only when adding the extension and do a manual build: ./rploader.sh ext denverton-7.1.0-42661 add https://raw.githubusercontent.com/pocopico/rp-ext/master/e1000/rpext-index.json ./rploader.sh build denverton-7.1.0-42661 manual I tried virtio with different versions without success (denverton-7.0.1-42218, denverton-7.1.0-42621, denverton-7.1.0-42661) Maybe something wrong with the package, or not compatible with denverton in general...
-
got it now, i tried so many combinations and forgot to switch back to usb Thanks Pocopico!!
-
SynologyNVR> fdisk -l Disk /dev/sdd: 43 GB, 46110081024 bytes, 90058752 sectors 5605 cylinders, 255 heads, 63 sectors/track Units: sectors of 1 * 512 = 512 bytes Device Boot StartCHS EndCHS StartLBA EndLBA Sectors Size Id Type /dev/sdd1 0,130,3 1023,254,63 8192 16785407 16777216 8192M fd Linux raid autodetect /dev/sdd2 1023,254,63 1023,254,63 16785408 20979711 4194304 2048M fd Linux raid autodetect Disk /dev/sdu: 1024 MB, 1073741824 bytes, 2097152 sectors 1011 cylinders, 34 heads, 61 sectors/track Units: sectors of 1 * 512 = 512 bytes Device Boot StartCHS EndCHS StartLBA EndLBA Sectors Size Id Type /dev/sdu1 * 0,32,33 6,62,56 2048 100351 98304 48.0M 83 Linux Partition 1 has different physical/logical start (non-Linux?): phys=(0,32,33) logical=(0,33,36) Partition 1 has different physical/logical end: phys=(6,62,56) logical=(48,13,7) /dev/sdu2 6,62,57 15,205,62 100352 253951 153600 75.0M 83 Linux Partition 2 has different physical/logical start (non-Linux?): phys=(6,62,57) logical=(48,13,8) Partition 2 has different physical/logical end: phys=(15,205,62) logical=(122,15,9) /dev/sdu3 15,205,63 130,138,8 253952 2097151 1843200 900M 83 Linux Partition 3 has different physical/logical start (non-Linux?): phys=(15,205,63) logical=(122,15,10) Partition 3 has different physical/logical end: phys=(130,138,8) logical=(1011,5,33) Disk /dev/md1: 2047 MB, 2147418112 bytes, 4194176 sectors 524272 cylinders, 2 heads, 4 sectors/track Units: sectors of 1 * 512 = 512 bytes Disk /dev/md1 doesn't contain a valid partition table SynologyNVR> Update: Attached messages output messages.rtf
-
got it, just use root as username
-
sorry to ask, i did not find the default username and password to login here...
-
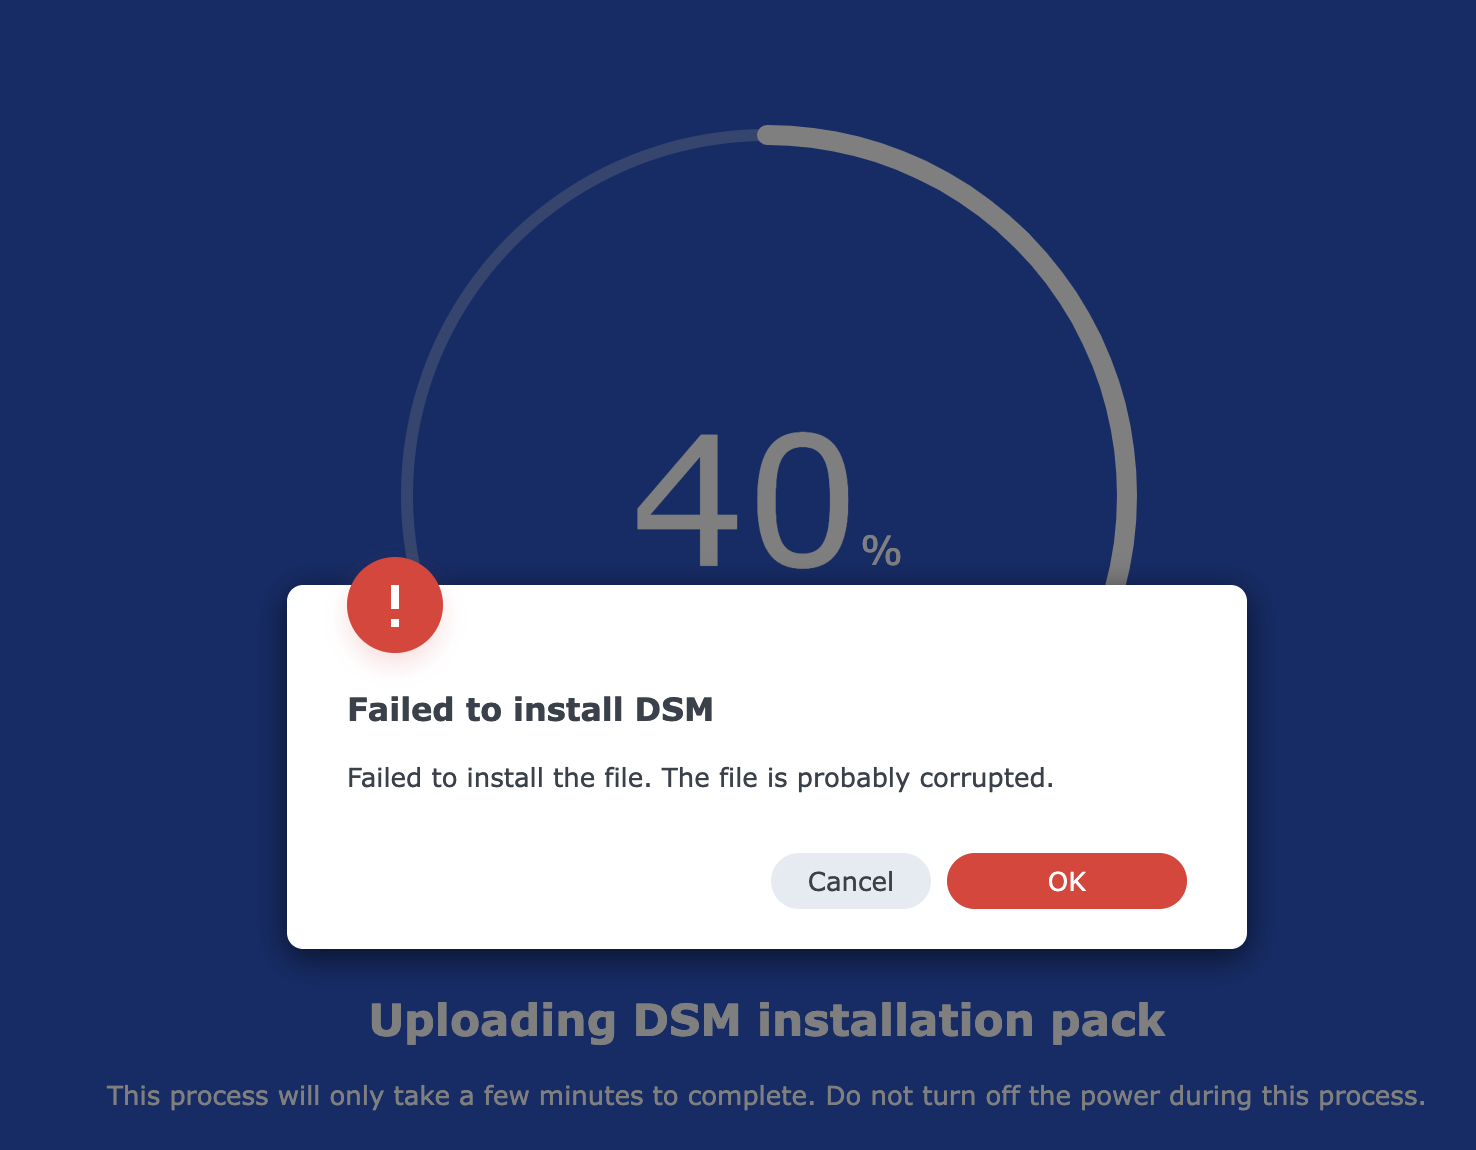
Thanks franky, I have now also done it with i440fx Version 5.1 without success. With Q35 i got this error at 55% and with i440fx at 40% during the installation. i have already 2 DSM Instances running in Unraid DS3617xs with DSM 6.2-23739 DS918+ with DSM7.0.1-42218 But i want to have the DVA3221 with the Surveillance Station Licenses