bulisor007
-
Posts
13 -
Joined
-
Last visited
Everything posted by bulisor007
-
How can I transform a failed DS1815+ into an expansion unit?
bulisor007 replied to bulisor007's topic in Hardware Modding
I've managed to read the DSM boot disk with the use of 4 breadboard jumper wires. The strange thing is that even though the disk seems to be with no errors and the first partition is marked as bootable, I was not able to boot my computer with that disk. I don't know if this is normal or not, I was still expecting to see some boot messages on the screen then to stop the process with an error message that the hardware is not Synology.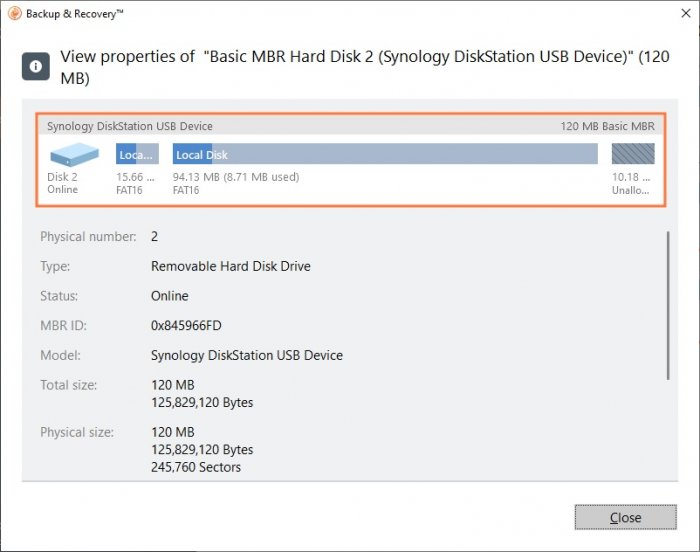
-
How can I transform a failed DS1815+ into an expansion unit?
bulisor007 replied to bulisor007's topic in Hardware Modding
That's true but the pitch of the pins is smaller than the standard USB layout so you can't plug it on a standard socket without an adapter. -
How can I transform a failed DS1815+ into an expansion unit?
bulisor007 replied to bulisor007's topic in Hardware Modding
I've tried the resistor workaround, without any luck. Currently I'm looking for an USB adapter to be able to read the DOM module and see if that's corrupted or not - this will help me understand if the issue is with the boot disk or with the CPU itself.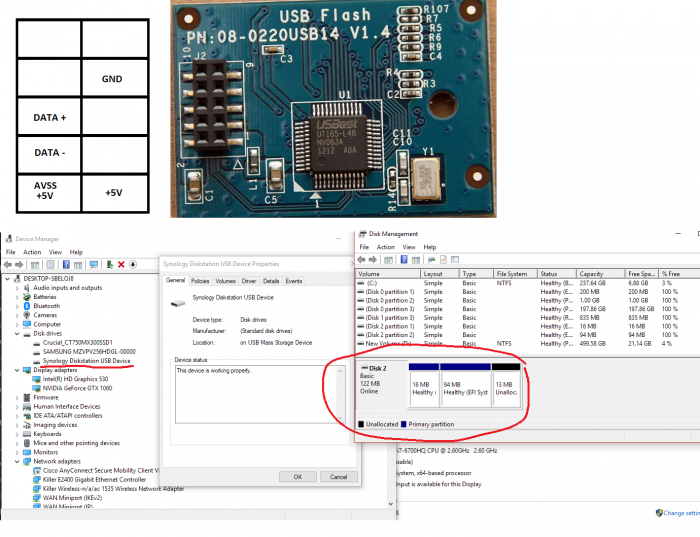
-
I'm having a failed DS1815+ unit (CPU died most likely) and I was wondering if it can be transformed into an expansion unit like DX517. The PSU is still working and I don't believe that the electronic part in an expansion unit is that complex so I may repurpose the failed unit to an expansion unit. Any thoughts?
-
HP Microserver Gen8 migration from VM to bare-metal and back
bulisor007 replied to bulisor007's topic in Archives
See on viewtopic.php?f=2&t=2147 what you need to do to run Xpenology on ESXi with Microserver Gen8 and having the fan running at 6% (dead silent). The instructions were for older versions of DSM but are still applicable for the newest versions, with minimal changes. -
HP Microserver Gen8 migration from VM to bare-metal and back
bulisor007 replied to bulisor007's topic in Archives
I would recommend to do the upgrade first bare metal and only once you have everything working as expected to move to VM, just to know what caused the issue in case you face any. -
Sometime even if the system was configured to run on VM, you may want to move to bare-metal to get the SMART information available for the HDDs but then you want to move back to VM to get the fan speed running at minimum level. Here are the details on how to perform this steps: 1. VM to bare-metal This works directly, without any action needed, all data is recognized and available immediately. 2. Bare-metal to VM When switching from bare-metal to VM the system won’t recognize the information on the HDDs and will wee the system as not installed. As the data is still on the HDDs (can be easily checked by booting again bare-metal) it means the issue is that VM can’t recognize the disk layout. To fix this you need to download Ubuntu Desktop, create a virtual machine booting from the Ubuntu ISO and the HDDs attached as RDM drives (only the data HDDs, just like they are attached to Xpenology VM which of course that needs to be powered off). Once the VM boots up select “Try Ubuntu” to be able to run all necessary commands without actually performing any installation. Once the desktop is available you can check if the HDDs are seen correctly by going to search menu and looking for “Disks” application Here you’ll see that indeed the partitioning of the disk seems to be invalid as all disks will appear as un-partitioned. Now close or minimize “Disks” and start terminal: Run the following commands: • sudo –i • gdisk /dev/sda Here you see that indeed there are some warnings about disk size and GPT headers and can check that the partitions are detected properly by typing p to list the detected partitions At this moment you only have to let gdisk correct the errors and write back correctly the partition information – you’ll do that by typing w and acknowledging the warning with y Now repeat the procedure for the rest of the disks: type “gdisk /dev/sdb” then w (and y), same for sdc, sdd etc. Once all disks have been corrected you can check again the “Disks” application to confirm that on all HDDs the partitions are detected as expected (2 partitions for Synology OS and one for the data partition) That’s all, shutdown Ubuntu VM and start Xpenology VM where all data should be accessible. P.S. I have the screenshots for all steps but apparently no more attachments can be uploaded, I get the error "Sorry, the board attachment quota has been reached"
-
64Bit - DS3612xs is capable with 12 drives, is that true?
bulisor007 replied to Elpee's topic in Archives
It's not a driver issue as you would not see the rest of the 10 drives. Please pay attention to what XPEH said as that's most probably the reason why you miss the other 2 drives. -
HP ProLiant MicroServer Gen8 fan issue solution
bulisor007 replied to bulisor007's topic in Legacy (Outdated) Tutorials
Nothing extra, just 2GB more RAM and 4 x 3TB WD Reds + 1 x 60GB 2.5'' Seagate. -
HP ProLiant MicroServer Gen8 fan issue solution
bulisor007 replied to bulisor007's topic in Legacy (Outdated) Tutorials
You are right: write speed is significantly higher than read speed (100MB/s vs 50 MB/s) but I don't know exactly why. Still, it seems that this comes from DSM itself and it's not a result of virtualization - the same behavior happens on bare metal installation of DSM (the "noisy" approach). -
HP ProLiant MicroServer Gen8 fan issue solution
bulisor007 replied to bulisor007's topic in Legacy (Outdated) Tutorials
no -
HP ProLiant MicroServer Gen8 fan issue solution
bulisor007 replied to bulisor007's topic in Legacy (Outdated) Tutorials
This setup was meant mainly to have XPEnology on a quiet HP ProLiant MicroServer Gen8 and only secondary to have compatibility with other systems. You can install XPEnology directly on the MicroServer Gen8 but you won't have drivers for iLO meaning that the fan will be noisy (at least 39%) - you need to do the workaround with ESXi in order to get the temperatures from the HDD into iLO and have the fan spinning at low rate (I have the fans at 6%). If you setup your HDD as a single RAID0 volume you'll get max of the space but will loose the redundancy - in case of any drive failure you'll loose all data. As MicroServer Gen8 can't do RAID5 at hardware level you'll have to use Synology's SHR if you want redundancy. -
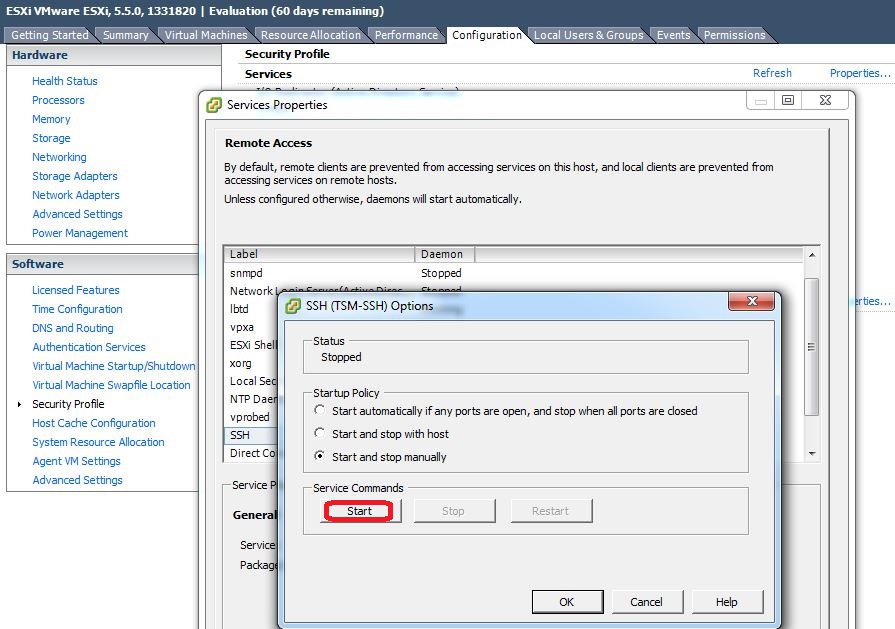
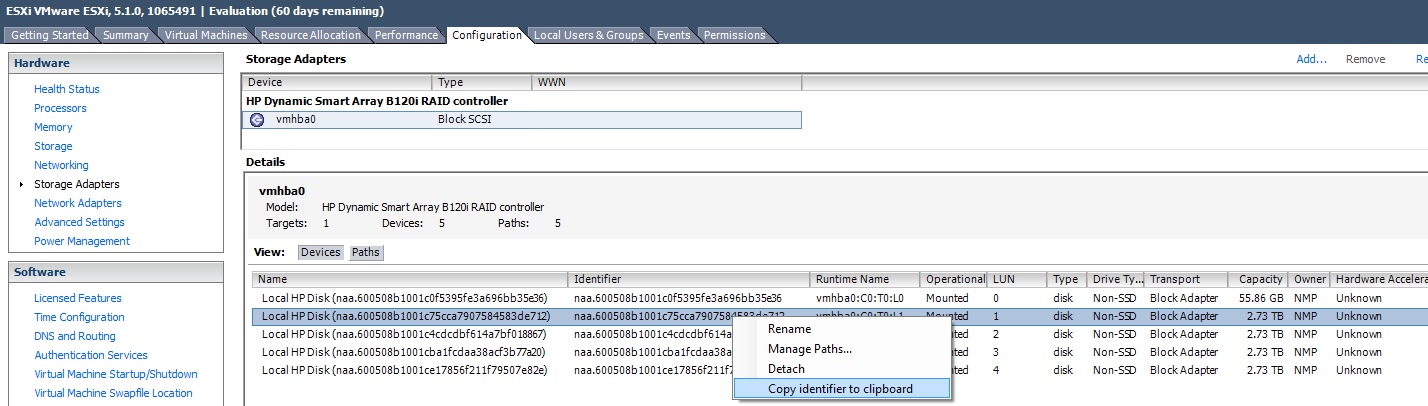
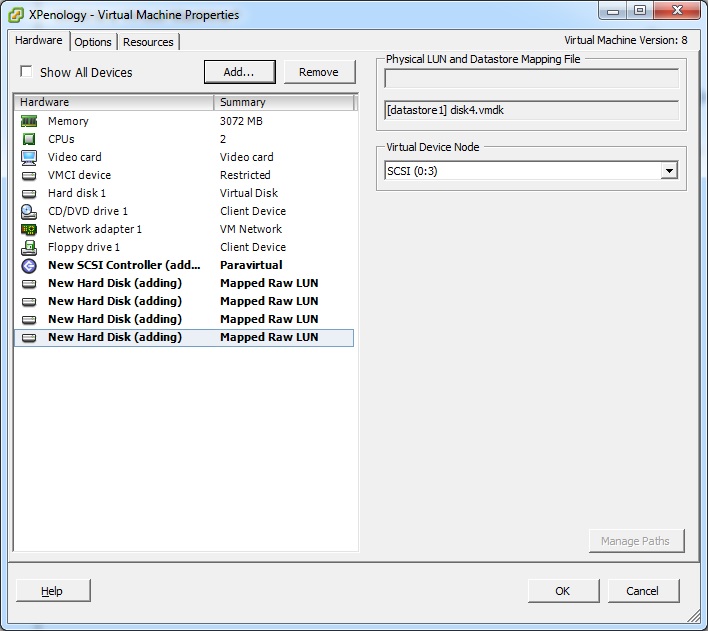
HP ProLiant MicroServer Gen8 is a great piece of hardware which would be perfect as XPEnology host but it has a problem: when iLO drivers are not installed the HDD temperature can't be read so the fan will be set at a safe value (at least 39%) to prevent overheating. Of course, the noise coming out of this fan level is rather high so the MicroServer can't be used in environments where noise is a problem. The solution is simple but challenging in the same time: have the right drivers for iLO. As the drivers are closed source from HP, the chance of getting this from HP is rather low. Still, as HP provides drivers for ESXi the solution is to use XPEnology on ESXi with Raw Device Mapping (RDM) so that the disks are accessed directly and not via a VMDK container. This setup allows unplugging the disks from MicroServer and attach to another XPEnology machine to have all the data available immediately. As there is no straight forward tutorial on how to do this I've created the tutorial myself, to help other HP ProLiant MicroServer Gen8 (and not only) users: 1. Install a 2.5’’ HDD on your HP Proliant Microserver Gen8 in the optical bay (see details at http://www.adamfowlerit.com/2013/09/30/ ... rld-usage/ ) and add more RAM if possible. ESXi can be installed on a microSD card or USB drive but you need a HDD to host a datastore as this is required for RDM. 2. Configure each individual drive in Smart Array Controller as RAID0 – start with 2.5’’ HDD first and then the other drives as this will allow booting from the 2.5’’HDD drive (will get the lowest logical drive ID and the system will always boot from the lowest logical drive ID) 3. Download the HP Customized ESXi Image for HP ProLiant Servers from http://h18004.www1.hp.com/products/serv ... image.html 4. Install ESXi on the 2.5’’ HDD using the downloaded ESXi image. Please note that you need more than 2GB RAM for ESXi 5.0.0 / ESXi 5.1.0 and more than 4GB RAM for ESXi 5.5.0 otherwise you’ll get “MEMORY_SIZE ERROR: This host has 1.84GiB of RAM. 1.97GiB are needed” or “MEMORY_SIZE ERROR: This host has 3.84 GiB of RAM. 3.97 GiB are needed” There is a workaround to minimal RAM size when installing ESXi (source: http://simon-simonnaes.blogspot.no/2012 ... b-ram.html and http://dtucker.co.uk/virtualization/byp ... are-esxi-5 ): • Boot the system from USB Stick with ESXi installer on it. • Once the installer welcome screen shows up, press ALT+F1 • Login as “root”, no password. • cd /usr/lib/vmware/weasel/util • rm upgrade_precheck.pyc • mv upgrade_precheck.py upgrade_precheck.py.old • cp upgrade_precheck.py.old upgrade_precheck.py • chmod 666 upgrade_precheck.py • vi upgrade_precheck.py • Type “/MEM_MIN” and press ENTER • Press “i” for insert • Edit the line to read “MEM_MIN_SIZE= (1*1024–32)” • Press ESC and then type “:w” and ENTER • Press ESC and then type “:q!” and ENTER • ps -c | grep weasel • Note the process id for “python” • kill –9 / • This brings back the main screen where you continue the install process 5. Download Trantor archive available at http://xpenology.trantor.be/xpenology.c ... xi_v1.1.7z and extract the VMDK 6. Open up the vSphere client and create a virtual machine using custom configuration, any name you want for the virtual machine (like XPEnology), the files stored on the datastore available from the 2.5’’ HDD, Virtual Machine version 8, Linux 64-bit (any flavor you want) as OS, 1 virtual socket and 2 cores per virtual socket, as much memory you want to allocate to this machine, 1 LAN as VMXNET 3, VMware Paravirtual SCSI controller and no disks attached. 7. Upload (using datastore browser) on the datastore used to hold the VM configuration files the VMDK file from Trantor (see step 5) in the VM folder. Once the VMDK is uploaded attach it to the VM using “Edit virtual machine settings” on the VM, add hard disk, use an existing virtual disk and select the VMDK from Trantor. 8. Enable SSH service on ESXi by going to Configuration / Security Profile (under Software section) / Services Properties / SSH Options and start the SSH service. Add_RDM_disks.jpg[/attachment] 13. Power on the virtual machine, connect using “Synology Assistant” and install the system with the standard PAT file from Trantor. 14. Configure your XPenology machine 15. Download DSM update, create a task with the below code, execute the task and finally apply the update. sed 's/flashupdateDeb/flashupdateDeb1/' /autoupd@te.info > /autoupd@te.info1 mv /autoupd@te.info1 /autoupd@te.info If this is not working try to remove files autoupd@te.info from the root folder (rm /autoupd@te.info* )and execute the update step again 16. You’re done, enjoy it!