

snoopy78
-
Posts
188 -
Joined
-
Last visited
-
Days Won
2
Everything posted by snoopy78
-
check your drive numbering/calculation within the model.conf " [System Disk 1] DEV_BUS=B00:D23:F0 DEV_PORT = 0 ERR_LED = EC:1 PRESENT_LED = EC:1 LOCATE_LED = EC:1 SLOT_NAME = Disk 1 [System Disk 2] DEV_BUS=B00:D23:F0 DEV_PORT = 1 PCI_SWITCH_PORT = 0 ERR_LED = EC:2 PRESENT_LED = EC:2 LOCATE_LED = EC:2 SLOT_NAME = Disk 2 " Also exclude the "boot disk" in "system disk" [Boot Disk 1] DISK_DRV_Type = ATA DEV_BUS=B00:D23:F0 DEV_PORT = 6 in my example system (https://lenovopress.lenovo.com/lp1548-thinksystem-st250-v2) there are 8 SATA connector numbered from 0 to 7 while i connected my boot ssd to port 6...so i have 7 HDD/SSD slots assingend with dev_port 0-5,7 With your HBA it is the same just find the correct numbering and exclude your boot disk from system disk
-
aktiv ja....hab es aber nur als bere-metal am laufen..
-
Check some Posts above...someone did already compile the needed .ko Driver file. This one you Mist then manually add when creating the boot disk.
-
Beachte, dass du ggfls. für realtek extra Treiber in das Boot Image implementieren musst (das geht glaube ich bei der Erstellung direkt...musst diese .ko Datei in das ensprechende Verzeichnis kopieren....einfach mal lesen, irgendwo hier ist das erklärt, finde den Post nur gerade nicht). Deswegen nutze ich z.b. nur Intel NICs, die werden von QNAP standardmässig unterstützt... Meine HDDs sind je am Marvell, Intel und LSI Controllern angeschlossen, alle werden korrekt vom System erkannt. (nutze nen Asrock SOC Xeon D1541 https://www.asrockrack.com/general/productdetail.asp?Model=D1541D4U-2O8R#Specifications ) schau z.B. mal hier in den Eintrag https://xpenology.com/forum/topic/27543-qnap-auf-eigener-hardware/?do=findComment&comment=278850
-
in deinen lspci -vtnn steht: +-11.0-[02]--+-00.0 VMware USB1.1 UHCI Controller [15ad:0774] | +-01.0 VMware HD Audio Controller [15ad:1977] | +-02.0 VMware USB2 EHCI Controller [15ad:0770] | \-04.0 VMware SATA AHCI controller [15ad:07e0] in deiner model.conf System Disk 1] DEV_BUS=B02:D04:F0 DEV_PORT = 0 PCI_SWITCH_PORT = 0 ERR_LED = EC:1 PRESENT_LED = EC:1 LOCATE_LED = EC:1 SLOT_NAME = Disk 1 das sollte so nicht passen... denn 11 HEX = 17 DEC ist, dann sollte es zumindest B17:D04:F0 lauten.... aber wie gesagt, mit Hypervisoren kenne ich mich nicht aus...habe die kisten nur als bar metal am laufen
-
=> i've never got an issue with the default boot images, except, that the old dog version is running in older systems (non uefi) while the new ox image is running only on uefi systems => this sounds like the "old" dog image...with the new "ox" image it should be "patch_extract"/"patch_install"
-
hi... i don't know about VMWare/ESXi, but as long as you have PCIe adressable devices shown in LSPCI / LSPCI - vtnn you should be able to address all devices/disks. For me, i used at the beginning the "old" version, since there is a script, which reads out the used adaptors and addresses and packs it into the model.conf. So with the old version it's actually quiet easy to get it up and running. But after some time, you'll understand how the calculation is done (its a simple HEX to DEC conversion) and you can then manually get it up and running. Personally i moved away from TVS-872XT and onto TVS-1683, since (i don't know why) with the 872 i couldn't get PCIe Passtrough to VMs up and running. Attached 2 of my files. One i use to boot up from an SATA SSD (ox image) and one from USB Stick (old dog image). (my internal SATA Ports i don't use, since i have a SAS3 HBA where are all drives are connected) In both the PCIe 1 & 2 are correct since in PCIe 1 i have a QM2-4P-384 (currently 2 nvme SSDs connected) and in PCIe2 i have a QNAP USB-U31A2P01 for passtrough only (therefor i didn't define the ports as USB port). !! the QNAP QXP-10G2U3A will NOT work for PCIe passtrough, since it's falsely classified in LSPCI and threrefore not detected by QNAP OS (i wasted 2-3 days with a friend to find this f*cking cause)!! model_USB.confmodel_SATA_with_both_PCIe.conf
-
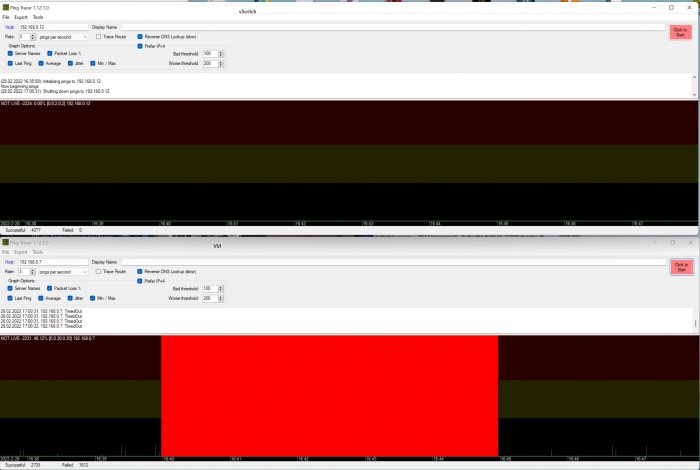
@banschee habe es gerade noch einmal getestet....die model.conf kann ganz normal zwichen dem Ox und DOG Image hin und hergeschoben werden. Einzig meine Anpassung des SATA Boot im OX image habe ich nicht ins DOG Image und umgekehrt übernommen. Mein Prob ist, dass meine WinVM (hab heut noch mal Win11 frisch reininstalliert) beim Streamen für einige (bis zu 5) Minuten nicht mehr erreichbar sind. Das Qnap dagegen die ganze Zeit, also ist alles bis zum vSwitch soweit i.O...und es ist irgendwas im VM, wenn ich die USB Karte per passtrough durchreiche. der "untere" ist die VM
-
Wenn du schon eine funktionierende model.conf hast, ist es doch super easy....nimm die uns Spiel die im neuen Image ein.... Wenn du schon ein richtiges Image installiert hast, einfach - in tiny core booten - per SSH auf das System connecten - "patch_extract" ausführen - per winscp auf System verbinden - per winscp die neue model.conf aufspielen - "sudo cp /home/tc/model.conf /home/tc/patch/etc/model.conf" absetzen - "patch_install" - "sudo reboot" fertig bist... Alternativ, mit dem "alten" die model.conf erstellen und wie o.g. in das neue System reinschieben Btw....irgendwie habe ich mit VMs ein Problem....habe mehrere am laufen....die Linux VMs gehen alle soweit.... Bei den Windows VMs (Server 2016 & 2022) hab ich das eine Stabilitätsproblem, wenn ich ne qnap USB Karte per pcie Passtrough durchreiche....(hatte hier mit nem bekannten 2 Tage verschwendet, weil die erste USB 3.2 Qnap Karte anscheinend defekt war und nicht richtig in lspci erkannt wurde...und wir dachten, dass die PCIe Zuordnung falsch sei)...die neue USB 3.1 Karte wird sauber erkannt und kann in die VM durchgereicht werden... Hab der WinVM 6 Lerne & 16 GB RAM gegeben....trotzdem, hängt die manchmal....das merke ich daran, dass mein DVBViewer, welcher in der VM läuft einfach weg ist....wenn ich USB Passtrough mache, dann ist es stabiler, aber ich habe Artefakte im Stream....auf reinem Blech läuft der USB2Sat Adapter stabil.... Bin hier am verzweifeln.....wollte schon das qnap in ne VM legen, aber unter esxi werden die SSDs nicht sauber erkannt....und in hyperV kann ich keine SCSI Adressen auslesen...und hab kein Lan.....
-
@s2k7 du scheinst das chinesische ja deutlich besser zu verstehen als ich....kannst du ggfls. mal den Modding/Patch-Part genauer erläutern.... soweit ich es verstanden habe, kann man eigene Dateien/Treiber via /home/tc/patch/etc/init.d/file und dann "./patch_install" integrieren.....getestet habe ich das aber bisher noch nicht....
-
k.a. was du verglichen hast....die neue funktioniert nur! bei UEFI & ist upgradefähig...jedoch ist das Script für die model.conf nicht dabei...musst also deine bestehende nehmen....
-
nee...schau mal hier..
-
sooo...habe das jetzt folgendermaßen geregelt....nicht schön, aber geht erst einmal... https://wiki.qnap.com/wiki/Running_Your_Own_Application_at_Startup habe die autorun.sh entsprechend angepasst autorun.sh #!/bin/sh echo "waiting & running new autostart.sh" /mnt/HDA_ROOT/qboot/S10yec.sh echo "All done!" S10yec.sh #!/bin/sh #### modify /lib/udev/rules.d/50-udev.rules sed -i '/UPS_YEC/d' /lib/udev/rules.d/50-udev.rules #### modify /etc/init.d/udev_run.sh sed -i '/UPS_YEC)/d' /etc/init.d/udev_run.sh sed -i 's/not_ups_vid_list=(1d6b 05e3 046d 1005 0b05 1c05 1c05 03f0)/not_ups_vid_list=(1d6b 05e3 046d 1005 0b05 1c05 1c05 03f0 0403)/g' /etc/init.d/udev_run.sh sed -i 's/not_ups_pid_list=(xxxx 0608 0826 b155 17ba 3074 2074 e207)/not_ups_pid_list=(xxxx 0608 0826 b155 17ba 3074 2074 e207 6001)/g' /etc/init.d/udev_run.sh NACH dem vollständigen Boot sind zumindest die YEC-USB Settings weg, so dass die Reader korrekt funktionieren. Wenn ich die Reader während des Bootvorganges dran lasse, dann erkennt das System die YEC-USV mit Abnormal und fährt wieder sauber runter.... kennt sich hier einer der Qnap-/Linuxcracks ggfls. besser aus und kann das eleganter lösen?
-
hatte heute mein System (siehe vorherige Post) auf das neue Image umgestellt, direkt danach kam das neue Update von QNAP 5.0.0.1932 raus......update ließ sich ohne Probleme einspielen..^^ Einzig meine Modifikationen in der Boot-Disk sind weg, muss mir jetzt halt was anderes einfallen lassen..^^ es soll ja die Möglichkeit geben, die autorun.sh anzupassen...naja...schauen wir mal, ob ich das so regeln kann..^^
-
Ich nutze für die 872X aktuellste 5er Version, kein QTS Hero...

-
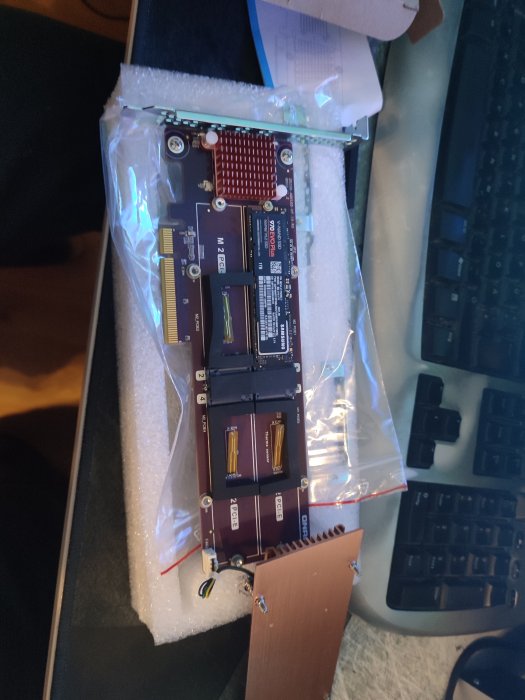
Ich hab doch die 4 Port Version von deiner Karte.....wo werden denn die nvme SSDs an den Strom angeschlossen?

-
...ok..hier ist noch ein weg um das rootfs zu modifizieren.....Treiber und so lassen sich ja mittels eines Script hinzufügen... " Ich möchte die Datei "create_udev_rule.sh" ändern, die sich in "/etc/init.d" im Qnap-Dateisystem befindet. Diese Datei erstellt einen Eintrag für UPS YEC, was zu Problemen (Nas-Shutdown) führt, wenn einige USB-Geräte angeschlossen und dann falsch klassifiziert werden. Das Löschen der YEC-Einträge in „create_udev_rule.sh“ löst dieses Problem daher zumindest nach dem Hochfahren des Geräts. Mit dem vorherigen Image konnte ich die Datei einfach bei der Erstellung modifizieren, aber mit der aktuellen konnte ich es so nicht lösen ... was ich bisher herausgefunden habe ist, dass meine initrd.boot in meiner scd2 liegt (du solltest deine mit fdisk -l finden) ....damit ein "sudo mount /dev/sdc2 /mnt/sdc2 " kann man dann darauf zugreifen cd /tmp/ mkdir initrd_content CD /initrd_content/ xz -dc /mnt/sdc2/boot/initrd.boot | cpio -i => dann kann ich in /tmp/initrd_content die Dateien sehen und ändern ...und z.b. die create_udev_rule.sh so anpassen, dass die YEC Einträge gelöscht sind. mit " find . | cpio -o -H newc | gzip > /home/tc/initrd.boot " packe ich es dann wieder (in /home/tc Ordner) & mit " sudo cp /home/tc/initrd.boot /mnt/sdc2/boot/initrd.boot " überschreibe dann die originale initrd.boot im /mnt/sdc2/boot mit sudo umount /mnt/sdc2 wird sdc2 wieder ausgeworfen... nach dem Neustart kann dann mittels cat /lib/udev/rules.d/50-udev.rules | grep YEC cat /etc/init.d/udev_run.sh |grep YEC getestet werden und das Ergebnis sieht dann so aus... " [~] # cat /lib/udev/rules.d/50-udev.rules | grep YEC [~] # cat /etc/init.d/udev_run.sh |grep YEC UPS_YEC) UPS_YEC) [~] # " In den 50_udev.rules sind keine YEC Einträge mehr vorhanden....^^ somit wird nach dem boot das Einstecken des USB nicht mehr zum shutdown führen...muss jetzt nur noch einen Weg finden die udev_run.sh permanent anzupassen....hat hier jemand eine IDEE? " ...ok..here is another way to modify the rootfs.....drivers and such can be added using a script... " I want to modify the "create_udev_rule.sh" file located in "/etc/init.d" in the Qnap file system. This file creates an entry for UPS YEC which causes problems (Nas shutdown) when some USB devices are plugged in and then misclassified. Therefore, deleting the YEC entries in create_udev_rule.sh solves this problem, at least after the device boots up. With the previous image I could just modify the file as it was created, but with the current one I couldn't solve it that way... what i found out so far is that my initrd.boot is in my scd2 (you should find yours with fdisk -l)....with a "sudo mount /dev/sdc2 /mnt/sdc2" you can then access it cd /tmp/ mkdir initrd_content CD /initrd_content/ xz -dc /mnt/sdc2/boot/initrd.boot | cpio -i => then I can see and change the files in /tmp/initrd_content ... and e.g. Adjust the create_udev_rule.sh so that the YEC entries are deleted. With " find . | cpio -o -H newc | gzip > /home/tc/initrd.boot " I then pack it again (in /home/tc folder) & with " sudo cp /home/tc/initrd.boot /mnt/sdc2/boot/initrd.boot " then overwrite the original initrd.boot in /mnt/sdc2/boot With sudo umount /mnt/sdc2 sdc2 is ejected again... after the restart you can use cat /lib/udev/rules.d/50-udev.rules | grep YEC cat /etc/init.d/udev_run.sh |grep YEC be tested and the result will look like this... " [~] # cat /lib/udev/rules.d/50-udev.rules | grep YEC [~] # cat /etc/init.d/udev_run.sh |grep YEC UPS_YEC) UPS_YEC) [~]# " There are no more YEC entries in the 50_udev.rules....^^ so plugging in the USB after the boot will no longer lead to a shutdown...now I just have to find a way to permanently adjust the udev_run.sh... .does anyone have an IDEA? "
-
@szararsiz versuche eine model.conf zu finden, die deiner richtigen HW am nähsten kommt, und nimm die CPU & RAM Daten von da in dein model.conf....so hatte ich da bei meiner gemacht (872X) und jetzt wird da korrekt der RAM und die CPU angezeigt
-
one question to all the linux cracks here.... with the new boot iso i created an bootable usb stick since i want to modify the i did unpack the initrd.boot to modify some values in "create_udev_rule.sh" (located /etc/init.d/ ) so i did mkdir /tmp/initrd_content cd /tmp/initrd_content sudo xz -z /tmp/initrd_content/ /mnt/sdc2/boot/initrd.boot -i Then i were anle to find & modify the required values... but HOW can i compress the changes now again so that i have a valid initdr.boot again? Thank you for your help
-
@szararsiz ist dein System UEFI? mit nicht-UEFI Systemen geht das nicht.... wenn du dich per SSH einloggst brauchst du tc/admin......lokal am PC admin/admin
-
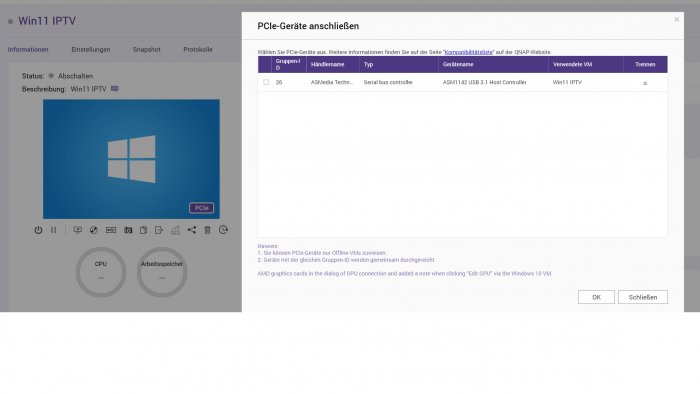
@hitman22 habe selber eine QM2-4P-384...hab die eingebaut und sofort erkannt..auch die beiden angeschlossenen nvme sind als volume nutzbar.. richtiger PCIe Port in der Konfig zugewiesen?
-
👏 wenn du ne ältere Firmware von Qnap genommen hättest, hattest du jetzt das Update prüfen können..
-
===> die Ausgabe dokumentieren und umrechnen z.B. /devices/pci0000:00/0000:00:14.0/usb4/4-4/4-4:1.0/host6/target6:0:0/6:0:0:0/block/sda/ => diese Wert in model.conf eintragen (wenn das nicht stimmt, bootet er nur bis ca. 18Sek) => [Boot Disk 1] DEV_BUS = B00:D20:F0 DEV_PORT = 4 m.W.n. sind das die Werte die du benötigst
-
du brauchst dann nur den USB Stick #2 ...den 1. kannst du ziehen, der wird nicht mehr benötigt..;) Ja, wenn du bei ca. 18Sek im Boot stehen bleibst ist der falsche Port ausgewählt. Idealerweise nutzt du einen USB Port, welcher an keinem HUB hängt, weil das noch ein bisserl mehr tricky ist...
-
hier eine kleine (grobe) Anleitungf zum neuen Image... - gewünschte Firmware von QNAP herunterladen - USB Stick (#1) mit ISO vorbereiten und booten ==> in Tinycore wechseln ===> admin/admin ====> ipconfig => SSH in das System ==> tc/admin => winscp in das System ==> tc/admin ===> via WinSCP die heruntergeladene Firmwaredatei auf das System kopieren ====> wenn du eine model.conf hast, ggfls. diese auch gleich in das Verzeichnis kopieren => in SSH folgende Befehle eingeben ==> sudo get_qnap_firmware /home/tc/TS-X72_20211223-4.5.4.1892.zip - leeren USB Stick (#2) anstecken (!! der wird später alles zum Booten enthalten und muss nicht mehr entfernt werden) ==> ls -al /sys/block /sd* ===> die Ausgabe dokumentieren und umrechnen z.B. /devices/pci0000:00/0000:00:14.0/usb4/4-4/4-4:1.0/host6/target6:0:0/6:0:0:0/block/sda/ => diese Wert in model.conf eintragen (wenn das nicht stimmt, bootet er nur bis ca. 18Sek) => [Boot Disk 1] DEV_BUS = B00:D20:F0 DEV_PORT = 4 ==> sudo cp model.conf /home/tc/patch/etc/model.conf ==> sudo create_qnap_boot 1. USB Stick rausziehen und dann sollte es laufen


