FiberInternetUser
-
Posts
57 -
Joined
-
Last visited
Everything posted by FiberInternetUser
-

RedPill - the new loader for 6.2.4 - Discussion
FiberInternetUser replied to ThorGroup's topic in Developer Discussion Room
After updating to the latest loader from @ThorGroup for apollolake-7.0.1-42214 on bare metal. Getting the following continuous output from the serial console port after the login prompt. Getting this notification from the USB Boot Thumbdrive.
-
RedPill - the new loader for 6.2.4 - Discussion
FiberInternetUser replied to ThorGroup's topic in Developer Discussion Room
Thanks @ThorGroup for RedPill, @haydibe for creating boot loader with docker and @Amoureux for instructions on creating boot loader with macOS. I used macOS Catalina 10.15.7 and Xcode 12.4 and was able to create boot loader for apollolake-7.0.1-42214. Install went without error on an Asrock J3455-itx motherboard. -
RedPill - the new loader for 6.2.4 - Discussion
FiberInternetUser replied to ThorGroup's topic in Developer Discussion Room
Used this Alpha bootloader to upgrade a spare box using an Asrock J3455-itx motherboard running DSM 6.2.3-25426 update 3. Removed thumb drive with Jun's v1.04b DS918+ bootloader and inserted thumb drive with the above RedPill 6.2.4 alpha bootloader. After powering up and when prompted for migration of drives, performed a manual install of DSM 6.2.4-25556. After installation, DSM 6.2.4-25556 recognized my Storage Volume of 4 drives, the onboard NIC and extra NIC. Upgrade went smoothly. Testing with Plex Media Server and Emby Media Server with live tv and other content. -
RedPill - the new loader for 6.2.4 - Discussion
FiberInternetUser replied to ThorGroup's topic in Developer Discussion Room
There could be but I am not aware of it. -
RedPill - the new loader for 6.2.4 - Discussion
FiberInternetUser replied to ThorGroup's topic in Developer Discussion Room
Used this DSM 7.0.1 alpha bootloader to install DSM 7.0.1-42214 on a spare box using an Asrock J3455-itx motherboard. DSM 7.0.1-42214 manually installed from download. 4 (1 tb) hard drives, onboard NIC and extra NIC recognized. Did not need to manually install File Station. Installed/testing Plex Media Server (Beta), Emby Server (DSM7.0), Hyper Backup, Synology Photos and Audio Station. When performing a reboot, it takes about 10 minutes for the server to come back up. -
N54L 6.2 1.03b - Unable to access DSM after update
FiberInternetUser replied to Bob Jones's question in General Questions
If you tried to update to DSM 6.2.4 here is a link that may help ... -
TS-453A is the first one I started with. I did try the TS-653B on another motherboard that has 6 sata ports. Testing continues ...
-
After using QTS 4.4.2 on an ASRock J3455-itx motherboard emulating aTS-453A NAS I have ran across a couple anomalies. Qboost and License Center need to be re-installed after a reboot. While in APP Center I can download and re-install apps but I can't get the "Settings Icon" to activate the dialog box so I can change APP Center settings.
-
I wanted to give this a try to checkout the QNAP HDMI programs. I also wanted to compare the QNAP programs with the Synology equivalent programs. I have a spare ASRock J3455-itx motherboard I used for the QNAP build. This motherboard has 4 SATA ports onboard. 2 x SATA3 6.0 gb/s connections are provided by the SOC and 2 SATA3 6Gb/s connections are provided by a ASMedia ASM1061 chip. 4 2.5” 1tb hard drives used. QNAP model emulated: TS-453A After a few tries I could only get the 2 SOC provided SATA Ports to work. After checking out jamkiki72’s post, I was able to get the ASMedia ASM1061 SATA Ports enabled. After a few days experimenting with DEV_BUS, I was able to get disks attached to the ASM1061 chip recognized. After opening “/home.tc/mymodel/model.conf” I changed the following Original Entries: [System Disk 3] DEV_BUS=B00:D18:F0 (This should be for the ASM1061) [System Disk 4] DEV_BUS=B02:D18:F0 (This should be for the ASM1061) I changed them to the following: [System Disk 3] DEV_BUS=B00:D19:F2 (This should be for the ASM1061) [System Disk 4] DEV_BUS=B02:D19:F2 (This should be for the ASM1061) After the change to DEV_BUS for System Disk 3 and System Disk 4, all disks are visible and usable. I do have another network card in my system for a total of 2. So I deleted the entries for [System Network 3] DEV_BUS=B00:D28:F3 PCI_SWITCH_PORT = 7 DEV_PORT = 0 [System Network 4] DEV_BUS=B00:D28:F3 PCI_SWITCH_PORT = 3 DEV_PORT = 0 After changing and deleting the above entries all appears to work. ——————————————————————————————— My Workflow: you can connect to the NAS with putty or you can make your changes at the NAS. I selected to make my changes at the NAS. Hardware model emulated TS-453A After booting into TinyCore. When you get to the QNAS menu Tiny Core is the 4th option. You need to select this quickly or it will try to boot QNAP OS. Open Terminal Window at the bottom right of TinyCore's icons and enter the following commands: vi ./my_create_qnap_boot - start vi editor to edit my_create_qnap_boot file. i - enter insert/delete mode DATA TO CHANGE FOR "TS-453A" IS AS FOLLOWS - IF YOU CHOSE ANOTHER MODEL, Change according to the Model Selected. 1. Model_Type = “QX850_QX670_12_10” 2. Patched_Firmware = “TS-X53A_20200529-4.4.2.1320” 3. Download_URL = “https://download.qnap.com/Storage/TS-X53II" :wq - write the file and quit vi sudo ./my_create_qnap_boot If the above 1, 2, and 3 entries were correct, it should connect to download.qnap.com and download the OS. If you get an error, then you need to ensure the entries in “my_create_qnap_boot” are correct. After making corrections and you try this command again you will get an error. sudo ./my_create_qnap_boot The error will be it could not mount the drive. Tinycore has an app called “MountTool” that will let you unmount the drive and try the command again. MountTool icon is next to the Terminal Icon. Once you start MountTool, you will see SDE3 as GREEN, you need to click on it and it will turn RED. This will unmount the drive. now rerun sudo ./my_create_qnap_boot ** DON’T RESTART IF YOU NEED TO ADD OR CHANGE HARDWARE - PROCEED AS FOLLOWS: cd /home/tc/mymodel/ vi ./model.conf i MAKE CHANGES YOU NEED - FOR MY CASE I CHANGED AND DELETED LINES STATED ABOVE :wq cd /home/tc/ sudo cp -f ./mymodel/* ./initrd/etc/ sudo ./re_packing exit RESTART FROM TINY CORE ------------------------------------------------------------ Use qfinder app to find NAS Follow on-screen instruction to install and configure NAS.
-
Where does DSM get installed to, the USB stick or hard drives?
FiberInternetUser replied to gquiring's question in General Questions
When you install DSM, a system partition is created on each of the hard drives you have in your system. This system partition on each hard drive is where DSM gets installed. Once you have your system up and running you could actually remove the boot-able thumb drive, as it is not needed for normal operation. If you did pull the thumb drive you would need to reinsert it to boot again. I would say your network card is compatible with the version of the boot loader you have on the thumb drive, but after DSM gets installed, DSM does not have the correct network driver for you network card. Also, it would help in troubleshooting , if you gave a description of your motherboard, network card, boot loader version and what version of DSM are you trying to install. -
Hello rickym, I have a couple motherboards I am testing which are running the DS918+ boot loader and DSM 6.2.1-23824 Update 2. When I set them up initially, I used the 1.03a boot loader and a graceful shutdown was normal When boot loader 1.04b became available, I thought I would switch to it. When I made the switch I discovered a graceful shutdown was not possible. So I just reverted back to the older boot loader. The older 1.03a boot loader only recognizes Intel Network Interface Cards. I am using a couple ASRock J3455-ITX motherboards and have the internal Realtek NIC disabled. I threw in an Intel NIC in the PCIe slot. A little inconvenient but I didn't want to take a chance on corrupting the test data by doing a hard shutdown. Something else I could not get to work with the 1.04b boot loader was hardware transcoding. I have it working with the older 1.03a boot loader.
-
- Outcome of the installation/update: SUCCESSFUL - DSM version prior update: DSM 6.2.1-23824 - Loader version and model: Jun's Loader v1.03a - DS918+ - Using custom extra.lzma: NO - Installation type: BAREMETAL - ASRock J3455-ITX -Additional Comments: /dev/dri directory present with 3 files. 1. card0, 2. controlD64 and 3. renderD123 .. Hardware Transcoding working with Emby Server. Onboard Realtek RTL8111GR Network Adapter disabled, using PCI Intel Network Adapter.
-
Unable to boot while attached USB drive
FiberInternetUser replied to soundsticks's question in General Questions
Hello, I would check the USB boot order in your bios. I have 3 USB External Drives for backup hooked up to my xpenoloby box plus the USB thumb drive which it boots from. In the bios I have the USB thumb drive as the first boot device. I hope this helps. -
After upgrading to jun's lastest 918+ boot loader 1.04b, ASRock J3455-ITX motherboard does not perform a graceful shutdown. Can't perform a reboot from the DSM GUI as It hangs on shutdown.
-
- Outcome of the update: SUCCESSFUL - DSM version prior update: DSM 6.2-23739 Update 2 - Loader version and model: Jun's LOADER v1.04b - DS918+ - Using custom extra.lzma: NO - Installation type: Baremetal, ASRock J3455-ITX motherboard - Additional comments: onboard NIC - Realtek RTL8111GR
-
Loader version and type (918+): 1.03a2 DS918+ DSM version in use (including critical update): DSM 6.2-23739 Update 1 Using custom modules/ramdisk? If yes which one?: None Hardware details: Motherboard: ASRock J344-ITX; NIC: Realtek 8111GR
-
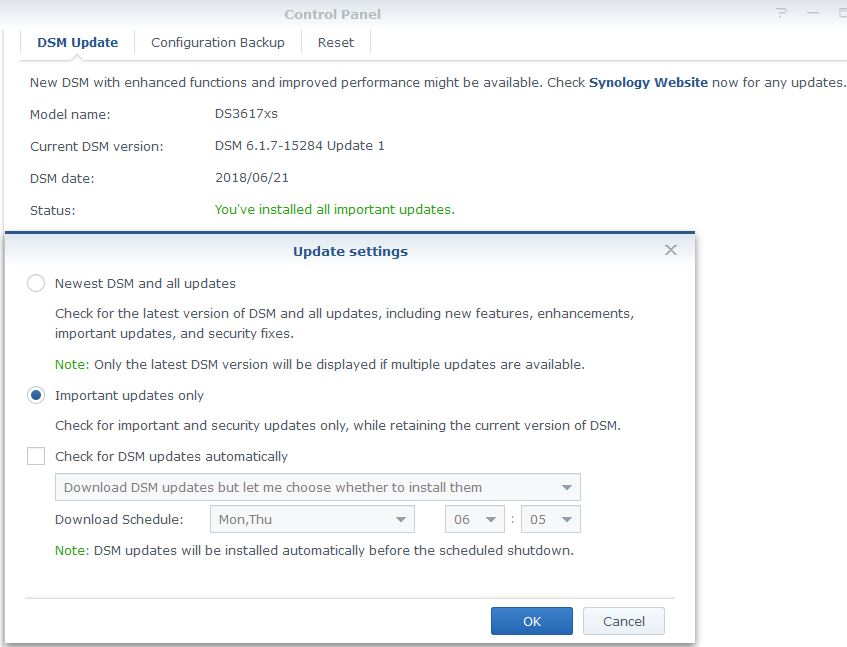
After you install DSM 6.1.7 using 1.02b loader, you may want to change your Control Panel Update & Restore settings. The following setting will only show you "important and security updates only, while retaining the current version of DSM." As IG-88 stated, each major release of dsm requires a new bootloader. There is also a setting that will automatically install all DSM and Important updates; this should not be selected using xpenology boot loaders. I hope this info is helpful. Control Panel Update & Restore Hide

-
I have other motherboards running DS3615xs and DS3617xs without any problems. I have a couple ASRock J3455-ITX motherboards I am testing Jun's 1.03a2 loader. A failed update is positive feedback to Jun, indicating there could be a problem with the loader. Currently, it is only alpha. I was able to do a reinstall on the J3455-ITX which reverted the system back to the previous state before the update. The ASRock J3455-ITX's are only test systems. No harm done other then the time to do the reinstall. Thanks for your feedback.
-
I just tried the DS918p 6.2-23739 Update 1 on a baremetal ASRock J3455-ITX using Jun's 1.03a2 loader and after the automatic reboot, the update experienced a kernel panic.
-
- Outcome of the update: UNSUCESSFUL - DSM version prior update: DSM 6.2-23739 UPDATE 1 - Loader version and model: JUN'S LOADER v1.03a2 - DS918p - Using custom extra.lzma: NO - Installation type: BAREMETAL - ASRock J3455-ITX - Additional comments: AFTER REBOOT, KERNEL PANIC Second Try after reinstall: - Outcome of the update: SUCCESSFUL - DSM version prior update: DSM 6.2-23739 UPDATE 1 - Loader version and model: JUN'S LOADER v1.03a2 - DS918p - Using custom extra.lzma: NO - Installation type: BAREMETAL - ASRock J3455-ITX - Additional comments: Automatic REBOOT
-
- Outcome of the update: SUCCESSFUL - DSM version prior update: DSM 6.1.7-15284 - Loader version and model: Jun's loader v1.02b - DS3615xs - Using custom extra.lzma: NO - Installation type: BAREMETAL - Gigabyte GA-Z87X-UD5H + 8Gb RAM - Additional comments: AUTOMATIC REBOOT
-
No, as I don't think the boot process completed correctly. Usually, with a normal boot using the older 6.1 DS3617xs image the boot completes with "Diskstation Login". At that point I can login through the serial port. When booting the 918+ image it has problems with one module and performs a trace, the boot continues and states network modules are loading ok but the boot process stops at the Loading module synobios ... does not complete to "Diskstation Login". I disabled both internal NIC's and I installed another network card which has a Realtek RTL8111E chip. Same results. I can't determine what module the boot process is having a problem with. Thanks for your help.
-
I disabled/removed each adapter one at a time. With the Ugreen using the RealTek RTL8111G chip, the boot process proceeded a little further. I still get the crash at the start but modules continuing loadiing. It loads OK the " :: Loading modul[ 6.349374] e1000: Intel(R) PRO/1000 Network Driver - version 7.3.21-k8-NAPI [ 6.357725] e1000: Copyright (c) 1999-2006 Intel Corporation. e e1000 ... [ OK ]. The boot process stops at :: Loading module synobios ..
-
System Tested: Shuttle SZ170R8 V2 CPU: i5-7600K Memory: 16 gb DDR4 Network 1: intel i219 Network 2: intel i211 Network 3: Ugreen PCI Express Network Adapter using Realtek RTL8111G chip When booting with jun's 1.03a2 DS918p image I get the following kernel panic.
-
Hello, If you are running DSM 6.2 .. go to Control Panel | Hardware & Power ... Scroll down to "LED Brightness Control" and drag the slider to the OFF position.