Leaderboard


Popular Content
Showing content with the highest reputation on 09/11/2022 in all areas
-
Should say a big thanks to fbelavenuto and everyone else involved in Redpill! Awesome work dudes!3 points
-
@renegadeBE 7.1.1-42962 not yet support on master branch. Try with develop version. curl --location "https://github.com/pocopico/tinycore-redpill/raw/develop/rploader.sh" -O ./rploader.sh fullupgrade ./rploader.sh postupdate broadwellnk-7.1.1-429622 points
-
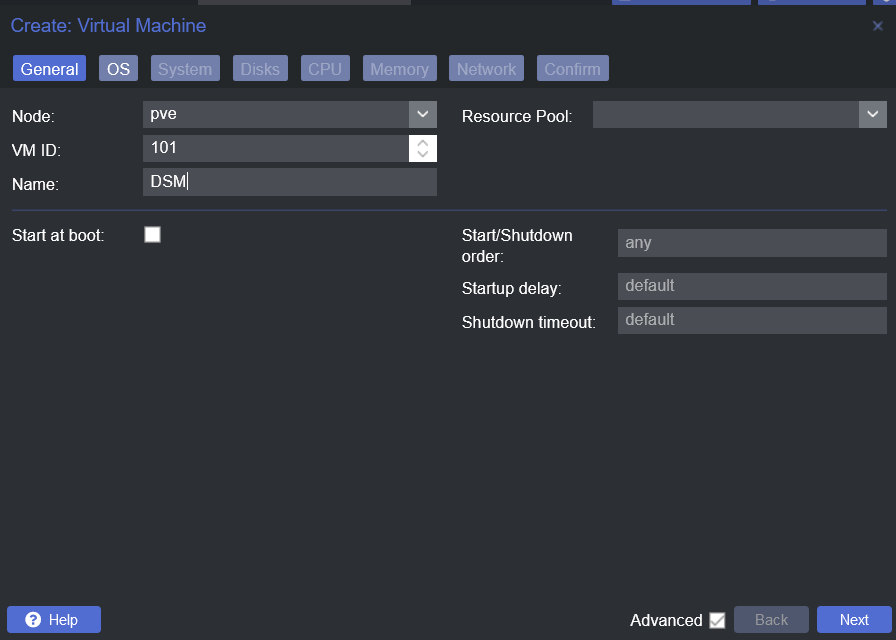
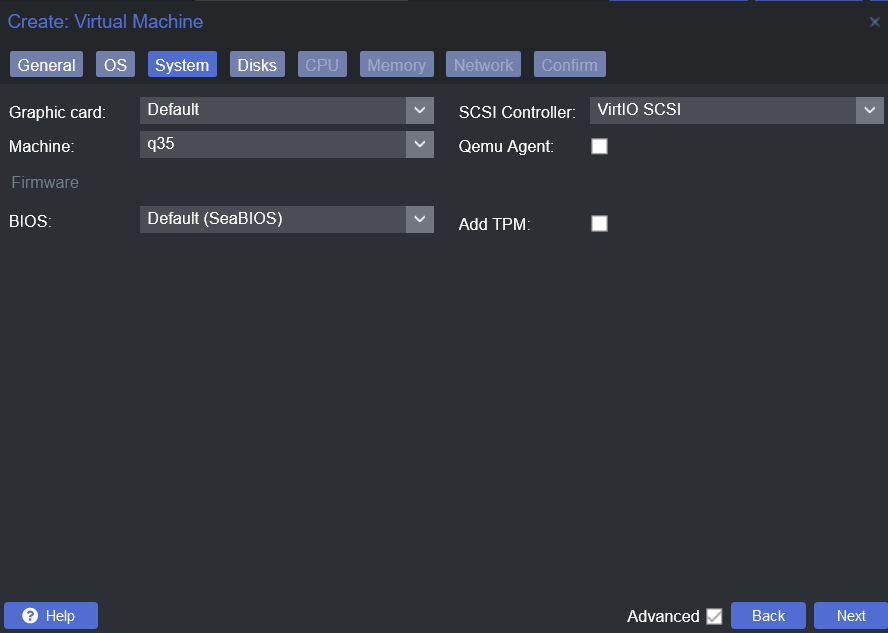
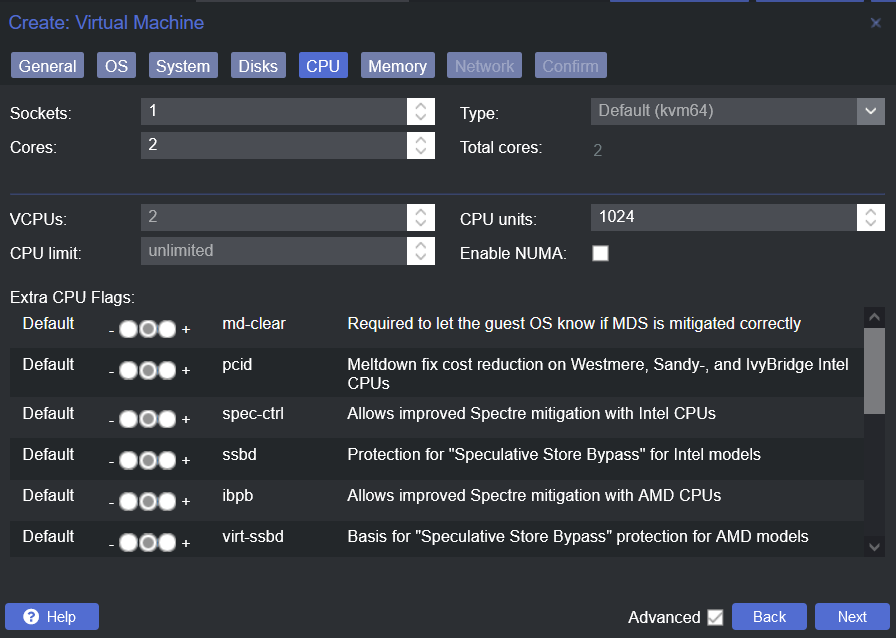
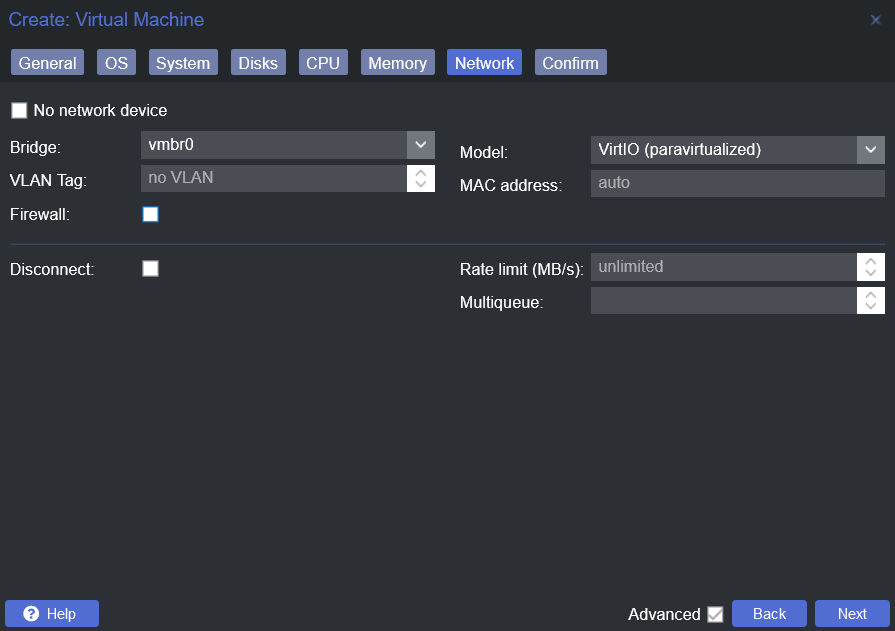
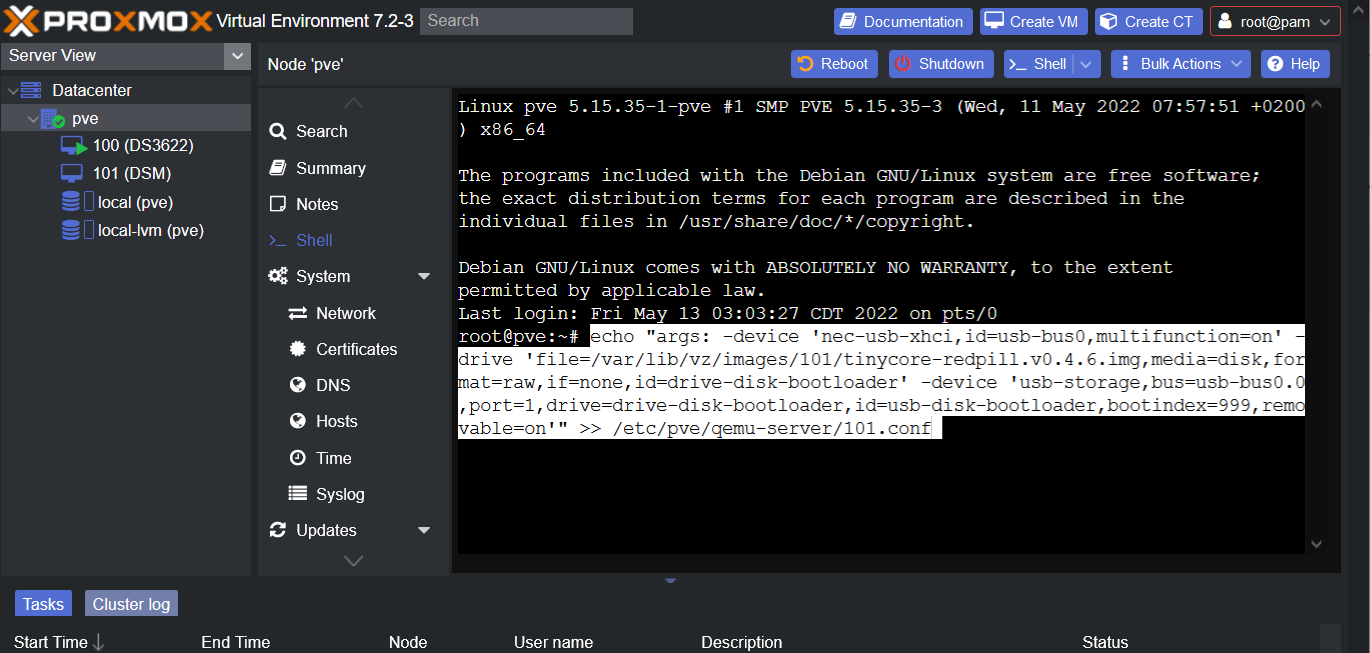
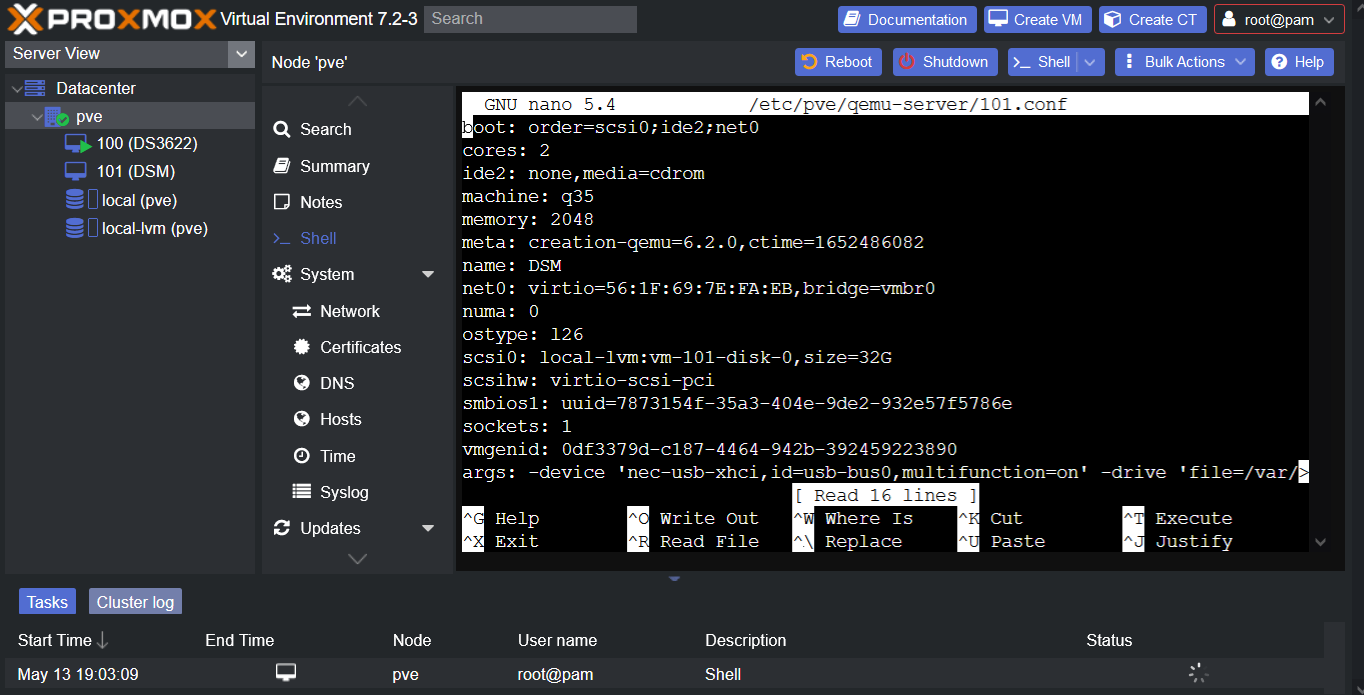
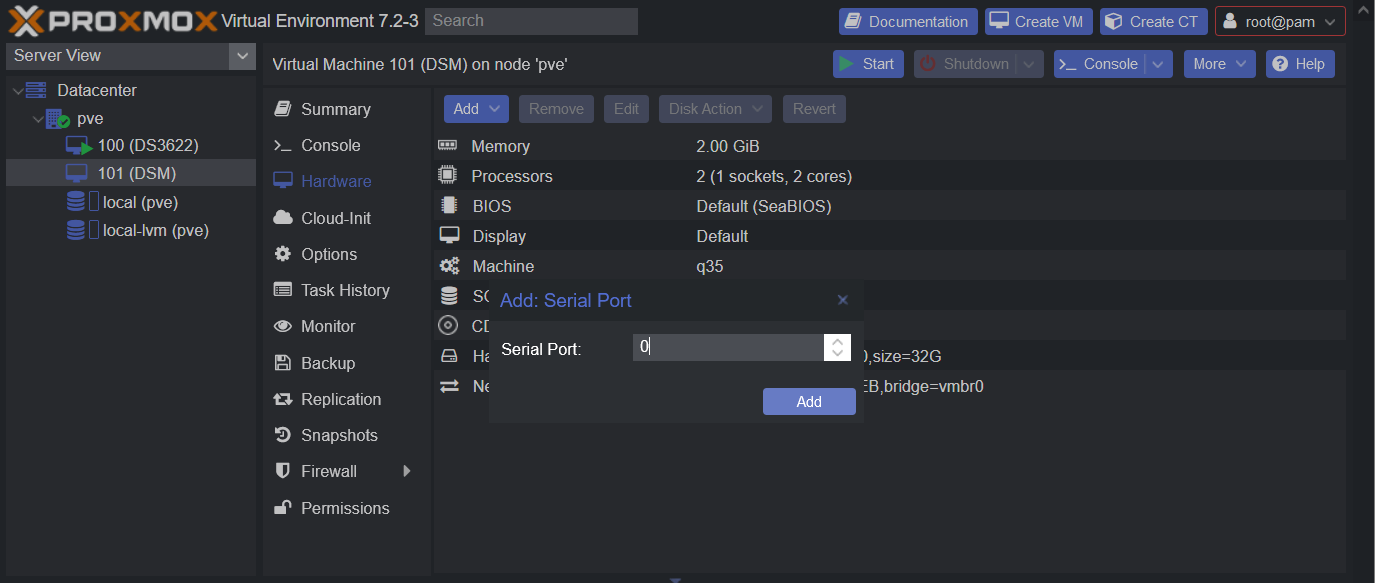
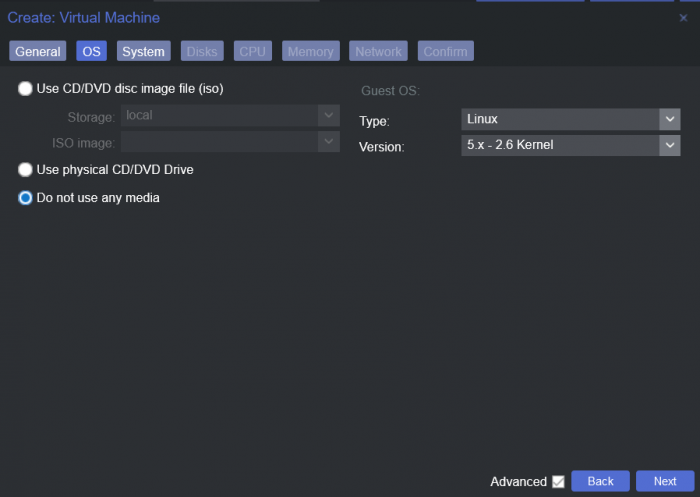
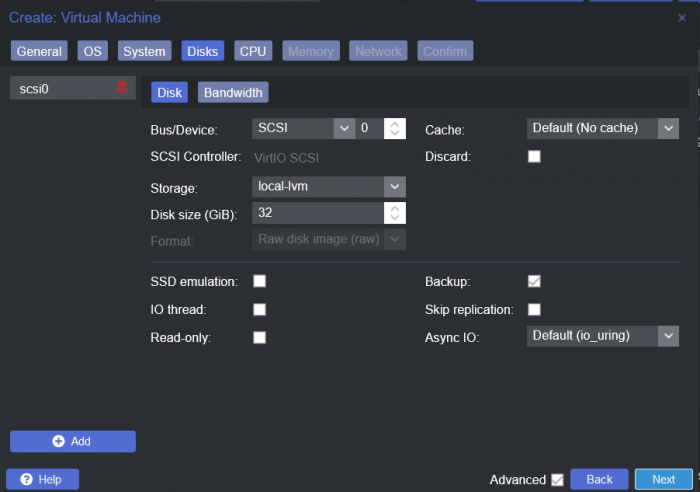
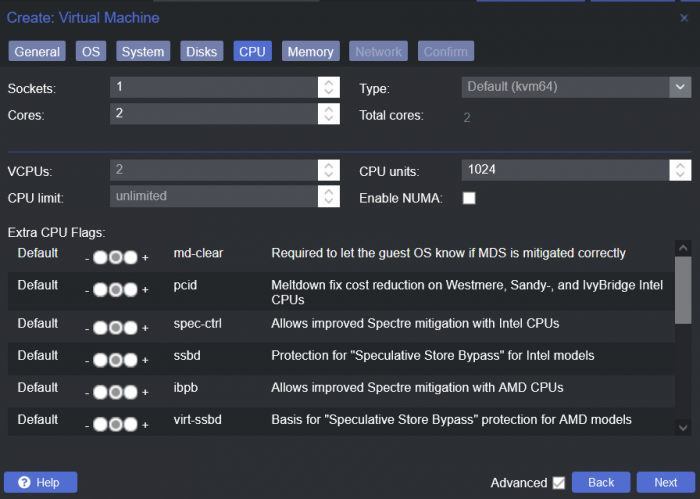
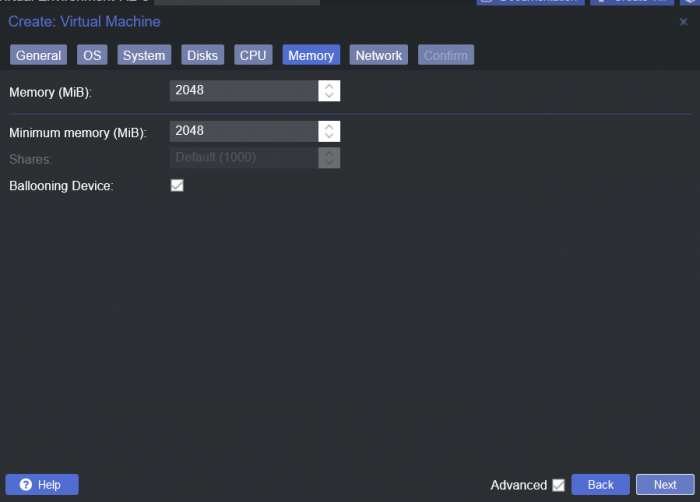
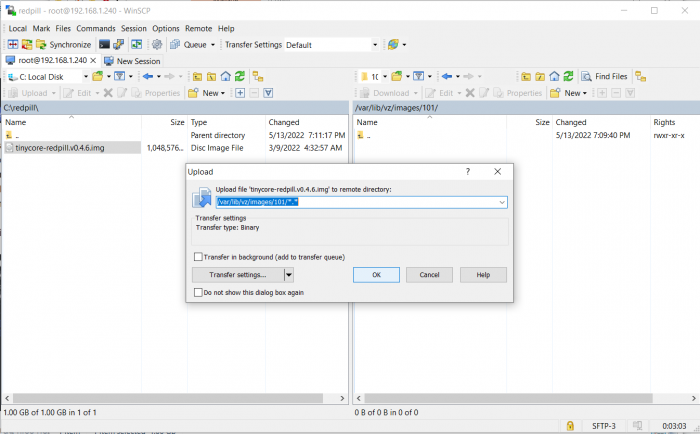
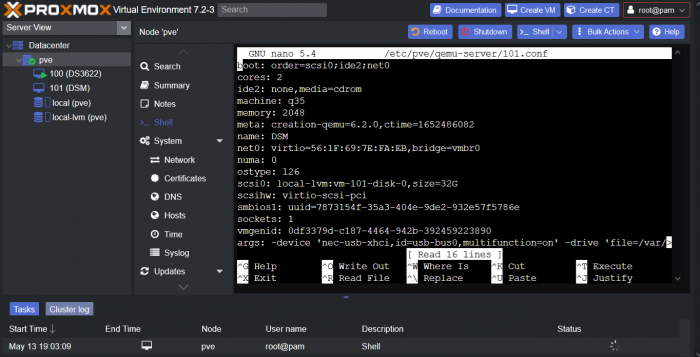
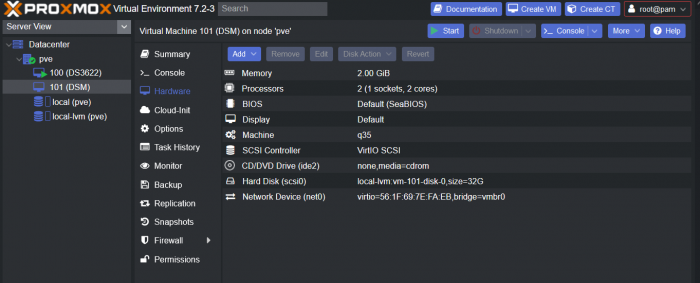
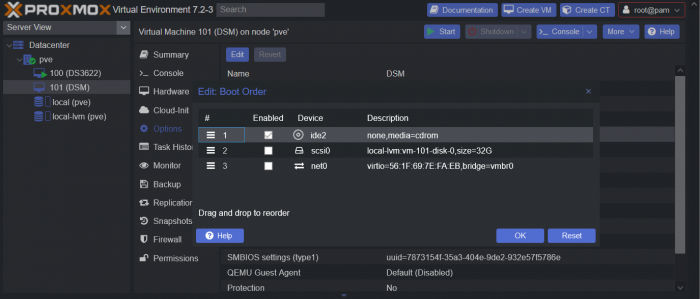
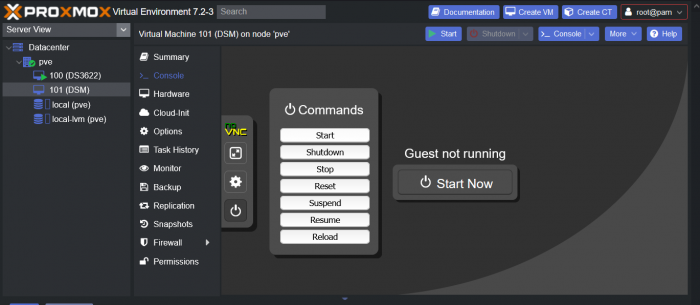
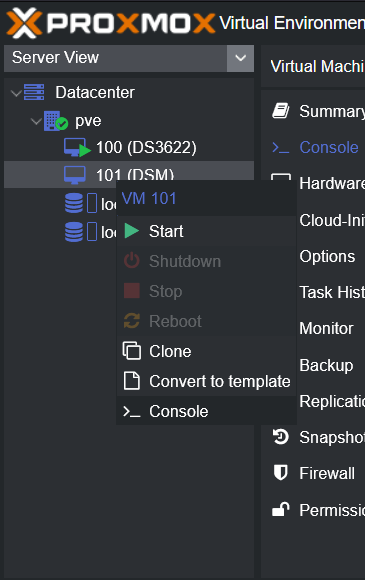
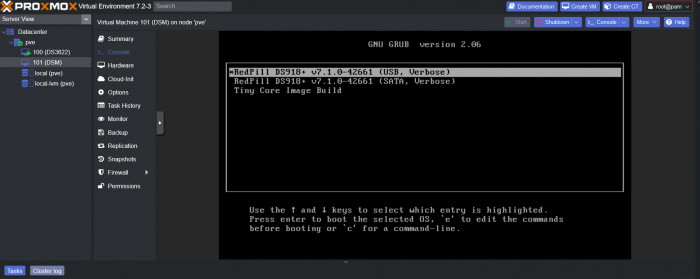
This is a simple guide and step by step tutorial on how I got tiny core red pill loader running and working on a proxmox server. This not the only way, just the way I do it and it seems to work. You will need a few things downloaded and ready to access on your local machine. The tiny core red pill image from @pocopico DOWNLOAD Putty for windows (or your mac equivalent) DOWNLOAD WinSCP for windows (or mac equivalent) DOWNLOAD and of course a working server with proxmox installed and running. DOWNLOAD The correct .pat dsm installation file downloaded directly from synology.com (you can handle this one on your own 😉) From proxmox create a VM. Most of the defaults work, change these according to your specific needs and requirements, I personally used: Q35, virtio nic, HDD is your choice, 2 cores and 2gb ram (again your choice). System Q35 is not required either, i440x works too, this is just what I used and it works. HDD is whatever you want, or pass thru complete drives or controllers.. again your choice based on your setup. Same for nic, cpu and ram. Just be sure to Use NO MEDIA in the OS section * REMEMBER THE VM ID # * you will need it later * Remember, do not use any media is selected here. Now, load WinSCP and connect to your proxmox server using your local ip and proxmox credentials. There on the right side, navigate to /var/lib/vz/images/ and create a folder/directory of whatever the vm number was you created, in these pictures its 101 so in this case it should be /var/lib/vz/images/101/ On the left side in WinSCP navigate to where you downloaded and extracted the tcrp image Copy the extracted tcrp img from your local machine to your proxmox vm directory Alternatively, you can enter a couple of command lines in the main pve node shell to download and extract the tcrp image without using winscp at all, but I do it the hard way. Either way works so its up to you. The alternative method is open the main pve node shell in proxmox and enter these commands (use copy and paste for each line) # set vm id to whatever it was at time of creation id=101 # create image directory, download and uncomporess mkdir -p /var/lib/vz/images/${id} curl --location https://github.com/pocopico/tinycore-redpill/raw/main/tinycore-redpill.v0.4.6.img.gz --output /var/lib/vz/images/${id}/tinycore-redpill.v0.4.6.img.gz gzip --decompress /var/lib/vz/images/${id}/tinycore-redpill.v0.4.6.img.gz --keep Now, at this point one way or another you should have a dir of your vm # in the correct location with the tcrp extracted image inside ready to issue the following commands, so now click your main pve node on the left panel and choose shell and paste this command there. (edit the 101 vm # with whatever your vm # is) echo "args: -device 'nec-usb-xhci,id=usb-bus0,multifunction=on' -drive 'file=/var/lib/vz/images/101/tinycore-redpill.v0.4.6.img,media=disk,format=raw,if=none,id=drive-disk-bootloader' -device 'usb-storage,bus=usb-bus0.0,port=1,drive=drive-disk-bootloader,id=usb-disk-bootloader,bootindex=999,removable=on'" >> /etc/pve/qemu-server/101.conf Now type nano and the last part of the above command (the directory part) to verify the entry into your vm .conf file so in this case nano /etc/pve/qemu-server/101.conf You easily verify the entry into the bottom of the .conf file of your vm, now press control x to exit. Now select your vm and choose hardware from the column Here using the Add button you should add a serial 0 console to monitor your dsm loader if needed (helpful for troubleshooting) and if you are adding hdd or using pass thru of hba controllers or sata controllers or any other specific hardware for your build add it here. Now select Options from the list column, and select only ide2 CD-ROM (uncheck all others) and make cd-rom priority #1 by dragging it to the top. Now you are ready to spin up your vm and build your loader. You can watch the process of booting by right clicking on the vm number/name and select >_ console a new window will open and you will see lines of code fly by, but only in this console monitor window. This is an optional step. At this point you should be booting tcrp and ready to build your loader... @Peter Suh has a great tutorial for that linked here. Follow his directions for building your loader. Use putty to SSH into tcrp to build the loader, The main thing when building if you used virtualized nic card, add the v9fs ext to get network port working, use this command before executing the redpill build command in putty. ./rploader.sh ext <build platform> add https://raw.githubusercontent.com/pocopico/rp-ext/master/v9fs/rpext-index.json After you successfully build your loader, and during the reboot, go back to proxmox gui and when you see the booting menu screen, press UP to select BOOT FROM USB, VERBOSE then press enter... that is very important. You only have to do this once, and it will save and retain that selection until you change it again. You do not want to boot from sata! At this point you load your browser, go to find.synology.com or use synology search application on your pc, or simply go to the ip of your new vm dsm and complete the process. If you had your console monitor opened from above, you should see sign in prompt, if you scroll up a little bit you will also see the ip of your dsm vm. If you successfully booted from usb, everything will work. If you did not change that during the first reboot, and you are booting from sata, you will most likely get a failure to install dsm. You will need to power down the vm, re-start the vm, and choose boot from usb verbose. If this guide helped you, please press the thanks button for me. 🖖😀 And remember to thank @pocopico and @Peter Suh Enjoy!


 1 point
 -
Ok, did the Update to actual RC 7.1.1-42962 on an TCRP 3622xs+ Thanks and best Credits to @pocopico awesome Work!!! Hints: Did a TCRP 0.8 Update, Manual Update in DSM an failed... Building whole new Loader with DEV 0.9.0.2 did the Trick for me and my System was "Migrated" now its up and running like Charm again. Puh, what a Ride. I thought its dead and I have to get there from scratch...but finally, the DEVs did it again. WoW!!! °-°
 1 point
 -
1 point
-
@loveburn Yep ! For DS3622xs curl --location "https://github.com/pocopico/tinycore-redpill/raw/develop/rploader.sh" -O ./rploader.sh fullupgrade ./rploader.sh clean rm -rf /mnt/sdb3/auxfiles ./rploader.sh identifyusb (detect and confirm "Y") ./rploader.sh satamap (detect OK, confirm "Y") ./rploader.sh serialgen DS3622xs+ (confirm "Y" ; or real mac ./rploader.sh serialgen DS3622xs+ realmac + confirm "Y" ; manual edit : vi user_config.json) -> check conf : cat user_config.json If OK ./rploader.sh ext broadwellnk-7.1.1-42962 auto ./rploader.sh build broadwellnk-7.1.1-42962 auto1 point
-
No need. I re-sized the 3rd partition of the img to be just a little bit smaller and got it to fit on a 1GB USB stick. What would make the most sense is for the 3rd partition of the img to be as small as possible and resize to fit the USB stick on first boot. This is merely a suggestion.1 point
-
I think it's pretty safe to upgrade. I've upgraded from Jun's 1.03b to redpill without a hitch sometime ago. But to be extra safe, you can emulate your current confing using different USB and HDD or VM and see if the update will work for you.1 point
-
Can someone make Update instructions with pictures or a quick video Thanks0 points