Leaderboard


Popular Content
Showing content with the highest reputation on 02/05/2022 in all areas
-
hier eine kleine (grobe) Anleitungf zum neuen Image... - gewünschte Firmware von QNAP herunterladen - USB Stick (#1) mit ISO vorbereiten und booten ==> in Tinycore wechseln ===> admin/admin ====> ipconfig => SSH in das System ==> tc/admin => winscp in das System ==> tc/admin ===> via WinSCP die heruntergeladene Firmwaredatei auf das System kopieren ====> wenn du eine model.conf hast, ggfls. diese auch gleich in das Verzeichnis kopieren => in SSH folgende Befehle eingeben ==> sudo get_qnap_firmware /home/tc/TS-X72_20211223-4.5.4.1892.zip - leeren USB Stick (#2) anstecken (!! der wird später alles zum Booten enthalten und muss nicht mehr entfernt werden) ==> ls -al /sys/block /sd* ===> die Ausgabe dokumentieren und umrechnen z.B. /devices/pci0000:00/0000:00:14.0/usb4/4-4/4-4:1.0/host6/target6:0:0/6:0:0:0/block/sda/ => diese Wert in model.conf eintragen (wenn das nicht stimmt, bootet er nur bis ca. 18Sek) => [Boot Disk 1] DEV_BUS = B00:D20:F0 DEV_PORT = 4 ==> sudo cp model.conf /home/tc/patch/etc/model.conf ==> sudo create_qnap_boot 1. USB Stick rausziehen und dann sollte es laufen2 points
-
Hi All, I modified jun's loader to work with DSM-6.2.4, for safe reason, I removed all the kmods from the extra.lzma but kept rtc_cmos.ko The loader is created with DSM-6.2.4 update 2 Tested working well with vmware, you will need change .vmx file to use e1000e as it's built-in. ethernet0.virtualDev = "e1000e" It should work with main boards that have r8168, igb like J3455-ITX, etc here is the step to create the loader. 1. prepare patched kernel zImage RedPill team already have that well explained, so just use their tool to generate one. 2. prepare patched ramdisk make the extra.cpio that contains modified files from jun's 1.0.4 loader, mainly the jun.patch to match the new files inside rd.gz you could add more kmods for network cards and storage cards to load, as there is a lot of them for RedPill loader already extract the rd.gz to rd.cpio lzma -dc < rd.gz > rd.cpio the kernel support multi-cpio booting, so just copy the 2 files to one cat rd.cpio extra.cpio > rd_extra.cpio make new rd.gz that accepted by the kernel. original rd.gz has 64bytes sig, as the patched kernel already bypass the sig check, so we just need to add a fake sig to end of file. create a padding.bin which is 64bytes. lzma -9 rd_extra.cpio cat rd_extra.cpio.lzma padding.bin > rd_extra.lzma 3. modify grub.cfg to boot with the new zImage and rd_extra.lzma copy the patched zImage to first EFI partition of the synoboot.img and replace bzImage copy the rd_extra.lzma to the second partition enable the initrd loading initrd /rd_extra.lzma if all the steps are done you should have bootable 6.2.4 loader. The modified files are attached. you should unpack the extra.cpio to see what are changed. And you could try the made loader from here https://ufile.io/hrdlt20r UsedFiles.rar1 point
-
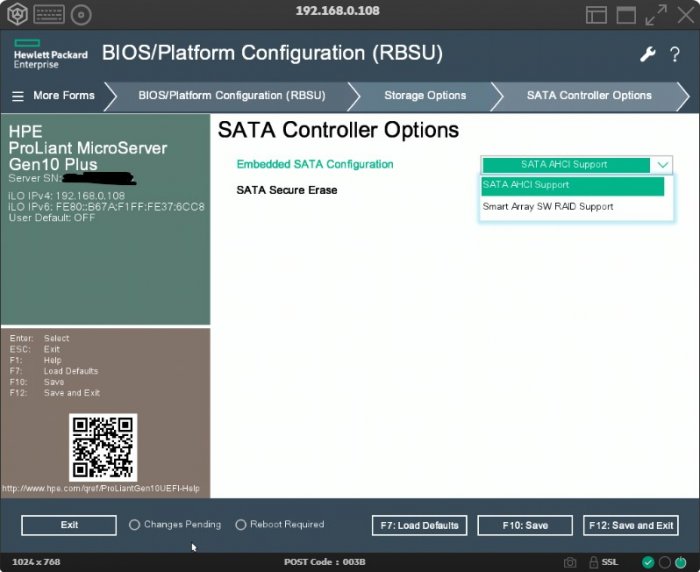
Ja, jetzt habe ich meine Einstellungen überprüft, "SATA AHCI Support" ist aktiv. Hinweis: Ich schreibe immer, indem ich ins Deutsche übersetze, tut mir leid, damit habe ich auch etwas Mühe.
 1 point
 -
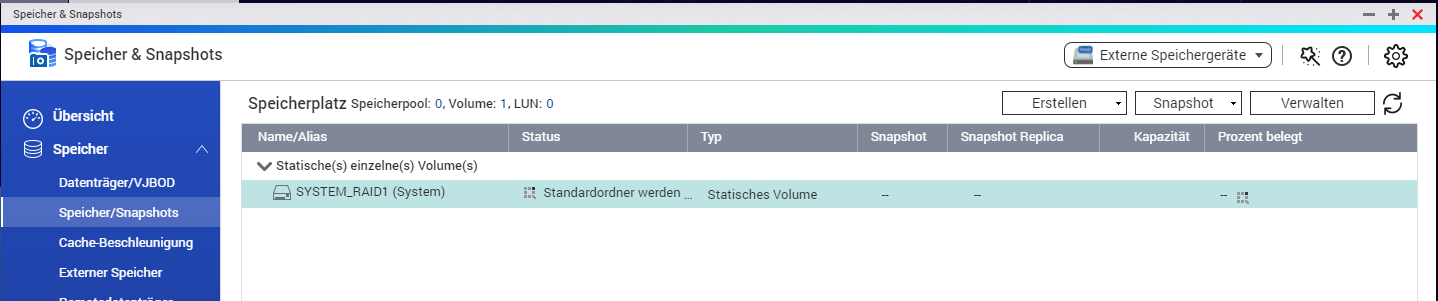
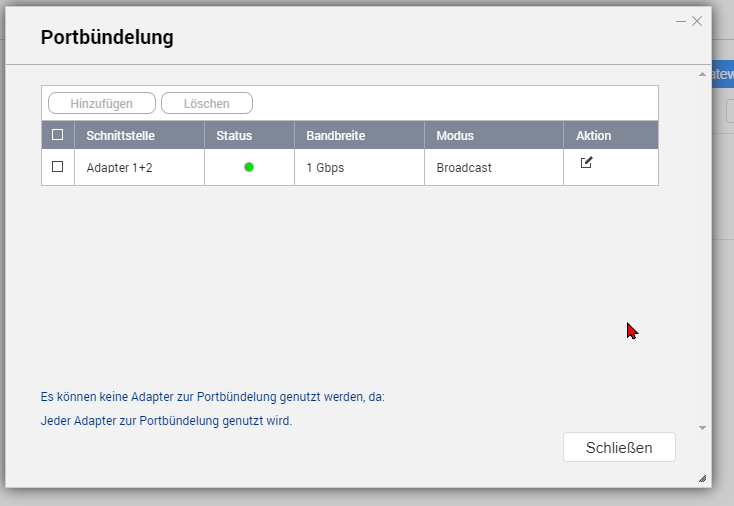
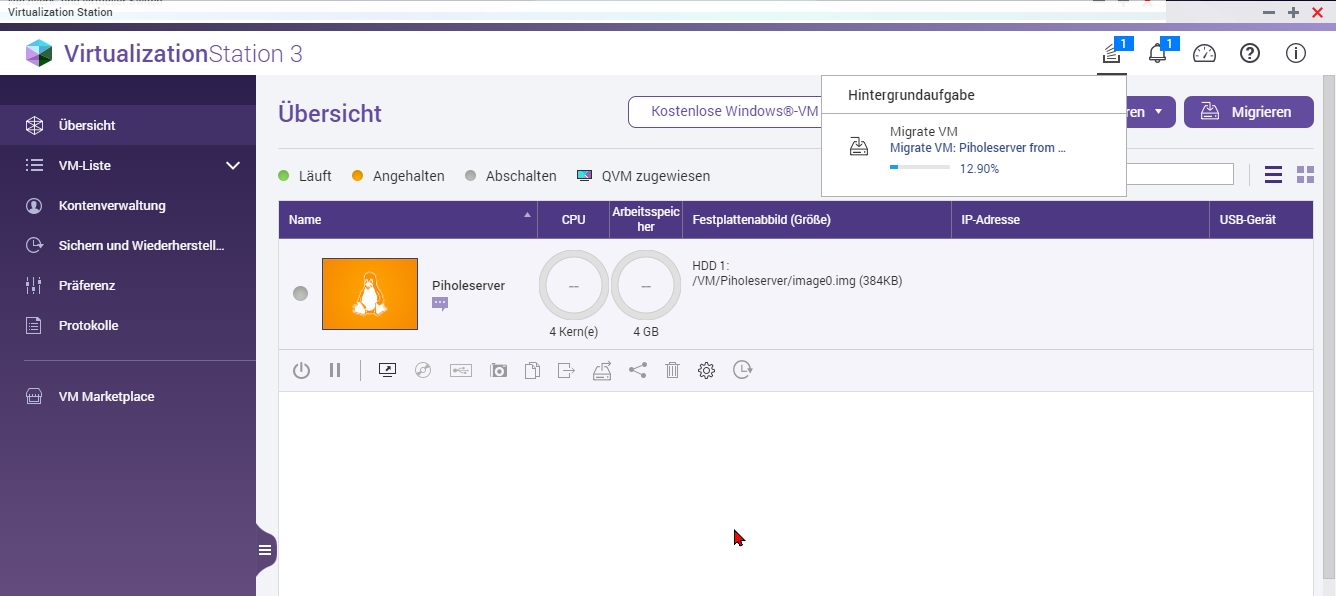
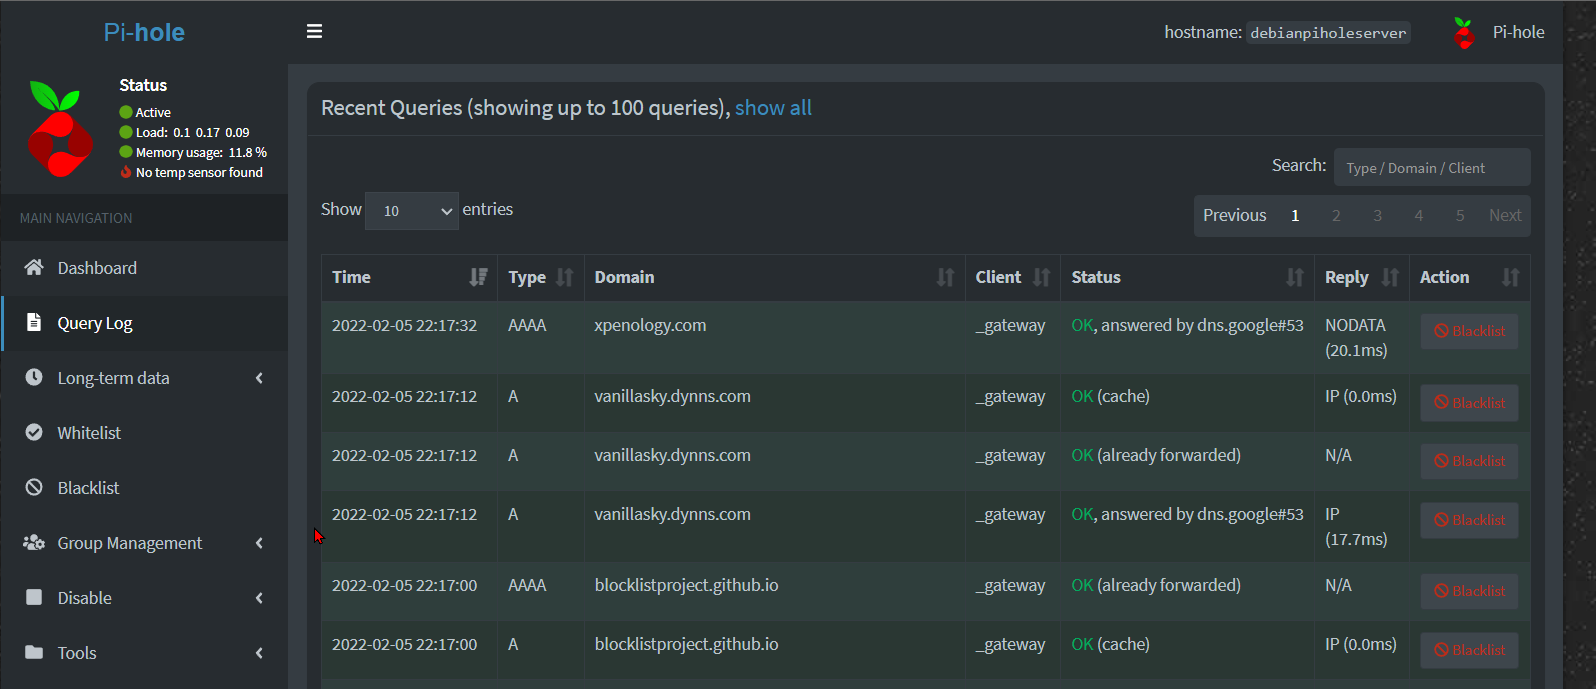
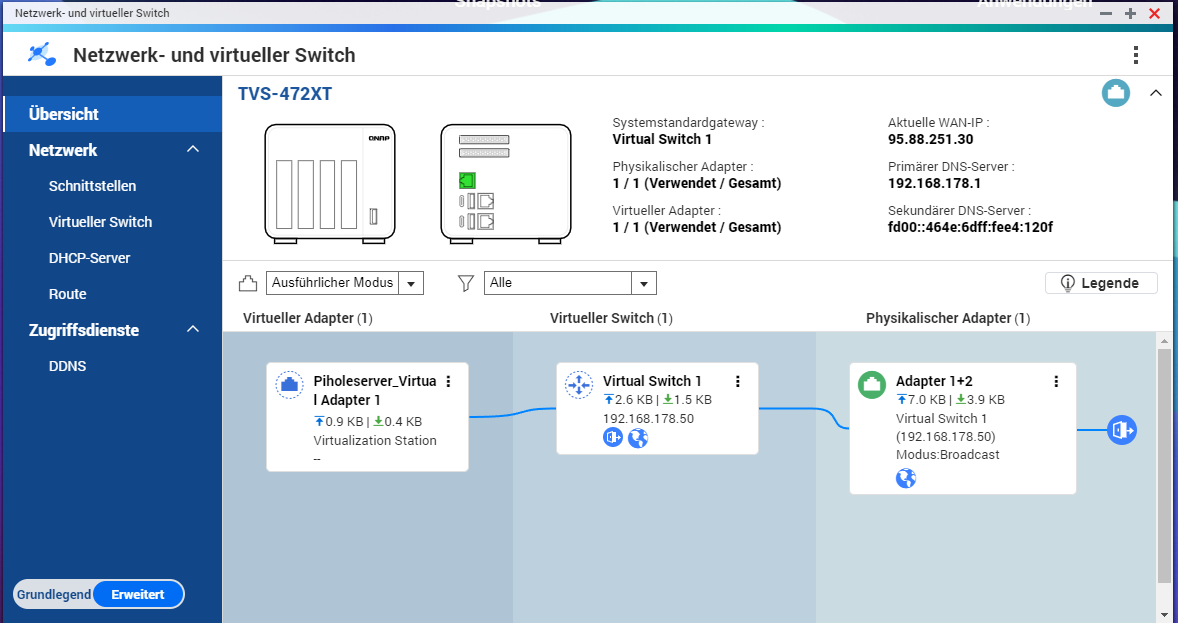
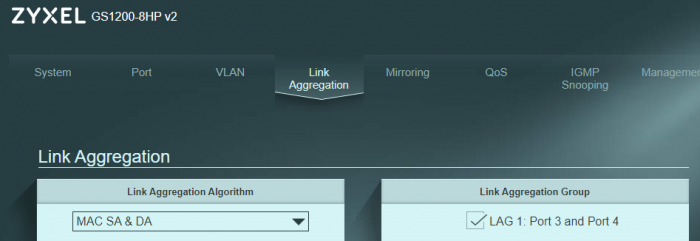
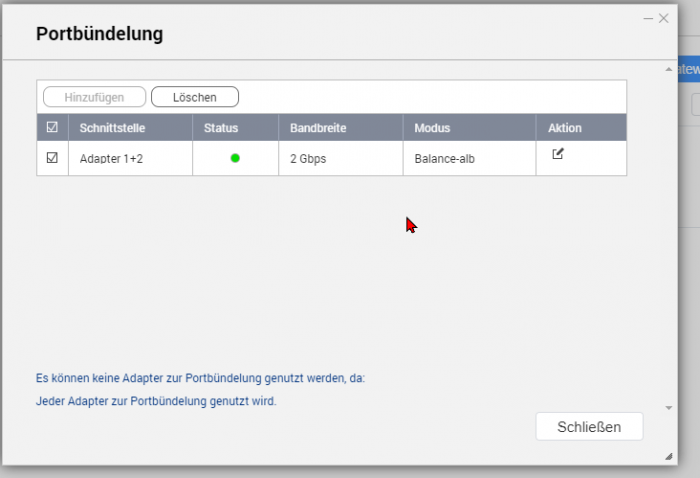
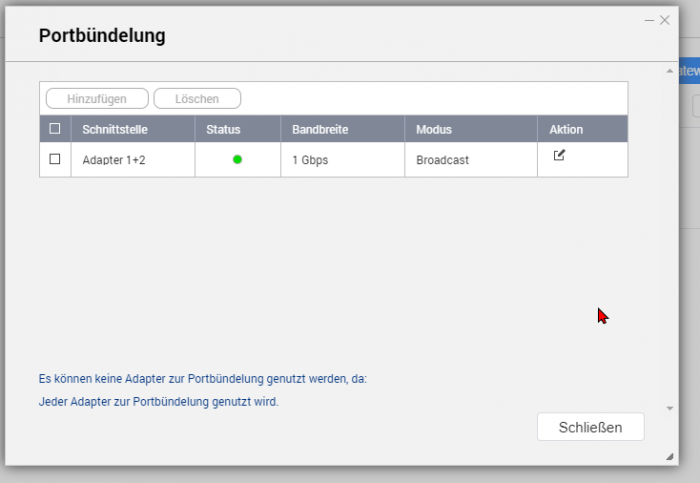
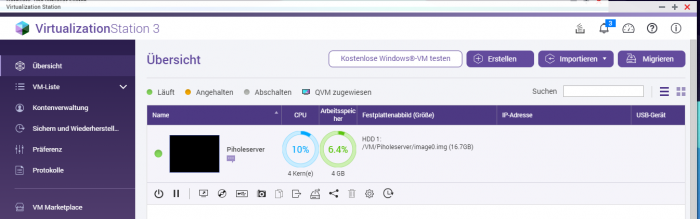
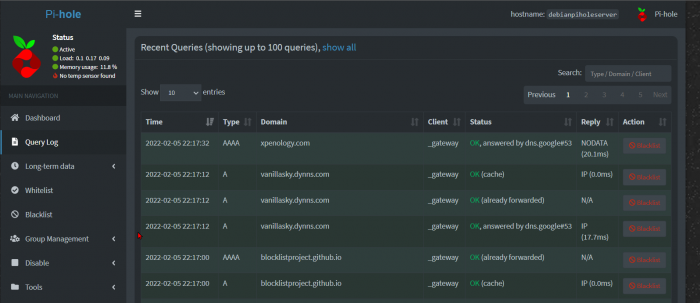
LAG und Portbündelung funktioniert 👍 Balanced-alb Broadcast Speicherpool RAID1 funktioniert 👍 Migration VM Pihole Server funktioniert 👍 VM Pihole läuft und funktioniert 👍


 1 point
 -
Assuming you power off before swapping the disks it shouldn’t be a problem, however as always make sure you have a backup of any important data.1 point
-
Hallo, Vielen Dank, ich habe auch den Server vorbereitet, ich habe mich darauf vorbereitet, mir die Freigaben anzusehen, in denen die Installationstests durchgeführt wurden, und es erneut zu versuchen. Wenn es eine andere .iso-Datei gibt, spart es Zeit, wenn ich es damit versuche.1 point
-
ok uploade es für alle nochmal hoch ...einen moment https://www.androidfilehost.com/?w=files&flid=3323991 point
-
Hallo, Ich glaube, dieser Link wurde gelöscht. file.io Die angeforderte Datei wurde gelöscht1 point
-
👏 wenn du ne ältere Firmware von Qnap genommen hättest, hattest du jetzt das Update prüfen können..1 point
-
du brauchst dann nur den USB Stick #2 ...den 1. kannst du ziehen, der wird nicht mehr benötigt..;) Ja, wenn du bei ca. 18Sek im Boot stehen bleibst ist der falsche Port ausgewählt. Idealerweise nutzt du einen USB Port, welcher an keinem HUB hängt, weil das noch ein bisserl mehr tricky ist...1 point
-
you can use the one you have1 point
-
DSM7 загрузчик еще в процессе разработки. Если у вас нет опыта и полного понимания процесса, лучше пока воздержаться и сидеть на версии 6.2.31 point
-
i checked the kernel config for denverton 7.0, it's 16 threads, same as 3617 maybe one unit in the denverton line comes with 8 core HT cpu? (not int the table) looks like using the table from the link above does not give reliable information, in the end its about how the kernel is build edit: just checked for amd v1000 architecture, its 16 threads in the kernel config maybe i should make a list for all platforms real thread count its 128 for kvmx64, if this kernel has enough stuff build in to have additional drivers ...1 point
-
Hi my friends, here is the link to the "Year of the OX" Loader someone mentioned earlier. Year of the Ox1 point
-
@Nemesis you should make your own loader based on the post. most important, add your own net and storage drivers. I tried my pc and VMware, both working fine. because there is kernel update with 6.2.4 update 2 you will need to create 2 loader, 1 for orig 6.2.4, another for update 2. install using the first one and after update using the second one. if the loader and installation package do not match, you will see dsm recovery page. if you have serial port enabled, you will see the log message of mismatch.1 point
-
hi. first of all thanks @pocopico for this great tool. finally i managed to create a uefi bootable flash drive. the steps are very easy but it took me about the whole day to figure out. after writing redpill tc loader image to your flash drive, you need a linux machine to add the uefi boot. in my case, i have a notebook with linux mint installed (latest edge edition). assuming that my flash drive was /dev/sdb, this is what i've done: Mount the filesystem: sudo mount -o umask=000 /dev/sdb1 /mnt Write the MBR and install the grub files required for legacy BIOS boot on the drive: (i don't know if this step is really needed but anyway it works) sudo grub-install --no-floppy --boot-directory=/mnt/boot --target=i386-pc /dev/sdb Install /EFI/BOOT/BOOTX64.EFI and other grub files required to load grub from a 64-bit UEFI firmware: sudo grub-install --removable --boot-directory=/mnt/boot --efi-directory=/mnt --target=x86_64-efi /dev/sdb Unmount the filesystem: sudo umount /dev/sdb1 after that, remove the flash drive and try it. for me, it worked at first try. no need to edit any other file. credits go to https://github.com/ndeineko/grub2-bios-uefi-usb for this helpful page without which I would never have succeeded.1 point