Leaderboard


Popular Content
Showing content with the highest reputation on 03/10/2021 in all areas
-
1. В центре пакетов, добавляете источник пакетов https://packages.synocommunity.com (в настройках разрешаете установку из любых источниках) 2. Устанавливайте SynoCli file tool. 3. Кидаем на хрень libsynophoto-plugin-detection.so в свою главную папку т.е home (или куда душе угодно) 4. Подключайтесь через pytty 5. логин - пасс. потом команда sudo su спросит пароль 6. mc 7. Появится список файлов главной папки там и будет libsynophoto-plugin-detection.so . Выделяем его, жмем Ctrl+x затем C 8. Ставим права на файл (визуально это будет выглядеть так) 0 - Это значит не отмечено 0 0 0 X X X X 0 X X 0 X 9. жмем TAB переходим в правую колонку идем по пути /var/packages/SynologyMoments/target/usr/lib/ . Возвращаемся в левую колонку TAB. Если не выделен файл libsynophoto-plugin-detection.so выделяем. Жмем F5 соглашаемся на замену. 10. Останавливаем пакет moments и снова запускаем. Профит !!!!2 points
-
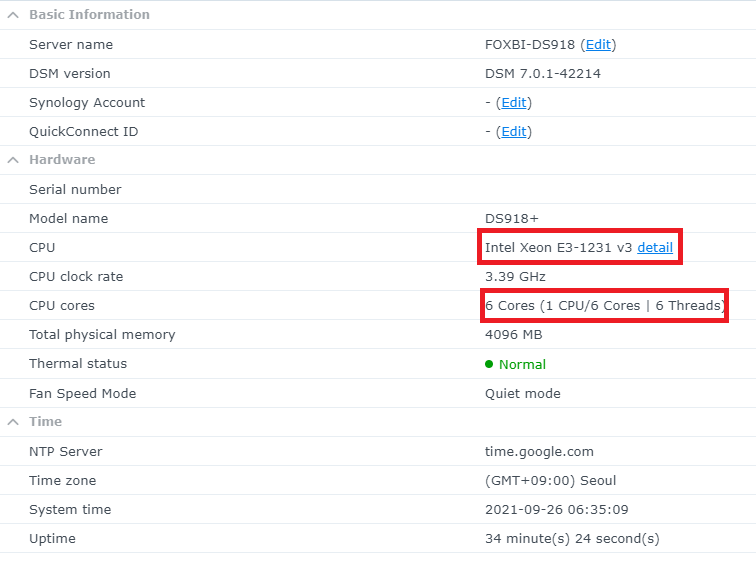
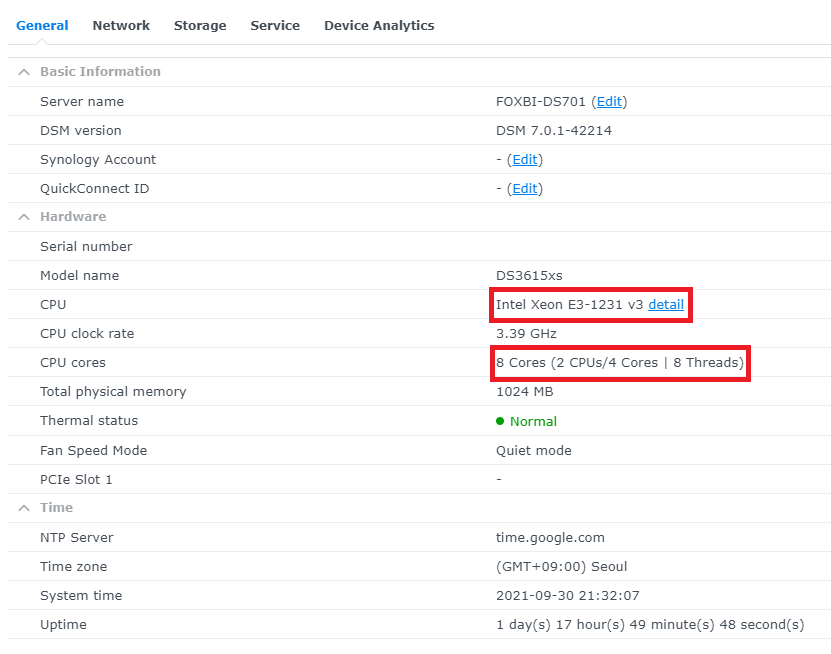
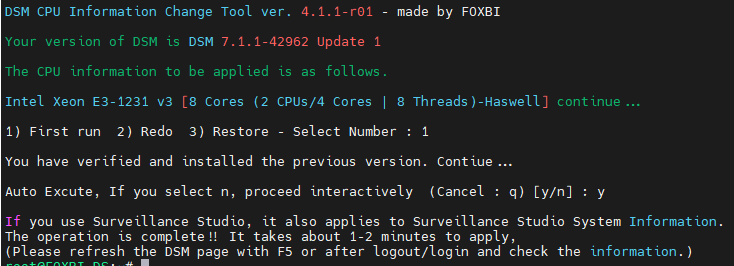
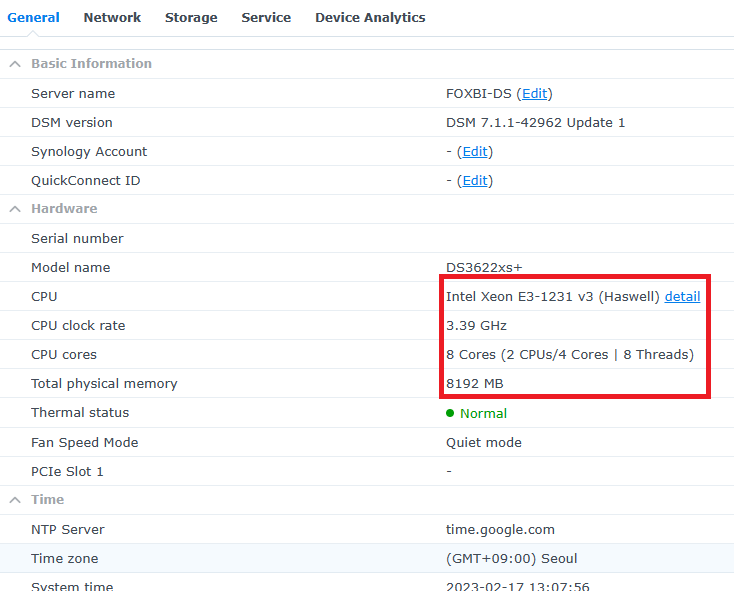
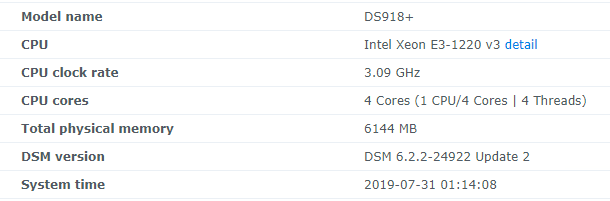
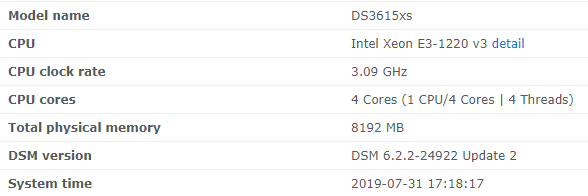
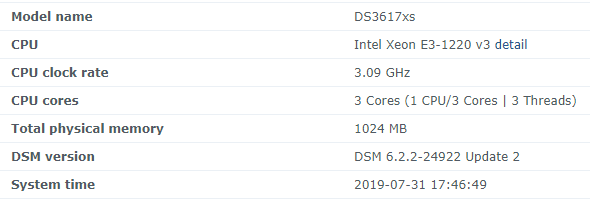
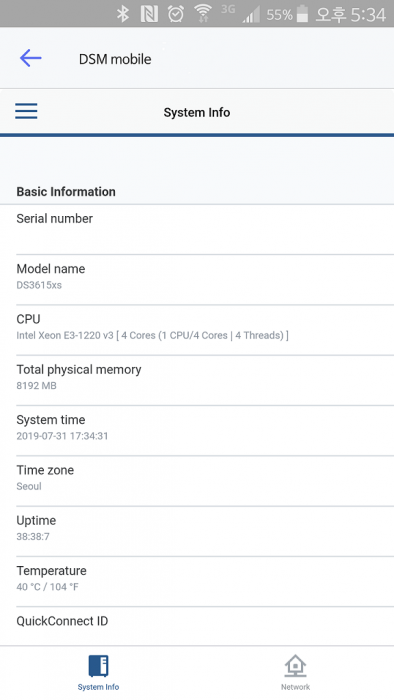
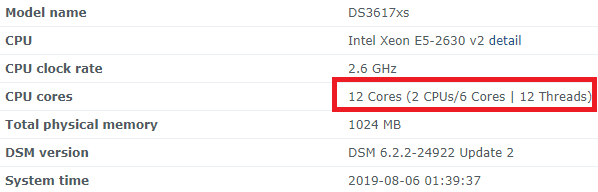
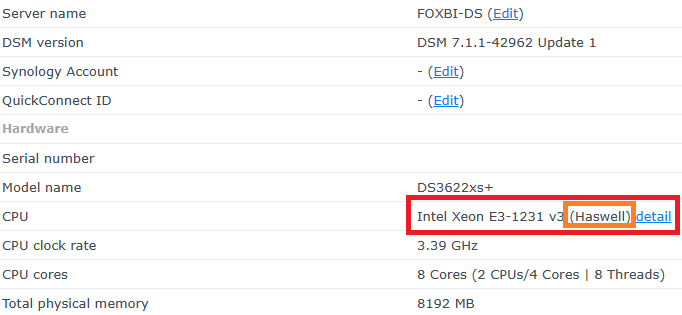
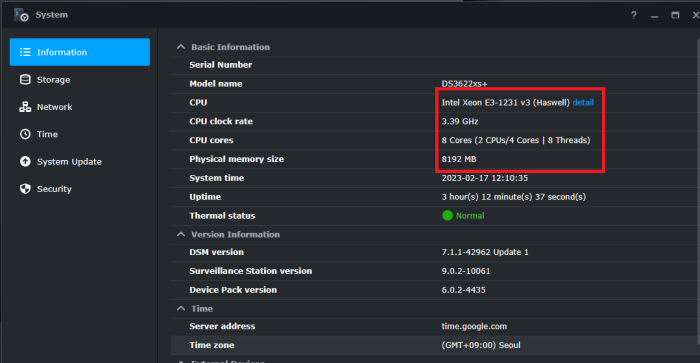
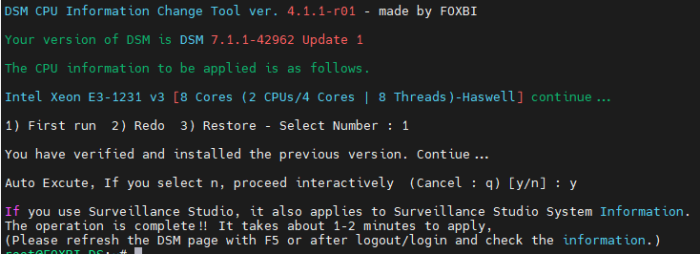
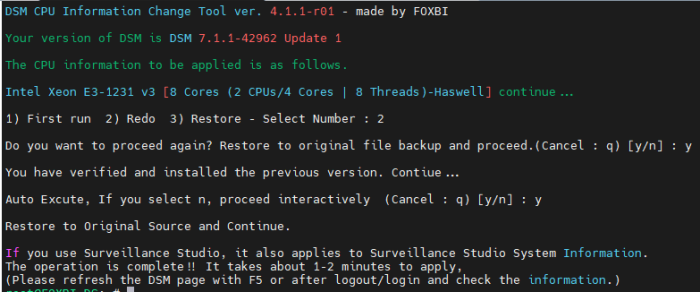
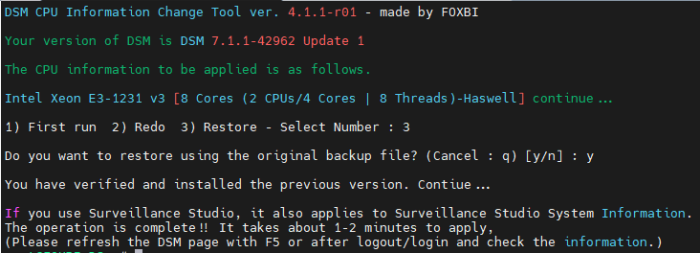
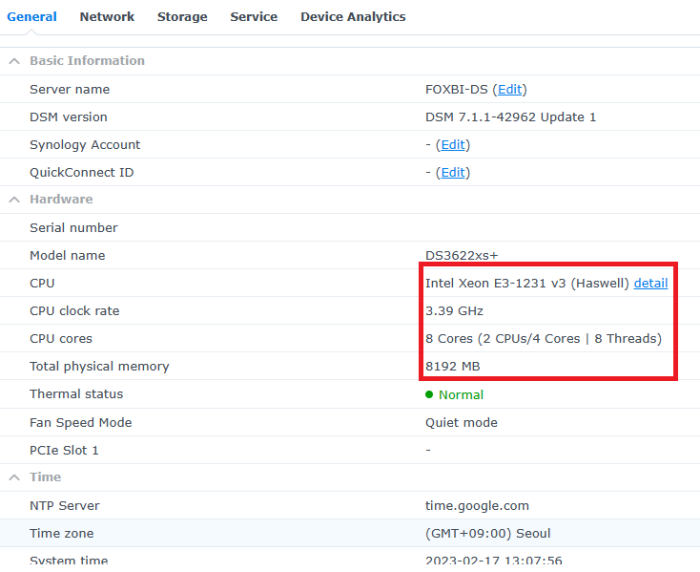
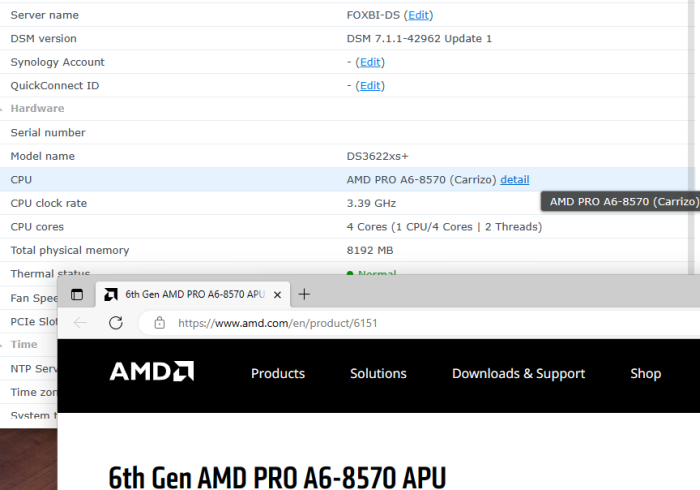
Hello! I am xpenology user. And I am an IT engineer who creates shell scripts as hobbies. Please understand that it is written by a google translate site. because i’m korean who is not fluent in English. I created a tool to change cpu information for Xpenology’s users. Modify the actual cpu name and cores of your pc or server. Howto Run ============================================================= 1. Download attached file on your PC (ch_cpuinfo.tar) (ch_cpuinfo_en.tar) / (ch_cpuinfo_kr.tar is file for korean) 2. Upload file to your DSM location (by filestation, sftp, webdav etc....) 3. Connect to ssh by admin account. (dsm > control panel > terminal & snmp > terminal > enable ssh check) 4. Switch user to root: sudo su - (input admin password) 5. Change directory to where ch_cpuinfo.tar file is located: cd /volume1/temp 5-1. in another way, Download ch_cpuinfo.tar with wget wget https://github.com/FOXBI/ch_cpuinfo/releases/download/ch_cpuinfo/ch_cpuinfo.tar 6. Decompress file & check file: tar xvf ch_cpuinfo.tar ls -lrt (check root’s run auth) 7. Run to Binary file ./ch_cpuinfo or ./ch_cpuinfo.sh (If you use busybox in DSM 5.x, you can use it as a source file) 8. When you execute it, proceed according to the description that is output. 9. Check your DSM’s CPU name, CPU cores at “information center” made a video of the how to run ch_cpuinfo. Extra Action If you want to use ch_cpuinfo in your language Modify and use the LANG.txt file in the same path as ch_cpuinfo. It is possible to use after changing the English content of each variable after translation and changing the value of CUSTLANG in line 8 to Y. Sample image(by Google trans) ==================================================== Addtional, Adjust binary to excute file made by shc(http://www.datsi.fi.upm.es/~frosal) The tool does not inclue worms, bad code. If you want to edit the CPU information yourself manually, please refer to the contents below. ——————————————————————————————————————————————————————————————— Location : /usr/syno/synoman/webman/modules/AdminCenter Source : admin_center.js / admin_center.js.gz(above 6.2) Add Before -> if(Ext.isDefined(h.cpu_vendor)&&Ext.isDefined(h.cpu_family)&&Ext.isDefined(h.cpu_series)){ o.push([_T("status","cpu_model_name"),String.format("{0} {1} {2}",h.cpu_vendor,h.cpu_family,h.cpu_series)])} if(Ext.isDefined(h.cpu_cores)){o.push([_T("status","cpu_cores"),h.cpu_cores])} Add contents: h.cpu_vendor="Intel";h.cpu_family="Xeon";h.cpu_series="E3-1220 V3";h.cpu_cores="4 Cores (1 CPU/4 Cores | 4 Threads)"; h.cpu_detail="<a href='https://ark.intel.com/content/www/us/en/ark/search.html?_charset_=UTF-8&q=E3-1220 V3' target=_blank>detail</a>" Change contens: String.format("{0} {1} {2}",h.cpu_vendor,h.cpu_family,h.cpu_series) to String.format("{0} {1} {2} {3}",h.cpu_vendor,h.cpu_family,h.cpu_series,h.cpu_detail) ——————————————————————————————————————————————————————————————— Finally, All descriptions are based on version 6.2, and the actual executable file supports 5.x, 6.x and 7.x Publish the source through github(https://github.com/FOXBI/ch_cpuinfo). For versions DSM 6.x and later, you can use the binary as before. If you use busybox in DSM 5.x, you can use it as a source file(ch_cpuinfo.sh). Please contact me by comment or bug report, i’ll respond to you as much as possible within my ability. Test & Made Environment ———————————————————————————————————— Base Server : HP ML310e v2 gen8 + VMware ESXi 6.0 + RDM DSM : DSM 6.2.3-25426 Update 3 (DS3615xs) Base Server : HP ML310e v2 gen8 + VMware ESXi 6.0 DSM : DSM 7.0.1-42214 (DS3615xs) Base Server : HP ML310e v2 gen8 + VMware ESXi 6.0 DSM : DSM 7.0.1-42214 (DS918+) Base Server : HP ML310e v2 gen8 + VMware ESXi 6.0 DSM : DSM 6.2.4-25556 (DS3615xs) Base Server : Intel E5-2630 v2 + VMware ESXi 6.7u2 DSM : 6.2.2-24922 Update 2 (DS3617xs) ———————————————————————————————————— Change Log Update new version (ch_cpuinfo ver 4.2.0-r01) 2023.02.18 - Application of AMD's CPU information collection function improvement - xpenlib(cpu_info.sh) refered https://github.com/FOXBI/xpenlib/blob/main/cpu_info.sh Update new version (ch_cpuinfo ver 4.2.1-r01) 2023.03.05 - Fixed error when users of previous version perform redo with version 4.2.0-r01 (Thanks for the @Mentat report.) I am sorry for not being able to actively respond to your inquiries due to busy life. Thank you!! Have a nice day!! Cheer up!! We can do it!! Reduce activity & Stay home & Wear a Mask!! Let's overcome COVID-19 !! Let's pray and support together for the two countries where the earthquake caused great damage and many deaths and missing people. ============================================= Download links: ch_cpuinfo ver 4.2.0-r01 - new version update -> ch_cpuinfo ver 4.2.1-r01 - new version update -> ch_cpuinfo.tar Reference images # 1.04b + DS918+ # 1.03b + DS3615xs # 1.03b + DS3617xs # Normal output is possible even when using more than 8core. # Support DSM 7.x


 1 point
 -
I have changed Cables on the 2 Disks that gave me issues. Running a smart Test on it to check if the Disk is all ok. Thanks both1 point
-
Ну вам хотя бы ответили. Мой запрос остался без ответа.1 point
-
Have successfully built and am running latest DSM6.2.4 on my 1010 set up as a 1511. Can confirm you need a usb stick with PID/VID both set to F400 else the DSM writing settings procedure will fail. Can reprogram the internal usb if you like too. Just need to create a custom made 1511 bootloader with your MAC addresses and 1010 serial number and write to external/internal usb. Have written a rather lengthy post, here...1 point
-
Success with AsRock J3160DC-ITX using DS918+ 1.04b loader with 0.8_syno ds918+ drivers patch. Notes: On first partition I updated grub config with correct USB stick VID/PID, valid SN and MACs (found on internet). On second partition I replaced kernel zImage and rd.gz with those from "DSM_DS918+_24922.pat" and replaced extra.lzma and extra2.lzma with those from "0.8_syno ds918+" package. First I used empty drive only to test if the loader works with clean installation using latest DSM 6.2.2-24922 Update 5 - selected automatic installation. Then I removed that test drive, attached existing drives and boot the system to start migration from DS3615xs DSM 6.1.7. Both network adapters works: onboard Realtek RTL8111GR and mini-pcie Intel 82574. HW transcoding not tested. I don't use it. Thanks @IG-881 point