Leaderboard


Popular Content
Showing content with the highest reputation on 06/18/2020 in all areas
-
I had couple of troubles with my installition with a good google search, I have found out couple of fixes. I have combined them into one script. This will be easier for many beginners. I am not really good Bash script writer but this is just fine. I have tried couple of times. Tried on DSM 6.2.3 with Juns 1.04 Loader on a Vm. Use it with caution. https://github.com/Jlozde/Xpenology-6.2.3-EasyFix Usage: wget https://raw.githubusercontent.com/Jlozde/xpenology-6.2.3-easyfix/master/patch.sh chmod +x patch.sh ./patch.sh reboot & reindex Thanks to;2 points
-
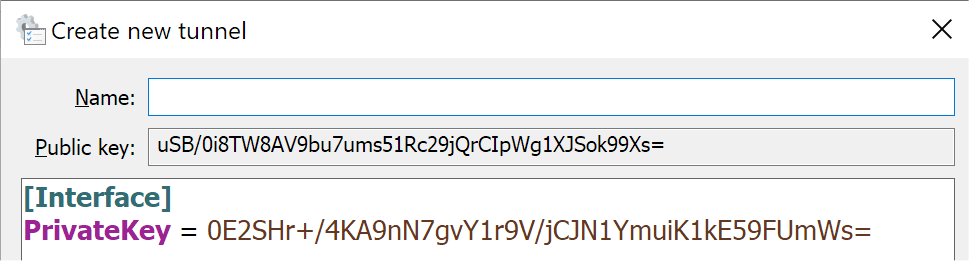
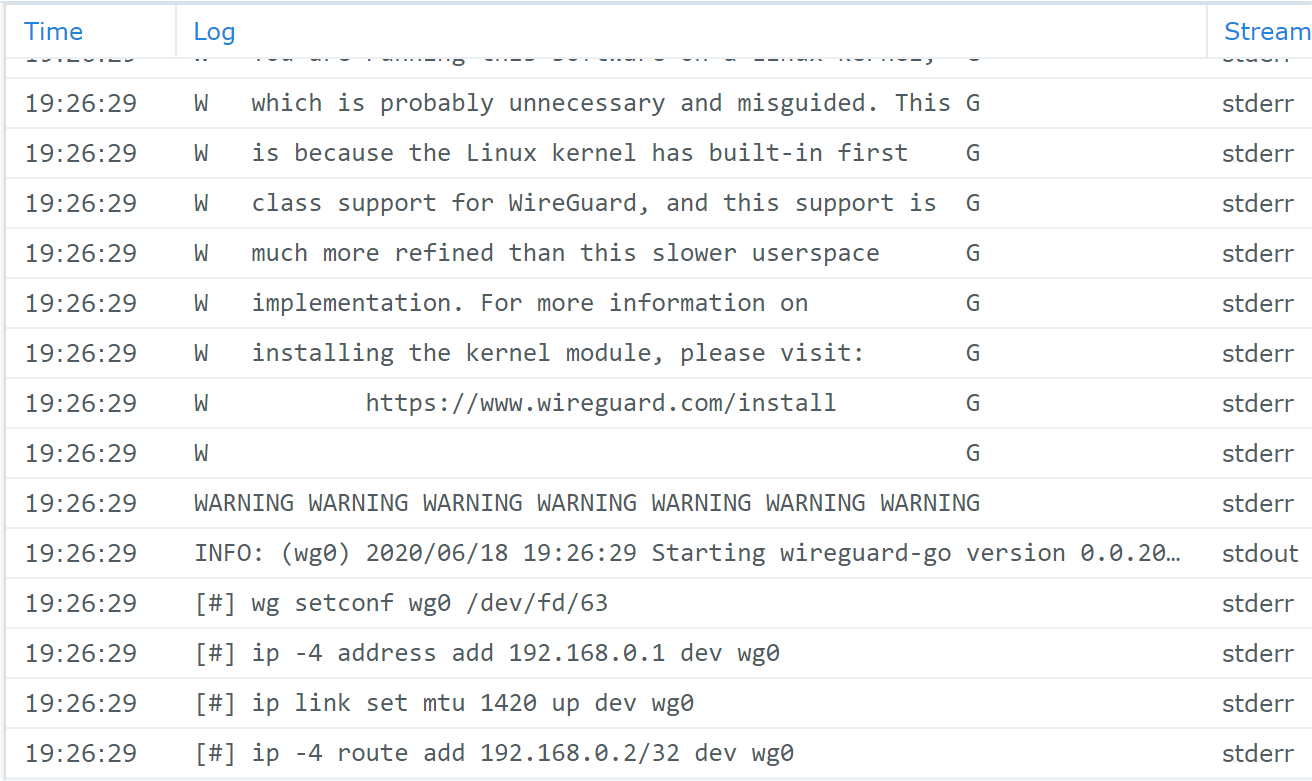
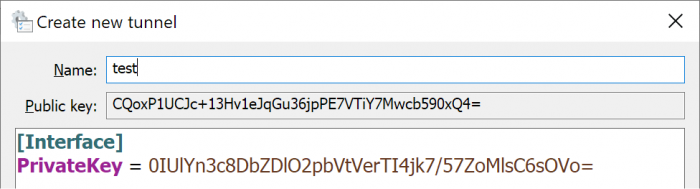
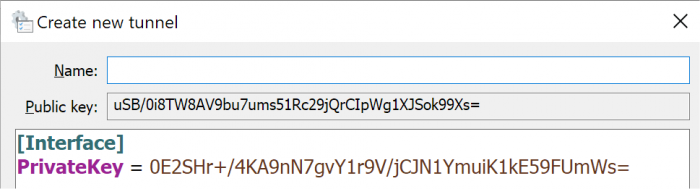
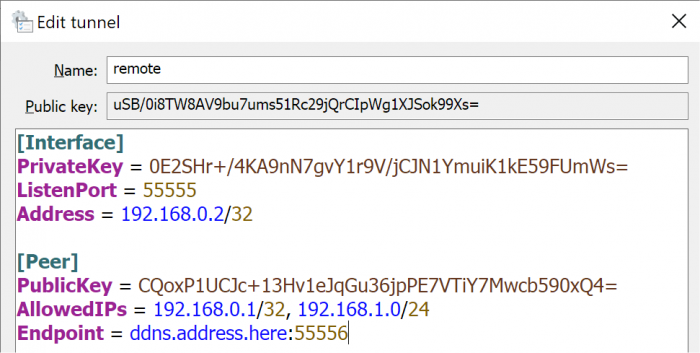
Unless you've been hiding under a rock, you will probably have heard about Wireguard - an emerging alternative to OpenVPN for quick, simple and secure VPN access. It's nothing short of amazing and very fast. It's so innovative that Linus Torvalds has cleared it for direct inclusion into the upcoming Linux kernel 5.6. Unfortunately, it's not an option for DSM, even with Docker, because it requires the Wireguard kernel-mode extensions compiled into the kernel (which we can't easily do). Enter an obscure docker module "masipcat/wireguard-go", compiled by an MIT researcher with a userspace (non-kernel) implementation interfacing to the /dev/net/tun device. This isn't as fast as a kernel implementation, but it provides the basis to make Wireguard work on DSM! Unfortunately the documentation and configuration examples are incredibly sparse, and Wireguard is positioned as a microservice whereas OpenVPN artificially embeds routing services (push commands). So it takes some doing to make Wireguard work beyond the most basic implementations. The basis of Wireguard is public/private key exchange. Each node of the VPN generates a private key, from which it then computes a public key. Then you install the public key from node A on node B, and vice-versa. This is a simple and quick configuration. So here are two example use cases where I've been able to make Wireguard work on DSM, exactly as desired, using this dockerfile - they might be of interest to you. Case #1: Remote access to a LAN behind a firewall (which includes a DSM server) Typically, we would install OpenVPN Server from Package Center for this. I'm not a fan of OpenVPN because the code on Synology is quite old, the configuration is unwieldy, and the interface is dumbed down to the simplest configurations. While it could work in this case, the Synology implementation cannot be used for more sophisticated or esoteric configurations. Scenario: Local network: 10.1.1.0/24, Client device 10.1.1.100 Remote LAN: 192.168.1.0/24, DSM server 192.168.1.50 The networks are each connected to consumer Internet (dynamic IP) services using port-forwarding capable firewalls First, download the Wireguard client for your client device (Windows, Mac etc) Create a new tunnel, which will compute a Public/Private key combination. Write down these two keys, which will be for the remote DSM server. Then delete the tunnel and create another one. Note that I call the tunnel "remote" because that is what makes sense in the UI (I'm connecting to the remote site) but the keys are for the local client and network. Now, configure the local client. The [Interface] section refers to the local device, and the [Peer] is the remote device. Use the PublicKey that you saved from the first step for the Peer. I'm arbitrarily picking 192.168.0.0/24 as the VPN network. The only restrictions are that it should use a private address scheme and not overlap any of the local or remote networks. The listen ports are also completely arbitrary; just don't create conflicts with existing services. In the Peer section, note the AllowedIPs. This refers to the networks that the local Wireguard client will intercept and encrypt onto the VPN. We need 192.168.0.1 because it will be the target VPN address on the remote DSM, and 192.168.1.0/24 so that we will be able to access other devices on the remote network. Finally note that we can use a DNS address, DDNS address or a static IP to find the remote endpoint on the Internet. Now we need to configure the Wireguard docker container on the remote DSM server. If you haven't already, install Docker from the Package Center. Unfortunately Synology Docker doesn't expose all the necessary config options in the UI, so we will need to create a container script manually. Once the container is built, it can be monitored, stopped and started from the UI. SSH into your system, elevate to root, and find the docker folder. In this example we will assume docker is installed to Volume 1. Then create a directory for Wireguard and an initiation script. # cd /volume1/docker # mkdir wireguard # cd wireguard # echo "docker run -d --name wireguard --restart=always --cap-drop=ALL --cap-add=NET_ADMIN --network=host -v /dev/net/tun:/dev/net/tun -v /volume1/docker/wireguard/wg0.conf:/etc/wireguard/wg0.conf --sysctl net.ipv4.ip_forward=1 --sysctl net.ipv6.conf.all.disable_ipv6=1 masipcat/wireguard-go" >wireguard.sh # chmod 700 wireguard.sh We do not have access to the capability or sysctl options with the Docker UI. Now, create the remote DSM Wireguard interface configuration /volume1/docker/wireguard/wg0.conf using your choice of editor, using the correct Private and Public keys from our first steps. Note there is no Endpoint configuration, which means that only the client will be able to start the tunnel. The ListenPort must match the Endpoint port on the client, and the remote AllowedIPs entry must match the Interface IP on the client. [Interface] Address = 192.168.0.1 PrivateKey = 0IUlYn3c8DbZDlO2pbVtVerTI4jk7/57ZoMlsC6sOVo= ListenPort = 55556 [Peer] PublicKey = uSB/0i8TW8AV9bu7ums51Rc29jQrCIpWg1XJSok99Xs= AllowedIPs = 192.168.0.2/32 Note that because the Wireguard docker container directly connects to the host DSM network, the ListenPort must not conflict with any services inside DSM. Unless you are already running OpenVPN on DSM, the /dev/net/tun VPN device will not be initialized. Download the attached loadtun.sh script and install in /usr/local/etc/rc.d folder. Set it to executable and run it to create your tun device. It will automatically start on boot from now on. # chmod 700 /usr/local/etc/rc.d/loadtun.sh # /usr/local/etc/rc.d/loadtun.sh start Now you are ready to start up the Wireguard docker container. # /volume1/docker/wireguard/wireguard.sh If all goes well, the container will download, initialize and display a hex string indicating that it is running. If you get error messages, check the wireguard.sh file for completeness and accuracy, referencing step #6. Check to make sure the remote Wireguard is ready for a connection by launching the Docker UI (you should see the wireguard container running). Select the container details, and display the log - it should look something like the image below. If there are errors, check your wg0.conf for correct syntax. The last step is to port-forward the remote firewall to the DSM IP. In this example, port 55556 is forwarded to 192.168.1.50. Now Activate the local client and you should have access to the remote DSM server and everything on its network! loadtun.sh
 1 point
 -
thanks for reporting this, i added a note to the instructions for 1.04b and dam 6.2.31 point
-
Связался с гуру этого форума IG-88, получил очень много информации. Отвечаю на свои вопросы выше: контроллер Marvell 88SE9215 + JMicron JMB5xx с множителем. Marvel 9215 + Marvell 9705 с множителем т.е. максимально DSM будет видеть 4 порта SATA. Да и вообще обширный поиск всех площадок показал - Не существует контроллеров на 8 SATA под pci-e 1x без множителя. В моём случае есть решение, заказать такой переходник, https://www.aliexpress.com/item/33016011943.html?spm=a2g0s.8937460.0.0.6e482e0ekrSfyt И взять 2 контроллера на 5 SATA на чипсете JMB585 с pci-e 3.0 4x https://www.amazon.co.uk/SNOWINSPRING-SATA3-0-Expansion-Computer-Chassis-black/dp/B089K4ZX7Q/ref=sr_1_1?dchild=1&keywords=JMB585&qid=1592129852&s=electronics&sr=1-1 Ограничения в моей текущей конфигурации будут следующие: У меня pci-e 2.0 x1, общая скорость обмена данными составит 500 MB/s. Для моих домашних нужд этого будет достаточно. Плюс в том, что если когда-нибудь я перейду на pci-e 3.0, то у меня будет прирост производительности. Вариант от IG-88 мне тоже понравился. Он предложил использовать схему без лишнего контроллера в цепочке, а только гибкий шлейф с pci-e x1 на pci-e x16. Схема уже проверена и рабочая. https://www.amazon.co.uk/non-brand-Ribbon-Extension-Cable-Adapter/dp/B07WK36H3B/ И взять один 8 портовый контроллер на чипсетах ASM1806 chip & 4 chips ASM1061. DSM видит все 8 дисков, проверено. https://www.amazon.co.uk/dp/B07KW38G9N?linkCode=gs2&tag=comonboo-21 По сути можно брать любой проверенный на форуме контроллер в данной схеме. Надеюсь кому-то это будет полезным. Удачи вам.


 1 point