Leaderboard


Popular Content
Showing content with the highest reputation on 03/06/2020 in all areas
-
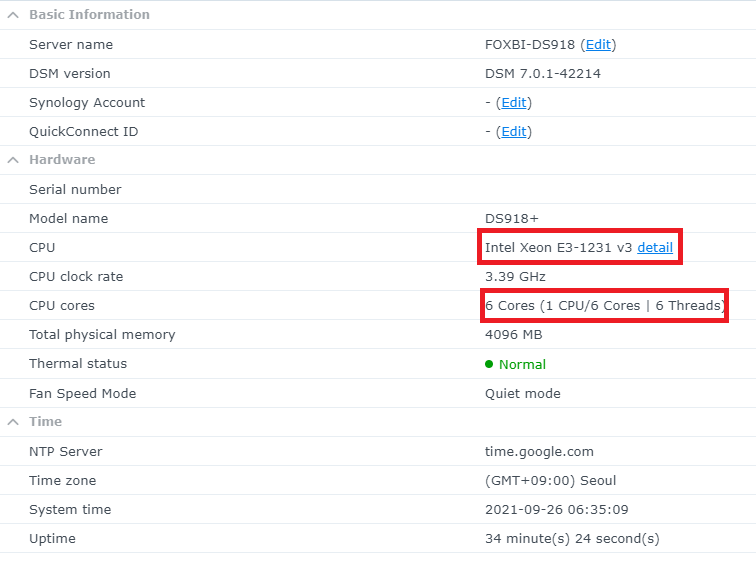
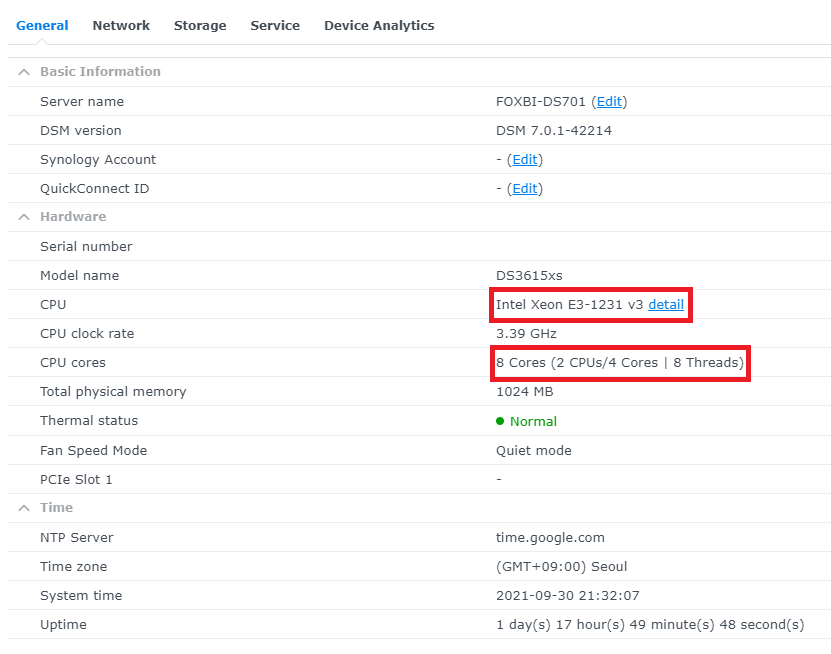
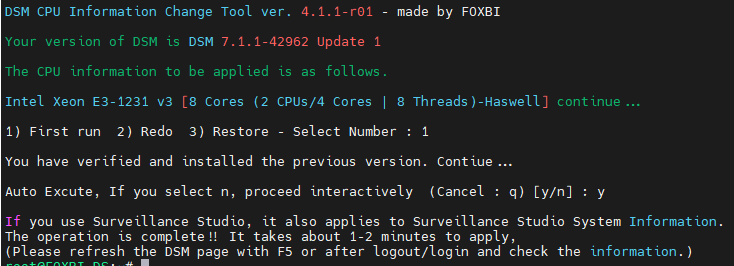
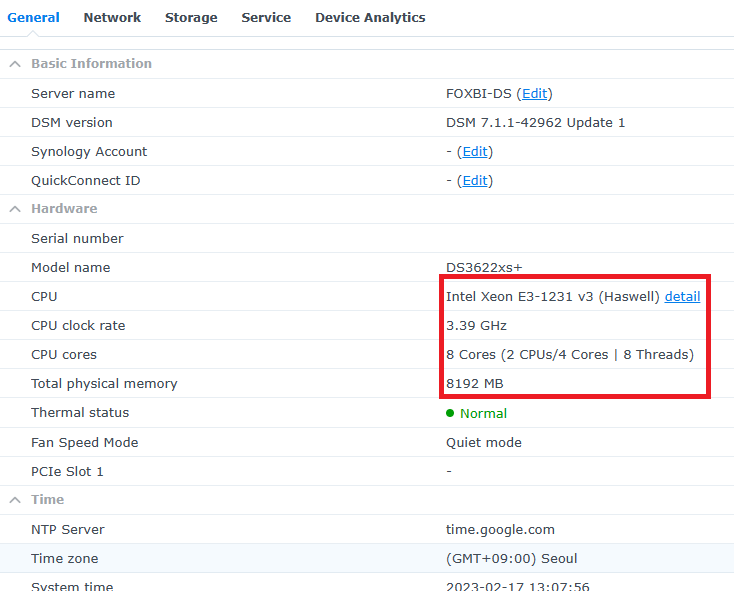
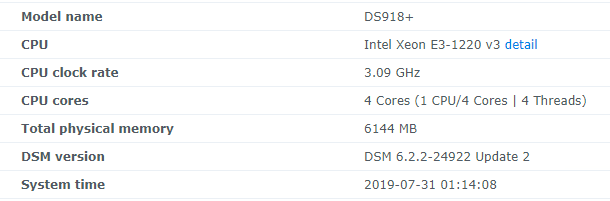
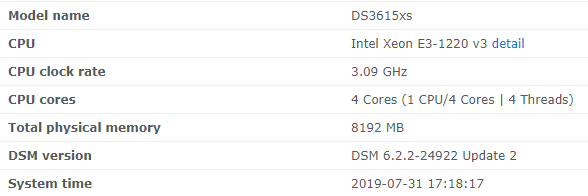
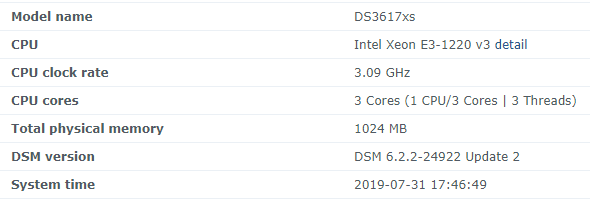
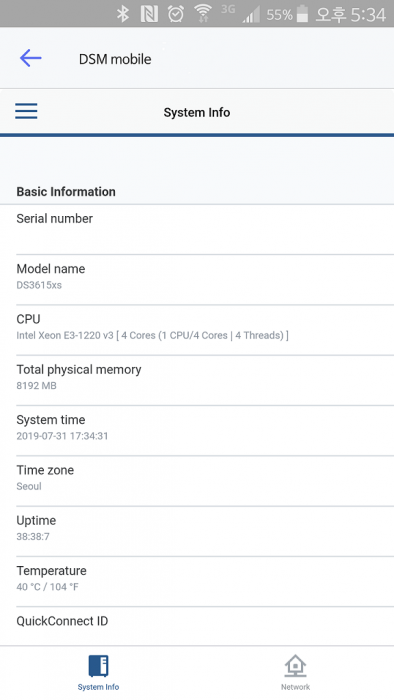
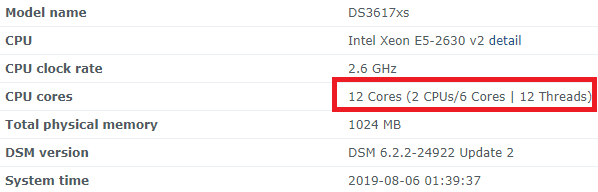
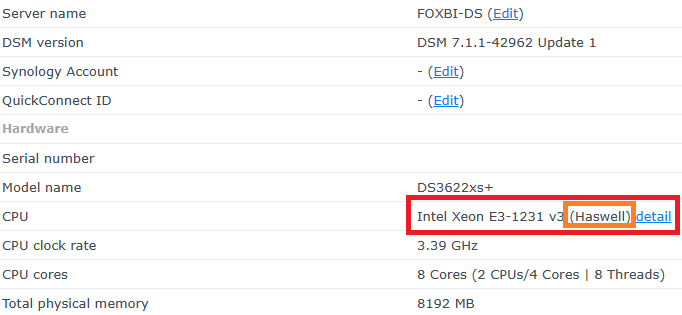
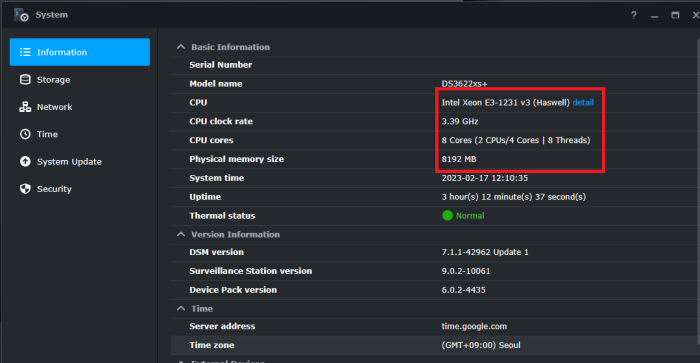
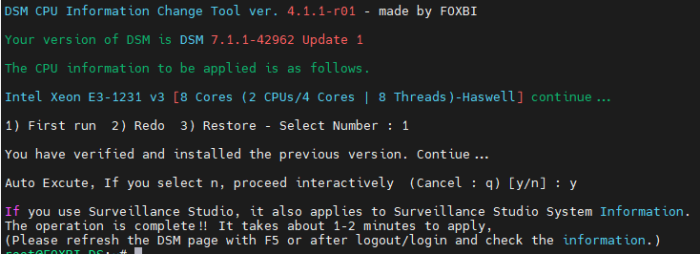
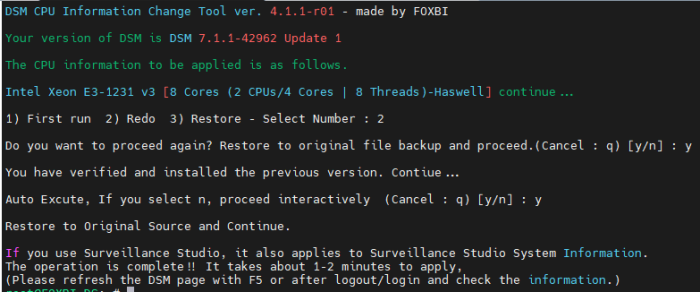
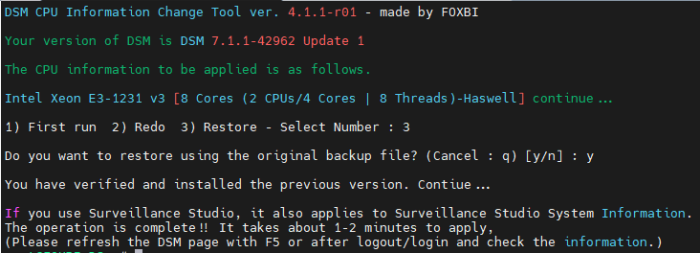
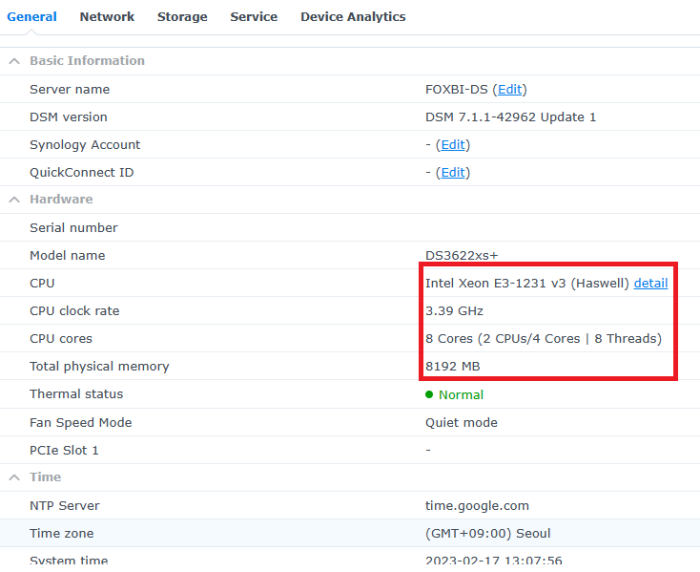
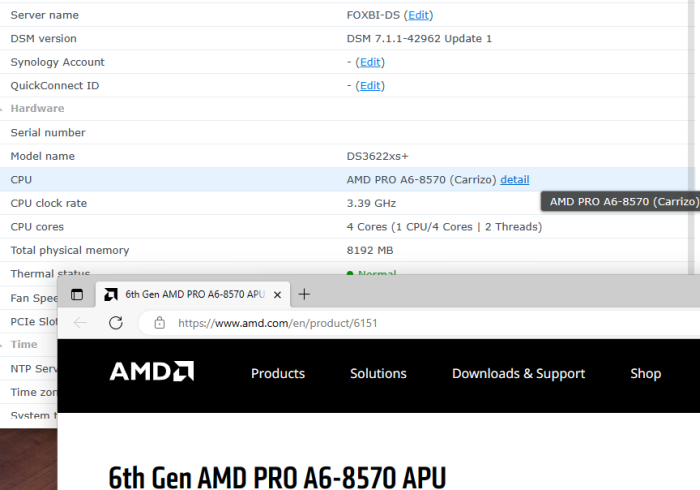
Hello! I am xpenology user. And I am an IT engineer who creates shell scripts as hobbies. Please understand that it is written by a google translate site. because i’m korean who is not fluent in English. I created a tool to change cpu information for Xpenology’s users. Modify the actual cpu name and cores of your pc or server. Howto Run ============================================================= 1. Download attached file on your PC (ch_cpuinfo.tar) (ch_cpuinfo_en.tar) / (ch_cpuinfo_kr.tar is file for korean) 2. Upload file to your DSM location (by filestation, sftp, webdav etc....) 3. Connect to ssh by admin account. (dsm > control panel > terminal & snmp > terminal > enable ssh check) 4. Switch user to root: sudo su - (input admin password) 5. Change directory to where ch_cpuinfo.tar file is located: cd /volume1/temp 5-1. in another way, Download ch_cpuinfo.tar with wget wget https://github.com/FOXBI/ch_cpuinfo/releases/download/ch_cpuinfo/ch_cpuinfo.tar 6. Decompress file & check file: tar xvf ch_cpuinfo.tar ls -lrt (check root’s run auth) 7. Run to Binary file ./ch_cpuinfo or ./ch_cpuinfo.sh (If you use busybox in DSM 5.x, you can use it as a source file) 8. When you execute it, proceed according to the description that is output. 9. Check your DSM’s CPU name, CPU cores at “information center” made a video of the how to run ch_cpuinfo. Extra Action If you want to use ch_cpuinfo in your language Modify and use the LANG.txt file in the same path as ch_cpuinfo. It is possible to use after changing the English content of each variable after translation and changing the value of CUSTLANG in line 8 to Y. Sample image(by Google trans) ==================================================== Addtional, Adjust binary to excute file made by shc(http://www.datsi.fi.upm.es/~frosal) The tool does not inclue worms, bad code. If you want to edit the CPU information yourself manually, please refer to the contents below. ——————————————————————————————————————————————————————————————— Location : /usr/syno/synoman/webman/modules/AdminCenter Source : admin_center.js / admin_center.js.gz(above 6.2) Add Before -> if(Ext.isDefined(h.cpu_vendor)&&Ext.isDefined(h.cpu_family)&&Ext.isDefined(h.cpu_series)){ o.push([_T("status","cpu_model_name"),String.format("{0} {1} {2}",h.cpu_vendor,h.cpu_family,h.cpu_series)])} if(Ext.isDefined(h.cpu_cores)){o.push([_T("status","cpu_cores"),h.cpu_cores])} Add contents: h.cpu_vendor="Intel";h.cpu_family="Xeon";h.cpu_series="E3-1220 V3";h.cpu_cores="4 Cores (1 CPU/4 Cores | 4 Threads)"; h.cpu_detail="<a href='https://ark.intel.com/content/www/us/en/ark/search.html?_charset_=UTF-8&q=E3-1220 V3' target=_blank>detail</a>" Change contens: String.format("{0} {1} {2}",h.cpu_vendor,h.cpu_family,h.cpu_series) to String.format("{0} {1} {2} {3}",h.cpu_vendor,h.cpu_family,h.cpu_series,h.cpu_detail) ——————————————————————————————————————————————————————————————— Finally, All descriptions are based on version 6.2, and the actual executable file supports 5.x, 6.x and 7.x Publish the source through github(https://github.com/FOXBI/ch_cpuinfo). For versions DSM 6.x and later, you can use the binary as before. If you use busybox in DSM 5.x, you can use it as a source file(ch_cpuinfo.sh). Please contact me by comment or bug report, i’ll respond to you as much as possible within my ability. Test & Made Environment ———————————————————————————————————— Base Server : HP ML310e v2 gen8 + VMware ESXi 6.0 + RDM DSM : DSM 6.2.3-25426 Update 3 (DS3615xs) Base Server : HP ML310e v2 gen8 + VMware ESXi 6.0 DSM : DSM 7.0.1-42214 (DS3615xs) Base Server : HP ML310e v2 gen8 + VMware ESXi 6.0 DSM : DSM 7.0.1-42214 (DS918+) Base Server : HP ML310e v2 gen8 + VMware ESXi 6.0 DSM : DSM 6.2.4-25556 (DS3615xs) Base Server : Intel E5-2630 v2 + VMware ESXi 6.7u2 DSM : 6.2.2-24922 Update 2 (DS3617xs) ———————————————————————————————————— Change Log Update new version (ch_cpuinfo ver 4.2.0-r01) 2023.02.18 - Application of AMD's CPU information collection function improvement - xpenlib(cpu_info.sh) refered https://github.com/FOXBI/xpenlib/blob/main/cpu_info.sh Update new version (ch_cpuinfo ver 4.2.1-r01) 2023.03.05 - Fixed error when users of previous version perform redo with version 4.2.0-r01 (Thanks for the @Mentat report.) I am sorry for not being able to actively respond to your inquiries due to busy life. Thank you!! Have a nice day!! Cheer up!! We can do it!! Reduce activity & Stay home & Wear a Mask!! Let's overcome COVID-19 !! Let's pray and support together for the two countries where the earthquake caused great damage and many deaths and missing people. ============================================= Download links: ch_cpuinfo ver 4.2.0-r01 - new version update -> ch_cpuinfo ver 4.2.1-r01 - new version update -> ch_cpuinfo.tar Reference images # 1.04b + DS918+ # 1.03b + DS3615xs # 1.03b + DS3617xs # Normal output is possible even when using more than 8core. # Support DSM 7.x


 1 point
 -
DSM 6.2.3 will not work with these drivers, if you install or update you will fall back to "native" drivers that come with DSM, like no realtek nic on 3615/17 but on 918+ or no mpt2/mpt3sas on 918+ or no broadcom onboard nic on HP microserver or Dell server read this if you want to know about "native" drivers https://xpenology.com/forum/topic/13922-guide-to-native-drivers-dsm-617-and-621-on-ds3615/ synology reverted the changes made in 6.2.2 so the old drivers made for 6.2.(0) are working again and there are new drivers made for 6.2.3 too (we got recent kernel source from synology lately) https://xpenology.com/forum/topic/28321-driver-extension-jun-104b-for-dsm623-for-918/ This is the new 2nd test version of the driver extension for loader 1.04b and 918+ DSM 6.2.2, network drivers for intel and realtek are now all latest and the same as in 3615/17 from mid. december (also broadcoam tg3 driver is working), tries to address the problems with the different GPU's by haveing 3 versions of the pack additional information and packages for 1.03b and 3615/3617 are in the lower half under a separate topic (i will unify the 918+ and 3615/17 parts later as they are now on the same level again) mainly tested as fresh install with 1.04b loader with DSM 6.2.2, there are extra.lzma and extra2.lzma in the zip file - you need both - the "extra2" file is used when booting the 1st time and under normal working conditions the extra.lzma is used (i guess also normal updates - jun left no notes about that so i had to find out and guess). Hardware in my test system used additional driver: r8168, igb, e1000e, bnx2x, tn40xx, mpt2sas The rest of the drivers just load without any comment on my system, i've seen drivers crashing only when real hardware is present so be warned, i assume any storage driver beside ahci and mps2sas/mpt3sas as not working, so if you use any other storage as listed before you would need to do a test install with a new usb and a single empty disk to find out before doing anything with your "production" system i suggest testing with a new usb and a empty disk and it that's ok then you have a good chance for updating for updating its the same as below in the 3615/17 section with case 1 and 2 but you have extra.lzma and extra2.lzma and you will need to use https://archive.synology.com/download/DSM/release/6.2.2/24922/DSM_DS918+_24922.pat most important is to have zImage and rd.gz from the "DSM_DS918+_24922.pat" file (can be opened with 7zip) together with the new extra/extra2, same procedure as for the new extra for 3615/17 (see below) all 4 files extra.lzma, extra2.lzma (both extracted from the zip downloaded), zImage and rd.gz go to the 2nd partition of the usb (or image when using osfmount), replacing the 4 files there if you want the "old" files of the original loader back you can always use 7zip to open the img file from jun and extract the original files for copying them to usb if really wanting to test with a running 6.2.x system then you should empty /usr/lib/modules/update/ and /usr/lib/firmware/i915/ before rebooting with the new extra/extra2 rm -rf /usr/lib/modules/update/* rm -rf /usr/lib/firmware/i915/* the loader will put its files on that locations when booting again, this step will prevent having old incompatible drivers in that locations as the loader replaces only files that are listed in rc.modules and in case of "syno" and "recovery" there are fewer entries, leaving out i915 related files, as long as the system boots up this cleaning can be done with the new 0.8 test version there a 3 types of driver package, all come with the same drivers (latest nic drivers for realtek and intel) and conditions/limitations as the 3615/17 driver set from mid. december (mainly storage untested, ahci and mpt3sas is tested). 1. "syno" - all extended i915 stuff removed and some firmware added to max compatibility, mainly for "iGPU gen9" (Skylake, Apollo Lake and some Kaby Lake) and older and cases where std did not work, i915 driver source date: 20160919, positive feedback for J3455, J1800 and N3150 2. "std" - with jun's i915 driver from 1.04b (tested for coffee lake cpu from q2/2018), needed for anything newer then kaby lake like gemini lake, coffee lake, cannon lake, ice lake, i915 driver source date: 20180514 - as i had no source i915 driver is the same binary as in jun's original extra/extra2, on my system its working with a G5400, not just /dev/dri present, tested completely with really transcoding a video, so its working in general but might fail in some(?) cases, also 8th/9th gen cpu like i3/i5 8100/9400 produce a /dev/dri, tested with a 9400 and it does work 3. "recovery" - mainly for cases where the system stops booting because of i915 driver (seen on one N3150 braswell), it overwrites all gpu drivers and firmware with files of 0 size on booting so they can't be loaded anymore, should also work for any system above but guarantees not having /dev/dri as even the firmware used from the dsm's own i915 driver is invalid (on purpose) - if that does not work its most likely a network driver problem, safe choice but no transcoding support start with syno, then std and last resort would be recovery anything with a kernel driver oops in the log is a "invalid" as it will result in shutdown problems - so check /var/log/dmesg the often seen Gemini Lake GPU's might work with "std", pretty sure not with "syno", most (all?) testers with gemini lake where unsuccessful with "std" so if you don't like experimenting and need hardware transcoding you should wait with the version you have the "_mod" on the end of the loader name below is a reminder that you need to to "modding" as in make sure you have zImage and rd.gz from DSM 6.2.2 on you usb for booting, the new extra.lzma will not work with older files 0.8_syno ds918+ - extra.lzma/extra2.lzma for loader 1.04b_mod ds918+ DSM 6.2.2 v0.8_syno https://gofile.io/d/mVBHGi SHA256: 21B0CCC8BE24A71311D3CC6D7241D8D8887BE367C800AC97CE2CCB84B48D869A Mirrors by @rcached https://clicknupload.cc/zh8zm4nc762m https://dailyuploads.net/qc8wy6b5h5u7 https://usersdrive.com/t0fgl0mkcrr0.html https://www104.zippyshare.com/v/hPycz12O/file.html 0.8_std ds918+ - extra.lzma/extra2.lzma for loader 1.04b_mod ds918+ DSM 6.2.2 v0.8_std https://gofile.io/d/y8neID SHA256: F611BCA5457A74AE65ABC4596F1D0E6B36A2749B16A827087D97C1CAF3FEA89A Mirrors by @rcached https://clicknupload.cc/h9zrwienhr7h https://dailyuploads.net/elgd5rqu06vm https://usersdrive.com/peltplqkfxvj.html https://www104.zippyshare.com/v/r9I7Tm0K/file.html 0.8_recovery ds918+ - extra.lzma/extra2.lzma for loader 1.04b_mod ds918+ DSM 6.2.2 v0.8_recovery https://gofile.io/d/4K3WPE SHA256: 5236CC6235FB7B5BB303460FC0281730EEA64852D210DA636E472299C07DE5E5 Mirrors by @rcached https://clicknupload.cc/uha07uso7vng https://dailyuploads.net/uwh710etr3hm https://usersdrive.com/ykrt1z0ho7cm.html https://www104.zippyshare.com/v/7gufl3yh/file.html !!! still network limit in 1.04b loader for 918+ !!! atm 918+ has a limit of 2 nic's (as the original hardware) If there are more than 2 nic's present and you can't find your system in network then you will have to try after boot witch nic is "active" (not necessarily the onboard) or remove additional nic's and look for this after installation You can change the synoinfo.conf after install to support more then 2 nic's (with 3615/17 it was 8 and keep in mind when doing a major update it will be reset to 2 and you will have manually change this again, same as when you change for more disk as there are in jun's default setting) - more info's are already in the old thread about 918+ DSM 6.2.(0) and here https://xpenology.com/forum/topic/12679-progress-of-62-loader/?do=findComment&comment=92682 I might change that later so it will be set the same way as more disks are set by jun's patch - syno's max disk default for this hardware was 4 disks but jun's pach changes it on boot to 16!!! (so if you have 6+8 sata ports then you should not have problems when updating like you used to have with 3615/17) Basically what is on the old page is valid, so no sata_*, pata_* drivers Here are the drivers in the test version listed as kernel modules: The old thread as reference !!! especially read "Other things good to know about DS918+ image and loader 1.03a2:" its still valid for 1.04b loader !!! This section is about drivers for ds3615xs and ds3617xs image/dsm version 6.2.2 (v24922) Both use the same kernel (3.10.105) but have different kernel options so don't swap or mix, some drivers might work on the other system some don't at all (kernel oops) Its a test version and it has limits in case of storage support, read careful and only use it when you know how to recover/downgrade your system !!! do not use this to update when you have a different storage controller then AHCI, LSI MPT SAS 6Gb/s Host Adapters SAS2004/SAS2008/SAS2108/SAS2116/SAS2208/SAS2308/SSS6200 (mpt2sas) or LSI MPT SAS 12Gb/s Host Adapters SAS3004/SAS3008/SAS3108 (mpt3sas - only in 3617), instead you can try a fresh "test" install with a different usb flash drive and a empty single disk on the controller in question to confirm if its working (most likely it will not, reason below) !!! The reason why 1.03b loader from usb does not work when updating from 6.2.0 to 6.2.2 is that the kernel from 6.2.2 has different options set witch make the drivers from before that change useless (its not a protection or anything), the dsm updating process extracts the new files for the update to HDD, writes the new kernel to the usb flash drive and then reboots - resulting (on USB) in a new kernel and a extra.lzma (jun's original from loader 1.03b for dsm 6.2.0) that contains now incompatible drivers, the only drivers working reliable in that state are the drivers that come with dsm from synology Beside the different kernel option there is another thing, nearly none of the new compiled scsi und sas drivers worked They only load as long as no drive is connected to the controller. ATM I assume there was some changes in the kernel source about counting/indexing the drives for scsi/sas, as we only have the 2.5 years old dsm 6 beta kernel source there is hardly a way to compensate People with 12GBit SAS controllers from LSI/Avago are in luck, the 6.2.2 of 3617 comes with a much newer driver mpt3sas then 6.2.0 and 6.2.1 (13.00 -> 21.00), confirmed install with a SAS3008 based controller (ds3617 loader) Driver not in this release: ata_piix, mptspi (aka lsi scsi), mptsas (aka lsi sas) - these are drivers for extremely old hardware and mainly important for vmware users, also the vmw_pvscsi is confirmed not to work, bad for vmware/esxi too Only alternative as scsi diver is the buslogic, the "normal" choice for vmware/ESXi would be SATA/AHCI I removed all drivers confirmed to not work from rc.modules so they will not be loaded but the *.ko files are still in the extra.lzma and will be copied to /usr/modules/update/ so if some people want to test they can load the driver manually after booting These drivers will be loaded and are not tested yet (likely to fail when a disk is connected) megaraid, megaraid_sas, sx8, aacraid, aic94xx, 3w-9xxx, 3w-sas, 3w-xxxx, mvumi, mvsas, arcmsr, isci, hpsa, hptio (for some explanation of what hardware this means look into to old thread for loader 1.02b) virtio driver: i added virtio drivers, they will not load automatically (for now), the drivers can be tested and when confirmed working we will try if there are any problems when they are loaded by default along with the other drivers they should be in /usr/modules/update/ after install To get a working loader for 6.2.2 it needs the new kernel (zImage and rd.gz) and a (new) extra.lzma containing new drivers (*.ko files) zImage and rd.gz will be copied to usb when updating DSM or can be manually extracted from the 6.2.2 DSM *.pat file and copied to usb manually and that's the point where to split up between cases/way's case 1: update from 6.2.0 to 6.2.2 case 2: fresh install with 6.2.2 or "migration" (aka upgrade) from 6.0/6.1 Case 1: update from 6.2.0 to 6.2.2 Basically you semi brick your system on purpose by installing 6.2.2 and when booting fails you just copy the new extra.lzma to your usb flash drive by plugging it to a windows system (witch can only mount the 2nd partition that contains the extra.lzma) or you mount the 2nd partition of the usb on a linux system Restart and then it will finish the update process and when internet is available it will (without asking) install the latest update (at the moment update4) and reboot, so check your webinterface of DSM to see whats going or if in doubt wait 15-20 minutes check if the hdd led's are active and check the webinterface or with synology assistant, if there is no activity for that long then power off and start the system, it should work now Case 2: fresh install with 6.2.2 or "migration" (aka upgrade) from 6.0/6.1 Pretty much the normal way as described in the tutorial for installing 6.x (juns loader, osfmount, Win32DiskImager) but in addition to copy the extra.lzma to the 2nd partition of the usb flash drive you need to copy the new kernel of dsm 6.2.2 too so that kernel (booted from usb) and extra.lzma "match" You can extract the 2 files (zImage and rd.gz) from the DSM *.pat file you download from synology https://archive.synology.com/download/DSM/release/6.2.2/24922/DSM_DS3615xs_24922.pat or https://archive.synology.com/download/DSM/release/6.2.2/24922/DSM_DS3617xs_24922.pat These are basically zip files so you can extract the two files in question with 7zip (or other programs) You replace the files on the 2nd partition with the new ones and that's it, install as in the tutorial In case of a "migration" the dsm installer will detect your former dsm installation and offer you to upgrade (migrate) the installation, usually you will loose plugins, but keep user/shares and network settings DS3615: extra.lzma for loader 1.03b_mod ds3615 DSM 6.2.2 v0.5_test https://gofile.io/d/iQuInV SHA256: BAA019C55B0D4366864DE67E29D45A2F624877726552DA2AD64E4057143DBAF0 Mirrors by @rcached https://clicknupload.cc/h622ubb799on https://dailyuploads.net/wxj8tmyat4te https://usersdrive.com/sdqib92nspf3.html https://www104.zippyshare.com/v/Cdbnh7jR/file.html DS3617: extra.lzma for loader 1.03b_mod ds3617 DSM 6.2.2 v0.5_test https://gofile.io/d/blXT9f SHA256: 4A2922F5181B3DB604262236CE70BA7B1927A829B9C67F53B613F40C85DA9209 Mirrors by @rcached https://clicknupload.cc/0z7bf9stycr7 https://dailyuploads.net/68fdx8vuwx7y https://usersdrive.com/jh1pkd33tmx0.html https://www104.zippyshare.com/v/twDIrPXu/file.html1 point
-
- Результат: Успешно - Версия и модель загрузчика: JUN'S LOADER v1.04b - DS918+ - Версия DSM: 6.2-23739 - Дополнительные модули extra.lzma: NO - Аппаратное решение: Asrock j4105 / 8gb ram / сеть Realtek RTL8111H / Seagate 2.5 5tb x2 Raid1 - Настройки Bios дефолтные - Завелось без проблем - HW и SW транскодинг работает (валидная пара SN/MAC) - Результат: Отказ - После установки DSM и первой перезагрузки не видит сеть - Версия и модель загрузчика: JUN'S LOADER v1.04b - DS918+ - Версия DSM: 6.2-24922 update 5 - Дополнительные модули extra.lzma: NO - Аппаратное решение: Asrock j4105 / 8gb ram / сеть Realtek RTL8111H / Seagate 2.5 5tb x2 Raid1 - Настройки Bios дефолтные - Результат: Успешно - Версия и модель загрузчика: JUN'S LOADER v1.04b - DS918+ - Версия DSM: 6.2-24922 update 5 - Дополнительные модули extra.lzma: YES (real3x) - Аппаратное решение: Asrock j4105 / 8gb ram / сеть Realtek RTL8111H / Seagate 2.5 5tb x2 Raid1 - Настройки Bios дефолтные - Завелось без проблем - HW транскодинг не работает (валидная пара SN/MAC) - Результат: Отказ - После установки DSM и первой перезагрузки не видит сеть - Версия и модель загрузчика: JUN'S LOADER v1.04b - DS918+ - Версия DSM: 6.2-24922 update 5 - Дополнительные модули extra.lzma: NO - Аппаратное решение: Asrock j4105 / 8gb ram /сеть PCI Intel Original EXPI9301CTBLK / Seagate 2.5 5tb x2 Raid1 - Настройки Bios дефолтные - Дискретная сетевая не помогла1 point
-
Приобрел 918+ 🤪1 point
-
Записываем загрузочную флешку. Редактируем grub.cfg программой OSFMount Начальная стадия установки DSM, это создание загрузочной флешки. После определения Хардового конфига (железо, его конфигурация) и дальнейших потребностей для себя от DSM, определяем версию DSM загрузчика под неё. На данный момент, имеется три версии загрузчика под разные эмуляции DSM , это : ds3615 , ds3617, ds918+ Под ds3615 , ds3617 - последний загрузчик v1.03 b Под ds918+ - последний загрузчик v1.04b Имеются и более ранние версии, всё зависит от вашей конфигурации и желаемого результата. Совместимость загрузчика и железа (возможно, список не полный): Все версии собраны здесь: https://mega.nz/#F!yQpw0YTI!DQqIzUCG2RbBtQ6YieScWg!7AoyySoS И так..... Определились с загрузчиком, начинаем его редактировать под себя и записываем на флешку. Нам необходимы, любая флешка от 128мб и установленные программы: OSFMount - небольшая бесплатная утилита, которая позволяет монтировать ранее сделанные образы дисков и представлять их в виде виртуальных приводов. Необходима для монтирования и последующей редакции образа загрузчика. https://www.osforensics.com/tools/mount-disk-images.html Notepad++ - свободный текстовый редактор с открытым исходным кодом для Windows. Необходима для редактирования grub.cfg https://notepad-plus-plus.org/ Rufus - это утилита, которая помогает форматировать и создавать загрузочные Flash. Необходима для записи загрузчика. https://rufus.ie/ Данные программы, кроме OSFMount, могут быть и другими, в зависимости от вашего предпочтения. Скачиваем необходимый вам загручик и открываем его в программе OSFMount, монтируем образ. Открываем ранее скачанный образ загрузчика Выбираем необходимый нам раздел. В нём находится нужный нам для редакции файл grub.cfg Обязательно снимаем галочку с опции: read only - только для чтения. Монтируем образ и открываем необходимый нам файл grub.cfg Редактируем в Notepad++ Редактируем значения: set vid=0x(Ваш vid - обязательно) set pid=0x(Ваш pid - обязательно) К вопросу о значении "0x" (мнения разнятся)..... Загрузчик имеет исходный формат (0xabcd). Значение 0x говорит что это шестнадцатеричный код. Если VID и PID вашей флешки состоит из цифр (1234), то без значения "0x" загрузчик работает , если имеются буквы (12АБ), то без значения "0x" может не сработать. Потому лучше прописывайте VID и PID как в исходнике: "0xВаши данные" set sn=Ваш серийник set mac1=Ваш mac1 set mac1=Ваш mac2,3,4 (если сетевая карта имеет больше одного порта) Значения set sn и set mac можно оставить по дефолту, если ван не нужны такие функции, как транскодинг, Push уведомления и QuickConnect. Так же, необязательно, но лучше отредактировать значение: set timeout='1' - изменить значение "1" на другое, скажем на 5 или больше. Это значение отвечает на время видимости начального загрузчика из трёх пунктов. Многие не успевают прочесть то, что там написано. Изменение этого значения даст возможность увеличить время отображения начальной страницы Отредактировав под себя grub.cfg , сохраняем его и размонтируем образ Теперь можно записать загрузчик на флешку Открываем , выбираем наш, уже правленый образ загрузчика и записываем на флешку Ну вот и всё, загрузочная флешка готова. Можно начинать установку DSM Из личного опыта........ Всегда сохраняйте свой, правленый образ загрузчика. Всякое может случиться и всегда полезно иметь уже готовый для записи образ. Лично я, всегда делаю ДВЕ флешки. Тоже, на непредвиденный случай. 😉1 point
-
Been there. Elite 8300 PITA of a system to set up Xpenology. Someone on the forum sugested Hybrid partition usb working. Found it, credit goes to "Mitja" https://xpenology.com/forum/topic/12867-user-reported-compatibility-thread-for-dsm-62/page/2/?tab=comments#comment-107653 Use 1.03b ds3615 (maybe 3617 works, but 3615 is prefered). You MUST create "HYBRID" partition bootable usb for HP Compaq Elite 8300. Using it myself, update from 6.2.1 to 6.2.2 or clean install of latest 6.2.2 working perfect. Allow me to make it easyer for you: ----------------------------------------------------------- PART 1. preparation: -Download: "gdisk-windows-1.0.4.zip" (for windows) or appropriate one for other systems from here https://sourceforge.net/projects/gptfdisk/files/gptfdisk/1.0.4/gdisk-binaries/ -unzip content to folder (in the instructions bellow I unziped it in folder named "a" and copied that folder to root of a C disk) -in the BIOS of the HP Compaq Elite 8300 turn OFF UEFI boot by going to boot menu and press (I think) "F5" while UEFI option is highlighted, this will disable PC to default to UEFI boot on restart or powering on after power off. -in option ROM loading menu set all to legacy (storage, gpu, network) -on the working pc create standard clean usb with 1.03b - ds3615xs as usual leave it in the PC when done. -go to computer manager/disk managment (right click "My Computer" or "This PC" select "Manage" then "disk managment") - IMPORTANT - DATA LOSS POSIBLE IF YOU MAKE MISTAKE!!! note your USB key disk number ( Disk 0 is usually system partition). Please be carefull and double check! in the down listed commands the USB Key is "Disk 2" , copy/paste commands to lets say notepad, and CHANGE to match your situation (including for folder "a" in a root off a C disk if you didnt do it that way). ----------------------------------------------------------- PART 2. creating HYBRID partition USB Key- "gdisk-windows-1.0.4.zip" unziped to folder "a" in root of a C disk, USB KEY is "Disk 2" - !!!ALTER THIS TO MATCH YOUR SITUATION!!! first command "cd c:\a" - "a" represents folder named "a" and location in root (C:\) of a C disk - !!!ALTER THIS TO MATCH YOUR SITUATION!!! second command: "gdisk64 2:" - nr.64 represents 64bit system is running on, if you use 32bit system use #gdisk32 2:" -nr.2 represents Disk 2 on the system - !!!ALTER THIS TO MATCH YOUR SITUATION!!! -open command prompt as admin List of commands as per situation above (64bit sys, gdisk in folder "a" root C, USB is "Disk 2") press ENTER after each one of course:-------------------------------------- cd c:\a gdisk64 2: r o h 1 2 3 n "JUST PRESS ENTER - THIS SHOWING UP (DO NOT TYPE ANYTHING): Enter code (MBR partition #1):" y "JUST PRESS ENTER - THIS SHOWING UP (DO NOT TYPE ANYTHING): Enter code (MBR partition #2):" n "JUST PRESS ENTER - THIS SHOWING UP (DO NOT TYPE ANYTHING): Enter code (MBR partition #3):" n w y exit -------------------------------------- Now window will probably pop up asking you to format the drive, DO NOT DO IT!! Safely remove USB and put it in Elite 8300 and You are ready to go. This way created USB is harder to reformat and use again. Best way I found is to use free version of "MiniTool Partition Wizard" , first rebuild MBR whitin the program then delete partitions one by one (apply betwen each operation). I am sure you manage it and find best way if you need to reformat and reuse USB Key. Sorry for my English, not native speaker.... Good Luck!!1 point
-
Добрый день. Подскажите, как из телнета вызвать проверку валидности. Это то что запускается в интерфейсе из настроек.1 point
-
Перед тем как что-то менять в своей работающей системе, настоятельно рекомендуется сделать резервные копии своих особо ценных данных, чтобы потом не жалеть об их безвозвратной потере. Все, что вы творите - это ваш страх и риск, никто не побуждает вас это делать. Самый простой и надежный способ безопасно попробовать - выключить хрень, отключить все диски и загрузочную флешку от действующей системы, взять чистый диск и другую флешку и попробовать установить новую версию загрузчика и системы, если прокатило, то делать уже на действующей системе. 1. Как установить (подготовительные работы описаны для компа с Windows): а) скачать образ загрузчика 1.04b (исходная тема тут), создать каталог в корне диска без символов на кириллице, например, c:/918/ и поместить туда образ загрузчика б) определить VID/PID флешки или картридера в который она вставлена (Панель управления - Диспетчер устройств - Контроллеры USB - Ваша флешка/ридер - Свойства - Сведения - ИД оборудования, нужно для того, чтобы система DSM опознала этот диск и не пыталась устанавливать себя на него, если неправильно определите и пропишите эти параметры, то система будет вылетать по ошибке 13 при установке в) скачать, установить и запустить программу OSFmount, смонтировать Partition 0 (15 Mb) из файла загрузчика, перед монтированием убрать галку Read-only drive г) скачать, установить и запустить программу Akelpad, открыть файл grub/grub.cfg на ранее смонтированном диске, правим, сохраняем: set vid=0xA234 #VID флешки/ридера set pid=0xB678 #PID флешки/ридера set sn=1780PDN123456 #sn set mac1=001132123456 #mac первой сетевой карты set mac1=001132123457 #mac второй сетевой карты, второй и последующий отличаются от первого на +1 в последнем разряде в шестнадцатеричной системе ... set netif_num=2 #количество сетевых карт ... set sata_args='SataPortMap=6' #контроллер sata, значения: 6 - 1 контроллер на 6 портов; 22 - 2 контроллера по 2 порта; 42 - 2 контроллера, первый на 4 порта, второй на 2 и т.п. Где брать sn и mac - ваша головная боль, гугл в помощь, система установится и будет работать с теми, которые изначально прописаны в загрузчике, но с ограничением функционирования некоторых сервисов и модулей, таких как: QC, пуш уведомления, активация кодеков для транскодинга, установка лицензий syno... Но для большинства и без них будет достаточно. На форуме писали, что прокатывало с sn и mac от других реальных моделей syno, но так не пробовал, поэтому утверждать не буду, кто хочет - дерзайте. д) размонтировать диск в OSFmount е) скачать, установить и запустить программу Rufus и записать ранее подготовленный образ на флешку з) вставить флешку в машину, на которой планируете запустить хрень, подключить диски, включить питание ж) отключить брандмауэр в антивирусе, в браузере набрать http://find.synology.com или установить Synology Assistant с сайта syno и найти вновь установленную хрень в вашей сети и) установить DSM установить хрень следуя инструкциям программы установки и приступить к настройке (как это делать здесь не описываю, ибо все ответы есть в базе знаний syno) Для ленивых есть утилита, где собраны основные проги для Windows x64 2. Если хрень не обнаружилась в сети, то скорее всего в загрузчике нет драйверов для ваших сетевых карт и/или для sata контроллеров. a) запустить программу OSFmount, смонтировать Partition 1 (30 Mb) из файла загрузчика, перед монтированием убрать галку Read-only drive б) скачать extra.lzma из этой темы и перезаписать в смонтированном диске в) размонтировать диск и перезаписать образ с добавленными драйверами на флешку г) попробовать запустить и найти хрень в сети, если не получилось, то увы и ах, либо просить, чтобы добавили дрова для ваших устройств в этой теме или самому их добавлять - теория тут 3. Транскодинг (нужны sn и mac от реальной железки) С наибольшей степени вероятности запустиnся на процессорах Intel начиная с 4го поколения (Haswell), но есть нюансы с моделями материнских плат и биосами. Проверяем следующим образом: hardware (hw) транскодинг - в корне системы должен быть каталог /dev/dri с тремя подкаталогами внутри, если его нет, но нет и hw транскодинга, чтобы проверить - ищем каталог в терминале/ssh командой cd /dev/dri. software (sw) транскодинг - должны подняться соответствующие кодеки, проверить можно командой в терминале/ssh cat /usr/syno/etc/codec/activation.conf Если результат такой, то он есть: {"success":true,"activated_codec":["hevc_dec","h264_dec","h264_enc","mpeg4part2_dec","ac3_dec","vc1_dec","vc1_enc","aac_dec","aac_enc","mpeg4part2_enc"],"token":"абракадабра"} Если ничего похожего нет, то нет и транскодинга. P.S. Просьба к админам прибить тему в шапке и дать мне доступ на редактирование первого поста этой темы, буду добавлять по мере поступления вопросов, ибо задолбали оленеводы, которые задают вопросы по установке, во всех подряд темах.1 point
-
При моем использовании XPEnology нет необходимости держать его постоянно включенным. Понимаю, что лучшим способом будет выключение через WEB интерфейс, DMS - Выключение.... Но не всегда под рукой имеется включенный комп. Может есть какой другой способ удобного отключения NAS и безопасно ли выключение NAS кнопкой Power?1 point